


机器学习第二十九周周报
摘要
Network in Network论文中描述了一种新型卷积神经网络结构,叫做Network in Network。NIN提出了一种全新的思路,用多个由卷积层和全连接层构成的微型网络来提取特征,其中全连接层用1 * 1的卷积层代替,用全局平均池化层来输出分类。这类新奇的设计思路影响着后面一系列卷积神经网络的设计。最后我尝试用代码去实现Network in Network、AlexNet和VGG等卷积神经网络模型。
Abstract
Network in Network, this paper describes a new convolutional neural network structure called Network in Network. NIN has put forward a new idea, multiple micro networks composed of convolution layer and full connection layer are used to extract features, the full connection layer is replaced by 1 * 1 convolution layer, the global average pooling layer is used to output the classification. This kind of novel design ideas affect the design of a series of convolutional neural networks. Finally, I try to use code to implement convolutional neural network models such as Network in Network, AlexNet and VGG.
一、文献阅读
1.题目
Network In Network
2.摘要
We propose a novel deep network structure called “Network In Network”(NIN) to enhance model discriminability for local patches within the receptive field. The conventional convolutional layer uses linear filters followed by a nonlinear activation function to scan the input. Instead, we build micro neural networks with more complex structures to abstract the data within the receptive field. We instantiate the micro neural network with a multilayer perceptron, which is a potent function approximator. The feature maps are obtained by sliding the micro networks over the input in a similar manner as CNN; they are then fed into the next layer. Deep NIN can be implemented by stacking mutiple of the above described structure. With enhanced local modeling via the micro network, we are able to utilize global average pooling over feature maps in the classification layer, which is easier to interpret and less prone to overfitting than traditional fully connected layers. We demonstrated the state-of-the-art classification performances with NIN on CIFAR-10 and CIFAR-100, and reasonable performances on SVHN and MNIST datasets.
3.网络结构
(1) 网络示意图
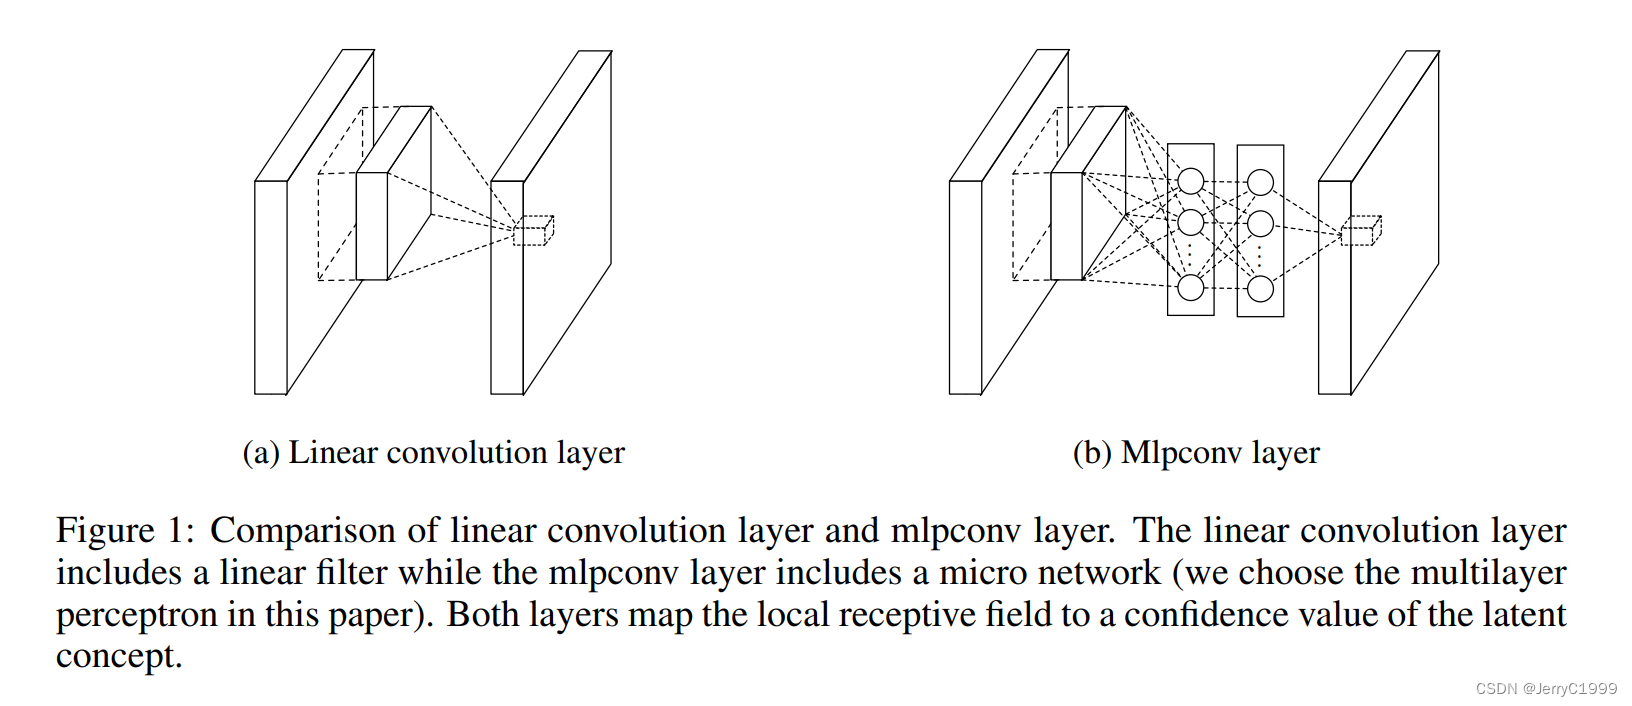
如下图所示,左边是线性卷积层,其中包含一个线性滤波器;右边是微型网络MLP层。
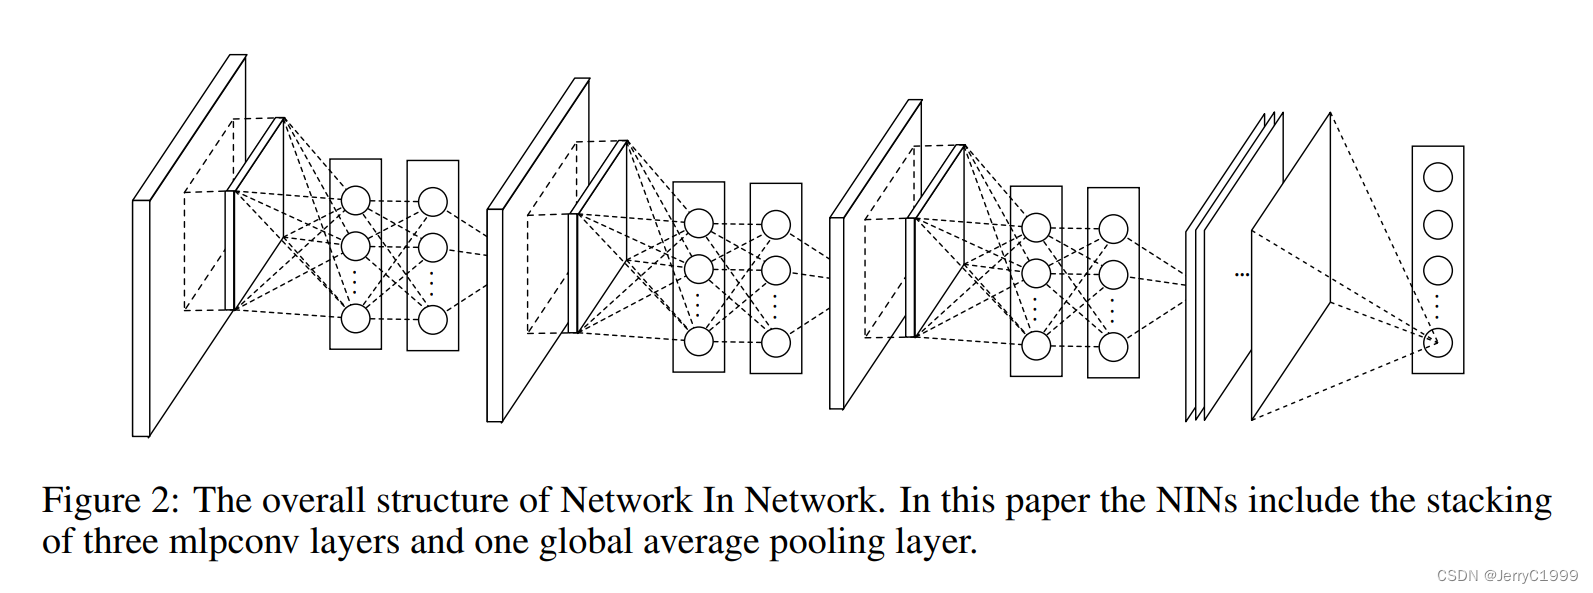
如下图所示,Network in Network的整体结构图,由3个MLP层和1个全局Average Pooling层组成。
(2)网络特点
- NIN网络:由3个mlpconv(微型神经网络)和1个GAP(全局平均池化层)组成。
- mlpconv内部由多层感知器实现,其中由1个卷积层和2个全连接层组成。
- mlpconv中的感知器层数可以被调整,并且它可以被用在卷积层之间,个数可以根据需要调整。
- NIN网络用微型网络mlpconv层代替了传统CNN模型中的卷积层提取特征,用GAP代替了传统CNN模型中的全连接层输出分类。
4.Network in Network
经典的卷积神经网络由交替堆叠的卷积层和空间池化层组成。卷积层通过线性卷积filter生成特征图,然后经过非线性激活函数(整流器、sigmoid、tanh等)处理。
经典的卷积计算特征图过程如下:
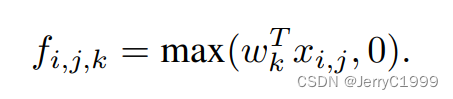
其中:(i, j)表示计算得到的特征图的像素坐标;xi,j表示一个以i, j为中心的输入块;k表示特征图的通道维数。
(1) MLP卷积层
在特征分布未知的情况下,通过使用更为通用的函数逼近器来对局部块进行提取,因为更能逼近特征的抽象表示。
选择MLP作为函数逼近器的原因:
- MLP和卷积层有良好的兼容性
- MLP是深度网络模型,符合特征重用的思想。
mlpconv的计算过程如下:
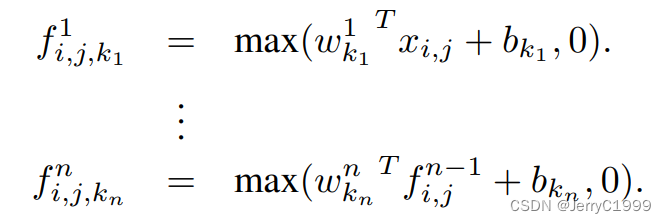
其中:n表示MLP的层数,MLP需要线性激活函数ReLU。
从跨通道池化的角度来看,上面的公式等效于在正常卷积层上进行级联跨通道参数池化。每个池化层在输入的特征图上进行加权线性重组,然后通过线性激活函数ReLU,特征会在一层层的跨通道池化中被交叉重组,使得channel上的特征可跨通道交互和互相学习。这样的结构可以等价于1 * 1卷积,因为它同样可以合并多通道,使得各个channel上的参数可交互。
(2) 全局平均池化GAP
在传统的CNN结构中,一般是全连接层后经过softmax输出分类,但这样会增加出现过拟合的风险,于是文章中将全连接层替换成了GAP全局平均池化层。
GAP全局平均池化的优势:
- 增强了特征映射和类别之间的对应关系,更加符合卷积的结构,因此特征图就更容易对应上最后要输出分类的类别置信度。
- 没有了全连接层,减少了大量需要学习的参数,也避免了过拟合情况的发生。
5.实验
文章中用NIN结构分别对以下4个训练集CIFAR-10、CIFAR-100、SVHN和MNIST。结构中除了最后一个mlpconv层外,其他层都采用了dropout,并使用weight decay用于正则化。文章中batch size设为128,从初始学习率开始训练,直到准确率停止升高,将学习率降低10倍,最后再降低10倍,直到训练结束。
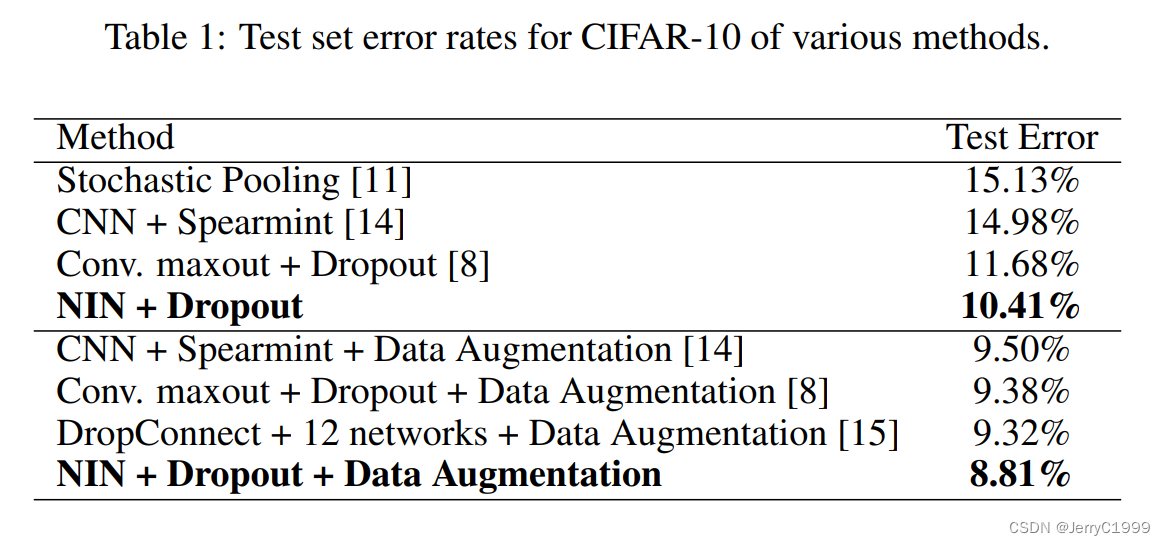
(1)CIFAR-10
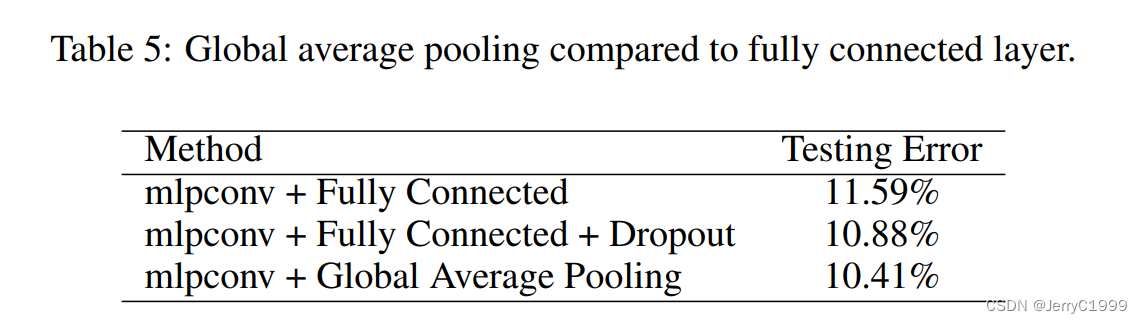
CIFAR-10数据集由50000个训练图像和10000个测试图像,图像大小32 * 32的3通道图片,总共有10个分类。 在CIFAR-10上,未采用Dropout正则化的NIN的错误率高达14.51%,使用Dropout后,错误率降低至10.41%,再加上数据增强(平移和水平翻转操作),可达到8.81%的水平。
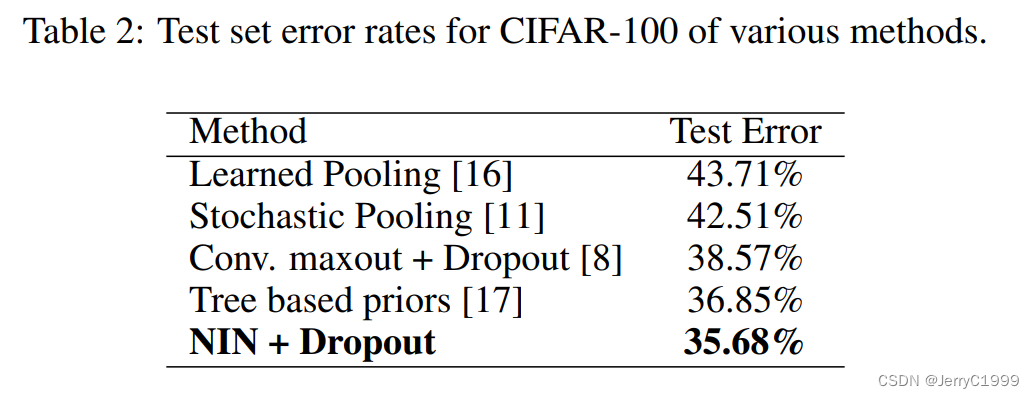
(2)CIFAR-100
CIFAR-100的图像数量和尺寸与CIFAR-10相同,只是分类种类增加至100个分类。NIN+Dropout在CIFAR-100数据集上得到分类错误率为35.68%。
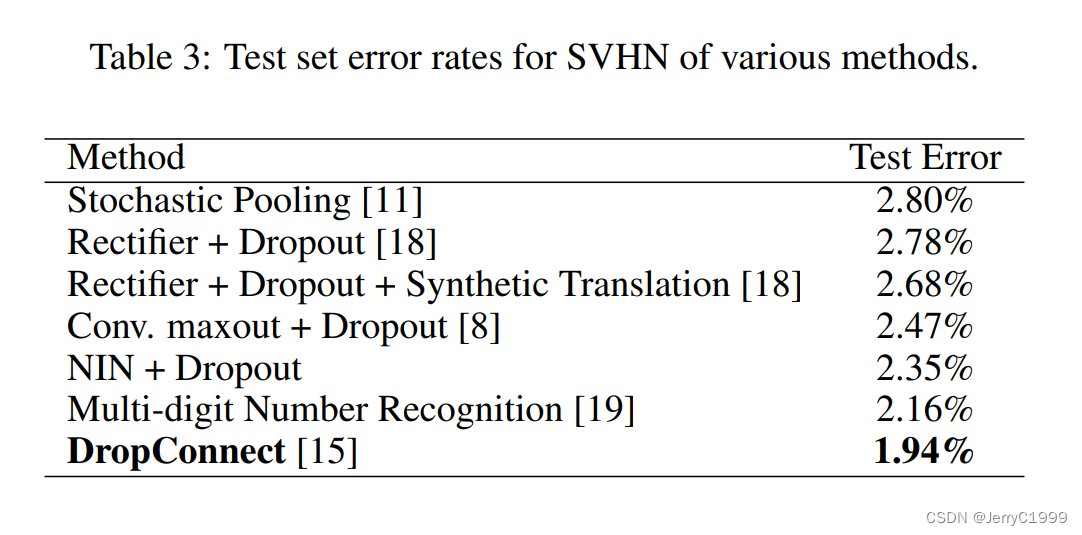
(3)SVHN
SVHN数据集是谷歌街景门牌号数据集,由630420个32 * 32的RGB图像组成。在SVHN数据集上得到分类错误率为2.35%。
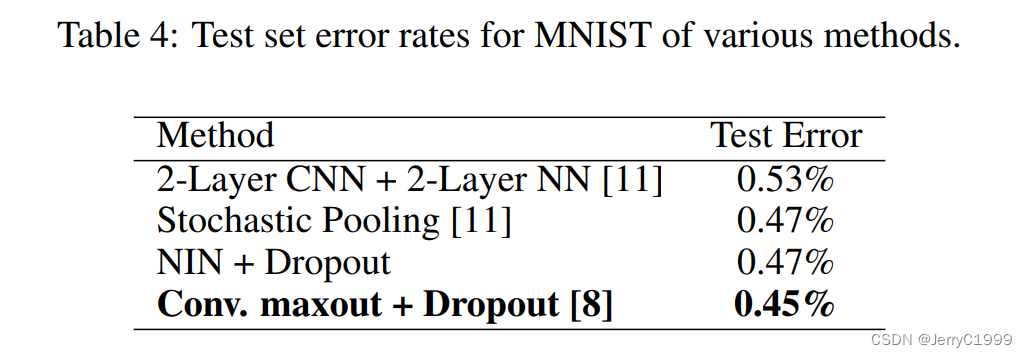
(4)MNIST
MNIST为手写数字识别数据集,包含60000张训练图像和10000张测试图,28 * 28的单通道图像。在MNIST数据集上得到分类错误率为0.45%,接近当前最好的水平0.45%。
(5)GAP做正则化器
文章在CIFAR-10数据集上比较mlpconv+传统全连接层和mlpconv+ GAP的训练效果,结果表明mlpconv + GAP的表现更好。
6.结论
mlpconv层可以更好地对局部特征块建模,而GAP则可以用于防止过拟合,还可以当作正则化器使用。
二、深度学习
1.使用Pytorch实现NIN
定义NIN基础块:NIN的mlpconv内部由由1个卷积层和2个全连接层组成,这里2个全连接层用1 * 1的卷积代替,从而使空间信息能够自然传递到后面的层。其中第1个卷积层的超参数可以自行设置,第2个和第3个卷积层超参数固定。
import torch
from torch import nn
import torch.nn.functional as F


def nin_block(in_channels, out_channels, kernel_size, stride, padding):
    blk = nn.Sequential(nn.Conv2d(in_channels, out_channels, kernel_size, stride, padding),
                        nn.ReLU(),
                        nn.Conv2d(out_channels, out_channels, kernel_size=1),
                        nn.ReLU(),
                        nn.Conv2d(out_channels, out_channels, kernel_size=1),
                        nn.ReLU())
    return blk
定义NIN网络模型:特点是使用全局平均池化层对每个通道中的所有元素求平均并直接用于分类。
class NIN(nn.Module):
    def __init__(self):
        super(NIN, self).__init__()
        self.model = nn.Sequential(
            nin_block(1, 96, kernel_size=11, stride=4, padding=0),
            nn.MaxPool2d(kernel_size=3, stride=2),
            nin_block(96, 256, kernel_size=5, stride=1, padding=2),
            nn.MaxPool2d(kernel_size=3, stride=2),
            nin_block(256, 384, kernel_size=3, stride=1, padding=1),
            nn.MaxPool2d(kernel_size=3, stride=2),
            nn.Dropout(0.5),
            nin_block(384, 10, kernel_size=3, stride=1, padding=1),
            nn.AdaptiveAvgPool2d((1, 1)),
            nn.Flatten()
        )

    def forward(self, x):
        y = self.model(x)
        return y


net = NIN()
print(net)
2.使用Pytorch实现AlexNet
定义AlexNet网络模型:在5个卷积层部分中,第1个卷积层和第2个卷积层之后,使用Max pooling池化层,而后面在第3,4,5个卷积层之后再次使用Max Pooling层,最后就是三个全连接层。
import torch
from torch import nn
import torch.nn.functional as F


class AlexNet(nn.Module):
    def __init__(self):
        super(AlexNet, self).__init__()

        # 卷积部分
        self.conv = nn.Sequential(
            nn.Conv2d(3, 48, kernel_size=11, stride=4, padding=1),
            nn.ReLU(),
            nn.MaxPool2d(3, 2),
            nn.Conv2d(48, 128, kernel_size=5, stride=1, padding=2),
            nn.ReLU(),
            nn.MaxPool2d(3, 2),
            nn.Conv2d(128, 192, kernel_size=3, stride=1, padding=1),
            nn.ReLU(),
            nn.Conv2d(192, 192, kernel_size=3, stride=1, padding=1),
            nn.ReLU(),
            nn.Conv2d(192, 128, kernel_size=3, stride=1, padding=1),
            nn.ReLU(),
            nn.MaxPool2d(3, 2)
        )

        # 全连接部分
        self.fc = nn.Sequential(
            nn.Linear(128 * 6 * 6, 2048),
            nn.ReLU(),
            nn.Dropout(0.5),
            nn.Linear(2048, 2048),
            nn.ReLU(),
            nn.Dropout(0.5),
            nn.Linear(2048, 1000)
        )

    def forward(self, x):
        feature = self.conv(x)
        output = self.fc(feature.view(x.shape[0], -1))
        return output


net = AlexNet()
print(net)
3.使用Pytorch实现VGG
定义vgg_block函数实现VGG块:连续使用多个相同的padding为1、kernel_size为3的卷积层后,接上一个strider为2、kernel_size为2的最大池化层。其中卷积层保持输入的高和宽不变,而池化层则对其进行减半操作。
import torch
from torch import nn
import torch.nn.functional as F


def vgg_block(num_convs, in_channels, out_channels):
    blk = []
    for i in range(num_convs):
        if i == 0:
            blk.append(nn.Conv2d(in_channels, out_channels, kernel_size=3, padding=1))
        else:
            blk.append(nn.Conv2d(out_channels, out_channels, kernel_size=3, padding=1))
        blk.append(nn.ReLU())
    blk.append(nn.MaxPool2d(kernel_size=2, stride=2))  # 宽高减半
    return nn.Sequential(*blk)
定义VGG网络模型:
class VGG(nn.Module):
    def __init__(self):
        super(VGG, self).__init__()

        self.conv = nn.Sequential(
            vgg_block(2, 1, 64),  # 64 * 112 * 112
            vgg_block(2, 64, 64 * 2),  # 128 * 56 * 56
            vgg_block(3, 64 * 2, 64 * 4),  # 256 * 28 *28
            vgg_block(3, 64 * 4, 512),  # 512 * 14 * 14
            vgg_block(3, 512, 512),  # 512 * 7 * 7)
        )

        self.fc = nn.Sequential(
            nn.Linear(512 * 7 * 7, 4096),
            nn.ReLU(),
            nn.Dropout(0.5),
            nn.Linear(4096, 4096),
            nn.ReLU(),
            nn.Dropout(0.5),
            nn.Linear(4096, 10)
        )

    def forward(self, x):
        out = self.conv(x)
        out = self.fc(out.view(x.shape[0], -1))
        return out


net = VGG()
print(net)
三、总结
Network in Network论文中提出了一种全新的模型设计,用MLP微型网络层代替了传统卷积层,用GAP全局平均池化代替了传统的全连接层层实现分类输出。对于MLP来说,它和卷积层是兼容的,并且是深度模型,符合特征重用的思想,其中的全连接层用1 * 1卷积代替。它的作用是为局部特征块提取出更抽象的特征,从而在送入下一层之前,增加抽象性,从而提高模型整体的通用性。对于GAP来说,没有全连接层之后,减少了大量需要学习的参数,也降低了全连接层发生过拟合的风险,有着正则化器的作用。它的作用是增强了特征映射和类别之间的对应关系,更符合卷积的结构,因此特征图更容易对应最后输出分类的类别置信度。


 941
941


 被折叠的 条评论
为什么被折叠?
被折叠的 条评论
为什么被折叠?
 到【灌水乐园】发言


