


【开源】基于YOLO的车牌检测和识别:数据集(CCPD2020)+yolov11+paddleocr
基于YOLO的车牌检测和识别
在初步掌握OpenCV的使用后,我完成了一个项目: 基于Opencv的手势识别,此后我继续深入学习了 YOLO 的相关应用,并尝试将其应用于车牌检测与识别任务中。本项目采用基于YOLO的车牌检测与识别技术,结合CCPD2020数据集、YOLOv11模型以及PaddleOCR工具,实现了高效精准的车牌识别功能。
项目已经=开源至github
为什么是YOLO
一个车牌检测和识别的系统,大概由几个部分构成:
其中最为重要的是车牌定位、字符切割、字符辨认
车牌定位: 准确检测车牌在图像中的位置。
字符切割:检测到车牌后,使用opencv将其裁剪并保存为新的图片
字符辨认: 在新的图片提取图片中的文字、字符、数字。
如果使用传统的OpenCV的操作,其基本操作如下:
- 对图像预处理
- 加载与灰度化
- 滤波去除噪声
- 边缘检测
- 边缘检测
- 寻找车牌轮廓(cv2.findContours)
- 排列出面积最大的前几个轮廓并且排除(车牌需要是四边形)
- 保留蓝色区域
- 图像处理
- 图像位运算进行遮罩
- 裁剪后保存
- 进行OCR识别
然而,这种方法存在诸多局限性。例如,当车牌污损严重时,仅依靠面积和形状筛选可能无法准确找到车牌;如果车牌颜色与背景颜色相近,或者存在多种颜色干扰,仅靠颜色识别也容易失败。
为什么使用YOLO
YOLO(You Only Look Once)是一种基于深度学习的目标检测算法,具有以下优势,使其更适合车牌检测和识别任务:
- 实时性
YOLO算法设计用于实时目标检测,能够在短时间内完成车牌的检测和定位,适合实时监控系统。 - 鲁棒性
YOLO通过大量的标注数据进行训练,能够学习到车牌在不同光照条件、角度和背景下的特征,具有较强的鲁棒性。 - 端到端检测
YOLO是一种端到端的检测算法,直接从图像输入到检测结果输出,无需手动设计特征提取和预处理步骤,减少了人为干预和参数调整。
数据集准备
本文训练模型使用的数据集为 CPDD,该数据集包含大量标注好的车牌图像,命名规则如下:
示例映像名称为
“025-95_113-154&383_386&473-386&473_177&454_154&383_363&402-0_0_22_27_27_33_16-37-15.jpg”。
每个名称可以拆分为 7 个字段。这些字段的说明如下。
面积:车牌面积与整个图片面积的面积比。
倾斜度:水平倾斜度和垂直倾斜度。
边界框坐标:左上顶点和右下顶点的坐标。
四个顶点位置:整个图像中 LP 的四个顶点的精确 (x, y) 坐标。这些坐标从右下角的顶点开始。
车牌号:CCPD 中的每个图像只有一个 LP。每个 LP 编号由一个汉字、一个字母和五个字母或数字组成。有效的中国车牌由七个字符组成:省份(1 个字符)、字母(1 个字符)、字母 + 数字(5 个字符)。“0_0_22_27_27_33_16” 是每个字符的索引。这三个数组定义如下。每个数组的最后一个字符是字母 O 而不是数字 0。我们使用 O 作为“无字符”的标志,因为中国车牌字符中没有 O。
下载数据集后,使用以下代码将数据集转换为 YOLO 格式:
import os
import re
import cv2
import shutil
import logging
from tqdm import tqdm

# 配置日志
logging.basicConfig(level=logging.INFO, format='%(asctime)s - %(levelname)s - %(message)s')

class YOLOFormatConverter:
    def __init__(self, data_path, save_path):
        """
        初始化转换器
        :param data_path: 原始数据集路径
        :param save_path: 转换后数据保存路径
        """
        self.data_path = data_path
        self.save_path = save_path

        # 创建保存路径
        self._create_directories()

    def _create_directories(self):
        """
        创建保存图片和标签的文件夹
        """
        try:
            for subset in ["test", "train", "val"]:
                images_save_path = os.path.join(self.save_path, subset, "images")
                labels_save_path = os.path.join(self.save_path, subset, "labels")
                if not os.path.exists(images_save_path):
                    os.makedirs(images_save_path)
                if not os.path.exists(labels_save_path):
                    os.makedirs(labels_save_path)
        except Exception as e:
            logging.error(f"创建文件夹时出错: {e}")
            raise

    @staticmethod
    def list_path_all_files(dirname):
        """
        遍历指定目录下的所有文件并返回文件路径列表
        :param dirname: 目录路径
        :return: 文件路径列表
        """
        result = []
        for maindir, subdir, file_name_list in os.walk(dirname):
            for filename in file_name_list:
                apath = os.path.join(maindir, filename)
                result.append(apath)
        return result

    def convert(self):
        """
        将数据集转换为YOLO格式
        """
        try:
            # 获取所有图片文件路径
            images_files = self.list_path_all_files(self.data_path)
            logging.info(f"找到 {len(images_files)} 个文件")

            # 初始化计数器
            cnt = {"test": 1, "train": 1, "val": 1}

            # 遍历所有图片文件
            for name in tqdm(images_files, desc="转换进度"):
                if name.endswith(".jpg") or name.endswith(".png"):
                    # 确定当前文件属于哪个子集(test/train/val)
                    subset = os.path.basename(os.path.dirname(name))

                    # 读取图片
                    img = cv2.imread(name)
                    if img is None:
                        logging.warning(f"无法读取图片: {name}")
                        continue

                    # 获取图片的高度和宽度
                    height, width = img.shape[0], img.shape[1]

                    # 使用正则表达式从文件名中提取坐标信息
                    try:
                        str1 = re.findall('-\d+\&\d+_\d+\&\d+-', name)[0][1:-1]
                        str2 = re.split('\&|_', str1)
                        x0 = int(str2[0])
                        y0 = int(str2[1])
                        x1 = int(str2[2])
                        y1 = int(str2[3])
                    except Exception as e:
                        logging.error(f"解析文件名时出错: {name}, 错误: {e}")
                        continue

                    # 计算边界框的中心点坐标以及宽度和高度,并进行归一化
                    x = round((x0 + x1) / 2 / width, 6)
                    y = round((y0 + y1) / 2 / height, 6)
                    w = round((x1 - x0) / width, 6)
                    h = round((y1 - y0) / height, 6)

                    # 构建保存路径
                    images_save_path = os.path.join(self.save_path, subset, "images")
                    labels_save_path = os.path.join(self.save_path, subset, "labels")

                    # 构建标签文件名和路径
                    txtfile = os.path.join(labels_save_path, f"green_plate_{str(cnt[subset]).zfill(6)}.txt")
                    # 构建图片文件名和路径
                    imgfile = os.path.join(images_save_path,
                                           f"green_plate_{str(cnt[subset]).zfill(6)}.{os.path.basename(name).split('.')[-1]}")

                    # 写入标签文件
                    with open(txtfile, "w") as f:
                        f.write(" ".join(["0", str(x), str(y), str(w), str(h)]))

                    # 移动图片到新位置
                    shutil.move(name, imgfile)

                    # 更新计数器
                    cnt[subset] += 1

            logging.info(f"转换完成,共处理 {sum(cnt.values()) - 3} 张图片")
        except Exception as e:
            logging.error(f"转换过程中出错: {e}")
            raise

if __name__ == '__main__':
    # 原始数据集路径
    data_path = "./ccpd_green"
    # 转换后数据保存路径
    save_path = "./dataset"

    converter = YOLOFormatConverter(data_path, save_path)
    converter.convert()
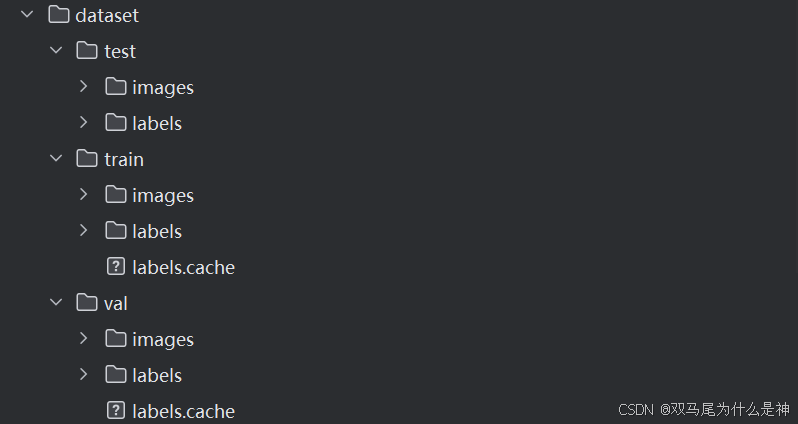
程序运行后会生成一个名为 dataset 的目录,其结构如下图所示:
将之放置于ultralytics源码目录下,然后撰写data.yaml
path: source path  # dataset root dir
train: train path
val: val path
test: test path
# Classes
nc: 1  # number of classes
names: ["green_plate"]  # class names
YOLO模型训练
YOLO环境配置
源码下载
我选择使用 YOLOv11 进行车牌检测与识别任务,首先需要YOLOv11下载源码
如果有需要可以下载预训模型:
环境配置
安装pytorch
访问 PyTorch 官网,根据系统配置和需求选择合适的安装命令,并将其粘贴到命令行中进行安装。

其他依赖型
使用项目的requirements.txt安装依赖项
pip install -r requirements.txt
对YOLO进行模型训练
接下来,我们开始训练 YOLOv11 模型。由于车牌数据通常未包含在通用预训练模型中,因此我们直接从头开始训练模型。以下是训练代码:
import warnings
warnings.filterwarnings('ignore')
from ultralytics import YOLO

if __name__ == '__main__':
    model =
#一般不使用预训练模型,因为车牌数据通常未包含在通用预训练模型中
#因此,我们直接从头开始训练YOLOv11模型
YOLO(model=r"./ultralytics/cfg/models/11/yolo11.yaml")
    #我们需要把上面撰写的data.yaml放在ultralytics目录下
    model.train(data=r"data.yaml",
                imgsz=640,#指定输入图像的尺寸(宽和高)。YOLO 模型会将所有输入图像缩放到这个尺寸进行处理。
                epochs=50,#模型会迭代 50 次训练数据。
                batch=4,#每次训练时,模型会处理 4 张图像。
                workers=0,
                device='',
                optimizer='SGD',
                close_mosaic=10,
                resume=False,#指定是否从上次中断的地方继续训练。
                project='runs/train',
                name='exp',
                single_cls=False,#指定是否为单类别训练。
                cache=False,#指定是否缓存数据集。
                )
接下来我们可以调用如下代码来检测模型的效用:
from ultralytics import YOLO
import cv2
# 所需加载的模型目录
path = 'models/best.pt'
# 需要检测的图片地址
img_path = "test.png"

model = YOLO(path, task='detect')

# 检测图片
results = model(img_path)
res = results[0].plot()

cv2.imshow("YOLO Detection", res)
cv2.waitKey(0)
车牌检测和处理
训练模型生成在runs目录中,模型名为best.pt。我们使用以下代码进行车牌检测,并对检测到的车牌进行处理(透视变换),以便后续进行 OCR 识别:
from ultralytics import YOLO
import cv2
import numpy as np


def order_points(pts):
    """对四个点进行排序:左上、右上、右下、左下"""
    rect = np.zeros((4, 2), dtype="float32")
    s = pts.sum(axis=1)
    rect[0] = pts[np.argmin(s)]  # 左上
    rect[2] = pts[np.argmax(s)]  # 右下
    diff = np.diff(pts, axis=1)
    rect[1] = pts[np.argmin(diff)]  # 右上
    rect[3] = pts[np.argmax(diff)]  # 左下
    return rect


def four_point_transform(image, pts):
    """执行四点透视变换"""
    rect = order_points(pts)
    (tl, tr, br, bl) = rect

    # 计算新图像的宽度和高度
    widthA = np.sqrt(((br[0] - bl[0]) ** 2) + ((br[1] - bl[1]) ** 2))
    widthB = np.sqrt(((tr[0] - tl[0]) ** 2) + ((tr[1] - tl[1]) ** 2))
    maxWidth = max(int(widthA), int(widthB))

    heightA = np.sqrt(((tr[0] - br[0]) ** 2) + ((tr[1] - br[1]) ** 2))
    heightB = np.sqrt(((tl[0] - bl[0]) ** 2) + ((tl[1] - bl[1]) ** 2))
    maxHeight = max(int(heightA), int(heightB))

    # 定义目标点并计算变换矩阵
    dst = np.array([
        [0, 0],
        [maxWidth - 1, 0],
        [maxWidth - 1, maxHeight - 1],
        [0, maxHeight - 1]], dtype="float32")

    M = cv2.getPerspectiveTransform(rect, dst)
    warped = cv2.warpPerspective(image, M, (maxWidth, maxHeight))
    return warped

model = YOLO('best.pt', task='detect')
img_path = "test.jpg"
original_image = cv2.imread(img_path)  # 读取原始图像

# 执行目标检测
results = model(img_path)

# 处理每个检测结果
for result in results:
    # 遍历所有检测到的边界框
    for box in result.boxes:
        # 获取边界框坐标(格式:x1,y1,x2,y2)
        x1, y1, x2, y2 = map(int, box.xyxy[0].cpu().numpy())
        pts = np.array([[x1, y1], [x2, y1], [x2, y2], [x1, y2]], dtype="float32")
        warped = four_point_transform(original_image, pts)

        cv2.imshow("Warped Result", warped)
        cv2.waitKey(0)

# 显示带有检测框的原始结果
annotated_image = results[0].plot()
cv2.imshow("YOLO Detection", annotated_image)
cv2.waitKey(0)
cv2.destroyAllWindows()
车牌字符识别
图片识别
import cv2
import numpy as np
from ultralytics import YOLO
from paddleocr import PaddleOCR
import matplotlib.pyplot as plt
import matplotlib

# 解决 Matplotlib 中文乱码
matplotlib.rcParams['font.sans-serif'] = ['SimHei']  # 黑体
matplotlib.rcParams['axes.unicode_minus'] = False   # 解决负号显示问题

# 初始化 PaddleOCR
ocr = PaddleOCR(use_angle_cls=True, lang="ch")

# 车牌检测模型
path = 'best.pt'
img_path = "test.jpg"
model = YOLO(path, task='detect')

# 读取原始图像
original_image = cv2.imread(img_path)

# 运行 YOLO 车牌检测
results = model(img_path)

# 透视变换
def four_point_transform(image, pts):
    rect = np.array(pts, dtype="float32")

    width = int(np.linalg.norm(rect[1] - rect[0]))
    height = int(np.linalg.norm(rect[3] - rect[0]))

    dst = np.array([
        [0, 0],
        [width - 1, 0],
        [width - 1, height - 1],
        [0, height - 1]], dtype="float32")

    M = cv2.getPerspectiveTransform(rect, dst)
    warped = cv2.warpPerspective(image, M, (width, height))

    return warped

# 遍历检测到的车牌
for result in results[0].boxes.xyxy:
    x1, y1, x2, y2 = map(int, result[:4])

    # 增加 padding
    padding = 10
    x1, y1 = max(x1 - padding, 0), max(y1 - padding, 0)
    x2, y2 = min(x2 + padding, original_image.shape[1] - 1), min(y2 + padding, original_image.shape[0] - 1)

    cropped_image = original_image[y1:y2, x1:x2]

    # 透视变换
    pts = np.array([
        [x1, y1],
        [x2, y1],
        [x2, y2],
        [x1, y2]
    ], dtype="float32")

    warped_image = four_point_transform(original_image, pts)

    # OCR 识别车牌
    result = ocr.ocr(warped_image, cls=True)
    plate_text = "".join([word[1][0] for line in result for word in line])

    # 显示结果
    plt.figure(figsize=(8, 4))
    plt.subplot(1, 2, 1)
    plt.imshow(cv2.cvtColor(cropped_image, cv2.COLOR_BGR2RGB))
    plt.title("检测到的车牌")

    plt.subplot(1, 2, 2)
    plt.imshow(cv2.cvtColor(warped_image, cv2.COLOR_BGR2RGB))
    plt.title(f"识别结果: {plate_text}")

    plt.show()
视频流识别
import cv2
import numpy as np
from ultralytics import YOLO
from paddleocr import PaddleOCR
from PIL import Image, ImageDraw, ImageFont
import logging

# 初始化 OCR
ocr = PaddleOCR(use_angle_cls=True, lang="ch")

# 加载 YOLO 车牌检测模型
model = YOLO('best.pt', task='detect')


# 透视变换
def four_point_transform(image, pts):
    rect = np.array(pts, dtype="float32")

    width = int(np.linalg.norm(rect[1] - rect[0]))
    height = int(np.linalg.norm(rect[3] - rect[0]))

    dst = np.array([
        [0, 0],
        [width - 1, 0],
        [width - 1, height - 1],
        [0, height - 1]], dtype="float32")

    M = cv2.getPerspectiveTransform(rect, dst)
    warped = cv2.warpPerspective(image, M, (width, height))

    return warped


# 处理中文文字显示
def add_chinese_text(img, text, position, textColor=(255, 255, 255), textSize=30):
    """ 在 OpenCV 画面上添加中文文字 """
    try:
        img_pil = Image.fromarray(cv2.cvtColor(img, cv2.COLOR_BGR2RGB))
        draw = ImageDraw.Draw(img_pil)
        try:
            fontStyle = ImageFont.truetype("simsun.ttc", textSize, encoding="utf-8")
        except IOError:
            fontStyle = ImageFont.truetype("arial.ttf", textSize)
        draw.text(position, text, fill=textColor, font=fontStyle)
        return cv2.cvtColor(np.asarray(img_pil), cv2.COLOR_RGB2BGR)
    except Exception as e:
        logging.error(f"文字渲染失败: {str(e)}")
        return img


# 选择视频或摄像头
video_path = "test.mp4"  # 摄像头: 0,或者改成 "video.mp4"
cap = cv2.VideoCapture(video_path)

if not cap.isOpened():
    print("❌ 无法打开摄像头或视频")
    exit()

cv2.namedWindow("车牌识别", cv2.WINDOW_NORMAL)
cv2.resizeWindow("车牌识别", 1280, 720)

while cap.isOpened():
    ret, frame = cap.read()
    if not ret:
        break

    frame = cv2.resize(frame, (1280, 720))  # 增加分辨率,提高检测率

    # 运行 YOLO 进行车牌检测
    results = model(frame, imgsz=640, conf=0.25, iou=0.45)

    for result in results[0].boxes.xyxy:
        x1, y1, x2, y2 = map(int, result[:4])

        # 增加 padding,防止边缘部分丢失
        padding = 10
        x1, y1 = max(x1 - padding, 0), max(y1 - padding, 0)
        x2, y2 = min(x2 + padding, frame.shape[1] - 1), min(y2 + padding, frame.shape[0] - 1)

        cropped_plate = frame[y1:y2, x1:x2]

        # 透视变换
        pts = np.array([
            [x1, y1],
            [x2, y1],
            [x2, y2],
            [x1, y2]
        ], dtype="float32")

        warped_plate = four_point_transform(frame, pts)

        # OCR 识别车牌
        result = ocr.ocr(warped_plate, cls=True)

        # 处理识别结果,防止 NoneType 错误
        plate_text = ""
        if result and isinstance(result, list):
            try:
                plate_text = "".join([word[1][0] for line in result for word in line if word])
            except Exception as e:
                print(f"⚠️ 车牌识别异常: {e}")
                plate_text = "识别失败"
        else:
            plate_text = "未检测到车牌"

        # 在原图上绘制检测到的车牌框
        cv2.rectangle(frame, (x1, y1), (x2, y2), (0, 255, 0), 2)

        # 使用 add_chinese_text 添加中文车牌信息
        frame = add_chinese_text(frame, f"车牌: {plate_text}", (x1, y1 - 30), textColor=(0, 255, 0), textSize=30)

    cv2.imshow("车牌识别", frame)

    if cv2.waitKey(1) & 0xFF == ord('q'):
        break

cap.release()
cv2.destroyAllWindows()
总结
在本项目中,虽然采用了先进的YOLO算法进行车牌检测,但在文字识别环节使用了PaddleOCR。当车辆行驶速度较快时,拍摄到的图像容易出现模糊,导致车牌上的文字无法被准确识别,从而影响了整体识别效果。
参考资料
[1] YOLOv11配置
[2] YOLO官网
[3] 车牌检测与识别:yolov8+paddleocr
[4] 车牌识别算法 基于yolov5的车牌检测+crnn中文车牌识别
[5] 使用opencv实现车牌识别
[6] OpenCV(项目)车牌识别1 – 车牌提取(形态学)
[7] CCPD (Chinese City Parking Dataset, ECCV)
[8] 图像坐标空间变换:透视变换


 1041
1041

 被折叠的 条评论
为什么被折叠?
被折叠的 条评论
为什么被折叠?
 到【灌水乐园】发言


