


既有适合小白学习的零基础资料,也有适合3年以上经验的小伙伴深入学习提升的进阶课程,涵盖了95%以上软件测试知识点,真正体系化!
由于文件比较多,这里只是将部分目录截图出来,全套包含大厂面经、学习笔记、源码讲义、实战项目、大纲路线、讲解视频,并且后续会持续更新
openstack-config --set /etc/glance/glance-registry.conf keystone_authtoken
auth_protocol http
openstack-config --set /etc/glance/glance-registry.conf keystone_authtoken
admin_tenant_name service
openstack-config --set /etc/glance/glance-registry.conf keystone_authtoken
admin_user glance
openstack-config --set /etc/glance/glance-registry.conf keystone_authtoken
admin_password GLANCE_PASS
openstack-config --set /etc/glance/glance-registry.conf paste_deploy
flavor keystone
启动服务:
service openstack-glance-api start
service openstack-glance-registry start
chkconfig openstack-glance-api on
chkconfig openstack-glance-registry on
创建服务:
$ keystone service-create --name=glance --type=image
–description=“OpenStack Image Service”
$ keystone endpoint-create
–service-id=$(keystone service-list | awk ‘/ image / {print $2}’)
–publicurl=http://controller:9292
–internalurl=http://controller:9292
–adminurl=http://controller:9292
[root@controller ~]# keystone service-create --name=glance --type=image \
–description=“OpenStack Image Service”
/usr/lib64/python2.6/site-packages/Crypto/Util/number.py:57: PowmInsecureWarning: Not using mpz_powm_sec. You should rebuild using libgmp >= 5 to avoid timing attack vulnerability.
_warn(“Not using mpz_powm_sec. You should rebuild using libgmp >= 5 to avoid timing attack vulnerability.”, PowmInsecureWarning)
±------------±---------------------------------+
| Property | Value |
±------------±---------------------------------+
| description | OpenStack Image Service |
| enabled | True |
| id | a45f77cfc12c42d19a45a6ea12cdfc51 |
| name| glance |
| type| image |
±------------±---------------------------------+
[root@controller ~]# keystone endpoint-create
–service-id=$(keystone service-list | awk ‘/ image / {print $2}’)
–publicurl=http://controller:9292
–internalurl=http://controller:9292
–adminurl=http://controller:9292
±------------±---------------------------------+
| Property | Value |
±------------±---------------------------------+
| adminurl | http://controller:9292 |
| id | 75deb2d2f85e4b7b88fe18bf5fca1a87 |
| internalurl | http://controller:9292 |
| publicurl | http://controller:9292 |
|region |regionOne |
| service_id | a45f77cfc12c42d19a45a6ea12cdfc51 |
±------------±---------------------------------+
创建镜像,先将下载好的cirros-0.3.2-x86\_64-disk.img放置在/root目录下,然后执行下面的命令:


复制代码 代码如下:


 glance image-create --name "cirros-0.3.2-x86\_64" --disk-format qcow2 \
 --container-format bare --is-public True --progress < cirros-0.3.2-x86\_64-disk.img


查看镜像列表:
glance image-list

在前面我们已经对kvm虚拟化有所了解,所以我们现在知道qcow2就是一个镜像文件。
服务器管理(Nova)
对于虚拟机管理我们需要从controller和computer01进行配置。
先来看controller的配置:
yum install openstack-nova-api openstack-nova-cert openstack-nova-conductor
openstack-nova-console openstack-nova-novncproxy openstack-nova-scheduler
python-novaclient
$ mysql -u root -p
mysql> CREATE DATABASE nova;
mysql> GRANT ALL PRIVILEGES ON nova.* TO ‘nova’@‘localhost’
IDENTIFIED BY ‘NOVA_DBPASS’;
mysql> GRANT ALL PRIVILEGES ON nova.* TO ‘nova’@‘%’
IDENTIFIED BY ‘NOVA_DBPASS’;
openstack-config --set /etc/nova/nova.conf database connection mysql://nova:NOVA_DBPASS@controller/nova
openstack-config --set /etc/nova/nova.conf DEFAULT rpc_backend qpid
openstack-config --set /etc/nova/nova.conf DEFAULT qpid_hostname controller
openstack-config --set /etc/nova/nova.conf DEFAULT my_ip 192.168.44.147
openstack-config --set /etc/nova/nova.conf DEFAULT vncserver_listen 192.168.216.210
openstack-config --set /etc/nova/nova.conf DEFAULT vncserver_proxyclient_address 192.168.44.147
openstack-config --set /etc/nova/nova.conf DEFAULT auth_strategy keystone
openstack-config --set /etc/nova/nova.conf keystone_authtoken auth_uri http://controller:5000
openstack-config --set /etc/nova/nova.conf keystone_authtoken auth_host controller
openstack-config --set /etc/nova/nova.conf keystone_authtoken auth_protocol http
openstack-config --set /etc/nova/nova.conf keystone_authtoken auth_port 35357
openstack-config --set /etc/nova/nova.conf keystone_authtoken admin_user nova
openstack-config --set /etc/nova/nova.conf keystone_authtoken admin_tenant_name service
openstack-config --set /etc/nova/nova.conf keystone_authtoken admin_password NOVA_PASS
$ keystone user-create --name=nova --pass=NOVA_PASS --email=nova@example.com
$ keystone user-role-add --user=nova --tenant=service --role=admin
$ keystone service-create --name=nova --type=compute
–description=“OpenStack Compute”
$ keystone endpoint-create
–service-id=$(keystone service-list | awk ‘/ compute / {print $2}’)
–publicurl=http://controller:8774/v2/%(tenant_id)s
–internalurl=http://controller:8774/v2/%(tenant_id)s
–adminurl=http://controller:8774/v2/%(tenant_id)s
然后是computer01的配置:
yum install openstack-nova-compute
openstack-config --set /etc/nova/nova.conf database connection mysql://nova:NOVA_DBPASS@controller/nova
openstack-config --set /etc/nova/nova.conf DEFAULT auth_strategy keystone
openstack-config --set /etc/nova/nova.conf keystone_authtoken auth_uri http://controller:5000
openstack-config --set /etc/nova/nova.conf keystone_authtoken auth_host controller
openstack-config --set /etc/nova/nova.conf keystone_authtoken auth_protocol http
openstack-config --set /etc/nova/nova.conf keystone_authtoken auth_port 35357
openstack-config --set /etc/nova/nova.conf keystone_authtoken admin_user nova
openstack-config --set /etc/nova/nova.conf keystone_authtoken admin_tenant_name service
openstack-config --set /etc/nova/nova.conf keystone_authtoken admin_password NOVA_PASS
openstack-config --set /etc/nova/nova.conf DEFAULT rpc_backend qpid
openstack-config --set /etc/nova/nova.conf DEFAULT qpid_hostname controller
openstack-config --set /etc/nova/nova.conf DEFAULT my_ip 192.168.44.148
openstack-config --set /etc/nova/nova.conf DEFAULT vnc_enabled True
openstack-config --set /etc/nova/nova.conf DEFAULT vncserver_listen 0.0.0.0
openstack-config --set /etc/nova/nova.conf DEFAULT vncserver_proxyclient_address 192.168.44.148
openstack-config --set /etc/nova/nova.conf DEFAULT novncproxy_base_url http://controller:6080/vnc_auto.html
openstack-config --set /etc/nova/nova.conf DEFAULT glance_host controller
openstack-config --set /etc/nova/nova.conf libvirt virt_type kvm
启动服务:
service libvirtd start
service messagebus start
service openstack-nova-compute start
chkconfig libvirtd on
chkconfig messagebus on
chkconfig openstack-nova-compute on
网络服务配置


在controller端:
openstack-config --set /etc/nova/nova.conf DEFAULT
network_api_class nova.network.api.API
openstack-config --set /etc/nova/nova.conf DEFAULT
security_group_api nova
在computer01端:
yum install openstack-nova-network openstack-nova-api
openstack-config --set /etc/nova/nova.conf DEFAULT \
network_api_class nova.network.api.API
openstack-config --set /etc/nova/nova.conf DEFAULT \
security_group_api nova
openstack-config --set /etc/nova/nova.conf DEFAULT \
network_manager nova.network.manager.FlatDHCPManager
openstack-config --set /etc/nova/nova.conf DEFAULT \
firewall_driver nova.virt.libvirt.firewall.IptablesFirewallDriver
openstack-config --set /etc/nova/nova.conf DEFAULT \
network_size 254
openstack-config --set /etc/nova/nova.conf DEFAULT \
allow_same_net_traffic False
openstack-config --set /etc/nova/nova.conf DEFAULT \
multi_host True
openstack-config --set /etc/nova/nova.conf DEFAULT \
send_arp_for_ha True
openstack-config --set /etc/nova/nova.conf DEFAULT \
share_dhcp_address True
openstack-config --set /etc/nova/nova.conf DEFAULT \
force_dhcp_release True
openstack-config --set /etc/nova/nova.conf DEFAULT \
flat_network_bridge br100
openstack-config --set /etc/nova/nova.conf DEFAULT \
flat_interface eth1
openstack-config --set /etc/nova/nova.conf DEFAULT \
public_interface eth0
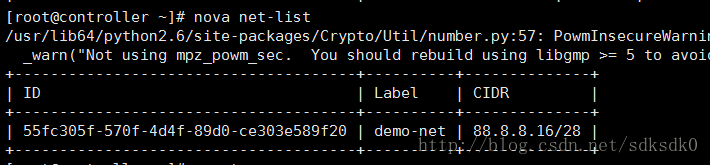
nova network-create demo-net –bridge br100 –multi-host T \
–fixed-range-v4 88.8.8.16/28
然后使用nova net-list来查看:
创建虚拟机
1、配置ssh密码登录:
ssh-keygen
2、增加公钥到openstack环境中:
nova keypair-add --pub-key ~/.ssh/id_rsa.pub demo-key
3、验证是否配置成功:
nova keypair-list
nova flavor-list
4、创建实例:


复制代码 代码如下:


nova boot --flavor m1.tiny --image cirros-0.3.2-x86\_64 --nic netid=DEMO\_NET\_ID\
 --security-group default --key-name demo-key demo-instance1


说明:


DEMO\_NET\_ID:指的是nova net-list的ID。


demo-instance1指的是虚拟机的名字。


例如我的成功执行如下:
nova boot --flavor m1.tiny --image cirros-0.3.2-x86_64 --nic net-id=55fc305f-570f-4d4f-89d0-ce303e589f20
–security-group default --key-name demo-key tfjt
5、使用nova list进行查看。

从这里我们看到我这上面有一个ip地址192.168.44.17.这个地址就是浮动IP。
6、配置浮动IP
浮动ip
nova-manage floating create --ip_range=192.168.44.16/28
查看可用地址
nova-manage floating list
nova floating-ip-create


给创建的虚拟机绑定浮动ip,这个7bc0086…就是我之前创建的虚拟机的ID。后面接上IP地址即可。
nova add-floating-ip 7bc00086-1870-4367-9f05-666d5067ccff 192.168.44.17
监听


cpdump -n -i eth0 icmp


在controller上:


nova secgroup-add-rule default icmp -1 -1 0.0.0.0/0


nova secgroup-add-rule default tcp 22 22 0.0.0.0/0


7、使用下面的命令可以输出一个url地址:
nova get-vnc-console tfjt novnc

8、我们可以在浏览器中进行访问。
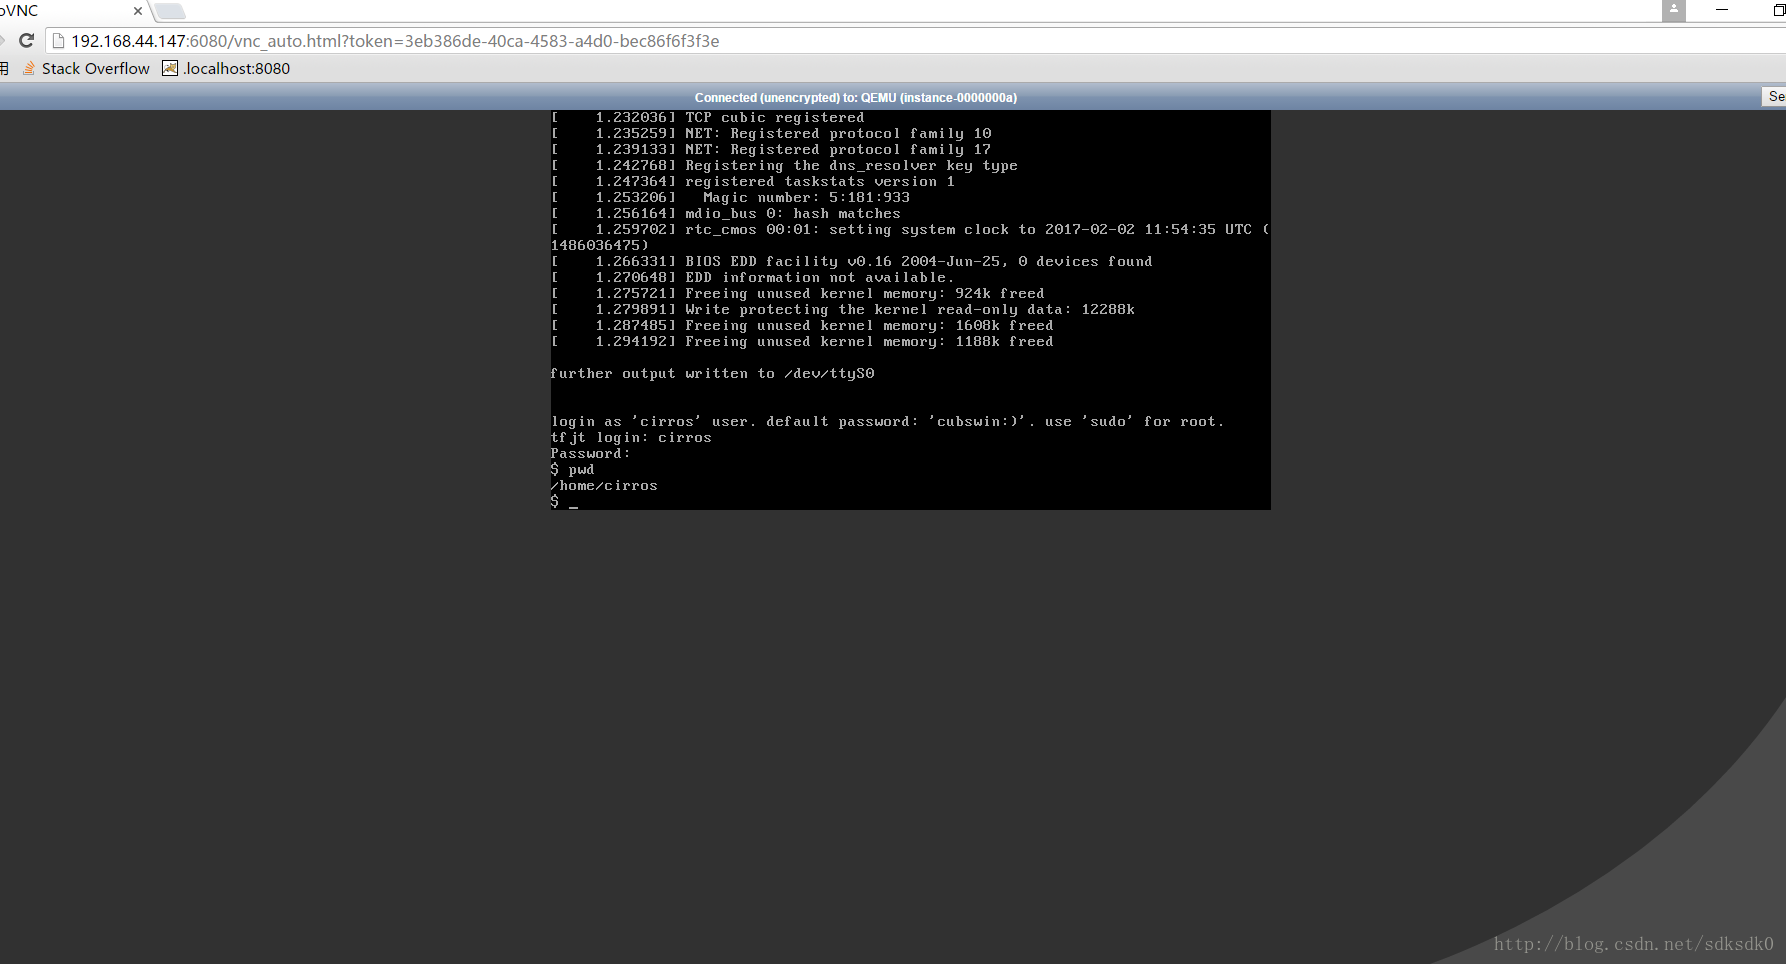
到这里为止,我们的云服务器就算完成了。可以在浏览器上访问我们的云服务器,怎么样是不是很激动。
界面服务(dashboard)
上面我们可以看到很多操作是在终端进行的,那么肯定是有界面版的,所以我们在computer02中进行配置。
1、安装服务
yum install memcached python-memcached mod_wsgi openstack-dashboard
2、文件配置。


在controller中


配置/etc/openstack-dashboard/local\_settings。修改为如下内容。
ALLOWED_HOSTS = [‘*’]
CACHES = {
‘default’: {
‘BACKEND’ : ‘django.core.cache.backends.memcached.MemcachedCache’,
‘LOCATION’ : ‘127.0.0.1:11211’
}
}
OPENSTACK_HOST = “controller”
3、连接
setsebool -P httpd_can_network_connect on
service httpd start
service memcached start
chkconfig httpd on
chkconfig memcached on
4、浏览器中访问。
http://192.168.44.147/dashboard/project/
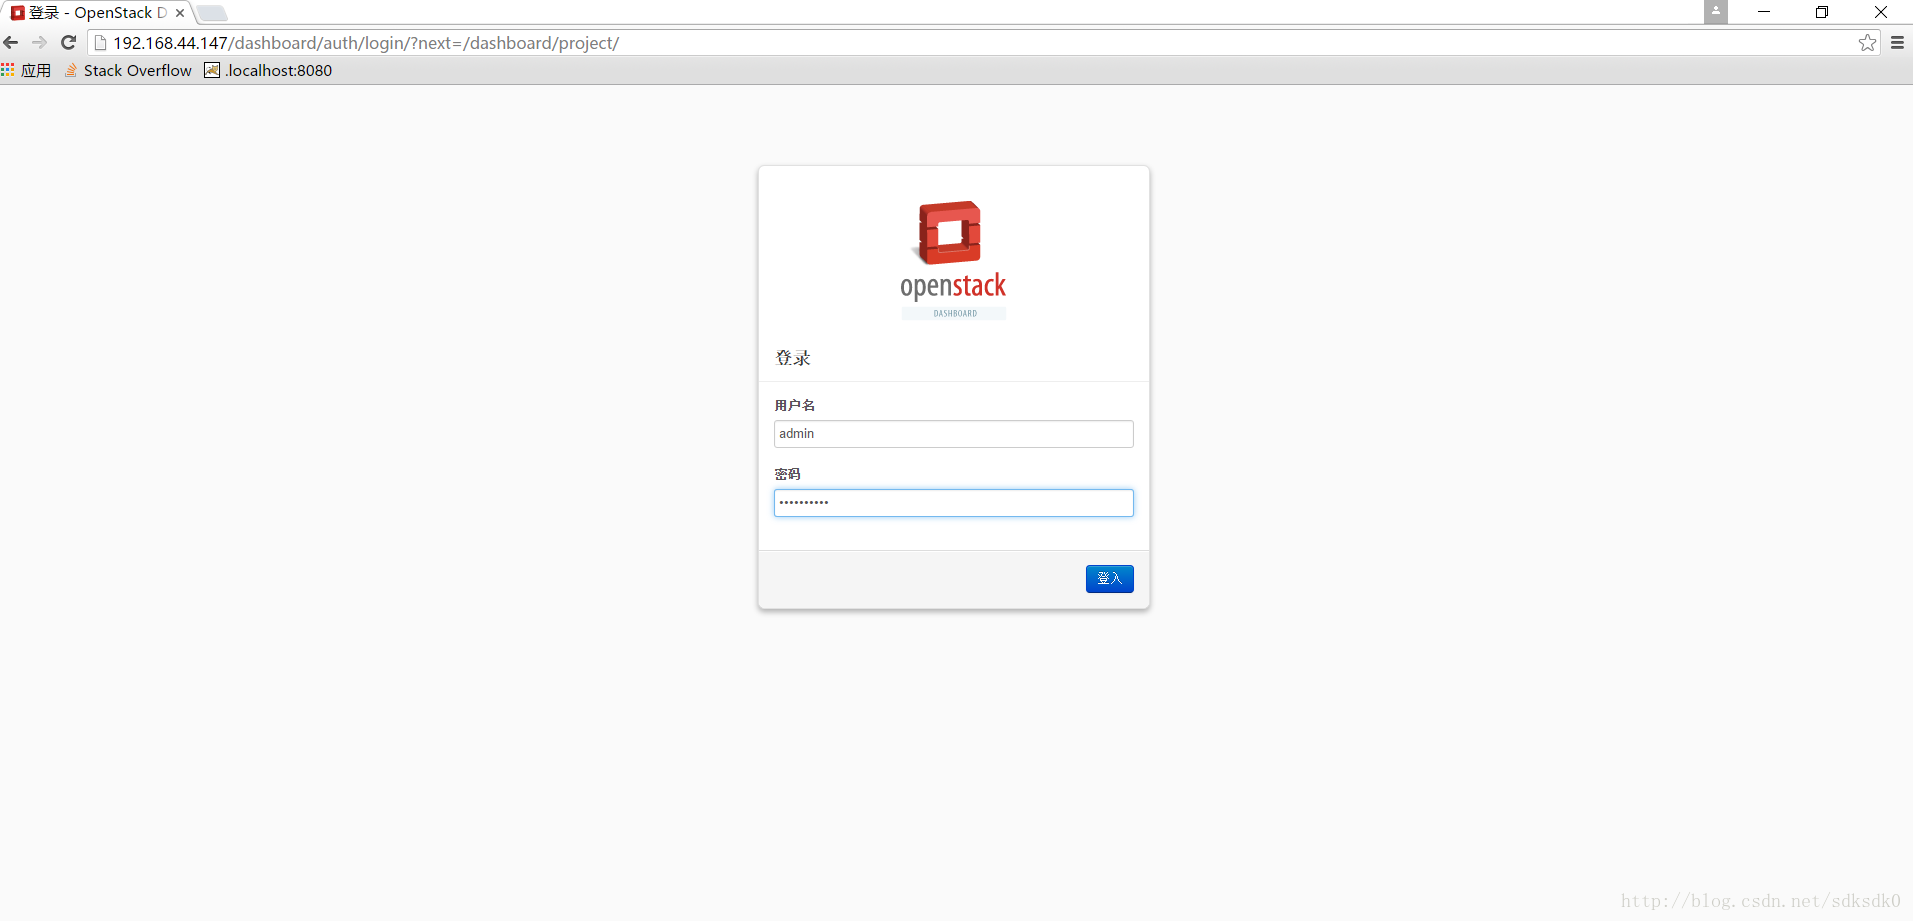
用户名就是我们之前配置的admin,密码是ADMIN\_PASS
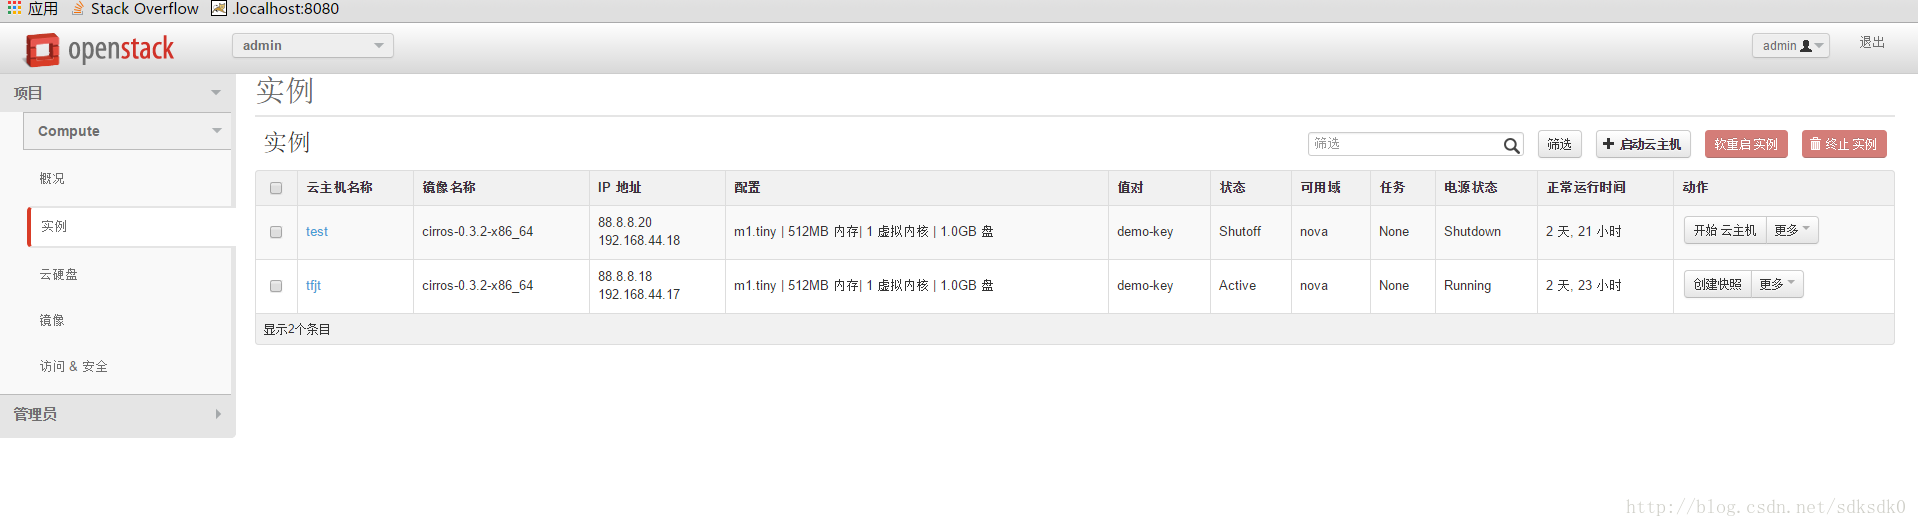
在这个界面版里面的各种操作我这里就不细说了,可以自己去体验。
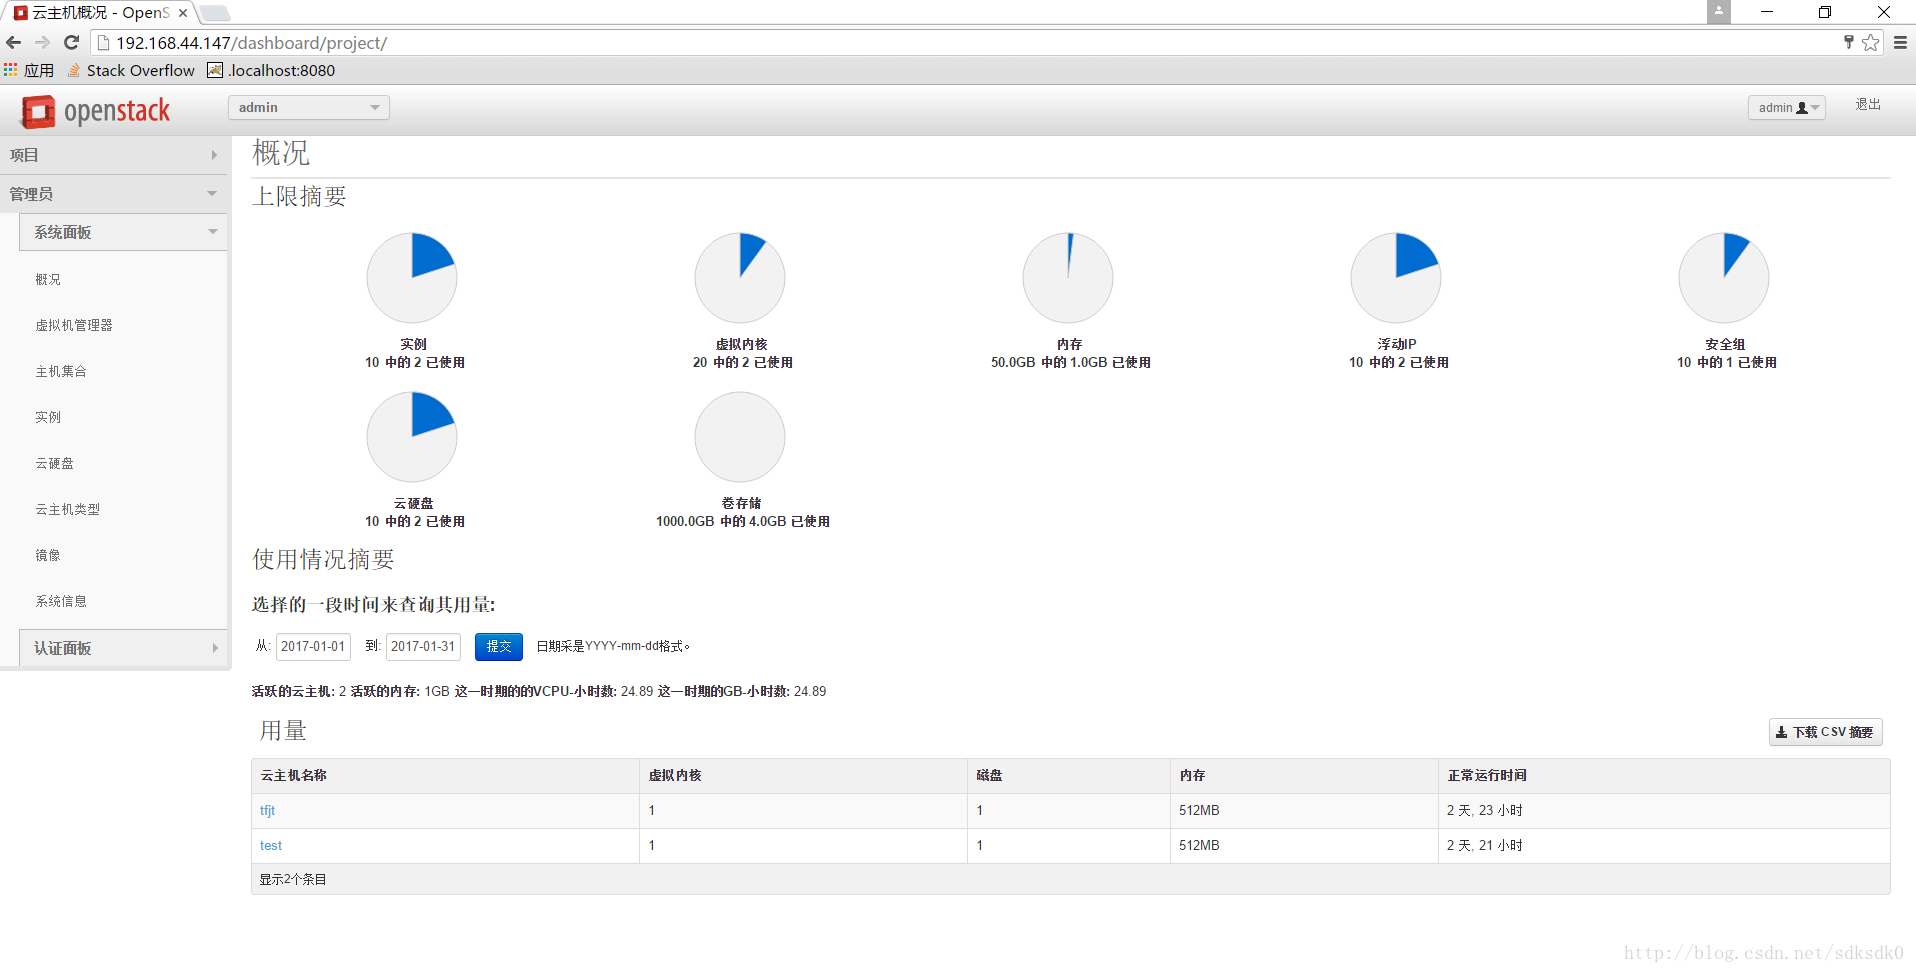
在这里可以看到我们的云服务器实例。
云硬盘服务(cinder)
了解过阿里云或者腾讯云的就知道,里面都有一个云硬盘服务,可以给我们的机器增加磁盘。
在controller端:
yum stall openstack-cinde
openstack-config --set /etc/cinder/cinder.conf
database connection mysql://cinder:CINDER_DBPASS@controller/cinder
mysql> CREATE DATABASE cinder;
mysql> GRANT ALL PRIVILEGES ON cinder.* TO ‘cinder’@‘localhost’
IDENTIFIED BY ‘CINDER_DBPASS’;
mysql> GRANT ALL PRIVILEGES ON cinder.* TO ‘cinder’@‘%’
IDENTIFIED BY ‘CINDER_DBPASS’;
创建数据库表:
su -s /bin/sh -c “cinder-manage db sync” cinder
创建用户并赋予角色:
$ keystone user-create --name=cinder --pass=CINDER_PASS–email=cinder@example.com
$ keystone user-role-add --user=cinder --tenant=service --role=admin
权限控制配置:
openstack-config --set /etc/cinder/cinder.conf DEFAULT \
auth_strategy keystone
openstack-config --set /etc/cinder/cinder.conf keystone_authtoken \
auth_uri http://controller:5000
openstack-config --set /etc/cinder/cinder.conf keystone_authtoken \
auth_host controller
openstack-config --set /etc/cinder/cinder.conf keystone_authtoken \
auth_protocol http
openstack-config --set /etc/cinder/cinder.conf keystone_authtoken \
auth_port 35357
openstack-config --set /etc/cinder/cinder.conf keystone_authtoken \
admin_user cinder
openstack-config --set /etc/cinder/cinder.conf keystone_authtoken \
admin_tenant_name service
openstack-config --set /etc/cinder/cinder.conf keystone_authtoken \
admin_password CINDER_PASS
消息队列配置:
openstack-config --set /etc/cinder/cinder.conf \
DEFAULT rpc_backend qpid
openstack-config --set /etc/cinder/cinder.conf \
DEFAULT qpid_hostname controller
$ keystone service-create --name=cinder --type=volume --description=“OpenStack Block Storage”
$ keystone endpoint-create
–service-id=$(keystone service-list | awk ‘/ volume / {print $2}’)
–publicurl=http://controller:8776/v1/%(tenant_id)s
–internalurl=http://controller:8776/v1/%(tenant_id)s
–adminurl=http://controller:8776/v1/%(tenant_id)s
$ keystone service-create --name=cinderv2 --type=volumev2 --description=“OpenStack Block Storage v2”
$ keystone endpoint-create
–service-id=$(keystone service-list | awk ‘/ volumev2 / {print $2}’)
–publicurl=http://controller:8776/v2/%(tenant_id)s
–internalurl=http://controller:8776/v2/%(tenant_id)s
–adminurl=http://controller:8776/v2/%(tenant_id)s
service openstack-cinder-api start
service openstack-cinder-scheduler start
chkconfig openstack-cinder-api on
chkconfig openstack-cinder-scheduler on
cinder service-list
openstack-config --set /etc/cinder/cinder.conf
DEFAULT qpid_hostname controller
cinder --debug list
keystone user-create --name=cinder --pass=CINDER_PASS --email=cinder@example.com
openstack-config --set /etc/cinder/cinder.conf
DEFAULT my_ip 192.168.44.147
在node端(computer02)
pvcreate /dev/sdb
vgcreate cinder-volumes /dev/sdb
yum install openstack-cinder scsi-target-utils
openstack-config --set /etc/cinder/cinder.conf DEFAULT \
auth_strategy keystone
openstack-config --set /etc/cinder/cinder.conf keystone_authtoken \
auth_uri http://controller:5000
openstack-config --set /etc/cinder/cinder.conf keystone_authtoken \
auth_host controller
openstack-config --set /etc/cinder/cinder.conf keystone_authtoken \
auth_protocol http
openstack-config --set /etc/cinder/cinder.conf keystone_authtoken \
auth_port 35357
openstack-config --set /etc/cinder/cinder.conf keystone_authtoken \
admin_user cinder
openstack-config --set /etc/cinder/cinder.conf keystone_authtoken \
admin_tenant_name service
openstack-config --set /etc/cinder/cinder.conf keystone_authtoken \
admin_password CINDER_PASS
openstack-config --set /etc/cinder/cinder.conf \
DEFAULT rpc_backend qpid
openstack-config --set /etc/cinder/cinder.conf \
DEFAULT qpid_hostname controller
openstack-config --set /etc/cinder/cinder.conf \
database connection mysql://cinder:CINDER_DBPASS@controller/cinde
openstack-config --set /etc/cinder/cinder.conf \
DEFAULT my_ip MANAGEMENT_INTERFACE_IP_ADDRESS
openstack-config --set /etc/cinder/cinder.conf \
DEFAULT glance_host controller
openstack-config --set /etc/cinder/cinder.conf \
DEFAULT iscsi_helper tgtadm
配置文件中:


vi /etc/tgt/targets.conf
include /etc/cinder/volumes/*
启动服务:
service openstack-cinder-volume start
service tgtd start
chkconfig openstack-cinder-volume on
chkconfig tgtd on
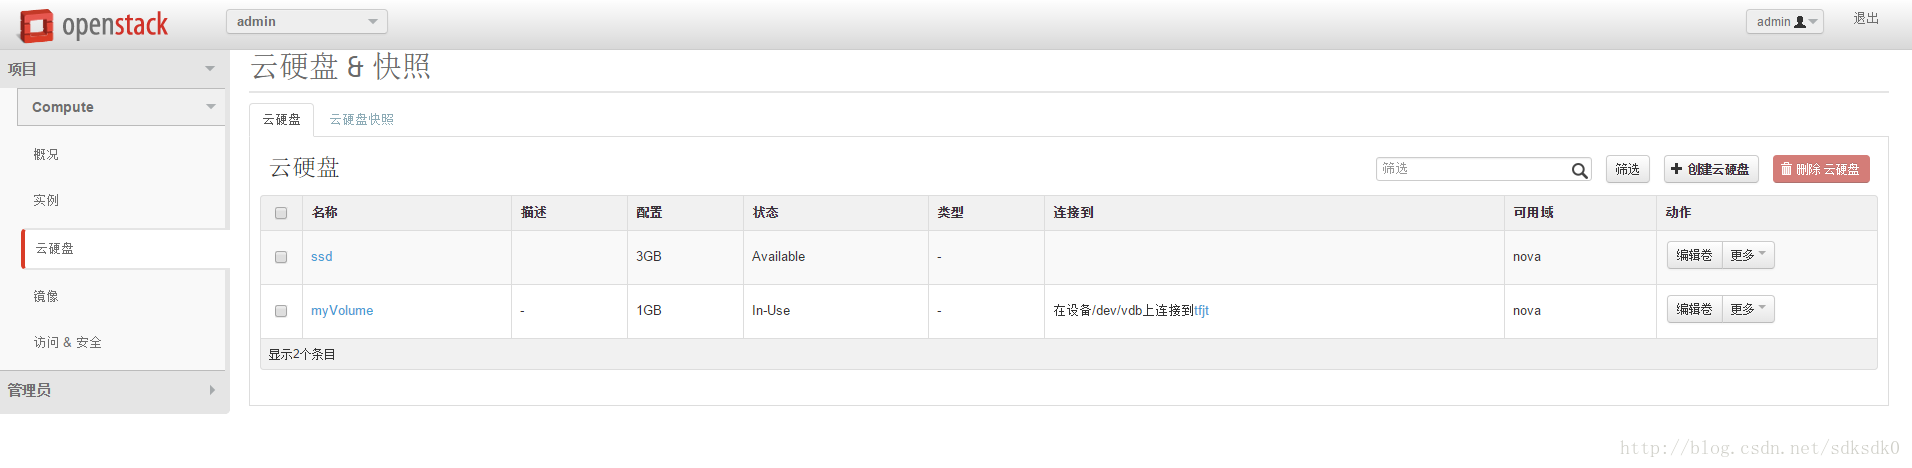
创建磁盘:
cinder create --display-name myVolume 1
查看磁盘列表:
cinder list
然后再界面端查看云硬盘的配置并进行挂载:
在云服务器上挂载磁盘:
$ mkfs.ext3 /dev/vdb1
$ mkdir /mnt/test
$ mount /dev/vdb1 /mnt/test
$ mount
$ fdisk /dev/vdb
Device contains neither a valid DOS partition table, nor Sun, SGI or OSF disklabel
Building a new DOS disklabel with disk identifier 0x64817ea3.
Changes will remain in memory only, until you decide to write them.
After that, of course, the previous content won’t be recoverable.
Warning: invalid flag 0x0000 of partition table 4 will be corrected by w(rite)
Command (m for help): n
Partition type:
p primary (0 primary, 0 extended, 4 free)
e extended
Select (default p): p
Partition number (1-4, default 1): 1
First sector (2048-2097151, default 2048): +1G
Value out of range.
First sector (2048-2097151, default 2048): +512M
Last sector, +sectors or +size{K,M,G} (1048576-2097151, default 2097151):
Using default value 2097151
Command (m for help): p
Disk /dev/vdb: 1073 MB, 1073741824 bytes
16 heads, 63 sectors/track, 2080 cylinders, total 2097152 sectors
Units = sectors of 1 * 512 = 512 bytes
Sector size (logical/physical): 512 bytes / 512 bytes
I/O size (minimum/optimal): 512 bytes / 512 bytes
Disk identifier: 0x64817ea3
Device Boot Start End Blocks Id System
/dev/vdb1 1048576 2097151 524288 83 Linux
Command (m for help): w
The partition table has been altered!

既有适合小白学习的零基础资料,也有适合3年以上经验的小伙伴深入学习提升的进阶课程,涵盖了95%以上软件测试知识点,真正体系化!
由于文件比较多,这里只是将部分目录截图出来,全套包含大厂面经、学习笔记、源码讲义、实战项目、大纲路线、讲解视频,并且后续会持续更新
3741824 bytes
16 heads, 63 sectors/track, 2080 cylinders, total 2097152 sectors
Units = sectors of 1 * 512 = 512 bytes
Sector size (logical/physical): 512 bytes / 512 bytes
I/O size (minimum/optimal): 512 bytes / 512 bytes
Disk identifier: 0x64817ea3
Device Boot Start End Blocks Id System
/dev/vdb1 1048576 2097151 524288 83 Linux
Command (m for help): w
The partition table has been altered!
[外链图片转存中…(img-v72IktSf-1715312803352)]
[外链图片转存中…(img-EMmkkVhL-1715312803352)]
[外链图片转存中…(img-kqhUllh9-1715312803353)]
既有适合小白学习的零基础资料,也有适合3年以上经验的小伙伴深入学习提升的进阶课程,涵盖了95%以上软件测试知识点,真正体系化!
由于文件比较多,这里只是将部分目录截图出来,全套包含大厂面经、学习笔记、源码讲义、实战项目、大纲路线、讲解视频,并且后续会持续更新


 2680
2680


 被折叠的 条评论
为什么被折叠?
被折叠的 条评论
为什么被折叠?
 到【灌水乐园】发言


