


网上学习资料一大堆,但如果学到的知识不成体系,遇到问题时只是浅尝辄止,不再深入研究,那么很难做到真正的技术提升。
一个人可以走的很快,但一群人才能走的更远!不论你是正从事IT行业的老鸟或是对IT行业感兴趣的新人,都欢迎加入我们的的圈子(技术交流、学习资源、职场吐槽、大厂内推、面试辅导),让我们一起学习成长!
* 将原始图像转换为灰度图。
* 对灰度图进行二值化处理。
- 查找轮廓:
image, contours, hierarchy = cv2.findContours(binary, cv2.RETR_EXTERNAL, cv2.CHAIN_APPROX_SIMPLE)
* 使用 `cv2.findContours()` 函数查找二值图像中的轮廓。
* `cv2.RETR_EXTERNAL` 参数表示只检测外部轮廓。
* `cv2.CHAIN_APPROX_SIMPLE` 参数表示使用简化的轮廓表示。
- 绘制并显示每个轮廓:
n = len(contours)
contoursImg = []

for i in range(n):
    temp = np.zeros(o.shape, np.uint8)
    contoursImg.append(temp)
    contoursImg[i] = cv2.drawContours(contoursImg[i], contours, i, (255, 255, 255), 5)

    # Display each contour using plt
    plt.imshow(cv2.cvtColor(contoursImg[i], cv2.COLOR_BGR2RGB))
    plt.title(f'Contour {i + 1}')
    plt.show()
* 遍历所有检测到的轮廓,每个轮廓都被绘制在 `contoursImg` 的相应元素中。
* 使用 Matplotlib 显示每个绘制了轮廓的图像,标题显示轮廓的序号。
总体而言,这段代码的目的是在原始图像中找到轮廓,然后将每个轮廓在图像上绘制出来并使用 Matplotlib 逐个显示,以便用户更好地理解轮廓检测的结果。
三、矩特征:用于描述图像的形状、轮廓和其他特征的数学描述符
矩可以得到图像的形状和结构信息,可以用来识别图像中的对象、测量物体的大小和姿态等。
矩的能力包括对图像的特征提取、形状匹配、边缘检测等,可以帮助计算机视觉系统理解和处理图像信息。
3.1 cv2.moments():该函数计算图像的矩
函数原型为:
cv2.moments(array[, binaryImage])
请注意,要正确使用`cv2.moments()`函数,
需要先加载图像并将其转换为灰度图像
参数:
array:这个参数可以是一个点集(contour),也可以是灰度图像或二值图像。当array是一个点集时,函数会将这些点看作轮廓的顶点,将整个点集作为一个轮廓,而不是将它们视为独立点binaryImage:可选参数,默认为False。如果设置为True,array内的所有非零值都会被处理为1,这样函数会将其视为二值图像进行处理。
返回值:
字典对象,包含了图像的矩特征。
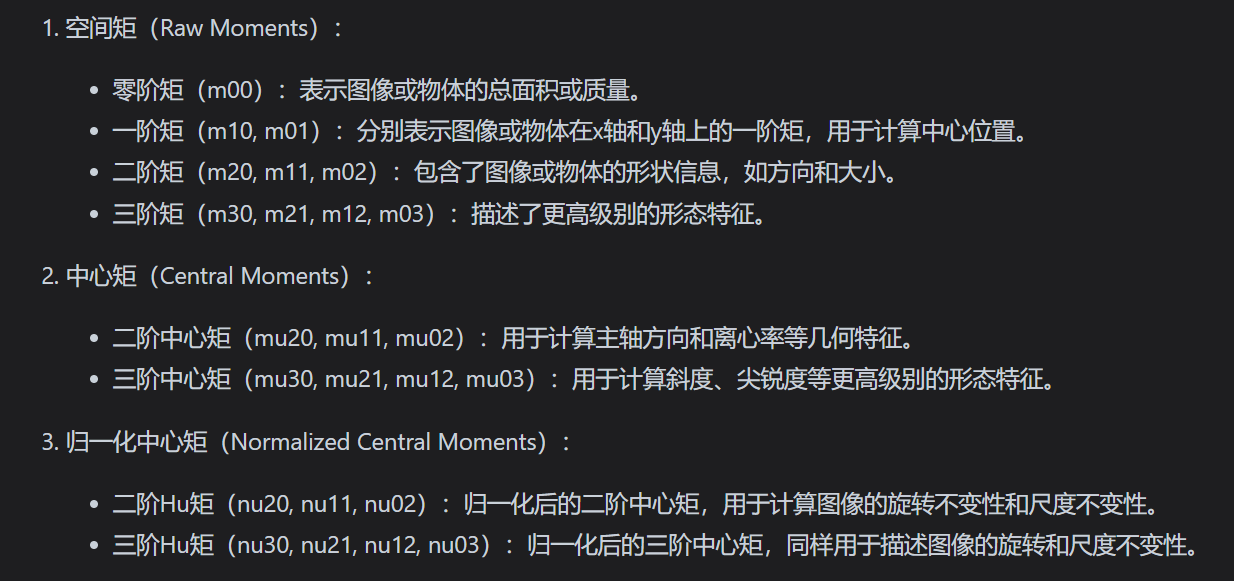
(1)空间矩
零阶矩:m00
一阶矩:m10, m01
二阶矩:m20, m11, m02
三阶矩:m30, m21, m12, m03
(2)中心矩
二阶中心矩:mu20, mu11, mu02
三阶中心矩:mu30, mu21, mu12,mu03
(3)归一化中心矩
二阶 Hu 矩:nu20, nu11, nu02
三阶 Hu 矩:nu30, nu21, nu12, nu03
GPT
Demo
import cv2
import numpy as np
# 读取图片
image = cv2.imread("img/img.png")
cv2.imshow("Original Image", image)
# 形态学处理
kernel = np.ones((14, 14), np.uint8)
morphology_result = cv2.morphologyEx(image, cv2.MORPH_OPEN, kernel)
cv2.imshow("Morphology Result", morphology_result)
# 灰度转换
gray_image = cv2.cvtColor(morphology_result, cv2.COLOR_BGR2GRAY)
# 二值化
_, binary_image = cv2.threshold(gray_image, 100, 255, cv2.THRESH_OTSU)
cv2.imshow("Binary Image", binary_image)
# 寻找轮廓
contours, _ = cv2.findContours(binary_image, cv2.RETR_EXTERNAL, cv2.CHAIN_APPROX_NONE)
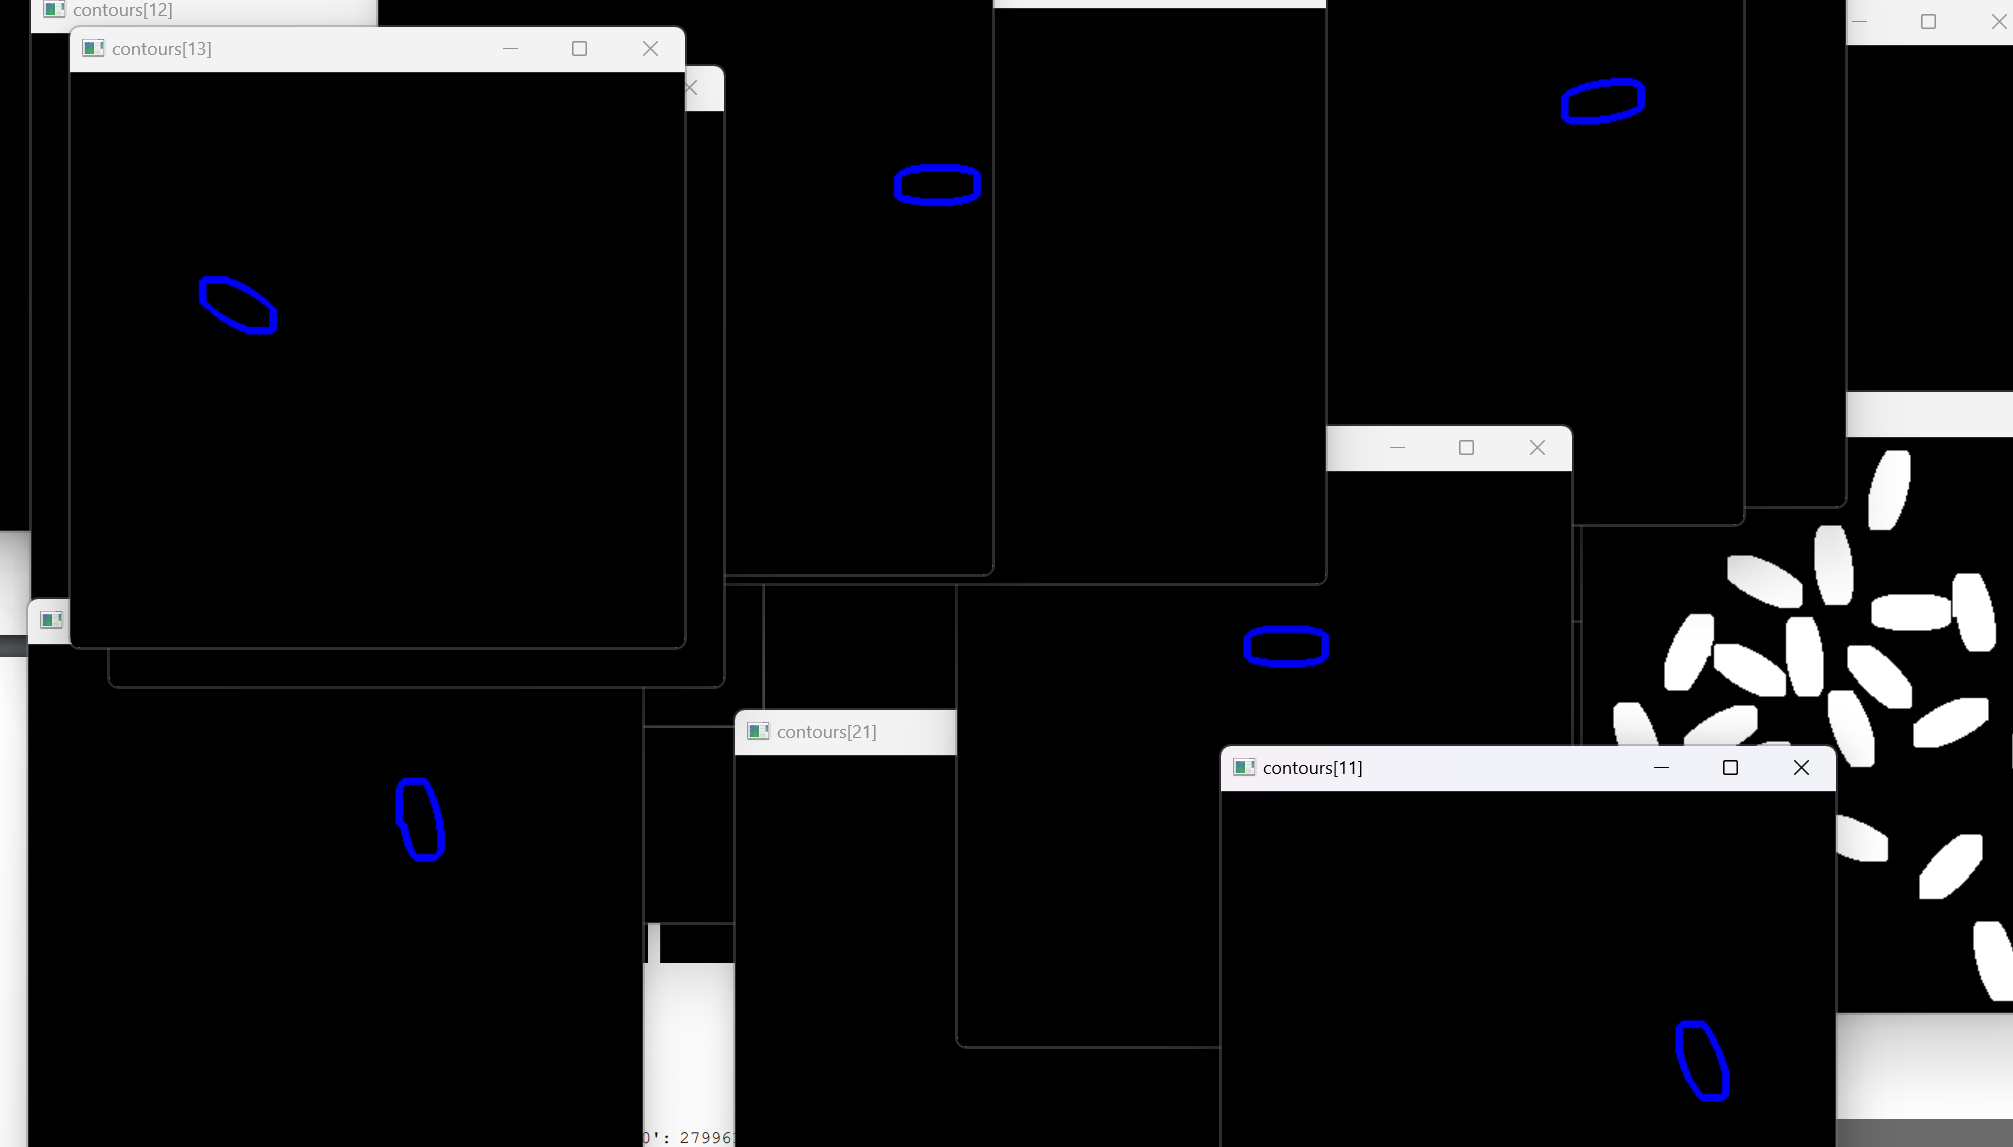
n = len(contours)
contoursImg = []
for i in range(n):
temp = np.zeros(image.shape, np.uint8)
contoursImg.append(temp)
contoursImg[i] = cv2.drawContours(contoursImg[i], contours, i, 255, 3)
cv2.imshow("contours[" + str(i) + "]", contoursImg[i])
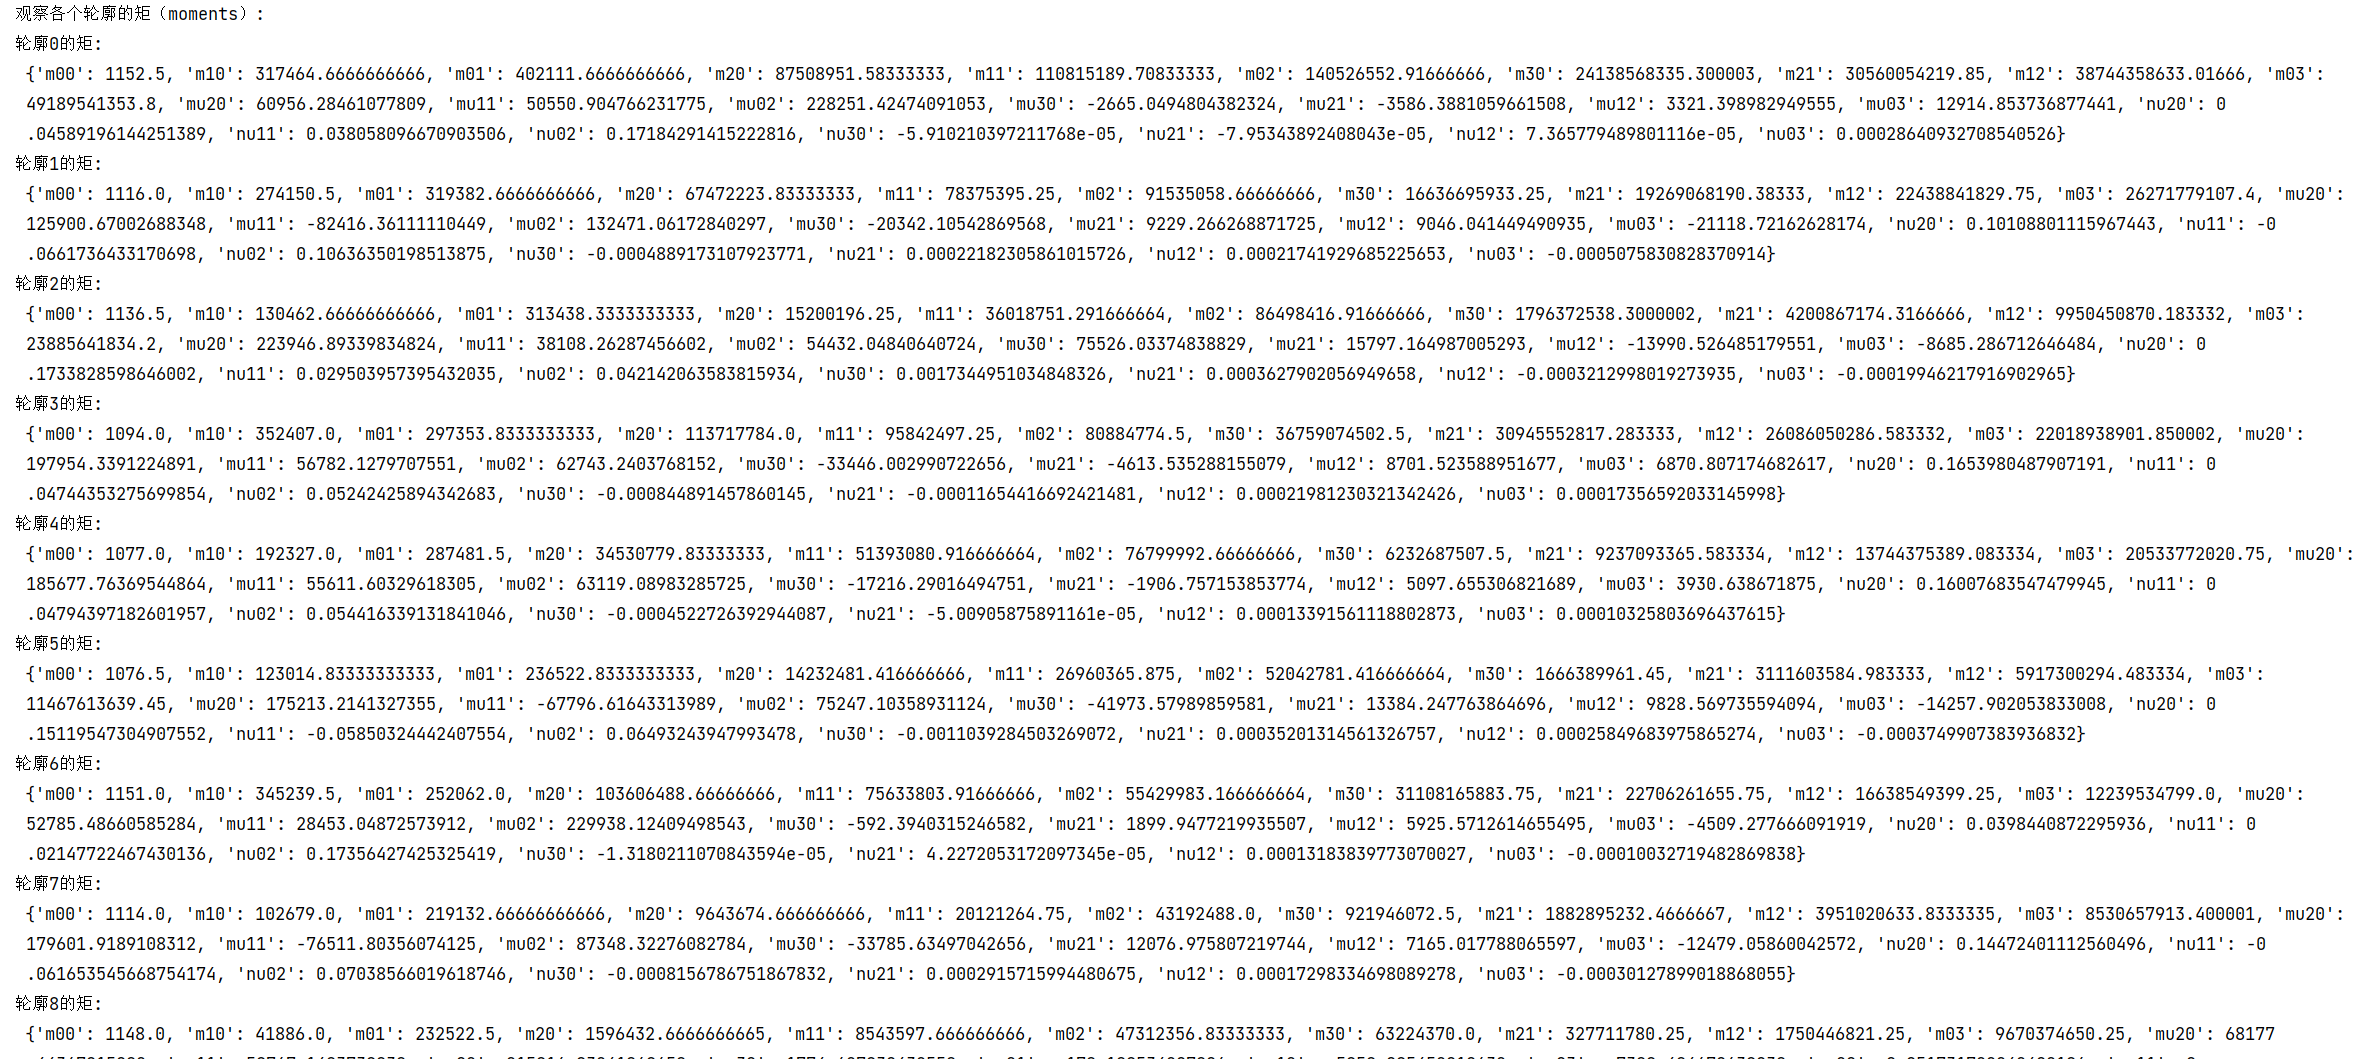
print("观察各个轮廓的矩(moments):")
for i in range(n):
print("轮廓" + str(i) + "的矩:\n", cv2.moments(contours[i]))
print("观察各个轮廓的面积:")
for i in range(n):
print("轮廓" + str(i) + "的面积:%d" % cv2.moments(contours[i])['m00'])
cv2.waitKey(0)
cv2.destroyAllWindows()
3.2 cv2.contourArea()计算图像中对象的大小
函数原型为:
cv2.contourArea(contour [, oriented] ))
参数:
- contour: 轮廓对象,是一个包含轮廓点坐标的数组。
- oriented (可选): 一个布尔值,指定是否计算有方向的面积。默认为
False,表示计算无方向的面积。如果设置为True,则计算有方向的面积。
返回值:
该函数返回轮廓的面积,单位为像素。如果计算有方向的面积,返回的值可能为负数。
示例:
import cv2
import numpy as np
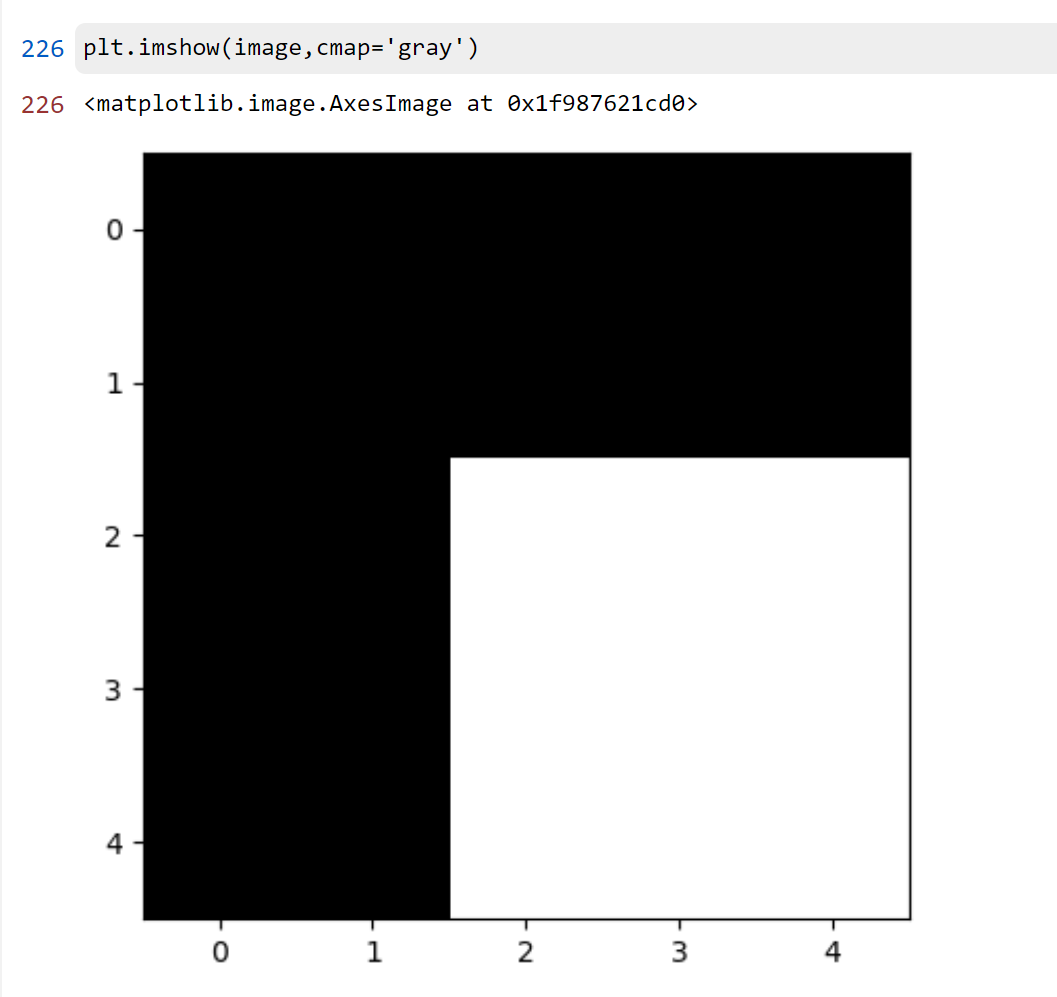
# 创建一张图像并找到轮廓
image = np.zeros((100, 100), dtype=np.uint8)
cv2.rectangle(image, (20, 20), (80, 80), 255, -1)
contours, _ = cv2.findContours(image, cv2.RETR_EXTERNAL, cv2.CHAIN_APPROX_SIMPLE)
# 计算轮廓的面积
area = cv2.contourArea(contours[0])
print("Contour Area:", area)
在这个例子中,我们创建了一张100x100的黑色图像,在其中绘制了一个白色矩形。然后使用cv2.findContours找到轮廓,最后使用cv2.contourArea计算轮廓的面积。
Demo
import cv2
# 读取图像并灰度化
import matplotlib.pyplot as plt
image = cv2.imread('img/S1.jpg')
gray_image = cv2.cvtColor(image, cv2.COLOR_BGR2GRAY)
# 轮廓提取
contours, hierarchy = cv2.findContours(gray_image, cv2.RETR_EXTERNAL, cv2.CHAIN_APPROX_SIMPLE)
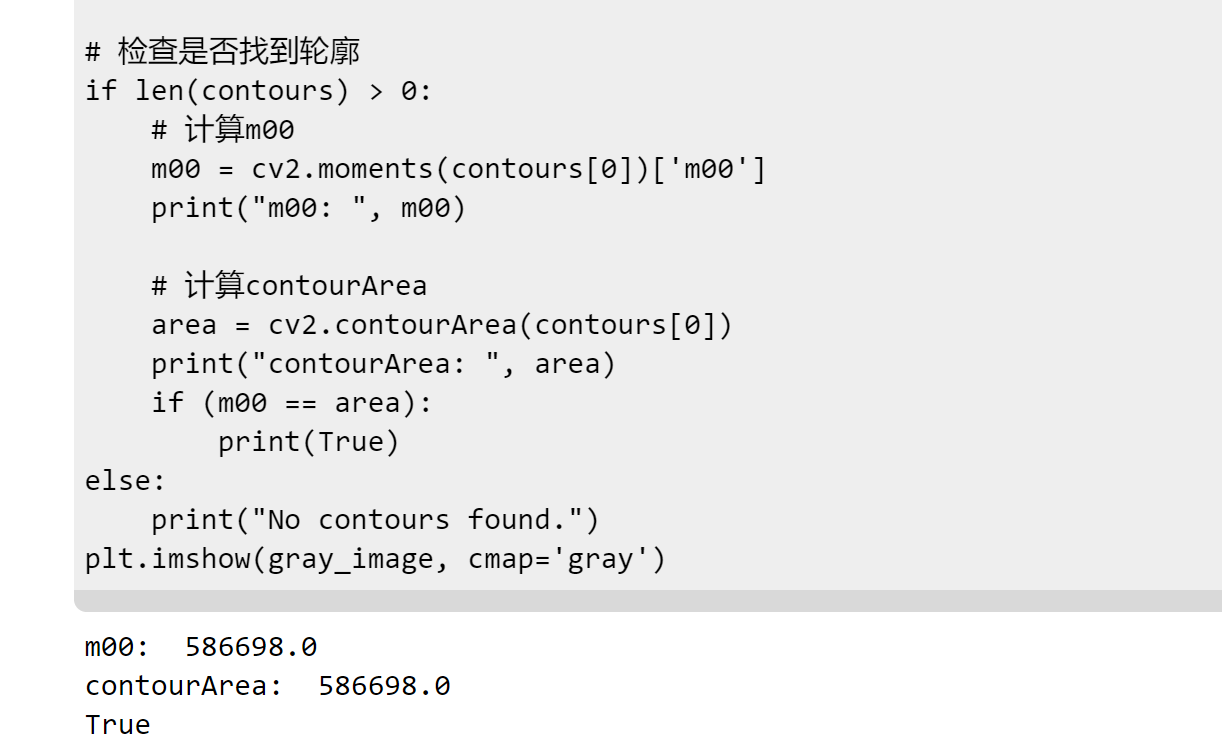
# 检查是否找到轮廓
if len(contours) > 0:
# 计算m00
m00 = cv2.moments(contours[0])['m00']
print("m00: ", m00)
# 计算contourArea
area = cv2.contourArea(contours[0])
print("contourArea: ", area)
else:
print("No contours found.")
plt.imshow(gray_image, cmap='gray')
3.3 cv2.arcLength():这个函数计算给定轮廓的弧长。弧长用于度量轮廓的周长或曲线的长度。
cv2.arcLength(contour, closed)
这个函数是OpenCV库中的一个函数,用于计算给定轮廓的弧长。弧长是指曲线的长度,可以用于测量轮廓的周长或曲线的总长度。
参数
contour:这是输入的轮廓参数,通常是一个由点组成的列表或数组,表示图像中的对象的边界。closed: 一个布尔值,指定轮廓是否是封闭的。如果为True,函数会假设轮廓是封闭的,计算封闭曲线的周长;如果为False,函数将计算非封闭曲线的长度。
返回值
- retval: 弧长或曲线的长度。
示例
import cv2
import numpy as np

# 创建一个简单的闭合轮廓
contour = np.array([[0, 0], [0, 1], [1, 1], [1, 0]], dtype=np.float32)
closed = True

# 计算轮廓的弧长
arc_length = cv2.arcLength(contour, closed)

print("Arc Length:", arc_length)
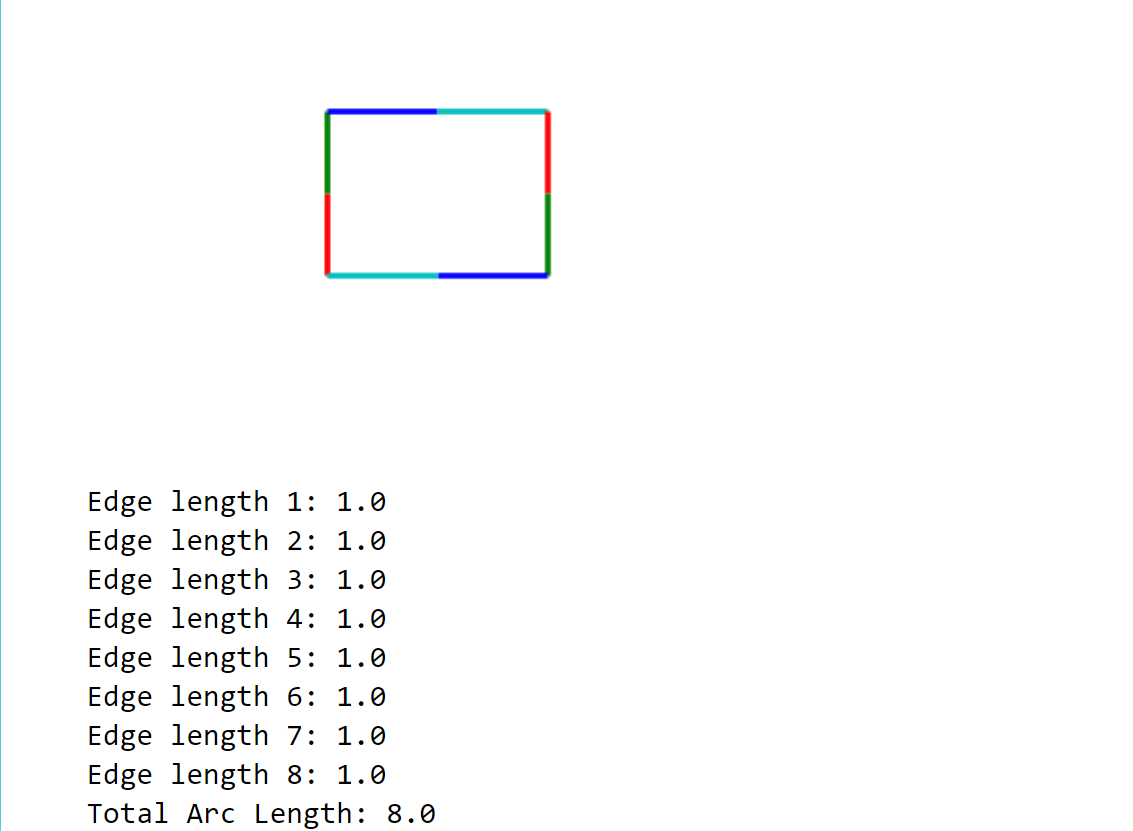
Demo
import numpy as np
import cv2
import matplotlib.pyplot as plt
from matplotlib.collections import LineCollection

# 创建图像并在中心设置一个3x3的方块
image = np.zeros((5,5), dtype=np.uint8)
image[2:5, 2:5] = 1

# 找到轮廓
contours, _ = cv2.findContours(image, cv2.RETR_EXTERNAL, cv2.CHAIN_APPROX_NONE)

# 假设只有一个轮廓
contour = contours[0]

# 轮廓点的数量
num_points = contour.shape[0]

# 创建一个线段集合,用于绘制不同颜色的边
lines = []
colors = ['r', 'g', 'b', 'c']  # 红、绿、蓝、青(这里只用于示例,实际情况下可能需要更多颜色或循环使用)

# 遍历轮廓的边
for i in range(num_points):
    # 获取当前点和下一个点(或第一个点,如果我们在最后一个点上)
    point1 = tuple(contour[i][0])
    point2 = tuple(contour[(i + 1) % num_points][0])

    # 添加线段到集合中
    lines.append([point1, point2])

# 创建线段集合
lc = LineCollection(lines, colors=colors, linewidths=2)

# 使用matplotlib显示图像
fig, ax = plt.subplots()

# 添加线段集合到图像上
ax.add_collection(lc)

# 设置坐标轴限制
ax.set_xlim(0, 9)
ax.set_ylim(0, 9)

# 关闭坐标轴
ax.axis('off')

# 显示图像
plt.show()

# 注意:这里我们假设了颜色和线段数量的匹配,
# 在实际应用中,您可能需要处理颜色和线段数量的对应关系。

# 遍历每个轮廓
for contour in contours:
    # 轮廓是一个点的数组,我们需要遍历这些点来计算相邻点之间的距离
    # 注意:轮廓是闭合的,所以最后一个点和第一个点是相连的
    num_points = contour.shape[0]
    for i in range(num_points):
        # 获取当前点和下一个点(或第一个点,如果我们在最后一个点上)
        point1 = contour[i]
        point2 = contour[(i + 1) % num_points]

        # 计算两点之间的距离(使用欧几里得距离)
        edge_length = np.linalg.norm(point1 - point2)

        # 输出边的长度
        print(f"Edge length {i + 1}: {edge\_length}")

# 计算所有轮廓的总弧长
total_arc_length = 0
for contour in contours:
    arc_length = cv2.arcLength(contour, True)
    total_arc_length += arc_length

print("Total Arc Length:", total_arc_length)
import cv2
import numpy as np
o = cv2.imread('img/S1.jpg')
if o is None:
print("Error loading image!")
exit()
cv2.imshow("original", o)
# 轮廓
gray = cv2.cvtColor(o, cv2.COLOR_BGR2GRAY)
ret, binary = cv2.threshold(gray, 127, 255, cv2.THRESH_BINARY)
# 注意:根据OpenCV版本,findContours的返回值可能会有所不同
contours, hierarchy = cv2.findContours(binary, cv2.RETR_LIST, cv2.CHAIN_APPROX_SIMPLE)
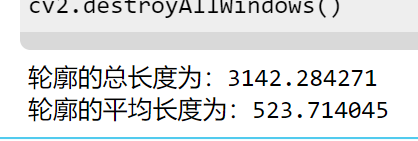
# --------------计算各轮廓的长度之和、平均长度--------------------
n = len(contours) # 获取轮廓的个数
cntLen = [cv2.arcLength(contours[i], True) for i in range(n)]
cntLenSum = np.sum(cntLen) # 各轮廓的长度之和
cntLenAvr = cntLenSum / n # 轮廓长度的平均值
print("轮廓的总长度为:%f" % cntLenSum)
print("轮廓的平均长度为:%f" % cntLenAvr)
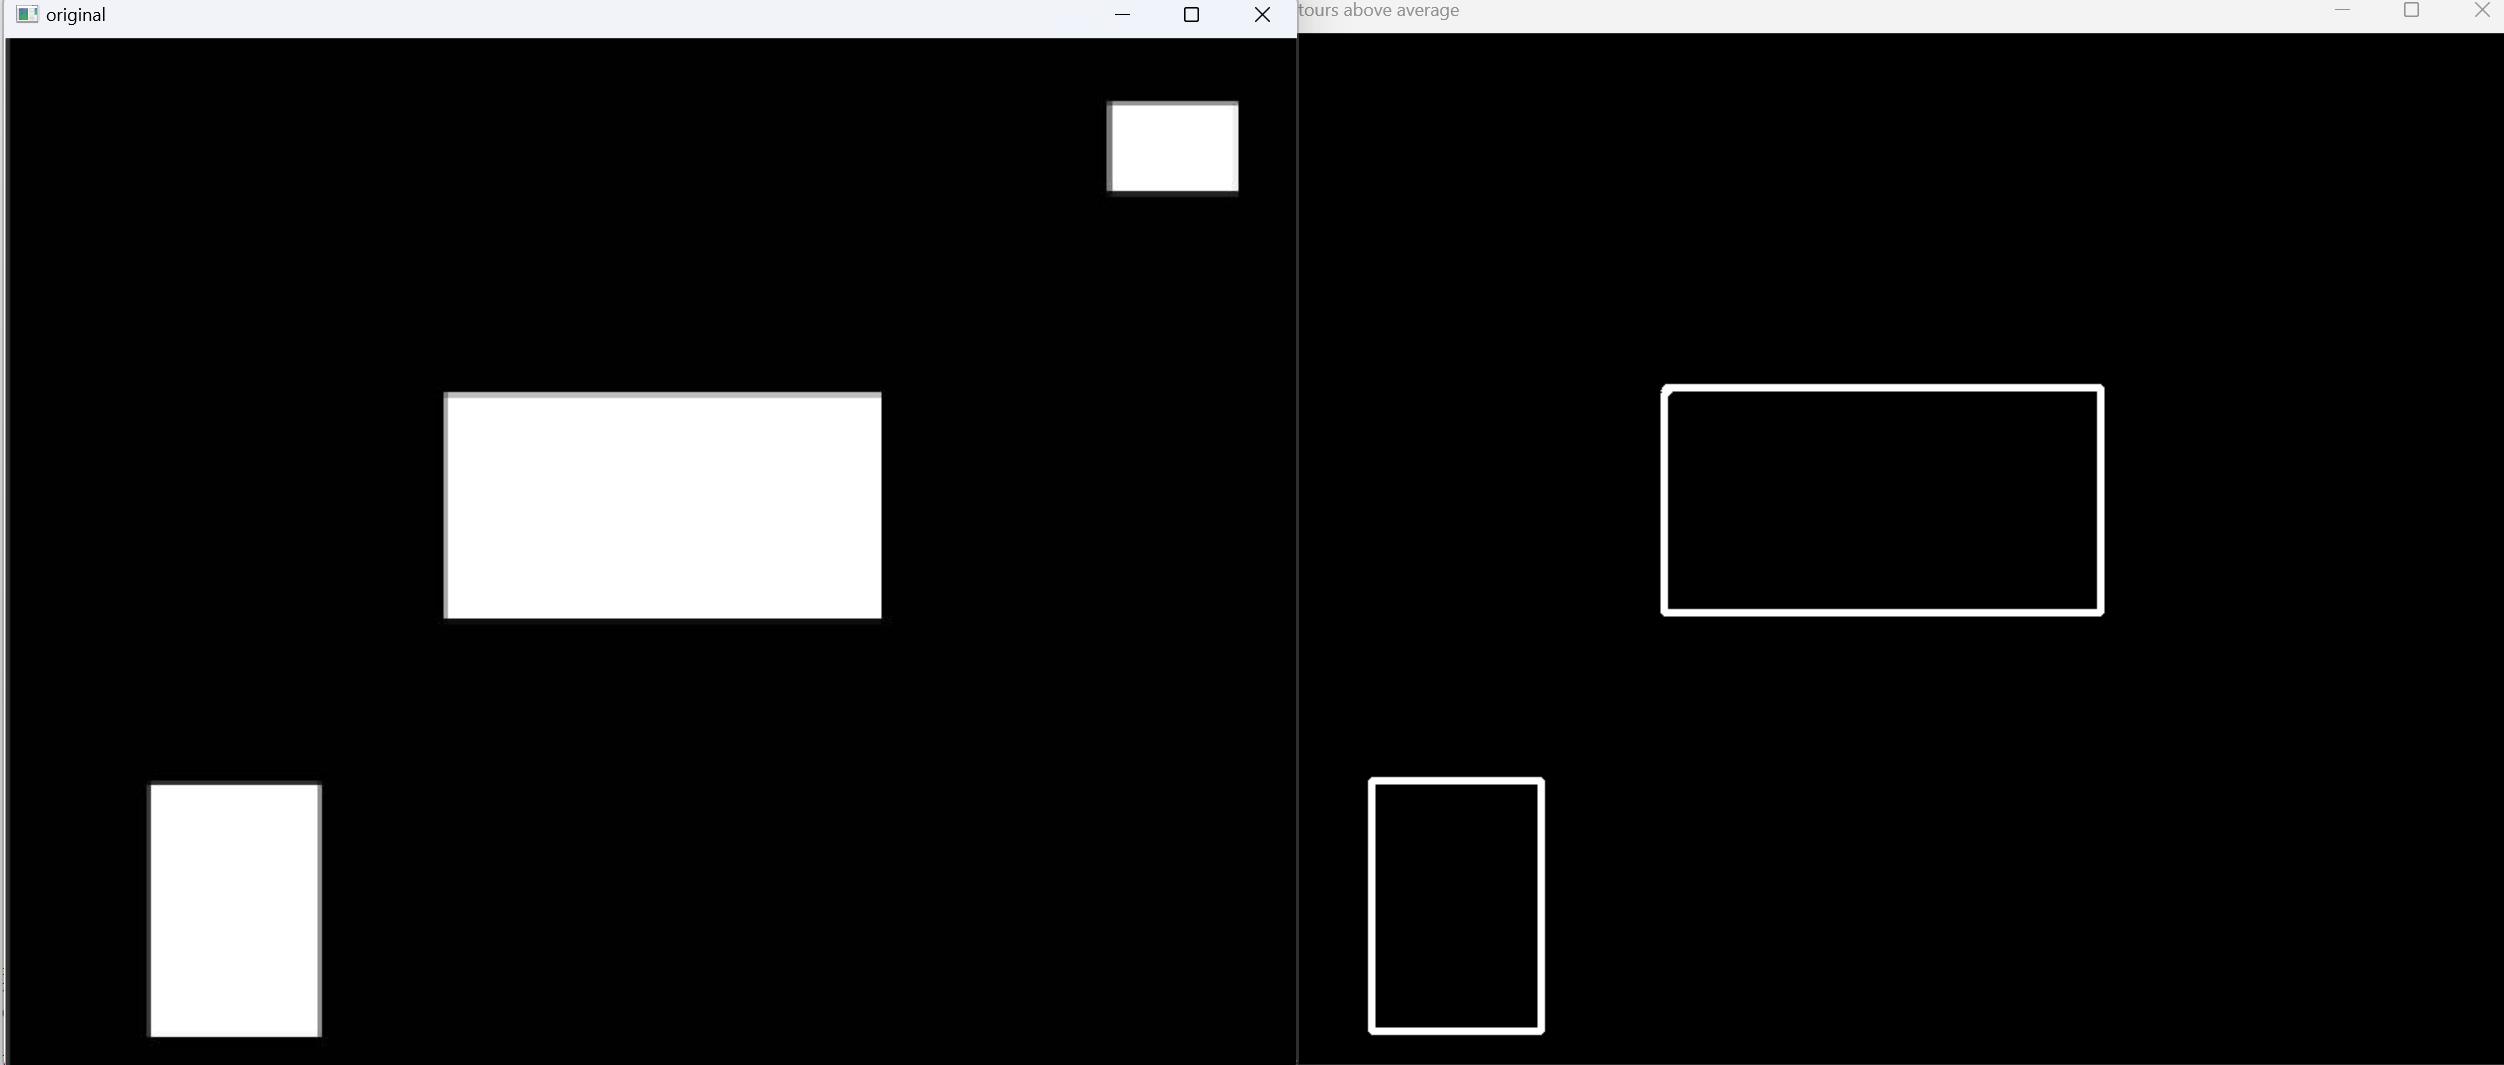
# --------------显示长度超过平均值的轮廓--------------------
result = np.zeros_like(o)
for i in range(n):
if cv2.arcLength(contours[i], True) > cntLenAvr:
cv2.drawContours(result, contours, i, (255, 255, 255), 3)
cv2.imshow("Contours above average", result)
cv2.waitKey()
cv2.destroyAllWindows()
四、Hu矩
Hu矩是通过对图像的几何矩进行归一化和线性组合得到的,主要用于图像的旋转、缩放和平移不变性的描述
4.1 Hu矩函数 cv2.HuMoments()
该函数使用 cv2.moments()函数的返回值作为参数,返回 7 个 Hu 矩值。
二阶 Hu 矩:eta20, eta11, eta02
三阶 Hu 矩:eta30, eta21, eta12, eta03
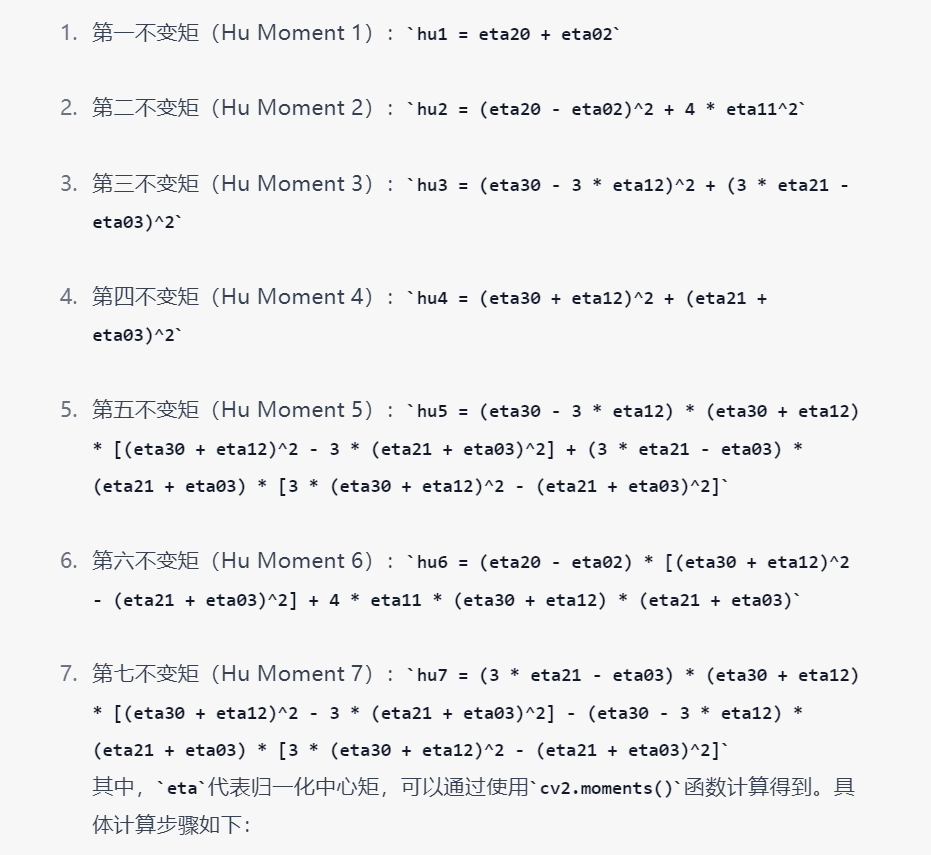
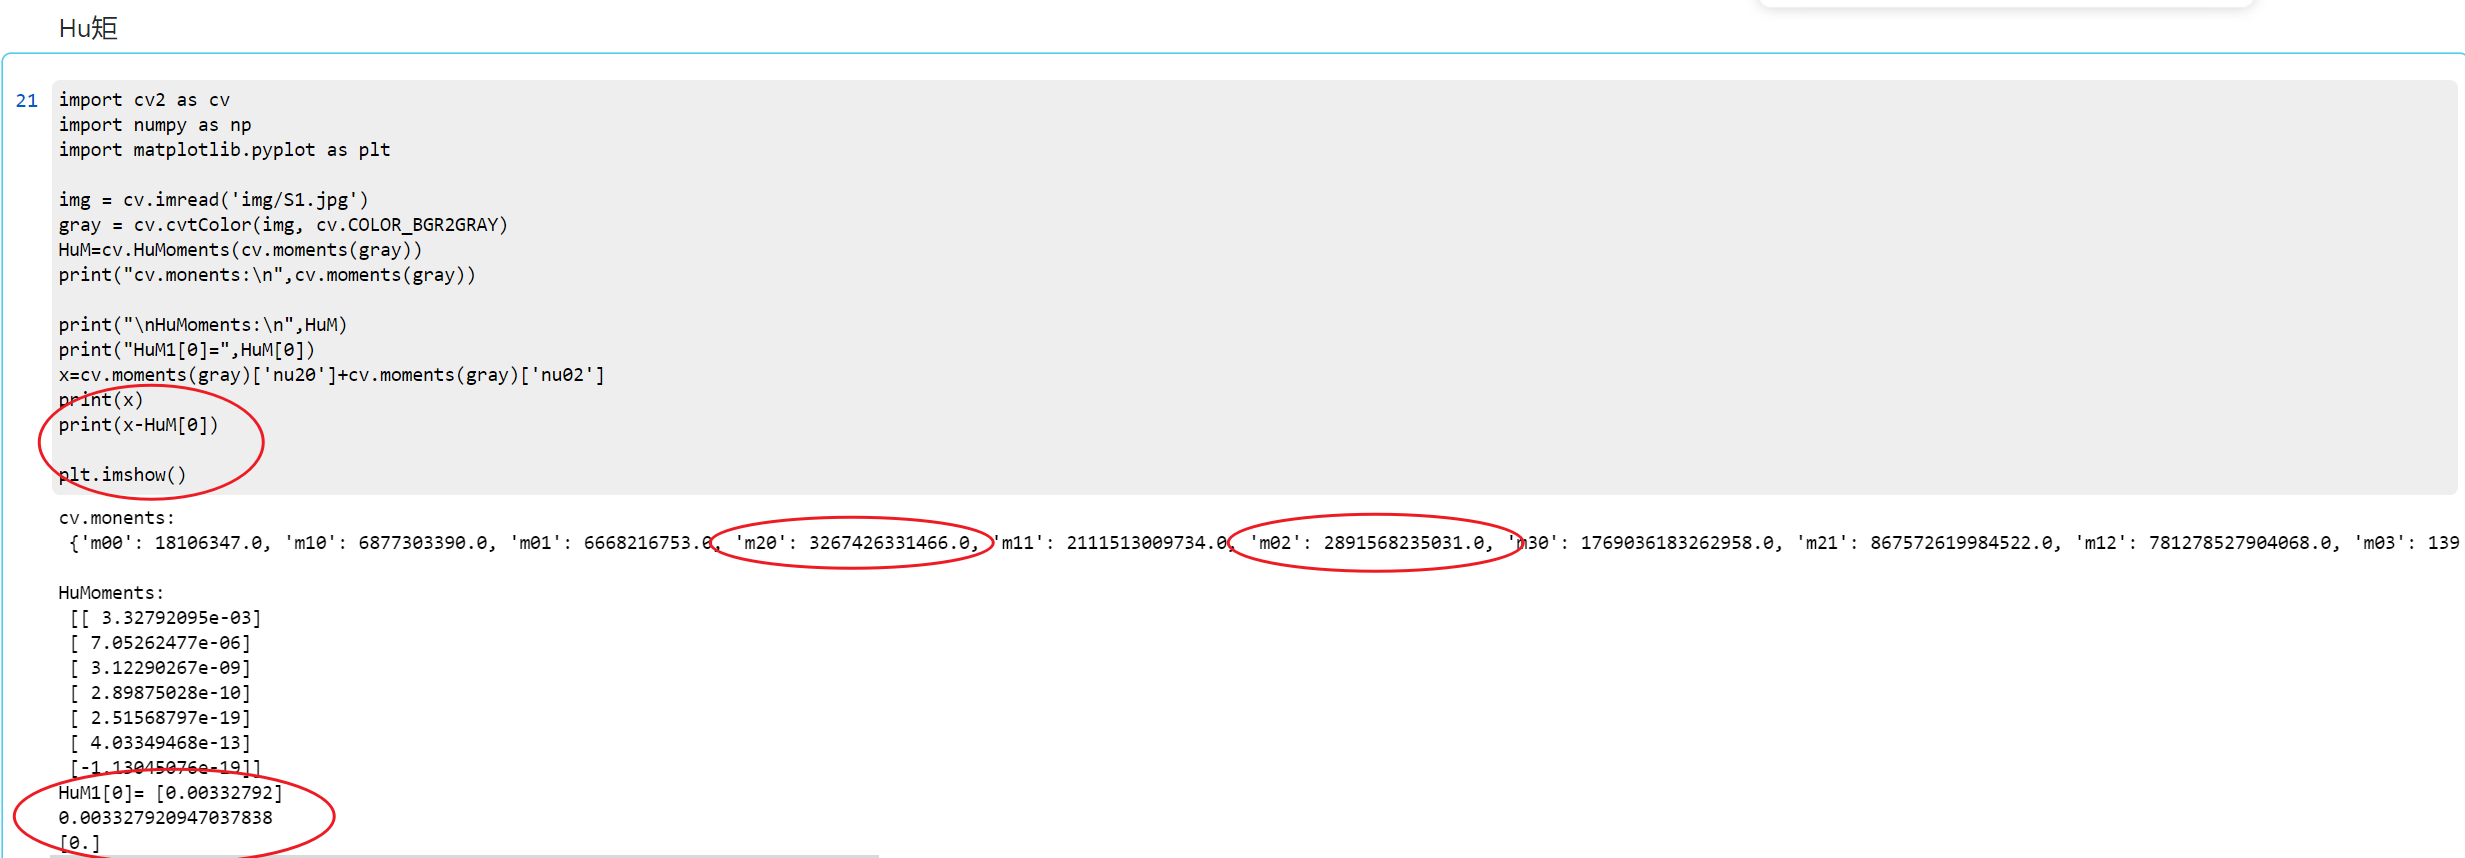
4.1.1 验证hu1 = eta20 + eta02
import cv2 as cv
import numpy as np
import matplotlib.pyplot as plt

img = cv.imread('img/S1.jpg')
gray = cv.cvtColor(img, cv.COLOR_BGR2GRAY)
HuM=cv.HuMoments(cv.moments(gray))
print("cv.monents:\n",cv.moments(gray))

print("\nHuMoments:\n",HuM)
print("HuM1[0]=",HuM[0])
x=cv.moments(gray)['nu20']+cv.moments(gray)['nu02']
print(x)
print(x-HuM[0])

plt.imshow()
4.2 比较Hu矩差异:形状匹配
cv2.matchShapes()是OpenCV中的一个函数,用于计算两个形状之间的相似性或匹配度。它通过计算形状的Hu矩来比较两个形状的差异程度。
retval = cv2.matchShapes(contour1, contour2, method, parameter)
其中:
contour1和contour2分别是两个轮廓(即形状)或者灰度图像。method指定了计算相似性的方法,可以是以下值之一:cv2.CONTOURS_MATCH_I1:使用I1方法进行匹配。cv2.CONTOURS_MATCH_I2:使用I2方法进行匹配。cv2.CONTOURS_MATCH_I3:使用I3方法进行匹配。
parameter是可选参数,用于控制匹配精度。
ℎ𝑖𝐴和ℎ𝑖𝐵分别是对象 A 和对象 B 的 Hu 矩。
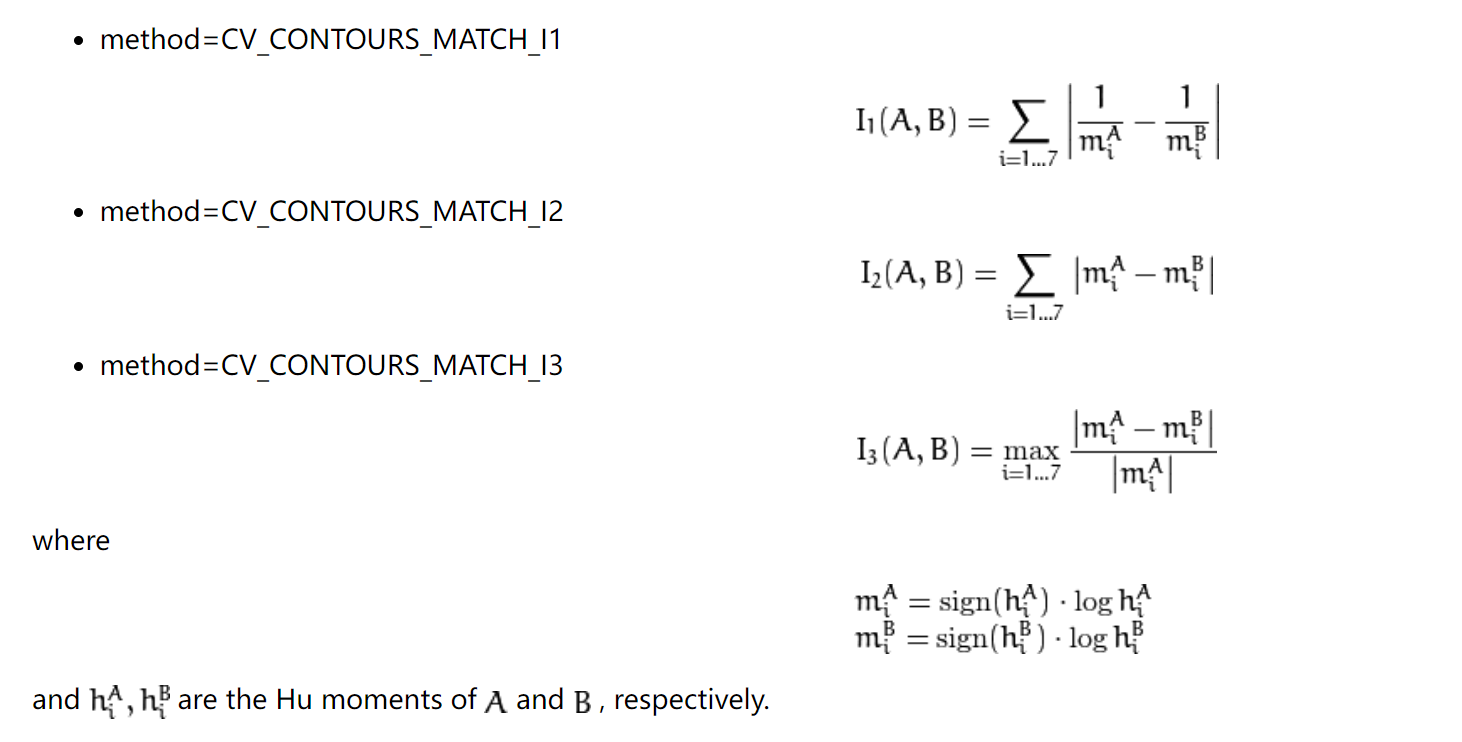
返回值retval表示两个形状之间的匹配程度。值越小表示形状越相似,值越大表示形状越不相似。
请注意,cv2.matchShapes()需要传入两个轮廓作为参数,因此在使用之前,你需要先获得两个轮廓。可以使用OpenCV的findContours()函数来获取图像中的轮廓。
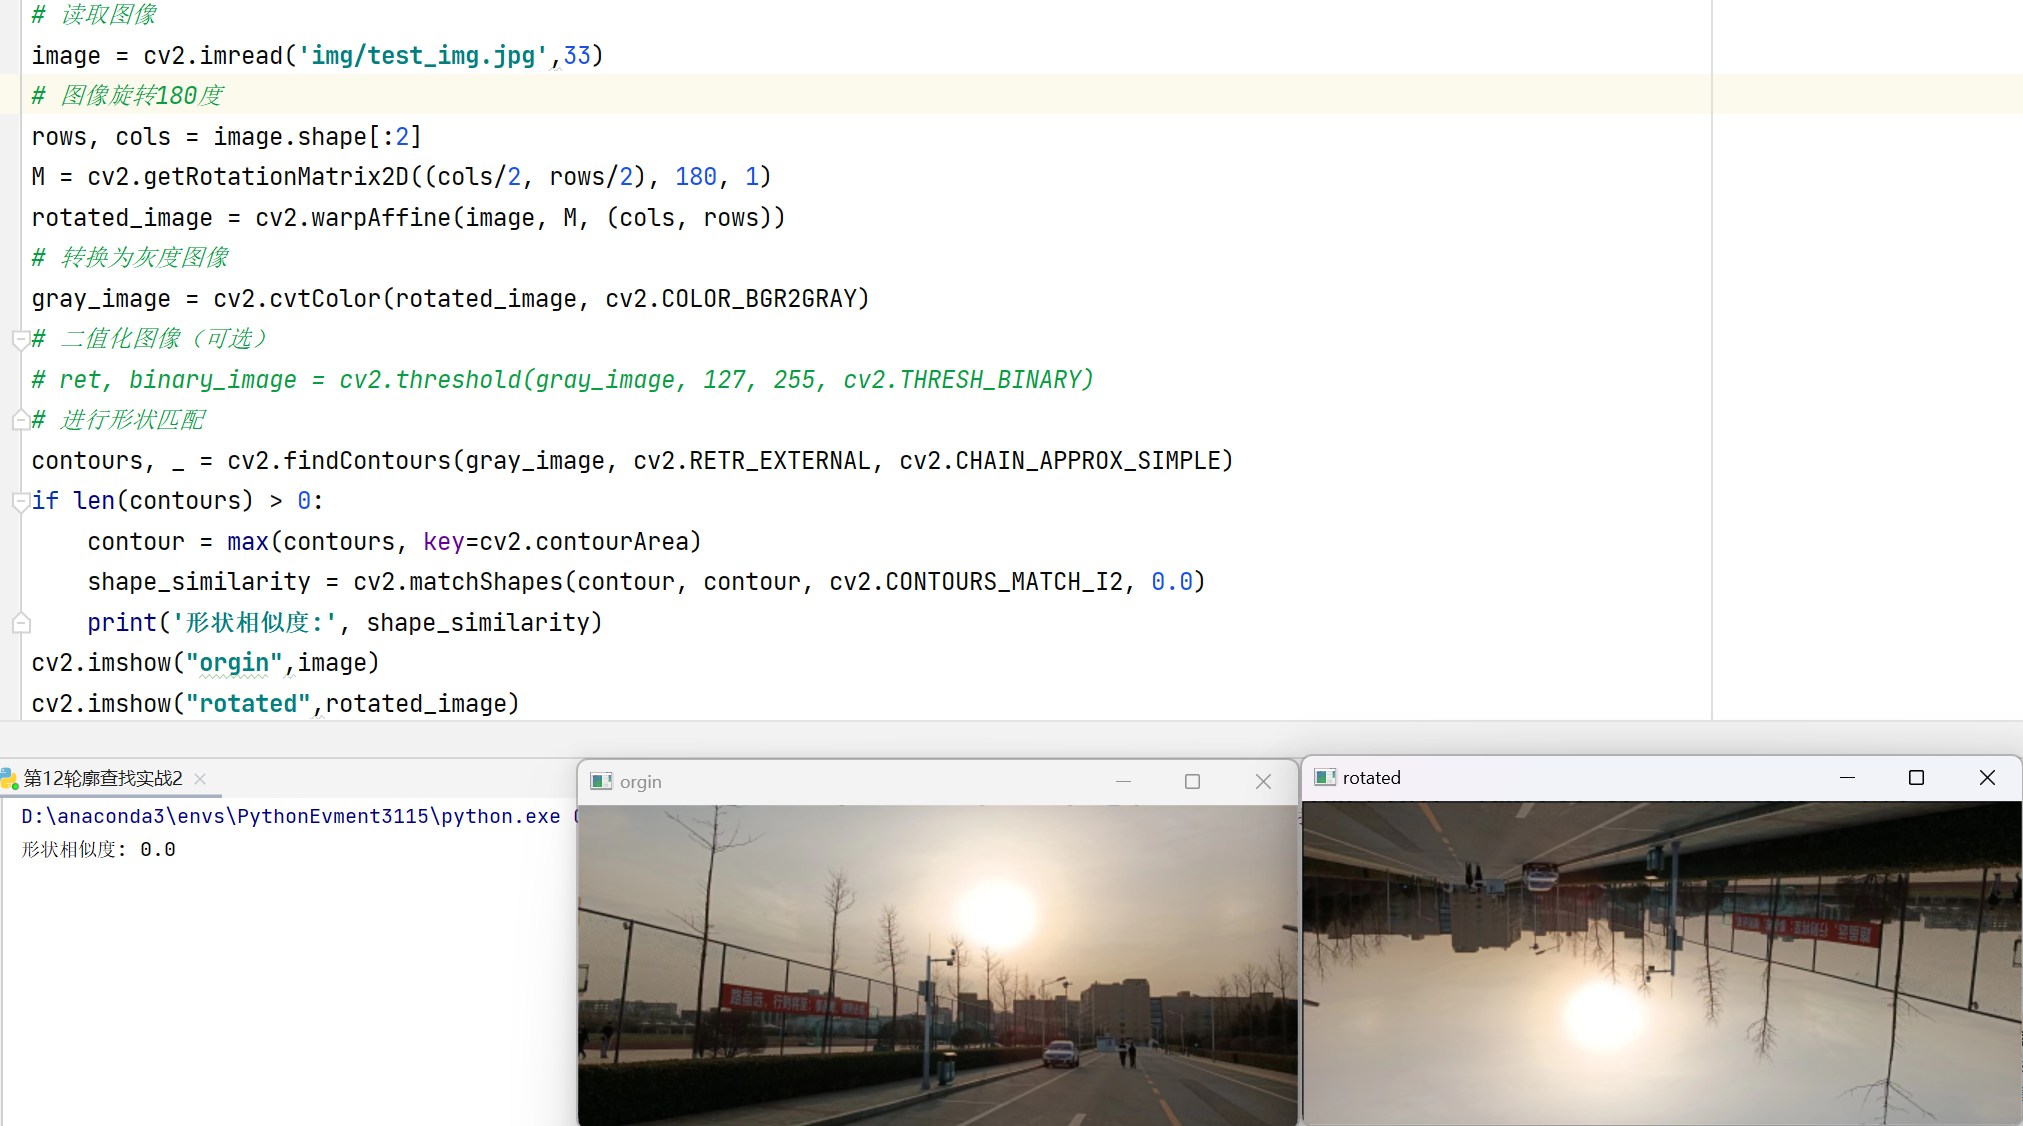
import cv2
# 读取图像
image = cv2.imread('img/test\_img.jpg',33)
# 图像旋转180度
rows, cols = image.shape[:2]
M = cv2.getRotationMatrix2D((cols/2, rows/2), 180, 1)
rotated_image = cv2.warpAffine(image, M, (cols, rows))
# 转换为灰度图像
gray_image = cv2.cvtColor(rotated_image, cv2.COLOR_BGR2GRAY)
# 二值化图像(可选)
# ret, binary\_image = cv2.threshold(gray\_image, 127, 255, cv2.THRESH\_BINARY)
# 进行形状匹配
contours, _ = cv2.findContours(gray_image, cv2.RETR_EXTERNAL, cv2.CHAIN_APPROX_SIMPLE)
if len(contours) > 0:
    contour = max(contours, key=cv2.contourArea)
    shape_similarity = cv2.matchShapes(contour, contour, cv2.CONTOURS_MATCH_I2, 0.0)
    print('形状相似度:', shape_similarity)
cv2.imshow("orgin",image)
cv2.imshow("rotated",rotated_image)
cv2.waitKey()
cv2.destroyAllWindows()
4.2.1 矩形包围cv2.boundingRect( array ): b用于计算给定轮廓或二进制图像的边界矩形。
参数:
array:可以是OpenCV中的轮廓对象,也可以是二值化的图像。轮廓对象是用于表示图像中物体边界的连续曲线,可以通过OpenCV的函数(如cv2.findContours())获得。
返回值:
(x, y, w, h):一个四元组,分别表示边界矩形的左上角点的x坐标和y坐标,以及矩形的宽度和高度。
以下是函数的示例用法:
import cv2
# 读取图像并进行二值化处理
image = cv2.imread('image.jpg')
gray = cv2.cvtColor(image, cv2.COLOR_BGR2GRAY)
_, binary = cv2.threshold(gray, 127, 255, cv2.THRESH_BINARY)
# 寻找图像的轮廓
contours, _ = cv2.findContours(binary, cv2.RETR_EXTERNAL, cv2.CHAIN_APPROX_SIMPLE)
# 遍历轮廓,并计算边界矩形
for contour in contours:
    x, y, w, h = cv2.boundingRect(contour)
    cv2.rectangle(image, (x, y), (x+w, y+h), (0, 255, 0), 2)
# 显示结果图像
cv2.imshow('Bounding Rectangle', image)
cv2.waitKey(0)
cv2.destroyAllWindows()
下面演示六张
(1)
(2)
(3)
(4)
(5)
(6)
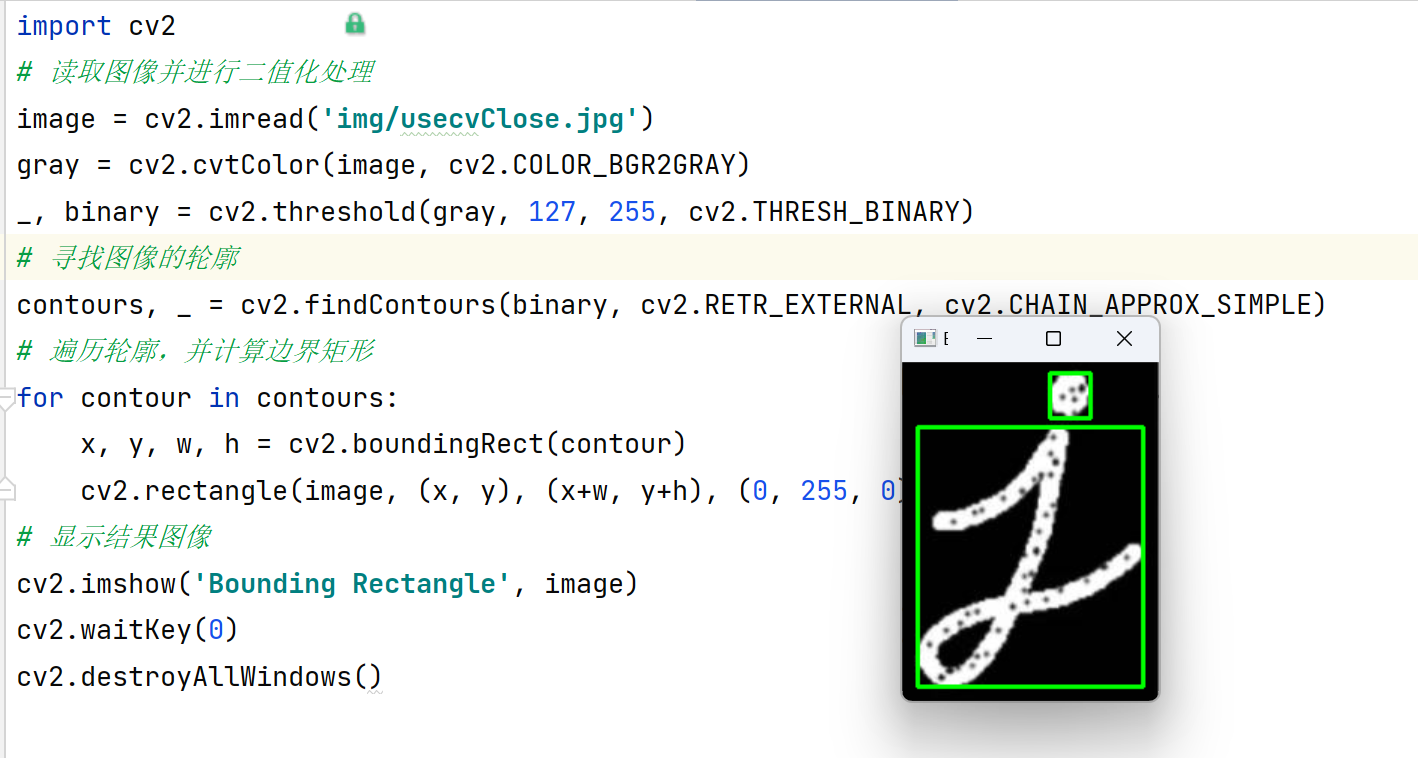
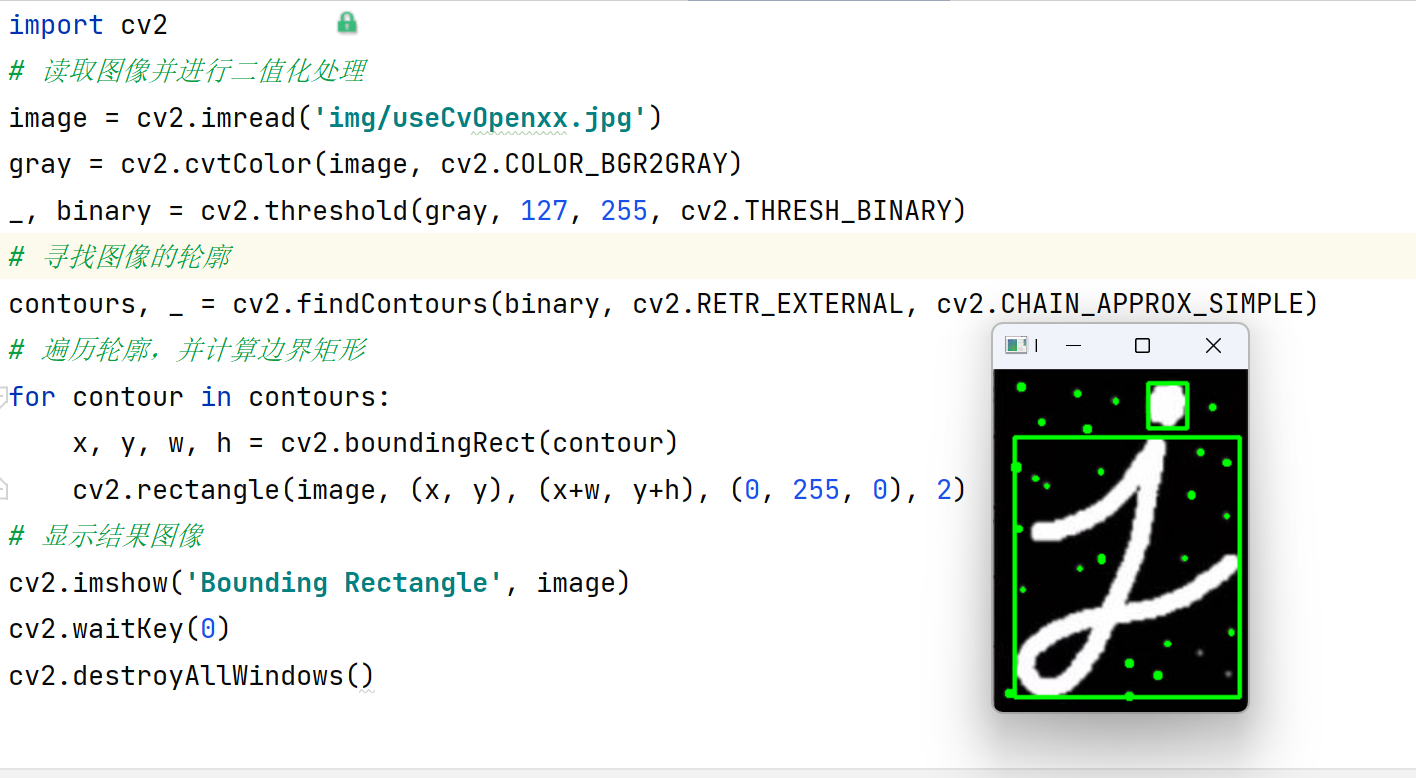

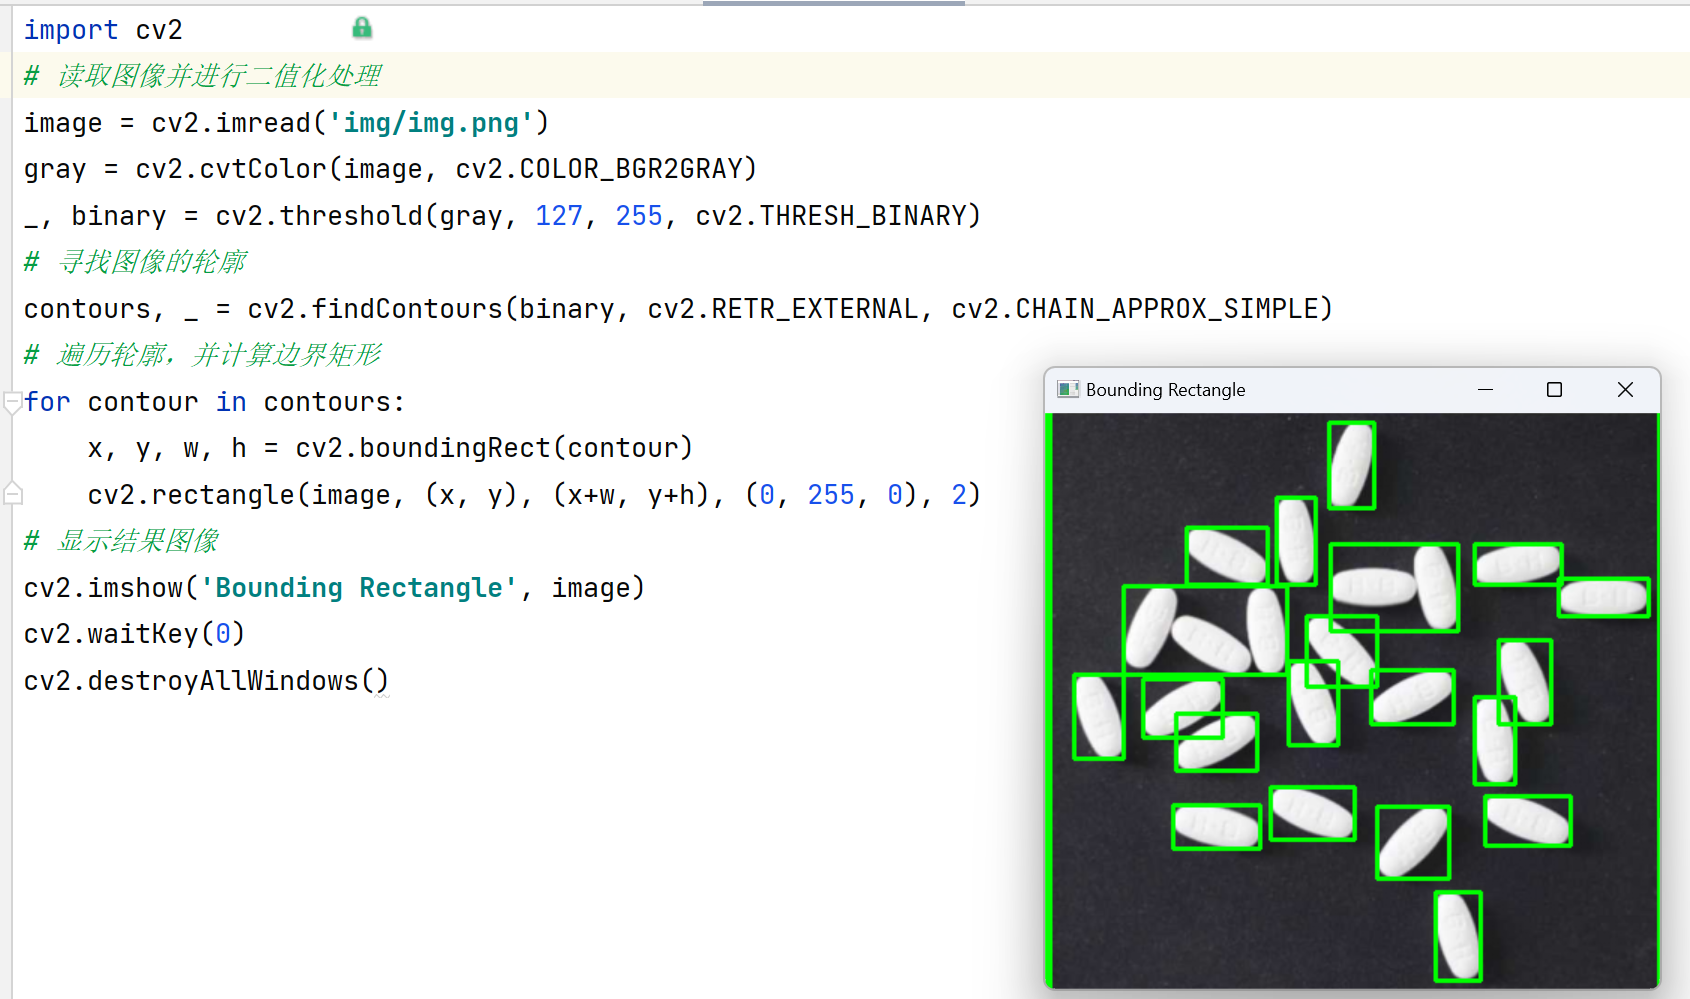
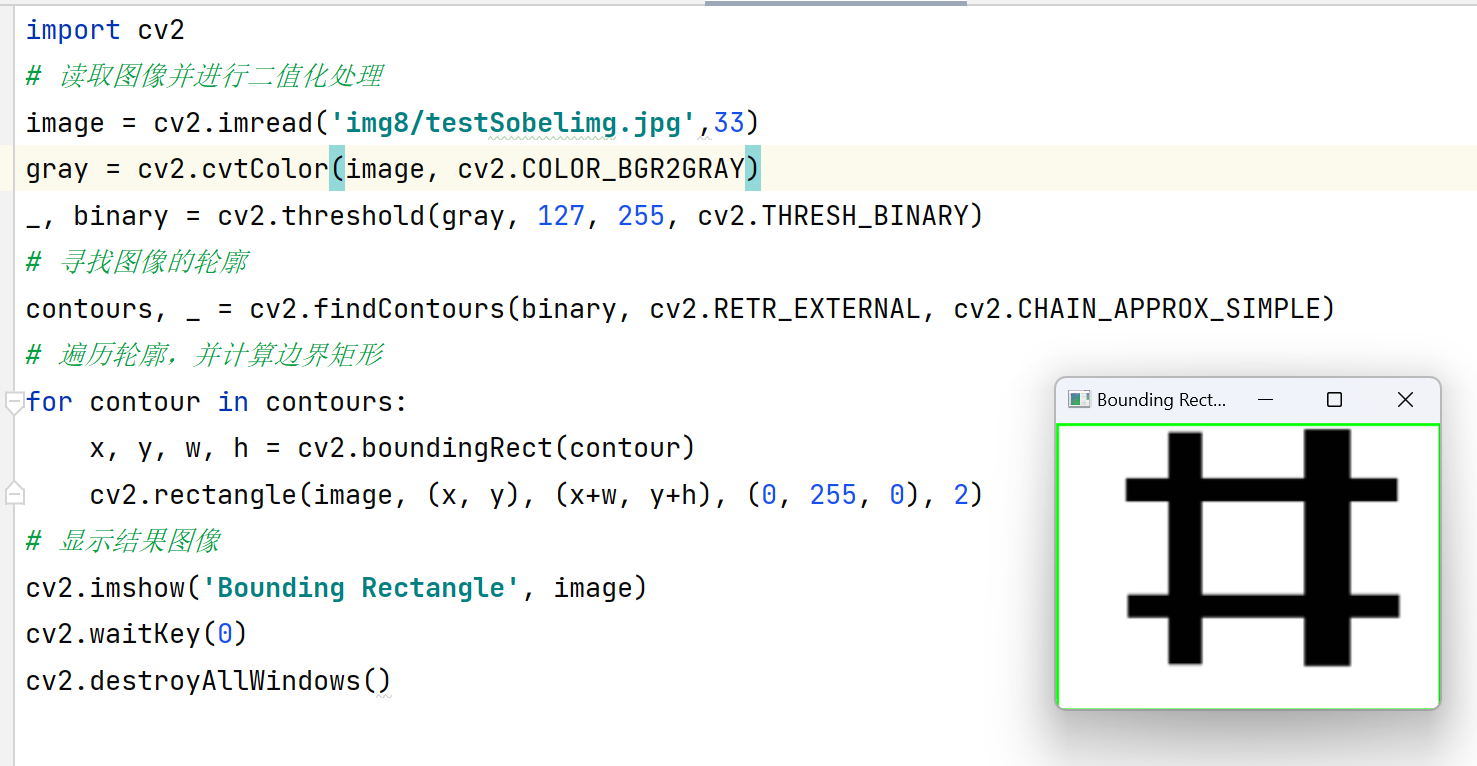
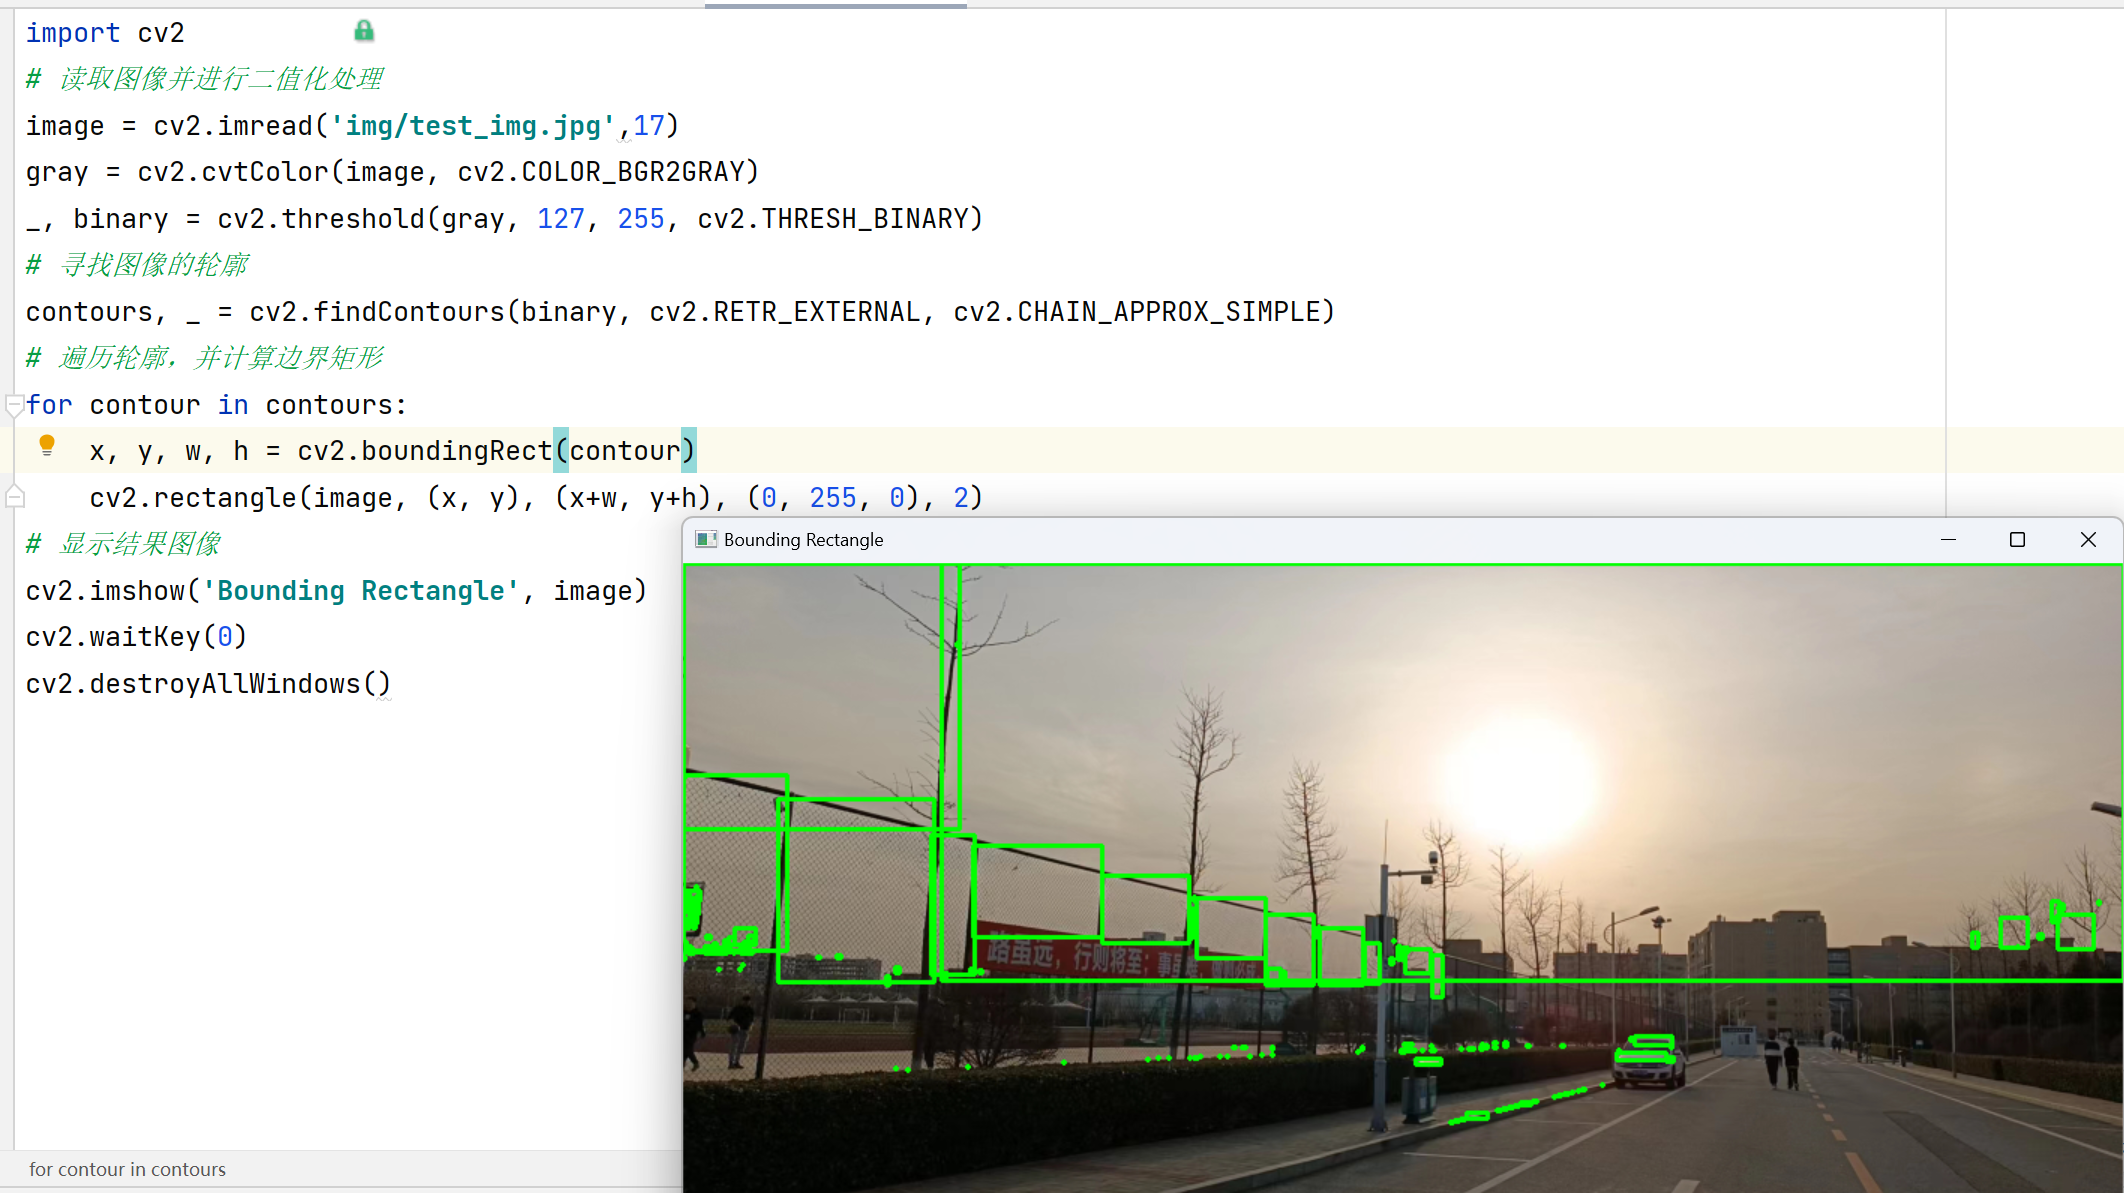
上述代码读取一张图像,将其转换为灰度图像,然后进行二值化处理。接着使用cv2.findContours()函数找到图像中的轮廓。最后,利用cv2.boundingRect()函数计算每个轮廓的边界矩形,并在原图像上绘制矩形。
五、轮廓拟合
5.1 最小包围矩形框
(1) 2D 点集的最小面积的旋转矩形:cv2.minAreaRect()
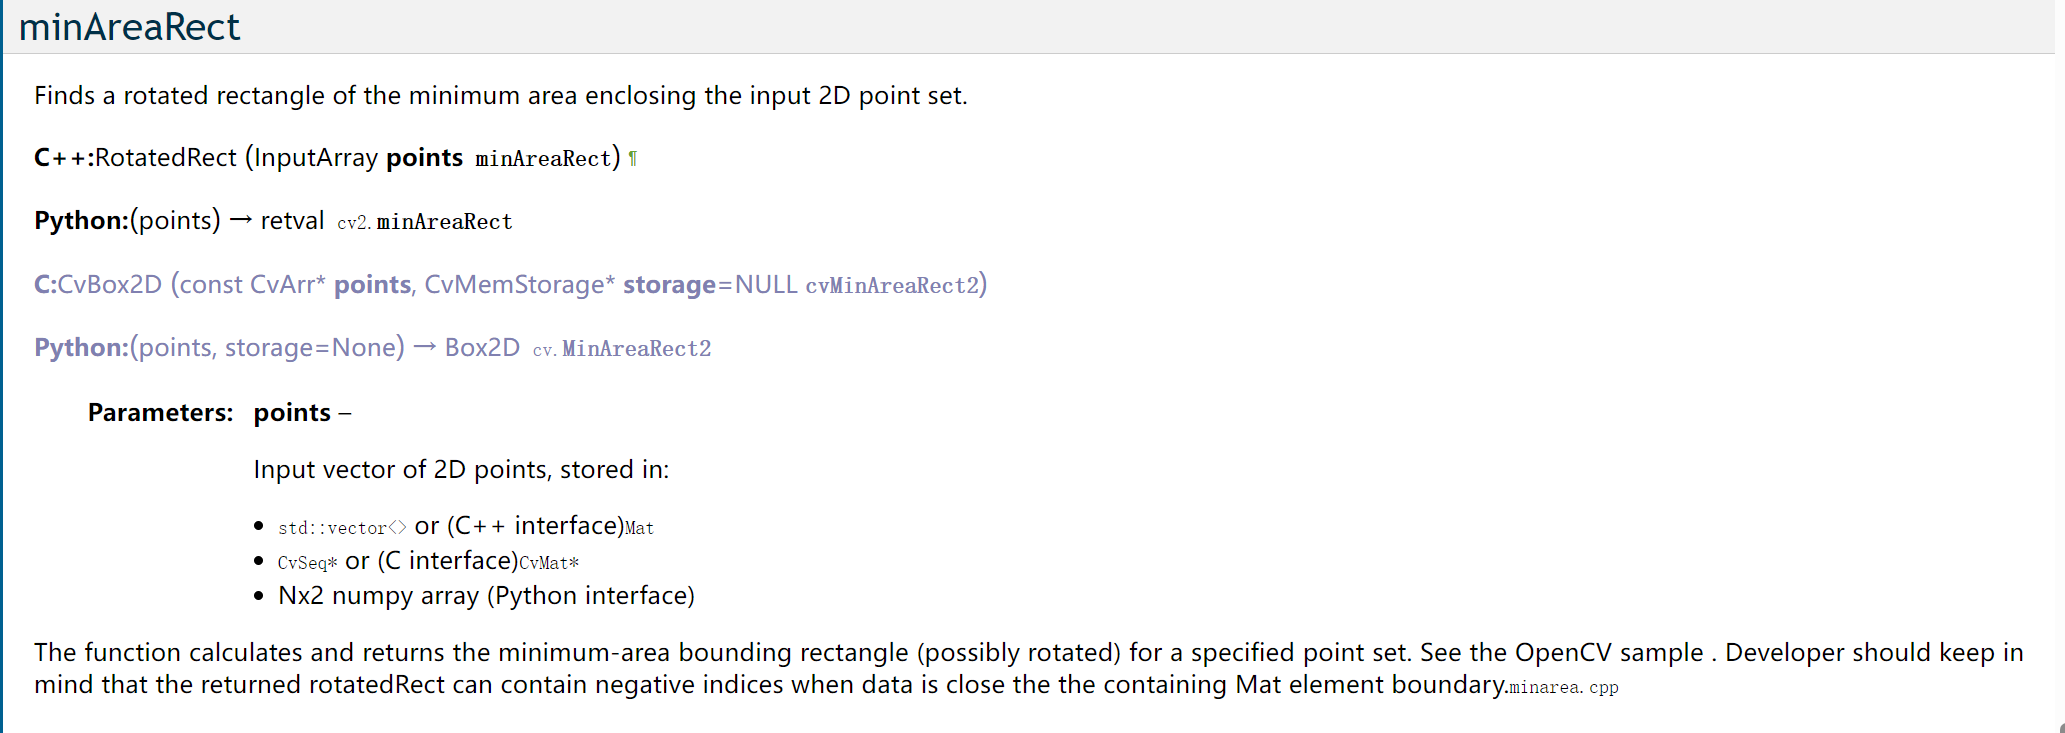
参数:
points:需要计算最小包围矩形的轮廓点集合。可以通过cv2.findContours()等函数获取。
返回值:
retval:最小包围矩形的特征信息,是一个((中心点x, 中心点y),(宽度, 高度),旋转角度)的元组形式。
(中心点x, 中心点y):矩形的中心点坐标。
(宽度, 高度):矩形的宽度和高度(尺寸)。
旋转角度:矩形相对于x轴正方向的顺时针旋转角度(角度范围为-90到0度)。
(2)cv2.drawContour
cv2.drawContours(image, contours, contourIdx, color, thickness)
cv2.drawContours()函数会在原始图像上绘制指定的轮廓,并返回修改后的图像。绘制的轮廓可以用于目标检测、图像分割和形状分析等应用。
需要注意的是,为了使用cv2.drawContours()函数,你需要先找到要绘制的轮廓。通常,可以通过使用cv2.findContours()函数从二值图像或边缘图像中检测轮廓。
参数
image: 要绘制轮廓的图像。可以是单通道灰度图像或三通道彩色图像。
contours: 轮廓数组。每个轮廓由一组点构成,通常由cv2.findContours()函数返回。
contourIdx: 指定要绘制的轮廓的索引。如果为负数,则绘制所有的轮廓。
color: 绘制轮廓的颜色。可以是单个整数值(灰度图像)或三个整数值(彩色图像)。
thickness: 绘制轮廓的线条粗细。如果为负数或cv2.FILLED,则填充轮廓内部。
通过调用cv2.drawContours()函数,可以在指定图像上绘制轮廓
cv2.findContours
(contours, _) = cv2.findContours(image, cv2.RETR_EXTERNAL, cv2.CHAIN_APPROX_SIMPLE)
在上述代码中,cv2.findContours()函数会返回一个存储轮廓的列表,以及其他相关信息。然后,你可以根据需要选择指定的轮廓,并使用cv2.drawContours()函数在图像上绘制它们。
请注意,以上是对cv2.drawContours()函数的基础介绍。实际使用中,你可能需要根据具体情况调整参数,并结合其他函数和技术来完成更复杂的图像处理任务
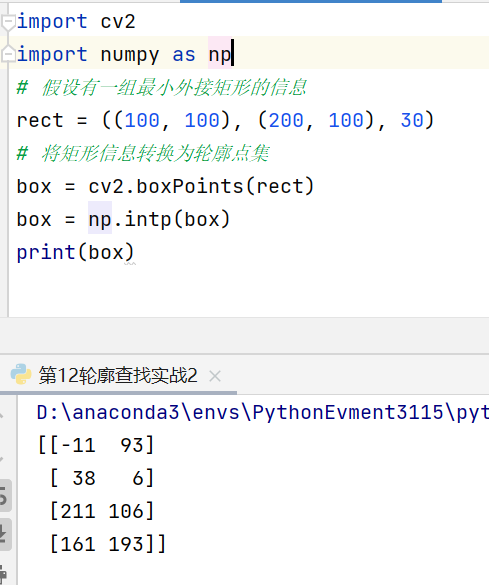
(3)cv2.boxPoints() 用于将cv2.minAreaRect()返回的矩形信息转换为符合要求的轮廓点集结构
将矩形的四个角点坐标转换为轮廓点集形式,以便可以直接传递给cv2.drawContours()函数进行绘制。
cv2.boxPoints()的参数是矩形的信息box,它是从cv2.minAreaRect()返回的矩形信息中获得的。box表示最小外接矩形的四个顶点坐标,每个顶点坐标有两个值(x, y)。返回的结果是一个NumPy数组,包含了四个顶点的坐标,每个坐标为一个二维点
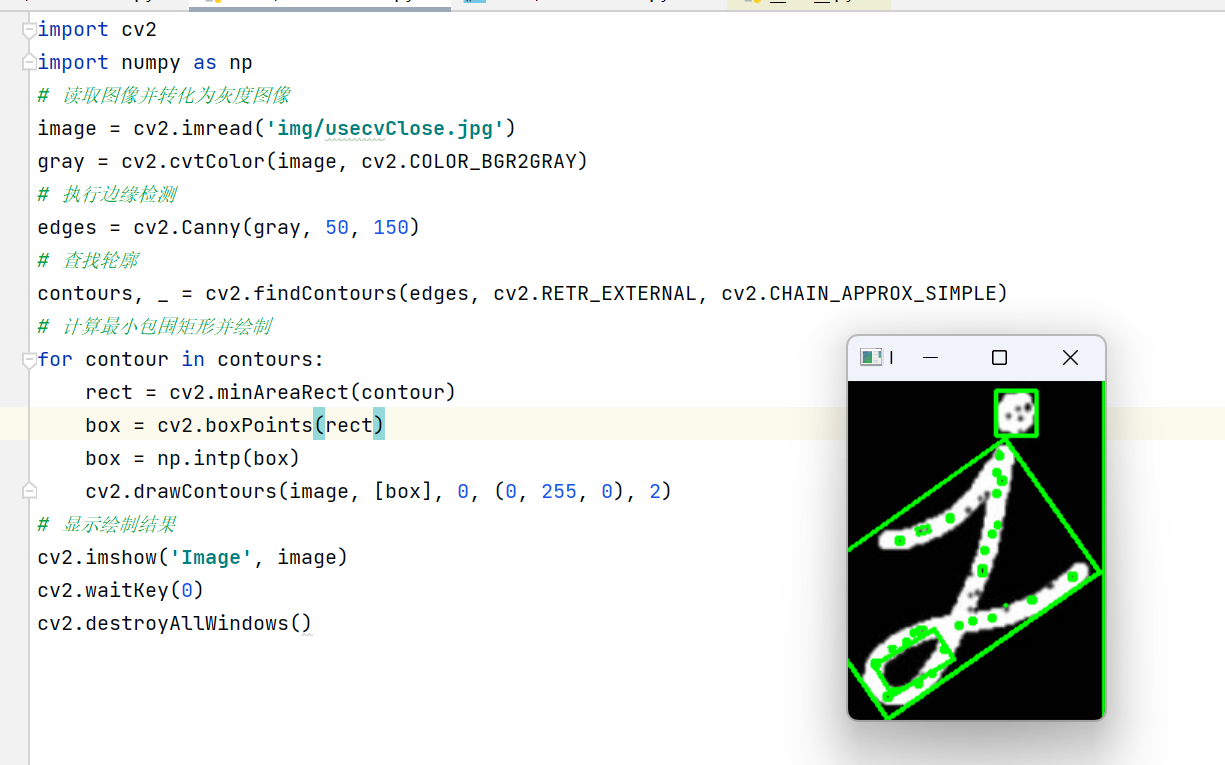
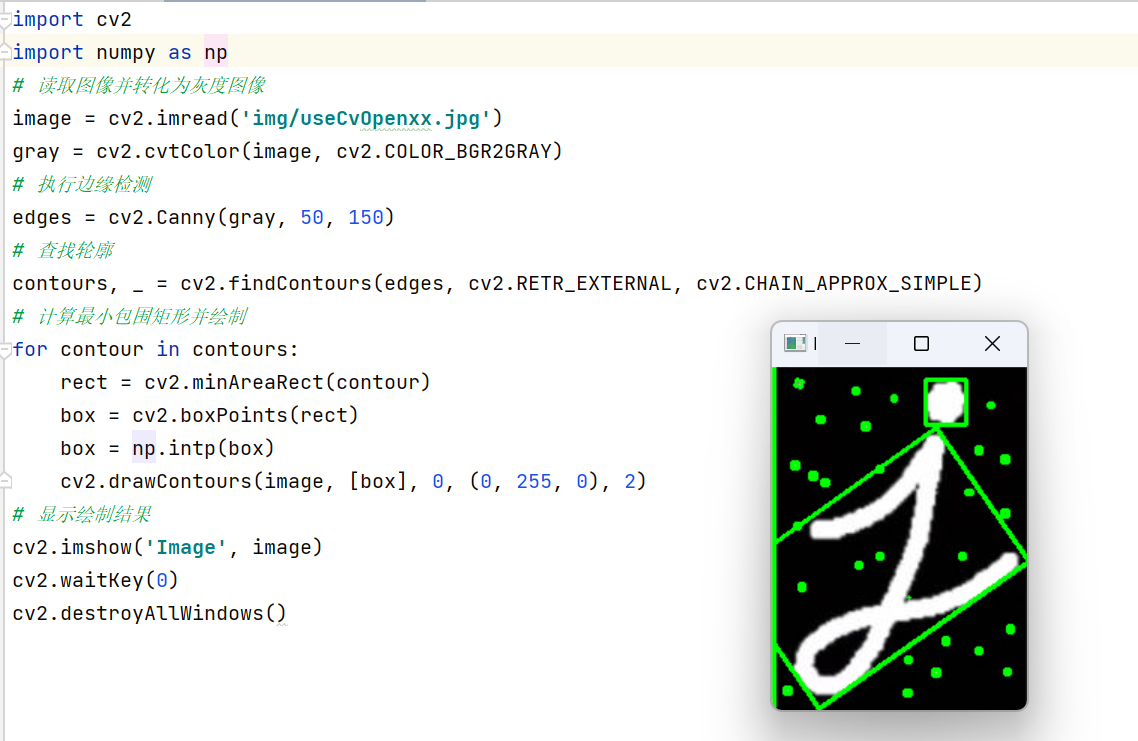
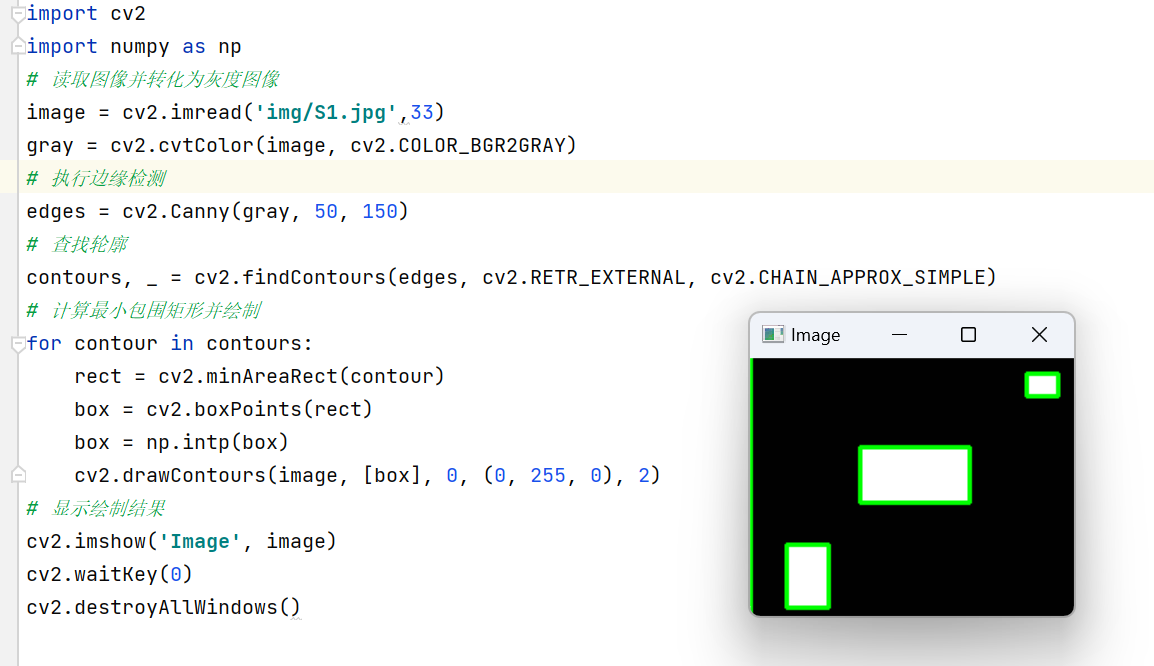
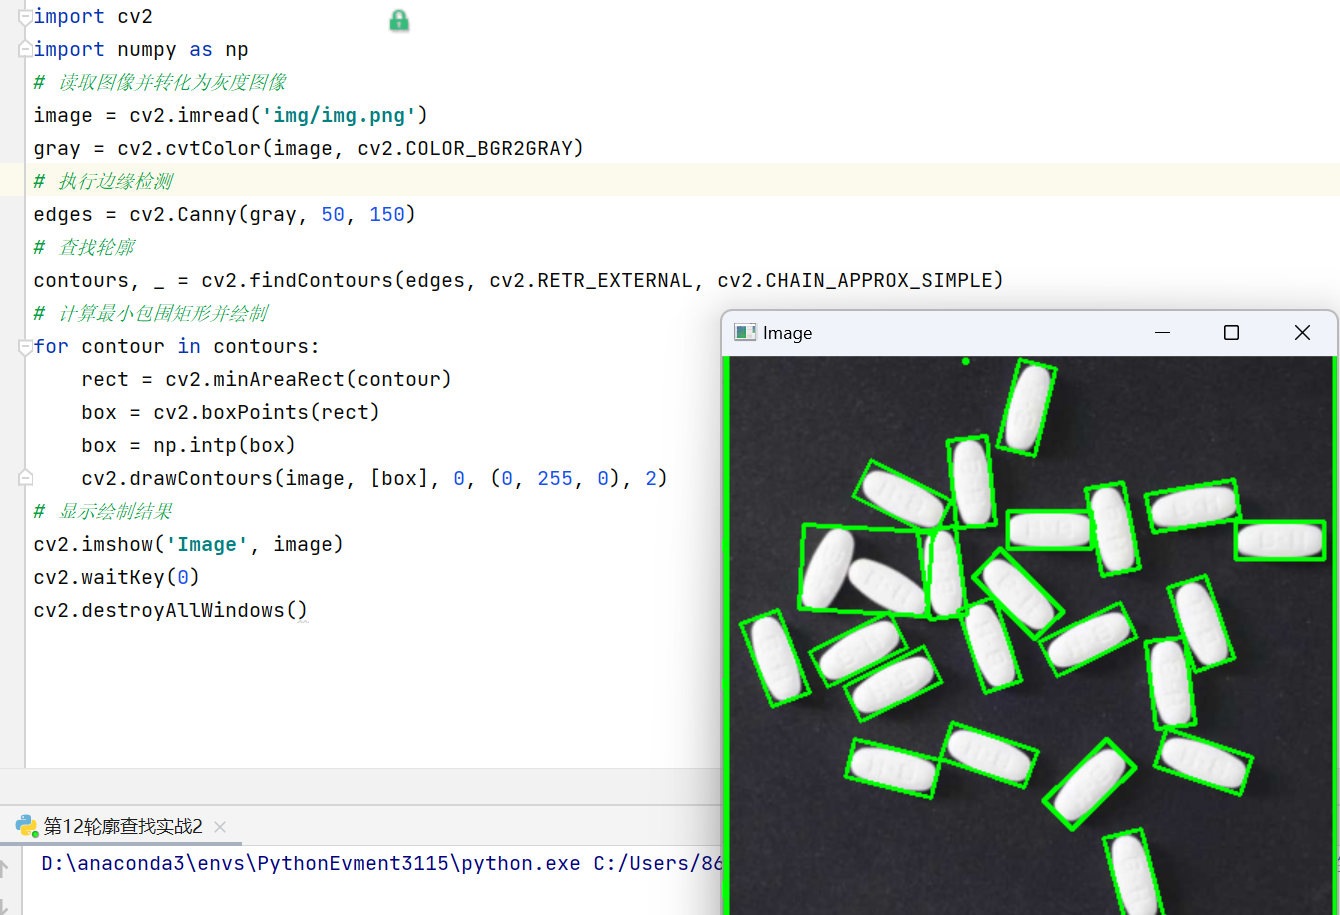
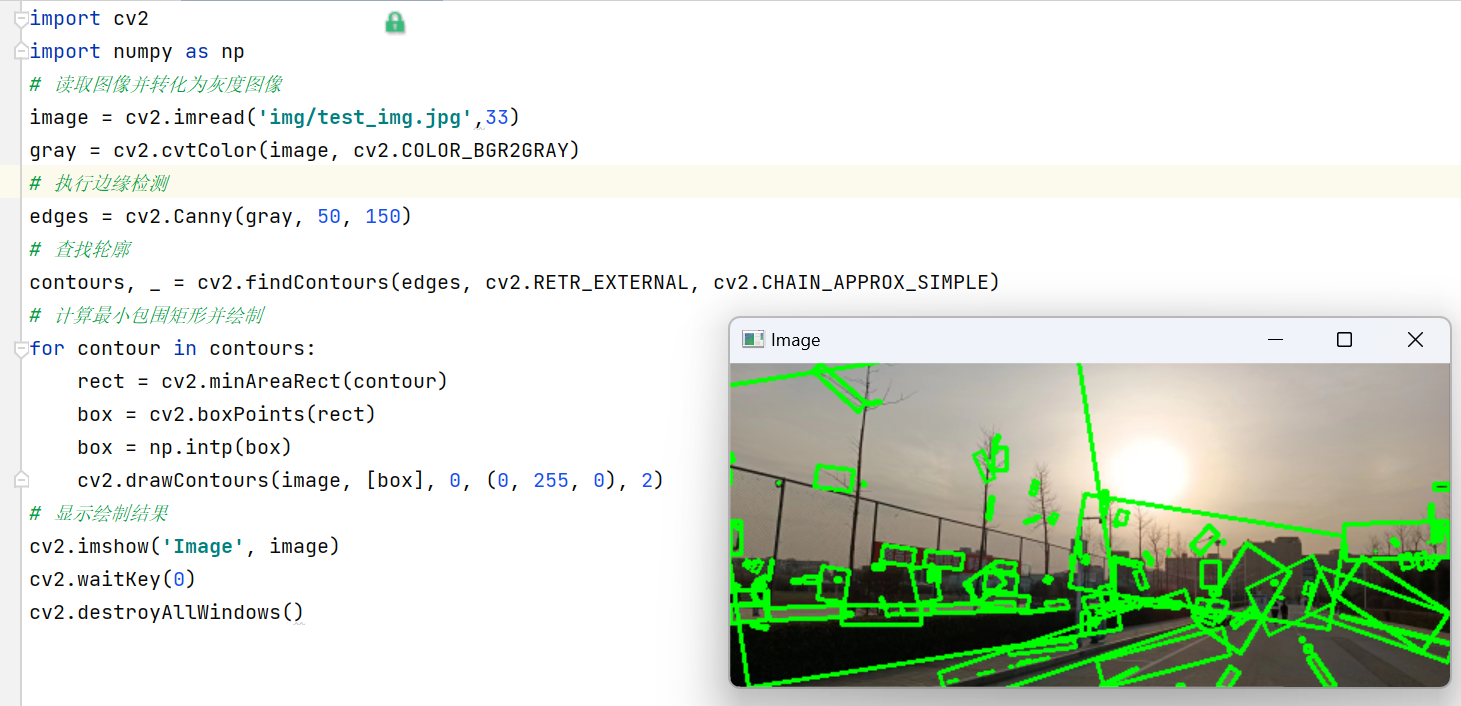
(4)Demo
import cv2
import numpy as np
# 读取图像并转化为灰度图像
image = cv2.imread('img/usecvClose.jpg')
gray = cv2.cvtColor(image, cv2.COLOR_BGR2GRAY)
# 执行边缘检测
edges = cv2.Canny(gray, 50, 150)
# 查找轮廓
contours, _ = cv2.findContours(edges, cv2.RETR_EXTERNAL, cv2.CHAIN_APPROX_SIMPLE)
# 计算最小包围矩形并绘制
for contour in contours:
    rect = cv2.minAreaRect(contour)
    box = cv2.boxPoints(rect)
    box = np.intp(box)
    cv2.drawContours(image, [box], 0, (0, 255, 0), 2)
# 显示绘制结果
cv2.imshow('Image', image)
cv2.waitKey(0)
cv2.destroyAllWindows()
(1)
(2)
(3)
(4)
(5)
5.2 最小包围圆形
5.2.1 查找包围 2D 点集的最小面积的圆 cv2.minEnclosingCircle()
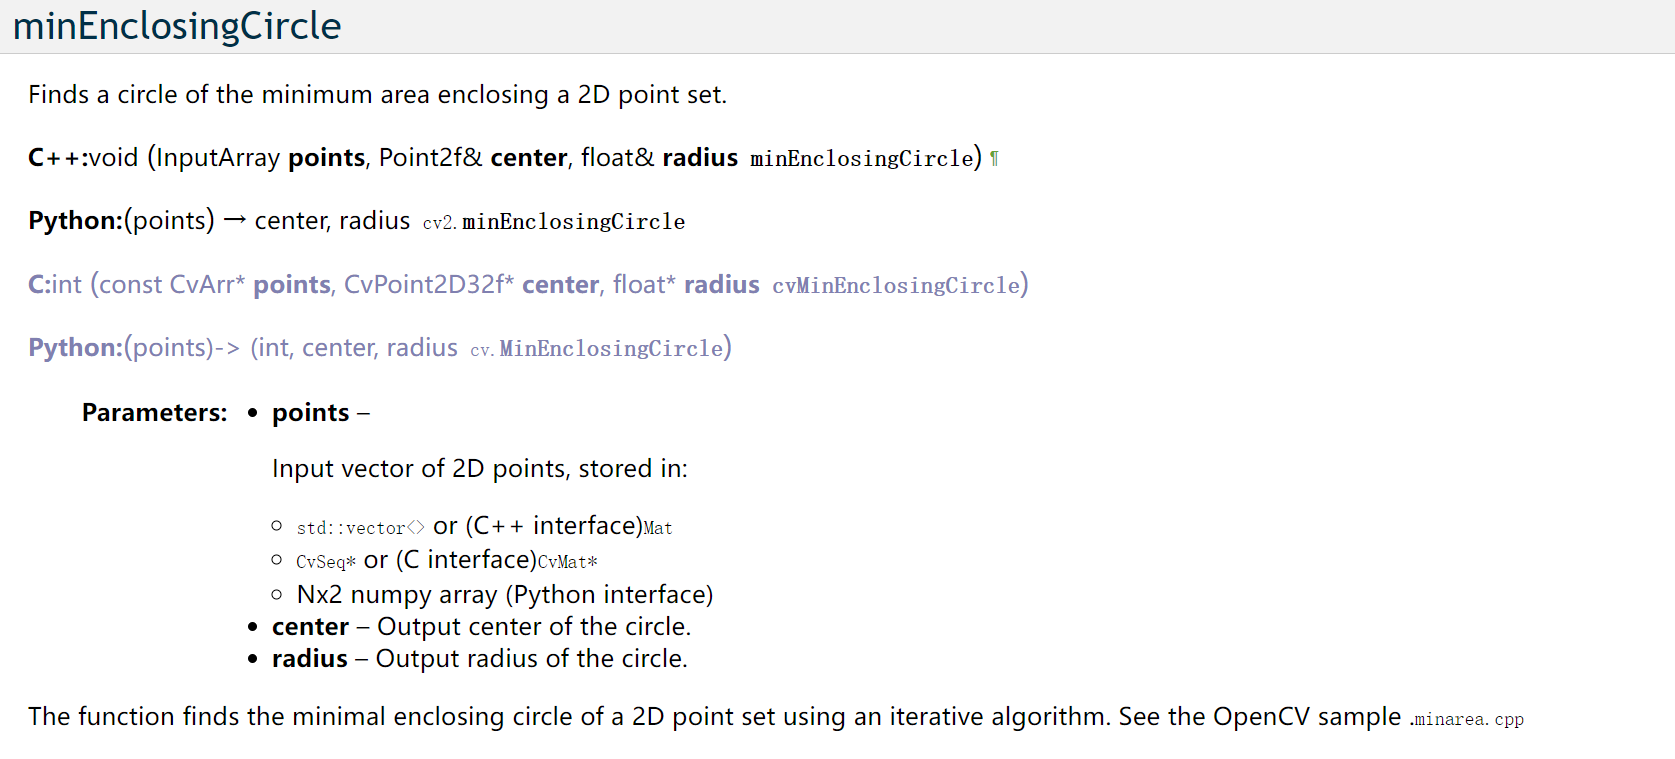
(center, radius) = cv2.minEnclosingCircle(points)
参数
points:输入的点集,可以是一个2D的numpy数组,每个点的坐标为(points[i][0], points[i][1])。
返回值:
center:返回最小外接圆的圆心坐标,类型是一个元组,表示为(center_x, center_y)。
radius:返回最小外接圆的半径。
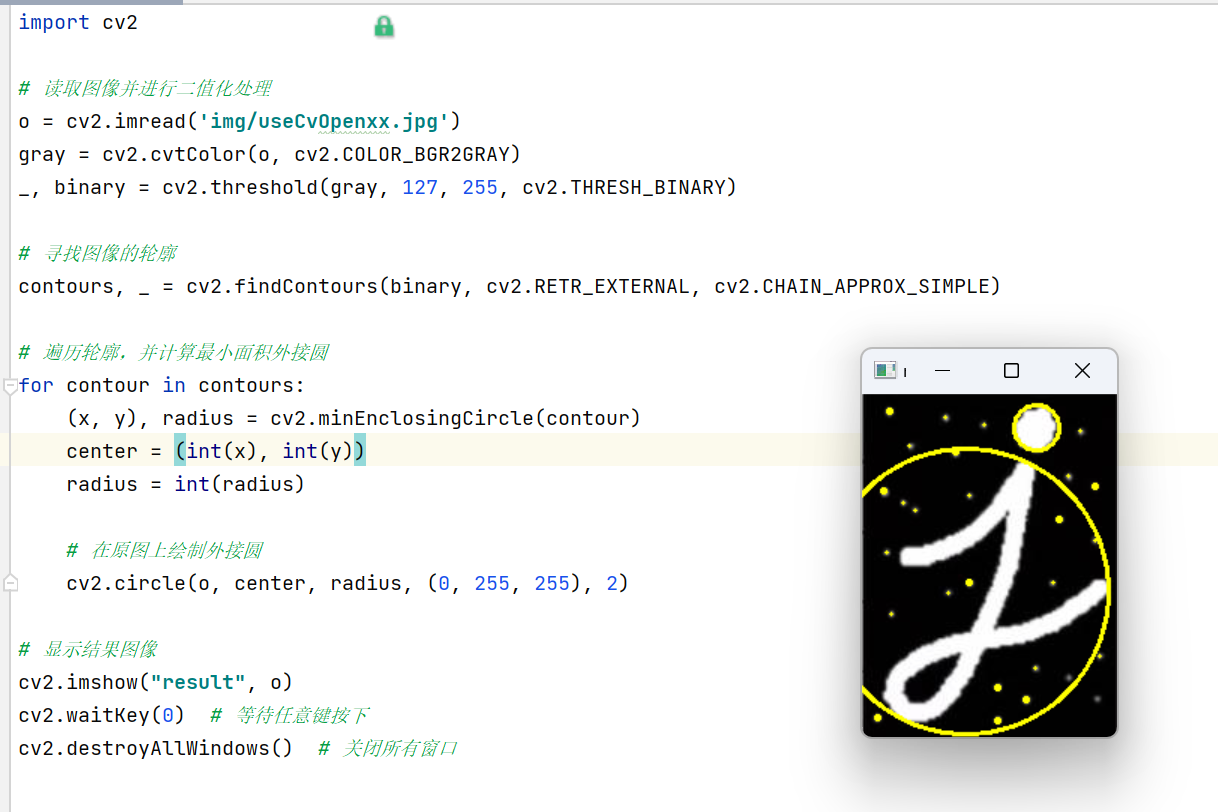
5.2.2 Demo
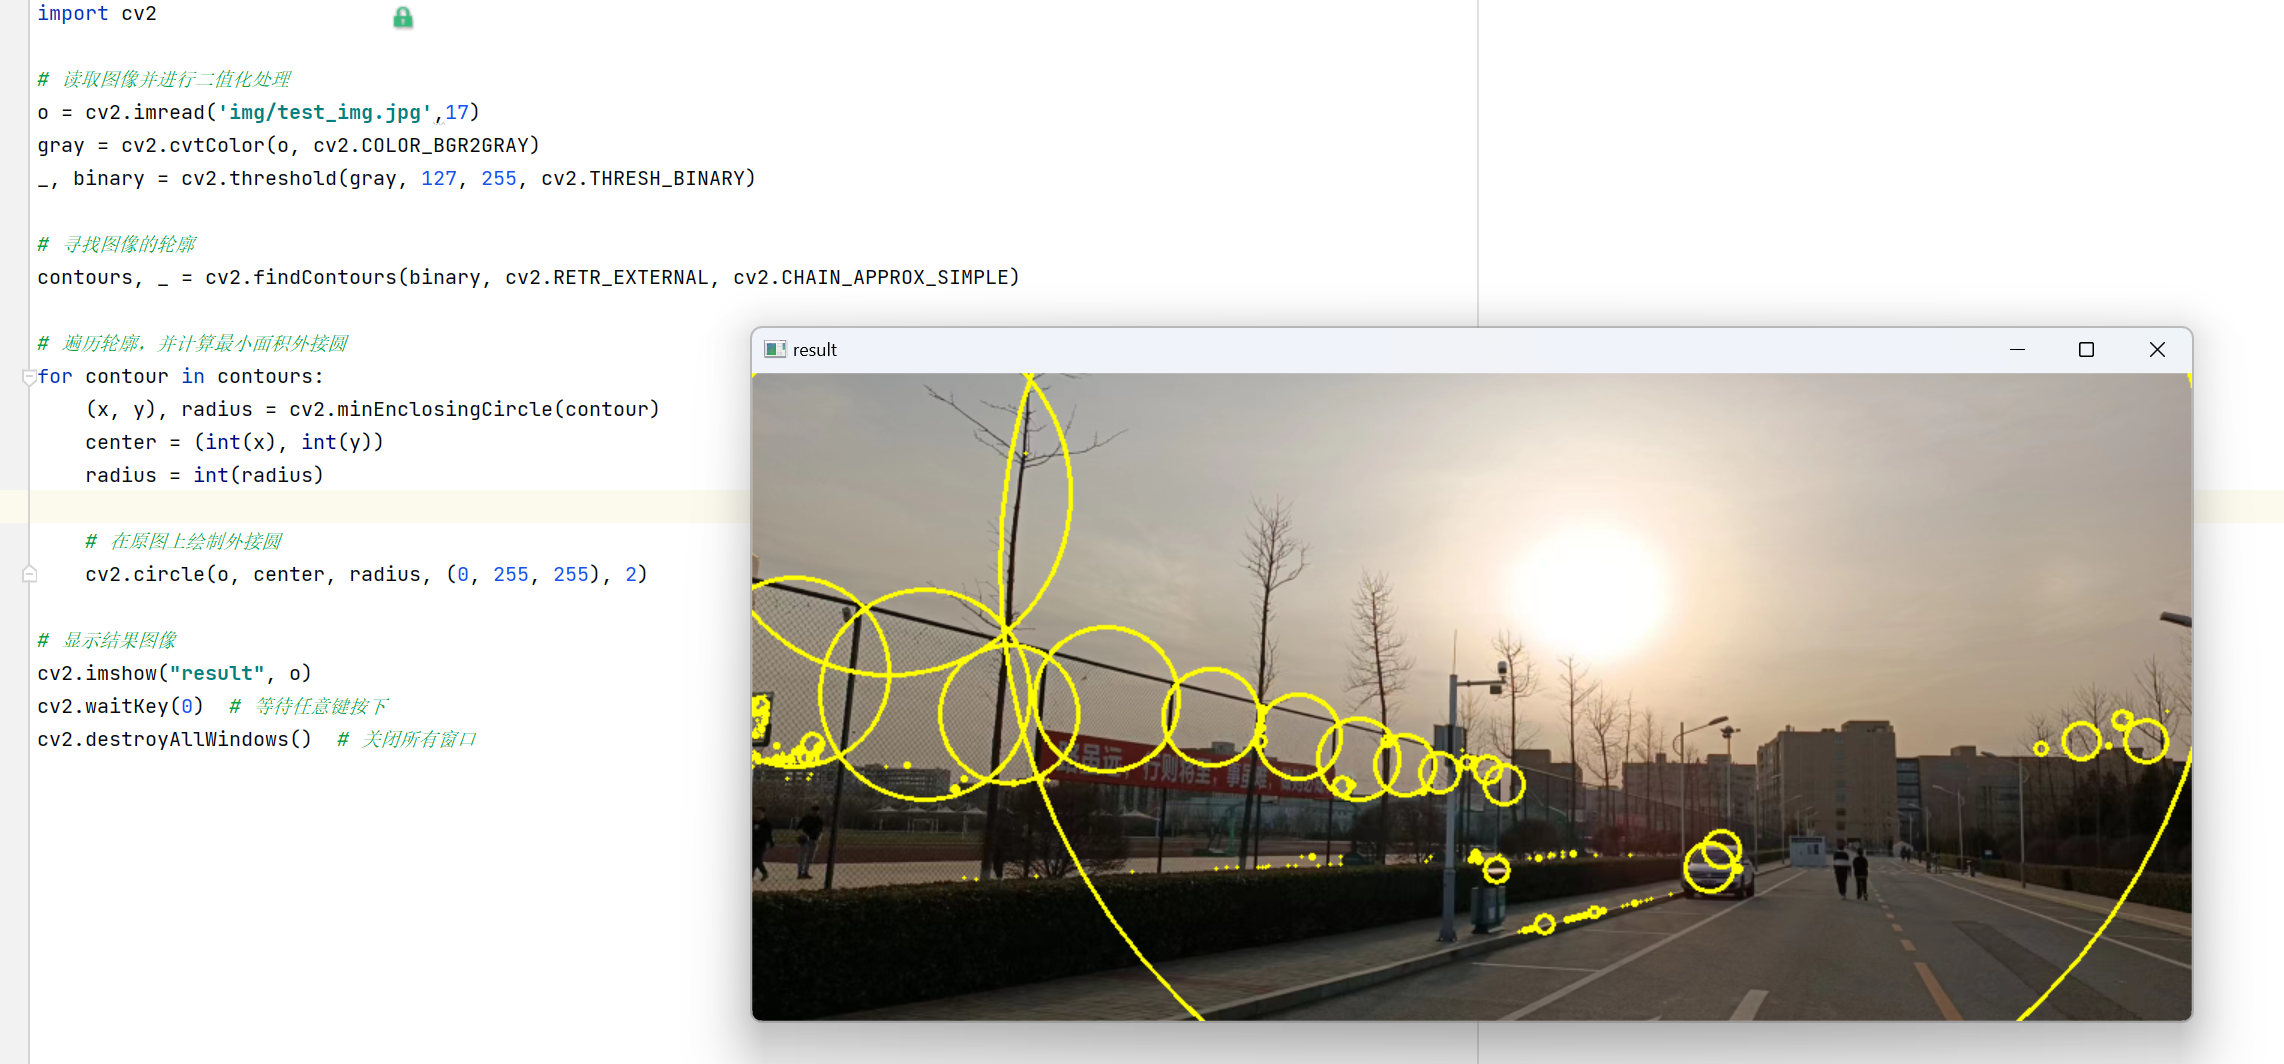
import cv2

# 读取图像并进行二值化处理
o = cv2.imread('img/useCvOpenxx.jpg')
gray = cv2.cvtColor(o, cv2.COLOR_BGR2GRAY)
_, binary = cv2.threshold(gray, 127, 255, cv2.THRESH_BINARY)

# 寻找图像的轮廓
contours, _ = cv2.findContours(binary, cv2.RETR_EXTERNAL, cv2.CHAIN_APPROX_SIMPLE)

# 遍历轮廓,并计算最小面积外接圆
for contour in contours:
    (x, y), radius = cv2.minEnclosingCircle(contour)
    center = (int(x), int(y))
    radius = int(radius)

    # 在原图上绘制外接圆
    cv2.circle(o, center, radius, (0, 255, 255), 2)

# 显示结果图像
cv2.imshow("result", o)
cv2.waitKey(0)  # 等待任意键按下
cv2.destroyAllWindows()  # 关闭所有窗口
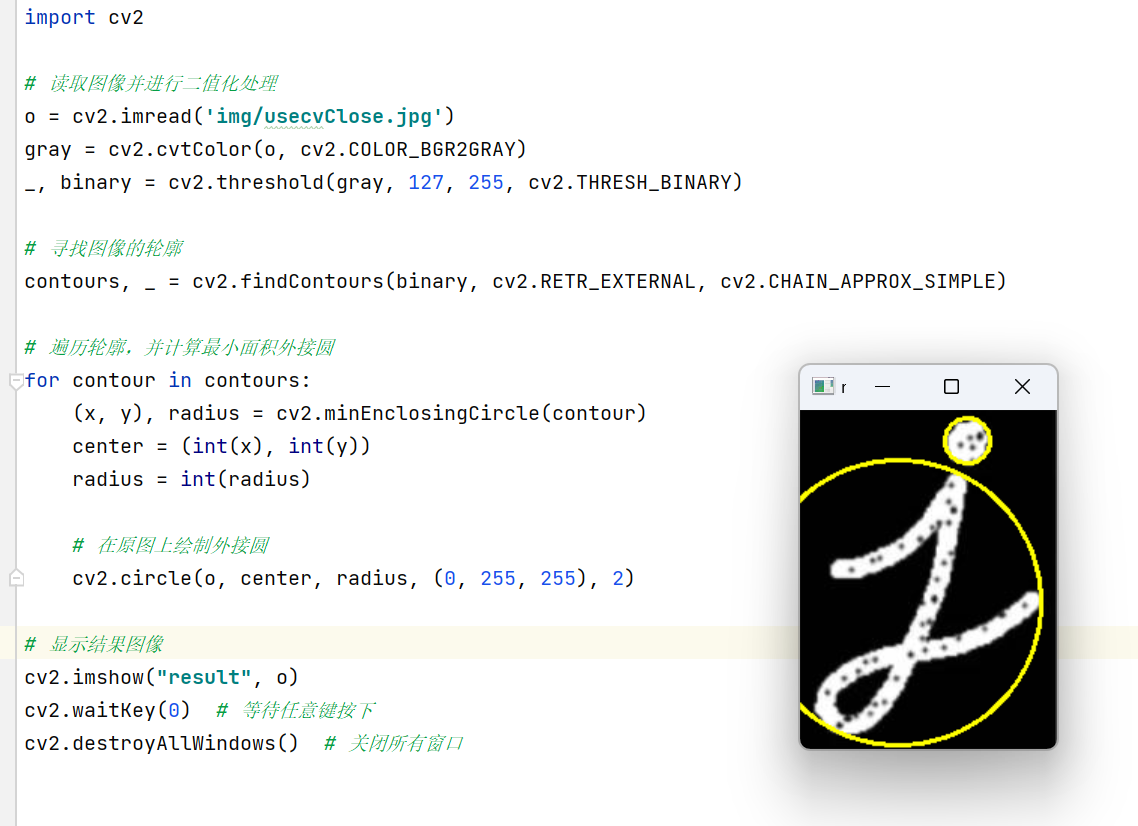
演示
(1)
(2)
(3)(4) 关于半圆的差异,可能的原因有多种:
【1】图像读取的问题:如果这些数值碰巧影响了图像读取的质量或者是否包含透明通道等特性,那么在轮廓检测和外接圆计算时就可能出现不同的结果。
【2】边缘处理:由于二值化阈值选取、轮廓查找方法等因素,对于不同读取方式得到的图像,在边缘处可能存在细微差别,这可能导致部分轮廓未被正确识别。
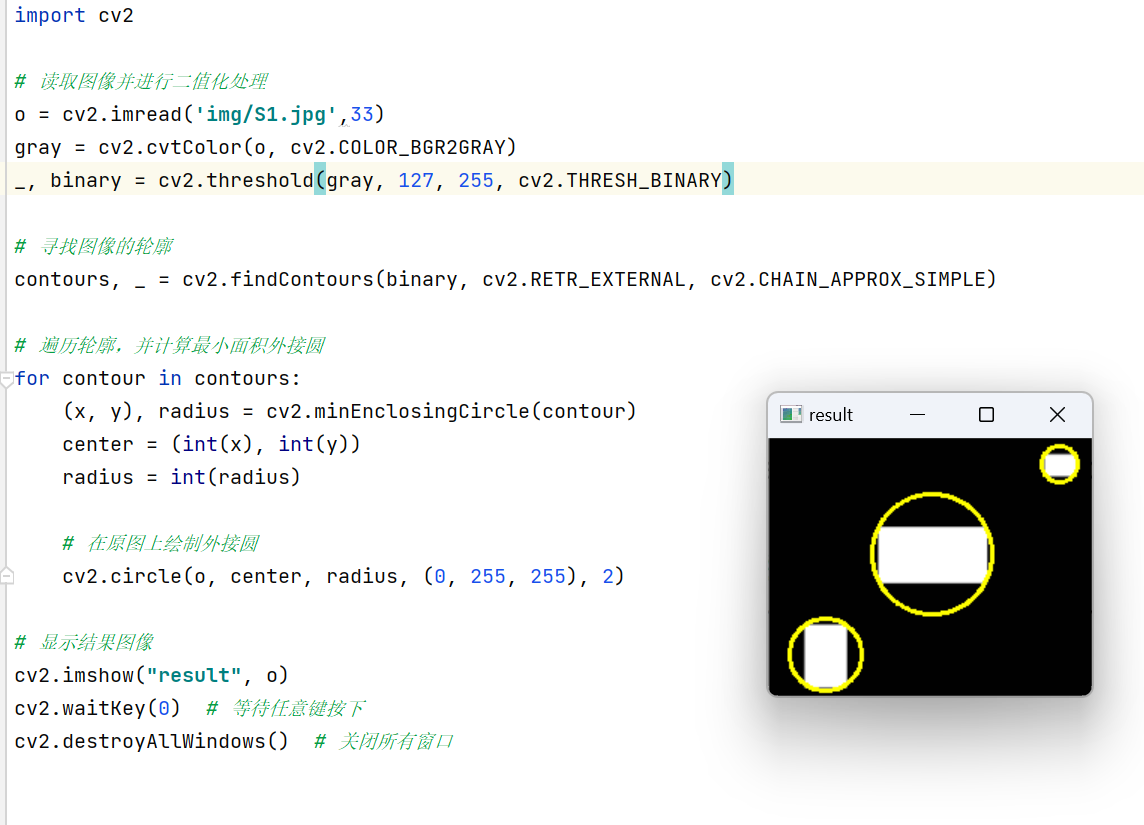
(3)
17>(4)
33(5)
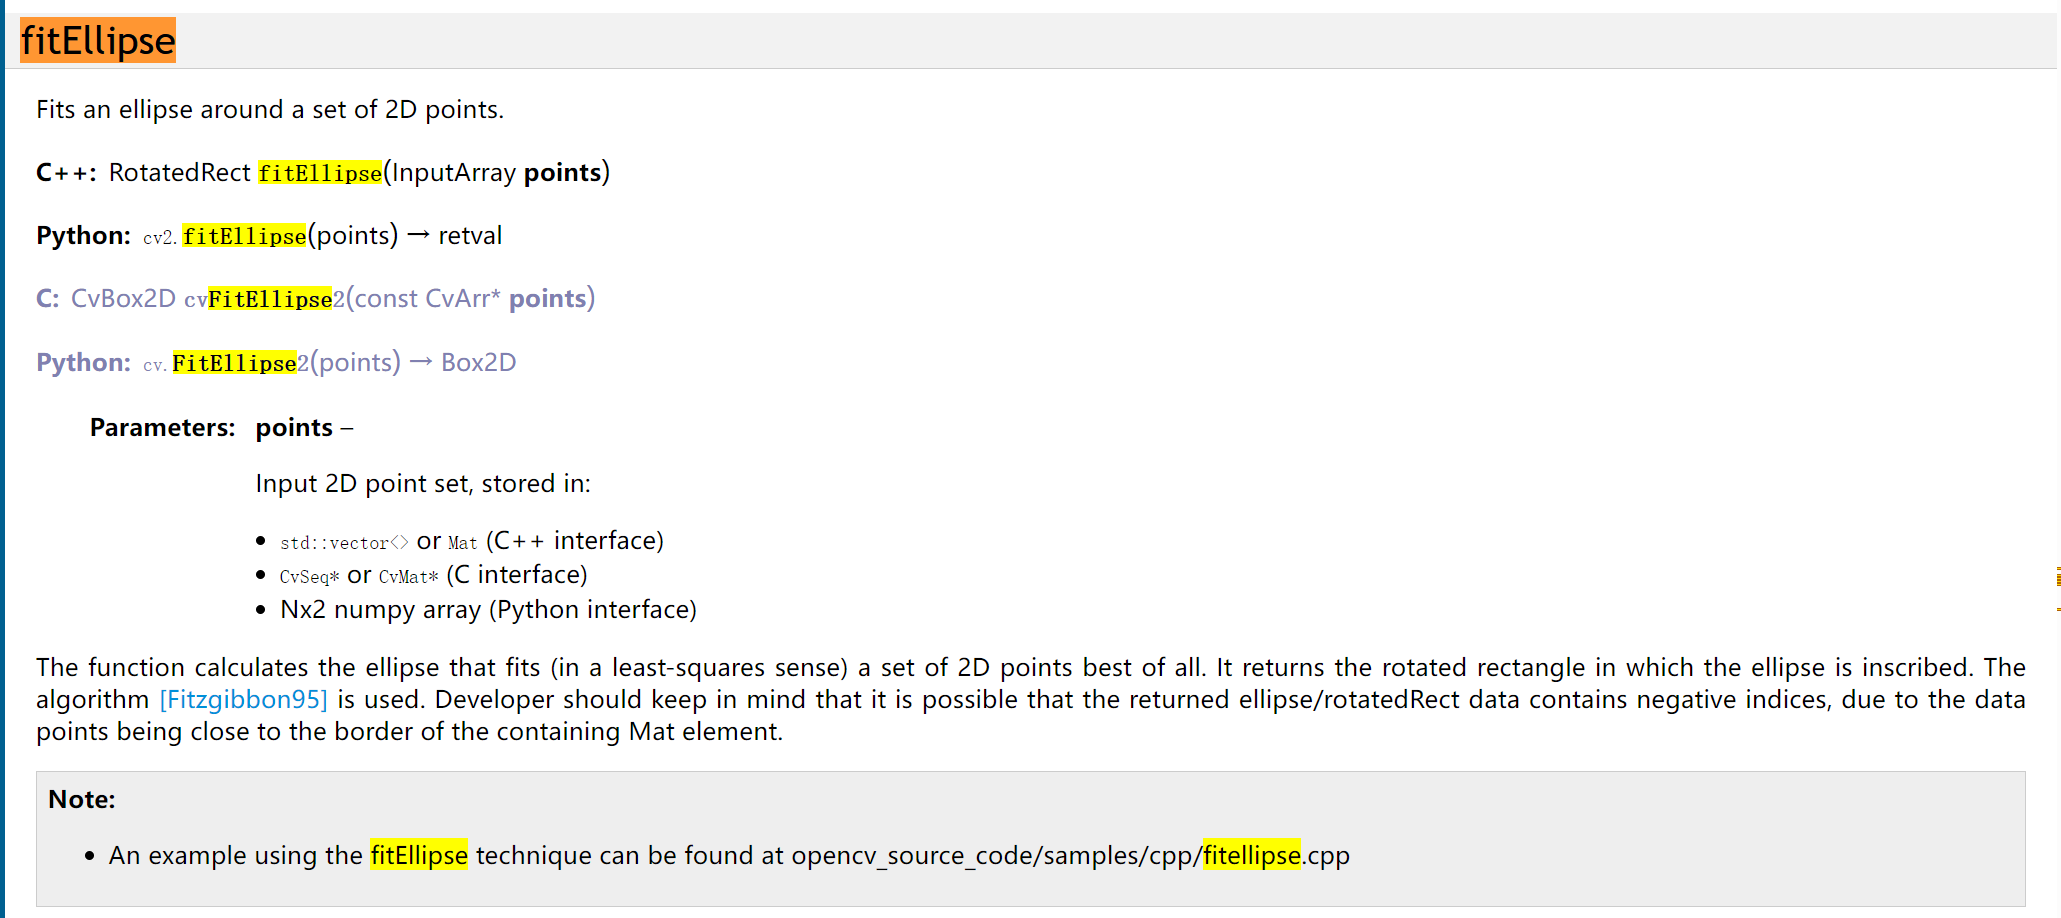
5.3 最优拟合椭圆
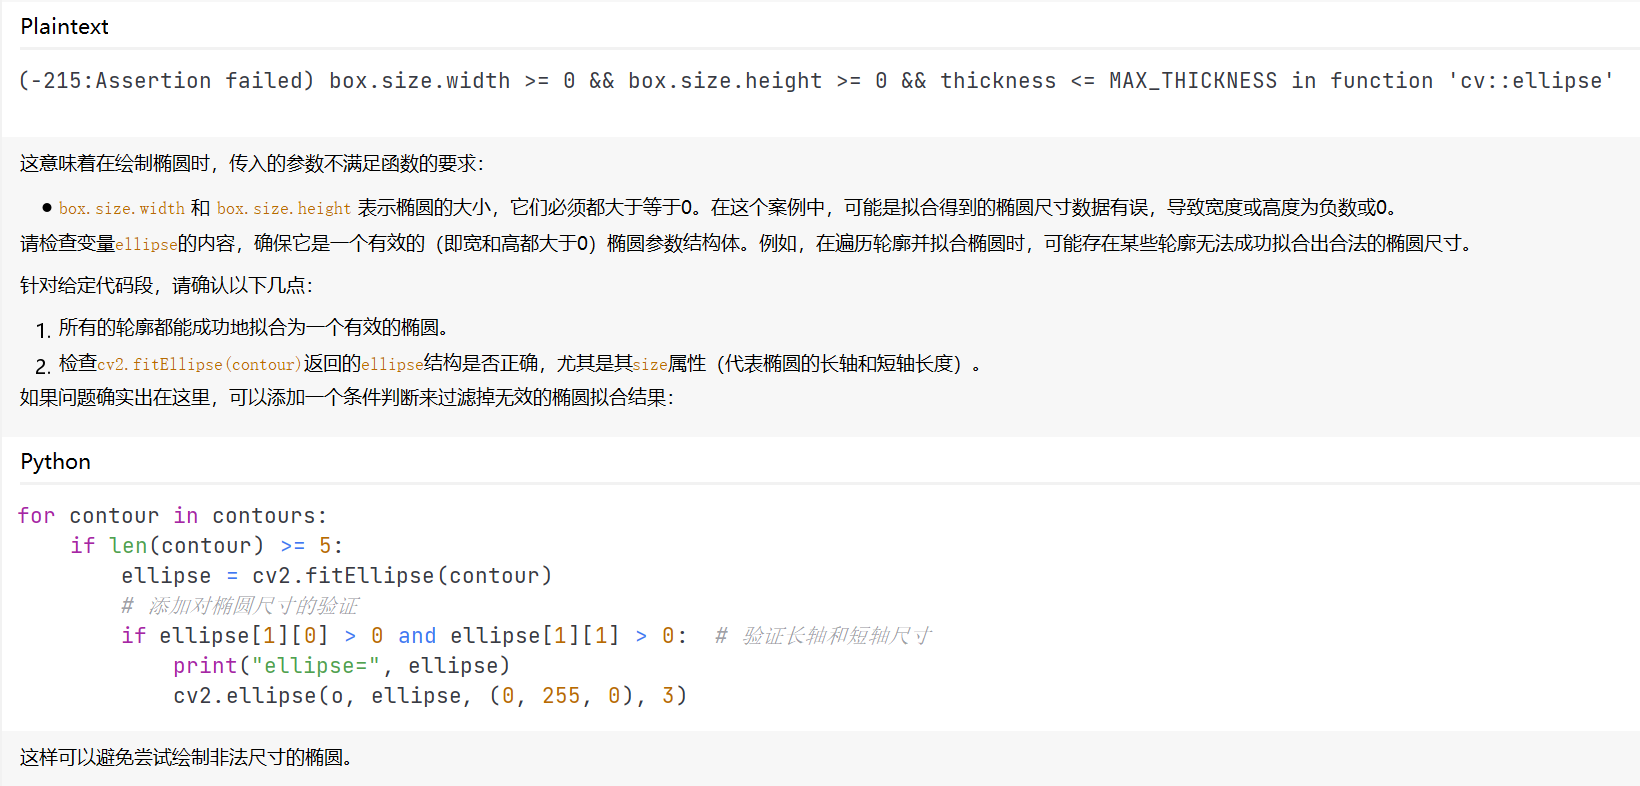
cv2.fitEllipse函数要求轮廓中至少包含5个点才能进行椭圆拟合。如果轮廓中的点数量少于5个,将无法进行拟合椭圆操作,从而导致出现错误。
你可以在for循环中添加一个条件来排除点数少于5个的轮廓
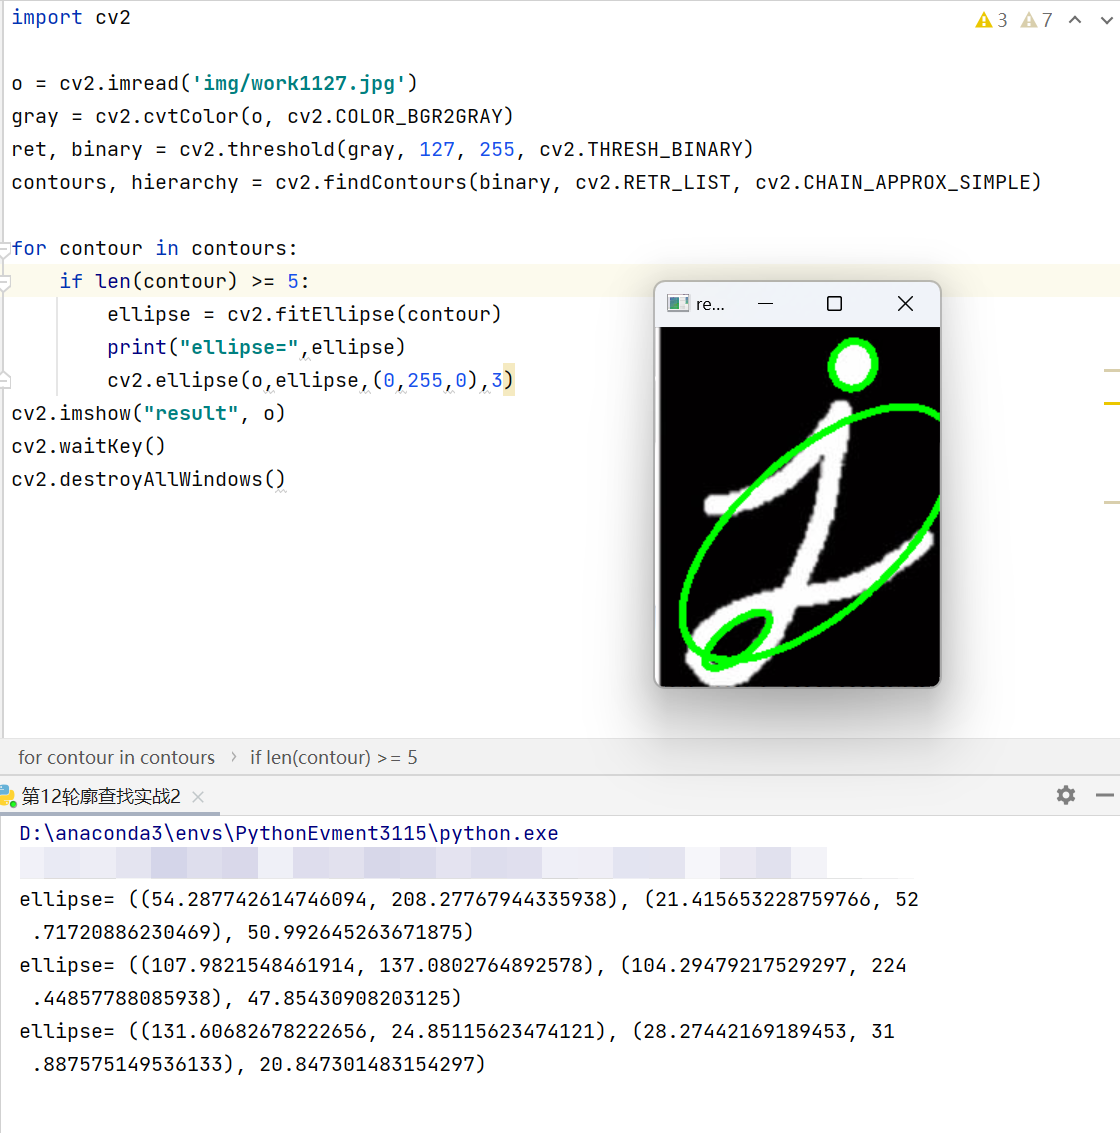
for contour in contours:
    if len(contour) >= 5:
        ellipse = cv2.fitEllipse(contour)
        print("ellipse=", ellipse)
        cv2.ellipse(o, ellipse, (0, 255, 0), 3)
import cv2

o = cv2.imread('img/img.png')
gray = cv2.cvtColor(o, cv2.COLOR_BGR2GRAY)
ret, binary = cv2.threshold(gray, 127, 255, cv2.THRESH_BINARY)
contours, hierarchy = cv2.findContours(binary, cv2.RETR_LIST, cv2.CHAIN_APPROX_SIMPLE)

for contour in contours:
    if len(contour) >= 5:
        ellipse = cv2.fitEllipse(contour)
        print("ellipse=",ellipse)
        cv2.ellipse(o,ellipse,(0,255,0),3)
cv2.imshow("result", o)
cv2.waitKey()
cv2.destroyAllWindows()
(1)
(2)
(3)
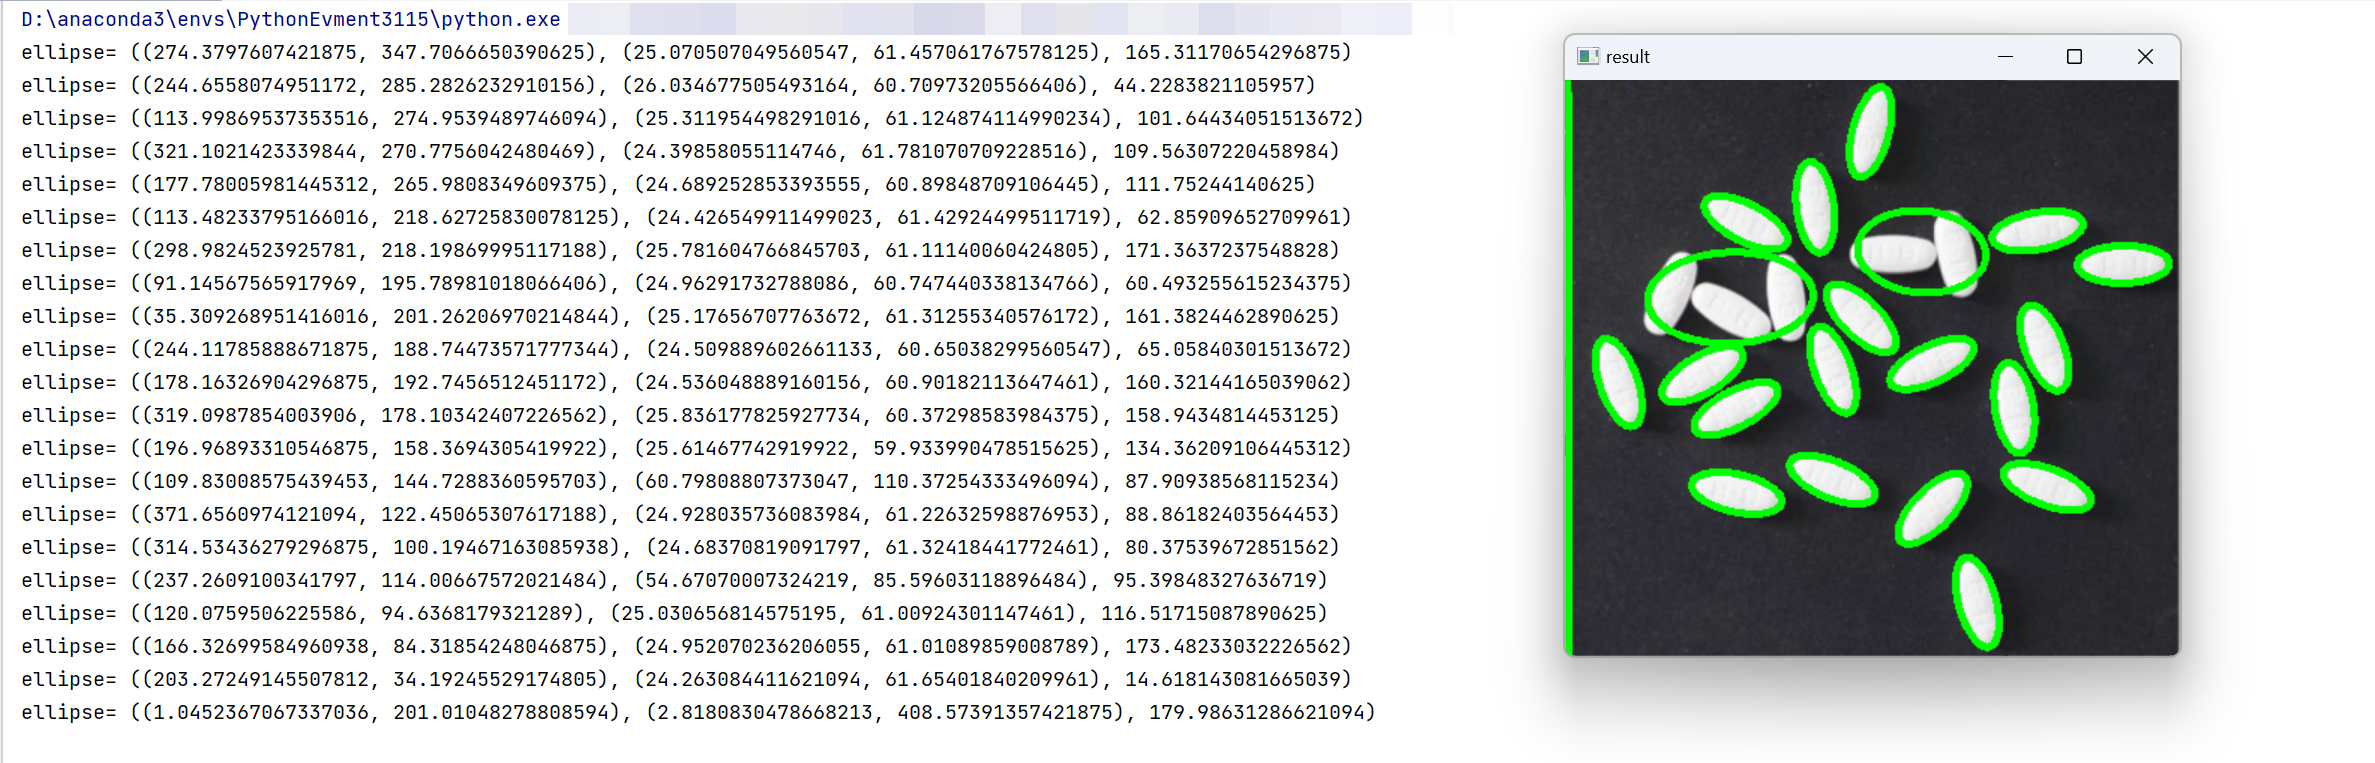
import cv2
# 仅导入所需的函数
import cv2
# 加载图像
o = cv2.imread('img/test\_img.jpg')
# 转换为灰度图像
gray = cv2.cvtColor(o, cv2.COLOR_BGR2GRAY)
# 阈值化
ret, binary = cv2.threshold(gray, 127, 255, cv2.THRESH_BINARY)
# 寻找轮廓
contours, hierarchy = cv2.findContours(binary, cv2.RETR_LIST, cv2.CHAIN_APPROX_SIMPLE)
# 遍历所有轮廓
for contour in contours:
if len(contour) >= 5:
ellipse = cv2.fitEllipse(contour)
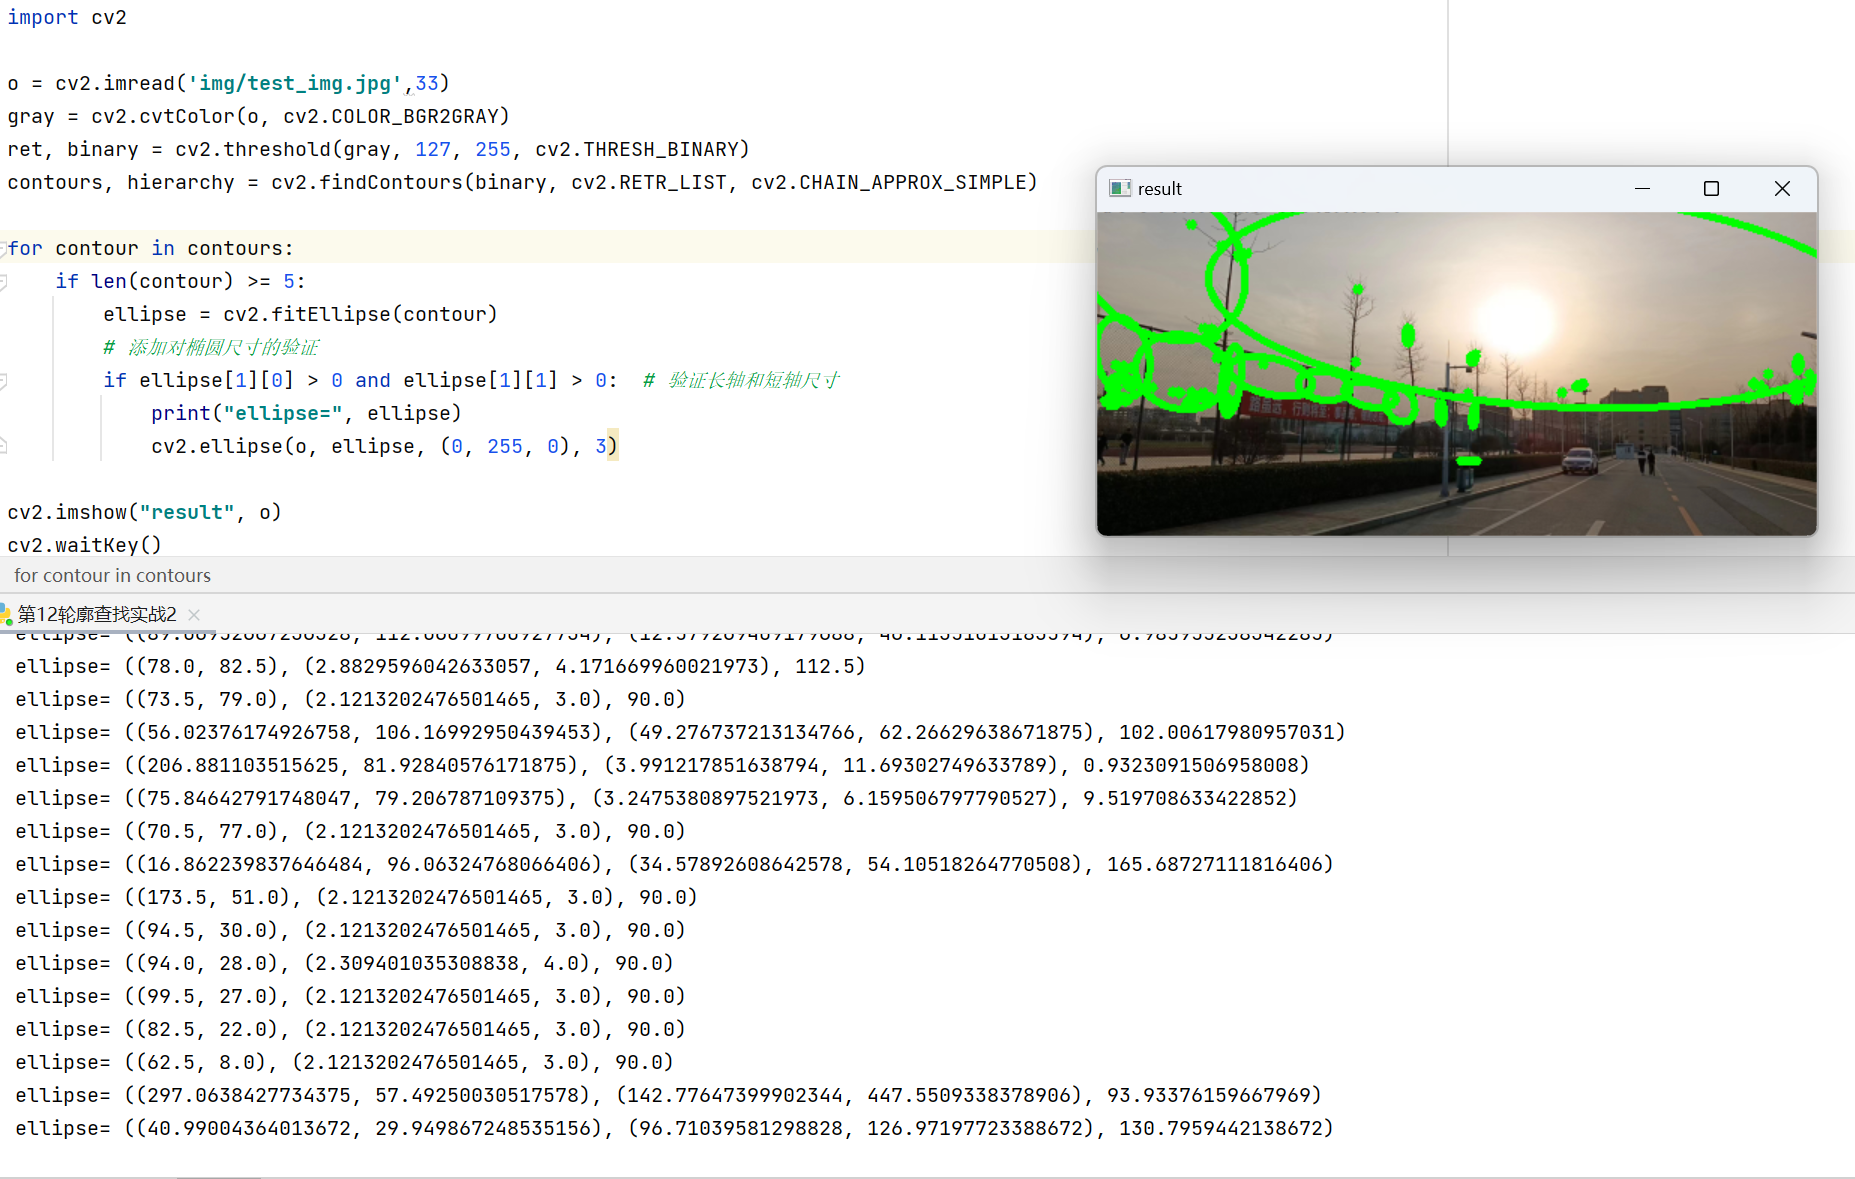
# 添加对椭圆尺寸的验证
if ellipse[1][0] > 0 and ellipse[1][1] > 0: # 验证长轴和短轴尺寸
print("ellipse=", ellipse)
cv2.ellipse(o, ellipse, (0, 255, 0), 3)
# 显示结果
cv2.namedWindow("result")
cv2.imshow("result", o)
cv2.waitKey()
cv2.destroyAllWindows()
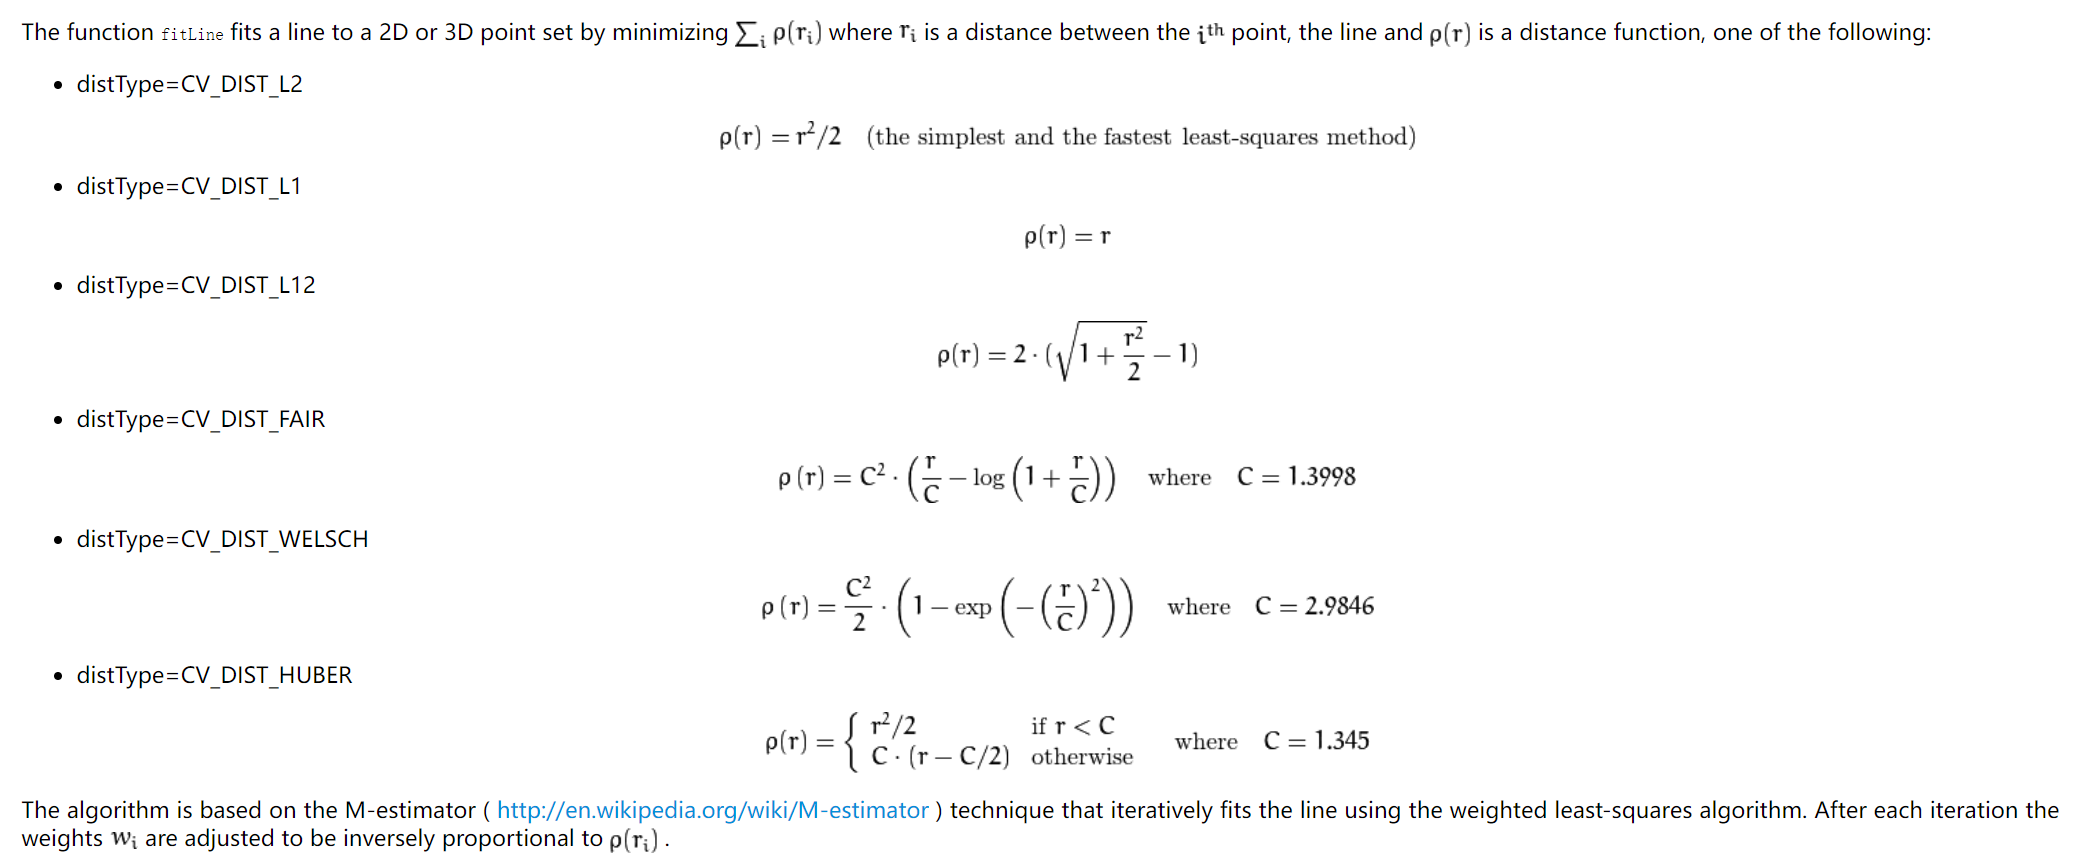
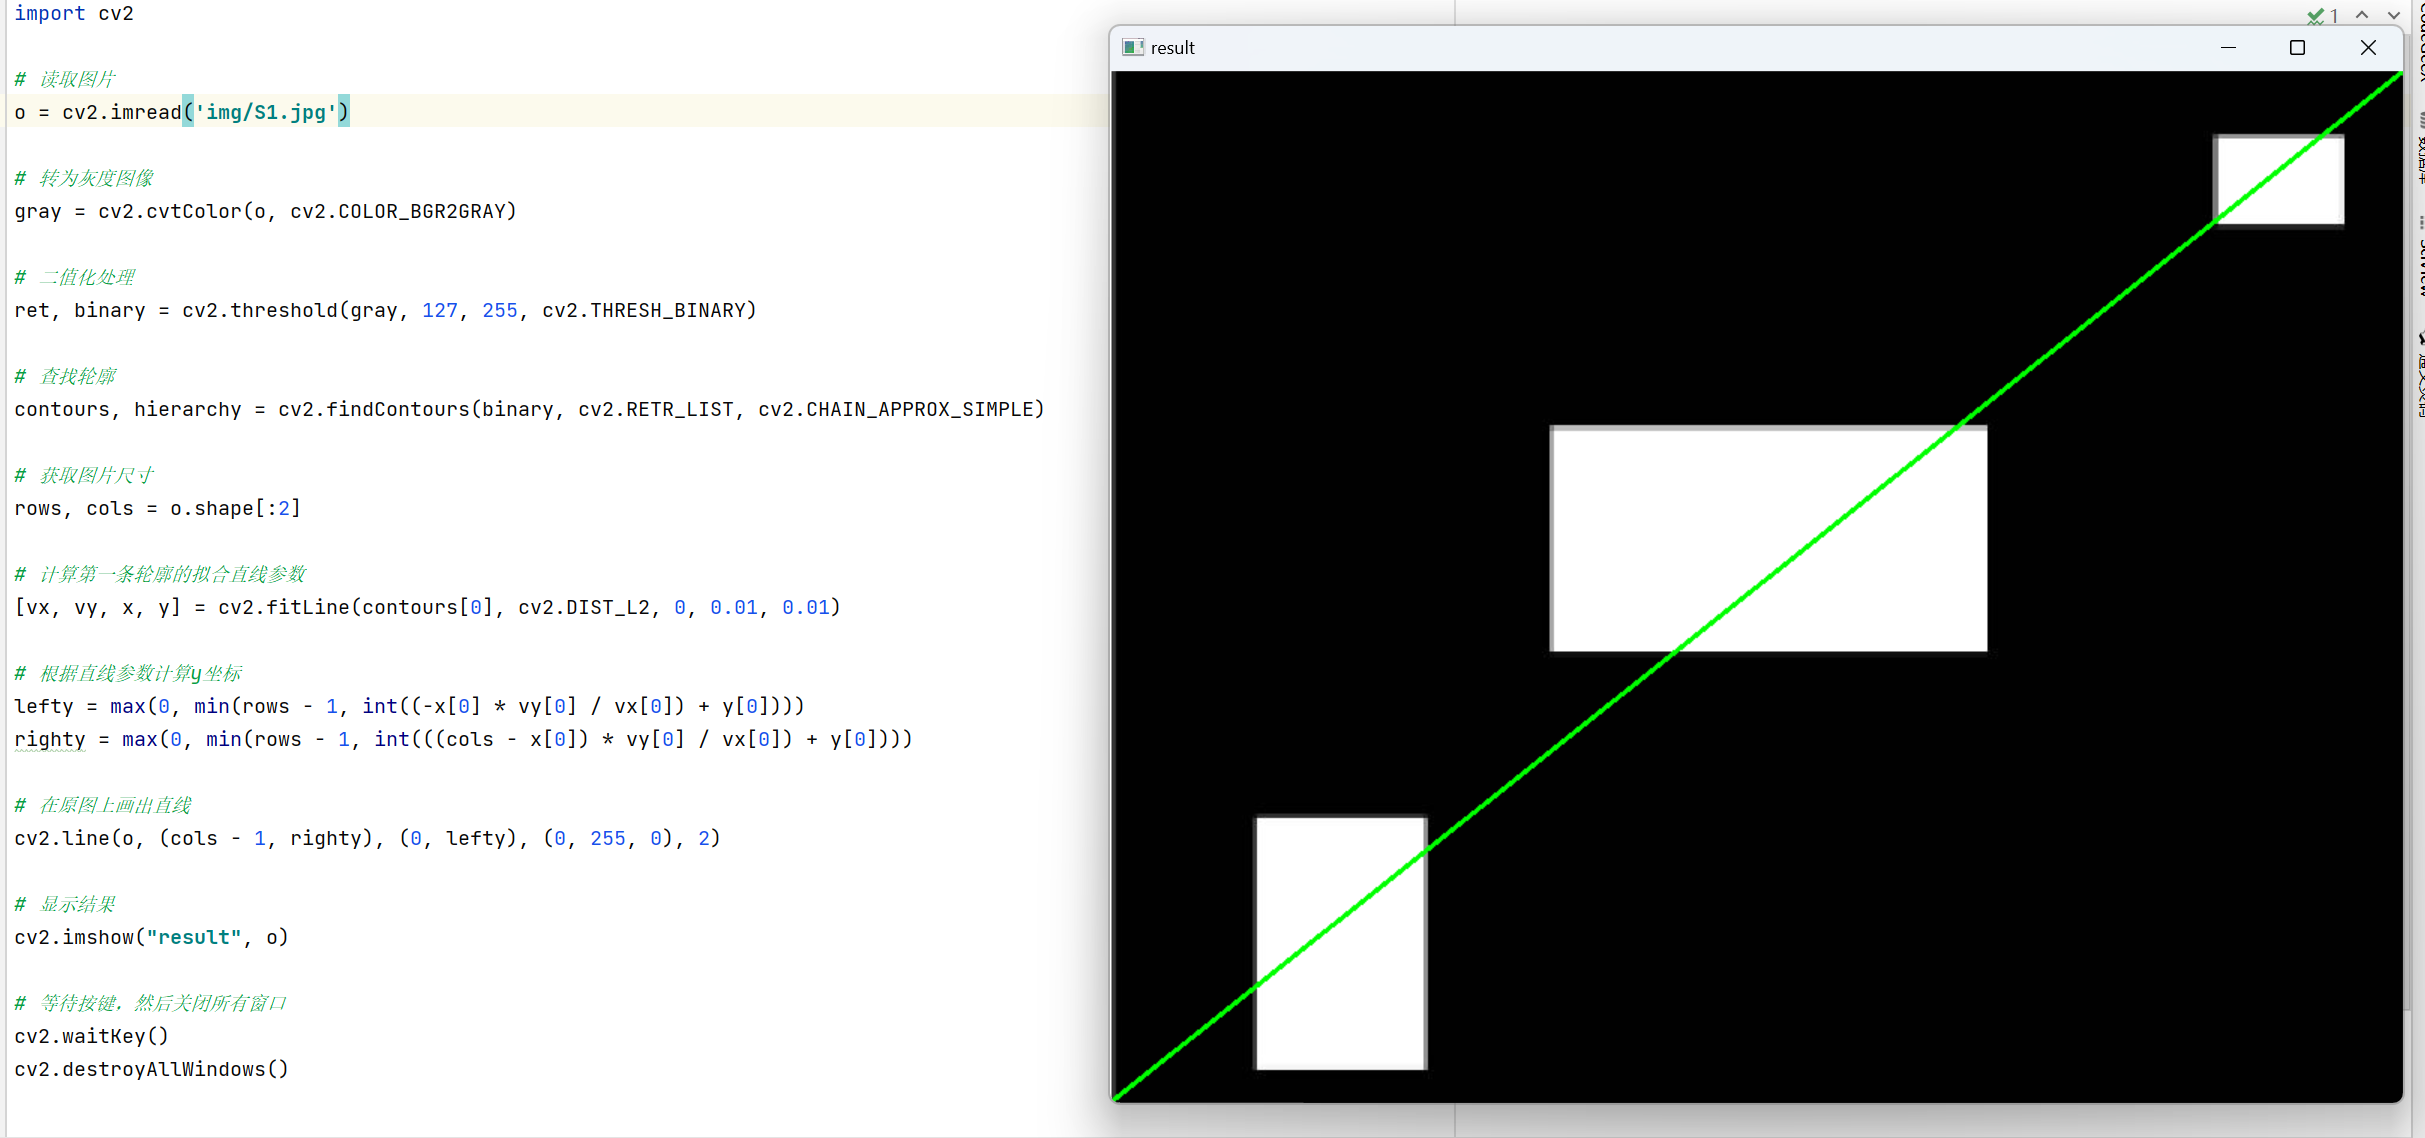
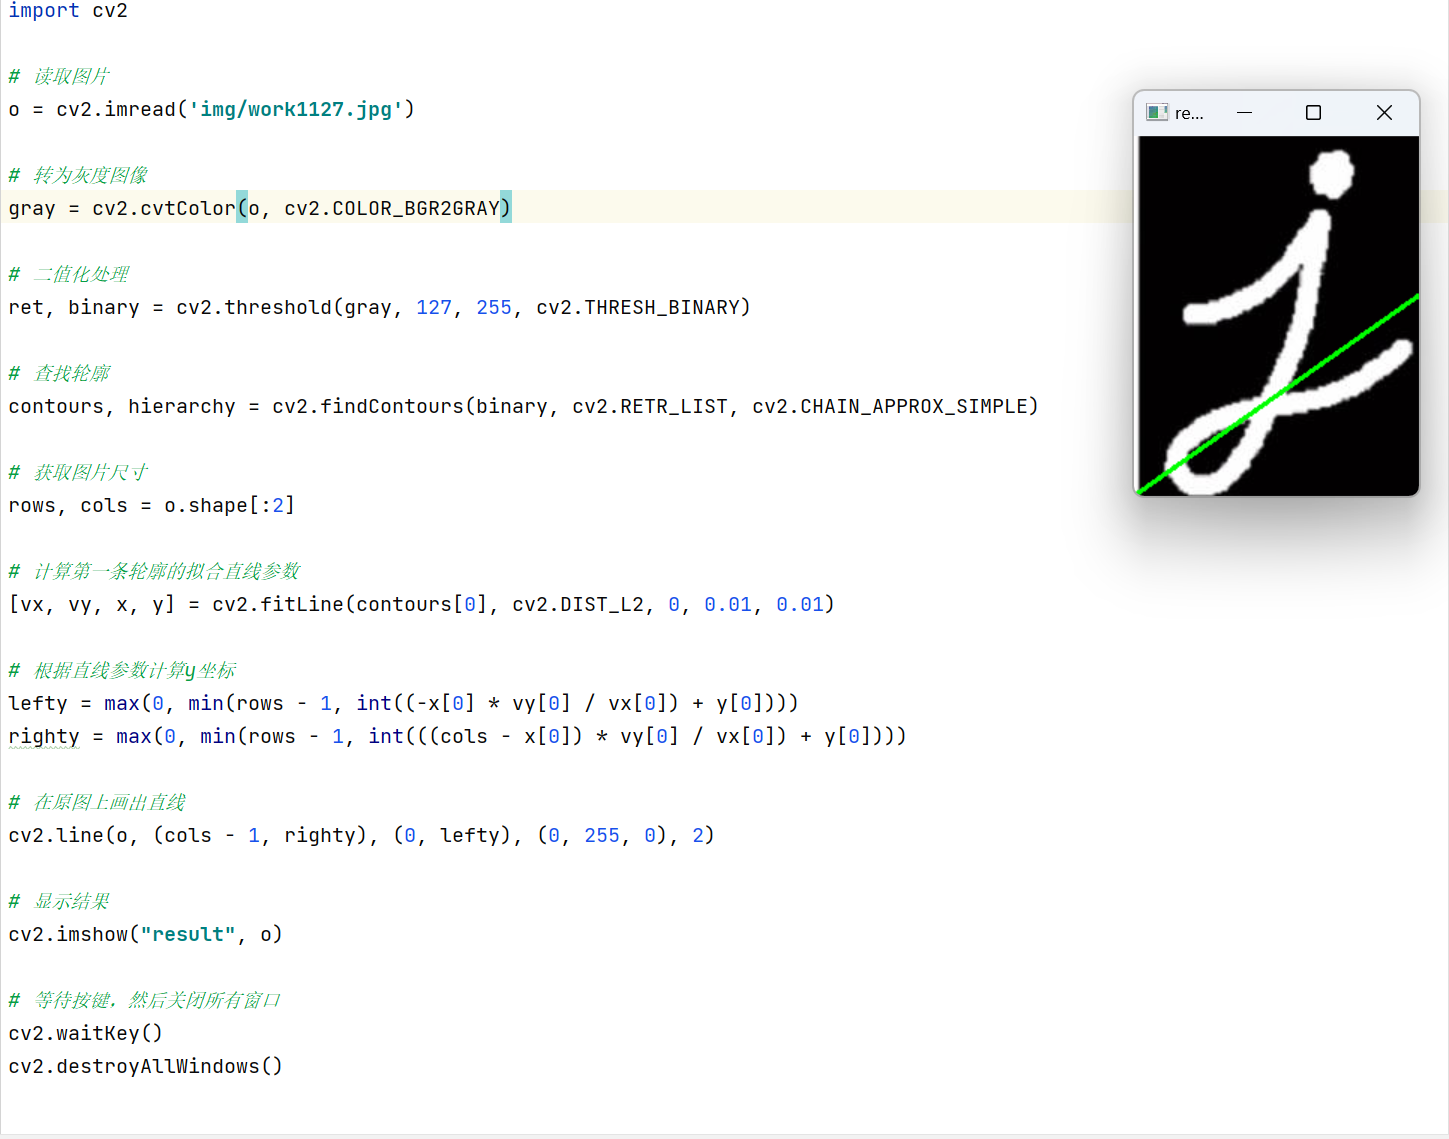
5.4 最优拟合直线
cv2.fitLine( points, distType, param, reps, aeps )


import cv2

# 读取图片
o = cv2.imread('img/S1.jpg')

# 转为灰度图像
gray = cv2.cvtColor(o, cv2.COLOR_BGR2GRAY)

# 二值化处理
ret, binary = cv2.threshold(gray, 127, 255, cv2.THRESH_BINARY)

# 查找轮廓
contours, hierarchy = cv2.findContours(binary, cv2.RETR_LIST, cv2.CHAIN_APPROX_SIMPLE)

# 获取图片尺寸
rows, cols = o.shape[:2]

# 计算第一条轮廓的拟合直线参数
[vx, vy, x, y] = cv2.fitLine(contours[0], cv2.DIST_L2, 0, 0.01, 0.01)

# 根据直线参数计算y坐标
lefty = max(0, min(rows - 1, int((-x[0] \* vy[0] / vx[0]) + y[0])))
righty = max(0, min(rows - 1, int(((cols - x[0]) \* vy[0] / vx[0]) + y[0])))

# 在原图上画出直线
cv2.line(o, (cols - 1, righty), (0, lefty), (0, 255, 0), 2)

# 显示结果
cv2.imshow("result", o)

# 等待按键,然后关闭所有窗口
cv2.waitKey()
cv2.destroyAllWindows()
5.5 最小外包三角形
retval, triangle = cv2.minEnclosingTriangle( points )
返回值:
retval:最小外包三角形的面积。
triangle:最小外包三角形的三个顶点集
import cv2
import numpy as np

# 读取图像并进行二值化处理
o = cv2.imread('img/useCvOpenxx.jpg')
gray = cv2.cvtColor(o, cv2.COLOR_BGR2GRAY)
_, binary = cv2.threshold(gray, 127, 255, cv2.THRESH_BINARY)
# 寻找图像的轮廓
contours, _ = cv2.findContours(binary, cv2.RETR_EXTERNAL, cv2.CHAIN_APPROX_SIMPLE)
# 遍历轮廓,并计算最小外包三角形
for contour in contours:
    # 计算最小外包三角形
    triangle = cv2.minEnclosingTriangle(contour)[1]

    # 在原图上绘制最小外包三角形
    cv2.polylines(o, [triangle.astype(int)], True, (0, 255, 255), 2)

    # 计算最小外包三角形的面积
    triangle_area = cv2.contourArea(triangle)

    # 输出最小外包三角形的面积和三个顶点坐标
    print("最小外包三角形的面积:", triangle_area)
    print("三个顶点坐标:")
    for point in triangle:
        print(tuple(point[0]))
# 显示结果图像
cv2.imshow("result", o)
cv2.waitKey(0)  # 等待任意键按下
cv2.destroyAllWindows()  # 关闭所有窗口

既有适合小白学习的零基础资料,也有适合3年以上经验的小伙伴深入学习提升的进阶课程,涵盖了95%以上C C++开发知识点,真正体系化!
由于文件比较多,这里只是将部分目录截图出来,全套包含大厂面经、学习笔记、源码讲义、实战项目、大纲路线、讲解视频,并且后续会持续更新
seCvOpenxx.jpg’)
gray = cv2.cvtColor(o, cv2.COLOR_BGR2GRAY)
_, binary = cv2.threshold(gray, 127, 255, cv2.THRESH_BINARY)
寻找图像的轮廓
contours, _ = cv2.findContours(binary, cv2.RETR_EXTERNAL, cv2.CHAIN_APPROX_SIMPLE)
遍历轮廓,并计算最小外包三角形
for contour in contours:
# 计算最小外包三角形
triangle = cv2.minEnclosingTriangle(contour)[1]
# 在原图上绘制最小外包三角形
cv2.polylines(o, [triangle.astype(int)], True, (0, 255, 255), 2)

# 计算最小外包三角形的面积
triangle_area = cv2.contourArea(triangle)

# 输出最小外包三角形的面积和三个顶点坐标
print("最小外包三角形的面积:", triangle_area)
print("三个顶点坐标:")
for point in triangle:
    print(tuple(point[0]))
显示结果图像
cv2.imshow(“result”, o)
cv2.waitKey(0) # 等待任意键按下
cv2.destroyAllWindows() # 关闭所有窗口
[外链图片转存中...(img-Z9PUwQPA-1715552844824)]
[外链图片转存中...(img-qduTeSPE-1715552844825)]

**既有适合小白学习的零基础资料,也有适合3年以上经验的小伙伴深入学习提升的进阶课程,涵盖了95%以上C C++开发知识点,真正体系化!**

**由于文件比较多,这里只是将部分目录截图出来,全套包含大厂面经、学习笔记、源码讲义、实战项目、大纲路线、讲解视频,并且后续会持续更新**

**[如果你需要这些资料,可以戳这里获取](https://bbs.csdn.net/topics/618668825)**


 1104
1104


 被折叠的 条评论
为什么被折叠?
被折叠的 条评论
为什么被折叠?
 到【灌水乐园】发言


