


一.硬件准备
- 树莓派 Pico W
- 土壤湿度传感器
- 温度传感器(例如 DS18B20)
- 光照传感器(例如 BH1750)
- OLED 显示屏(例如 SSD1306)
- 面包板和连接线
二.软件准备
- MicroPython 固件(已经在之前的步骤中安装)
- Thonny IDE(已经在之前的步骤中安装)
- 连接 Wi-Fi 的代码(已经在之前的步骤中编写)
见《树莓派Pico W的wifi模块配置与简单实战》
三、项目步骤
- 连接硬件
- 将土壤湿度传感器的 VCC 接 Pico W 的 3.3V,GND 接 Pico W 的 GND,数据引脚接 Pico W 的一个 ADC 引脚(例如 ADC0)。
- 将 DS18B20 温度传感器的 VCC 接 Pico W 的 3.3V,GND 接 Pico W 的 GND,数据引脚接 Pico W 的一个 GPIO 引脚(例如 GPIO 16)。
- 将 BH1750 光照传感器的 VCC 接 Pico W 的 3.3V,GND 接 Pico W 的 GND,SCL 和 SDA 分别接 Pico W 的 I2C 引脚(SCL 接 GPIO 17,SDA 接 GPIO 16)。
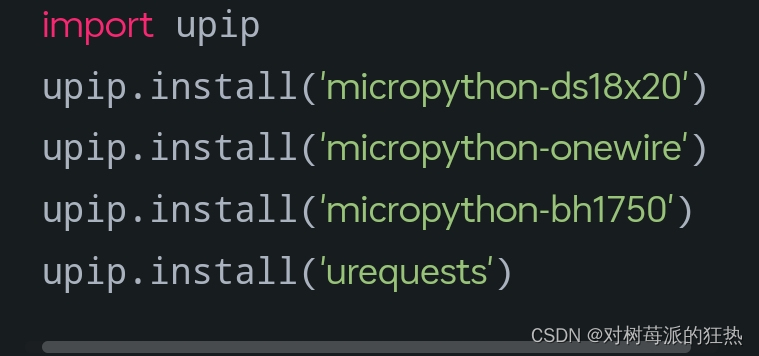
2.安装所需库
在Thonny IDE上写入以下code。
3.编写代码
编写代码来读取土壤湿度传感器、DS18B20 温度传感器和 BH1750 光照传感器的数据,显示在 OLED 屏上,并上传到云服务。
import network
import urequests as requests
import time
from machine import Pin, ADC, I2C
import ds18x20
import onewire
import bh1750
import ssd1306
ssid = 'your_SSID' # 替换为你的 Wi-Fi 名称
password = 'your_password' # 替换为你的 Wi-Fi 密码
api_key = 'your_thingspeak_api_key' # 替换为你的 ThingSpeak API 密钥
# 连接到 Wi-Fi
wlan = network.WLAN(network.STA_IF)
wlan.active(True)
wlan.connect(ssid, password)
print("Connecting to Wi-Fi", end="")
while not wlan.isconnected():
print(".", end="")
time.sleep(1)
print("\nConnected to Wi-Fi")
print("Network config:", wlan.ifconfig())
# 初始化传感器
adc = ADC(Pin(26)) # 土壤湿度传感器接 ADC0
ow = onewire.OneWire(Pin(16)) # DS18B20 数据引脚接 GPIO16
ds = ds18x20.DS18X20(ow)
i2c = I2C(0, scl=Pin(17), sda=Pin(16)) # BH1750 和 OLED 接 I2C0
light_sensor = bh1750.BH1750(i2c)
oled = ssd1306.SSD1306_I2C(128, 64, i2c)
# 搜索 DS18B20 传感器
roms = ds.scan()
print('Found DS devices: ', roms)
while True:
# 读取土壤湿度
soil_moisture = adc.read_u16()
# 读取温度
ds.convert_temp()
time.sleep_ms(750)
temp = ds.read_temp(roms[0])
# 读取光照强度
light_intensity = light_sensor.luminance(bh1750.BH1750.CONT_HIRES_1)
# 显示数据在 OLED 上
oled.fill(0)
oled.text('Soil: {}'.format(soil_moisture), 0, 0)
oled.text('Temp: {}C'.format(temp), 0, 20)
oled.text('Light: {}lx'.format(light_intensity), 0, 40)
oled.show()
print('Soil Moisture: {}, Temperature: {}°C, Light Intensity: {} lux'.format(soil_moisture, temp, light_intensity))
# 上传数据到 ThingSpeak
url = 'https://api.thingspeak.com/update?api_key={}&field1={}&field2={}&field3={}'.format(api_key, soil_moisture, temp, light_intensity)
response = requests.get(url)
print(response.text)
# 每 15 秒上传一次数据
time.sleep(15)
2.保存这个.py文件于pico w上
四、运行项目
- 确保树莓派 Pico W 已连接到电脑并打开 Thonny IDE。
- 在 Thonny IDE 中打开并运行代码。
- 观察 Thonny IDE 的 Shell 窗口(底下的)输出,确认土壤湿度、温度和光照强度数据被成功读取并显示在 OLED


 3313
3313

 被折叠的 条评论
为什么被折叠?
被折叠的 条评论
为什么被折叠?
 到【灌水乐园】发言


