


0.如果你学习这篇文章,这篇文章的目的是视觉处理方面的,1是视觉识别,2是单片机与视觉结合
学习前资源推荐:
黑马程序员 : 黑马程序员人工智能教程_10小时学会图像处理OpenCV入门教程_哔哩哔哩_bilibili
这个是yolo:2025最新YOLO目标检测训练/开发教程(Python 人工智能Ai视觉模型)_哔哩哔哩_bilibili
最好自己看完这个课在看文章,黑马程序员的是学图什么的检测和opencv的使用,yolo这个不需要学训练,只学怎么用,这些是基础,这个文章可以认为是学位基础后的使用。
1.学习基础(这里测重讲原理,最好弄明白)
这里说一下,这个学基础需要达到什么程度就可以下一步了
1.你自己能写一篇博客,来讲,讲解的顺序是(引用库,图片/视频初始化,模型初始化,用模型处理图片,对用模型处理图片的数据处理,用cv2.imshow()展示图片)
这里如果只是简单使用,就是几行代码的事情,但我希望你能讲明白,这样方便后面的学习,imshow能展示什么图片?为什么模型处理后的图片不能直接展示?(就是模型处理后的值为什么不能直接展示)怎么样对模型处理后的图片进行处理?模型处理后返回的数据有那些?这些数据可以怎么用,用在哪里?
我的习惯是用代码教人,而不是从头学,什么需要用,学什么,怎么学,看不懂的,用豆包deep seek 等等ai也可以去百度,路就在这里,怎么弄懂,需要自己去努力,这是你们的事情
import cv2                     #oepncv库引用
from ultralytics import YOLO   #yolo引用

img = cv2.imread('car_img.jpg')   #读取照片
model = YOLO('yolov8n.pt')   #引用模型

cars = model(img)        #用模型对照片处理(从这一行开始看下面的注解)
car = cars[0].plot()
cv2.imshow('cars',car)  #这里是展示图片,“cars”是给窗口起的名字,car是要展示处理后的图片
cv2.waitKey(100000)    #加这个是等待函数,不然图片处理完,展示的时间很短,这个是毫秒的1000等于1秒,就是延时函数
cv2.destroyAllWindows()   #关闭窗口
cars = model(img) 这一行讲一下,cars就是用模型处理完图片后,cars就是各种结果,这个结果需要自己处理,之后才能显示,不然不能显示,简单就是,处理完图片,处理完的信息都保存在cars里面,有人物识别信息,物体识别信息,关节什么之类的,如果显示,他不知道要显示什么,按照什么格式,所以需要你自己处理,这里先展示cars和car里面返回的内容,在讲处理方法
这里是用来检测代码,用print打印cars和car来看他们返回的内容(下面的cars和car的返回信息的方法,就是这个)
import cv2

from ultralytics import YOLO
img = cv2.imread('car_img.jpg')
model = YOLO('yolov8n.pt')

cars = model(img)
car = cars[0].plot()
print(cars)
print("_____________________________________________")
print(car)
这里先展cars和car示运行后的结果
D:\rj\ancand\envs\PyTorch_cpu\python.exe C:\Users\Administrator\Desktop\ultralytics-main\ultralytics\text\1\main.py

0: 480x640 3 cars, 56.7ms
Speed: 3.0ms preprocess, 56.7ms inference, 0.9ms postprocess per image at shape (1, 3, 480, 640)
[ultralytics.engine.results.Results object with attributes:

boxes: ultralytics.engine.results.Boxes object
keypoints: None
masks: None
names: {0: 'person', 1: 'bicycle', 2: 'car', 3: 'motorcycle', 4: 'airplane', 5: 'bus', 6: 'train', 7: 'truck', 8: 'boat', 9: 'traffic light', 10: 'fire hydrant', 11: 'stop sign', 12: 'parking meter', 13: 'bench', 14: 'bird', 15: 'cat', 16: 'dog', 17: 'horse', 18: 'sheep', 19: 'cow', 20: 'elephant', 21: 'bear', 22: 'zebra', 23: 'giraffe', 24: 'backpack', 25: 'umbrella', 26: 'handbag', 27: 'tie', 28: 'suitcase', 29: 'frisbee', 30: 'skis', 31: 'snowboard', 32: 'sports ball', 33: 'kite', 34: 'baseball bat', 35: 'baseball glove', 36: 'skateboard', 37: 'surfboard', 38: 'tennis racket', 39: 'bottle', 40: 'wine glass', 41: 'cup', 42: 'fork', 43: 'knife', 44: 'spoon', 45: 'bowl', 46: 'banana', 47: 'apple', 48: 'sandwich', 49: 'orange', 50: 'broccoli', 51: 'carrot', 52: 'hot dog', 53: 'pizza', 54: 'donut', 55: 'cake', 56: 'chair', 57: 'couch', 58: 'potted plant', 59: 'bed', 60: 'dining table', 61: 'toilet', 62: 'tv', 63: 'laptop', 64: 'mouse', 65: 'remote', 66: 'keyboard', 67: 'cell phone', 68: 'microwave', 69: 'oven', 70: 'toaster', 71: 'sink', 72: 'refrigerator', 73: 'book', 74: 'clock', 75: 'vase', 76: 'scissors', 77: 'teddy bear', 78: 'hair drier', 79: 'toothbrush'}
obb: None
orig_img: array([[[ 92,  72,  61],
        [ 93,  75,  64],
        [ 94,  75,  67],
        ...,
        [151, 154, 162],
        [152, 155, 163],
        [153, 156, 164]],

       [[ 92,  74,  63],
        [ 93,  75,  64],
        [ 94,  75,  67],
        ...,
        [155, 159, 164],
        [155, 159, 164],
        [155, 159, 164]],

       [[ 97,  83,  71],
        [ 99,  84,  75],
        [100,  84,  77],
        ...,
        [157, 160, 165],
        [158, 161, 166],
        [158, 161, 166]],

       ...,

       [[148, 157, 166],
        [151, 160, 169],
        [150, 159, 168],
        ...,
        [138, 138, 138],
        [164, 166, 167],
        [168, 171, 175]],

       [[154, 163, 172],
        [156, 165, 174],
        [154, 163, 172],
        ...,
        [131, 129, 128],
        [147, 145, 145],
        [152, 152, 152]],

       [[154, 163, 172],
        [158, 167, 176],
        [157, 168, 176],
        ...,
        [138, 133, 132],
        [137, 133, 132],
        [142, 138, 137]]], dtype=uint8)
orig_shape: (620, 827)
path: 'image0.jpg'
probs: None
save_dir: 'runs\\detect\\predict'
speed: {'preprocess': 3.004900000000088, 'inference': 56.74599999999997, 'postprocess': 0.8767000000000635}]
_____________________________________________
[[[ 92  72  61]
  [ 93  75  64]
  [ 94  75  67]
  ...
  [151 154 162]
  [152 155 163]
  [153 156 164]]

 [[ 92  74  63]
  [ 93  75  64]
  [ 94  75  67]
  ...
  [155 159 164]
  [155 159 164]
  [155 159 164]]

 [[ 97  83  71]
  [ 99  84  75]
  [100  84  77]
  ...
  [157 160 165]
  [158 161 166]
  [158 161 166]]

 ...

 [[148 157 166]
  [151 160 169]
  [150 159 168]
  ...
  [138 138 138]
  [164 166 167]
  [168 171 175]]

 [[154 163 172]
  [156 165 174]
  [154 163 172]
  ...
  [131 129 128]
  [147 145 145]
  [152 152 152]]

 [[154 163 172]
  [158 167 176]
  [157 168 176]
  ...
  [138 133 132]
  [137 133 132]
  [142 138 137]]]

进程已结束,退出代码为 0
这里大家可以看到cars返会的是————————上面的东西,car是返回的————————下面的东西,先说car返回的东西,是一个二维的数组,照片就是这个样子的,而cv2.imshow(里面的展示值是三维的数组和二维数组) ,这时候有该疑惑的是啥是三维数组,三维数组,其实就是RGB图,直白点就是一个像素点有三个值共同影响(就是平时大家看到的图),GRAY就是灰度图(就是大家平时的黑白图),一个点有两个来决定就是黑与白,范围就是2的8次方,(0,255)区间内,这里说一下,像在灰度图里面[[ 71 74 75 ... 156 157 158]就是第一行的灰度返回值,下一行就是[ 73 74 75 ... 160 160 160],而RGB图一行就是,就这样,一行一行的橡像素点就成了图片,具体怎么用1和0 的数组变成真正的图片,这个需要汇编,这里不多讲,
[[ 92 72 61]
[ 93 75 64]
[ 94 75 67]
...
[151 154 162]
[152 155 163] 应为三给通道决定一个像素点,所以好多个成一行吗
[153 156 164]]
这个是灰度图的返回值
[[ 71  74  75 ... 156 157 158]
 [ 73  74  75 ... 160 160 160]
 [ 81  83  84 ... 161 162 162]
 ...
 [159 162 161 ... 138 166 172]
 [165 167 165 ... 129 145 152]
 [165 169 169 ... 133 133 138]]
_____________________________________________
这个是RGB图返回的值
[[[ 92  72  61]
  [ 93  75  64]
  [ 94  75  67]
  ...
  [151 154 162]
  [152 155 163]
  [153 156 164]]

 [[ 92  74  63]
  [ 93  75  64]
  [ 94  75  67]
  ...
  [155 159 164]
  [155 159 164]
  [155 159 164]]

 [[ 97  83  71]
  [ 99  84  75]
  [100  84  77]
  ...
  [157 160 165]
  [158 161 166]
  [158 161 166]]
说白的就是cv2.imshow得展示的是这种数组,而不是像模型处理完后的图片
数组是一行一行的,从最左到右,从上到下,从而构成图片
这来讲模型处理完后返回的图片cars返回的值里面怎么处理,是我们想要的,
这是cars返回的内容
0: 480x640 3 cars, 61.8ms
Speed: 2.5ms preprocess, 61.8ms inference, 0.9ms postprocess per image at shape (1, 3, 480, 640)
[ultralytics.engine.results.Results object with attributes:

boxes: ultralytics.engine.results.Boxes object
keypoints: None
masks: None
names: {0: 'person', 1: 'bicycle', 2: 'car', 3: 'motorcycle', 4: 'airplane', 5: 'bus', 6: 'train', 7: 'truck', 8: 'boat', 9: 'traffic light', 10: 'fire hydrant', 11: 'stop sign', 12: 'parking meter', 13: 'bench', 14: 'bird', 15: 'cat', 16: 'dog', 17: 'horse', 18: 'sheep', 19: 'cow', 20: 'elephant', 21: 'bear', 22: 'zebra', 23: 'giraffe', 24: 'backpack', 25: 'umbrella', 26: 'handbag', 27: 'tie', 28: 'suitcase', 29: 'frisbee', 30: 'skis', 31: 'snowboard', 32: 'sports ball', 33: 'kite', 34: 'baseball bat', 35: 'baseball glove', 36: 'skateboard', 37: 'surfboard', 38: 'tennis racket', 39: 'bottle', 40: 'wine glass', 41: 'cup', 42: 'fork', 43: 'knife', 44: 'spoon', 45: 'bowl', 46: 'banana', 47: 'apple', 48: 'sandwich', 49: 'orange', 50: 'broccoli', 51: 'carrot', 52: 'hot dog', 53: 'pizza', 54: 'donut', 55: 'cake', 56: 'chair', 57: 'couch', 58: 'potted plant', 59: 'bed', 60: 'dining table', 61: 'toilet', 62: 'tv', 63: 'laptop', 64: 'mouse', 65: 'remote', 66: 'keyboard', 67: 'cell phone', 68: 'microwave', 69: 'oven', 70: 'toaster', 71: 'sink', 72: 'refrigerator', 73: 'book', 74: 'clock', 75: 'vase', 76: 'scissors', 77: 'teddy bear', 78: 'hair drier', 79: 'toothbrush'}
obb: None
orig_img: array([[[ 92,  72,  61],
        [ 93,  75,  64],
        [ 94,  75,  67],
        ...,
        [151, 154, 162],
        [152, 155, 163],
        [153, 156, 164]],

       [[ 92,  74,  63],
        [ 93,  75,  64],
        [ 94,  75,  67],
        ...,
        [155, 159, 164],
        [155, 159, 164],
        [155, 159, 164]],

       [[ 97,  83,  71],
        [ 99,  84,  75],
        [100,  84,  77],
        ...,
        [157, 160, 165],
        [158, 161, 166],
        [158, 161, 166]],

       ...,

       [[148, 157, 166],
        [151, 160, 169],
        [150, 159, 168],
        ...,
        [138, 138, 138],
        [164, 166, 167],
        [168, 171, 175]],

       [[154, 163, 172],
        [156, 165, 174],
        [154, 163, 172],
        ...,
        [131, 129, 128],
        [147, 145, 145],
        [152, 152, 152]],

       [[154, 163, 172],
        [158, 167, 176],
        [157, 168, 176],
        ...,
        [138, 133, 132],
        [137, 133, 132],
        [142, 138, 137]]], dtype=uint8)
orig_shape: (620, 827)
path: 'image0.jpg'
probs: None
save_dir: 'runs\\detect\\predict'
speed: {'preprocess': 2.500899999999806, 'inference': 61.822800000000285, 'postprocess': 0.9405999999998471}]
以下是对这段模型处理图片后返回数据的详细解读: ### 整体概述 这段输出是使用 `YOLO` 模型对图片进行目标检测后得到的结果信息,包含了检测的基本统计、检测结果对象的各种属性等。 ### 第一行信息 ```plaintext 0: 480x640 3 cars, 61.8ms ``` - `0`:通常表示批次中的索引,这里只有一张图片,所以索引为 `0`。 - `480x640`:表示模型输入图片的尺寸为高度 `480` 像素,宽度 `640` 像素。 - `3 cars`:表示在这张图片中检测到了 `3` 辆汽车。 - `61.8ms`:表示模型对这张图片进行推理(`inference`)所花费的时间,单位是毫秒。 ### 第二行信息 ```plaintext Speed: 2.5ms preprocess, 61.8ms inference, 0.9ms postprocess per image at shape (1, 3, 480, 640) ``` - `Speed`:表明下面是关于处理速度的信息。 - `2.5ms preprocess`:表示对每张图片进行预处理(如调整图片大小、归一化等操作)所花费的时间为 `2.5` 毫秒。 - `61.8ms inference`:再次强调模型推理所花费的时间为 `61.8` 毫秒。 - `0.9ms postprocess`:表示对推理结果进行后处理(如非极大值抑制等操作)所花费的时间为 `0.9` 毫秒。 - `(1, 3, 480, 640)`:表示输入模型的张量形状,`1` 表示批次大小(即一次处理的图片数量为 `1` 张),`3` 表示图片的通道数(RGB 三个通道),`480` 和 `640` 分别表示图片的高度和宽度。 ### `ultralytics.engine.results.Results` 对象属性 #### `boxes` ```plaintext boxes: ultralytics.engine.results.Boxes object ``` 这是一个 `Boxes` 对象,包含了检测到的目标的边界框信息,如边界框的坐标(通常是 `xyxy` 格式,即左上角和右下角的坐标)、置信度分数以及类别标签等。你可以通过这个对象进一步获取每个检测框的具体信息。 #### `keypoints` ```plaintext keypoints: None ``` 表示在本次检测中没有进行关键点检测,或者模型没有输出关键点信息。 #### `masks` ```plaintext masks: None ``` 表示在本次检测中没有进行实例分割,或者模型没有输出分割掩码信息。 #### `names` ```plaintext names: {0: 'person', 1: 'bicycle', 2: 'car', ..., 79: 'toothbrush'} ``` 这是一个字典,将类别索引映射到具体的类别名称。例如,索引 `2` 对应的类别是 `'car'`,在后续处理中可以根据检测结果中的类别索引来查找对应的类别名称。 #### `obb` ```plaintext obb: None ``` 表示没有输出旋转边界框(Oriented Bounding Box)信息。 ——————————————————————————————————————————————(这里开始后面的了解一下就可以,前面的需要知道什么是什么) #### `orig_img` ```plaintext orig_img: array([[[ 92, 72, 61], ...]], dtype=uint8) ``` 这是一个 `NumPy` 数组,表示原始输入的图片。数组的形状为 `(高度, 宽度, 3)`,每个元素是一个 `[R, G, B]` 三元组,表示对应像素的颜色值。 #### `orig_shape` ```plaintext orig_shape: (620, 827) ``` 表示原始图片的尺寸,高度为 `620` 像素,宽度为 `827` 像素。 #### `path` ```plaintext path: 'image0.jpg' ``` 表示输入图片的文件路径。 #### `probs` ```plaintext probs: None ``` 表示没有输出分类概率信息,因为这是目标检测任务,不是单纯的分类任务。 #### `save_dir` ```plaintext save_dir: 'runs\\detect\\predict' ``` 表示检测结果保存的目录。 #### `speed` ```plaintext speed: {'preprocess': 2.500899999999806, 'inference': 61.822800000000285, 'postprocess': 0.9405999999998471} ``` 这是一个字典,包含了预处理、推理和后处理所花费的时间,与前面输出的时间信息相对应,只是这里给出了更精确的数值。 综上所述,这段输出提供了关于目标检测的详细信息,包括检测结果、处理时间、原始图片信息等,方便你进一步分析和处理检测结果。masks,boxes,keypoints,names,obb (这5个值是我们处理模型处理后的返回的数据,我们一般都选择,需要什么,要他们对应的值,然后处理完后变成数组,在cv2.imshow里面显示)
{这里只展示这些函数的可使用方向,不具体讲,不然东西太多,大家对那个感兴趣,可以自行查阅,后面用到会讲,不用就不讲了,这里大家了解就好}
1.
boxes
boxes属性是一个Boxes对象,它包含了检测到的目标的边界框信息,如边界框的坐标、置信度分数以及类别标签等。2.
keypoints
keypoints属性通常用于关键点检测任务,例如人体姿态估计。它包含了检测到的目标的关键点坐标信息。3.
obb
obb表示旋转边界框(Oriented Bounding Box),它可以更精确地拟合目标的形状,特别是对于非矩形的目标。4.
masks
masks属性用于实例分割任务,它包含了每个检测到的目标的分割掩码信息5.
names
names属性是一个字典,将类别索引映射到具体的类别名称。它的主要用途是将检测结果中的类别索引转换为人类可读的类别名称。这里还有一个特殊的 plot()
plot(img,conf,boxes,labels参数)这个可以直接处理模型处理完的数据,直接默认所有boxes的物体都显示,优势是简单,缺点是不能筛选,比如boxes效率高
可以直接给,目标框起来(感兴趣可以去查一查怎么用)
names就是可以用来筛选你想要的物体,而masks是吧你想要的猫直接扣下来,obb是用来,对于直接框物体有可能比较大,而obb是不规则的框物体,keypoint直白就是跟踪轨迹,boxes就是返回目标位置
这里讲一下视频(这里大家自己搜所讲解,,比较简单,不过多讲解,主要问题还是用模型处理之后返回数据的处理,直白一点,视频其实就是一帧一帧的图片,每次处理一张图片,循环到处理完结束,视频与图片之间就这样,不难)
import cv2

from ultralytics import YOLO
cap = cv2.VideoCapture('car_video.mp4')
model = YOLO('yolov8n.pt')

while(1):
    ret , fram = cap.read()#imgread会返回两个值,一个ret真假,一个fram一帧图片,所以用循环,吧视频的所有帧都循环出来
    cars = model(fram)
    car = cars[0].plot()
    cv2.imshow('car',car)
    if cv2.waitKey(1) & 0xFF == ord('q'):
        break

cap.release()
cv2.destroyAllWindows()
效果(上面的car就是模型处理图片/视频返回数据names里的东西,但是并不是只有car,还有其他的标签或者说其他的东西,我们只想要车怎么办,标题2里面会讲怎么筛选)
2.视频/图片车辆的设别,这里我认为大家基础的知识都掌握了(这里实现的方法是用上面说的boxes+names的方法限制搜索,当然也可以同理限制搜索其他的物体)
用到的,for i in boxes里面 i.cls[0]会获得对应的i的索引值
简单一点,如果我们想要限制车辆,,我们的模型会吧所有他能识别的物体都识别,怎么样能做到只识别一个,比如车那,首先,模型处理后视频/图片的数据集里面,boxes会有好多种,意思就是,不同种的物体,只要模型可以识别,那怎么限制那,在boxes里面每一种物体对应都有索引,这个索引会对应着names,从而输出,那么怎么办那,才能限制那,很简单,i[0]的意思就是每次选这一种,其他的不管,但是循环会吧每一种都循环一次的,所以,当i.cls[0]意思是获得对应的索引值,这是一个函数,获得索引带入到names里面,然后就获得对应的name如果name是car这包留,直接上if就可以做到筛选的效果了,下面写代码演示
这里先解释一下boxes选择会返回的东西
import cv2

from ultralytics import YOLO
cap = cv2.VideoCapture('car_video.mp4')
model = YOLO('yolov8n.pt')

while(1):
    ret , fram = cap.read()#imgread会返回两个值,一个ret真假,一个fram一帧图片,所以用循环,吧视频的所有帧都循环出来
    results = model(fram)

    for result in results:
        boxes = result.boxes
        print(boxes)

    cv2.imshow('car',fram)
    if cv2.waitKey(1) & 0xFF == ord('q'):
        break

cap.release()
cv2.destroyAllWindows()
0: 384x640 9 cars, 1 bus, 2 trucks, 67.5ms Speed: 1.6ms preprocess, 67.5ms inference, 0.8ms postprocess per image at shape (1, 3, 384, 640) ultralytics.engine.results.Boxes object with attributes: cls: tensor([2., 2., 2., 2., 2., 2., 2., 7., 2., 7., 2., 5.]) conf: tensor([0.8687, 0.8297, 0.6923, 0.6560, 0.6163, 0.5487, 0.5389, 0.5382, 0.4465, 0.3434, 0.2943, 0.2612]) data: tensor([[2.2004e+02, 2.5787e+01, 2.7354e+02, 6.0151e+01, 8.6872e-01, 2.0000e+00], [7.6982e+02, 3.8463e+01, 7.9947e+02, 6.5924e+01, 8.2973e-01, 2.0000e+00], [2.0237e+02, 6.8753e+01, 2.6758e+02, 1.1164e+02, 6.9234e-01, 2.0000e+00], [5.9670e+02, 3.3903e+01, 6.2590e+02, 5.8015e+01, 6.5597e-01, 2.0000e+00], [6.4295e+02, 2.6568e+02, 7.3329e+02, 3.5969e+02, 6.1626e-01, 2.0000e+00], [7.3819e+02, 1.4036e+01, 7.7193e+02, 4.6646e+01, 5.4868e-01, 2.0000e+00], [7.9243e+02, 2.1458e+02, 8.7422e+02, 2.8449e+02, 5.3892e-01, 2.0000e+00], [6.4202e+02, 2.6592e+02, 7.3345e+02, 3.5933e+02, 5.3820e-01, 7.0000e+00], [1.4367e+00, 8.8690e+01, 5.3892e+01, 1.3079e+02, 4.4651e-01, 2.0000e+00], [6.4300e+02, 1.6368e+00, 6.9639e+02, 7.1306e+01, 3.4343e-01, 7.0000e+00], [1.2887e+00, 8.4863e+01, 8.1583e+01, 1.3082e+02, 2.9428e-01, 2.0000e+00], [6.4392e+02, 2.9810e+00, 6.9653e+02, 7.1818e+01, 2.6117e-01, 5.0000e+00]]) id: None is_track: False orig_shape: (720, 1280) shape: torch.Size([12, 6]) xywh: tensor([[246.7929, 42.9691, 53.4965, 34.3638], [784.6472, 52.1938, 29.6523, 27.4608], [234.9782, 90.1942, 65.2135, 42.8823], [611.2987, 45.9588, 29.1956, 24.1124], [688.1201, 312.6871, 90.3344, 94.0142], [755.0596, 30.3411, 33.7378, 32.6094], [833.3273, 249.5357, 81.7902, 69.9111], [687.7350, 312.6215, 91.4241, 93.4109], [ 27.6643, 109.7388, 52.4552, 42.0966], [669.6957, 36.4712, 53.3884, 69.6689], [ 41.4358, 107.8398, 80.2942, 45.9533], [670.2241, 37.3995, 52.6135, 68.8370]]) xywhn: tensor([[0.1928, 0.0597, 0.0418, 0.0477], [0.6130, 0.0725, 0.0232, 0.0381], [0.1836, 0.1253, 0.0509, 0.0596], [0.4776, 0.0638, 0.0228, 0.0335], [0.5376, 0.4343, 0.0706, 0.1306], [0.5899, 0.0421, 0.0264, 0.0453], [0.6510, 0.3466, 0.0639, 0.0971], [0.5373, 0.4342, 0.0714, 0.1297], [0.0216, 0.1524, 0.0410, 0.0585], [0.5232, 0.0507, 0.0417, 0.0968], [0.0324, 0.1498, 0.0627, 0.0638], [0.5236, 0.0519, 0.0411, 0.0956]]) xyxy: tensor([[220.0446, 25.7872, 273.5411, 60.1510], [769.8210, 38.4633, 799.4734, 65.9242], [202.3714, 68.7530, 267.5850, 111.6353], [596.7009, 33.9026, 625.8965, 58.0151], [642.9529, 265.6801, 733.2873, 359.6942], [738.1907, 14.0364, 771.9285, 46.6459], [792.4323, 214.5801, 874.2224, 284.4912], [642.0229, 265.9160, 733.4470, 359.3269], [ 1.4367, 88.6905, 53.8919, 130.7871], [643.0015, 1.6368, 696.3899, 71.3057], [ 1.2887, 84.8632, 81.5829, 130.8165], [643.9174, 2.9810, 696.5309, 71.8179]]) xyxyn: tensor([[0.1719, 0.0358, 0.2137, 0.0835], [0.6014, 0.0534, 0.6246, 0.0916], [0.1581, 0.0955, 0.2091, 0.1550], [0.4662, 0.0471, 0.4890, 0.0806], [0.5023, 0.3690, 0.5729, 0.4996], [0.5767, 0.0195, 0.6031, 0.0648], [0.6191, 0.2980, 0.6830, 0.3951], [0.5016, 0.3693, 0.5730, 0.4991], [0.0011, 0.1232, 0.0421, 0.1816], [0.5023, 0.0023, 0.5441, 0.0990], [0.0010, 0.1179, 0.0637, 0.1817], [0.5031, 0.0041, 0.5442, 0.0997]])这里可以看到boxes返回的数据有很多种,我们需要继续处理,因为cv2.imshow需要numpy数组的形式,显然这些都不是,也没有达到我们的目的,这些标签的含义在基础里面讲了,如果有些没有,可以自行网络搜索一下,我们要用的方式是索引搜索names与boxes对比,用if筛选
这里继续上一步,便利boxes,看能输出什么
import cv2

from ultralytics import YOLO
cap = cv2.VideoCapture('car_video.mp4')
model = YOLO('yolov8n.pt')

while(1):
    ret , fram = cap.read()#imgread会返回两个值,一个ret真假,一个fram一帧图片,所以用循环,吧视频的所有帧都循环出来
    results = model(fram)

    for result in results:
        boxes = result.boxes
        names = result.names   //应为需要用names,所以吧names也返回出来,这个names是一个列表,可以用索引弄出来对应的值
        for box in boxes:
            print(box)

    cv2.imshow('car',fram)
    if cv2.waitKey(1) & 0xFF == ord('q'):
        break

cap.release()
cv2.destroyAllWindows()
结果(这里很长,大家想一下为什么,我们看一下,每一段都有一个cls有的一样,有的不一样,这个cls其实就是所选物体,就是被识别的物体的索引,这个索引有什么用,这个索引如果给到nams其实就是对应的名字,他显示名字的原理其实就是用这个cls,如果我们对names限制显示不就可以只显示我们想要的吗,是不是,里面的conf是相似度,当然id这里是none,我们也可给,这给后面会讲到,同时我们也可以限制ID显示)
D:\rj\ancand\envs\PyTorch_cpu\python.exe C:\Users\Administrator\Desktop\ultralytics-main\ultralytics\text\1\main.py

0: 384x640 6 cars, 1 bus, 1 truck, 86.7ms
Speed: 3.3ms preprocess, 86.7ms inference, 1.0ms postprocess per image at shape (1, 3, 384, 640)
ultralytics.engine.results.Boxes object with attributes:

cls: tensor([2.])
conf: tensor([0.8193])
data: tensor([[7.9470e+02, 8.6327e+01, 8.3723e+02, 1.1906e+02, 8.1935e-01, 2.0000e+00]])
id: None
is_track: False
orig_shape: (720, 1280)
shape: torch.Size([1, 6])
xywh: tensor([[815.9636, 102.6953,  42.5322,  32.7374]])
xywhn: tensor([[0.6375, 0.1426, 0.0332, 0.0455]])
xyxy: tensor([[794.6975,  86.3266, 837.2297, 119.0640]])
xyxyn: tensor([[0.6209, 0.1199, 0.6541, 0.1654]])
ultralytics.engine.results.Boxes object with attributes:

cls: tensor([2.])
conf: tensor([0.7054])
data: tensor([[558.7633,  94.8540, 606.0900, 135.8443,   0.7054,   2.0000]])
id: None
is_track: False
orig_shape: (720, 1280)
shape: torch.Size([1, 6])
xywh: tensor([[582.4266, 115.3492,  47.3267,  40.9903]])
xywhn: tensor([[0.4550, 0.1602, 0.0370, 0.0569]])
xyxy: tensor([[558.7633,  94.8540, 606.0900, 135.8443]])
xyxyn: tensor([[0.4365, 0.1317, 0.4735, 0.1887]])
ultralytics.engine.results.Boxes object with attributes:

cls: tensor([2.])
conf: tensor([0.6877])
data: tensor([[ 78.4699,  79.7789, 150.9606, 128.0164,   0.6877,   2.0000]])
id: None
is_track: False
orig_shape: (720, 1280)
shape: torch.Size([1, 6])
xywh: tensor([[114.7152, 103.8976,  72.4907,  48.2375]])
xywhn: tensor([[0.0896, 0.1443, 0.0566, 0.0670]])
xyxy: tensor([[ 78.4699,  79.7789, 150.9606, 128.0164]])
xyxyn: tensor([[0.0613, 0.1108, 0.1179, 0.1778]])
ultralytics.engine.results.Boxes object with attributes:

cls: tensor([2.])
conf: tensor([0.6159])
data: tensor([[194.7665,  42.4848, 244.7061,  70.8124,   0.6159,   2.0000]])
id: None
is_track: False
orig_shape: (720, 1280)
shape: torch.Size([1, 6])
xywh: tensor([[219.7363,  56.6486,  49.9396,  28.3276]])
xywhn: tensor([[0.1717, 0.0787, 0.0390, 0.0393]])
xyxy: tensor([[194.7665,  42.4848, 244.7061,  70.8124]])
xyxyn: tensor([[0.1522, 0.0590, 0.1912, 0.0984]])
ultralytics.engine.results.Boxes object with attributes:

cls: tensor([2.])
conf: tensor([0.5989])
data: tensor([[359.6129,  19.8893, 394.6417,  47.4438,   0.5989,   2.0000]])
id: None
is_track: False
orig_shape: (720, 1280)
shape: torch.Size([1, 6])
xywh: tensor([[377.1273,  33.6665,  35.0288,  27.5546]])
xywhn: tensor([[0.2946, 0.0468, 0.0274, 0.0383]])
xyxy: tensor([[359.6129,  19.8893, 394.6417,  47.4438]])
xyxyn: tensor([[0.2809, 0.0276, 0.3083, 0.0659]])
ultralytics.engine.results.Boxes object with attributes:

cls: tensor([2.])
conf: tensor([0.5598])
data: tensor([[312.6578,   8.0989, 345.9049,  32.8827,   0.5598,   2.0000]])
id: None
is_track: False
orig_shape: (720, 1280)
shape: torch.Size([1, 6])
xywh: tensor([[329.2814,  20.4908,  33.2471,  24.7838]])
xywhn: tensor([[0.2573, 0.0285, 0.0260, 0.0344]])
xyxy: tensor([[312.6578,   8.0989, 345.9049,  32.8827]])
xyxyn: tensor([[0.2443, 0.0112, 0.2702, 0.0457]])
ultralytics.engine.results.Boxes object with attributes:

cls: tensor([5.])
conf: tensor([0.5384])
data: tensor([[6.3959e+02, 1.6860e+01, 7.1215e+02, 1.4103e+02, 5.3845e-01, 5.0000e+00]])
id: None
is_track: False
orig_shape: (720, 1280)
shape: torch.Size([1, 6])
xywh: tensor([[675.8716,  78.9432,  72.5549, 124.1654]])
xywhn: tensor([[0.5280, 0.1096, 0.0567, 0.1725]])
xyxy: tensor([[639.5941,  16.8605, 712.1490, 141.0258]])
xyxyn: tensor([[0.4997, 0.0234, 0.5564, 0.1959]])
ultralytics.engine.results.Boxes object with attributes:

cls: tensor([7.])
conf: tensor([0.4563])
data: tensor([[6.3954e+02, 1.6457e+01, 7.1221e+02, 1.4156e+02, 4.5633e-01, 7.0000e+00]])
id: None
is_track: False
orig_shape: (720, 1280)
shape: torch.Size([1, 6])
xywh: tensor([[675.8740,  79.0100,  72.6716, 125.1060]])
xywhn: tensor([[0.5280, 0.1097, 0.0568, 0.1738]])
xyxy: tensor([[639.5382,  16.4570, 712.2098, 141.5630]])
xyxyn: tensor([[0.4996, 0.0229, 0.5564, 0.1966]])

0: 384x640 6 cars, 1 bus, 1 truck, 69.7ms
Speed: 2.4ms preprocess, 69.7ms inference, 0.9ms postprocess per image at shape (1, 3, 384, 640)
ultralytics.engine.results.Boxes object with attributes:
这里用box对应的cls的索引值放入到nams里面就会返回对应的names
import cv2

from ultralytics import YOLO
cap = cv2.VideoCapture('car_video.mp4')
model = YOLO('yolov8n.pt')

while(1):
    ret , fram = cap.read()#imgread会返回两个值,一个ret真假,一个fram一帧图片,所以用循环,吧视频的所有帧都循环出来
    results = model(fram)

    for result in results:
        boxes = result.boxes
        names = result.names
        for box in boxes:
            box_results = box.cls[0]
            names_reults= names[int(box_results)]
            print(names_reults)
    cv2.imshow('car',fram)
    if cv2.waitKey(1) & 0xFF == ord('q'):
        break

cap.release()
cv2.destroyAllWindows()
结果(这样我们,就可以用names限制输出)
0: 384x640 8 cars, 1 bus, 2 trucks, 84.8ms
Speed: 1.2ms preprocess, 84.8ms inference, 0.8ms postprocess per image at shape (1, 3, 384, 640)
car
car
car
car
car
car
truck
car
car
bus
truck
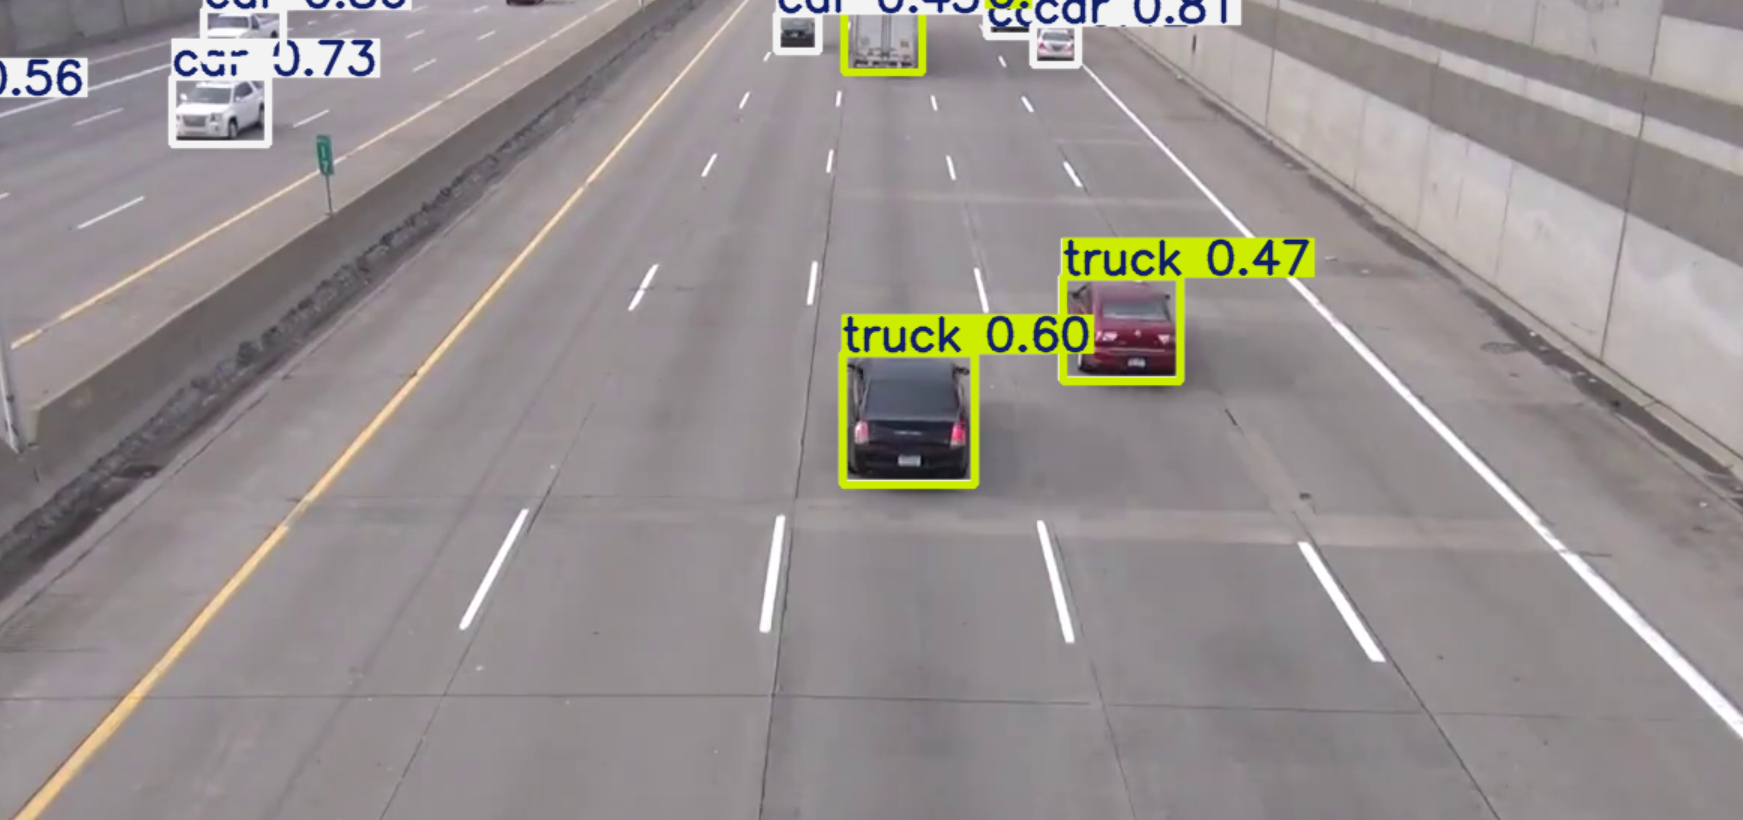
正常情况下会把车误认,我们限制之后就不会了
运行代码(这里大家可能不理解为什么有的地方加【0】而有的地方不加,之前我们对返回值Box进行过打印,box是每张里面所有被选择问题信息的集合,那必定有很多,我们怎么样只要一张,如果用列表的方式[0]就是直接本身,正好可以用循环的方式讲解这个问题)
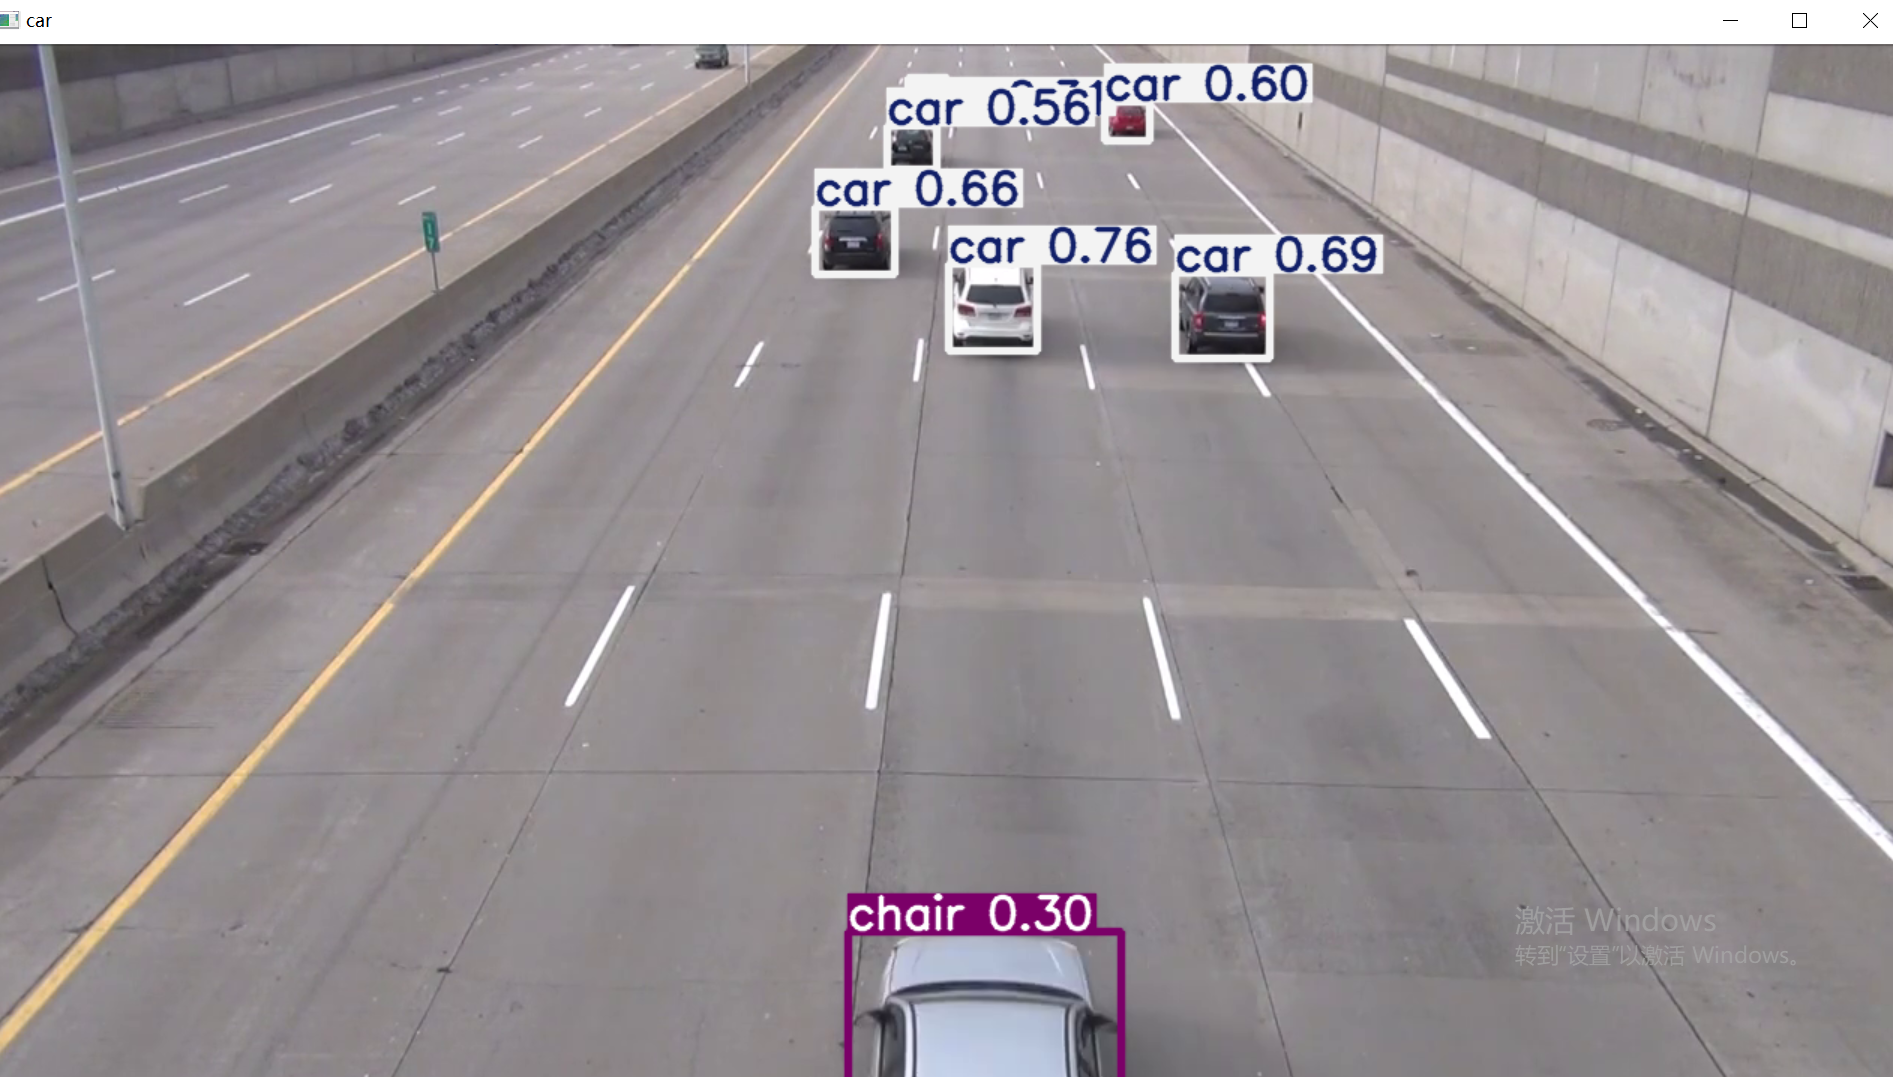
import cv2

from ultralytics import YOLO
cap = cv2.VideoCapture('car_video.mp4')
model = YOLO('yolov8n.pt')

while(1):
    ret , fram = cap.read()#imgread会返回两个值,一个ret真假,一个fram一帧图片,所以用循环,吧视频的所有帧都循环出来
    results = model(fram)
    fram1= fram.copy()
    for result in results:
        boxes = result.boxes
        names = result.names
        for box in boxes:
            box_results = box.cls[0]
            names_reults= names[int(box_results)]
            if names_reults == 'car':
                x1,y1,x2,y2 = map(int,box.xyxy[0])#这里其实就是,之前返回值里面的东西只是提取出来了,
                cv2.rectangle(fram1,(x1,y1),(x2,y2),(255,0,0),5)
                conf = float(box.conf[0])
                text = names_reults
                content = f'{text},{conf:.2f} '
                cv2.putText(fram1,content,(x1,y1-10),cv2.FONT_HERSHEY_SIMPLEX, 0.5, (0, 255, 0), 2)

    cv2.imshow('car',fram1)
    if cv2.waitKey(1) & 0xFF == ord('q'):
        break

cap.release()
cv2.destroyAllWindows()
运行结果(达到目的,用限制names方式限制选择,这里不深讨论如果汽车重叠不显示等等问题,只简单带大家入门,等之后在讲解)
3.这里先讲区域划分,然后讲颜色划分,kcf跟踪最后讲
这里讲的方法比较简单,不用算法只是达到效果
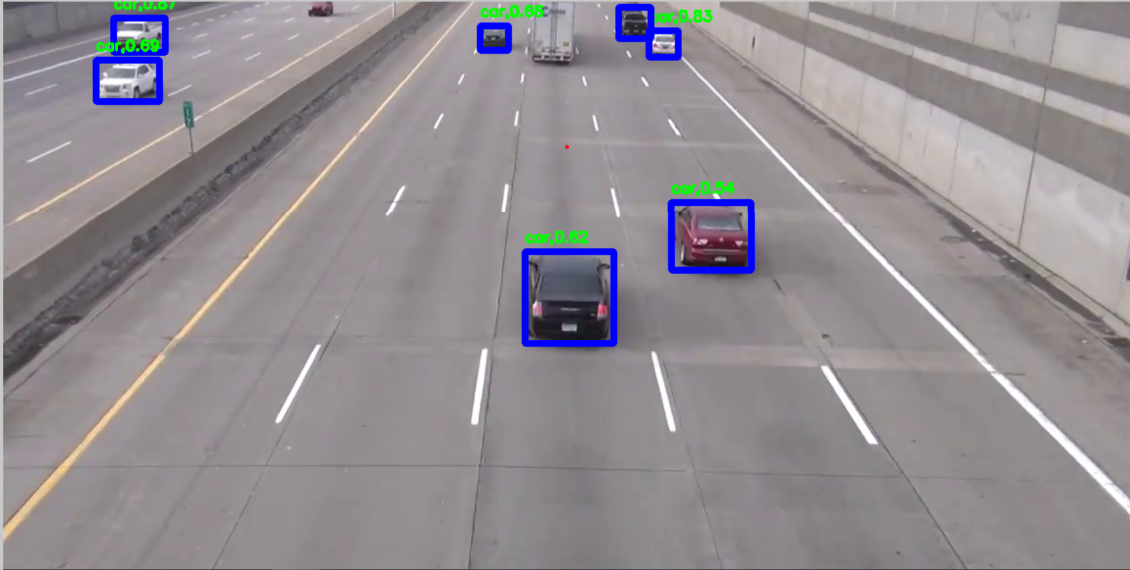
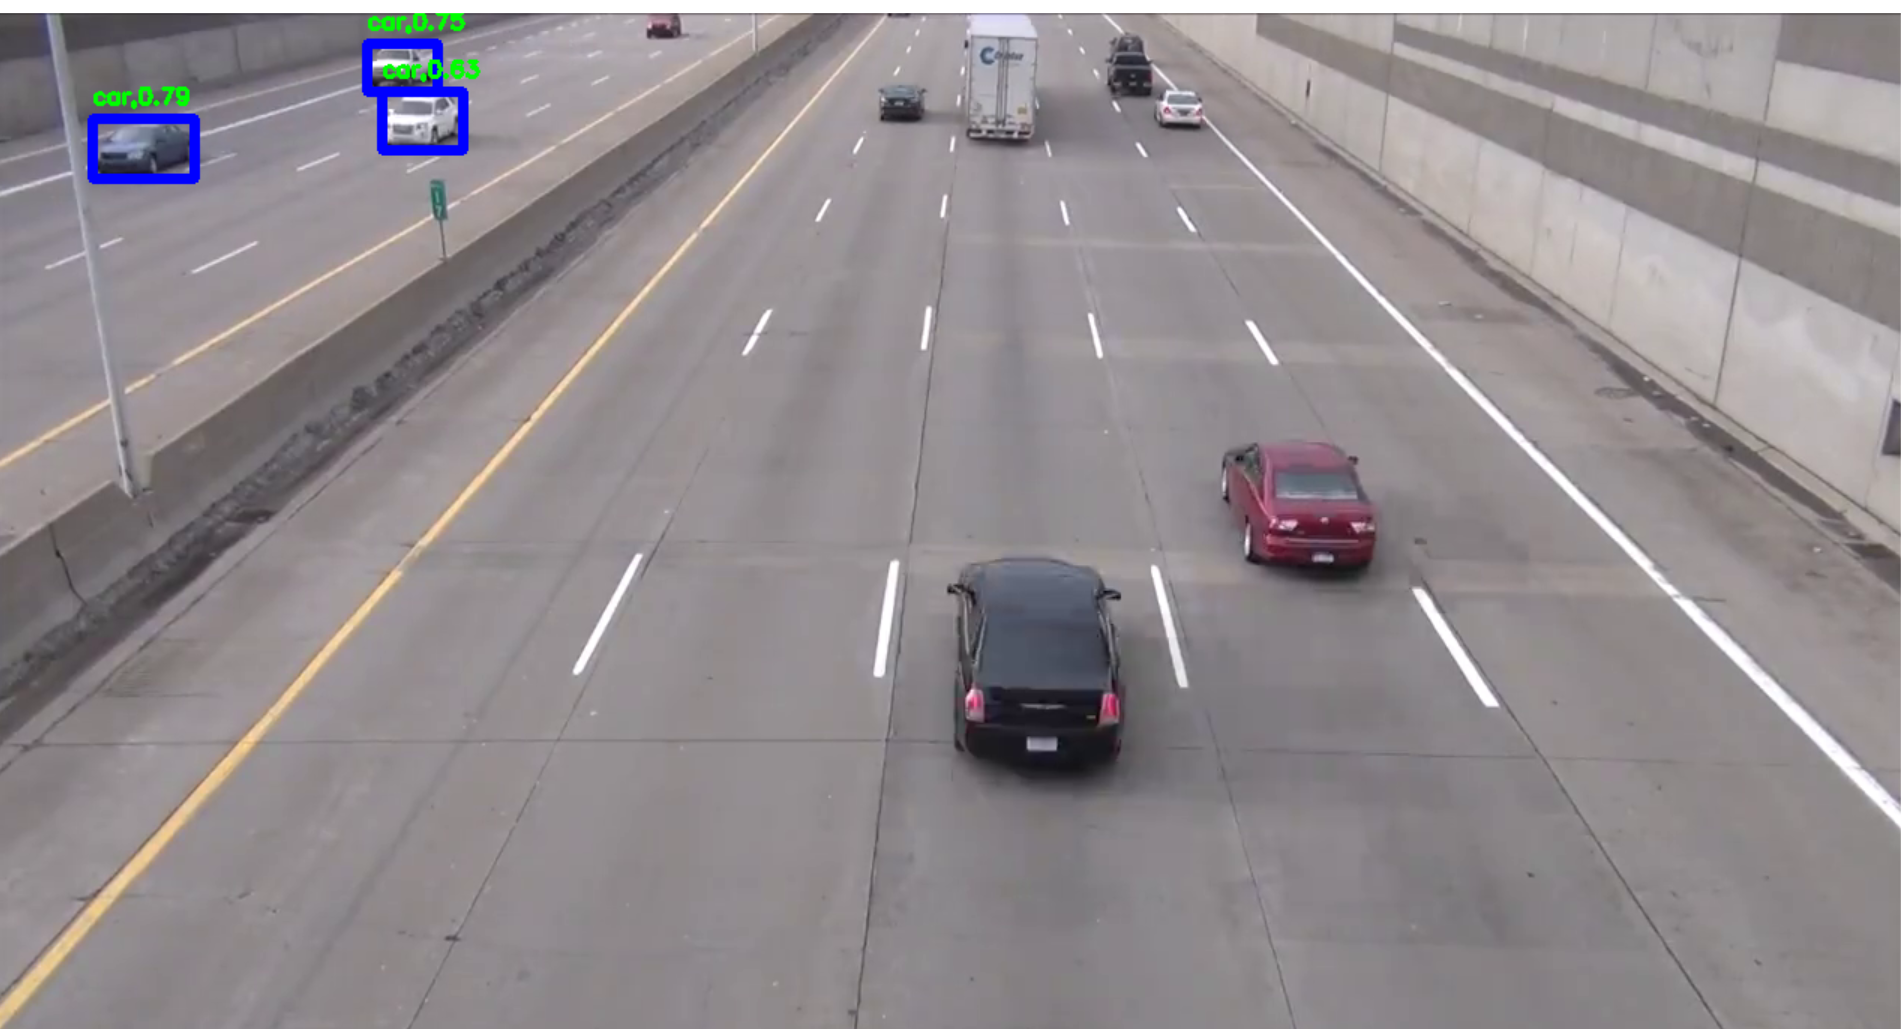
import cv2

from ultralytics import YOLO
cap = cv2.VideoCapture('car_video.mp4')
model = YOLO('yolov8n.pt')

while(1):
    ret , fram = cap.read()#imgread会返回两个值,一个ret真假,一个fram一帧图片,所以用循环,吧视频的所有帧都循环出来
    results = model(fram)


    #定义区域限制区域
    d_x1,d_y1 = 0,0
    d_x2,d_y2 = 500,500

    fram1= fram.copy()
    for result in results:
        boxes = result.boxes
        names = result.names
        for box in boxes:
            box_results = box.cls[0]
            names_reults= names[int(box_results)]
            if names_reults == 'car':
                x1,y1,x2,y2 = map(int,box.xyxy[0])
                if x1 >d_x1 and y1 >d_y1 and x2<d_x2 and y2<d_y2:
                    cv2.rectangle(fram1,(x1,y1),(x2,y2),(255,0,0),5)
                    conf = float(box.conf[0])
                    text = names_reults
                    content = f'{text},{conf:.2f} '
                    cv2.putText(fram1,content,(x1,y1-10),cv2.FONT_HERSHEY_SIMPLEX, 0.5, (0, 255, 0), 2)

    cv2.imshow('car',fram1)
    if cv2.waitKey(1) & 0xFF == ord('q'):
        break

cap.release()
cv2.destroyAllWindows()
这里是结果(其实就是在我们限制names下面在限制一个范围就可以了,用if,但我们一般图片要限定的范围是吧规整的,所以要用不同的方式,这种方式只适合垂直规整的图片或者视频,不然没办法做到完整,应为x1,y1与x2,y2是矩形的对角坐标)
3.颜色跟踪(主要方法参考了openmv的颜色跟踪方式){不要用openmv里面对摄像头一样进行取消曝光和自动均衡,不然你的摄像头就算卸载重装也是很暗,不是摄像头驱动的问题,只能通过代码调回去}
灵感是这个<追踪小球>我用opencv仿写的(如果感兴趣可以去学一下openmv他主要是单片相机,当然可以用opencv代替他,但是openmv与他们的相机绑定,有驱动,不一样用不了,所以要学就得买相机,便宜的100多,根据自己情况,也可以用我这个替代方案,用系统承载opencv就是单片机装个系统,系统里面下载opencv等,装ros用订阅的方式吧摄像头里面的图像用opencv+YOLOv8处理,怎么样让检测到物体使单片机移动那,很简单,python里面有个库叫ctypes可以掉用c语言写的文件,使用用if的方式就可以调用单片机,说直白,就是如果检测到目标,执行c语言文件,这个文件里面就是你写的单片机c语言,就可以做到视觉控制单片机,就可以达到效果)
10分钟快速上手 · OpenMV中文入门教程 这是openmv教程

好到这里就开始讲颜色识别了(openmv使用的方式是颜色阈值的检测)
老样子先上代码
这里先提供一些资源供大家学习:阈(yu)值
1.(他的这篇文章不学图片BRG变HSV,我后面讲怎么用鼠标获得HSv值,方便使用)
openCV学习笔记6—颜色转换,物体跟踪,获取阈值_opencv颜色阈值-CSDN博客
对里面可能有疑惑的地方讲解:
这里面的cv2.bitwise_and (fram,fram,mask= mask)
这里讲一下为什么要穿两给fram进行操作,说直白,就是mask与第一个fram进行位操作,只不过他会吧你想要的区域变成空白,然后用这个需要地方是空白跟你大小一样的图片与第二张图片进行位运算,得到你想要的地方,达到掩膜的效果,但是我有个问题,为什么不能的一个掩膜之后直接取反,这样我就不需要传两个了,但是取反大家回忆一下,取反是对像素操作,,而我们的掩膜是对1与0 ,而不是像素,所以不行。这里面的np.array是创建数组的意思,这里的阈值是HSV的格式,不要写错了(这篇文章的作者很厉害很不错,简单易懂)
mask我们一般称这个叫掩膜 = inRang(hsv格式的图片,最小阈值,最大阈值)
import cv2
import numpy as np

cap=cv2.VideoCapture(0)

while (1):
    #获取每一帧的图片
    ret,frame=cap.read()
    #转化为HSV
    hsv=cv2.cvtColor(frame,cv2.COLOR_BGR2HSV)

    #设定蓝色的阈值
    lower_blue=np.array([110,50,50])
    upper_blue=np.array([130,255,255])

    #根据阈值构建掩膜
    mask=cv2.inRange(hsv,lower_blue,upper_blue)

    #对原图像和掩膜进行位运算
    #src1:第一个图像(合并的第一个对象)src2:第二个图像(合并的第二个对象)mask:理解为要合并的规则。
    res=cv2.bitwise_and(frame,frame,mask=mask)

    #显示图像
    cv2.imshow('frame',frame)
    cv2.imshow('mask',mask)
    cv2.imshow('res',res)
    k=cv2.waitKey(5)&0xFF
    #按esc键退出
    if k==27:
        break

cv2.destroyAllWindows()
同理这个方法,限制的阈值穿到视频里面再结合前面讲的框目标一样,就可以达到通过颜色阈值跟踪物品的效果,当然最主要的颜色问题解决了,但是怎么样判断这个物体的hsv对应值那,如果没有这个阈值,就没办法通过颜色处理,正好opencv里面有对鼠标事件的处理,也正好讲一下,方便使用和测量。
这里讲怎么写鼠标操作,进行读取HSV值
鼠标事件介绍
EVENT_MOUSEMOVE 0            #滑动
EVENT_LBUTTONDOWN 1          #左键点击
EVENT_RBUTTONDOWN 2          #右键点击
EVENT_MBUTTONDOWN 3          #中键点击
EVENT_LBUTTONUP 4            #左键放开
EVENT_RBUTTONUP 5            #右键放开
EVENT_MBUTTONUP 6            #中键放开
EVENT_LBUTTONDBLCLK 7        #左键双击
EVENT_RBUTTONDBLCLK 8        #右键双击
EVENT_MBUTTONDBLCLK 9        #中键双击
————————————————
下面讲一下怎么用
这里偷懒
参靠Python学习笔记第七十八天(OpenCV鼠标事件)_opencv 鼠标按下事件-CSDN博客
我们现在只简单了解
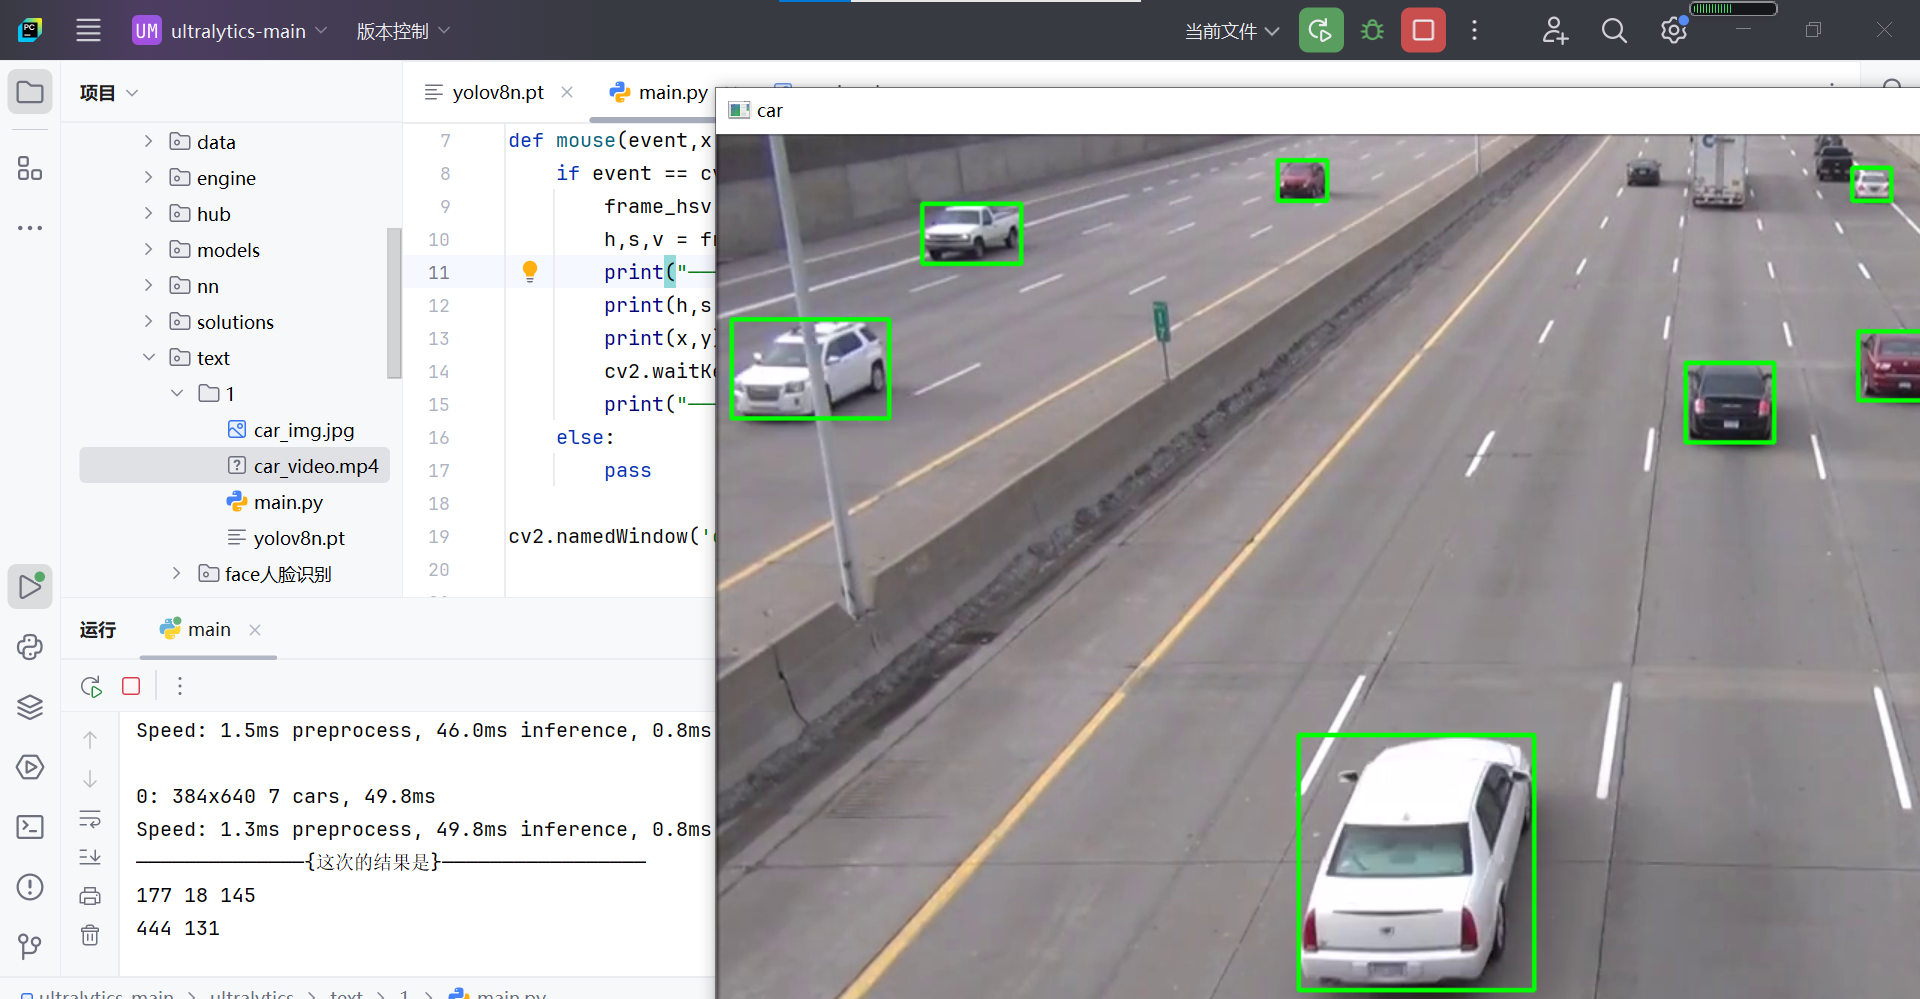
import cv2

from ultralytics import YOLO
cap = cv2.VideoCapture('car_video.mp4')
model = YOLO('yolov8n.pt')

def mouse(event,x,y,flag,frame):
    if event == cv2.EVENT_LBUTTONDOWN:
        frame_hsv = cv2.cvtColor(frame,cv2.COLOR_BGR2HSV)
        h,s,v = frame_hsv[y,x]
        print("——————————————{这次的结果是}—————————————————")
        print(h,s,v)
        print(x,y)
        cv2.waitKey(0)
        print("—————————————{请输入任意键继续}————————————————")
    else:
        pass

cv2.namedWindow('car')


while(1):
    ret , frame = cap.read()#imgread会返回两个值,一个ret真假,一个fram一帧图片,所以用循环,吧视频的所有帧都循环出来
    results = model(frame)
    for result in results:
        boxes = result.boxes
        for box in boxes:
            x1,y1,x2,y2 = map(int,box.xyxy[0])
            cv2.rectangle(frame, (x1, y1), (x2, y2), (0, 255, 0), 2)
    cv2.setMouseCallback('car', mouse, frame)


    cv2.imshow('car', frame)
    if cv2.waitKey(1) & 0xFF == ord('q'):
        break

cap.release()
cv2.destroyAllWindows()
效果展示(英文状态下键盘点击就可以进行视频,第一行是点击位置这张图HSV对应的hsv三个的值,可以用来颜色跟踪,第二行是鼠标的x,y坐标,这个算是一个小工具,同理,你也可以弄出来点击返回GRAY图的坐标颜色等等)
4.kcf算法跟踪车辆
先上代码在讲解
{ 先选择ROI区域bbox
创建跟踪器tracker
初始化跟踪器与ROI和图片
使用跟踪器读取,返回数据
处理数据
显示
}我这个可以避免绝大多数的问题,我也是网上根本找不到解决方法,只能问ai最好也是弄出来了
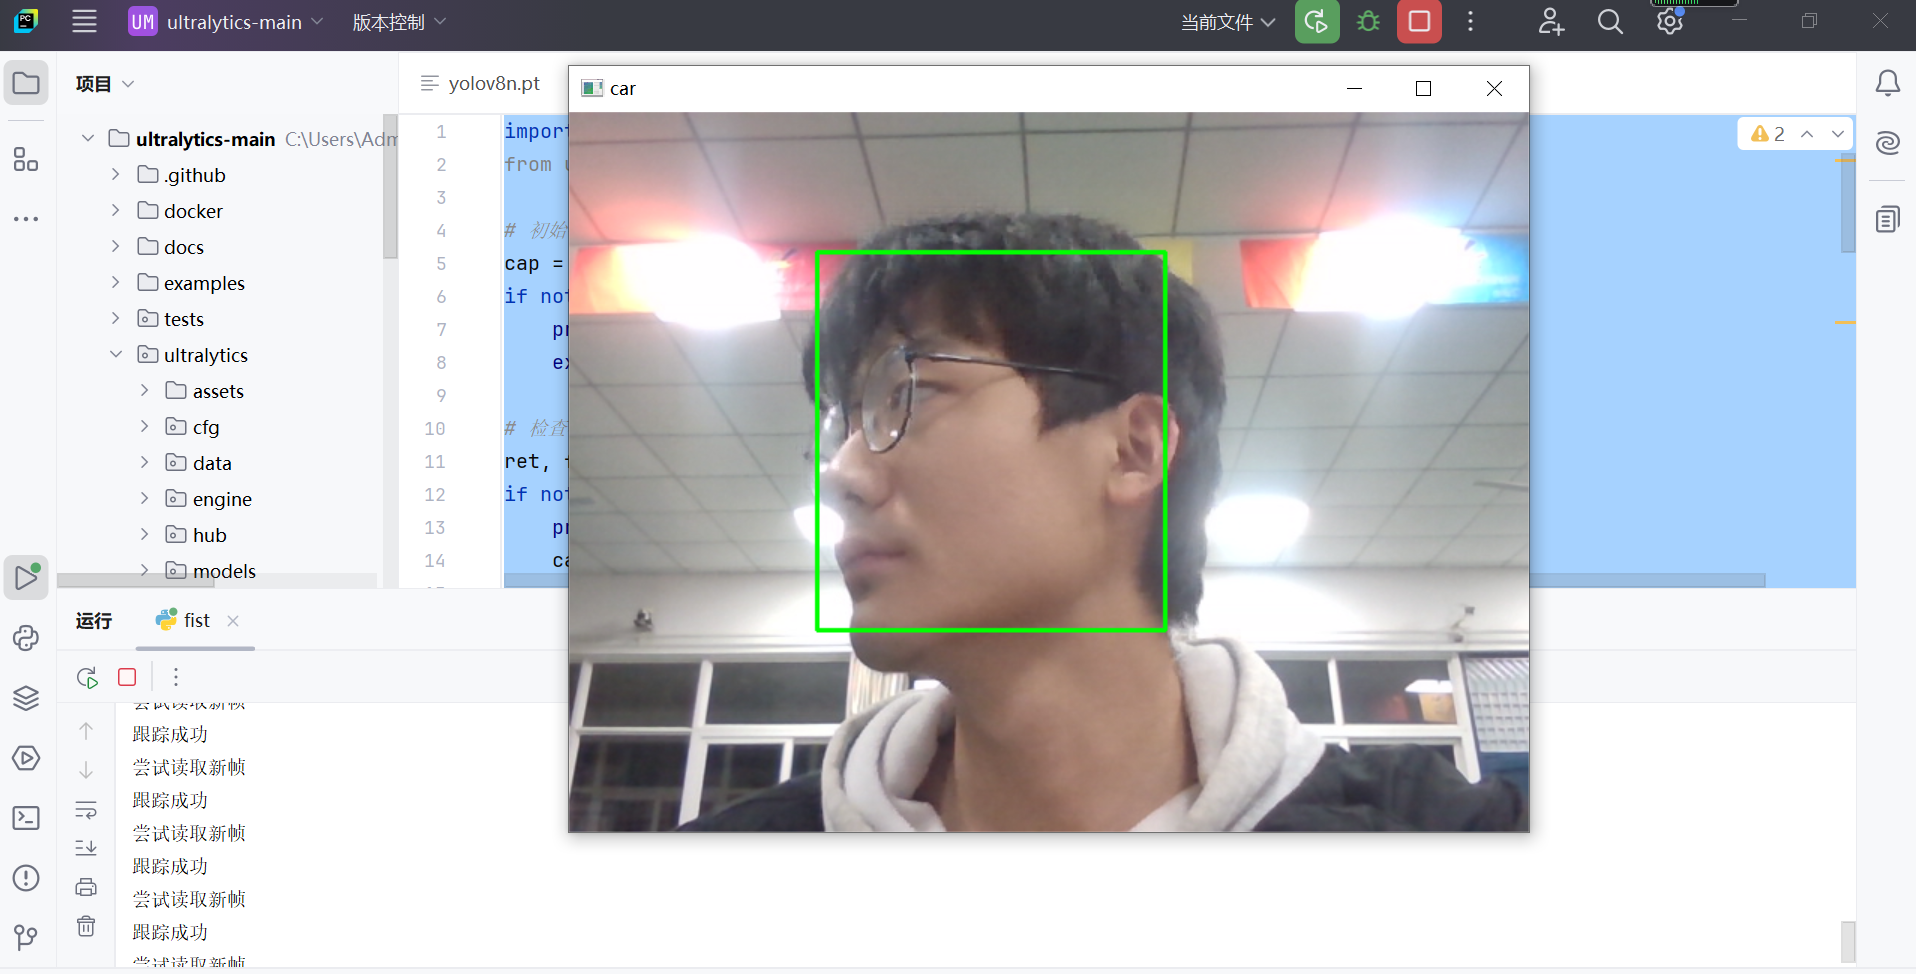
import cv2
from ultralytics import YOLO

# 初始化视频捕获
cap = cv2.VideoCapture(0)
if not cap.isOpened():
    print('读取失败摄像头')
    exit()

# 检查视频是否成功打开
ret, frame = cap.read()
if not ret:
    print('第一个读取失败')
    cap.release()
    exit()

bbox = cv2.selectROI("car", frame, False)
if bbox == (0, 0, 0, 0):
    print("未选择有效的 ROI,程序退出")
    cap.release()
    exit()

print("成功选择 ROI,准备初始化跟踪器")
# 创建 KCF 跟踪器
tracker = cv2.legacy.TrackerKCF_create() if hasattr(cv2.legacy, 'TrackerKCF_create') else cv2.TrackerKCF_create()
# 初始化跟踪器
if not tracker.init(frame, bbox):
    print("跟踪器初始化失败")
    cap.release()
    exit()

# 主循环
while True:
    print('尝试读取新帧')
    # 读取新帧
    ret, frames = cap.read()
    if not ret:
        print('读取新帧失败')
        break

    rets, bbox = tracker.update(frames)
    if rets:
        print('跟踪成功')
        x, y, w, h = [int(v) for v in bbox]
        cv2.rectangle(frames, (x, y), (x + w, y + h), (0, 255, 0), 2)

    # 显示处理后的帧
    cv2.imshow('car', frames)

    # 按 q 键退出
    if cv2.waitKey(30) & 0xFF == ord('q'):
        break

# 释放资源
cap.release()
cv2.destroyAllWindows()
效果,这是摄像头,跟踪我的头
到这里所有要讲的都讲完了,恭喜你学到了很多的功能,当然我的水平有限,大家可以提出来,我来改正,谢谢


 2854
2854

 被折叠的 条评论
为什么被折叠?
被折叠的 条评论
为什么被折叠?
 到【灌水乐园】发言


