


代码来源:
一、基础环境:
1. ubuntu 22.04,架构x86_64
hostnamectl
Static hostname: lthpc-SYS-4028GR-TR2-BO004
Icon name: computer-server
Chassis: server
Machine ID: f6e35879a62a4f358c80f4bf48dde0bc
Boot ID: 59612ec3df444c1cada3ca2aabde2612
Operating System: Ubuntu 22.04 LTS
Kernel: Linux 6.5.0-41-generic
Architecture: x86-64
Hardware Vendor: Supermicro
Hardware Model: SYS-4028GR-TR2-BO004
2. g++和gcc,输入g++ -v和gcc -v
g++ -v gcc -v
(base) root@test:~$ g++ -v
Using built-in specs.
COLLECT_GCC=g++
COLLECT_LTO_WRAPPER=/usr/lib/gcc/x86_64-linux-gnu/7/lto-wrapper
OFFLOAD_TARGET_NAMES=nvptx-none
OFFLOAD_TARGET_DEFAULT=1
Target: x86_64-linux-gnu
Configured with: …/src/configure -v --with-pkgversion=‘Ubuntu 7.5.0-3ubuntu1~18.04’ --with-bugurl=file:///usr/share/doc/gcc-7/README.Bugs --enable-languages=c,ada,c++,go,brig,d,fortran,objc,obj-c++ --prefix=/usr --with-gcc-major-version-only --program-suffix=-7 --program-prefix=x86_64-linux-gnu- --enable-shared --enable-linker-build-id --libexecdir=/usr/lib --without-included-gettext --enable-threads=posix --libdir=/usr/lib --enable-nls --enable-bootstrap --enable-clocale=gnu --enable-libstdcxx-debug --enable-libstdcxx-time=yes --with-default-libstdcxx-abi=new --enable-gnu-unique-object --disable-vtable-verify --enable-libmpx --enable-plugin --enable-default-pie --with-system-zlib --with-target-system-zlib --enable-objc-gc=auto --enable-multiarch --disable-werror --with-arch-32=i686 --with-abi=m64 --with-multilib-list=m32,m64,mx32 --enable-multilib --with-tune=generic --enable-offload-targets=nvptx-none --without-cuda-driver --enable-checking=release --build=x86_64-linux-gnu --host=x86_64-linux-gnu --target=x86_64-linux-gnu
Thread model: posix
gcc version 7.5.0 (Ubuntu 7.5.0-3ubuntu1~18.04)
(base) root@test:~$ gcc -v
Using built-in specs.
COLLECT_GCC=gcc
COLLECT_LTO_WRAPPER=/usr/lib/gcc/x86_64-linux-gnu/7/lto-wrapper
OFFLOAD_TARGET_NAMES=nvptx-none
OFFLOAD_TARGET_DEFAULT=1
Target: x86_64-linux-gnu
Configured with: …/src/configure -v --with-pkgversion=‘Ubuntu 7.5.0-3ubuntu1~18.04’ --with-bugurl=file:///usr/share/doc/gcc-7/README.Bugs --enable-languages=c,ada,c++,go,brig,d,fortran,objc,obj-c++ --prefix=/usr --with-gcc-major-version-only --program-suffix=-7 --program-prefix=x86_64-linux-gnu- --enable-shared --enable-linker-build-id --libexecdir=/usr/lib --without-included-gettext --enable-threads=posix --libdir=/usr/lib --enable-nls --enable-bootstrap --enable-clocale=gnu --enable-libstdcxx-debug --enable-libstdcxx-time=yes --with-default-libstdcxx-abi=new --enable-gnu-unique-object --disable-vtable-verify --enable-libmpx --enable-plugin --enable-default-pie --with-system-zlib --with-target-system-zlib --enable-objc-gc=auto --enable-multiarch --disable-werror --with-arch-32=i686 --with-abi=m64 --with-multilib-list=m32,m64,mx32 --enable-multilib --with-tune=generic --enable-offload-targets=nvptx-none --without-cuda-driver --enable-checking=release --build=x86_64-linux-gnu --host=x86_64-linux-gnu --target=x86_64-linux-gnu
Thread model: posix
gcc version 7.5.0 (Ubuntu 7.5.0-3ubuntu1~18.04)
3. 显卡驱动版本535.183.01,
nvidia-smi

4. CUDA版本11.8
nvcc -V
nvcc: NVIDIA ® Cuda compiler driver
Copyright © 2005-2022 NVIDIA Corporation
Built on Tue_Mar__8_18:18:20_PST_2022
Cuda compilation tools, release 11.6, V11.6.124
Build cuda_11.8.r11.8/compiler.31057947_0
二、CUDA如果已下载,跳过以下的下载过程:
(1) CUDA11.8版本下载
下载地址https://developer.nvidia.com/cuda-11-8-0-download-archive↳

(2) 输入图中的命令sudo sh cuda_11.8.0_520.61.05_linux.run后,等待一会,出现以下命令框,选择continue

(3) 输入accept

(4) 如果已安装显卡驱动(见上)且驱动版本满足CUDA11.8的要求,要取消勾选Driver

(5) 等待安装。安装成功后,输入以下命令:
ls /usr/local/
(base) root@test:~$ ls /usr/local/
bin cuda cuda-11.8 etc games include lib man sbin share src sunlogin
(6) 可以看到已经成功安装cuda-11.8,但还需要配置环境变量
vim ~/.bashrc
(base) root@test:~$ vim ~/.bashrc
(7) 添加以下环境变量内容(重要)
export PATH=/usr/local/cuda-11.8/bin${PATH:+:${PATH}}export LD_LIBRARY_PATH=/usr/local/cuda-11.8/lib64${LD_LIBRARY_PATH:+:${LD_LIBRARY_PATH}}
输入vim指令 :wq 保存更改
(8) 输入以下指令,使上述环境变量生效
source ~/.bashrc
(base) root@test:~$ source ~/.bashrc
(9) 添加完后,输入nvcc -V,可看到cuda版本信息
nvcc -V
(base) root@test:~$ nvcc -V
nvcc: NVIDIA ® Cuda compiler driver
Copyright © 2005-2022 NVIDIA Corporation
Built on Wed_Sep_21_10:33:58_PDT_2022
Cuda compilation tools, release 11.8, V11.8.89
Build cuda_11.8.r11.8/compiler.31833905_0
(10) 输入which nvcc,可看到nvcc安装位置
which nvcc
(base) root@test:~$ which nvcc
/usr/local/cuda-11.8/bin/nvcc
至此,CUDA安装成功
三、配置3D Gaussian Splatting环境
1. 拉取github代码,注意带上–recursive后缀(会拉取子模块的代码)。
git clone https://github.com/graphdeco-inria/gaussian-splatting --recursive
2. 拉取后查看以下两个文件夹中 是否是非空
gaussian-splatting/submodules/diff-gaussian-rasterization gaussian-splatting/submodules/diff-gaussian-rasterization/third_party/glm
3. 查看environment.yaml文件 原内容
name: gaussian_splatting
channels:
- pytorch
- conda-forge
- defaults
dependencies:- cudatoolkit=11.6
- plyfile
- python=3.7.13
- pip=22.3.1
- pytorch=1.12.1
- torchaudio=0.12.1
- torchvision=0.13.1
- tqdm
- pip:
- submodules/diff-gaussian-rasterization
- submodules/simple-knn↳
4. 本文不采用以上配置,因为在执行pip submodules时,可能会卡住。
(1) 分别执行命令:
cd gaussian-splatting conda create -n gaussian_splatting python=3.8 conda activate gaussian_splatting
(2) 安装torch,Previous PyTorch Versions | PyTorch

pip install torch==2.0.0 torchvision==0.15.1 torchaudio==2.0.1 --index-url https://download.pytorch.org/whl/cu118
经过漫长地等待,输入以下命令验证torch 和CUDA可用
python import torch print(torch.cuda.is_available()) exit()
(gaussian_splatting) root@test:~/postg/thesis/gaussian-splatting$ python
Python 3.7.13 (default, Oct 18 2022, 18:57:03)
[GCC 11.2.0] :: Anaconda, Inc. on linux
Type “help”, “copyright”, “credits” or “license” for more information.
>>> import torch
>>> print(torch.cuda.is_available())
True↳>>> exit()
(3) 执行安装子模块,这一步容易报错
pip install submodules/diff-gaussian-rasterization pip install submodules/simple-knn
可能会报错,报错信息:
cc1plus: fatal error: cuda_runtime.h: No such file or directory
gcc: fatal error: cannot execute ‘cc1plus’: execvp: No such file or directory
packages/torch/utils/cpp_extension.py", line 1785, in _write_ninja_file_and_compile_objects _run_ninja_build( File “/home/gyw/anaconda3/envs/pgsr/lib/python3.8/site-packages/torch/utils/cpp_extension.py”, line 2121, in _run_ninja_build raise RuntimeError(message) from e RuntimeError: Error compiling objects for extension [end of output] note: This error originates from a subprocess, and is likely not a problem with pip. ERROR: Failed building wheel for diff_plane_rasterization Running setup.py clean for diff_plane_rasterization Failed to build diff_plane_rasterization ERROR: ERROR: Failed to build installable wheels for some pyproject.toml based projects (diff_plane_rasterization)
先查看是否已安装c语言编译环境(见上)
gcc -vg++ -v
(gaussian_splatting) root@test:~/postg/thesis/gaussian-splatting$ gcc -v
Using built-in specs.
COLLECT_GCC=gcc
COLLECT_LTO_WRAPPER=/usr/lib/gcc/x86_64-linux-gnu/9/lto-wrapper
OFFLOAD_TARGET_NAMES=nvptx-none:hsa
OFFLOAD_TARGET_DEFAULT=1
Target: x86_64-linux-gnu
Configured with:
Thread model: posix
gcc version 9.4.0 (Ubuntu 9.4.0-1ubuntu1~20.04.2)
注意红色的部分,如果红色部分是某个conda环境的路径,就删除此conda环境
如果已安装,再查看是否已配置bashrc中的环境变量(见上)
export PATH=/usr/local/cuda-11.8/bin${PATH:+:${PATH}}export LD_LIBRARY_PATH=/usr/local/cuda-11.8/lib64${LD_LIBRARY_PATH:+:${LD_LIBRARY_PATH}}
(4) 执行安装剩余包
pip install plyfile tqdm
制作数据集并训练
在此不做赘述,参考我的另一篇文章colmap。步骤大致相同,值得注意的是:
在进行特征提取时候记得选择相机模型,最好不要使用默认的,选择SIMPLE——PINHOLE和PINHOLE均可


结束后点击Processing旁边的Reconstruction,选择Start Reconstruction,等待结束
在完成这一步后我们最好查看一下是否每一张图片都被匹配到了,可能会出现没重建上的情况,这些图片要留意,后面我们要删除。
结束后,点击File,选择Export model,这里一定注意不要直接保存,需要新建两个文件夹(sparse,0),请保持一致 nerf原代码中固定了sparse/0文件夹的名称
结束后检查文件夹中的东西:
sparse/0/有三个bin文件和一个project.ini即可。在根目录下还应该有一个.db文件,这是第一步你创建project时候就生成的。
在gaussian-splating1目录下新建data文件夹
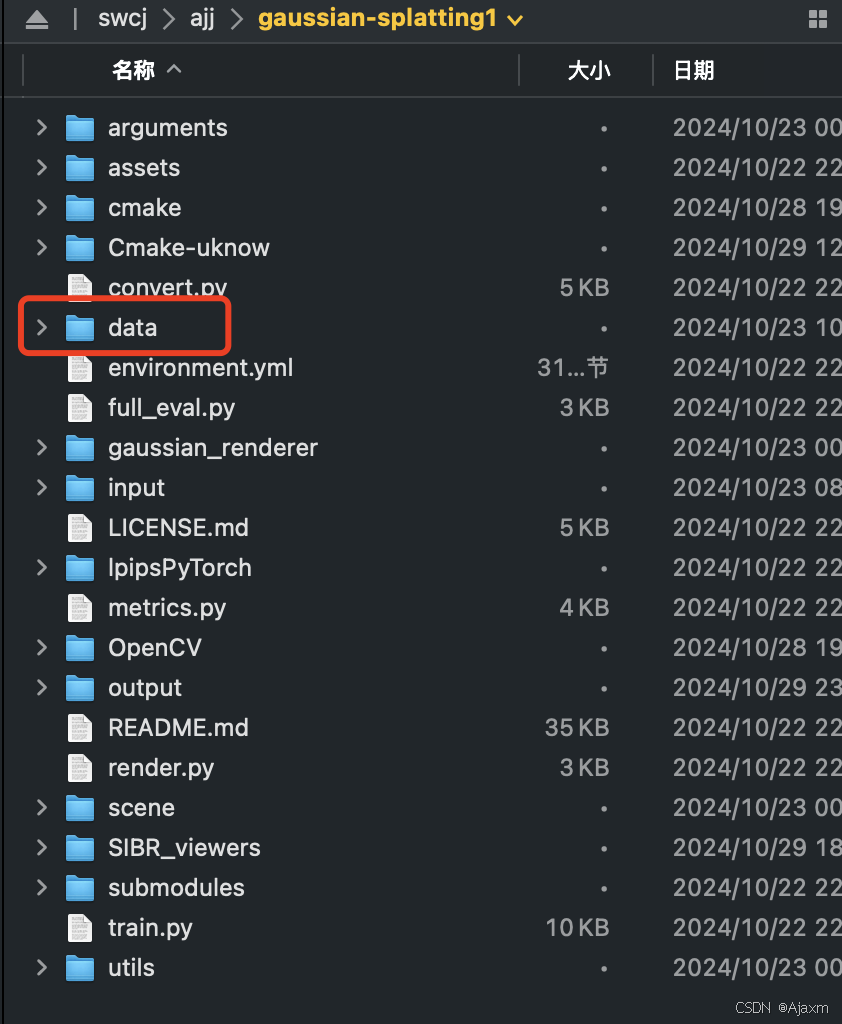
将其中的上面准备好的(包含sparse和images)的文件复制到data文件夹中

然后直接训练即可:
python train.py -s data/truck/ data/output
会自动生成输出结果文件夹,结果的树结构如下
(base) root@test:~/postg/thesis/gaussian-splatting/data$ tree output
output
├── cameras.json
├── cfg_args
├── input.ply
└── point_cloud
├── iteration_30000
│ └── point_cloud.ply
└── iteration_7000
└── point_cloud.ply↳4 directories, 5 files
四、 可视化结果
这可以是说是坑最多的地方了,坑多到博主耗费了将近一个星期的时间直到现在还没搞定。
官方为可视化提供了两种途径Windows版本和Linux版本,这两种途径的难易程度可以说是天差地别,我们先来说简单的:
Windows版可视化
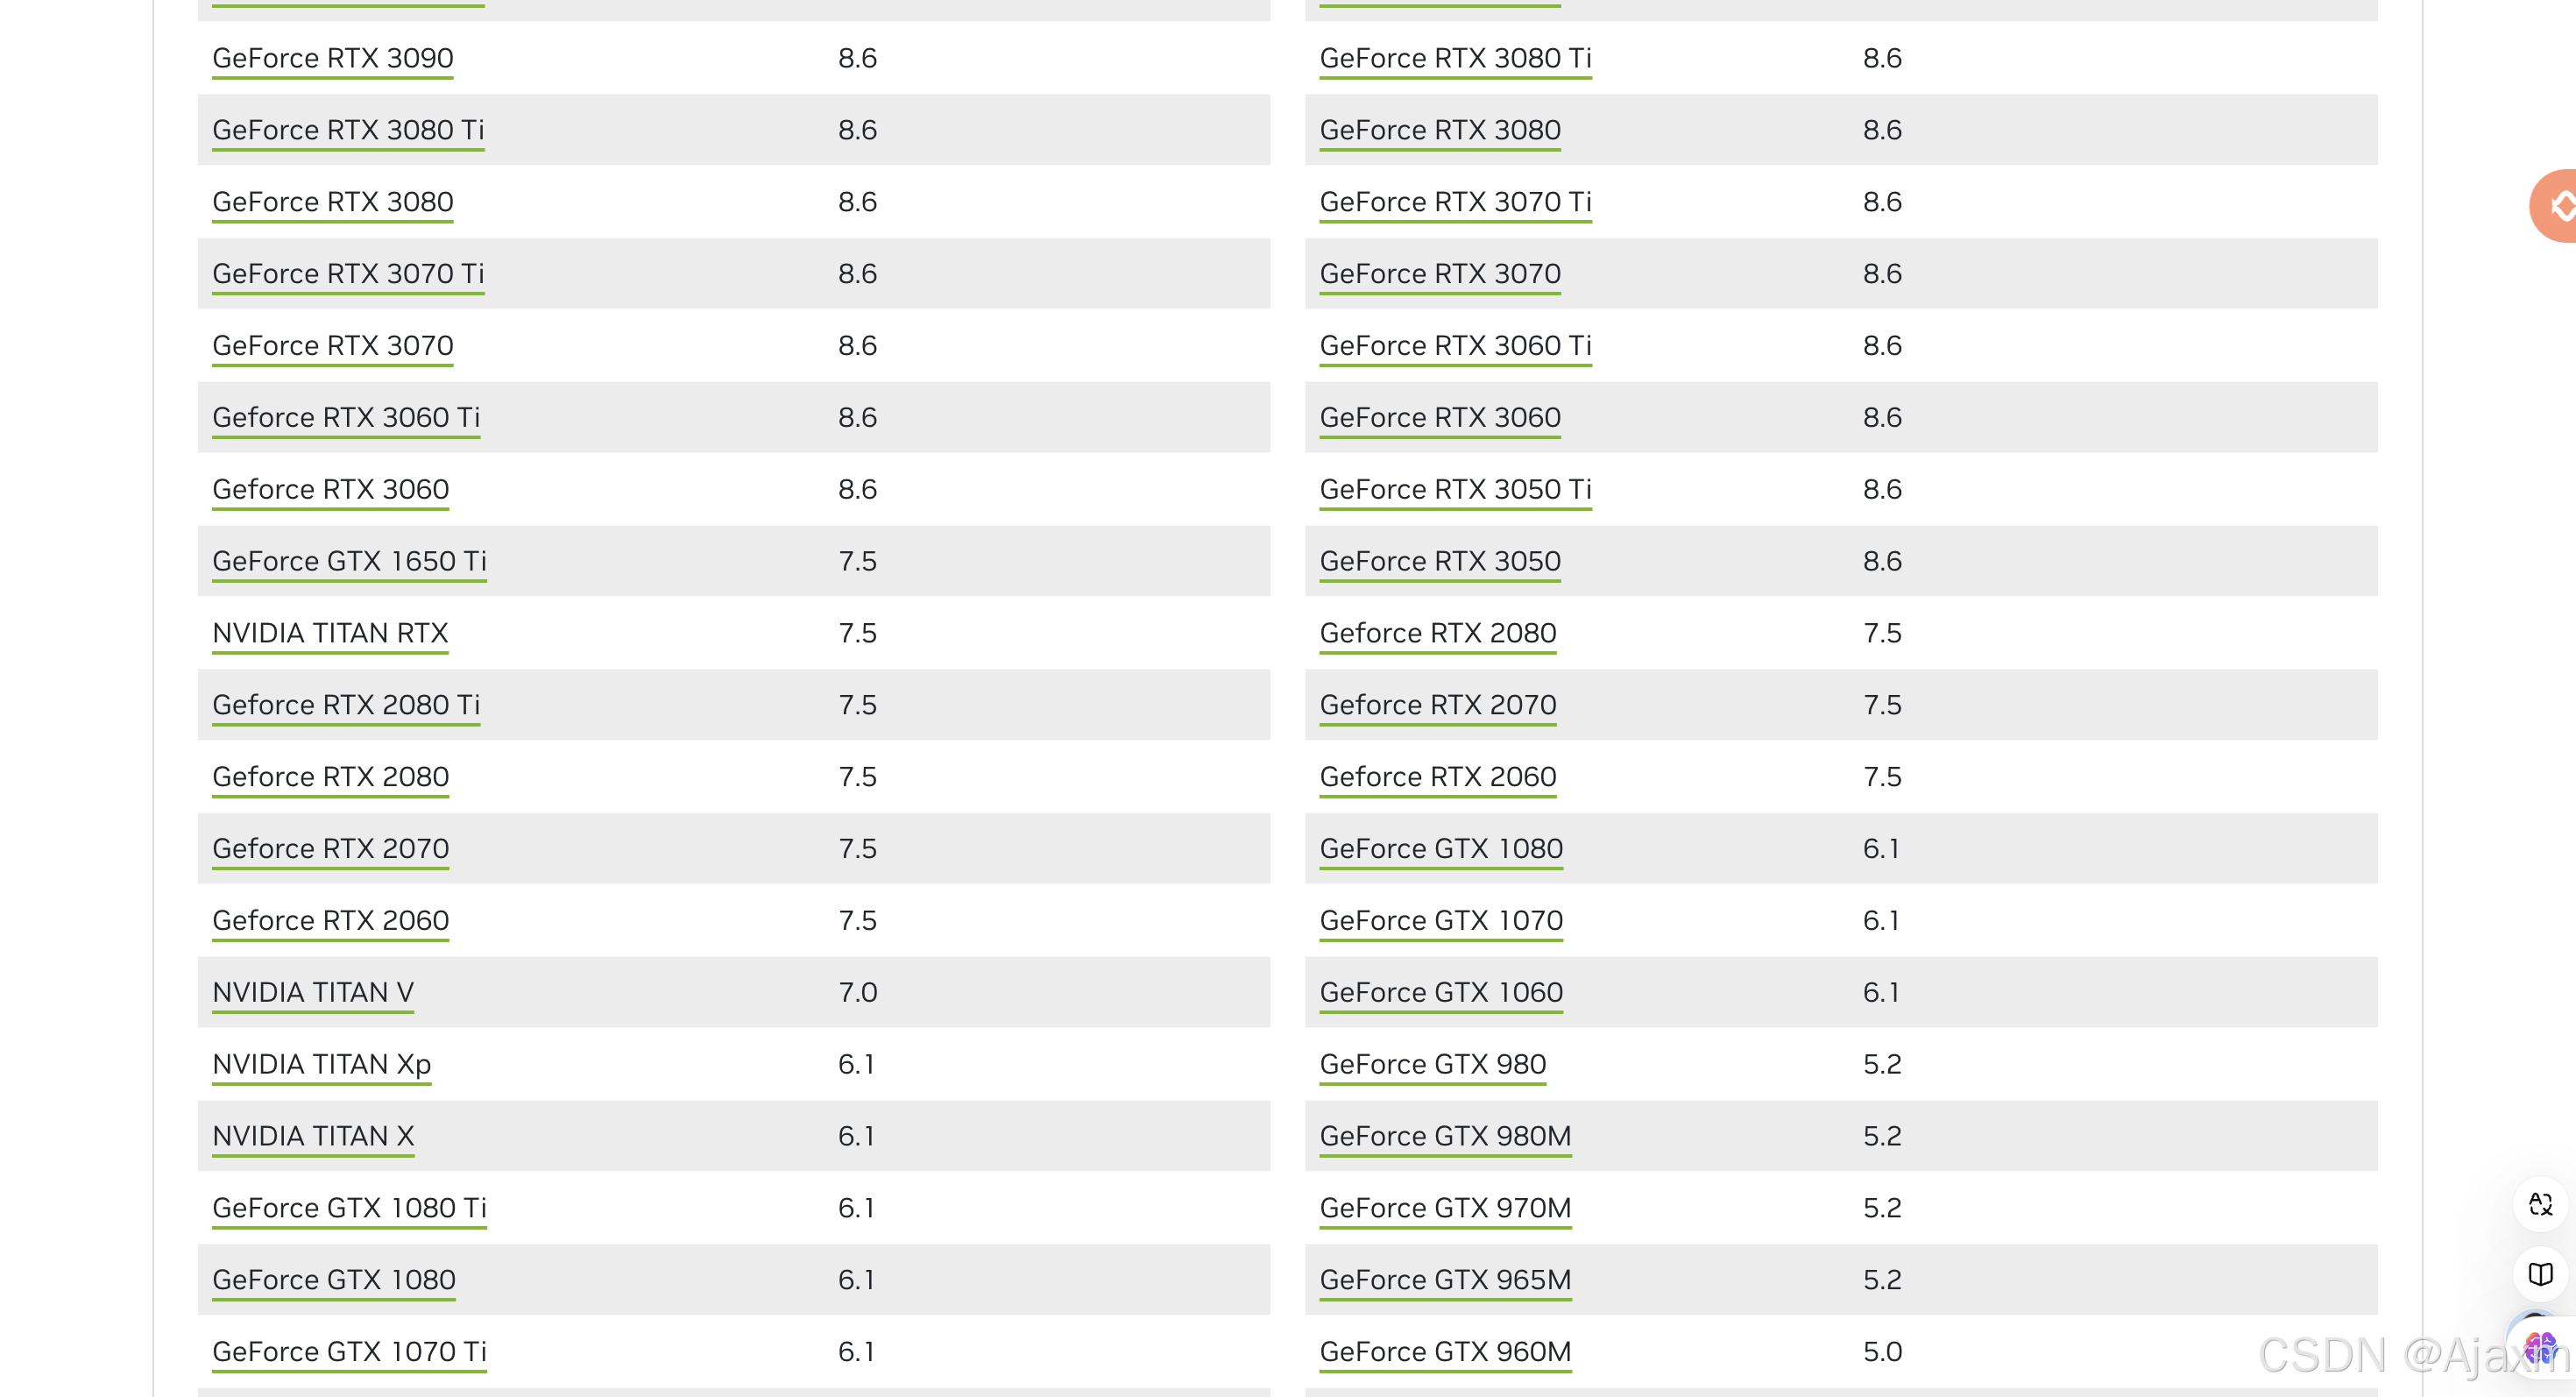
首先
你要确定你的显卡算力,通过https://developer.nvidia.com/cuda-gpus 查看,要求算力必须大于7,如果比7小,那就跟博主一样,软件打开就会闪退,可以直接移步Linux部分了:
若你的算力大于7,那恭喜,已经完成百分之八十了,
接下来
我们下载Windows下的可视化SIBR_viewers应用下载https://repo-sam.inria.fr/fungraph/3d-gaussian-splatting/binaries/viewers.zip↳
并解压
然后
我们将刚才训练过后的output文件夹整体移动至viewers下

最后
在终端打开cmd命令
.\bin\SIBR_gaussianViewer_app.exe -m .\output
等待,即可视化成功
可视化效果:

使用w a s d q e来前后上下平移镜头,使用i j k l u o来左右上下移动视角
Linux版可视化
这可以说是巨麻烦,坑多到踩不完,请好充分的心理准备,再继续。
参考&致谢
以下是我的参考文章,可能会对你们的问题有帮助,感谢他们:
Linux Ubuntu 20.04LTS安装OpenSSL步骤_ubuntu安装openssl-CSDN博客
ubuntu安装cmake的三种方法(超方便!)-CSDN博客
opencv编译与anaconda下lib冲突,屏蔽anaconda编译opencv_anaconda opencv冲突 lib-CSDN博客
在ubuntu下安装opencv4.1.0详细步骤_ubuntu22.04安装opencv4.10-CSDN博客
【已解决】Ubuntu 20.04 编译OpenCV 动态链接库指向版本不一致导致出错_ubuntu opencv ffi-CSDN博客
Ubuntu中安装openCV3.4.12编译过程中与Anaconda冲突_编译opencv-4.6之前我安装了anaconda3,系统库的路径被覆盖掉-CSDN博客
Linux Ubuntu 20.04LTS安装OpenSSL步骤_ubuntu安装openssl-CSDN博客
退出conda环境
建议退出conda环境,conda环境的libtiff.so等动态链接库可能会影响到opencv的安装
conda deactivate
出现第一个问题,参考以下博客进行解决:
Ubuntu中安装openCV3.4.12编译过程中与Anaconda冲突_编译opencv-4.6之前我安装了anaconda3,系统库的路径被覆盖掉-CSDN博客
openssl的安装
cmake的安装需要OpenSSL 的头文件和库文件,Ubuntu 20.04LTS 系统自带 OpenSSL ,但是这个OpenSSL 是没有<头文件.h>和<动态库文件.so及静态库文件.a>的,所以需要手动下载。
sudo apt-get install libssl-dev
my@test:~/下载$ sudo apt-get install libssl-dev
正在读取软件包列表… 完成
正在分析软件包的依赖关系树
正在读取状态信息… 完成…
此方法会把OpenSSL的头文件放在 “/usr/include/openssl” ,动态库文件(libssl.so、libcrypto.so)、静态库文件(libssl.a、libcrypto.a)均放在 “/lib/x86_64-linux-gnu”
未下载OpenSSL头文件、库文件,cmake安装会报以下错误:Could not find OpenSSL

cmake的安装
1. cmake下载
Download CMake cmake网址

点击上述链接进入gitlab页面可下载cmake指定版本,以及可查看安装过程的指令CMake / CMake · GitLabCMake, the cross-platform, open-source build system. https://gitlab.kitware.com/cmake/cmake
本文使用cmake3.30.4 source源码版本

2. 解压
tar -xvzf cmake-3.30.4.tar.gz
my@test:~/下载$ tar -xvzf cmake-3.30.4.tar.gz
cmake-3.30.4/
cmake-3.30.4/.clang-format
cmake-3.30.4/.clang-tidy
cmake-3.30.4/Auxiliary/
cmake-3.30.4/Auxiliary/CMakeLists.txt
cmake-3.30.4/Auxiliary/bash-completion/…
当然,如果是ubuntu桌面版,可以直接右击“提取到…”
3. 执行“文件检查&编译&安装”
cd cmake-3.30.4/./bootstrap && make -j8 && sudo make install
my@test:~/下载$ cd cmake-3.30.4/
my@test:~/下载/cmake-3.30.4$ ./bootstrap && make -j8 && sudo make install
---------------------------------------------
CMake 3.30.4, Copyright 2000-2024 Kitware, Inc. and Contributors
Found GNU toolchain
C compiler on this system is: gcc
C++ compiler on this system is: g++
Makefile processor on this system is: make
g++ has setenv
g++ has unsetenv…
---------------------------------------------
CMake has bootstrapped. Now run make.
[ 0%] Building C object Source/kwsys/CMakeFiles/cmsys.dir/ProcessUNIX.c.o
[ 0%] Building C object Source/kwsys/CMakeFiles/cmsys.dir/Base64.c.o
[ 0%] Building C object Source/kwsys/CMakeFiles/cmsys.dir/EncodingC.c.o…
[ 1%] Built target cmsys
[ 2%] Built target cmsys_c
[ 3%] Built target cmsysTestsC
[ 3%] Built target testConsoleBufChild
cmake安装到了/usr/local/share/cmake-3.30路径
报错
CMake Error at /home/my/anaconda3/lib/cmake/Qt5Gui/Qt5GuiConfigExtras.cmake:9 (message):
Failed to find “GL/gl.h” in
“/home/my/anaconda3/include;/croot/qt-main_1693210824277/_build_env/x86_64-conda-linux-gnu/sysroot/usr/include;/croot/qt-main_1693210824277/_build_env/x86_64-conda-linux-gnu/sysroot/usr/include/libdrm;/croot/qt-main_1693210824277/_build_env/x86_64-conda-linux-gnu/sysroot/usr/include”.
Call Stack (most recent call first):
/home/my/anaconda3/lib/cmake/Qt5Gui/Qt5GuiConfig.cmake:233 (include)
/home/my/anaconda3/lib/cmake/Qt5Widgets/Qt5WidgetsConfig.cmake:100 (find_package)
Tests/CMakeLists.txt:280 (find_package)

会看到链接动态库到anaconda了,是由于没退出anaconda base环境造成的,先conda deactivate,再删除CMakeCache.txt,重新./bootstrap && make -j8 && sudo make install
5. 软链接
sudo ln -sf /usr/local/bin/cmake /usr/bin/
6. 验证版本
my@test:~/下载/cmake-3.30.4$ cmake --version
cmake version 3.30.4CMake suite maintained and supported by Kitware (kitware.com/cmake).
opencv的安装
1. 下载依赖
sudo apt-get install build-essential unzip pkg-configsudo apt-get install libjpeg-dev libpng-dev libtiff-devsudo apt-get install libavcodec-dev libavformat-dev libswscale-dev libv4l-devsudo apt-get install libxvidcore-dev libx264-devsudo apt-get install libgtk-3-devsudo apt-get install libatlas-base-dev gfortransudo apt-get install python3-dev
2. opencv下载
https://opencv.org/releases/ opencv下载
https://github.com/opencv/opencv_contrib/releases/tag/4.10.0 opencv_contrib下载

3. 解压
unzip opencv-4.10.0.zipunzip opencv_contrib-4.10.0.zip
my@test:~/下载$ unzip opencv-4.10.0.zip
Archive: opencv-4.10.0.zip
71d3237a093b60a27601c20e9ee6c3e52154e8b1
creating: opencv-4.10.0/
inflating: opencv-4.10.0/.editorconfig…
当然,如果是ubuntu桌面版,可以直接右击“提取到…”
4.移动opencv_contrib
将opencv_contrib-4.10.0移到opencv-4.10.0文件夹下
5. cmake链接
cmake opencv_contrib-4.10.0会下载外网额外的组件,注意网速慢
cd opencv-4.10.0/mkdir buildcd build cmake -D CMAKE_BUILD_TYPE=Release -D OPENCV_EXTRA_MODULES_PATH=../opencv_contrib-4.10.0/modules ..
my@test:~/下载/opencv-4.10.0/build$ cmake -D CMAKE_BUILD_TYPE=Release -D OPENCV_EXTRA_MODULES_PATH=…/opencv_contrib-4.10.0/modules …
CMake Warning (dev) at CMakeLists.txt:127 (enable_language):
project() should be called prior to this enable_language() call.
This warning is for project developers. Use -Wno-dev to suppress it.– The CXX compiler identification is GNU 9.4.0
– The C compiler identification is GNU 9.4.0
– Detecting CXX compiler ABI info
– Detecting CXX compiler ABI info - done
– Check for working CXX compiler: /bin/c++ - skipped
如果有报错信息如下:
CMake Error at CMakeLists.txt:10 (message):
FATAL: In-source builds are not allowed.
You should create a separate directory for build files.– Configuring incomplete, errors occurred!
则需要先删除cmake缓存
rm ../CMakeCache.txt
6. 编译
make -j8
my@test:~/下载/opencv-4.10.0/build$ make -j8
[ 0%] Built target opencv_videoio_plugins
[ 0%] Built target opencv_dnn_plugins
[ 0%] Built target opencv_highgui_plugins…
报错1
报错信息:
fatal error: openjpeg.h: No such file or directory
原因是找不到openjpeg文件,我的解决是修改报错信息中给的.hpp文件:
先locate openjpeg.h,输出/usr/include/openjpeg-2.3/openjpeg.h
修改.hpp文件的引入
//#include <openjpeg.h>
#include </usr/include/openjpeg-2.3/openjpeg.h>
报错2
/usr/lib/x86_64-linux-gnu/libopencv_imgcodecs.so.3.2.0: undefined reference to `TIFFReadDirectory@LIBTIFF_4.0’
//usr/lib/libgdal.so.20: undefined reference to `TIFFLastDirectory@LIBTIFF_4.0’
/usr/lib/x86_64-linux-gnu/libopencv_imgcodecs.so.3.2.0: undefined reference to `TIFFWriteEncodedStrip@LIBTIFF_4.0’
/usr/lib/x86_64-linux-gnu/libopencv_imgcodecs.so.3.2.0: undefined reference to `TIFFIsTiled@LIBTIFF_4.0’
//usr/lib/libgdal.so.20: undefined reference to `TIFFSwabArrayOfShort@LIBTIFF_4.0’
在确保libtiff-dev已安装的情况下,sudo apt-get install libtiff4-dev
cmake指令增加 -D BUILD_TIFF=ON
7. 安装opencv
sudo make install
my@test:~/下载/opencv-4.10.0/build$ sudo make install
[ 0%] Built target opencv_dnn_plugins
[ 0%] Built target opencv_highgui_plugins
[ 2%] Built target libopenjp2
[ 2%] Built target opencv_videoio_plugins…
Install the project…
– Install configuration: “Release”
– Installing: /usr/local/share/licenses/opencv4/ippicv-readme.htm
SIBR_viewers的安装
github原文档谈到了SIBR的安装,但是我的安装过程有报错
1. 依赖安装
sudo apt install -y libglew-dev libassimp-dev libboost-all-dev libgtk-3-dev libopencv-dev libglfw3-dev libavdevice-dev libavcodec-dev libeigen3-dev libxxf86vm-dev libembree-dev
my@test:~/postg/thesis/gaussian-splatting/SIBR_viewers$ sudo apt install -y libglew-dev libassimp-dev libboost-all-dev libgtk-3-dev libopencv-dev libglfw3-dev libavdevice-dev libavcodec-dev libeigen3-dev libxxf86vm-dev libembree-dev
正在读取软件包列表… 完成
正在分析软件包的依赖关系树
正在读取状态信息… 完成
问题找不到libembree-dev:手动去github下载并解压到对应文件夹下。
2. 切换SIBR的分支
如果是ubuntu20.04,还需要切换SIBR的分支,如果是ubuntu22.04则不需要
cd SIBR_viewersgit checkout fossa_compatibility
my@test:~/postg/thesis/gaussian-splatting/SIBR_viewers$ git checkout fossa_compatibility
M CMakeLists.txt
M src/projects/remote/CMakeLists.txt
已经位于 ‘fossa_compatibility’
您的分支与上游分支 ‘origin/fossa_compatibility’ 一致。↳
3. cmake链接
cmake -Bbuild . -DCMAKE_BUILD_TYPE=Release
这问题多的说不完,只能一点点去解决:
报错1
我在cmake时出现
CMake Error at /usr/local/share/cmake-3.30/Modules/FindPackageHandleStandardArgs.cmake:233 (message): │···
Could NOT find Boost: Found unsuitable version “1.65.1”, but required is at │···
least “1.71.0” (found /usr/include, found components: system chrono │···
filesystem date_time) │···
Call Stack (most recent call first): │···
/usr/local/share/cmake-3.30/Modules/FindPackageHandleStandardArgs.cmake:601 (_FPHSA_FAILURE_MESSAGE) │···
/usr/local/share/cmake-3.30/Modules/FindBoost.cmake:2409 (find_package_handle_standard_args) │···
cmake/dependencies.cmake:173 (find_package) │···
cmake/include_once.cmake:20 (include) │···
src/CMakeLists.txt:46 (include_once)
这个错误信息表明您的系统上安装的 Boost 库版本为 1.65.1,但您的项目需要至少 1.71.0 版本的 Boost。因此,需要安装符合要求的 Boost 版本,并让 CMake 能正确找到它。以下是解决方法:
方法 1:升级 Boost 库
-
在系统中安装新版 Boost:
sudo apt update sudo apt install libboost-all-dev- 如果系统的包管理器不提供符合要求的 Boost 版本,您可以从 Boost 官网 下载源代码并编译安装。
-
让 CMake 指向新的 Boost:
- 在 CMake 配置中指定 Boost 的路径,例如:
cmake -DBoost_NO_SYSTEM_PATHS=ON -DBOOST_ROOT=/path/to/new/boost -DBoost_LIBRARY_DIRS=/path/to/new/boost/lib .. - 将
/path/to/new/boost替换为实际 Boost 安装路径。
- 在 CMake 配置中指定 Boost 的路径,例如:
方法 2:从源码编译安装 Boost
-
下载并编译 Boost:
- 前往 Boost 下载页面 下载所需版本的源码压缩包。
- 解压后进入目录并编译安装:
./bootstrap.sh ./b2 install --prefix=/opt/boost_1_71_0 - 安装路径可以是
/opt/boost_1_71_0或其他目录。
-
配置 CMake 使用新安装的 Boost:
- 指定
BOOST_ROOT和Boost_LIBRARY_DIRS,如同上一步骤所示。
- 指定
方法 3:使用 CMake 选项指定版本
如果以上方法不方便,还可以尝试在项目的 CMakeLists.txt 中增加选项,使得 CMake 可以更灵活地找到不同版本的 Boost。例如:
set(Boost_NO_BOOST_CMAKE ON)
set(BOOST_MIN_VERSION "1.71.0")
find_package(Boost ${BOOST_MIN_VERSION} REQUIRED COMPONENTS system chrono filesystem date_time)
这样可以让 CMake 更加精确地查找符合要求的 Boost 版本。
报错2
CMake Error at /usr/local/share/cmake-3.30/Modules/FindPackageHandleStandardArgs.cmake:233 (message): │···
ASSIMP wasn’t found correctly. Set ASSIMP_DIR to the root SDK installation │···
directory. (missing: ASSIMP_LIBRARIES) │···
Call Stack (most recent call first): │···
/usr/local/share/cmake-3.30/Modules/FindPackageHandleStandardArgs.cmake:603 (_FPHSA_FAILURE_MESSAGE) │···
cmake/Modules/FindASSIMP.cmake:97 (FIND_PACKAGE_HANDLE_STANDARD_ARGS) │···
cmake/dependencies.cmake:88 (find_package) │···
cmake/include_once.cmake:20 (include) │···
src/CMakeLists.txt:46 (include_once) │···
这个错误表明 CMake 无法找到 ASSIMP 库(用于 3D 模型文件导入)。通常可以通过以下方法解决该问题:
方法 1:安装 Assimp 库
-
使用包管理器安装:
- 在 Debian/Ubuntu 系统上,您可以使用以下命令安装 Assimp:
sudo apt update
sudo apt install libassimp-dev
- 在 Debian/Ubuntu 系统上,您可以使用以下命令安装 Assimp:
-
重新配置 CMake:
- 在安装 Assimp 库后,重新运行 CMake 配置命令:
cmake ..
- 在安装 Assimp 库后,重新运行 CMake 配置命令:
方法 2:从源码编译并安装 Assimp
如果您的系统软件源中没有提供所需版本的 Assimp,您可以从源码编译安装。
-
从 Assimp 官方 GitHub 页面下载源码:
- 访问 Assimp GitHub 下载最新版本的源码。
- 解压后,进入 Assimp 源码目录:
mkdir build
cd build
cmake ..
make -j4
sudo make install
-
确保 CMake 找到 Assimp 路径:
- 通常 Assimp 会安装在
/usr/local下,可以在 CMake 配置时指定路径:cmake -DASSIMP_DIR=/usr/local ..
- 通常 Assimp 会安装在
方法 3:手动指定 ASSIMP_DIR 路径
在 CMake 命令中,手动设置 ASSIMP_DIR 和 ASSIMP_LIBRARIES,以确保 CMake 能找到 Assimp 安装路径。例如:
cmake -DASSIMP_DIR=/path/to/assimp -DASSIMP_LIBRARIES=/path/to/assimp/lib ..
将 /path/to/assimp 替换为实际 Assimp 安装路径。
这样设置后,CMake 应该能够正确找到 Assimp 库。
报错3
CMake Warning at CMakeLists.txt:27 (message):
Untested version of cmake. If you checked everything is working properly,
please update 3.27.0 in the main CmakeLists.txt with the version you
tested.
CMake Error at CMakeLists.txt:41 (include):
include could not find requested file:
cmake_policies
CMake Error at CMakeLists.txt:42 (setPolicies):
Unknown CMake command “setPolicies”.
– Configuring incomplete, errors occurred!
我的cmake_policies在:(base) root@1433976774ef:/workspace/gaussian-splatting1/SIBR_viewers/cmake# ls
MSVCsetUserCommand.cmake cmake_policies.cmake git_describe.cmake parse_arguments_multi.cmake
Modules dependencies.cmake include_once.cmake sibr_library.cmake
Win3rdParty.cmake downloadAndExtractZipFile.cmake install_runtime.cmake
cmake_policies.cmake 文件是在 cmake/ 目录中,但在 CMakeLists.txt 没有正确包含它。可以通过指定路径来确保它被正确包含。
尝试以下更改:
-
确保正确包含
cmake_policies.cmake:在CMakeLists.txt中将include(cmake_policies)替换为include(${CMAKE_SOURCE_DIR}/cmake/cmake_policies.cmake)。 -
检查
setPolicies命令:可能这个命令在cmake_policies.cmake中定义,但在当前配置中找不到。请打开cmake_policies.cmake文件,确认setPolicies的定义是否存在,或者直接删除该行进行测试。
修改后的 CMakeLists.txt 示例
# 省略其他内容...

# 确保正确包含cmake_policies
include(${CMAKE_SOURCE_DIR}/cmake/cmake_policies.cmake) # 确保路径正确
# 删除setPolicies行,或在cmake_policies.cmake中定义该命令
# setPolicies()

# 省略其他内容...
这样应该能够解决找不到 cmake_policies 文件和 setPolicies 的问题。
中途可能卡顿,是因为在下载其他依赖组件。我的解决方法是换一个cmake版本(比如使用sudo apt-get install cmake),就成功了
–Populating library imgui…↳
报错4
CMake Error at /usr/local/share/cmake-3.30/Modules/FindPackageHandleStandardArgs.cmake:233 (message):
Could NOT find Boost (missing: Boost_INCLUDE_DIR)
Call Stack (most recent call first):
/usr/local/share/cmake-3.30/Modules/FindPackageHandleStandardArgs.cmake:603 (_FPHSA_FAILURE_MESSAGE)
/usr/local/share/cmake-3.30/Modules/FindBoost.cmake:2409 (find_package_handle_standard_args)
CMakeLists.txt:18 (find_package)
要将 Boost 库添加到 CMakeLists.txt 文件中,你可以在 find_package(OpenCV REQUIRED) 之后添加对 Boost 的查找和设置指令。以下是修改后的部分示例:
# 查找 OpenCV
find_package(OpenCV REQUIRED)

# 查找 Boost
find_package(Boost REQUIRED)

# 包含 OpenCV 和 Boost 头文件目录
include_directories(${OpenCV_INCLUDE_DIRS} ${Boost_INCLUDE_DIRS})
完整修改示例
在你的 CMakeLists.txt 文件中,可以按如下方式整合这部分代码:
# 查找 OpenCV
find_package(OpenCV REQUIRED)

# 查找 Boost
find_package(Boost REQUIRED)

# 包含 OpenCV 和 Boost 头文件目录
include_directories(${OpenCV_INCLUDE_DIRS} ${Boost_INCLUDE_DIRS})
注意事项
-
Boost 库的版本:如果你需要特定版本的 Boost,可以在
find_package中指定版本,例如find_package(Boost 1.70 REQUIRED)。 -
Boost 组件:如果只需要 Boost 的特定组件,可以在
find_package中指定,例如:find_package(Boost REQUIRED COMPONENTS filesystem system)这样可以只查找所需的 Boost 组件。
-
构建过程:在更改
CMakeLists.txt后,记得重新运行 CMake 配置命令,以确保新设置生效。
通过这些修改,CMake 将会找到并链接 Boost 库,确保你的项目可以使用 Boost 提供的功能。
报错5
CMake Error at /usr/local/share/cmake-3.30/Modules/FetchContent.cmake:1906 (message):
CMake step for imgui failed: 1
Call Stack (most recent call first):
/usr/local/share/cmake-3.30/Modules/FetchContent.cmake:1609 (__FetchContent_populateSubbuild)
/usr/local/share/cmake-3.30/Modules/FetchContent.cmake:1997 (__FetchContent_doPopulation)
/usr/local/share/cmake-3.30/Modules/FetchContent.cmake:1978:EVAL:1 (__FetchContent_Populate)
/usr/local/share/cmake-3.30/Modules/FetchContent.cmake:1978 (cmake_language)
cmake/linux/sibr_library.cmake:141 (FetchContent_Populate)
cmake/linux/dependencies.cmake:250 (sibr_gitlibrary)
cmake/linux/include_once.cmake:20 (include)
src/CMakeLists.txt:46 (include_once)
– Configuring incomplete, errors occurred!
这个错误表明在使用 CMake 的 FetchContent 模块获取 imgui 库时出现了问题。为了解决这个问题,你可以按照以下步骤操作:
1. 检查 CMake 输出
首先,检查 CMake 的完整输出,以了解 imgui 的构建过程中具体发生了什么错误。通常在错误信息之前会有一些提示,指示问题的具体原因。
2. 确保网络连接
由于 FetchContent 会从 Git 仓库拉取代码,确保你的网络连接正常,能够访问 imgui 的 GitHub 仓库。
3. 检查 CMakeLists.txt`
确认你的 CMakeLists.txt 中关于 FetchContent 的配置是否正确。一个典型的配置如下:
include(FetchContent)

FetchContent_Declare(
  imgui
  GIT_REPOSITORY https://github.com/ocornut/imgui.git
  GIT_TAG v1.86  # 或者你需要的其他版本标签
)

FetchContent_MakeAvailable(imgui)
确保 GIT_REPOSITORY 和 GIT_TAG 是有效的。
4. 手动获取 imgui
如果 FetchContent 无法正常工作,可以手动下载 imgui:
- 从 imgui GitHub 页面 下载源代码。
- 将下载的代码放到项目的某个目录下,例如
external/imgui。 - 修改
CMakeLists.txt,手动添加imgui的路径:
add_subdirectory(external/imgui)
5. 检查 CMake 版本
确保你的 CMake 版本支持 FetchContent。
报错信息:
CMake Error in src/core/system/CMakeLists.txt:
Imported target “Boost::system” includes non-existent path↳"/include"↳in its INTERFACE_INCLUDE_DIRECTORIES. Possible reasons include:↳
* The path was deleted, renamed, or moved to another location.↳
* An install or uninstall procedure did not complete successfully.↳
* The installation package was faulty and references files it does not
provide.”↳
直接有效的解决方法是创建/include文件夹,并将boot文件夹复制到include文件夹下
locate boost/version.hpp ##定位boost文件夹,我的boost文件是在 /usr/include/boost
sudo mkdir /include
sudo cp -r /usr/include/boost/ /include/ ##复制文件夹
其实还有很多很多遇见的报错,先写到这,博主到现在也只是解决了cmake链接问题,至于编译安装问题是更多,博主也在努力的去解决这些问题。
大多数都是因为版本不兼容导致的冲突问题,怎么说呢,还是得一个个的去慢慢解决吧。
4. 编译安装
cmake --build build -j24 --target install
报错6
报错信息:
In file included from /home/my/postg/thesis/gaussian-splatting/SIBR_viewers/src/./core/graphics/Utils.hpp:15,
from /home/my/postg/thesis/gaussian-splatting/SIBR_viewers/src/core/graphics/Utils.cpp:14:
/home/my/postg/thesis/gaussian-splatting/SIBR_viewers/src/./core/graphics/Config.hpp:29:12: fatal error: opencv2/opencv.hpp: 没有那个文件或目录
29 | # include <opencv2/opencv.hpp>
| ^~~~~~~~~~~~~~~~~~~~
compilation terminated.
先更新到这


 882
882

 被折叠的 条评论
为什么被折叠?
被折叠的 条评论
为什么被折叠?
 到【灌水乐园】发言


