


本文借助llama这个模型快速入门LLM的推理过程,很多技术细节都是通用的,也适合其他的LLM。
这篇也算是总结的性质,仅需要的知识点都列出来,简单介绍一番。可能说的不够详细,想看具体细节的小伙伴可参考文中引用的相关详细文章。
什么是LLM
llama是LLM(LLM指大语言模型)模型的一种结构,llama这种模型的任务就是在阅读前n个单词后预测句子中下一个单词,输出取决于过去和现在输入,与未来无关。
过程大概是这样,每次输入模型会带上上一次输出的结果(不同于CV模型,CV模型输入只需要一次即可,一次推理即可得到结果):
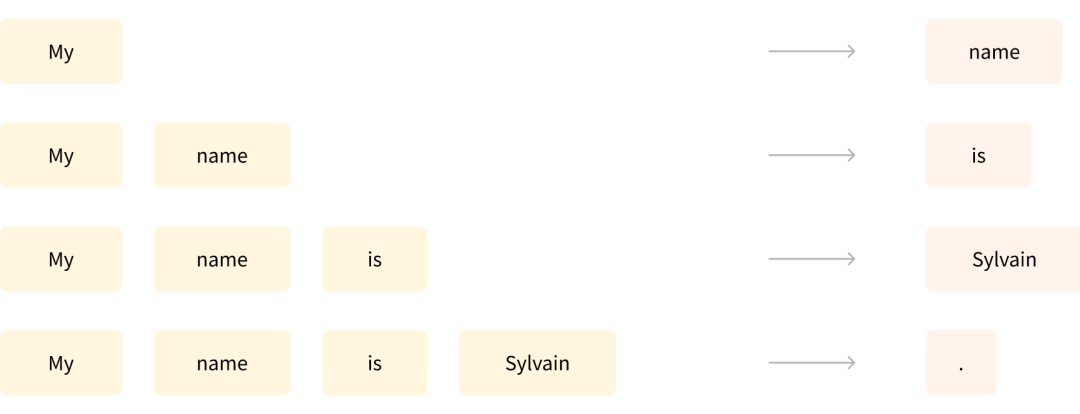
LLM-生成
一般来说,LLM模型主要由两个块组成:
-
编码器(左侧):编码器接收输入并构建其表示形式(特征)。这意味着该模型被优化为从输入中获取理解(比如输入文本判断这段话是高兴还是难受)。
-
解码器(右侧):解码器使用编码器的表示形式(特征)以及其他输入来生成目标序列。这意味着该模型被优化用于生成输出。

编码器和解码器
这些部分都可以根据任务独立使用:
-
Encoder-only models:适用于需要理解输入的任务,例如句子分类和命名实体识别。
-
Decoder-only models:适用于生成性任务,如文本生成。
-
Encoder-decoder models or sequence-to-sequence models:适用于需要输入的生成性任务,例如翻译或摘要。
LLAMA属于Decoder-only models,只有decoder层。
llama相关的知识点
llama的decoder部分的结构取自transformer,关于transformer的介绍知乎上太多,这里不赘述了,想详细理解transformer的建议看知乎上的其他优秀文章以及b站沐神的讲解。
transformer的结构如下:
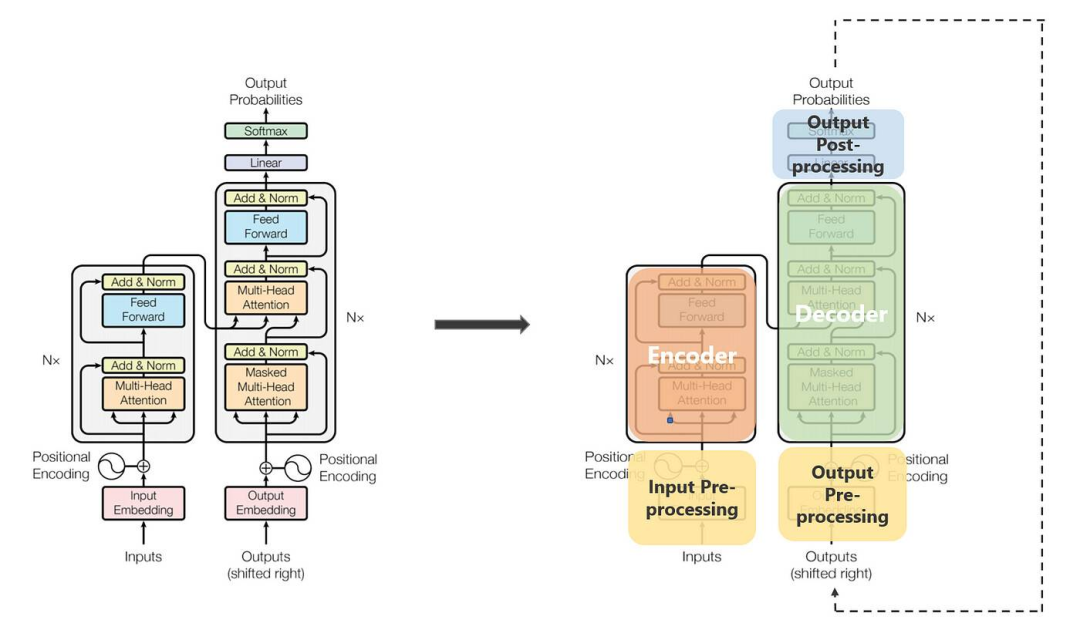
transformer
对于llama来说,只用了decoder部分,重点关注这几个概念:
-
Tokenization 分词器
-
Embedding 嵌入层
-
Positional Encoding 位置编码
-
Self-attention 自注意力机制
-
Multi-head attention 多头注意力与采用掩码机制的多头注意力
-
Batch Norm & Layer Norm 批标准化/层标准化 llama用的是RMSNorm
-
ResNet 残差网络
具体的可以查阅相关的博文,这里同样不进行赘述,只会简单描述下过程。
拿到llama模型后,主要关注:
-
模型的结构,包含哪些算子哪些op,模型复杂度
-
模型的前后处理,前后处理实现细节,模型的执行方式
-
模型各种参数配置以及其他一些细节
llama的整个执行过程分了好多步,涉及到很多前后处理,前后处理又涉及到很多细节的步骤,之后也会介绍。
先过一下知识点。
分词器、token、embeding
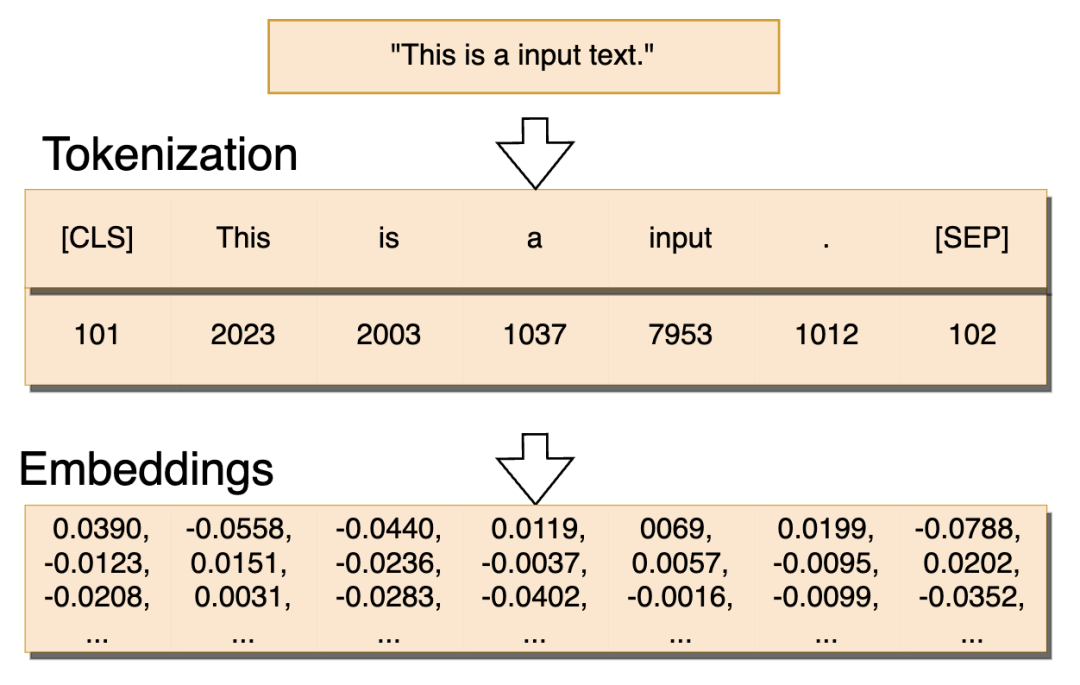
主要是分词、编码、Tokenizer(tokenization)、embed(embedding)的过程。
分词过程
图片来自 https://zhuanlan.zhihu.com/p/631463712 详细可以参考这篇
什么是分词?也就是Tokenizer的作用。
分词器可将原始文本转换为由token组成的文本的初始数值表征。
分词器之所以是模型的重要构成部分之一,是因为模型可借此妥善应对人类语言的复杂性。例如,分词器可将凝集性语言中的词分解为更易管理的组成部分、处理原始语料库中不存在的新词或外来词/特殊字符,并确保模型生成紧凑(尽可能精简)的文本表征。
每种语言都有可选用的数量众多且各不相同的分词器。大部分基于 Transformer 的架构均使用经过训练的分词器,这些分词器旨在充分缩短典型序列的长度。WordPiece(应用于 BERT)、SentencePiece(应用于 T5 或 RoBerta)等分词器同样具有多个变体,这是因为众多的语言和不同的专业领域(如医疗健康语料库)采用了这些分词器,且这些分词器在训练方式上也有所不同(选用不同的最大标记数,或以不同的方式处理大小写)。
然后看回代码。
首先看tokenizer,运行llama的时候我们会调用tokenizer = AutoTokenizer.from_pretrained(args.model, use_fast=False)。
如果我们模型传入的是llama的某个模型(llama-7b)那么返回的就是LlamaTokenizer:
class LlamaTokenizer(PreTrainedTokenizer): """ Construct a Llama tokenizer. Based on byte-level Byte-Pair-Encoding. ...
这个类是LLAMA模型的分词器(tokenizer)的实现,基于字节级的字节对编码(Byte-Pair Encoding)。这个分词器的主要功能是将文本字符串转换为模型可以理解的数字序列,反之亦然。这里假设输入为 ‘“this is a python code:”’ 。
具体我们看干了些啥,创建好tokenizer之后我们执行:input_ids = tokenizer.encode(args.text, return_tensors="pt").to(dev),这里又分两步:
-
第一步是 Converts a string in a sequence of tokens (string), using the tokenizer. Split in words for word-based vocabulary or sub-words for sub-word-based vocabularies (BPE/SentencePieces/WordPieces). 这里调用
self.sp_model.encode(text, out_type=str),sp_model就是sentencepiece中的一个函数,执行完出来变为 [‘▁"’, ‘this’, ‘▁is’, ‘▁a’, ‘▁python’, ‘▁code’, ‘:"’] -
第二步将token string转变为 token id -> Converts a token string (or a sequence of tokens) in a single integer id (or a sequence of ids), using the vocabulary. 具体就是个for循环,对之前分好的tokens一个一个转。
最后我们得到:
input_ids tensor([[ 0, 376, 1366, 338, 263, 3017, 775, 6160]], device='cuda:0') input_ids.shape torch.Size([1, 8])
至于如何转换为embedding,之后会调用:
inputs_embeds = self.embed_tokens(input_ids),其中embeds的shape是torch.Size([1, 8, 4096])。
在自然语言处理(NLP)中,嵌入(Embedding)是一种将离散变量(如单词、短语、或者文档)转换为连续向量的方法。这种转换的目的是让计算机能更好地理解和处理自然语言数据。embedding矩阵的本质是一个查找表 ,每个单词会定位这个表中的某一行,而这一行就是这个单词学习到的在嵌入空间的语义。
更多信息可以参考:
-
https://zhuanlan.zhihu.com/p/626308831
-
https://zhuanlan.zhihu.com/p/631463712
自注意力 Self-Attention
Transformer模型的一个关键特点是使用了称为注意力层的特殊层。“Attention Is All You Need”。
这一层会告诉模型,在处理每个单词的表示时,要对你传递给它的句子中某些单词特别关注(并且忽略其他单词)。
把这个概念放到背景中,考虑从英语翻译成法语的任务。给定输入“你喜欢这门课程”,翻译模型还需要关注相邻单词“你”,以获得正确翻译动词“like”的形式,因为在法语中,“like”根据主语不同而有不同变化形式。然而,句子其余部分对于该单次翻转来说没有用处。同样地,在翻转“This”时,模型也需要注意到单次“course”,因为“This”根据相关名字是否男性或女性而有不同意思表达方式。再次强调,在更复杂的句子(和更复杂的语法规则)中,模型需要特别关注可能出现在句子较远位置上以正确翻译每个单次的单词。
同样的概念适用于与自然语言相关的任何任务:一个单次本身具有意义,但是该意义深受上下文影响,这可以是正在研究的单次之前或之后的任何其他单次(或多个)。
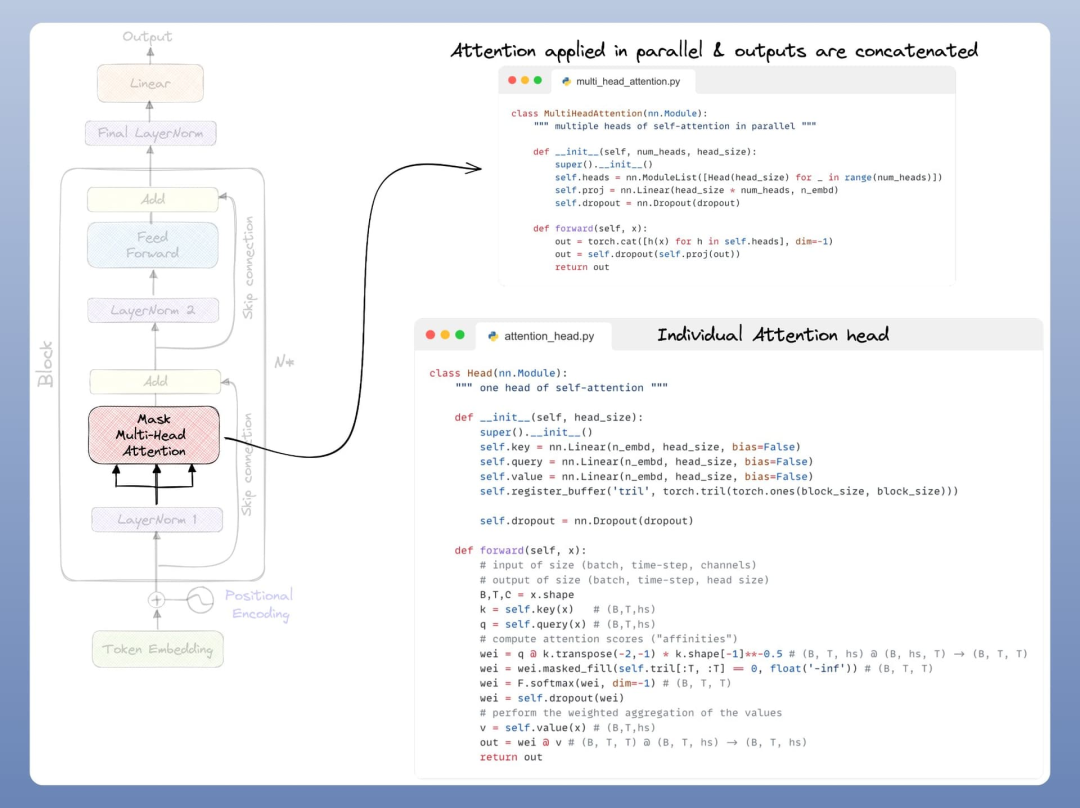
MHA
来自 https://twitter.com/akshay_pachaar/status/1741074200662856102/photo/1
Self-attention是Transformer的核心,其允许模型考虑到序列中的其他标记,以便更好地理解每个标记的上下文。每个标记的新表示形式是由它自己和其他标记的交互得到的。
具体可以参考:
- https://zhuanlan.zhihu.com/p/420820453
位置编码
由于Transformer的结构没有考虑到标记的顺序,所以我们需要加入位置编码来给模型提供词元在序列中的位置信息。这些编码会被添加到词嵌入向量中。
多头注意力(Multi-head Attention)
多头注意力是对自注意力机制的扩展。它将自注意力分解为多个“头”,每个头在不同的表示空间中学习和应用自注意力。这允许模型同时捕捉到各种不同类型的信息。在有掩码的多头注意力中,掩码被用于阻止模型查看某些不应该看到的信息,例如在生成新的标记时阻止查看未来的信息。现在基本都使用MHA,一般不用单头。
批标准化(Batch Norm) & 层标准化(Layer Norm)
这些都是用于正规化激活的技术,可以加速学习,提高模型的性能。
批标准化是在整个批次的数据上进行标准化,而层标准化则是在单个数据样本上进行标准化。RMSNorm是一种新的归一化方法,是对LayerNorm的一个改进,没有做re-center操作(移除了其中的均值项),可以看作LayerNorm在均值为0时的一个特例。
残差网络(ResNet)
老熟人了。通过在网络中添加跳跃连接(或称为“skip”连接),可以使得模型更容易地学习到恒等映射,从而避免了训练深度网络时常见的梯度消失问题。在Transformer中,每个子层(如自注意力层和前馈神经网络层)都有一个对应的残差连接,并且每个子层的输出都会进行层标准化。
LLAMA的模型结构
我们可以很轻易的通过huggingface代码库中看到llama的模型结构。
以hugging库中的7B模型为例,运行model = LlamaForCausalLM.from_pretrained(model, torch_dtype='auto')后,可以通过print看模型结构:
LlamaForCausalLM( (model): LlamaModel( (embed_tokens): Embedding(32000, 4096, padding_idx=31999) (layers): ModuleList( (0-31): 32 x LlamaDecoderLayer( (self_attn): LlamaAttention( (q_proj): Linear(in_features=4096, out_features=4096, bias=False) (k_proj): Linear(in_features=4096, out_features=4096, bias=False) (v_proj): Linear(in_features=4096, out_features=4096, bias=False) (o_proj): Linear(in_features=4096, out_features=4096, bias=False) (rotary_emb): LlamaRotaryEmbedding() ) (mlp): LlamaMLP( (gate_proj): Linear(in_features=4096, out_features=11008, bias=False) (down_proj): Linear(in_features=11008, out_features=4096, bias=False) (up_proj): Linear(in_features=4096, out_features=11008, bias=False) (act_fn): SiLUActivation() ) (input_layernorm): LlamaRMSNorm() (post_attention_layernorm): LlamaRMSNorm() ) ) (norm): LlamaRMSNorm() ) (lm_head): Linear(in_features=4096, out_features=32000, bias=False) )
7B有32个LlamaDecoderLayer,每个Decoder包含一个LlamaAttention和LlamaMLP,然后是LlamaRMSNorm和head部分,核心的结构是LlamaDecoderLayer。
先看核心的LlamaDecoderLayer,7B有32个,而30B的话有60个,30B和7B的差别也就是decoder的个数和decoder的不同配置。
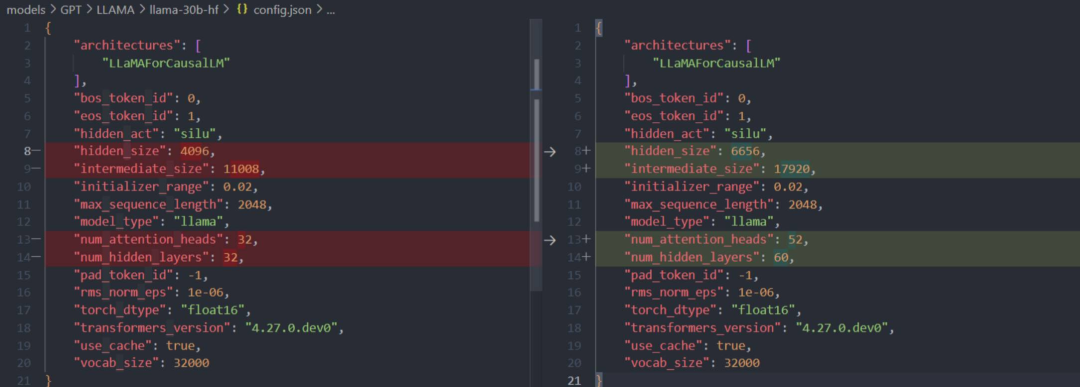
7B-config和30B-config区别
看下7B模型的config,可以看到模型类型为float16,use_cache设置为true:
{ "architectures": [ "LLaMAForCausalLM" ], "bos_token_id": 0, "eos_token_id": 1, "hidden_act": "silu", "hidden_size": 4096, "intermediate_size": 11008, "initializer_range": 0.02, "max_sequence_length": 2048, "model_type": "llama", "num_attention_heads": 32, "num_hidden_layers": 32, "pad_token_id": 0, "rms_norm_eps": 1e-06, "torch_dtype": "float16", "transformers_version": "4.27.0.dev0", "use_cache": true, "vocab_size": 32000 }
运行pipeline
llama的运行流程和大多数的LLM一样,流程如下:
-
分词encode,我理解相当于预处理
-
输入input_ids后模型开始运行,这里会for循环运行好多次
-
运行完后得到logits进行后处理预测下一个token
-
循环往复直到所有要求数量的token都输出或者输出遇到了end_id
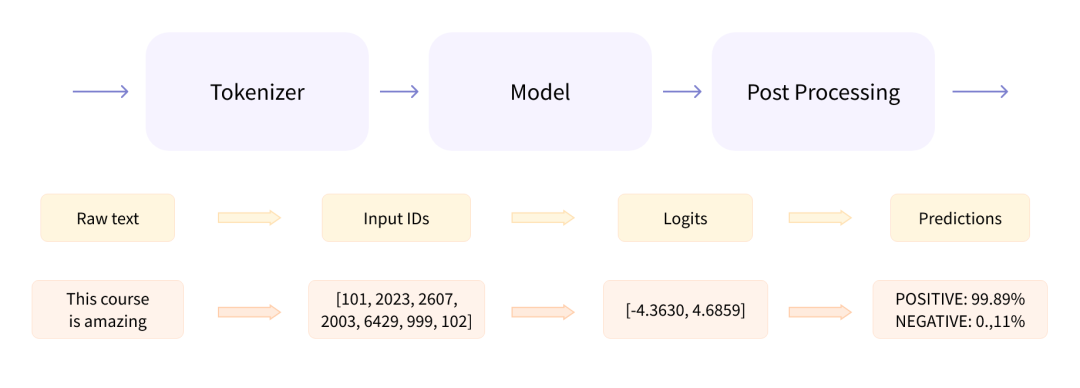
LLM整体流程图,来自huggingface
再回顾下LLAMA的模型组成:
class LlamaModel(LlamaPreTrainedModel): def __init__(self, config: LlamaConfig): super().__init__(config) self.padding_idx = config.pad_token_id self.vocab_size = config.vocab_size self.embed_tokens = nn.Embedding(config.vocab_size, config.hidden_size, self.padding_idx) self.layers = nn.ModuleList([LlamaDecoderLayer(config) for _ in range(config.num_hidden_layers)]) self.norm = LlamaRMSNorm(config.hidden_size, eps=config.rms_norm_eps) self.gradient_checkpointing = False # Initialize weights and apply final processing self.post_init() ...
主要部分就三个:
embed_tokens : 嵌入层,它将输入的词(或者词的索引)映射到一个高维空间中,使得具有相似语义的词在这个空间中的距离更近。这个嵌入层在训练过程中会被优化,以更好地捕捉单词之间的语义关系。这里使用的嵌入层是一个 PyTorch 的 nn.Embedding 层,它将大小为 config.vocab_size 的词汇表中的每个词映射到一个 config.hidden_size 维的向量。self.padding_idx 是用于指定在嵌入矩阵中,哪个索引是用于填充的,通常这个填充索引对应的嵌入向量会被初始化为零,并在训练过程中保持为零
layers: num_hidden_layers个解码器
norm : RMSNorm 归一化函数,和layernorm类似
第一步 分词
调用tokenizer.encode(args.text, return_tensors="pt").to(DEV),具体流程如下:
输入prompt -> ‘“this is a python code:”’
-> [‘▁"’, ‘this’, ‘▁is’, ‘▁a’, ‘▁python’, ‘▁code’, ‘:"’]
-> [376, 1366, 338, 263, 3017, 775, 6160]
-> {‘input_ids’: tensor([[ 0, 376, 1366, 338, 263, 3017, 775, 6160]]), ‘attention_mask’: tensor([[1, 1, 1, 1, 1, 1, 1, 1]])}
-> 然后开始generation,开始第二步
第二步 配置
主要就是配置一些信息和做预处理。
设置min_length、max_length、top_p、temperature进入model.generate
-> 处理、配置、验证generation_config 设置 generation parameters
-> 设置模型的输入
inputs_tensor, model_input_name, model_kwargs = self._prepare_model_inputs( inputs, generation_config.bos_token_id, model_kwargs )
bos_token_id 是 0, inputs就是刚才传过来的input_ids。
-> 设置模型的参数
model_kwargs["attention_mask"] = self._prepare_attention_mask_for_generation( inputs_tensor, generation_config.pad_token_id, generation_config.eos_token_id )
其中 pad_token_id为 -1,eos_token_id为1,一般从config中获取。
-> 设置 max_length -> input_ids_seq_length = input_ids.shape[-1]
-> 决定generation mode
-> prepare distribution pre_processing samplers
-> prepare stopping criteria
-> 设置好 sample_gen_mode、 prepare logits warper
-> expand input_ids with num_return_sequences additional sequences per batch

设置好的模型参数
第三步 sample
继续准备模型的输入,调用self.prepare_inputs_for_generation(如果提供了past_key_values,那么input_ids = input_ids[:, -1:],同时根据attention_mask和是否提供past_key_values计算出position_ids,也就是说提供了past_key_values的话,input_ids可以少计算很多)返回model_inputs。
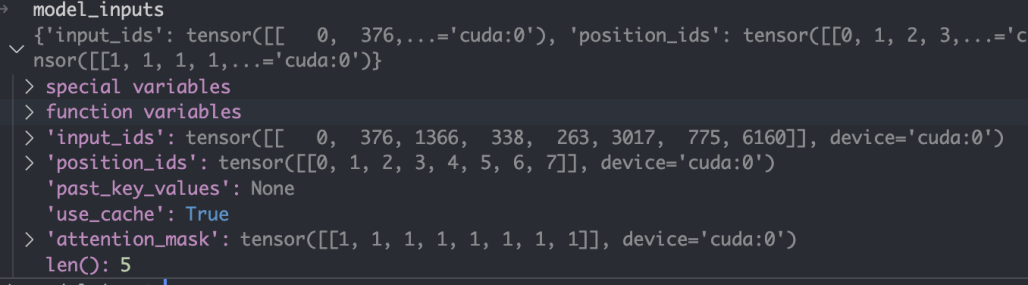
model_inputs
-> 开始进入auto-regressive generation的循环,是个while True
进入LlamaForCausalLM函数,输入刚才的model_inputs,主要包含input_ids、attention_mask、position_ids、past_key_values
-> 根据是否存在 past_key_values 更新 past_key_values_length 和 seq_length_with_past
-> 判断inputs_embeds是否存在判断是否需要调用self.embed_tokens,也就是说如果自己提供了embeds就不需要在这里单独embed了
这里调用 inputs_embeds = self.embed_tokens(input_ids),embeds的shape是torch.Size([1, 8, 4096]),8代表输入input_ids的长度,我这里是8
-> 调用_prepare_decoder_attention_mask函数,调用后的attention_mask维度为torch.Size([1, 1, 8, 8]):
attention_mask = self._prepare_decoder_attention_mask( attention_mask, (batch_size, seq_length), inputs_embeds, past_key_values_length )
进入一个for循环, 因为llama有很多self.layers = nn.ModuleList([LlamaDecoderLayer(config) for _ in range(config.num_hidden_layers)]),都是一模一样的LlamaDecoderLayer:
for idx, decoder_layer in enumerate(self.layers): if output_hidden_states: all_hidden_states += (hidden_states,) # 如果存在past_key_value,则一并传进去 past_key_value = past_key_values[idx] if past_key_values is not None else None layer_outputs = decoder_layer( hidden_states, attention_mask=attention_mask, position_ids=position_ids, past_key_value=past_key_value, output_attentions=output_attentions, use_cache=use_cache ) hidden_states = layer_outputs[0] if use_cache: next_decoder_cache += (layer_outputs[2 if output_attentions else 1],) if output_attentions: all_self_attns += (layer_outputs[1],)
这里插播个结构分析,我们重点看LlamaDecoderLayer函数。
LlamaDecoderLayer
函数的传入的参数:hidden_states [1,8,4096]、attention_mask [1,1,8,8]、position_ids [1,8]、past_key_value [[]] or None。
执行的程序也很简单,顺序执行以下步骤:
-
首先归一化 self.input_layernorm(hidden_states)
-
然后经过 self_attn
-
残差 hidden_states = residual(之前residual = hidden_states) + hidden_states(经过self_attn后)
-
全连接 self.post_attention_layernorm(hidden_states) -> self.mlp(hidden_states)
-
继续残差 hidden_states = residual(之前经过self_attn后) + hidden_states(经过全连接后)
代码如下:
residual = hidden_states hidden_states = self.input_layernorm(hidden_states) # Self Attention hidden_states, self_attn_weights, present_key_value = self.self_attn( hidden_states=hidden_states, attention_mask=attention_mask, position_ids=position_ids, past_key_value=past_key_value, output_attentions=output_attentions, use_cache=use_cache, ) hidden_states = residual + hidden_states # Fully Connected residual = hidden_states hidden_states = self.post_attention_layernorm(hidden_states) hidden_states = self.mlp(hidden_states) hidden_states = residual + hidden_states outputs = (hidden_states,) if output_attentions: outputs += (self_attn_weights,) if use_cache: outputs += (present_key_value,) return outputs
然后我们看下核心的LlamaAttention:
LlamaAttention
这个就是Multi-headed attention from ‘Attention Is All You Need’ paper。这个类的成员变量如下:
`class LlamaAttention(nn.Module): def __init__(self, config: LlamaConfig): super().__init__() self.config = config self.hidden_size = config.hidden_size self.num_heads = config.num_attention_heads # head的数量 这里是32 self.head_dim = self.hidden_size // self.num_heads # head的大小 这里是128 self.max_position_embeddings = config.max_position_embeddings if (self.head_dim * self.num_heads) != self.hidden_size: raise ValueError( f"hidden_size must be divisible by num_heads (got `hidden_size`: {self.hidden_size}" f" and `num_heads`: {self.num_heads})." ) # 线性层self.q_proj, self.k_proj, self.v_proj将输入hidden_states映射到num_heads * head_dim的维度,以分别获得查询、键、值tensor。 self.q_proj = nn.Linear(self.hidden_size, self.num_heads * self.head_dim, bias=False) self.k_proj = nn.Linear(self.hidden_size, self.num_heads * self.head_dim, bias=False) self.v_proj = nn.Linear(self.hidden_size, self.num_heads * self.head_dim, bias=False) self.o_proj = nn.Linear(self.num_heads * self.head_dim, self.hidden_size, bias=False) self.rotary_emb = LlamaRotaryEmbedding(self.head_dim, max_position_embeddings=self.max_position_embeddings) ... `
其中,多头机制的自注意力:
-
self.num_heads定义了attention head的数量
-
self.head_dim定义了每个head的大小,是hidden_size除以num_heads
-
线性层self.q_proj, self.k_proj, self.v_proj将输入hidden_states映射到num_heads * head_dim的维度,以分别获得查询、键、值tensor
操作代码如下:
`def forward( self, hidden_states: torch.Tensor, attention_mask: Optional[torch.Tensor] = None, position_ids: Optional[torch.LongTensor] = None, past_key_value: Optional[Tuple[torch.Tensor]] = None, output_attentions: bool = False, use_cache: bool = False, ) -> Tuple[torch.Tensor, Optional[torch.Tensor], Optional[Tuple[torch.Tensor]]]: bsz, q_len, _ = hidden_states.size() query_states = self.q_proj(hidden_states).view(bsz, q_len, self.num_heads, self.head_dim).transpose(1, 2) key_states = self.k_proj(hidden_states).view(bsz, q_len, self.num_heads, self.head_dim).transpose(1, 2) value_states = self.v_proj(hidden_states).view(bsz, q_len, self.num_heads, self.head_dim).transpose(1, 2) kv_seq_len = key_states.shape[-2] if past_key_value is not None: kv_seq_len += past_key_value[0].shape[-2] cos, sin = self.rotary_emb(value_states, seq_len=kv_seq_len) query_states, key_states = apply_rotary_pos_emb(query_states, key_states, cos, sin, position_ids) # [bsz, nh, t, hd] if past_key_value is not None: # reuse k, v, self_attention key_states = torch.cat([past_key_value[0], key_states], dim=2) value_states = torch.cat([past_key_value[1], value_states], dim=2) past_key_value = (key_states, value_states) if use_cache else None attn_weights = torch.matmul(query_states, key_states.transpose(2, 3)) / math.sqrt(self.head_dim) if attn_weights.size() != (bsz, self.num_heads, q_len, kv_seq_len): raise ValueError( f"Attention weights should be of size {(bsz * self.num_heads, q_len, kv_seq_len)}, but is" f" {attn_weights.size()}" ) if attention_mask is not None: if attention_mask.size() != (bsz, 1, q_len, kv_seq_len): raise ValueError( f"Attention mask should be of size {(bsz, 1, q_len, kv_seq_len)}, but is {attention_mask.size()}" ) attn_weights = attn_weights + attention_mask attn_weights = torch.max(attn_weights, torch.tensor(torch.finfo(attn_weights.dtype).min)) # upcast attention to fp32 attn_weights = nn.functional.softmax(attn_weights, dim=-1, dtype=torch.float32).to(query_states.dtype) attn_output = torch.matmul(attn_weights, value_states) if attn_output.size() != (bsz, self.num_heads, q_len, self.head_dim): raise ValueError( f"`attn_output` should be of size {(bsz, self.num_heads, q_len, self.head_dim)}, but is" f" {attn_output.size()}" ) attn_output = attn_output.transpose(1, 2) attn_output = attn_output.reshape(bsz, q_len, self.hidden_size) attn_output = self.o_proj(attn_output) if not output_attentions: attn_weights = None return attn_output, attn_weights, past_key_value `
其中两点需要注意:
-
query_states = self.q_proj(hidden_states).view(bsz, q_len, self.num_heads, self.head_dim).transpose(1, 2)就是多头计算,得到的结果query_states、key_states、value_states的维度是torch.Size([1, 32, 8, 128]),32代表头的数量、8是输入的input_ids长度,128代表头的大小,剩下的计算也是多头自注意力的部分,不多介绍了 -
如果提供了past_key_value,则利用cache的机制,直接
torch.cat([past_key_value[0], key_states], dim=2)即可,每次传入的input_ids只有最新的一个id
好了回到刚才的pipeline:
接着for循环完32个decoder层之后,需要进行norm操作:hidden_states = self.norm(hidden_states)。
输出后得到outputs.logits维度为torch.Size([1, 8, 32000]),接下来对这个logits进行操作,以下是相关代码,比较长:
`next_token_logits = outputs.logits[:, -1, :] # pre-process distribution next_token_scores = logits_processor(input_ids, next_token_logits) next_token_scores = logits_warper(input_ids, next_token_scores) ... probs = nn.functional.softmax(next_token_scores, dim=-1) next_tokens = torch.multinomial(probs, num_samples=1).squeeze(1) # logits_processor中执行的操作 class MinLengthLogitsProcessor(LogitsProcessor): [`LogitsProcessor`] enforcing a min-length by setting EOS probability to 0. def __init__(self, min_length: int, eos_token_id: Union[int, List[int]]): if not isinstance(min_length, int) or min_length < 0: raise ValueError(f"`min_length` has to be a non-negative integer, but is {min_length}") if isinstance(eos_token_id, int): eos_token_id = [eos_token_id] if not all([isinstance(i, int) for i in eos_token_id]) or any([i < 0 for i in eos_token_id]): logger.warning(f"`eos_token_id` has to be a list of positive integers, but is {eos_token_id}") self.min_length = min_length self.eos_token_id = eos_token_id def __call__(self, input_ids: torch.LongTensor, scores: torch.FloatTensor) -> torch.FloatTensor: cur_len = input_ids.shape[-1] if cur_len < self.min_length: for i in self.eos_token_id: scores[:, i] = -float("inf") return scores ... # logits_warper调用的三个函数 class TemperatureLogitsWarper(LogitsWarper): def __init__(self, temperature: float): if not isinstance(temperature, float) or not (temperature > 0): raise ValueError(f"`temperature` has to be a strictly positive float, but is {temperature}") self.temperature = temperature def __call__(self, input_ids: torch.Tensor, scores: torch.Tensor) -> torch.FloatTensor: scores = scores / self.temperature return scores class TopKLogitsWarper(LogitsWarper): def __init__(self, top_k: int, filter_value: float = -float("Inf"), min_tokens_to_keep: int = 1): if not isinstance(top_k, int) or top_k <= 0: raise ValueError(f"`top_k` has to be a strictly positive integer, but is {top_k}") self.top_k = max(top_k, min_tokens_to_keep) self.filter_value = filter_value def __call__(self, input_ids: torch.LongTensor, scores: torch.FloatTensor) -> torch.FloatTensor: top_k = min(self.top_k, scores.size(-1)) # Safety check # Remove all tokens with a probability less than the last token of the top-k indices_to_remove = scores < torch.topk(scores, top_k)[0][..., -1, None] scores = scores.masked_fill(indices_to_remove, self.filter_value) return scores class TopPLogitsWarper(LogitsWarper): def __init__(self, top_p: float, filter_value: float = -float("Inf"), min_tokens_to_keep: int = 1): top_p = float(top_p) if top_p < 0 or top_p > 1.0: raise ValueError(f"`top_p` has to be a float > 0 and < 1, but is {top_p}") self.top_p = top_p self.filter_value = filter_value self.min_tokens_to_keep = min_tokens_to_keep def __call__(self, input_ids: torch.LongTensor, scores: torch.FloatTensor) -> torch.FloatTensor: sorted_logits, sorted_indices = torch.sort(scores, descending=False) cumulative_probs = sorted_logits.softmax(dim=-1).cumsum(dim=-1) # Remove tokens with cumulative top_p above the threshold (token with 0 are kept) sorted_indices_to_remove = cumulative_probs <= (1 - self.top_p) if self.min_tokens_to_keep > 1: # Keep at least min_tokens_to_keep sorted_indices_to_remove[..., -self.min_tokens_to_keep :] = 0 # scatter sorted tensors to original indexing indices_to_remove = sorted_indices_to_remove.scatter(1, sorted_indices, sorted_indices_to_remove) scores = scores.masked_fill(indices_to_remove, self.filter_value) return scores `
其中主要的过程:
-
将 logits 传递给 logits_processor 和 logits_warper,在这两个方法中进行一些预处理过程,例如添加惩罚项或对概率分布进行修改,使得生成的结果更符合期望,具体调用了(这里用到了temperature参数,作用是调节模型生成的随机性,temperature通常被用于控制softmax函数的形状,从而影响生成序列的多样性,当temperature值接近0时,模型趋向于输出最可能的单个结果,也就是模型的输出趋向于确定性。这种情况下,所有的概率质量都集中在概率最大的那个输出上,其他的输出的概率几乎为0,当temperature值比较大(大于1)时,模型趋向于输出更多样化的结果,也就是增加了模型输出的随机性。在这种情况下,不同的输出之间的概率差异减小,使得即使概率较小的输出也有可能被选中)
-
TopKLogitsWarper类是一个用于处理模型输出分数(scores)的工具,主要用于进行所谓的“Top-K截断”。在自然语言生成的过程中,Top-K截断是一种常见的技巧,它的目标是在每个生成步骤中,只保留K个最可能的输出选项,而忽略其他的选项。这种方法可以降低生成过程的复杂性,并且可以减少不太可能的输出的干扰。
-
TopPLogitsWarper类实现了被称为"Top-p(或nucleus)抽样"的策略。该策略用于限制模型在每个生成步骤中所考虑的可能输出的范围。在Top-p抽样中,我们不再固定考虑概率最高的K个输出,而是根据概率分布的累积分布函数(CDF)来选择可能的输出。我们设置一个阈值P,然后选择输出,直到它们的累积概率大于等于P。由于这个方法根据概率分布动态地调整输出的数量,所以它可以更好地处理不同的分布情况,从而在某些情况下可以生成更自然的文本。
-
最后,使用 softmax 函数将经过预处理的 logits 转换为概率分布,并利用 multinomial 方法从中采样得到下一个 token。最后,将该 token 添加到原始输入序列中,并进行下一次迭代,生成新的文本内容。如果需要记录中间变量,则将它们存储在相应的变量中,以便之后访问根据得到的新token,随后更新input_ids得到下一个token_id之后
得到next_tokens之后,执行以下代码:
input_ids = torch.cat([input_ids, next_tokens[:, None]], dim=-1) if streamer is not None: streamer.put(next_tokens.cpu()) model_kwargs = self._update_model_kwargs_for_generation( outputs, model_kwargs, is_encoder_decoder=self.config.is_encoder_decoder ) # if eos_token was found in one sentence, set sentence to finished if eos_token_id_tensor is not None: unfinished_sequences = unfinished_sequences.mul( next_tokens.tile(eos_token_id_tensor.shape[0], 1).ne(eos_token_id_tensor.unsqueeze(1)).prod(dim=0) ) # stop when each sentence is finished, or if we exceed the maximum length if unfinished_sequences.max() == 0 or stopping_criteria(input_ids, scores): if not synced_gpus: break else: this_peer_finished = True
其中:
-
根据条件判断语句对生成结果进行一些后处理,例如将已完成的序列末尾添加 padding token,更新 model inputs 和 length 等等
-
如果已经生成完整的句子,则将其标记为 finished,并检查是否满足终止条件。当全部句子都结束或达到最大长度时,停止生成
最后通过分词器进行decode即可得到所有结果,这个是支持batch的:
print(tokenizer.batch_decode(generated_ids, skip_special_tokens=True, clean_up_tokenization_spaces=False)[0])
过程差不多就是这样的,整体pipeline结束。
落地相关
部署的时候,除了模型要搞好,确保模型可以输出正常结果的设置参数也需要整明白,需要暴露出来以便上游去调节。
CV模型的话,我们一般可调节的就是预处理的均值方差、图片RGB还是BGR(通道什么的)、输入数据范围,图像resize大小什么的;后处理的话,如果是检测模型,那就是iou阈值、nms阈值什么的。
对于llama来说,可调节的参数就有点多了。
举个例子,随便拿出一个gradio展示的LLM模型,可调节的参数如下:
-
seed : seed如果固定了,我们的输出也就固定了,我们使用chatgpt的时候,seed每次应该不一样
-
gen mode sample :一般来说就是用这个 do_sample ;greed 貌似这个最快;beam search 这个效果最好
-
end_id: 模型训练的时候设置的结束id,模型在预测的时候,如果预测下一个token是end_id的话就应该终止预测了,就是这段话说完了
-
start_id: 一般来说是在tokenizer中设置,在将输入文本encode的时候,设置的第一个token id
padding
LLM和CV模型一样,组batch的时候需求输入大小一致,比如[4,3,128,128],而NLP中输入的是input_ids,padding的方法如下:
input_sentences = [ "DeepSpeed is a machine learning framework", "He is working on", "He has a", "He got all", "Everyone is happy and I can", "The new movie that got Oscar this year", "In the far far distance from our galaxy,", "Peace is the only way", ] tokenizer.pad_token = 0 input_tokens = tokenizer.batch_encode_plus(input_sentences, return_tensors="pt", padding=True)
bad_words和stop_words
LLM在生成token的时候需要避免一些:
-
不想生成的token
-
遇到就停止的token
kv-cache
kv-cache是LLM推理过程的一个优化点,可以减少计算,不过需要额外显存去存这些cache。
总结
可以参考hugglingface搭建服务的规则和一些细节,一般要支持:
-
对于stream模式,要支持多个同时的请求
-
对于非stream模式,需要支持多batch输入,也可以支持组batch
-
对于stream模式,如果服务端认为生成token到结尾了,则可以主动断开连接并且返回终止符给客户端
一些概念
unconditional generation
在自然语言处理(NLP)中,"unconditional generation"是指模型在没有特定输入或提示的情况下生成文本。对比之下,“conditional generation"是指模型在给定某些输入或提示(例如,开头的一段文本或特定的任务描述)的情况下生成文本。
举个例子,如果我们让一个语言模型写一个故事,但不给它任何具体的主题或开头,这就是无条件生成。如果我们给模型一个特定的开头,比如"在一个深深的森林里,有一个小屋……”,然后要求模型继续写下去,这就是有条件生成。
"start token"和"end token"是用来标识生成任务的开始和结束的特殊标记。在GPT-J(我在2021年9月之前的知识库中没有关于GPT-J的信息,因此我不确定这是何种模型)中,对于无条件生成任务,开始标记和结束标记可能是相同的。这可能意味着,在没有输入或提示的情况下开始和结束文本生成。
context len
在自然语言处理(NLP)中,“context window”(上下文窗口)是一种常见的概念,它指的是在处理某个词或词组时考虑的前后相关词汇的范围。这个范围可以是固定的,也可以是动态的,取决于具体的模型和任务。
例如,如果我们使用一个大小为5的上下文窗口来处理一个词,那么我们会考虑这个词前后各2个词作为其上下文。这样做的目的是获取更多的上下文信息,以便更好地理解和处理这个词。此外,某些类型的模型,如Transformer模型,实际上可以看作是没有固定上下文窗口大小的,因为它们使用的机制(如自注意力机制)允许它们在处理每个词时考虑整个输入序列的所有词。
值得注意的是,上下文窗口的大小和处理策略可能会对模型的性能和结果产生显著影响。较大的上下文窗口可能会捕获更多的长距离依赖关系,但也可能增加模型的计算复杂度。相反,较小的上下文窗口可能会减少计算复杂度,但可能无法捕获一些重要的长距离依赖关系。因此,选择合适的上下文窗口大小和处理策略通常需要根据具体的任务和数据进行调整。


 1619
1619

 被折叠的 条评论
为什么被折叠?
被折叠的 条评论
为什么被折叠?
 到【灌水乐园】发言


