


-
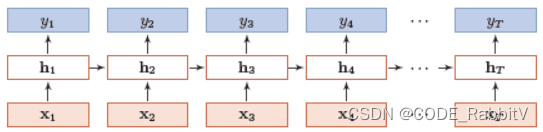
RNN Layer
torch.nn.RNN(input_size,hidden_size,num_layers,batch_first)input_size: 输入的编码维度hidden_size: 隐含层的维数num_layers: 隐含层的层数batch_first:·True指定输入的参数顺序为:- x:[batch, seq_len, input_size]
- h0:[batch, num_layers, hidden_size]
-
RNN 的输入:
- x:[seq_len, batch, input_size]
seq_len: 输入的序列长度batch: batch size 批大小
- h0:[num_layers, batch, hidden_size]
- x:[seq_len, batch, input_size]
-
RNN 的输出:
- y: [seq_len, batch, hidden_size]
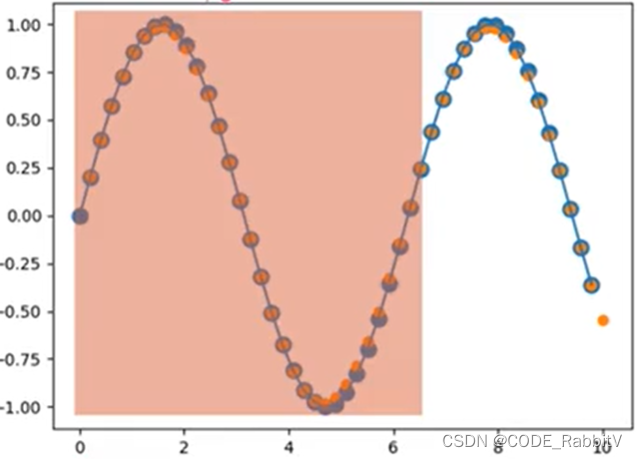
- 实战之预测
正弦曲线:以下会以此为例,演示RNN预测任务的部署
-
步骤一:确定 RNN Layer 相关参数值并基于此创建
Netimport numpy as np from matplotlib import pyplot as plt import torch import torch.nn as nn import torch.optim as optim seq_len = 50 batch = 1 num_time_steps = seq_len input_size = 1 output_size = input_size hidden_size = 10 num_layers = 1 batch_first = True class Net(nn.Module): ## model 定义 def __init__(self): super(Net, self).__init__() self.rnn = nn.RNN( input_size=input_size, hidden_size=hidden_size, num_layers=num_layers, batch_first=batch_first) # for p in self.rnn.parameters(): # nn.init.normal_(p, mean=0.0, std=0.001) self.linear = nn.Linear(hidden_size, output_size) def forward(self, x, hidden_prev): out, hidden_prev = self.rnn(x, hidden_prev) # out: [batch, seq_len, hidden_size] out = out.view(-1, hidden_size) # [batch*seq_len, hidden_size] out = self.linear(out) # [batch*seq_len, output_size] out = out.unsqueeze(dim=0) # [1, batch*seq_len, output_size] return out, hidden_prev -
步骤二:确定 训练流程
lr=0.01 def tarin_RNN(): model = Net() print('model:\n',model) criterion = nn.MSELoss() optimizer = optim.Adam(model.parameters(), lr) hidden_prev = torch.zeros(num_layers, batch, hidden_size) #初始化h l = [] for iter in range(100): # 训练100次 start = np.random.randint(10, size=1)[0] ## 序列起点 time_steps = np.linspace(start, start+10, num_time_steps) ## 序列 data = np.sin(time_steps).reshape(num_time_steps, 1) ## 序列数据 x = torch.tensor(data[:-1]).float().view(batch, seq_len-1, input_size) y = torch.tensor(data[1: ]).float().view(batch, seq_len-1, input_size) # 目标为预测一个新的点 output, hidden_prev = model(x, hidden_prev) hidden_prev = hidden_prev.detach() ## 最后一层隐藏层的状态要 detach loss = criterion(output, y) model.zero_grad() loss.backward() optimizer.step() if iter % 100 == 0: print("Iteration: {} loss {}".format(iter, loss.item())) l.append(loss.item()) #############################绘制损失函数################################# plt.plot(l,'r') plt.xlabel('训练次数') plt.ylabel('loss') plt.title('RNN LOSS') plt.savefig('RNN_LOSS.png') return hidden_prev,model hidden_prev,model = tarin_RNN() -
步骤三:测试训练结果
start = np.random.randint(3, size=1)[0]  ## 序列起点
time_steps = np.linspace(start, start+10, num_time_steps)  ## 序列
data = np.sin(time_steps).reshape(num_time_steps, 1)  ## 序列数据
x = torch.tensor(data[:-1]).float().view(batch, seq_len-1, input_size)
y = torch.tensor(data[1: ]).float().view(batch, seq_len-1, input_size)  # 目标为预测一个新的点

predictions = []  ## 预测结果
input = x[:,0,:]
for _ in range(x.shape[1]):
    input = input.view(1, 1, 1)
    pred, hidden_prev = model(input, hidden_prev)
    input = pred  ## 循环获得每个input点输入网络
    predictions.append(pred.detach().numpy()[0])
x= x.data.numpy()
y = y.data.numpy( )
plt.scatter(time_steps[:-1], x.squeeze(), s=90)
plt.plot(time_steps[:-1], x.squeeze())
plt.scatter(time_steps[1:],predictions)  ## 黄色为预测
plt.show()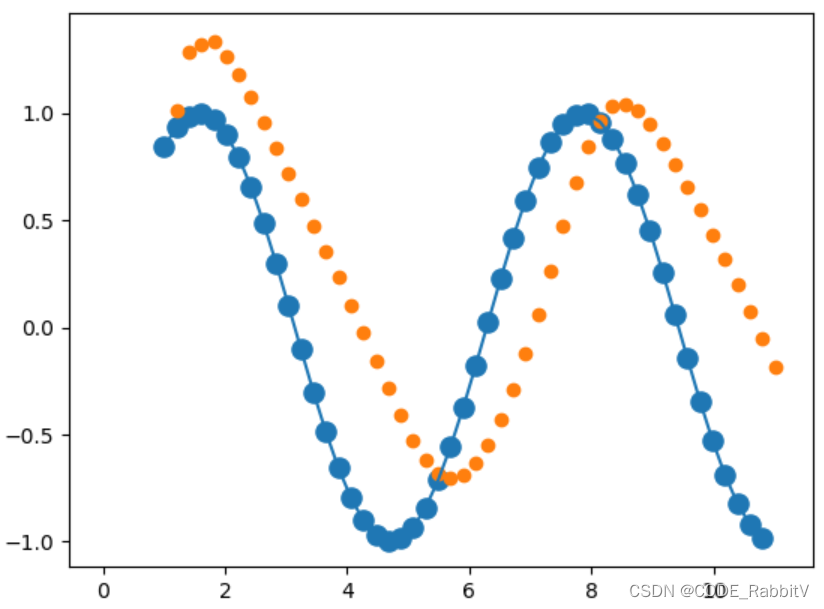
-
【高阶】上述例子比较简单,便于入门以推理到自己的目标任务,实际 RNN (长时间序列) 训练可能更有难度,可以添加
- 对于梯度爆炸的解决:
for p in model.parameters()" print(p.grad.norm()) ## 查阅梯度,看看是否爆炸 torch.nn.utils.clip_grad_norm_(p, 10) ## grad 限幅,其中的 norm 后面的_ 表示 in place 操作 - 对于梯度消失的解决:->
LSTM


 4175
4175


 被折叠的 条评论
为什么被折叠?
被折叠的 条评论
为什么被折叠?
 到【灌水乐园】发言


