


【Yolo5V6学习】(3)完整代码实现
直接上全部代码吧,今天有点累,不想写其他的了,想学习的兄弟,自已照着手敲一遍,自然就懂了。
下篇文章,我们重点来分析各个OpenCV 官方的函数
// Author:  ciellee
// Date:    2022/03/01
#include <iostream>
#include <opencv2/opencv.hpp>

using namespace std;
using namespace cv;
using namespace dnn;

struct Output {
    int id;             // 检测结果类别 id
    float confidence;   // 检测结果置信度
    Rect box;           // 选框位置
};

class Yolov5 {
public:
    Yolov5() {}
    ~Yolov5() {}
    bool ReadModel(Net& net, string& netPath, bool isCuda);
    bool Detect(Mat& SrcImg, Net& net, vector<Output>& output);
    void DrawPred(Mat& img, vector<Output> result, vector<Scalar> color);

public:
    // 锚框: 参考默认的 anchors.yaml 文件,采用 anchors_p5_640 中的数据,yolov5-6.0\models\hub\anchors.yaml
    // 三个不同分辨率的特征图上的锚框anchor,能够分别对大、中、小目标进行计算
    const float netAnchors[3][6] = {
        { 10.0, 13.0, 16.0, 30.0, 33.0, 23.0 },     // P3 / 8
        { 30.0, 61.0, 62.0, 45.0, 59.0, 119.0 },    // P4 / 16
        { 116.0, 90.0, 156.0, 198.0, 373.0, 326.0 } // P5 / 32
    };
    const float netStride[3] = { 8.0, 16.0, 32.0 };

    const int netWidth = 640;   // 宽:图像尺度大小,必须为32的整数倍
    const int netHeight = 640;  // 高:图像尺度大小,必须为32的整数倍
    float nmsThreshold = 0.45;  // 交并比阈值,IOU值:预测框大小∩真实框大小 / 预测框大小∪真实框大小,预测框与真实框的交集与并集的取值。
        //越大,则容易将对于同一个物品的不同预测结果 当成 对多个物品的多个预测结果,导致一个物品出现了多个预测结果。
        //越小,则容易将对于多个物品的不同预测结果 当成 对同一个物品的不同预测结果,导致多个物品只出现了一个预测结果。
    float boxThreshold = 0.5;
    float classThreshold = 0.25;    // 置信度阈值,只显示预测概率超过conf_thres的预测结果

    // 分类名
    std::vector<std::string> className = {
        "Person", "Bicycle", "Car", "Motorcycle", "Airplane", "Bus", "Train", "Truck", "Boat", "Traffic light",
        "fire hydrant", "stop sign", "parking meter", "bench", "bird", "cat", "dog", "horse", "sheep", "cow",
        "elephant", "bear", "zebra", "giraffe", "backpack", "umbrella", "handbag", "tie", "suitcase", "frisbee",
        "skis", "snowboard", "sports ball", "kite", "baseball bat", "baseball glove", "skateboard", "surfboard",
        "tennis racket", "bottle", "wine glass", "cup", "fork", "knife", "spoon", "bowl", "banana", "apple",
        "sandwich", "orange", "broccoli", "carrot", "hot dog", "pizza", "donut", "cake", "chair", "couch",
        "potted plant", "bed", "dining table", "toilet", "tv", "laptop", "mouse", "remote", "keyboard", "cell phone",
        "microwave", "oven", "toaster", "sink", "refrigerator", "book", "clock", "vase", "scissors", "teddy bear",
        "hair drier", "toothbrush"
    };
};


int main()
{
    string img_path = "6.jpg";
    string model_path = "yolov5s.onnx";

    Yolov5 yolo;    // 创建Yolov5实例
    Net net;        // 创建神经网络实例

    // 读取模型
    if (yolo.ReadModel(net, model_path, false)) {
        cout << "\nread Net ok" << endl;
    }
    else{
        return -1;
    }

    // 生成80种随机颜色
    // cv::Scalar的构造函数是cv::Scalar(v1, v2, v3, v4),前面的三个参数是依次设置BGR的,和RGB相反,第四个参数设置图片的透明度。
    // 当使用opencv提供的库函数imread()、imwrite()和imshow()时,cv::Scalar(v1, v2, v3, v4)的这四个参数就依次是BGRA,即蓝、绿、红和透明度。
    vector<Scalar> color;
    srand(time(0));
    for (int i = 0; i < 80; i++)
    {
        int b = rand() % 256;
        int g = rand() % 256;
        int r = rand() % 256;
        color.push_back(Scalar(b, g, r));
    }
    vector<Output> result;

    // 读取图片
    Mat img = imread(img_path);
    //Mat img;

    //VideoCapture cap("test.mp4");
    //if (!cap.isOpened()) {
    //    cout << "打开视频失败" << endl;
    //    return -1;
    //}

    clock_t start, end;
    double duration;

    //while (1) {
        //cap.read(img);              // 获取一帧数据
        //if (img.empty()) break;     // 如果是空帧的话

        start = clock();
        // 开始预测
        if (yolo.Detect(img, net, result)) {
            // 预测成功,开始绘制选框
            yolo.DrawPred(img, result, color);

            end = clock();
            duration = (double)(end - start) / CLOCKS_PER_SEC;
            printf("\n预测耗时:%f s", duration);
        }
        else {
            cout << "Detect Failed!" << endl;
        }

        //result.clear();
    //}

    //img.release();
    //cap.release();      // 关闭视频
    waitKey(10000);
    return 0;
}

// 读取模型
bool Yolov5::ReadModel(Net& net, string& netPath, bool isCuda)
{
    try {
        net = readNet(netPath);
    }
    catch(const std::exception& e) {
        cout << "Read Net Error: \n" << e.what() << endl;
        return false;
    }
    // 如果支持NVDIA GPU 的话
    if (isCuda) {
        net.setPreferableBackend(DNN_BACKEND_CUDA);     // 配置 NVIDA GPU 显示计算
        net.setPreferableTarget(DNN_TARGET_CUDA_FP16);  // 采用半精度浮点数, 修改所有参数和buffer 为half半精度浮点类型,与单精度浮点数相比,它的优点是只需要一半的存储空间和带宽,但是缺点是精度较低
    }
    else {
        net.setPreferableBackend(DNN_BACKEND_DEFAULT);  // 采用默认的 CPU
        net.setPreferableTarget(DNN_TARGET_CPU);
    }

    cout << "\ngetLayerTypes: \n";
    std::vector<String> s;
    net.getLayerTypes(s);           // 打印当前NET支持的LayerTypes
    for(int i =0; i<s.size(); i++){
        cout << s[i] << ", ";
        if (i!=0 && i % 4 == 0) cout << endl;
    }
    return true;
}

// 绘制选框
void draw_rect(Mat& img, cv::Rect rec, int r, int g , int b)
{
    rectangle(img, rec, Scalar(r, g, b), 2, 8);
    imshow("1", img);
    waitKey(1);
}

// 绘制选框
void draw_rect_1(Mat& img, cv::Rect rec, int r, int g, int b)
{
    Mat i = img.clone();
    rectangle(i, rec, Scalar(b, g, r), 2, 8);
    imshow("1", i);
    waitKey(1);
}

// 预测函数
bool Yolov5::Detect(Mat& SrcImg, Net& net, vector<Output>& output)
{
    Mat blob;
    int col = SrcImg.cols;      // 获取图片的宽
    int row = SrcImg.rows;      // 获取图片的高
    int maxLen = MAX(col, row); // 取宽高中的最大值,对图片进行resize,不足的地方补0

    Mat netInputImag = SrcImg.clone();  // 备份图片数据,避免损坏原图数据
    // 对图片进行resize 操作
    if (maxLen > 1.2 * col || maxLen > 1.2 * row) {
        Mat resizeImg = Mat::zeros(maxLen, maxLen, CV_8UC3);    // 申请一块宽高为maxLen的矩阵内存
        SrcImg.copyTo(resizeImg(Rect(0, 0, col, row)));         // 从(0,0)开始放置图片数据
        netInputImag = resizeImg;
    }

    //blobFromImage主要是用来对图片进行预处理,生成四维矩阵,保存在blob
    //包含两个主要过程:
    //1. 整体像素值减去平均值(mean), cv::Scalar(104, 117, 123)
    //2. 通过缩放系数(scalefactor)对图片像素值进行缩放,1/255.0
    blobFromImage(netInputImag, blob, 1 / 255.0, cv::Size(netWidth, netHeight), cv::Scalar(104, 117, 123), true, false);

    Mat nettest = netInputImag.clone();
    Mat nettest1 = netInputImag.clone();

    net.setInput(blob);

    vector<Mat> netOutputImg;
    net.forward(netOutputImg, net.getUnconnectedOutLayersNames());      // 获取所有输出无连接的层的名字

    vector<int> classIds;       // Layers ID 数组
    vector<float> confidences;  // 各ID 对应的置信度数组
    vector<cv::Rect> boxes;     // 各ID 对应的矩形选框
    float ratio_h = (float)netInputImag.rows / netHeight;
    float ratio_w = (float)netInputImag.cols / netWidth;
    int net_width = className.size() + 5;   // 输出的网络宽度是类别数+5

    float* pdata = (float*)netOutputImg[0].data;
    for (int stride = 0; stride < 3; stride++) {
        int grid_x = (int)(netWidth / netStride[stride]);
        int grid_y = (int)(netHeight / netStride[stride]);
        for (int anchor = 0; anchor < 3; anchor++) { //anchors
            const float anchor_w = netAnchors[stride][anchor * 2];
            const float anchor_h = netAnchors[stride][anchor * 2 + 1];


            for (int i = 0; i < grid_y; i++) {
                for (int j = 0; j < grid_x; j++) {
                    float box_score = pdata[4];         // 获取每一行的box框中含有物体的置信度概率

                    //printf("\npdata: x(%f), y(%f), w(%f), h(%f), score(%f)", pdata[0], pdata[1], pdata[2], pdata[3], pdata[4]);
                    float x = pdata[0];
                    float y = pdata[1];
                    float w = pdata[2];
                    float h = pdata[3];
                    int left = (x - 0.5 * w) * ratio_w;
                    int top = (y - 0.5 * h) * ratio_h;

                    //printf("\npdata: x(%4d), y(%4d), w(%4d), h(%4d),score(%4.3f), left(%4d), top(%4d)", int(x * ratio_w), int(y * ratio_h), int(w * ratio_w), int(h * ratio_h), pdata[4], left, top);
                    //draw_rect_1(nettest, Rect(left, top, int(w * ratio_w), int(h * ratio_h)), 60* 255,0,0);

                    // 比较置信度
                    if (box_score > boxThreshold) {
                        Mat scores(1, className.size(), CV_32FC1, pdata + 5);
                        Point classIdPoint;
                        double max_class_score;
                        minMaxLoc(scores, 0, &max_class_score, 0, &classIdPoint);
                        max_class_score = (float)max_class_score;
                        if (max_class_score > classThreshold) {
                            float x = pdata[0];
                            float y = pdata[1];
                            float w = pdata[2];
                            float h = pdata[3];
                            int left = (x - 0.5 * w) * ratio_w;
                            int top = (y - 0.5 * h) * ratio_h;

                            //printf("\n===>pdata: x(%4d), y(%4d), w(%4d), h(%4d), max_class_score(%4.3f), left(%4d), top(%4d)", int(x * ratio_w), int(y * ratio_h), int(w * ratio_w), int(h * ratio_h), max_class_score, left, top);
                            //draw_rect(nettest, Rect(left, top, int(w * ratio_w), int(h * ratio_h)), 0, 255, 0);

                            classIds.push_back(classIdPoint.x);
                            confidences.push_back(max_class_score * box_score);
                            boxes.push_back(Rect(left, top, int(w * ratio_w), int(h * ratio_h)));
                        }
                    }
                    pdata += net_width; //指针移到下一行
                }
            }
        }
    }

    //执行非最大抑制以消除具有较低置信度的冗余重叠框(NMS)
    vector<int> nms_result;
    NMSBoxes(boxes, confidences, classThreshold, nmsThreshold, nms_result);
    for (int i = 0; i < nms_result.size(); i++) {
        int idx = nms_result[i];
        Output result;
        result.id = classIds[idx];
        result.confidence = confidences[idx];
        result.box = boxes[idx];
        output.push_back(result);

        //draw_rect(nettest1, boxes[idx], 0, 0, 255);
        //waitKey(200);
    }

    if (output.size())
        return true;
    else
        return false;
}

// 绘制选框
void Yolov5::DrawPred(Mat& img, vector<Output> result, vector<Scalar> color)
{
    char label_t[50];

    for (int i = 0; i < result.size(); i++) {
        int left, top;
        left = result[i].box.x;
        top = result[i].box.y;
        int color_num = i;

        //rectangle(img, result[i].box, color[result[i].id], 1, 8);
        rectangle(img, result[i].box, Scalar(0, 0, 255), 1, 8, 0);

        //string label = className[result[i].id] + ":" + to_string(result[i].confidence);
        memset(label_t, 0, 50);
        sprintf_s(label_t, "%s: %.2f", className[result[i].id], result[i].confidence);
        string label(label_t);

        int baseLine;
        Size labelSize = getTextSize(label, FONT_HERSHEY_DUPLEX, 2, 3, &baseLine);//FONT_HERSHEY_SIMPLEX
        top = max(top, labelSize.height);
        //rectangle(frame, Point(left, top - int(1.5 * labelSize.height)), Point(left + int(1.5 * labelSize.width), top + baseLine), Scalar(0, 255, 0), FILLED);
        //putText(img, label, Point(left, top), FONT_HERSHEY_TRIPLEX, 1, color[result[i].id], 2);
        putText(img, label, Point(left, top), FONT_HERSHEY_DUPLEX, 0.7, Scalar(0, 0, 255), 1);

		//imshow("1", img);
	    //waitKey(200);
    }
    imshow("1", img);
//  imwrite("out.bmp", img);
    waitKey(1);
//  destroyAllWindows();
}
.
运行结果如下:
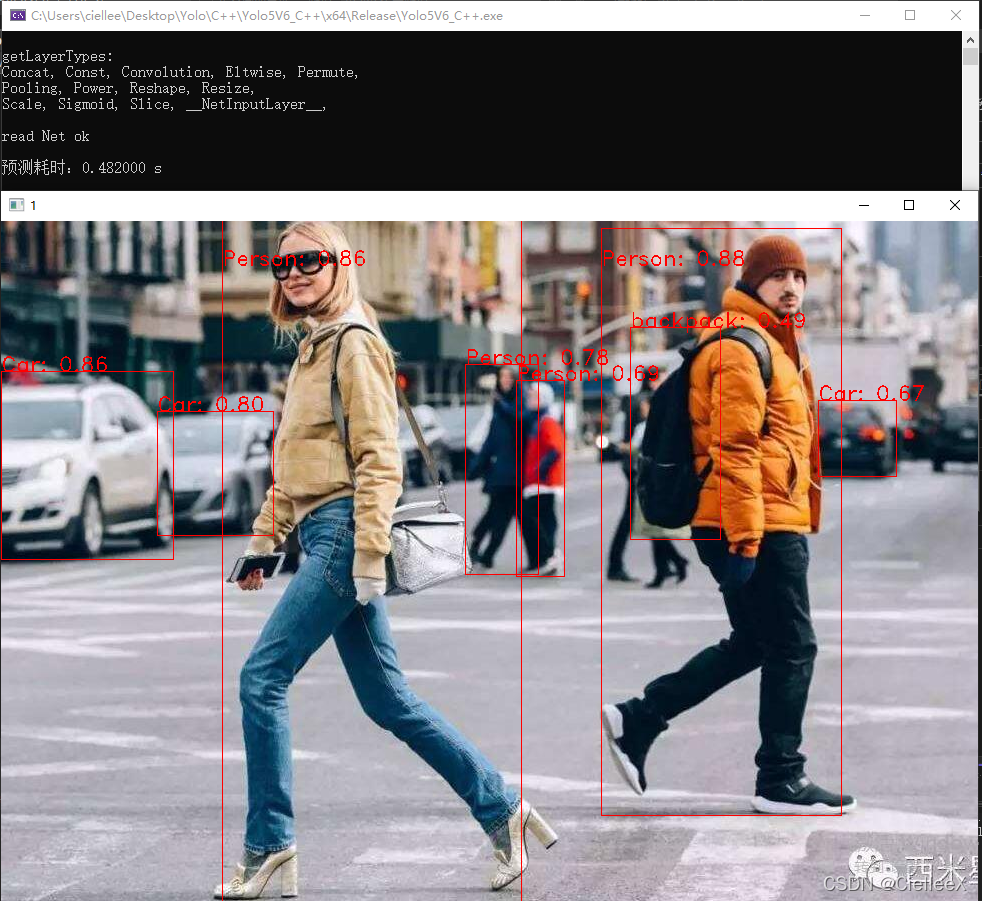
等你看懂了代码,把一些注释打开,
你还能看到整个YOLO算法遍历识别的过程,有助于理解和学习
全过程太长,我省去一部分:


 528
528

 被折叠的 条评论
为什么被折叠?
被折叠的 条评论
为什么被折叠?
 到【灌水乐园】发言


