


Mask R-CNN详解+个人理解(附代码)(一)
一、简介
作为何凯明先生2017年的扛鼎之作,代表了计算机视觉领域在2017年的最新成果。Mask R-CNN的问世在目标检测的道路上又前进了一大步。这篇论文的成功,证明了单任务的网络结构已经逐渐不再引人瞩目,取而代之的是集成,复杂,一石多鸟的多任务网络模型。Mask R-CNN就是典型的代表。那么首先简要概括一下Mask R-CNN完成了哪些任务,首先看图。 图1:这是Mask R-CNN的目标检测的效果图
从图中可以看出,Mask R-CNN完成了以下任务:
- 目标检测:用边界框框出目标物体。
- 目标分类:对于每一个目标,需要找到对应的类别(class),区分到底是人,是车,还是其他类别。
- 目标分割:在每个目标中,需要在像素层面区分,什么是前景,什么是背景。实例分割不仅要正确的找到图像中的objects,还要对其精确的分割。所以Instance Segmentation可以看做object dection和semantic segmentation的结合。
值得一提的是,Mask R-CNN是对Faster R-CNN的改良,它在Faster R-CNN的基础上:加了一个Mask Prediction Branch (Mask 预测分支),并且改良了ROI Pooling,提出了ROI Align。但是,他的训练速度慢于Faster R-CNN。所以为了能更好的明白,Mask R-CNN的运行模式,我们需要先对Faster R-CNN有深入的理解。
二、Mask R-CNN的部件解读

图2:Mask R-CNN的基本架构
(一)、convolutional backbone
convolutional backbone是一系列的卷积层用于提取图像的feature maps,比如可以是VGG16,VGG19,GooLeNet,ResNet50,ResNet101等。这里主要使用的是ResNet101(残差神经网络)的结构。
对于传统的神经网络结构,我们会遇到一个问题,那就是随着神经网络的深度(层数)增加,我们难免会遇到梯度弥散和梯度爆炸的问题。那就是网络越深所能学到的东西就越多,当然收敛速度同时也就越慢,训练时间越长,然而深度到了一定程度之后就会发现有一些越往深学习率越低的情况。深度残差网络的设计就是为了克服这种由于网络深度加深而产生的学习率变低,准确率无法有效提升的问题,也称作网络的退化问题。

图3. 残差神经网络的基本block
网络试图让一个block的输出为f(x) + x,其中的f(x)为残差。本来一个由2层网络组成的映射关系我们可以称之为F(x)的这样一个期望函数来拟合,而现在我们期望用H(x)=F(x)+x来拟合,这本身就引入了更为丰富的参考信息或者说更为丰富的维度(特征值)。这样网络就可以学到更为丰富的内容。如果想更了解残差神经网络,可以参考: https://blog.csdn.net/qq_40027052/article/details/78261737
这里我简单介绍一下残差神经网络的原理:
这种类似短路的block引入后会有一种有趣的现象,就是会产生一个非常平滑的正向传递过程。我们看xl+1和其前面一层xl的关系是纯粹一个线性叠加的关系。如果进一步推导xl+2及其以后层的输出会发现展开后是这样一个表达式:

从这个表达式里可以看出,后面层的向量XL都有前面各层的线性贡献。
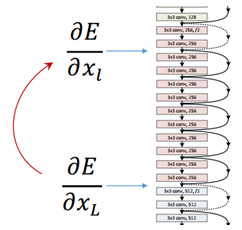
同样。在反向传播的过程中,残差的传递也是非常平滑的过程。
在ResNet网络中只存在两种类型的block,在构建ResNet中一直是这两种block在交替或者循环的使用,接下来介绍一下这两种类型的block(identity_block, conv_block):

图4. 跳过三个卷积的identity block
图中可以看出该block中直接把开端的x接入到第三个卷积层的输出,所以该x也被称为shortcut,很像是一条用来短路的导线。注意主路上第三个卷积层使用激活层,在相加之后才进行了ReLU的激活。

图5. 跳过三个卷积并在shortcut上存在卷积的conv block
与identity block其实是差不多的,只是在shortcut上加了一个卷积层再进行相加。注意主路上的第三个卷积层和shortcut上的卷积层都没激活,而是先相加再进行激活的。
其实在作者的代码中,主路中的第一个和第三个卷积都是1*1的卷积(改变的只有feature maps的通道大小,不改变长和宽),为了降维从而实现卷积运算的加速;注意需要保持shortcut和主路最后一个卷积层的channel要相同才能够进行相加。
下面展示一下ResNet101的整体框架:

图6.ResNet101整体架构
从图中可以得知ResNet分为了5个stage,C1-C5分别为每个Stage的输出,这些输出在后面的FPN中会使用到。你可以数数,看看是不是总共101层,数的时候除去BatchNorm层。注:stage4中是由一个conv_block和22个identity_block,如果要改成ResNet50网络的话只需要调整为5个identity_block。接下来是ResNet101的代码(基于tensorflow和keras):
首先是identity_block:
def identity_block(input_tensor, kernel_size, filters, stage, block,
                   use_bias=True, train_bn=True):
     """The identity_block is the block that has no conv layer at shortcut
    # Arguments
        input_tensor: input tensor
        kernel_size: default 3, the kernel size of middle conv layer at main path
        filters: list of integers, the nb_filters of 3 conv layer at main path
        stage: integer, current stage label, used for generating layer names
        block: 'a','b'..., current block label, used for generating layer names
        use_bias: Boolean. To use or not use a bias in conv layers.
        train_bn: Boolean. Train or freeze Batch Norm layers
    """
    nb_filter1, nb_filter2, nb_filter3 = filters
    conv_name_base = 'res' + str(stage) + block + '_branch'
    bn_name_base = 'bn' + str(stage) + block + '_branch'

    x = KL.Conv2D(nb_filter1, (1, 1), name=conv_name_base + '2a',
                  use_bias=use_bias)(input_tensor)
    x = BatchNorm(name=bn_name_base + '2a')(x, training=train_bn)
    x = KL.Activation('relu')(x)

    x = KL.Conv2D(nb_filter2, (kernel_size, kernel_size), padding='same',
                  name=conv_name_base + '2b', use_bias=use_bias)(x)
    x = BatchNorm(name=bn_name_base + '2b')(x, training=train_bn)
    x = KL.Activation('relu')(x)

    x = KL.Conv2D(nb_filter3, (1, 1), name=conv_name_base + '2c',
                  use_bias=use_bias)(x)
    x = BatchNorm(name=bn_name_base + '2c')(x, training=train_bn)

    x = KL.Add()([x, input_tensor])
    x = KL.Activation('relu', name='res' + str(stage) + block + '_out')(x)
    return x
接着是conv_block:
def conv_block(input_tensor, kernel_size, filters, stage, block,
               strides=(2, 2), use_bias=True, train_bn=True):
    """conv_block is the block that has a conv layer at shortcut
    # Arguments
        input_tensor: input tensor
        kernel_size: default 3, the kernel size of middle conv layer at main path
        filters: list of integers, the nb_filters of 3 conv layer at main path
        stage: integer, current stage label, used for generating layer names
        block: 'a','b'..., current block label, used for generating layer names
        use_bias: Boolean. To use or not use a bias in conv layers.
        train_bn: Boolean. Train or freeze Batch Norm layers
    Note that from stage 3, the first conv layer at main path is with subsample=(2,2)
    And the shortcut should have subsample=(2,2) as well
    """
    nb_filter1, nb_filter2, nb_filter3 = filters
    conv_name_base = 'res' + str(stage) + block + '_branch'
    bn_name_base = 'bn' + str(stage) + block + '_branch'

    x = KL.Conv2D(nb_filter1, (1, 1), strides=strides,
                  name=conv_name_base + '2a', use_bias=use_bias)(input_tensor)
    x = BatchNorm(name=bn_name_base + '2a')(x, training=train_bn)
    x = KL.Activation('relu')(x)

    x = KL.Conv2D(nb_filter2, (kernel_size, kernel_size), padding='same',
                  name=conv_name_base + '2b', use_bias=use_bias)(x)
    x = BatchNorm(name=bn_name_base + '2b')(x, training=train_bn)
    x = KL.Activation('relu')(x)

    x = KL.Conv2D(nb_filter3, (1, 1), name=conv_name_base +
                  '2c', use_bias=use_bias)(x)
    x = BatchNorm(name=bn_name_base + '2c')(x, training=train_bn)

    shortcut = KL.Conv2D(nb_filter3, (1, 1), strides=strides,
                         name=conv_name_base + '1', use_bias=use_bias)(input_tensor)
    shortcut = BatchNorm(name=bn_name_base + '1')(shortcut, training=train_bn)

    x = KL.Add()([x, shortcut])
    x = KL.Activation('relu', name='res' + str(stage) + block + '_out')(x)
    return x
综合形成残差神经网络:
def resnet_graph(input_image, architecture, stage5=False, train_bn=True):
    """Build a ResNet graph.
        architecture: Can be resnet50 or resnet101
        stage5: Boolean. If False, stage5 of the network is not created
        train_bn: Boolean. Train or freeze Batch Norm layers
    """
    assert architecture in ["resnet50", "resnet101"]
    # Stage 1
    x = KL.ZeroPadding2D((3, 3))(input_image)
    x = KL.Conv2D(64, (7, 7), strides=(2, 2), name='conv1', use_bias=True)(x)
    x = BatchNorm(name='bn_conv1')(x, training=train_bn)
    x = KL.Activation('relu')(x)
    C1 = x = KL.MaxPooling2D((3, 3), strides=(2, 2), padding="same")(x)
    # Stage 2
    x = conv_block(x, 3, [64, 64, 256], stage=2, block='a', strides=(1, 1), train_bn=train_bn)
    x = identity_block(x, 3, [64, 64, 256], stage=2, block='b', train_bn=train_bn)
    C2 = x = identity_block(x, 3, [64, 64, 256], stage=2, block='c', train_bn=train_bn)
    # Stage 3
    x = conv_block(x, 3, [128, 128, 512], stage=3, block='a', train_bn=train_bn)
    x = identity_block(x, 3, [128, 128, 512], stage=3, block='b', train_bn=train_bn)
    x = identity_block(x, 3, [128, 128, 512], stage=3, block='c', train_bn=train_bn)
    C3 = x = identity_block(x, 3, [128, 128, 512], stage=3, block='d', train_bn=train_bn)
    # Stage 4
    x = conv_block(x, 3, [256, 256, 1024], stage=4, block='a', train_bn=train_bn)
    block_count = {"resnet50": 5, "resnet101": 22}[architecture]
    for i in range(block_count):
        x = identity_block(x, 3, [256, 256, 1024], stage=4, block=chr(98 + i), train_bn=train_bn)
    C4 = x
    # Stage 5
    if stage5:
        x = conv_block(x, 3, [512, 512, 2048], stage=5, block='a', train_bn=train_bn)
        x = identity_block(x, 3, [512, 512, 2048], stage=5, block='b', train_bn=train_bn)
        C5 = x = identity_block(x, 3, [512, 512, 2048], stage=5, block='c', train_bn=train_bn)
    else:
        C5 = None
    return [C1, C2, C3, C4, C5]
后续内容请观看下集 Mask R-CNN论文详解+个人理解(附代码)(二)-------Mask R-CNN的其他部件解读。
参考资料:
【1】https://blog.csdn.net/remanented/article/details/79564045
【2】https://blog.csdn.net/qq_40027052/article/details/78261737
【3】https://blog.csdn.net/jiongnima/article/details/79094159


 2841
2841


 被折叠的 条评论
为什么被折叠?
被折叠的 条评论
为什么被折叠?
 到【灌水乐园】发言


