


文章目录
一、 环境
1、orb_slam3(https://github.com/extdomains/github.com/UZ-SLAMLab/ORB_SLAM3.git)
ubuntu18.04 | ros-melodic | opencv3.2 | eigen3.1.0 | pangolin1.8
2、农业数据集
官网:https://ucr-robotics.github.io/Citrus-Farm-Dataset/
论文:Multimodal Dataset for Localization, Mapping and Crop Monitoring in Citrus Tree Farms
Github: https://github.com/extdomains/github.com/UCR-Robotics/Citrus-Farm-Dataset.git
二、数据集下载
1、数据集结构
citrus-farm-dataset/
├── 01_13B_Jackal/
│   ├── adk_*.bag		// 热力相机数据
│   ├── base_*.bag      // 外置imu GPS-RTK lidar数据
│   ├── blackfly_*.bag  // 	单目数据
│   ├── mapir_*.bag 	// RGNIR相机数据
│   ├── odom_*.bag	// 轮式里程计数据
│   └── zed_*.bag 		// zed双目彩色+深度+内置imu数据
├── 02_13B_Jackal/
├── 03_13B_Jackal/
├── 04_13D_Jackal/
├── 05_13D_Jackal/
├── 06_14B_Jackal/
├── 07_14B_Jackal/
├── Calibration/
│   ├── README.pdf
│   ├── config/	// 标定板
│   ├── data/		// 标定bag
│   ├── results/	// 标定结果
│   └── scripts/	// 	标定脚本工具
└── ground_truth/
    ├── 01_13B_Jackal/
    │   ├── gt.bag
    │   └── gt.csv
    ├── 02_13B_Jackal/
    ├── 03_13B_Jackal/
    ├── 04_13D_Jackal/
    ├── 05_13D_Jackal/
    ├── 06_14B_Jackal/
    └── 07_14B_Jackal/
详细文件列表可查看github下的dataset_file_list.yaml
2 、下载
先把github的文件clone下来
git clone https://github.com/extdomains/github.com/UCR-Robotics/Citrus-Farm-Dataset.git
官方给出了三种下载方式
1)py脚本下载
cd Citrus-Farm-Dataset/scripts/
python3 download_citrusfarm.py
报错提示缺什么库就安装什么库
可修改文件中的folder_list、modality_list来选择要下载那些文件,毕竟数据集一共1.3T,全下完很费时间,各取所需就好。
  # List of folders you want to download
  folder_list = ["01_13B_Jackal", "02_13B_Jackal", "03_13B_Jackal", "04_13D_Jackal",
                 "05_13D_Jackal", "06_14B_Jackal", "07_14B_Jackal",
                 "Calibration", "Calibration/config", "Calibration/data",
                 "Calibration/results", "Calibration/scripts",
                 "ground_truth/01_13B_Jackal", "ground_truth/02_13B_Jackal",
                 "ground_truth/03_13B_Jackal", "ground_truth/04_13D_Jackal",
                 "ground_truth/05_13D_Jackal", "ground_truth/06_14B_Jackal",
                 "ground_truth/07_14B_Jackal"]

  # List of modalities you want to download
  modality_list = ["adk",      # thermal
                   "base",     # LiDAR, IMU, GPS-RTK raw data
                   "blackfly", # Monochrome
                   "mapir",    # NIR
                   "odom",     # wheel odom, GPS-RTK odom (post-processed from raw data)
                   "zed"       # RGB, depth
                   ]
这种方法网络一不稳定就会下载失败直接报错,再次启动就会从头开始下载,很不稳定。推荐第二种方法
2)aws下载
官方把数据集放在了aws上,并且不需要注册登录就可以直接下载,而且也比较稳定,还能对指定文件单独下载,强烈推荐使用该方法。
#安装awscli
sudo apt install awscli
# 查看数据集下的文件
aws s3 ls --no-sign-request s3://ucr-robotics/citrus-farm-dataset/
aws s3 ls --no-sign-request s3://ucr-robotics/citrus-farm-dataset/06_14B_Jackal/
# 下载该目录下所有文件到指定路径
aws s3 sync --no-sign-request s3://ucr-robotics/citrus-farm-dataset/ /path/to/local/directory
# 下载指定文件到指定路径
aws s3 cp --no-sign-request s3://ucr-robotics/citrus-farm-dataset/06_14B_Jackal/base_2023-07-18-14-29-35_0.bag /path/to/local/directory
3)网盘下载
官方给出了两种网盘下载方式
谷歌网盘:
https://drive.google.com/drive/folders/12h5CAagVVtz1Od9bK_O6hDMyG8Xh_DLG?usp=sharing
百度网盘:
https://pan.baidu.com/s/1NVRTHKvFUue2qaQsb7wlVQ?pwd=ilas
PS:
具体下载教程可去官网查看(https://ucr-robotics.github.io/Citrus-Farm-Dataset/download.html)
4) 文件完整性校验
官方在dataset_file_list.yaml文件中给出了每个文件的MD5值,可以用于校验数据的完整性,防止我们下载的数据集丢失数据,或在拷贝的过程中数据损坏。
# md5sum linux系统自带,无需下载
md5sum zed_2023-07-18-14-29-35_0.bag
# 输出
71bc564fd092a0983461a40b6c545685  zed_2023-07-18-14-29-35_0.bag
# 与官方文件给出的md5值对比
zed_2023-07-18-14-29-35_0.bag:
	md5: 71bc564fd092a0983461a40b6c545685
二、测试 (双目+imu)
1、配置yaml文件
1)相机参数
标定文件Calibration/results/01-muti-cam-result.yaml中的cam1、cam2表示zed的左右相机
# Camera calibration and distortion parameters (OpenCV)
# left
Camera1.fx: 527.5591059906969
Camera1.fy: 528.5624579927512
Camera1.cx: 647.1975009993375
Camera1.cy: 357.2476935284654

Camera1.k1: 0.0
Camera1.k2: 0.0
Camera1.p1: 0.0
Camera1.p2: 0.0

#right
Camera2.fx: 528.9103358910911
Camera2.fy: 530.2388864649299
Camera2.cx: 648.5912694971759
Camera2.cy: 356.37488150521466

Camera2.k1: 0.0
Camera2.k2: 0.0
Camera2.p1: 0.0
Camera2.p2: 0.0

Camera.width: 1280
Camera.height: 720
左右相机的欧式矩阵为cam2下的T_cn_cnm1,即为T_cam1_cam2,具体可查看calibration/README.pdf
cam2:
  # cam2to cam1
  T_cn_cnm1:
  - [0.9999965384345549, -4.7928276260704e-05, -0.0026307454816564923, -0.11982032081709064]
  - [5.493645261583918e-05, 0.9999964501882208, 0.0026639431196346527, 0.00034092466032724784]
  - [0.002630608464803411, -0.0026640784220456977, 0.9999929912680725, 0.004294161487045633]
  - [0.0, 0.0, 0.0, 1.0]
2)imu 参数
(外置imu以下简称imu,zed内置imu简称zedIMU)
外置imu参数
噪音参数Calibration/results/02-imu-instrinsics.yaml
  accelerometer_noise_density: 0.0002276846771973415
  accelerometer_random_walk: 6.706087584689249e-06
  gyroscope_noise_density: 0.00010426654551109309
  gyroscope_random_walk: 3.5636559575381104e-06
  model: calibrated
  rostopic: /microstrain/imu/data
  time_offset: 0.0
  update_rate: 200.0
imu与zed的欧式矩阵
02-imu-cam-result.yaml中的欧式矩阵是单目相机cam0和imu的关系即T_cam0_i,要获得zed相机cam1和imu的欧式矩阵T_i_cam1需要做坐标变换。另外还需要T_cam1_cam0,可在Calibration/results/01-muti-cam-result.yaml中得到。
公式为
T_cam1_i  = T_cam1_cam0 * T_cam0_i
T_i_cam1 = T_cam1_i.inverse
原理可参考高博slam十四讲中第3讲3.6节最后的例子。
最后得到
# Transformation from camera 0 to body-frame (imu)
IMU.T_b_c1: !!opencv-matrix
  rows: 4
  cols: 4
  dt: f
  data: [-0.0234653, 0.00342746, -0.999719, -0.172357,
         0.999722, 0.0021686,-0.0234579, -0.0610075,
         0.00208759, -0.999992, -0.00347748, -0.0814507,
         0.0, 0.0, 0.0, 1.0]
内置imu参数
官方没有给出zedimu的标定结果,但数据集中包含zedimu的数据,想使用这部分数据的话,可以随便搜一篇zed2i相机双目+imu的标定贴,如果博主给出他的标定结果的话就直接复制过来用。因为我觉得同款相机标定出的imu结果大差不差,只要运行效果可以就说明能用。
下面给出我找的帖子中的数据 (https://blog.csdn.net/weixin_42703210/article/details/130595740)
# IMU noise
IMU.NoiseGyro: 1.9907361538269255e-03 # 1.6968e-04
IMU.NoiseAcc: 2.1014029979335751e-02 # 2.0000e-3
IMU.GyroWalk: 3.9258772229758955e-05
IMU.AccWalk: 4.5856543488109373e-04 # 3.0000e-3
IMU.Frequency: 200.0
# Transformation from camera 0 to body-frame (imu)
IMU.T_b_c1: !!opencv-matrix
  rows: 4
  cols: 4
  dt: f
  data: [ 0.00939132,-0.00382123,0.9999486,0.03501837,
          -0.99992989,0.00717673,0.00941857,0.01888495,
          -0.00721235,-0.99996695,-0.00375356,-0.00339231,
          0.0, 0.0, 0.0, 1.0]
最后贴下配置文件
%YAML:1.0

#--------------------------------------------------------------------------------------------
# System config
#--------------------------------------------------------------------------------------------

# When the variables are commented, the system doesn't load a previous session or not store the current one
# If the LoadFile doesn't exist, the system give a message and create a new Atlas from scratch
# System.LoadAtlasFromFile: "MapEuRoCMH_StereoImu"

# The store file is created from the current session, if a file with the same name exists it is deleted
# System.SaveAtlasToFile: "MapEuRoCMH_StereoImu"

#--------------------------------------------------------------------------------------------
# Camera Parameters. Adjust them!
#--------------------------------------------------------------------------------------------
File.version: "1.0"

Camera.type: "PinHole"

# Camera calibration and distortion parameters (OpenCV)
# left
Camera1.fx: 527.5591059906969
Camera1.fy: 528.5624579927512
Camera1.cx: 647.1975009993375
Camera1.cy: 357.2476935284654

Camera1.k1: 0.0
Camera1.k2: 0.0
Camera1.p1: 0.0
Camera1.p2: 0.0

#right
Camera2.fx: 528.9103358910911
Camera2.fy: 530.2388864649299
Camera2.cx: 648.5912694971759
Camera2.cy: 356.37488150521466

Camera2.k1: 0.0
Camera2.k2: 0.0
Camera2.p1: 0.0
Camera2.p2: 0.0

Camera.width: 1280
Camera.height: 720

# Camera frames per second
Camera.fps: 10

# Color order of the images (0: BGR, 1: RGB. It is ignored if images are grayscale)
Camera.RGB: 1

# Close/Far threshold. Baseline times.
Stereo.ThDepth: 10000.0
Stereo.T_c1_c2: !!opencv-matrix
  rows: 4
  cols: 4
  dt: f
  data: [0.9999965384345549, -4.7928276260704e-05, -0.0026307454816564923, -0.11982032081709064,
         5.493645261583918e-05, 0.9999964501882208, 0.0026639431196346527, 0.00034092466032724784,
         0.002630608464803411, -0.0026640784220456977, 0.9999929912680725, 0.004294161487045633,
         0.0, 0.0, 0.0, 1.0]


# Transformation from camera 0 to body-frame (imu)
IMU.T_b_c1: !!opencv-matrix
  rows: 4
  cols: 4
  dt: f
  # data: [-0.0234653, 0.00342746, -0.999719, -0.172357,
  #        0.999722, 0.0021686,-0.0234579, -0.0610075,
  #        0.00208759, -0.999992, -0.00347748, -0.0814507,
  #        0.0, 0.0, 0.0, 1.0]
  data: [ 0.00939132,-0.00382123,0.9999486,0.03501837,
          -0.99992989,0.00717673,0.00941857,0.01888495,
          -0.00721235,-0.99996695,-0.00375356,-0.00339231,
          0.0, 0.0, 0.0, 1.0] # zedimu

# IMU noise
# IMU.NoiseGyro: 0.00010426654551109309
# IMU.NoiseAcc: 0.0002276846771973415
# IMU.GyroWalk: 3.5636559575381104e-06
# IMU.AccWalk: 6.706087584689249e-06
# IMU.Frequency: 200.0

# zedimu
IMU.NoiseGyro: 1.9907361538269255e-03
IMU.NoiseAcc: 2.1014029979335751e-02
IMU.GyroWalk: 3.9258772229758955e-05
IMU.AccWalk: 4.5856543488109373e-04
IMU.Frequency: 200.0


#--------------------------------------------------------------------------------------------
# ORB Parameters
#--------------------------------------------------------------------------------------------

# ORB Extractor: Number of features per image
ORBextractor.nFeatures: 1200

# ORB Extractor: Scale factor between levels in the scale pyramid
ORBextractor.scaleFactor: 1.2

# ORB Extractor: Number of levels in the scale pyramid
ORBextractor.nLevels: 8

# ORB Extractor: Fast threshold
# Image is divided in a grid. At each cell FAST are extracted imposing a minimum response.
# Firstly we impose iniThFAST. If no corners are detected we impose a lower value minThFAST
# You can lower these values if your images have low contrast
ORBextractor.iniThFAST: 20
ORBextractor.minThFAST: 7

#--------------------------------------------------------------------------------------------
# Viewer Parameters
#--------------------------------------------------------------------------------------------
Viewer.KeyFrameSize: 0.05
Viewer.KeyFrameLineWidth: 1.0
Viewer.GraphLineWidth: 0.9
Viewer.PointSize: 2.0
Viewer.CameraSize: 0.08
Viewer.CameraLineWidth: 3.0
Viewer.ViewpointX: 0.0
Viewer.ViewpointY: -1.7
Viewer.ViewpointZ: 0.8
Viewer.ViewpointF: -500.0
Viewer.imageViewScale: 1.0
2、使用
1)双目+外置imu
因为是外置imu,所以需要对相机和imu进行融合,我成功的方法是使用官方给的imu滤波脚本对外置imu数据的时间轴进行过滤后使用,脚本文件scripts\imu_filter.py,该文件在github中,不是数据集下的scripts文件。
这个脚本文件会接受imu的数据话题,过滤后发布过滤数据话题,在slam中把imu话题改为过滤后的话题即可。
踩坑:如果直接使用imu的原始话题数据运行slam的双目imu模式,slam系统会直接报错
Sophus ensure failed in function 'static Sophus::SO3<Scalar_> Sophus::SO3<Scalar_, Options>::expAndTheta(const Tangent&, Sophus::SO3<Scalar_, Options>::Scalar*) [with Scalar_ = float; int Options = 0; Sophus::SO3<Scalar_, Options>::Ta    ngent = Eigen::Matrix<float, 3, 1>; Sophus::SO3<Scalar_, Options>::Scalar = float]', file '/home/user/plvs/Thirdparty/Sophus/sophus/so3.hpp', line 614.
SO3::exp failed! omega: -nan -nan -nan, real: -nan, img: -nan
bash: line 1: 169876 Aborted                 (core dumped)
一开始以为是代码的错误,就找到两个解决办法
a、
https://521github.com/UZ-SLAMLab/ORB_SLAM3/issues/608
https://blog.csdn.net/weixin_43667077/article/details/130699499
b、
https://521github.com/DavidPetkovsek/MORB_SLAM/issues/17
https://521github.com/DavidPetkovsek/MORB_SLAM/commit/8b22f886117eb7f60cc8edd856346377172ec600
但按这两种方法修改后还是会报同样的错,可能是用相机内置的imu数据用习惯了,忽略了传感器数据融合问题,最后发现使用了官方的卡尔曼滤波脚本得到的imu数据能跑通,才发现问题是出现在数据上。
在搜错误的时候发现一篇关于使用gdb调试Core Dumps错误的教程帖子,写的非常详细。
https://www.brendangregg.com/blog/2016-08-09/gdb-example-ncurses.html
之后就正常跑就可以了
// 修改订阅话题
ros::Subscriber sub_imu = n.subscribe("/microstrain/imu/data_filtered", 1000, &ImuGrabber::GrabImu, &imugb);
ros::Subscriber sub_img_left = n.subscribe("/zed2i/zed_node/left/image_rect_color", 100, &ImageGrabber::GrabImageLeft,&igb);
ros::Subscriber sub_img_right = n.subscribe("/zed2i/zed_node/right/image_rect_color", 100, &ImageGrabber::GrabImageRight,&igb);
我下载了第六序列的含imu数据、zed相机的全部bag,即base_xxxx.bag、zed_xxx.bag
播放bag
# first 开启imu滤波
 cd /Citrus-Farm-Dataset/scripts/
 python3  imu_filter.py
#  second other terminal play bag
rosbag play zed_2023-07-18-14-*.bag base_2023-07-18-14-29-35_0.bag
这样就把第六序列的imu和zed相机数据同时播放了
2)双目+相机imu
// 修改话题
ros::Subscriber sub_imu = n.subscribe("/zed2i/zed_node/imu/data", 1000, &ImuGrabber::GrabImu, &imugb);
ros::Subscriber sub_img_left = n.subscribe("/zed2i/zed_node/left/image_rect_color", 100, &ImageGrabber::GrabImageLeft,&igb);
ros::Subscriber sub_img_right = n.subscribe("/zed2i/zed_node/right/image_rect_color", 100, &ImageGrabber::GrabImageRight,&igb);
# 播放bag
rosbag play zed_2023-07-18-14-*.bag
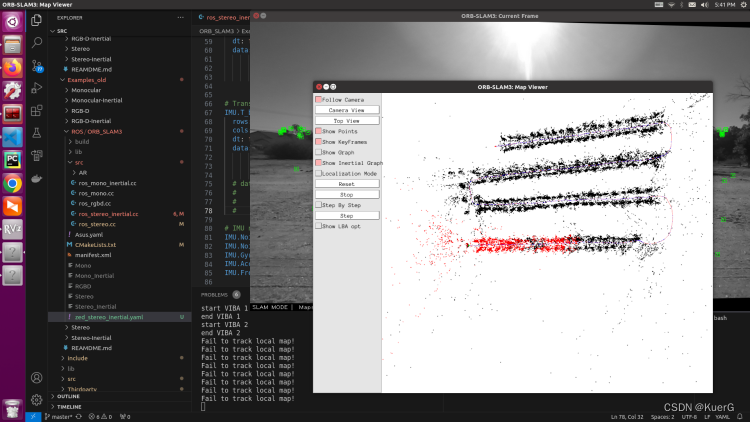
效果和外置的差不多,之后会用evo库评测效果,进行对比。


 1270
1270


 被折叠的 条评论
为什么被折叠?
被折叠的 条评论
为什么被折叠?
 到【灌水乐园】发言


