


State模式主要解决的是在开发中时常遇到的根据不同 的状态需要进行不同的处理操作的问题,而这样的问题,大部分人是采用switch-case语句进行处理的,这样会造成一个问题:分支过多,而且如果加入 一个新的状态就需要对原来的代码进行编译.State模式采用了对这些不同的状态进行封装的方式处理这类问题,当状态改变的时候进行处理然后再切换到另一 种状态,也就是说把状态的切换责任交给了具体的状态类去负责.同时,State模式和Strategy模式在图示上有很多相似的地方,需要说明的是两者的 思想都是一致的,只不过封装的东西不同:State模式封装的是不同的状态,而Stategy模式封装的是不同的算法.
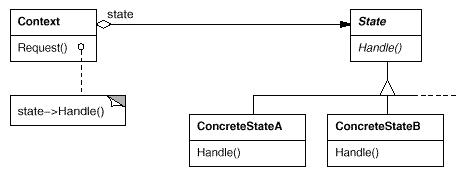
State 模式 UML结构图:
下面的例子描述了一个指挥灯的工作过程。该过程涉及到的两类对象,分别是指挥灯和控制器,其中控制器控制指挥灯的工作。指挥灯共三种状态:Red,Green,Blue.
Light.h 源文件如下:
/*
作者: zhang_gl
blog: http://blog.csdn.net/zgl_dm/
描述:State Pattern
*/
#ifndef _LIGHT_H_
#define
_LIGHT_H_
#include
<
iostream
>
#include
<
string
>
#include
"
ControlMachine.h
"
using
namespace
std;
class
ControlMachine;
class
Light

 ...
{
...
{
 public:
virtual void Push(ControlMachine *ctrl)=0;
virtual string GetColor()=0;
 }
;
}
;
class
RedLight:
public
Light
...
{
public:
void Push(ControlMachine *ctrl);
string GetColor();
}
;
class
GreenLight:
public
Light
...
{
public:
void Push(ControlMachine *ctrl);
string GetColor();
}
;
class
BlueLight:
public
Light
...
{
public:
void Push(ControlMachine *ctrl);
string GetColor();
}
;
#endif
作者: zhang_gl
blog: http://blog.csdn.net/zgl_dm/
描述:State Pattern
*/
#ifndef _LIGHT_H_
#define
_LIGHT_H_
#include
<
iostream
>
#include
<
string
>
#include
"
ControlMachine.h
"
using
namespace
std;
class
ControlMachine;
class
Light
...
{public: virtual void Push(ControlMachine *ctrl)=0; virtual string GetColor()=0;}
;
class
RedLight:
public
Light
...
{public: void Push(ControlMachine *ctrl); string GetColor();}
;
class
GreenLight:
public
Light
...
{public: void Push(ControlMachine *ctrl); string GetColor();}
;
class
BlueLight:
public
Light
...
{public: void Push(ControlMachine *ctrl); string GetColor();}
;
#endif
ControlMachine.h 源文件如下:
#ifndef _CONTROL_MACHINE_H_
#define
_CONTROL_MACHINE_H_
#include
"
Light.h
"
class
Light;
class
ControlMachine
...
{public: ControlMachine(Light *light); void SetLight(Light *light); void Push(); void Output();private: Light* _light;}
;
#endif
Light.cpp 源文件如下:
#include
"
Light.h
"
void
RedLight::Push(ControlMachine
*
ctrl)
...
{ ctrl->SetLight(new GreenLight());}
string
RedLight::GetColor()
...
{ return "red";}
void
GreenLight::Push(ControlMachine
*
ctrl)
...
{ ctrl->SetLight(new BlueLight());}
string
GreenLight::GetColor()
...
{ return "green";}
void
BlueLight::Push(ControlMachine
*
ctrl)
...
{ ctrl->SetLight(new RedLight());}
string
BlueLight::GetColor()
...
{ return "blue";}
ControlMachine.cpp 源文件如下:
#include
"
ControlMachine.h
"
ControlMachine::ControlMachine(Light
*
light)
...
{ _light=light;}
void
ControlMachine::Push()
...
{ _light->Push(this);}
void
ControlMachine::SetLight(Light
*
light)
...
{ _light=light;}
void
ControlMachine::Output()
...
{ cout<<_light->GetColor()<<endl;}
Main.cpp 源文件如下:
#include
"
ControlMachine.h
"
#include
"
Light.h
"
void
main()
...
{ Light *light=new RedLight(); ControlMachine machine(light); machine.Output(); for(int i=0;i<3;i++)
 ...{ machine.Push(); machine.Output();
 }
}delete light;
}
运行结果如下:
red
green
blue
red


 271
271

 被折叠的 条评论
为什么被折叠?
被折叠的 条评论
为什么被折叠?
 到【灌水乐园】发言


