


face.py
import cv2
import face_ui


# 面部识别录入程序
def face(text):
    # 选择分类器
    faceCascade = cv2.CascadeClassifier('./date/haarcascade_frontalface_default.xml')
    # 匹配电脑摄像头
    cap = cv2.VideoCapture(0, cv2.CAP_DSHOW)
    cap.set(3, 640)  # set Width
    cap.set(4, 480)  # set Height

    while True:
        ret, img = cap.read()
        # 将彩色图转为灰度图
        gray = cv2.cvtColor(img, cv2.COLOR_BGR2GRAY)
        faces = faceCascade.detectMultiScale(
            gray,
            scaleFactor=1.2,
            minNeighbors=5
            ,
            minSize=(20, 20)

        )
        # 画框
        for (x, y, w, h) in faces:
            cv2.rectangle(img, (x, y), (x + w, y + h), (0, 0, 255), 2)
            roi_gray = gray[y:y + h, x:x + w]
            roi_color = img[y:y + h, x:x + w]
        # 显示图像
        cv2.imshow('video', img)
        # 等待按键
        k = cv2.waitKey(1) & 0xff
        # 按s保存
        if k == ord('s'):
            n = text
            cv2.imwrite('./data/face/' + n + '.jpg', roi_gray)
            cap.release()
            cv2.destroyAllWindows()
            # 返回值为保存的地址
            return './data/face/' + n + '.jpg'
        # 按esc退出
        if k == 27:  # press 'ESC' to quit
            break
    # 关闭摄像头
    cap.release()
    # 关闭窗口
    cv2.destroyAllWindows()
finalface.py
import cv2
import os
def a():
# 加载识别器
recognizer = cv2.face.LBPHFaceRecognizer_create()
recognizer.read('./trainer/trainer3.yml')
# 加载分类器
cascade_path = "./date/haarcascade_frontalface_alt2.xml"
face_cascade = cv2.CascadeClassifier(cascade_path)
cam = cv2.VideoCapture(0, cv2.CAP_DSHOW)
minW = 0.1 * cam.get(3)
minH = 0.1 * cam.get(4)
font = cv2.FONT_HERSHEY_SIMPLEX
# 成员的名字列表
names = []
# 没用到的,原本网上说有用,但我没用到
agelist = [21, 21, 21, 21, 21, 21, 22]
path = './data/face/'
# 在os.pate也就是上一句给的路径下遍历文件地址
imagePaths = [os.path.join(path, f) for f in os.listdir(path)]
for imagePath in imagePaths:
# 把文件名转化为整形,方便列出
id = int(os.path.split(imagePath)[1].split('.')[0])
names.append(id)
while True:
ret, img = cam.read()
gray = cv2.cvtColor(img, cv2.COLOR_BGR2GRAY)
faces = face_cascade.detectMultiScale(
gray,
scaleFactor=1.3,
minNeighbors=5,
minSize=(int(minW), int(minH))
)
# 画框
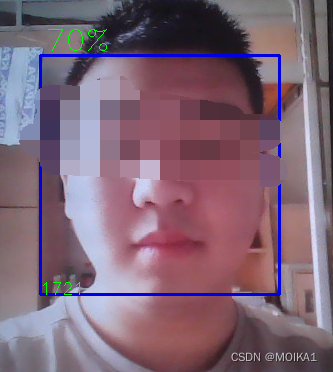
for (x, y, w, h) in faces:
cv2.rectangle(img, (x, y), (x + w, y + h), (0, 0, 255), 2)
img_id, confidence = recognizer.predict(gray[y:y + h, x:x + w])
# confidence是匹配程度
if confidence < 50:
confidence = "{0}%".format(round(100 - confidence))
else:
img_id = "Unknown"
confidence = "{0}%".format(round(100 - confidence))
cv2.putText(img, str(img_id), (x, y + h), font, 0.55, (0, 0, 255), 1)
cv2.putText(img, str(confidence), (x + 5, y - 5), font, 1, (0, 0, 255), 1)
if img_id != "Unknown":
cam.release()
cv2.destroyAllWindows()
return str(img_id)
cv2.imshow('face', img)
if cv2.waitKey(5) & 0xFF == 27:
cam.release()
cv2.destroyAllWindows()
return 0
cam.release()
cv2.destroyAllWindows()
return 0
train.py
import os

import cv2
import numpy as np
from PIL import Image


def getImageAndLabels(path):
    facesSamples = []
    ids = []
    imagePaths = [os.path.join(path, f) for f in os.listdir(path)]
    # 检测人脸
    face_detector = cv2.CascadeClassifier('./date/haarcascade_frontalface_alt2.xml')
    # 打印数组imagePaths
    print('数据排列:', imagePaths)
    # 遍历列表中的图片
    for imagePath in imagePaths:
        # 打开图片,黑白化
        PIL_img = Image.open(imagePath).convert('L')
        # 将图像转换为数组,以黑白深浅
        # PIL_img = cv2.resize(PIL_img, dsize=(400, 400))
        img_numpy = np.array(PIL_img, 'uint8')
        # 获取图片人脸特征
        faces = face_detector.detectMultiScale(img_numpy)
        # 获取每张图片的id和姓名
        id = int(os.path.split(imagePath)[1].split('.')[0])
        # 预防无面容照片
        for x, y, w, h in faces:
            ids.append(id)
            facesSamples.append(img_numpy[y:y + h, x:x + w])
    return facesSamples, ids


def train():
    # 图片路径
    path = './data/face/'
    # 获取图像数组和id标签数组和姓名
    faces, ids = getImageAndLabels(path)
    # 获取训练对象

    recognizer = cv2.face.LBPHFaceRecognizer_create()

    # recognizer.train(faces,names)#np.array(ids)
    recognizer.train(faces, np.array(ids))
    # 保存文件
    recognizer.write('./trainer/trainer3.yml')
    return 0
face_ui.py
from os import environ
import cv2
import os
from PyQt5 import QtCore, QtGui, QtWidgets
# 防止pyqt5报错
def suppress_qt_warnings():
environ["QT_DEVICE_PIXEL_RATIO"] = "0"
environ["QT_AUTO_SCREEN_SCALE_FACTOR"] = "1"
environ["QT_SCREEN_SCALE_FACTORS"] = "1"
environ["QT_SCALE_FACTOR"] = "1"
suppress_qt_warnings()
class Ui_MainWindow(QtWidgets.QMainWindow):
# 定义主窗口
def setupUi(self, MainWindow):
# 主窗口名字
MainWindow.setObjectName("MainWindow")
# 大小设置600*600
MainWindow.resize(600, 600)
# 不允许窗口大小改变
MainWindow.setMinimumSize(QtCore.QSize(600, 600))
MainWindow.setMaximumSize(QtCore.QSize(600, 600))
# 显示姓名,QLabel是一个标签,定义这个标签为“name”
self.name = QtWidgets.QLabel(MainWindow)
self.name.setGeometry(QtCore.QRect(30, 20, 71, 21))
self.name.setObjectName("name")
# 显示学号,定义这个标签为“number”
self.number = QtWidgets.QLabel(MainWindow)
self.number.setGeometry(QtCore.QRect(30, 60, 72, 15))
self.number.setObjectName("number")
# QLineEdit是文本输入框,输入姓名
self.nametext = QtWidgets.QLineEdit(MainWindow)
self.nametext.setGeometry(QtCore.QRect(80, 20, 113, 21))
self.nametext.setObjectName("nametext")
# 输入学号
self.numbertext = QtWidgets.QLineEdit(MainWindow)
self.numbertext.setGeometry(QtCore.QRect(80, 60, 113, 21))
self.numbertext.setCursor(QtGui.QCursor(QtCore.Qt.IBeamCursor))
self.numbertext.setObjectName("numbertext")
# 按钮,录入按钮
self.inputpush = QtWidgets.QPushButton(MainWindow)
self.inputpush.setGeometry(QtCore.QRect(30, 90, 161, 31))
self.inputpush.setObjectName("inputpush")
# 文本框,输出文本
self.textBrowser = QtWidgets.QTextBrowser(MainWindow)
self.textBrowser.setGeometry(QtCore.QRect(225, 20, 351, 61))
self.textBrowser.setObjectName("textBrowser")
# 按钮二维码生成按钮
self.pushButton = QtWidgets.QPushButton(MainWindow)
self.pushButton.setGeometry(QtCore.QRect(200, 90, 161, 31))
self.pushButton.setObjectName("pushButton")
# 识别按钮
self.detect = QtWidgets.QPushButton(MainWindow)
self.detect.setGeometry(QtCore.QRect(370, 90, 161, 31))
self.detect.setObjectName("detect")
self.retranslateUi(MainWindow)
QtCore.QMetaObject.connectSlotsByName(MainWindow)
def retranslateUi(self, MainWindow):
_translate = QtCore.QCoreApplication.translate
MainWindow.setWindowTitle(_translate("MainWindow", "上海电力大学核酸系统"))
self.name.setText(_translate("MainWindow", "姓名:"))
self.number.setText(_translate("MainWindow", "学号:"))
self.inputpush.setText(_translate("MainWindow", "录入数据"))
self.pushButton.setText(_translate("MainWindow", "生成核酸码"))
self.detect.setText(_translate("MainWindow", "人脸识别"))
self.inputpush.clicked.connect(self.gettext)
self.detect.clicked.connect(self.final)
self.pushButton.clicked.connect(self.Qrdetect)
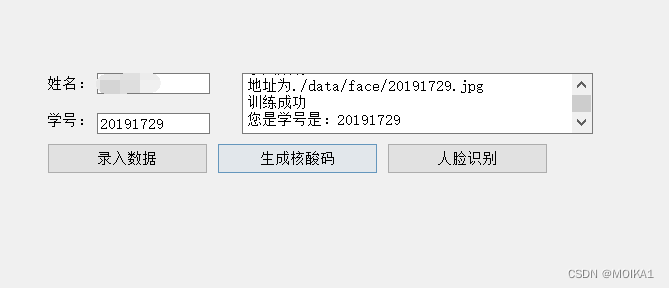
def gettext(self):
# 导入其他py文件,这是录入数据的那个
import face
# 获取学号
text = self.numbertext.text()
Ui_MainWindow.printf(self, '开始录入数据,按s保存信息。')
back = face.face(text)
# 返回值是保存图片的地址
Ui_MainWindow.printf(self, '录入成功!!')
Ui_MainWindow.printf(self, '地址为' + back)
self.train()
# 定义显示函数,在文本框中输出
def printf(self, mes):
self.textBrowser.append(mes) # 在指定的区域显示提示信息
self.cursot = self.textBrowser.textCursor()
self.textBrowser.moveCursor(self.cursot.End)
QtWidgets.QApplication.processEvents()
# 训练
def train(self):
import training
back = training.train()
Ui_MainWindow.printf(self, '训练成功')
# 识别
def final(self):
import finalface
back = finalface.a()
if back != 0:
Ui_MainWindow.printf(self, '您是学号是:' + back) # 核酸码生成
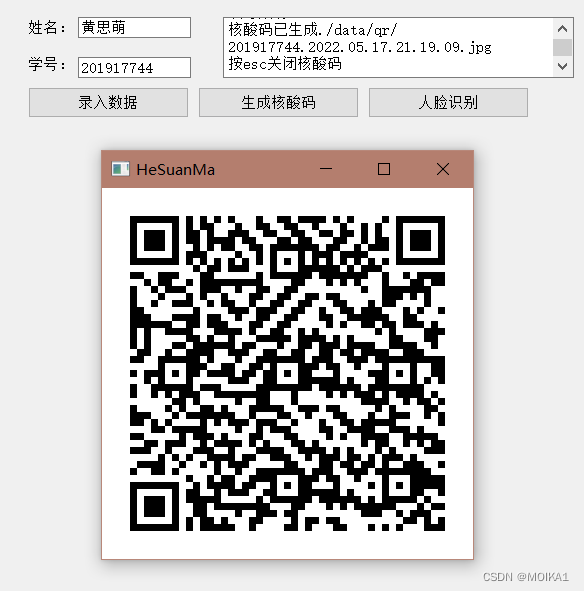
def Qrdetect(self):
import QRmake
id = self.numbertext.text()
back = QRmake.qrmake(id)
self.printf("核酸码已生成" + back)
img = cv2.imread(back)
cv2.imshow('HeSuanMa', img)
self.printf("按esc关闭核酸码")
k = cv2.waitKey(1)
if k == 27:
cv2.destroyAllWindows()
return 1
if __name__ == '__main__':
import sys
app = QtWidgets.QApplication(sys.argv)
MainWindow = QtWidgets.QMainWindow()
ui = Ui_MainWindow()
ui.setupUi(MainWindow)
MainWindow.show()
sys.exit(app.exec_())
以下还有二维码识别的代码,放在下面的链接了。
如果对你有帮助的话点个赞哦!^-^


 5875
5875


 被折叠的 条评论
为什么被折叠?
被折叠的 条评论
为什么被折叠?
 到【灌水乐园】发言


