


结合 tensorRT官方给出的一个例程,介绍tensorRT的使用。
这个例程是mnist手写体识别。例程位于目录: /usr/src/tensorrt/samples/sampleMNIST
文件结构:
| 1 2 3 4 5 | tensorrt/samples/sampleMNIST -common.cpp -common.h -Makefile -sampleMNIST.cpp |
主要是 sampleMNIST.cpp 文件, common.cpp 文件主要提供 读取文件的函数和 Logger对象。
main
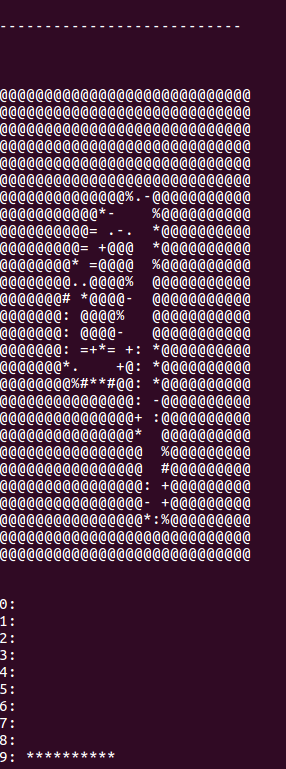
| 1 2 3 4 5 6 7 8 9 10 11 12 13 14 15 16 17 18 19 20 21 22 23 24 25 26 27 28 29 30 31 32 33 34 35 36 37 38 39 40 41 42 43 44 45 46 47 48 49 50 51 52 53 54 55 56 57 58 59 60 61 62 63 64 65 66 67 68 69 70 71 72 73 74 75 76 77 78 79 80 81 82 83 84 85 86 87 88 89 90 91 92 93 94 95 96 97 98 99 100 101 102 103 104 105 106 107 108 109 110 111 112 113 114 115 116 117 118 119 120 121 122 123 124 125 126 127 | #include <algorithm> #include <assert.h> #include <cmath> #include <cuda_runtime_api.h> #include <fstream> #include <iostream> #include <sstream> #include <sys/stat.h> #include <time.h> #include "NvCaffeParser.h" #include "NvInfer.h" #include "common.h" using namespace nvinfer1; using namespace nvcaffeparser1; //定义输入输出大小,创建Logger对象 //Logger是一个日志类,在common.h文件中定义 static Logger gLogger; // Attributes of MNIST Caffe model static const int INPUT_H = 28; static const int INPUT_W = 28; static const int OUTPUT_SIZE = 10; //指定输入输出blob,和资源文件夹 const char* INPUT_BLOB_NAME = "data"; const char* OUTPUT_BLOB_NAME = "prob"; const std::vector<std::string> directories{"data/samples/mnist/", "data/mnist/"}; //查找文件 std::string locateFile(const std::string& input) { return locateFile(input, directories); } //读取图片 // Simple PGM (portable greyscale map) reader void readPGMFile(const std::string& fileName, uint8_t buffer[INPUT_H * INPUT_W]) { readPGMFile(fileName, buffer, INPUT_H, INPUT_W); } ……………… ……………… int main(int argc, char** argv) { if (argc > 1) { std::cout << "This sample builds a TensorRT engine by importing a trained MNIST Caffe model.\n"; std::cout << "It uses the engine to run inference on an input image of a digit.\n"; return EXIT_SUCCESS; } // Create TRT model from caffe model and serialize it to a stream // 创建tensorRT流对象 trtModelStream,这个就跟文件流中的 ifstream 是类似的。 // trtModelStream是一块内存区域,用于保存序列化的plan文件。 IHostMemory* trtModelStream{nullptr}; //1. build阶段:调用caffeToTRTModel函数,传入caffe模型文件和权值文件,创建 Ibuilder对象,调用模型解析函数, //生成的plan文件保存在 gieModelStream 中 caffeToTRTModel("mnist.prototxt", "mnist.caffemodel", std::vector<std::string>{OUTPUT_BLOB_NAME}, 1, trtModelStream); assert(trtModelStream != nullptr); // 随机读取一张图片 // Read a random digit file srand(unsigned(time(nullptr))); uint8_t fileData[INPUT_H * INPUT_W]; const int num = rand() % 10; readPGMFile(locateFile(std::to_string(num) + ".pgm", directories), fileData); //将原始图片中的像素用二进制文本 “.:-=+*#%@”来输出 // Print ASCII representation of digit std::cout << "\nInput:\n" << std::endl; for (int i = 0; i < INPUT_H * INPUT_W; i++) std::cout << (" .:-=+*#%@"[fileData[i] / 26]) << (((i + 1) % INPUT_W) ? "" : "\n"); // 加载均值文件,将读取的图片统一减去平均值。 // Parse mean file ICaffeParser* parser = createCaffeParser(); IBinaryProtoBlob* meanBlob = parser->parseBinaryProto(locateFile("mnist_mean.binaryproto", directories).c_str()); parser->destroy(); // Subtract mean from image const float* meanData = reinterpret_cast<const float*>(meanBlob->getData()); float data[INPUT_H * INPUT_W]; for (int i = 0; i < INPUT_H * INPUT_W; i++) data[i] = float(fileData[i]) - meanData[i]; meanBlob->destroy(); // Deserialize engine we serialized earlier // 创建运行时环境 IRuntime对象,传入 gLogger 用于打印信息 IRuntime* runtime = createInferRuntime(gLogger); assert(runtime != nullptr); ICudaEngine* engine = runtime->deserializeCudaEngine(trtModelStream->data(), trtModelStream->size(), nullptr); assert(engine != nullptr); trtModelStream->destroy(); //创建上下文环境,主要用于inference 函数中启动cuda核 IExecutionContext* context = engine->createExecutionContext(); assert(context != nullptr); //2.deploy 阶段:调用 doInference 函数,进行推理过程 // Run inference on input data float prob[OUTPUT_SIZE]; doInference(*context, data, prob, 1); //销毁无用对象 // Destroy the engine context->destroy(); engine->destroy(); runtime->destroy(); //输出分类结果 // Print histogram of the output distribution std::cout << "\nOutput:\n\n"; float val{0.0f}; int idx{0}; for (unsigned int i = 0; i < 10; i++) { val = std::max(val, prob[i]); if (val == prob[i]) idx = i; std::cout << i << ": " << std::string(int(std::floor(prob[i] * 10 + 0.5f)), '*') << "\n"; } std::cout << std::endl; return (idx == num && val > 0.9f) ? EXIT_SUCCESS : EXIT_FAILURE; } |
实际上从第93行创建 IRuntime对象时,就可以认为是属于deploy了。
最后输出是这样的:读进一张9,输出一个结果:
其中最重要的两个函数 caffeToTRTModel( ) 和 doInference( )分别完成的是build和deploy的功能。
Build Phase
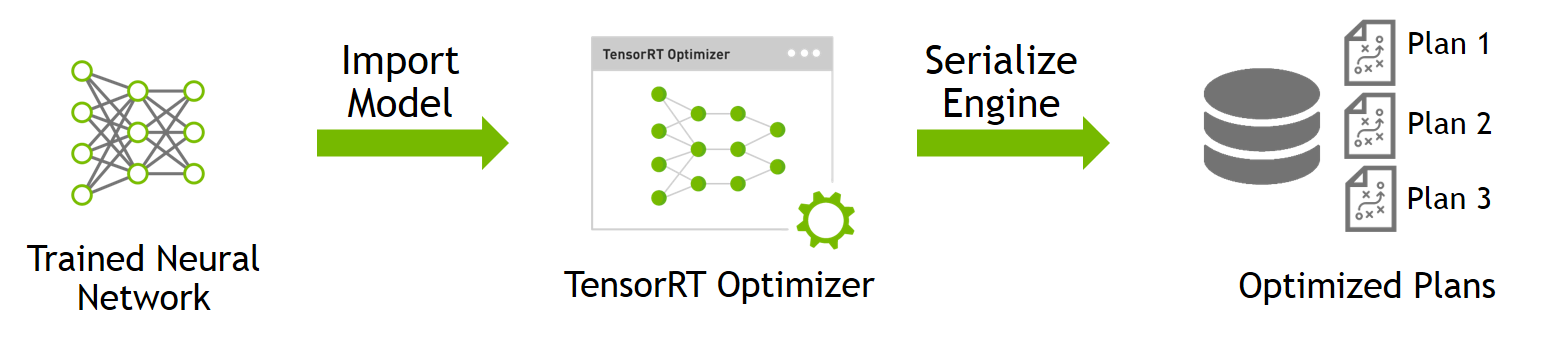
将Caffe model 转换为 TensorRT object,首先使用其他深度学习框架训练好模型,然后丢进tensorRT优化器中进行优化,优化后会产生一个文件,这个文件可以认为是优化后的模型,接着使用序列化方法将这个优化好后的模型存储在磁盘上,存储到磁盘上的文件称为 plan file。
这个阶段需要给tensorRT提供两个文件,分别是
- 网络模型文件(比如,caffe的deploy.prototxt)
- 训练好的权值文件(比如,caffe的net.caffemodel)
除此之外,还需要明确 batch size,并指明输出层。
mnist例程中的caffe模型解析代码:标志是创建 IBuilder对象。
| 1 2 3 4 5 6 7 8 9 10 11 12 13 14 15 16 17 18 19 20 21 22 23 24 25 26 27 28 29 30 31 32 33 34 35 36 37 38 39 40 41 42 43 44 45 46 47 48 49 50 51 52 53 54 55 56 57 58 59 60 61 | // 解析caffemodel到tensorrt void caffeToTRTModel(const std::string& deployFile, // Path of Caffe prototxt file const std::string& modelFile, // Path of Caffe model file const std::vector<std::string>& outputs, // Names of network outputs unsigned int maxBatchSize, // Note: Must be at least as large as the batch we want to run with IHostMemory*& trtModelStream) // Output buffer for the TRT model { // 1. Create builder //创建一个 IBuilder,传进gLogger参数是为了方便打印信息。 //builder 这个地方感觉像是使用了建造者模式。 IBuilder* builder = createInferBuilder(gLogger); // Parse caffe model to populate network, then set the outputs const std::string deployFpath = locateFile(deployFile, directories); const std::string modelFpath = locateFile(modelFile, directories); std::cout << "Reading Caffe prototxt: " << deployFpath << "\n"; std::cout << "Reading Caffe model: " << modelFpath << "\n"; //创建一个 network对象,但是这个network对象只是一个空架子,里面的属性还没有具体的数值。 INetworkDefinition* network = builder->createNetwork(); //创建一个caffe模型解析对象,parser,并调用解析函数,填充network对象, //将caffe模型中的blob解析为tensorRT中的tensor,赋给blob_name_to_tensor变量。 //此处使用了模型文件和权值文件。 ICaffeParser* parser = createCaffeParser(); const IBlobNameToTensor* blobNameToTensor = parser->parse(deployFpath.c_str(), modelFpath.c_str(), *network, DataType::kFLOAT); //标记输出blob. // Specify output tensors of network for (auto& s : outputs) network->markOutput(*blobNameToTensor->find(s.c_str())); // 设置batch size;设置工作空间 size。 builder->setMaxBatchSize(maxBatchSize); builder->setMaxWorkspaceSize(1 << 20); // 2.Build engine //使用network创建 CudaEngine,优化方法在这里执行。 //至此,caffe模型已转换为tensorRT object。 ICudaEngine* engine = builder->buildCudaEngine(*network); assert(engine); //销毁没用的network对象和parser对象。 // Destroy parser and network network->destroy(); parser->destroy(); //将转换好的tensorRT object序列化到内存中,trtModelStream是一块内存空间。 //这里也可以序列化到磁盘中。 // Serialize engine and destroy it trtModelStream = engine->serialize(); //销毁无用对象 engine->destroy(); builder->destroy(); //关闭protobuf库 shutdownProtobufLibrary(); } |
Deploy Phase
Deploy 阶段需要文件如下:
- 标签文件(这个主要是将模型产生的数字标号分类,与真实的名称对应起来),不过这个例子中就不需要了,因为MNIST的真实分类就是数字标号。
Deploy 阶段可以认为从主函数中就已经开始了。标志是创建 IRuntime 对象。
| 1 2 3 4 5 6 7 8 9 10 11 12 13 14 15 16 17 18 19 20 21 22 | int main(int argc, char** argv) { ……………… ……………… // Deserialize engine we serialized earlier // 创建运行时环境 IRuntime对象,传入 gLogger 用于打印信息 IRuntime* runtime = createInferRuntime(gLogger); assert(runtime != nullptr); ICudaEngine* engine = runtime->deserializeCudaEngine(trtModelStream->data(), trtModelStream->size(), nullptr); assert(engine != nullptr); trtModelStream->destroy(); //创建上下文环境,主要用于inference 函数中启动cuda核 IExecutionContext* context = engine->createExecutionContext(); assert(context != nullptr); //2.deploy 阶段:调用 inference 函数,进行推理过程 // Run inference on input data float prob[OUTPUT_SIZE]; doInference(*context, data, prob, 1); ……………… ……………… } |
其中 doInference函数的详细内容如下:
| 1 2 3 4 5 6 7 8 9 10 11 12 13 14 15 16 17 18 19 20 21 22 23 24 25 26 27 28 29 30 31 32 33 34 35 36 37 38 39 40 41 42 43 44 45 46 47 | void doInference(IExecutionContext& context, float* input, float* output, int batchSize) { //使用传进来的context恢复engine。 const ICudaEngine& engine = context.getEngine(); //engine.getNbBindings()是为了获取与这个engine相关的输入输出tensor的数量。 //这个地方,输入+输出 总共就2个,所以做个验证。 // Pointers to input and output device buffers to pass to engine. // Engine requires exactly IEngine::getNbBindings() number of buffers. assert(engine.getNbBindings() == 2); //void* 型数组,主要用于下面GPU开辟内存。 void* buffers[2]; //获取与这个engine相关的输入输出tensor的索引。 // In order to bind the buffers, we need to know the names of the input and output tensors. // Note that indices are guaranteed to be less than IEngine::getNbBindings() const int inputIndex = engine.getBindingIndex(INPUT_BLOB_NAME); const int outputIndex = engine.getBindingIndex(OUTPUT_BLOB_NAME); //为输入输出tensor开辟显存。 // Create GPU buffers on device CHECK(cudaMalloc(&buffers[inputIndex], batchSize * INPUT_H * INPUT_W * sizeof(float))); CHECK(cudaMalloc(&buffers[outputIndex], batchSize * OUTPUT_SIZE * sizeof(float))); //创建cuda流,用于管理数据复制,存取,和计算的并发操作 // Create stream cudaStream_t stream; CHECK(cudaStreamCreate(&stream)); //从内存到显存,从CPU到GPU,将输入数据拷贝到显存中 //input是读入内存中的数据;buffers[inputIndex]是显存上的存储区域,用于存放输入数据 // DMA input batch data to device, infer on the batch asynchronously, and DMA output back to host CHECK(cudaMemcpyAsync(buffers[inputIndex], input, batchSize * INPUT_H * INPUT_W * sizeof(float), cudaMemcpyHostToDevice, stream)); //启动cuda核,异步执行推理计算 context.enqueue(batchSize, buffers, stream, nullptr); //从显存到内存,将计算结果拷贝回内存中 //output是内存中的存储区域;buffers[outputIndex]是显存中的存储区域,存放模型输出. CHECK(cudaMemcpyAsync(output, buffers[outputIndex], batchSize * OUTPUT_SIZE * sizeof(float), cudaMemcpyDeviceToHost, stream)); //这个是为了同步不同的cuda流。 cudaStreamSynchronize(stream); //销毁流对象和释放显存 // Release stream and buffers cudaStreamDestroy(stream); CHECK(cudaFree(buffers[inputIndex])); CHECK(cudaFree(buffers[outputIndex])); } |
辅助函数
用到 common.cpp 文件中的辅助函数:locateFile( ) 和 readPGMFile( )
| 1 2 3 4 5 6 7 8 9 10 11 12 13 14 15 16 17 18 19 20 21 22 23 24 25 26 27 28 29 30 31 32 33 34 35 36 37 38 39 40 41 42 43 44 45 46 47 48 49 50 | #include "common.h" // Locate path to file, given its filename or filepath suffix and possible dirs it might lie in // Function will also walk back MAX_DEPTH dirs from CWD to check for such a file path //查找文件 inline std::string locateFile(const std::string& filepathSuffix, const std::vector<std::string>& directories) { const int MAX_DEPTH{10}; bool found{false}; std::string filepath; for (auto& dir : directories) { filepath = dir + filepathSuffix; for (int i = 0; i < MAX_DEPTH && !found; i++) { std::ifstream checkFile(filepath); found = checkFile.is_open(); if (found) break; filepath = "../" + filepath; // Try again in parent dir } if (found) { break; } filepath.clear(); } if (filepath.empty()) { std::string directoryList = std::accumulate(directories.begin() + 1, directories.end(), directories.front(), [](const std::string& a, const std::string& b) { return a + "\n\t" + b; }); throw std::runtime_error("Could not find " + filepathSuffix + " in data directories:\n\t" + directoryList); } return filepath; } //读取图片 inline void readPGMFile(const std::string& fileName, uint8_t* buffer, int inH, int inW) { std::ifstream infile(fileName, std::ifstream::binary); assert(infile.is_open() && "Attempting to read from a file that is not open."); std::string magic, h, w, max; infile >> magic >> h >> w >> max; infile.seekg(1, infile.cur); infile.read(reinterpret_cast<char*>(buffer), inH * inW); } |
日志类
common.h文件中有个日志类: class Logger : public nvinfer1::ILogger
这是一个日志类,继承自 nvinfer1::ILogger
| 1 2 3 4 5 6 7 8 9 10 11 12 13 14 15 16 17 18 19 20 21 22 23 24 25 26 27 | // Logger for TensorRT info/warning/errors class Logger : public nvinfer1::ILogger { public: Logger(): Logger(Severity::kWARNING) {} Logger(Severity severity): reportableSeverity(severity) {} void log(Severity severity, const char* msg) override { // suppress messages with severity enum value greater than the reportable if (severity > reportableSeverity) return; switch (severity) { case Severity::kINTERNAL_ERROR: std::cerr << "INTERNAL_ERROR: "; break; case Severity::kERROR: std::cerr << "ERROR: "; break; case Severity::kWARNING: std::cerr << "WARNING: "; break; case Severity::kINFO: std::cerr << "INFO: "; break; default: std::cerr << "UNKNOWN: "; break; } std::cerr << msg << std::endl; } Severity reportableSeverity{Severity::kWARNING}; }; |
nvinfer1::ILogger 这个类位于 tensorRT头文件 NvInfer.h 中,此文件路径: /usr/include/x86_64-linux-gnu/NvInfer.h
把 ILogger 类摘出来:
| 1 2 3 4 5 6 7 8 9 10 11 12 13 14 15 16 17 18 19 20 21 22 23 24 25 26 27 | class ILogger { public: //! //! \enum Severity //! //! The severity corresponding to a log message. //! enum class Severity { kINTERNAL_ERROR = 0, //!< An internal error has occurred. Execution is unrecoverable. kERROR = 1, //!< An application error has occurred. kWARNING = 2, //!< An application error has been discovered, but TensorRT has recovered or fallen back to a default. kINFO = 3 //!< Informational messages. }; //! //! A callback implemented by the application to handle logging messages; //! //! \param severity The severity of the message. //! \param msg The log message, null terminated. //! virtual void log(Severity severity, const char* msg) = 0; protected: virtual ~ILogger() {} }; |
可见这个类 是 builder, engine and runtime 的一个日志接口,这个类应该以单例模式使用。即当有多个IRuntime 和/或 IBuilder 对象时,也只能使用同一个ILogger接口。
这个接口中有个枚举类 enum class Severity 定义了日志报告级别,分别为 kINTERNAL_ERROR,kERROR,kWARNING和kINFO;然后还有一个纯虚函数 log( ) ,用户可以自定义这个函数,以实现不同效果的打印。
比如common.h 文件中Logger类的 log()函数,就是根据不同的报告级别向标准错误输出流输出带有不同前缀的信息。这个地方是可以自己定义的,比如你可以设置为输出信息到文件流然后把信息保存到txt文件中等。
以上就是使用tensorRT优化MNIST的LeNet的一个简单的例子,其实对于mnist来说,使用tensorRT加速的意义不大,因为这个模型本来就比较小,这里使用这个例子主要是为了学习tensorRT的用法。


 151
151

 被折叠的 条评论
为什么被折叠?
被折叠的 条评论
为什么被折叠?
 到【灌水乐园】发言


