


参考
超声波选型指南
Arduino - Ultrasonic Sensor
2.1 认识超声波
可在空气中传播的超声波频率,大约介于20~200KHz之间,其衰减程度与频率成正比(即频率越高,传播距离越短)
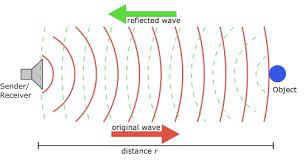
在室温20°C的环境中,声波的传输速度约为344m/s(**声音在水中传播的速度比在空气快60倍),因此,假设超声波往返的时间为600μs,可通过公式:
距离
=
344
米
/
秒
×
传播时间
2
距离 = 344米/秒 \times \frac{传播时间}{2}
距离=344米/秒×2传播时间
求得:被测物的距离为10.3cm。
2.2 影响声音传播速度的因素
- 空气的密度会影响声音的传播速度,空气的密度越高,声音的传播速度越快,而空气的密度又与温度密切相关,考虑温度变化的声音传播速度的近似公式:
速度 = V 0 + 0.6 × T 速度 = V_0 + 0.6 \times T 速度=V0+0.6×T
其中, V 0 V_0 V0:声音在0摄氏度时的传播速度331.5米/秒。T:温度 - 物体的形状和材质会影响超声波传感器的效果和准确度,探测表面平整的墙壁和玻璃时,声波将会入射角度反射回来;只要物体表面的坑洞尺寸小于声波波长的
1
4
\frac{1}{4}
41,即可视为平整表面。波长计算公式:
波长 = 相速度 频率 波长 = \frac{相速度}{频率} 波长=频率相速度
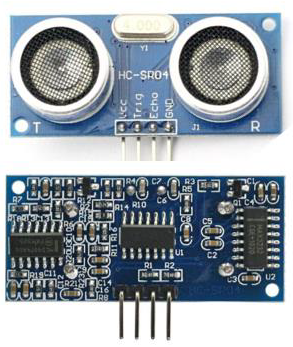
2.3 超声波传感器简介
超声波传感器模块上面通常有两个超声波元器件,一个用于发射,一个用于接收。电路板上有4个引脚:VCC(正极)、Trig(触发)、Echo(回应)、GND(接地),主要参数:
- 工作电压与电流 :5V、15mA。
- 感测距离 :2~400cm
- 感测角度:不大于15°。
- 被测物的面积不要小于50cm²并且尽量平整。
- 具备温度补偿电路。
在超声波模块的触发脚位输入10微妙以上的高电位,即可发射超声波,发射超声波之后,与接收到传回的超声波之前,“响应”脚位呈现高电位。因此,程序可从“响应”脚位的高电位脉冲持续时间,换算出被测物的距离。
2.4 实验
任务1:使用超声波传感器制作数字量尺
实验说明: 使用超声波感测与障碍物之间的距离,显示在串口监视器或LCD模块。
实验材料:
| 名称 | 数量 |
|---|---|
| 超声波传感器 | 1个 |
测量脉冲持续时间的pulseln()函数
Arduino提供一个测量脉冲时间长度的pulseln()函数,语法格式:
-
Syntax
pulseIn(pin, value)
pulseIn(pin, value, timeout)
此函数将返回微秒单位的脉冲时间,建议用unsigned long类型的变量来存放。
pulseln()函数会等待脉冲出现再开始计时,预设的等待截止时间是1秒(即 1 0 6 10^6 106微秒),假如脉冲信号未在等待时间内出现,pulseln()将传回0。假如有需要,指定timeout的值为10微秒~3分钟的等待截止时间。
如果想要测量信号的频率,可以采用Martin Nawrath开发的频率计时器扩展库“FreqCounter”。 -
Parameters
pin: the number of the pin on which you want to read the pulse. (int)
value: type of pulse to read: either HIGH or LOW. (int)
timeout (optional): the number of microseconds to wait for the pulse to start; default is one second (unsigned long)
实验程序:
const byte trigPin = 10;
const int echoPin = 9;
unsigned long d;
unsigned long ping() {
	digitalWrite(trigPIN,  HIGH);
	delayMicroseconds(5);
	digitalWrite(trigPin, LOW);
	return pulseln(echoPin, HIGH);
}
void setup()  {
	pinMode(trigPin, OUTPUT);
	pinMode(echoPin, INPUT);
	Serial.begin(9600);
}

void loop(){
	d = ping() / 58;

	Serial.print(d);
	Serial.print("cm");
	Serial.println();
	delay(1000);
}
2.5 hc-sr04超声波传感器
HC-SR04超声波传感器使用声纳来确定物体的距离。它提供了非常好的非接触范围检测,准确度高,读数稳定,易于使用,尺寸从2厘米到400厘米或1英寸到13英尺不等。
其操作不受阳光或黑色材料的影响,尽管在声学上,柔软的材料(如布料等)可能难以检测到。它配有超声波发射器和接收器模块。
- 技术规格
| 指标 | 参考 |
|---|---|
| 电源 | + 5V DC |
| 静态电流 | <2mA |
| 工作电流 | 15mA |
| 有效角度 | <15° |
| 测距距离 | 2厘米-400厘米/1英寸-13英尺 |
| 分辨率 | 0.3厘米 |
| 测量角度 | 30度 |
- 必需的组件
你将需要以下组件:
- 1 × Breadboard 面包板
- 1 × Arduino Uno R3
- 1 × 超声波传感器(HC-SR04)
- Arduino代码
const int pingPin = 7; // Trigger Pin of Ultrasonic Sensor
const int echoPin = 6; // Echo Pin of Ultrasonic Sensor

void setup() {
   Serial.begin(9600); // Starting Serial Terminal
   pinMode(pingPin, OUTPUT);
   pinMode(echoPin, INPUT);
}

void loop() {
   long duration, inches, cm;

   digitalWrite(pingPin, LOW);
   delayMicroseconds(2);
   digitalWrite(pingPin, HIGH);
   delayMicroseconds(10);
   digitalWrite(pingPin, LOW);

   duration = pulseIn(echoPin, HIGH);
   inches = microsecondsToInches(duration);
   cm = microsecondsToCentimeters(duration);
   Serial.print(inches);
   Serial.print("in, ");
   Serial.print(cm);
   Serial.print("cm");
   Serial.println();
   delay(100);
}

long microsecondsToInches(long microseconds) {
   return microseconds / 74 / 2;
}

long microsecondsToCentimeters(long microseconds) {
   return microseconds / 29 / 2;
}
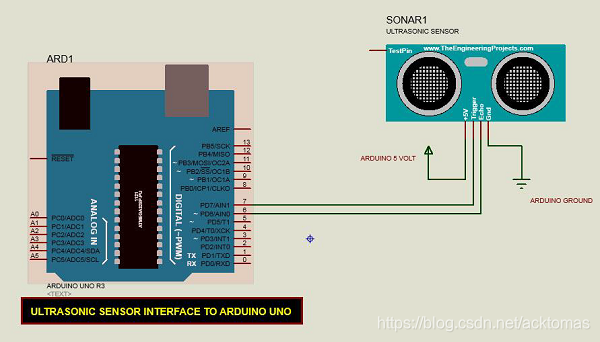
- 代码说明
超声波传感器有四个端子:+5V,Trigger,Echo和GND,连接如下:超声波传感器有四个端子:+5V,Trigger,Echo和GND,连接如下:
- 将+5V引脚连接到Arduino板上的+5v。
- 将Trigger连接到Arduino板上的数字引脚7。
- 将Echo连接到Arduino板上的数字引脚6。
- 将GND连接到Arduino上的GND。
在我们的程序中,我们通过串口显示了传感器测量的距离,单位为英寸和厘米。
结果,你将在Arduino串口监视器上看到传感器测量的距离,单位为英寸和厘米。
3. 超声波代码原理
Arduino - Ultrasonic Sensor Arduino - 超声波传感器
In this tutorial, we are going to learn:
在本教程中,我们将学习:
- How ultrasonic sensor works
超声波传感器的工作原理 - How to connect the ultrasonic sensor to Arduino
如何将超声波传感器连接到Arduino - How to program Arduino to read the state from the ultrasonic sensor
如何对Arduino进行编程以从超声波传感器读取状态 - How to use Arduino and ultrasonic sensor HC-SR04 to measure the distance to an object
如何使用Arduino和超声波传感器HC-SR04测量到物体的距离 - How to filter noise from distance measurements of ultrasonic sensor in Arduino code
如何在Arduino代码中过滤超声波传感器距离测量的噪声
About Ultrasonic Sensor 关于超声波传感器
Ultrasonic sensor HC-SR04 is used to measure the distance to an object by using ultrasonic waves.
超声波传感器HC-SR04用于通过超声波测量到物体的距离。
Pinout 引脚排列
The ultrasonic sensor HC-SR04 includes four pins:
超声波传感器 HC-SR04 包括四个引脚:
- VCC pin: needs to be connected to VCC (5V)
VCC引脚:需要连接到VCC(5V) - GND pin: needs to be connected to GND (0V)
GND引脚:需要接GND(0V) - TRIG pin: this pin receives the control signal (pulse) from Arduino.
TRIG引脚:该引脚接收来自Arduino的控制信号(脉冲)。 - ECHO pin: this pin sends a signal (pulse) to Arduino. Arduino measures the duration of pulse to calculate distance.
ECHO引脚:此引脚向Arduino发送信号(脉冲)。Arduino测量脉冲的持续时间以计算距离。

How It Works 它是如何工作的
- Micro-controller: generates a 10-microsecond pulse on the TRIG pin.
微控制器:在 TRIG 引脚上生成 10 微秒脉冲。 - The ultrasonic sensor automatically emits the ultrasonic waves.
超声波传感器自动发射超声波。 - The ultrasonic wave is reflected after hitting an obstacle.
超声波在撞到障碍物后被反射。 - The ultrasonic sensor: 超声波传感器:
- Detects the reflected ultrasonic wave.
检测反射的超声波。 - Measures the travel time of the ultrasonic wave.
测量超声波的传播时间。
- Detects the reflected ultrasonic wave.
Ultrasonic sensor: generates a pulse to the ECHO pin. The duration of the pulse is equal to the travel time of the ultrasonic wave.
超声波传感器:向 ECHO 引脚产生脉冲。脉冲的持续时间等于超声波的传播时间。
Micro-controller measures the pulse duration in the ECHO pin, and then calculate the distance between sensor and obstacle.
微控制器测量 ECHO 引脚中的脉冲持续时间,然后计算传感器与障碍物之间的距离。
How to Get Distance From Ultrasonic Sensor 如何用超声波传感器测量距离
To get distance from the ultrasonic sensor, we only need to do two steps (1 and 6 on How It Works part)
为了获得与超声波传感器的距离,我们只需要做两个步骤(工作原理部分的 1 和 6)
- Generates a 10-microsecond pulse on TRIG pin
在 TRIG 引脚上产生 10 微秒脉冲 - Measures the pulse duration in ECHO pin, and then calculate the distance between sensor and obstacle
测量 ECHO 引脚中的脉冲持续时间,然后计算传感器与障碍物之间的距离
Distance Calculation 距离计算
We have: 我们有:
- The travel time of the ultrasonic wave (µs): travel_time = pulse_duration
超声波的传播时间(μs):travel_time=pulse_duration - The speed of the ultrasonic wave:
speed = SPEED_OF_SOUND = 340 m/s = 0.034 cm/µs
超声波的速度:速度=SPEED_OF_SOUND=340米/秒=0.034厘米/微秒
So:
-
The travel distance of the ultrasonic wave (cm):
travel_distance = speed × travel_time = 0.034 × pulse_duration
超声波的传播距离(cm):travel_distance=速度× travel_time=0.034× pulse_duration -
The distance between sensor and obstacle (cm):
distance = travel_distance / 2 = 0.034 × pulse_duration / 2 = 0.017 × pulse_duration
传感器与障碍物之间的距离(厘米):距离 = travel_distance / 2 = 0.034 × pulse_duration / 2 = 0.017 × pulse_duration
Arduino - Ultrasonic Sensor Arduino - 超声波传感器的实现
Arduino’s pins can generate a 10-microsecond pulse and measure the pulse duration. Therefore, we can get the distance from the ultrasonic sensor by using two Arduino’s pins:
Arduino的引脚可以产生10微秒的脉冲并测量脉冲持续时间。因此,我们可以使用两个Arduino的引脚来获得与超声波传感器的距离:
- One pin is connected to TRIG PIN to generate 10µs pulse to TRIG pin of the sensor
一个引脚连接到 TRIG 引脚,以产生 10μs 脉冲到传感器的 TRIG 引脚 - Another pin is connected to ECHO PIN measure pulse from the sensor
另一个引脚连接到来自传感器的 ECHO PIN 测量脉冲
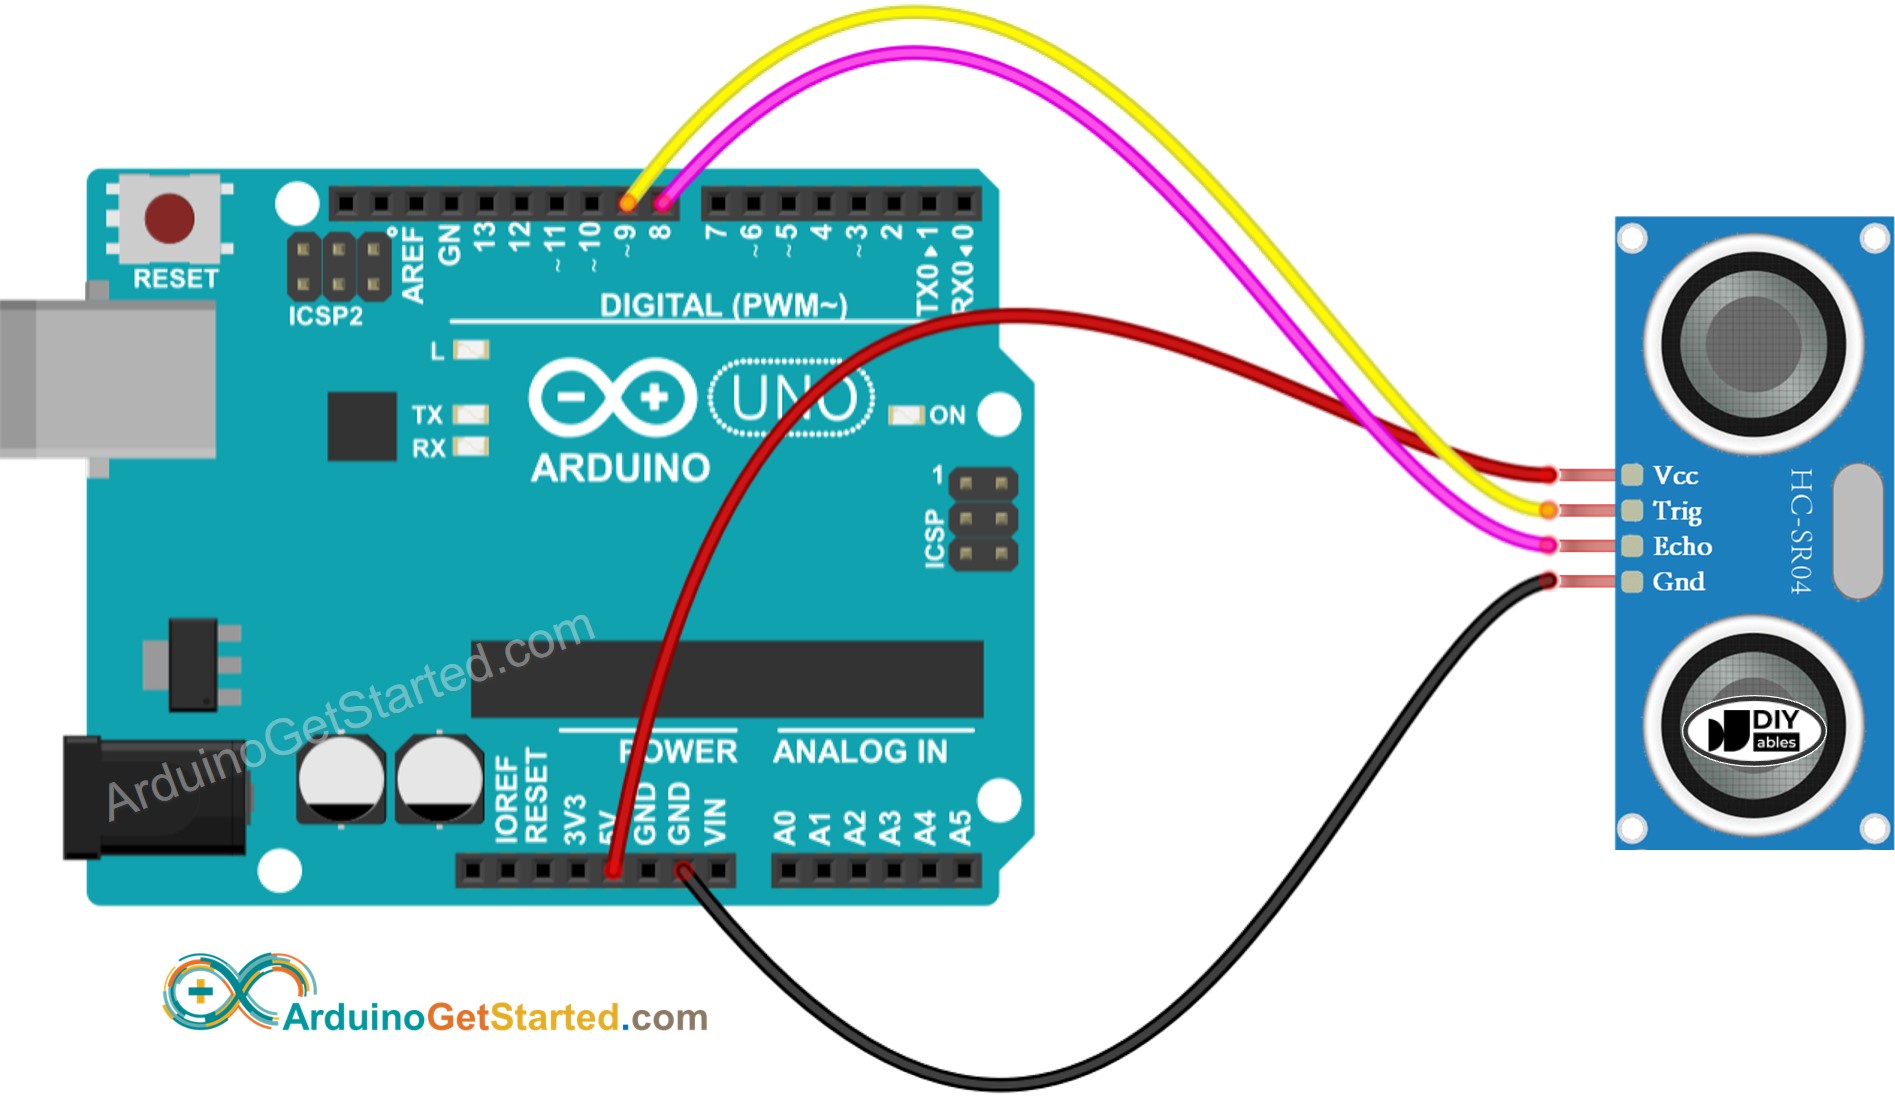
Wiring Diagram 接线图
How To Program For Ultrasonic Sensor 如何对超声波传感器进行编程
- Generate a 10-microsecond pulse in Arduino’s pin by using digitalWrite() and delayMicroseconds() functions. For example, pin 9:
使用 digitalWrite() 和 delayMicroseconds() 函数在 Arduino 的引脚中生成 10 微秒的脉冲。例如,引脚 9:
digitalWrite(9, HIGH);
delayMicroseconds(10);
digitalWrite(9, LOW);
- Measures the pulse duration (µs) in Arduino’s pin by using pulseIn() function. For example, pin 8:
使用 pulseIn() 函数测量 Arduino 引脚中的脉冲持续时间 (μs)。例如,引脚 8:
duration_us = pulseIn(8, HIGH);
- Calculate distance (cm): 计算距离(厘米):
distance_cm = 0.017 * duration_us;
Arduino Code Arduino代码
/*
 * Created by ArduinoGetStarted, https://arduinogetstarted.com
 *
 * Arduino - Ultrasonic Sensor HC-SR04
 *
 * Wiring: Ultrasonic Sensor -> Arduino:
 * - VCC  -> 5VDC
 * - TRIG -> Pin 9
 * - ECHO -> Pin 8
 * - GND  -> GND
 *
 * Tutorial is available here: https://arduinogetstarted.com/tutorials/arduino-ultrasonic-sensor
 */

int trigPin = 9;    // TRIG pin
int echoPin = 8;    // ECHO pin

float duration_us, distance_cm;

void setup() {
  // begin serial port
  Serial.begin (9600);

  // configure the trigger pin to output mode
  pinMode(trigPin, OUTPUT);
  // configure the echo pin to input mode
  pinMode(echoPin, INPUT);
}

void loop() {
  // generate 10-microsecond pulse to TRIG pin
  digitalWrite(trigPin, HIGH);
  delayMicroseconds(10);
  digitalWrite(trigPin, LOW);

  // measure duration of pulse from ECHO pin
  duration_us = pulseIn(echoPin, HIGH);

  // calculate the distance
  distance_cm = 0.017 * duration_us;

  // print the value to Serial Monitor
  Serial.print("distance: ");
  Serial.print(distance_cm);
  Serial.println(" cm");

  delay(500);
}
How to Filter Noise from Distance Measurements of Ultrasonic Sensor 如何过滤超声波传感器距离测量的噪声
The measurement result from ultrasonic sensor contains noise. In some application, the noised result causes the unwanted operation. We can remove noise by using the following algorithm:
超声波传感器的测量结果包含噪声。在某些应用中,嘈杂的结果会导致不必要的操作。我们可以使用以下算法来消除噪声:
- Taking multiple measurements and store in an array
进行多次测量并存储在阵列中 - Sorting the array in ascending order
按升序对数组进行排序 - Filtering noise 滤波噪声
- The some smallest samples are considered as noise → ignore it
最小的样本被认为是噪声→忽略它 - The some biggest samples are considered as noise → ignore it
最大的样本被认为是噪声→忽略它 - ⇒ get average of the middle samples
⇒得到中间样本的平均值
- The some smallest samples are considered as noise → ignore it
The below example code takes 20 measurements
以下示例代码需要 20 次测量
-
The five smallest samples are considered as noise → ignore it
五个最小的样本被认为是噪声→忽略它 -
The five biggest samples are considered as noise → ignore it
五个最大的样本被认为是噪声→忽略它
⇒ get average of the 10 middle samples (from 5th to 14th)
⇒得到 10 个中间样本的平均值(从第 5 个到第 14 个)
/*
 * Created by ArduinoGetStarted.com
 *
 * This example code is in the public domain
 *
 * Tutorial page: https://arduinogetstarted.com/tutorials/arduino-ultrasonic-sensor
 */

#define TRIG_PIN 9 // TRIG pin
#define ECHO_PIN 8 // ECHO pin

float filterArray[20]; // array to store data samples from sensor
float distance; // store the distance from sensor

void setup() {
  // begin serial port
  Serial.begin (9600);

  // configure the trigger and echo pins to output mode
  pinMode(TRIG_PIN, OUTPUT);
  pinMode(ECHO_PIN, INPUT);
}

void loop() {
  // 1. TAKING MULTIPLE MEASUREMENTS AND STORE IN AN ARRAY
  //1. 进行多次测量并存储在数组中
  for (int sample = 0; sample < 20; sample++) {
    filterArray[sample] = ultrasonicMeasure();
    delay(30); // to avoid untrasonic interfering
  }

  // 2. SORTING THE ARRAY IN ASCENDING ORDER按升序对数组排序
  for (int i = 0; i < 19; i++) {
    for (int j = i + 1; j < 20; j++) {
      if (filterArray[i] > filterArray[j]) {
        float swap = filterArray[i];
        filterArray[i] = filterArray[j];
        filterArray[j] = swap;
      }
    }
  }

  // 3. FILTERING NOISE
  // + the five smallest samples are considered as noise -> ignore it
  // + the five biggest  samples are considered as noise -> ignore it
  // ----------------------------------------------------------------
  // => get average of the 10 middle samples (from 5th to 14th)
  double sum = 0;
  for (int sample = 5; sample < 15; sample++) {
    sum += filterArray[sample];
  }

  distance = sum / 10;

  // print the value to Serial Monitor
  Serial.print("distance: ");
  Serial.print(distance);
  Serial.println(" cm");
}

float ultrasonicMeasure() {
  // generate 10-microsecond pulse to TRIG pin
  digitalWrite(TRIG_PIN, HIGH);
  delayMicroseconds(10);
  digitalWrite(TRIG_PIN, LOW);

  // measure duration of pulse from ECHO pin
  float duration_us = pulseIn(ECHO_PIN, HIGH);

  // calculate the distance
  float distance_cm = 0.017 * duration_us;

  return distance_cm;
}
Function References
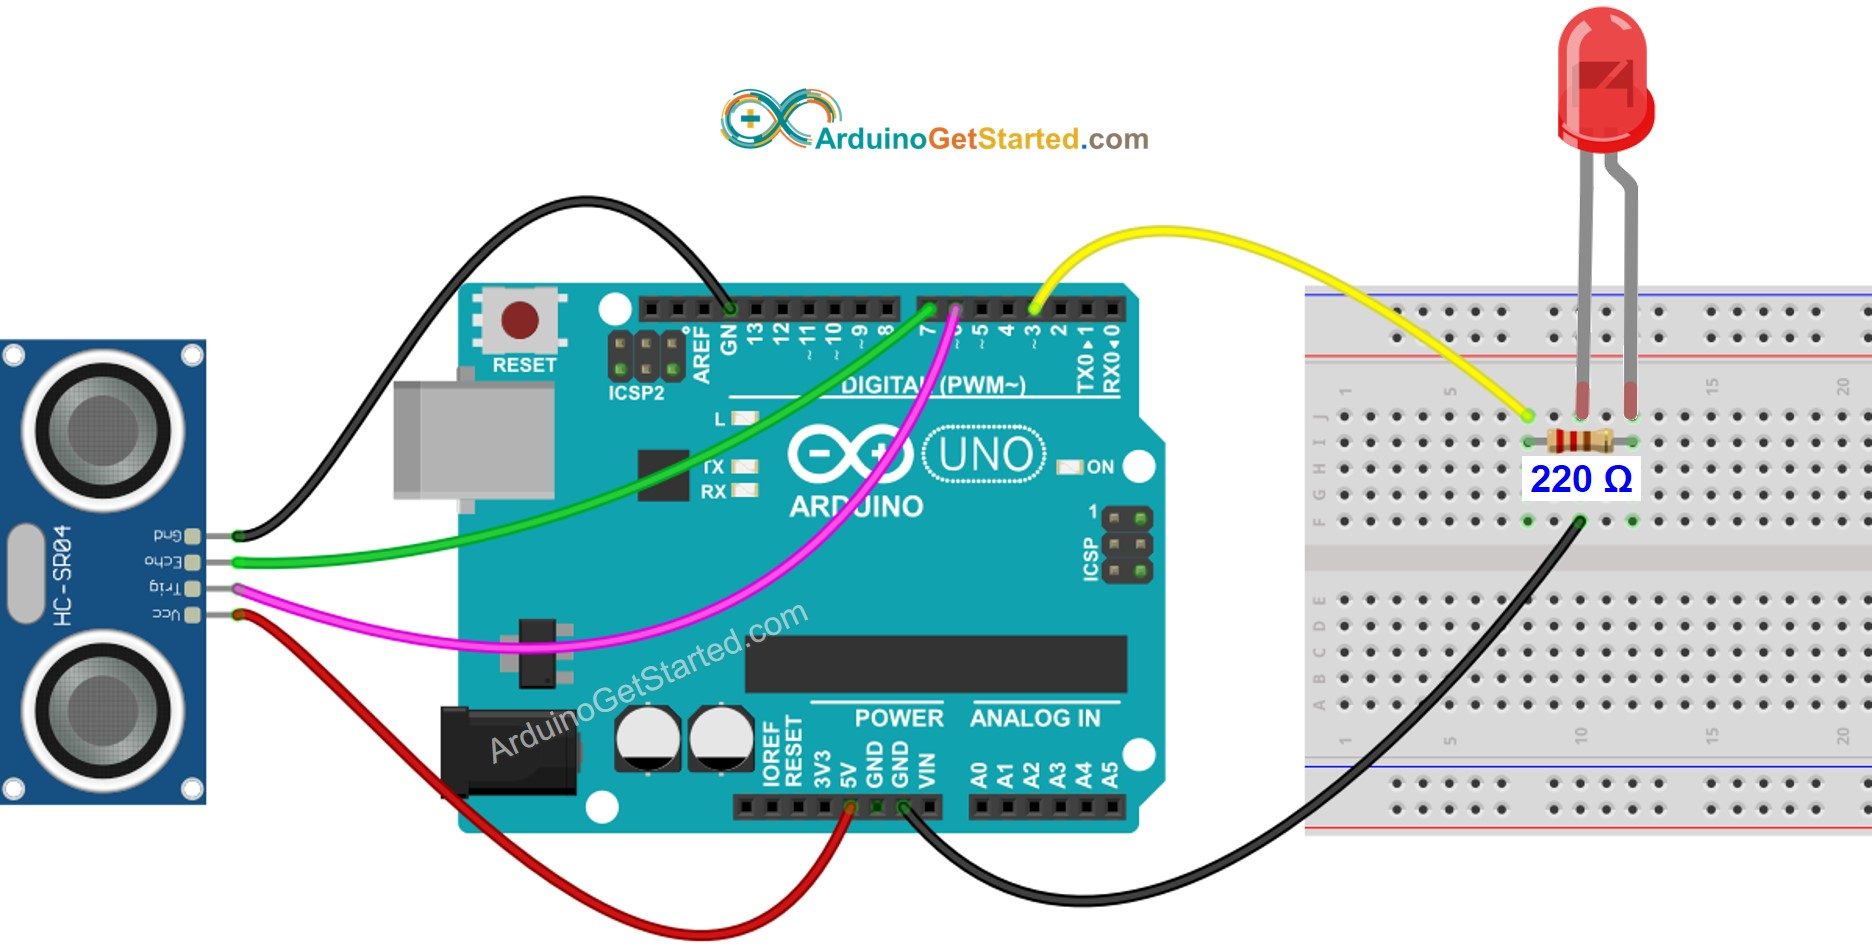
4.示例: 超声波传感器控制LED
我们将学习如何:
-
如果物体靠近超声波传感器,打开 LED
-
如果物体远离超声波传感器,关闭 LED
/*
 * Created by ArduinoGetStarted.com
 *
 * This example code is in the public domain
 *
 * Tutorial page: https://arduinogetstarted.com/tutorials/arduino-ultrasonic-sensor-led
 */

// constants won't change
const int TRIG_PIN = 6; // Arduino pin connected to Ultrasonic Sensor's TRIG pin
const int ECHO_PIN = 7; // Arduino pin connected to Ultrasonic Sensor's ECHO pin
const int LED_PIN  = 3; // Arduino pin connected to LED's pin
const int DISTANCE_THRESHOLD = 50; // centimeters

// variables will change:
float duration_us, distance_cm;

void setup() {
  Serial.begin (9600);       // initialize serial port
  pinMode(TRIG_PIN, OUTPUT); // set arduino pin to output mode
  pinMode(ECHO_PIN, INPUT);  // set arduino pin to input mode
  pinMode(LED_PIN, OUTPUT);  // set arduino pin to output mode
}

void loop() {
  // generate 10-microsecond pulse to TRIG pin
  digitalWrite(TRIG_PIN, HIGH);
  delayMicroseconds(10);
  digitalWrite(TRIG_PIN, LOW);

  // measure duration of pulse from ECHO pin
  duration_us = pulseIn(ECHO_PIN, HIGH);
  // calculate the distance
  distance_cm = 0.017 * duration_us;

  if(distance_cm < DISTANCE_THRESHOLD)
    digitalWrite(LED_PIN, HIGH); // turn on LED
  else
    digitalWrite(LED_PIN, LOW);  // turn off LED

  // print the value to Serial Monitor
  Serial.print("distance: ");
  Serial.print(distance_cm);
  Serial.println(" cm");

  delay(500);
}


 1328
1328

 被折叠的 条评论
为什么被折叠?
被折叠的 条评论
为什么被折叠?
 到【灌水乐园】发言


