


halcon模板匹配学习(二) 准备模板
版权声明:本文为博主原创文章,转载请注明原地址。
如下,我们将介绍匹配的第一个操作:准备模板
初始时刻,我们准备好参考图像,并对其做一定的处理,然后我们需要从参考图像中导出模板,也就是将参考图像裁剪成所谓的模板图像。获取模板图像可以通过设置ROI来完成。对于某些应用来说,也可以使用综合模板代替模版图像。综合模板既可以是综合创造的模板图像,也可以是一个XLD轮廓。
裁剪参考图像,使之成为模板图像
为了创建模板图像,我们需要从参考图像中选取ROI,并使用 reduce_domain裁剪图像的定义域为我们选取的ROI。这样我们就创建了模板图像,后续将作为匹配算子的输入参数。
选取ROI有两种方法:
- 直接指定法。
我们可以直接指定区域的参数进而直接生成区域。HALCON 提供了多种算子用来创建区域,既包括标准的形状像矩形(gen_rectangle2)或者椭圆(gen_ellipse) 到自由形状的区域,比如多边形区域(gen_region_polygon_filled).为了使用这些算子,你需要这些区域的参数,比如矩形的位置、大小、方向或者园的位置和半径。如果这些参数不能直接获得,你可以使用draw算子,比如你可以在打开的图像上画一个形状,然后返回其参数。这些算子可以在HDevelop菜单 Operators :fa-play: Graphics :fa-play: Drawing 获得。 - 通过图像处理获得区域。
有时我们可以通过图像处理获得区域,如阈值处理分割图像、通过blob分析connection、fill_up、select_shape等可以选取某种特征的区域。
综合模板图像,作为模板图像的替代选择
综合模板图像
综合模板图像主要应用于 correlation-based 匹配和所有基于轮廓的2D方法 比如 shape-based, component-based, local deformable, and perspective deformable matching.
如下我们举例说明。

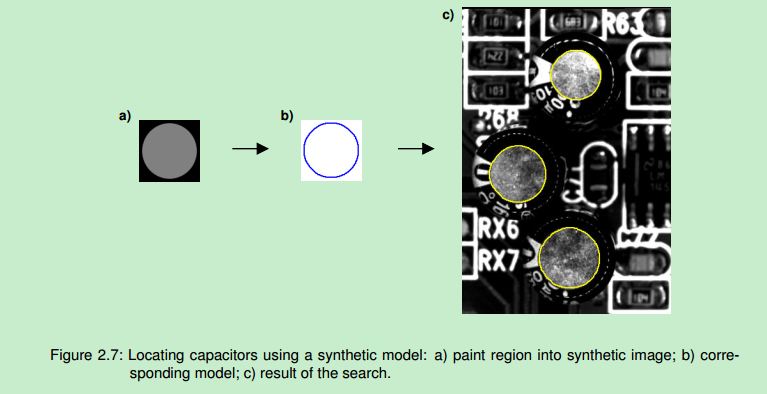
我们想要定位电容。如果我们选择明亮的圆域作为ROI区域,则会发现该区域包括大量的噪声点。因此最后匹配出的电容只有一个。如果我们改进之前的圆区域,换成一个环形区域作为ROI,则最后匹配出理想的电容区域。但是即使这样,环形区域使得内部的区域丢失了一部分,而且仍然包含部分噪点,所以不理想。
最好的方法是使用综合模板图像。具体步骤如下:
Step 1: 创造一个XLD轮廓
首先我们使用算子gen_ellipse_contour_xld创造一个圆形区域。
<code class="hljs mathematica has-numbering">RadiusCircle := <span class="hljs-number">43</span>
SizeSynthImage := <span class="hljs-number">2</span>*RadiusCircle + <span class="hljs-number">10</span>
gen_ellipse_contour_xld (<span class="hljs-keyword">Circle</span>, SizeSynthImage/<span class="hljs-number">2</span>, SizeSynthImage/<span class="hljs-number">2</span>, <span class="hljs-number">0</span>,
RadiusCircle, RadiusCircle, <span class="hljs-number">0</span>, <span class="hljs-number">6.28318</span>, <span class="hljs-string">'positive'</span>, <span class="hljs-number">1.5</span>)</code><ul class="pre-numbering"><li>1</li><li>2</li><li>3</li><li>4</li></ul><div class="save_code tracking-ad" style="display: none;" data-mod="popu_249"><a target=_blank href="javascript:;" target="_blank"><img src="http://static.blog.csdn.net/images/save_snippets.png" alt="" /></a></div><ul class="pre-numbering"><li>1</li><li>2</li><li>3</li><li>4</li></ul>
注意合成图像应该比区域大一些,因为对于 shape-based matching,当创建图像金字塔时,区域外面的像素也被使用。
Step 2: 创造一个图像,并将XLD插入图像中
然后我们使用算子gen_image_const创造一个空的图像,并使用算子* paint_xld*将XLD轮廓插入图像中.
<code class="hljs erlang has-numbering"><span class="hljs-function"><span class="hljs-title">gen_image_const</span> <span class="hljs-params">(<span class="hljs-variable">EmptyImage</span>, 'byte', <span class="hljs-variable">SizeSynthImage</span>, <span class="hljs-variable">SizeSynthImage</span>)</span>
<span class="hljs-title">paint_xld</span> <span class="hljs-params">(<span class="hljs-variable">Circle</span>, <span class="hljs-variable">EmptyImage</span>, <span class="hljs-variable">SyntheticModelImage</span>, <span class="hljs-number">128</span>)</span></span></code><ul class="pre-numbering"><li>1</li><li>2</li></ul><div class="save_code tracking-ad" data-mod="popu_249"><a target=_blank href="javascript:;" target="_blank"><img src="http://static.blog.csdn.net/images/save_snippets.png" alt="" /></a></div><ul class="pre-numbering"><li>1</li><li>2</li></ul>
Step 3: 创建模型
使用综合模板创建模型。
请注意:
完整的代码,见:HDevelop 项目 solution_guide/matching/synthetic_circle.hdev
来自XLD轮廓的模型
对于 shape-based matching 和 the local and perspective deformable matching,你不必要从一个XLD轮廓中创建一个综合模板图像,因为你可以直接使用XLD轮廓作为模板。比如说,对于shape-based matching, 你不必要提供一幅图像,选择ROI,然后调用 create_shape_model, create_scaled_shape_model, or create_aniso_shape_model其中之一去创建模型。
相反,你可以简单地调用create_shape_model_xld, create_scaled_shape_model_xld, or create_aniso_shape_model_xld使用XLD轮廓作为输入参数。
举例说明。如下的完整项目,见 HDevelop example program: examples\hdevelop\Matching\Shape-Based\create_shape_model_xld.dev:
<code class="hljs bash has-numbering">gen_circle_contour_xld (ContCircle, <span class="hljs-number">300</span>, <span class="hljs-number">300</span>, MeanRadius, <span class="hljs-number">0</span>, <span class="hljs-number">6.28318</span>, \
<span class="hljs-string">'positive'</span>, <span class="hljs-number">1</span>)
create_shape_model_xld (ContCircle, <span class="hljs-string">'auto'</span>, <span class="hljs-number">0</span>, <span class="hljs-number">0</span>, <span class="hljs-string">'auto'</span>, <span class="hljs-string">'auto'</span>, \
<span class="hljs-string">'ignore_local_polarity'</span>, <span class="hljs-number">10</span>, ModelID)</code><ul class="pre-numbering"><li>1</li><li>2</li><li>3</li><li>4</li></ul><div class="save_code tracking-ad" data-mod="popu_249"><a target=_blank href="javascript:;" target="_blank"><img src="http://static.blog.csdn.net/images/save_snippets.png" alt="" /></a></div><ul class="pre-numbering"><li>1</li><li>2</li><li>3</li><li>4</li></ul>
对于 local and perspective deformable matching 的处理也可以相应的被使用。这里你可以使用算子create_local_deformable_model_xld for the local deformable matching and create_planar_uncalib_deformable_model_xldor create_planar_calib_deformable_model_xld, respectively, for perspective deformable matching.
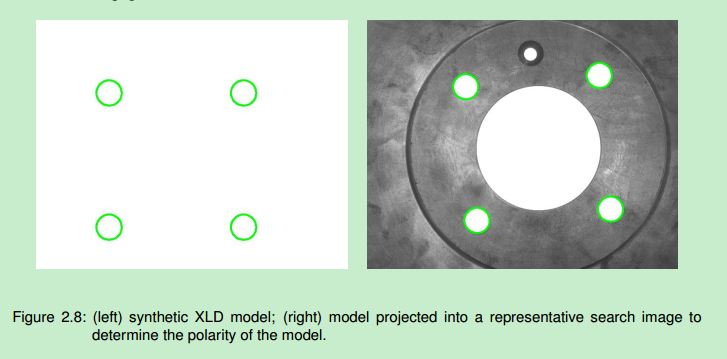
初始时刻不知道极性,因为轮廓不提供极性。所以需要在一个有代表性的图像中做实验,看看如何设置极性。开始忽略极性,即参数
Metric设置为ignore_local_polarity,后面设置极性.可以调用算子set_shape_model_metric for shape-based matching,set_local_deformable_model_metric
for local deformable matching, and set_planar_uncalib_deformable_model_metric or
set_planar_calib_deformable_model_metric, respectively, for perspective deformable matching.
然后极性信息就被存储到模型中。然后在接下里的搜索算子中可以通过参数
Metric设置各位合适的值,如’use_polarity’. 这种处理强烈推荐给迅速且鲁棒的搜索。
<code class="hljs r has-numbering">find_shape_model (Image, ModelID, <span class="hljs-number">0</span>, <span class="hljs-number">0</span>, <span class="hljs-number">0.7</span>, <span class="hljs-number">0</span>, <span class="hljs-number">0</span>, <span class="hljs-string">'least_squares'</span>, <span class="hljs-number">0</span>, <span class="hljs-number">0.9</span>, Row, Column, Angle, Score)

<span class="hljs-keyword">...</span> accessing the indices of the matches
<span class="hljs-keyword">...</span> that represent suitable drill holes

vector_angle_to_rigid (<span class="hljs-number">0</span>, <span class="hljs-number">0</span>, <span class="hljs-number">0</span>, Row[HoleIndices[<span class="hljs-number">0</span>]], Column[HoleIndices[<span class="hljs-number">0</span>]], Angle[HoleIndices[<span class="hljs-number">0</span>]], HomMat2D)

set_shape_model_metric (Image, ModelID, HomMat2D, <span class="hljs-string">'use_polarity'</span>)

<span class="hljs-keyword">for</span> Index := <span class="hljs-number">2</span> to <span class="hljs-number">9</span> by <span class="hljs-number">1</span>
    read_image (Image, <span class="hljs-string">'brake_disk/brake_disk_part_'</span>+Index$<span class="hljs-string">'02d'</span>)
    find_shape_model (Image, ModelID, <span class="hljs-number">0</span>, <span class="hljs-number">0</span>, <span class="hljs-number">0.7</span>, <span class="hljs-number">0</span>, <span class="hljs-number">0</span>,   <span class="hljs-string">'least_squares'</span>, <span class="hljs-number">0</span>, <span class="hljs-number">0.9</span>, Row, Column, Angle, Score)
endfor</code><ul class="pre-numbering"><li>1</li><li>2</li><li>3</li><li>4</li><li>5</li><li>6</li><li>7</li><li>8</li><li>9</li><li>10</li><li>11</li><li>12</li><li>13</li></ul><div class="save_code tracking-ad" data-mod="popu_249"><a target=_blank href="javascript:;" target="_blank"><img src="http://static.blog.csdn.net/images/save_snippets.png" alt="" /></a></div><ul class="pre-numbering"><li>1</li><li>2</li><li>3</li><li>4</li><li>5</li><li>6</li><li>7</li><li>8</li><li>9</li><li>10</li><li>11</li><li>12</li><li>13</li></ul>
如下图为示意图:
注:关于极性的选择。
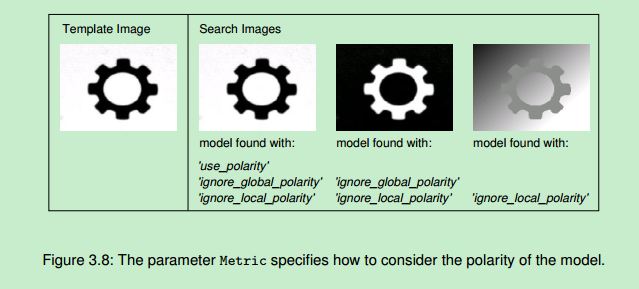
1. 使用极性模式: 要求模板与图像黑白亮度对应。
2. 忽略模板全局极性: 不需要模板与图像黑白亮度对应
3. 忽略局部极性: 不需要模板与图像黑白亮度对应,允许变化。
-
顶
- 0
-
踩
- 0


 8823
8823


 被折叠的 条评论
为什么被折叠?
被折叠的 条评论
为什么被折叠?
 到【灌水乐园】发言


