


 本文介绍了一种针对边缘计算设备设计的轻量级人脸检测模型,特别关注模型大小、计算量和部署优化,包括输入尺寸选择、数据筛选、SSD网络结构和模型转换。作者提供了预训练模型和用Tengine进行部署的方法。
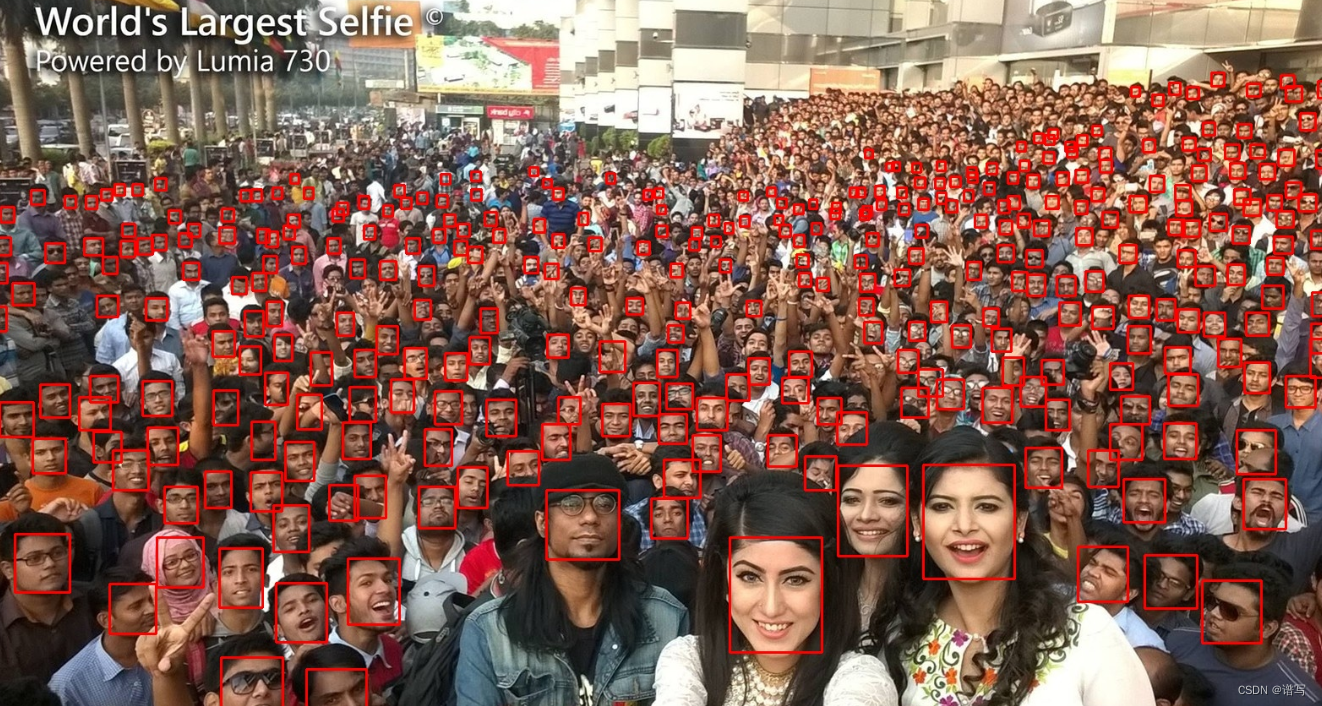
Ultra-Light-Fast-Generic-Face-Detector-1MB-master
模型是针对边缘计算设备设计的轻量人脸检测模型。
- 在模型大小上,默认FP32精度下(.pth)文件大小为 1.04~1.1MB,推理框架int8量化后大小为 300KB 左右。
- 在模型计算量上,320x240的输入分辨率下 90~109 MFlops左右。
- 模型有两个版本,version-slim(主干精简速度略快),version-RFB(加入了修改后的RFB模块,精度更高)。
- 提供320x240、640x480不同输入分辨率下使用widerface训练的预训练模型,更好的工作于不同的应用场景。
2数据处理
2.1 输入尺寸的选择
由于涉及实际部署时的推理速度,因此模型输入尺寸的选择也是一个很重要的话题。
在作者的原github中,也提到了一点,如果在实际部署的场景中大多数情况为中近距离、人脸大同时人脸的数量也比较少的时候,则可以采用
320×240
的输入尺寸;
如果在实际部署的场景中大多数情况为中远距离、人脸小同时人脸的数量也比较多的时候,则可以采用
640×480
或者
480×360
的输入尺寸;
这里由于使用的是EAIDK310进行部署测试,边缘性能不是很好,因此选择原作者推荐的最小尺寸
320×240
进行训练和部署测试。 注意:过小的输入分辨率虽然会明显加快推理速度,但是会大幅降低小人脸的召回率。
2.2 数据筛选
由于widerface官网数据集中有比较多的低于10像素的人脸照片,因此在这里选择剔除这些像素长宽低于10个pixel的照片;
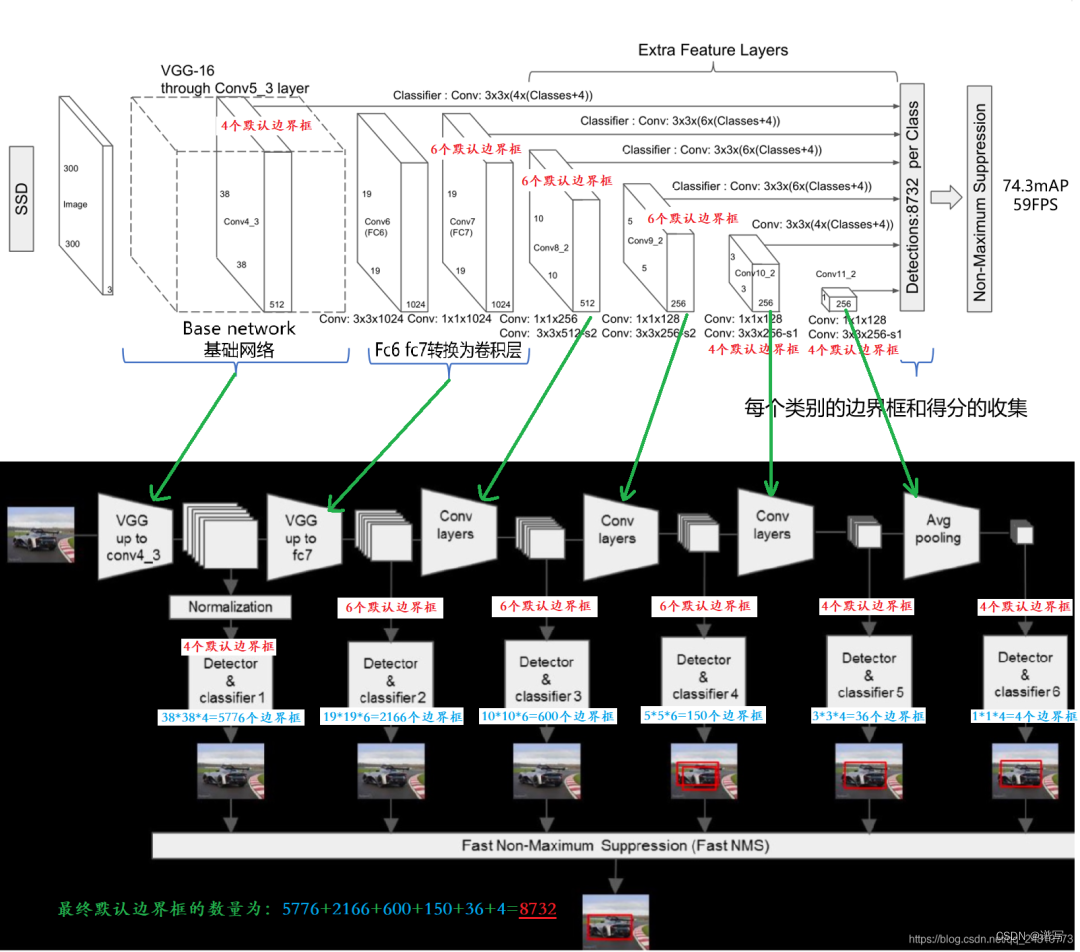
3SSD网络结构
SSD是一个端到端的模型,所有的检测过程和识别过程都是在同一个网络中进行的;同时SSD借鉴了Faster R-CNN的Anchor机制的想法,这样就像相当于在基于回归的的检测过程中结合了区域的思想,可以使得检测效果较定制化边界框的YOLO v1有比较好的提升。

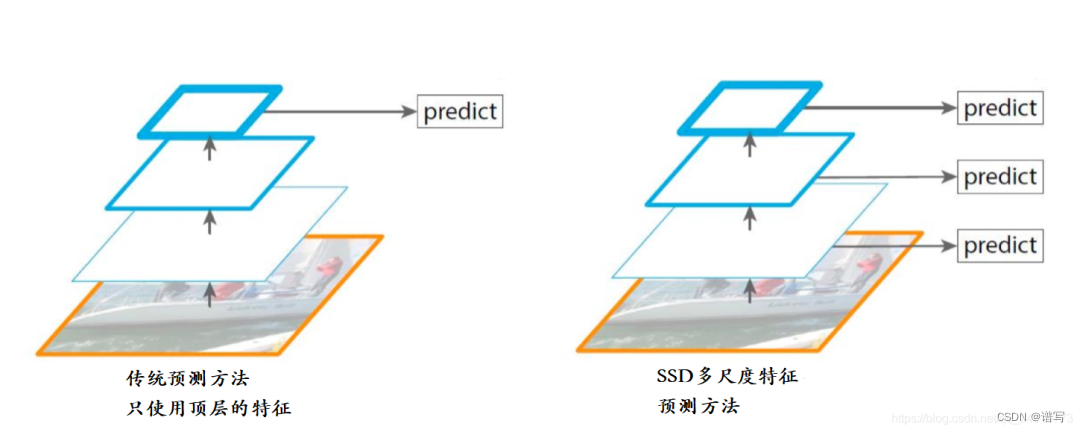
SSD较传统的检测方法使用顶层特征图的方法选择了使用多尺度特征图,因为在比较浅的特征图中可以对于小目标有比较好的表达,随着特征图的深入,网络对于比较大特征也有了比较好表达能力,故SSD选择使用多尺度特征图可以很好的兼顾大目标和小目标。

SSD模型结构如下:
这里关于SSD不进行更多的阐述,想了解的小伙伴自行搜索查看
整个项目模型搭建如下:
# 网络的主题结构为SSD模型
class SSD(nn.Module):
    def __init__(self, num_classes: int, base_net: nn.ModuleList, source_layer_indexes: List[int],
                 extras: nn.ModuleList, classification_headers: nn.ModuleList,
                 regression_headers: nn.ModuleList, is_test=False, config=None, device=None):
        """Compose a SSD model using the given components.
        """
        super(SSD, self).__init__()

        self.num_classes = num_classes
        self.base_net = base_net
        self.source_layer_indexes = source_layer_indexes
        self.extras = extras
        self.classification_headers = classification_headers
        self.regression_headers = regression_headers
        self.is_test = is_test
        self.config = config

        # register layers in source_layer_indexes by adding them to a module list
        self.source_layer_add_ons = nn.ModuleList([t[1] for t in source_layer_indexes
                                                   if isinstance(t, tuple) and not isinstance(t, GraphPath)])
        if device:
            self.device = device
        else:
            self.device = torch.device("cuda:0" if torch.cuda.is_available() else "cpu")
        if is_test:
            self.config = config
            self.priors = config.priors.to(self.device)

    def forward(self, x: torch.Tensor) -> Tuple[torch.Tensor, torch.Tensor]:
        confidences = []
        locations = []
        start_layer_index = 0
        header_index = 0
        end_layer_index = 0
        for end_layer_index in self.source_layer_indexes:
            if isinstance(end_layer_index, GraphPath):
                path = end_layer_index
                end_layer_index = end_layer_index.s0
                added_layer = None
            elif isinstance(end_layer_index, tuple):
                added_layer = end_layer_index[1]
                end_layer_index = end_layer_index[0]
                path = None
            else:
                added_layer = None
                path = None
            for layer in self.base_net[start_layer_index: end_layer_index]:
                x = layer(x)
            if added_layer:
                y = added_layer(x)
            else:
                y = x
            if path:
                sub = getattr(self.base_net[end_layer_index], path.name)
                for layer in sub[:path.s1]:
                    x = layer(x)
                y = x
                for layer in sub[path.s1:]:
                    x = layer(x)
                end_layer_index += 1
            start_layer_index = end_layer_index
            confidence, location = self.compute_header(header_index, y)
            header_index += 1
            confidences.append(confidence)
            locations.append(location)

        for layer in self.base_net[end_layer_index:]:
            x = layer(x)

        for layer in self.extras:
            x = layer(x)
            confidence, location = self.compute_header(header_index, x)
            header_index += 1
            confidences.append(confidence)
            locations.append(location)

        confidences = torch.cat(confidences, 1)
        locations = torch.cat(locations, 1)

        if self.is_test:
            confidences = F.softmax(confidences, dim=2)
            boxes = box_utils.convert_locations_to_boxes(
                locations, self.priors, self.config.center_variance, self.config.size_variance
            )
            boxes = box_utils.center_form_to_corner_form(boxes)
            return confidences, boxes
        else:
            return confidences, locations

    def compute_header(self, i, x):
        confidence = self.classification_headers[i](x)
        confidence = confidence.permute(0, 2, 3, 1).contiguous()
        confidence = confidence.view(confidence.size(0), -1, self.num_classes)

        location = self.regression_headers[i](x)
        location = location.permute(0, 2, 3, 1).contiguous()
        location = location.view(location.size(0), -1, 4)

        return confidence, location

    def init_from_base_net(self, model):
        self.base_net.load_state_dict(torch.load(model, map_location=lambda storage, loc: storage), strict=True)
        self.source_layer_add_ons.apply(_xavier_init_)
        self.extras.apply(_xavier_init_)
        self.classification_headers.apply(_xavier_init_)
        self.regression_headers.apply(_xavier_init_)

    def init_from_pretrained_ssd(self, model):
        state_dict = torch.load(model, map_location=lambda storage, loc: storage)
        state_dict = {k: v for k, v in state_dict.items() if not (k.startswith("classification_headers") or k.startswith("regression_headers"))}
        model_dict = self.state_dict()
        model_dict.update(state_dict)
        self.load_state_dict(model_dict)
        self.classification_headers.apply(_xavier_init_)
        self.regression_headers.apply(_xavier_init_)

    def init(self):
        self.base_net.apply(_xavier_init_)
        self.source_layer_add_ons.apply(_xavier_init_)
        self.extras.apply(_xavier_init_)
        self.classification_headers.apply(_xavier_init_)
        self.regression_headers.apply(_xavier_init_)

    def load(self, model):
        self.load_state_dict(torch.load(model, map_location=lambda storage, loc: storage))

    def save(self, model_path):
        torch.save(self.state_dict(), model_path)
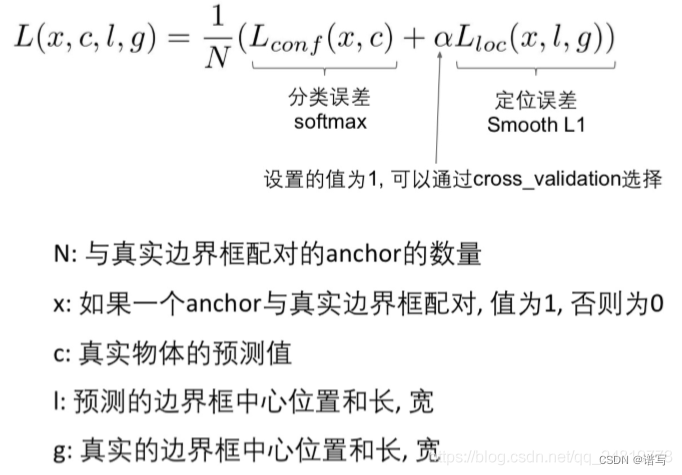
损失函数
损失函数作者选择使用的依旧是SSD的Smooth L1 Loss以及Cross Entropy Loss,其中Smooth L1 Loss用于边界框的回归,而Cross Entropy Loss则用于分类。

具体pytorch实现如下:
class MultiboxLoss(nn.Module):
    def __init__(self, priors, neg_pos_ratio,
                 center_variance, size_variance, device):
        """Implement SSD Multibox Loss.

        Basically, Multibox loss combines classification loss
         and Smooth L1 regression loss.
        """
        super(MultiboxLoss, self).__init__()
        self.neg_pos_ratio = neg_pos_ratio
        self.center_variance = center_variance
        self.size_variance = size_variance
        self.priors = priors
        self.priors.to(device)

    def forward(self, confidence, predicted_locations, labels, gt_locations):
        """Compute classification loss and smooth l1 loss.

        Args:
            confidence (batch_size, num_priors, num_classes): class predictions.
            locations (batch_size, num_priors, 4): predicted locations.
            labels (batch_size, num_priors): real labels of all the priors.
            boxes (batch_size, num_priors, 4): real boxes corresponding all the priors.
        """
        num_classes = confidence.size(2)
        with torch.no_grad():
            # derived from cross_entropy=sum(log(p))
            loss = -F.log_softmax(confidence, dim=2)[:, :, 0]
            mask = box_utils.hard_negative_mining(loss, labels, self.neg_pos_ratio)

        confidence = confidence[mask, :]
        # 分类损失函数
        classification_loss = F.cross_entropy(confidence.reshape(-1, num_classes), labels[mask], reduction='sum')
        pos_mask = labels > 0
        predicted_locations = predicted_locations[pos_mask, :].reshape(-1, 4)
        gt_locations = gt_locations[pos_mask, :].reshape(-1, 4)
        # 边界框回归损失函数
        smooth_l1_loss = F.smooth_l1_loss(predicted_locations, gt_locations, reduction='sum')  # smooth_l1_loss
        # smooth_l1_loss = F.mse_loss(predicted_locations, gt_locations, reduction='sum')  #l2 loss
        num_pos = gt_locations.size(0)
        return smooth_l1_loss / num_pos, classification_loss / num_pos
结果预测
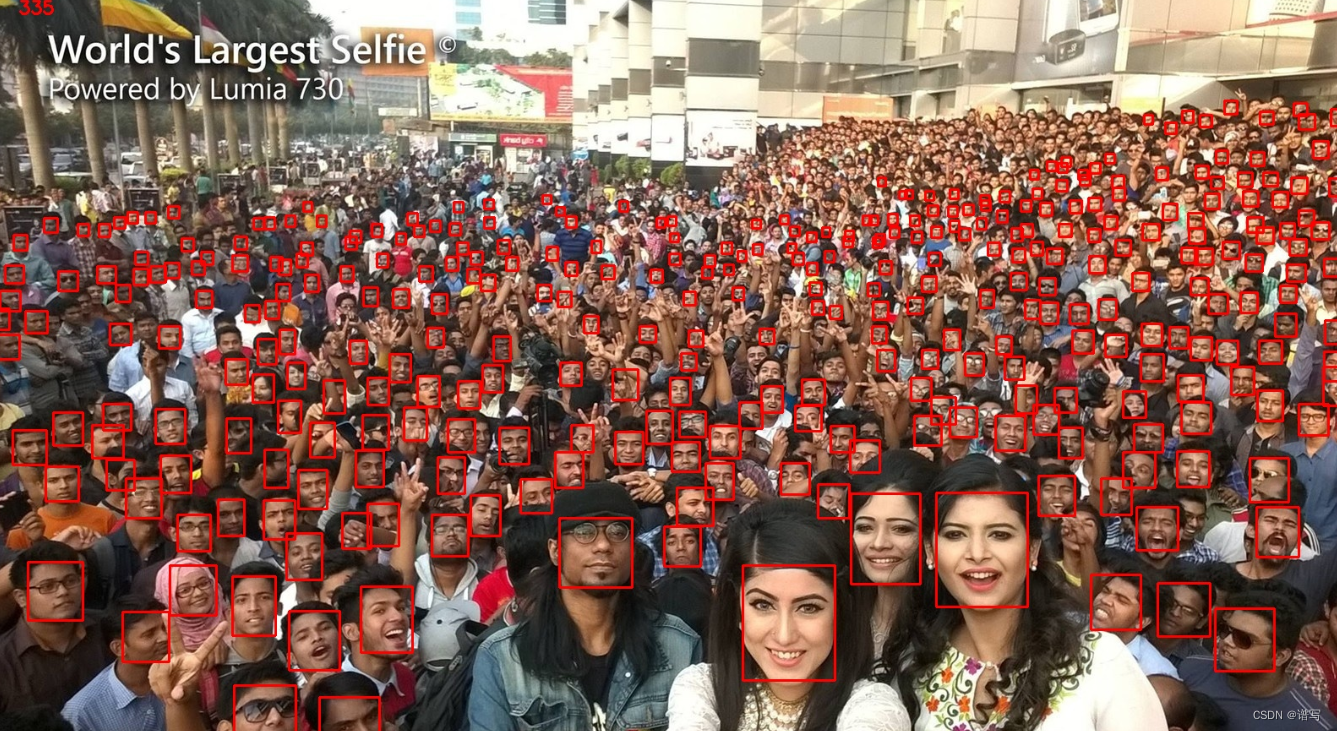
输入为:

输出为:
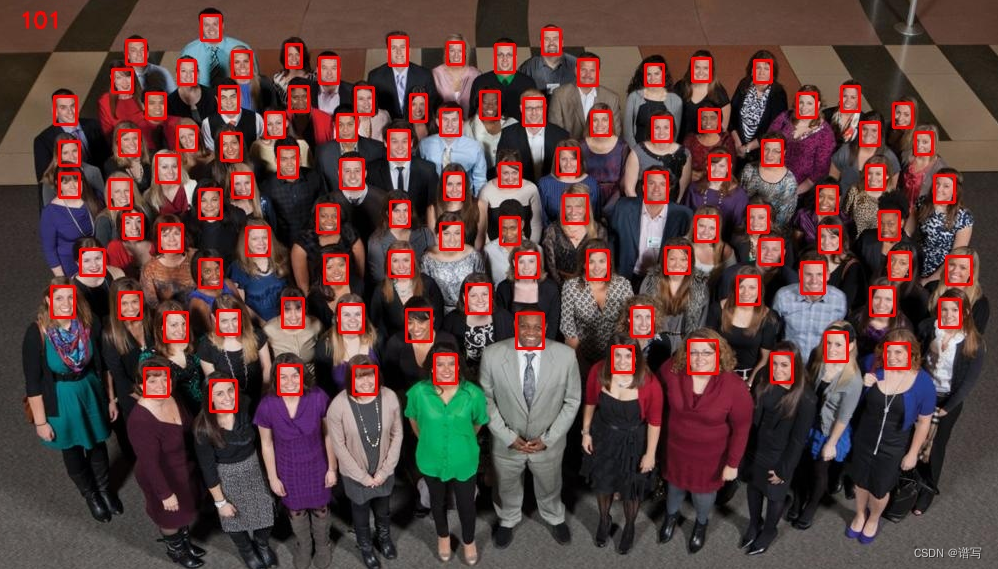
输入为

输出为
模型转换
由于部署使用的是Tengine边缘推理框架,由于pytorch输出的模型无法直接转换到tmfile模型下,因此还是选择使用onnx中间件的形式进行过度,具体实现代码如下:
model_path = "models/pretrained/version-RFB-320.pth"
net = create_Mb_Tiny_RFB_fd(len(class_names), is_test=True)
net.load(model_path)
net.eval()
net.to("cuda")

model_name = model_path.split("/")[-1].split(".")[0]
model_path = f"models/onnx/{model_name}.onnx"

dummy_input = torch.randn(1, 3, 240, 320).to("cuda")
# dummy_input = torch.randn(1, 3, 480, 640).to("cuda") #if input size is 640*480
torch.onnx.export(net, dummy_input, model_path, verbose=False, input_names=['input'], output_names=['scores', 'boxes'])
得到onnx模型后便可以进行Tengine模型的转换和部署。
参考
https://github.com/Linzaer/Ultra-Light-Fast-Generic-Face-Detector-1MB
关于cv2.rectangle()函数
cv2.rectangle(img, pt1, pt2, color, thickness, lineType, shift )
参数表示依次为: (图片,长方形框左上角坐标, 长方形框右下角坐标, 字体颜色,字体粗细)
在图片img上画长方形,坐标原点是图片左上角,向右为x轴正方向,向下为y轴正方向。左上角(x,y),右下角(x,y) ,颜色(B,G,R), 线的粗细如:
cv2.rectangle(frame, (int(bbox[0]), int(bbox[1])), (int(bbox[2]), int(bbox[3])), color, 2)
关于裁剪下发给对比侧
#裁剪
x, y, w, h = (int(box[0]), int(box[1]))[0], (int(box[0]), int(box[1]))[1], (int(box[2]), int(box[3]))[0] - \
(int(box[0]), int(box[1]))[0], \
(int(box[2]), int(box[3]))[1] - \
(int(box[0]), int(box[1]))[1]
cropped_image = image[y:y + h, x:x + w]
# 显示裁剪后的图片
cv2.imshow('Cropped image', cropped_image)
cv2.waitKey(0)
cv2.destroyAllWindows()# 如果需要保存裁剪后的图片
cv2.imwrite('cropped_image.jpg', cropped_image)


 750
750

 被折叠的 条评论
为什么被折叠?
被折叠的 条评论
为什么被折叠?
 到【灌水乐园】发言


