


Note from Ray: This is the third iOS 6 tutorial in the iOS 6 Feast! In this tutorial, we’re updating one of your older tutorials to iOS 6 so it’s fully up-to-date with the latest features like ARC, Storyboards, and new iOS 6 APIs.
Parts of this tutorial come from our Beginning In-App Purchase chapter in our new book iOS 6 by Tutorials, although the book is about a different app (iOS Hangman!) and takes things MUCH further than this simple example, such as covering the new iOS 6 Hosted Downloads feature. Enjoy!
This is a blog post by site administrator Ray Wenderlich, an independent software developer and gamer.
One of the great things about being an iOS devleoper is that there are a variety of models you can use to make money off of your apps, including paid, free with ads, and in-app purchases.
In-app purchases are a particularly compelling option, for several reasons:
- You can earn more money than just the price of your app. Some users are willing to spend a lot more on extra content!
- You can release your app for free (which is a no-brainer download for most people), and if they enjoy it they can purchase more.
- Once you have it implemented, you can keep adding additional content in the future to the same app (rather than having to make a new app to earn more money!)
You can use In-App Purchases with varying business models. For example, in Wild Fables, I made the app free with three stories included, and more available as in-app purchases. And in my upcoming upgrade to Battle Map, it is a paid app with optional extra content as In-App Purchases.
In this tutorial, you’ll learn how to use in-app purchases to unlock local content embedded in your app, and I’ll show you how you can deal with the tricky asycnchronous nature of in-app purchases.
This tutorial assumes familiarity with basic iOS programming concepts. If you’re still new to iOS development, check out some of the other tutorials on this site.
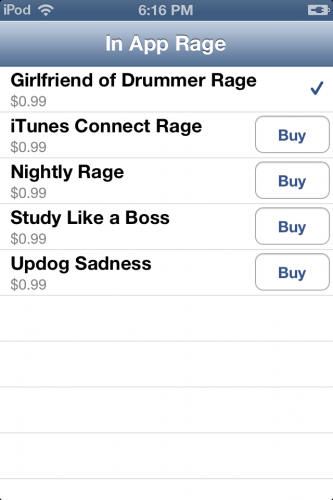
In App Rage
So what app are you going to make in this tutorial? Well, let me give you some background first…
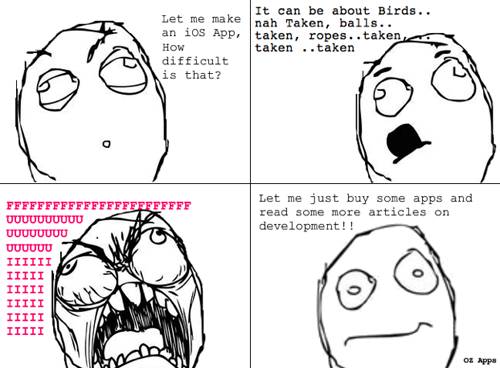
Lately I’ve become addicted to these comics online called rage comics, or sometimes “F7U12”. If you haven’t heard of them before, they’re basically funny little comics where someone goes through a common and frustrating situation, and has a wild rage or other humorous expression at the end.
So for this tutorial, you’re going to make a little app called “In App Rage” where people can buy some of these comics. But before you can even start coding, you need to create a placeholder app entry using iOS Developer Center and iTunes Connect.
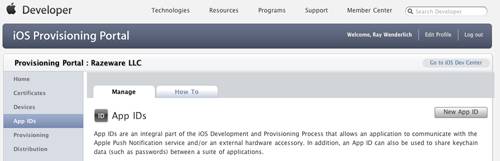
The first step is to create an App ID for the app. So log into the iOS Developer Center, select the “App IDs” tab, and click “New App ID”:
Fill out the page by entering a description and bundle identifier, similar to the screenshot below:
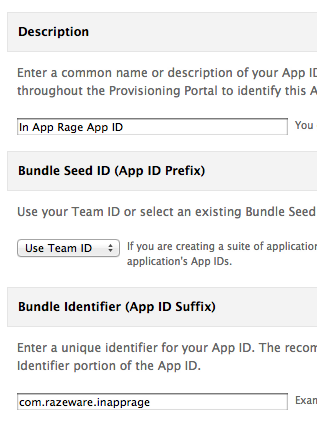
Note you should change the bundle identifier to have your own unique prefix, by using your own domain name (if you have one), or if all fails a made-up one based on your name or something else fairly unique.
When you’re done, click Submit, and viola – you have a new App ID! Now you’ll use it to create a new app on iTunes Connect.
Log onto iTunes Connect, click “Manage Your Applications”, and then “Add New App”. If you’re prompted between iOS App or Mac OSX App, choose iOS App obviously. Then enter in an App Name, SKU number, and choose the Bundle ID you just made as shown below:
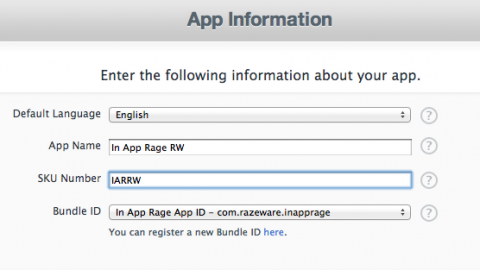
You’ll probably have to tweak the App Name, because app names need to be unique and I’ve added an entry for this one. Maybe replace the RW with your own initials.
The next two pages will ask you for your app’s information. Just put in placeholder information for now – you can change all of this later. But unfortunately – you have to fill out *each and every field* (including adding screenshots, which you don’t even have yet!)
Just so you know, here’s how I feel about this:
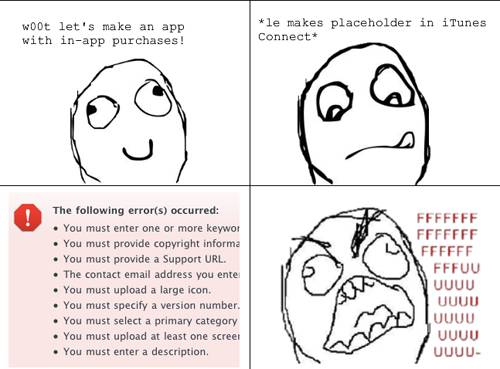
If you get any errors like the above, just keep entering in dummy data. Also, here’s an icon and fake screenshot you can upload to make iTunes Connect happy.
After you get through all of the errors, you should have your placeholder app created – aww yeah!
Managing In App Purchases
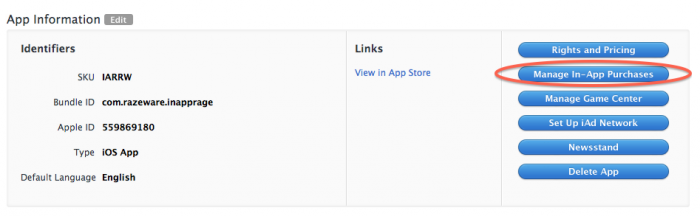
The reason you just created a placeholder app is that before you can code in-app purchases, you have to set them up in iTunes Connect. So now that you have a placeholder app, just click on the “Manage In App Purchases” button, as shown below:
Then click “Create New” in the upper left:

You will get to a screen that lets you select the type of In-App Purchase you want to add. Note that there are are two types of In-App Purchases most frequently used:
- Consumables. This means things you can buy more than once and can be used up, like extra lives, in-game currency, temporary power-ups, and the like.
- Non-Consumables. This means something that you buy once, and expect to have it permanently. This means things like extra levels, unlockable content, and the like.
For In App Rage, you are going to be selling comics. Once the user purchases them, they should always have them, so choose Non-Consumable.

Any Non-Consumable purchase should be available to a user on any device they have. I.e. you don’t get to charge a user twice if they have two devices!
We’ll talk more about how to allow the user to get the non-consumable content they purchased on other devices later, when we discuss restoring transactions.
There is no such requirement for consumables though – consumables can be for just the device the user bought them on. If you want consumables to be cross-device, you’d have to implement that yourself with iCloud or some other technology.
Next, you will be taken to a page to enter some information about your In-App Purchase. Fill in the fields according to the screenshot below:
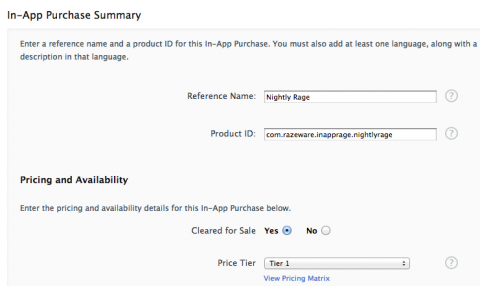
Let’s cover what each of these fields means:
- Reference Name: This is what shows up in iTunes Connect for this in-app purchase. It can be whatever you want since you won’t see it anywhere in the app.
- Product ID: Also known as “product identifier” in the Apple docs, this is the unique string that identifies your in-app purchase. Usually it’s best to start out with your bundle id, and then append a unique name for the purchase at the end.
- Cleared for Sale: If this in-app purchase is OK for users to purchase as soon as the app becomes available.
- Price Tier: How much this in-app purchase should cost.
After you’ve set that up, scroll down to the Language section and click Add Language. Fill out the form that pops up with the following information:
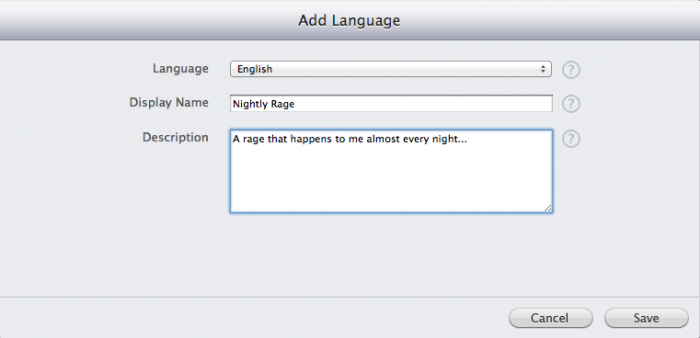
This information will be returned to you when you query the App Store later on for the in-app purchases that are available.
You might wonder why this step is necessary (after all, you could embed this information in your app!) Well, obviously Apple needs to know the price. Also in the App Store it displays some of this information (such as when it displays the top in-app purchases). Finally, it might make things easier for you too, since it avoids having this information hard-coded into your app and allows you to enable/disable purchases on the fly.
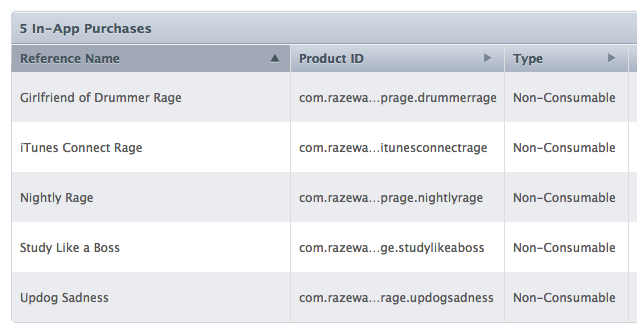
Once you’re done, save the entry and create several more, similar to this screenshot below. Don’t worry about the descriptions – you won’t be using them in this tutorial, so you can just use the Display Name for those.
You might notice that this process takes a while, and I could imagine it gets annoying if you have a ton of in-app purchases in your app. Luckily you’re not in that situation, but if you are in your app, draw me a rage comic :]
Retrieving Product List
Before you can allow the user to purchase any products from your app, you must issue a query to iTunes Connect to retrieve the list of available products from the server.
We could just add the code to do this into the view controller that uses it, but that would be brittle since it wouldn’t be very easy to re-use. Instead, you will create a helper class to manage all aspects of in-app purchases for us, that you can easily re-use in your own projects!
Along with getting the list of products from the server, this helper class will also keep track of which products have been purchased or not. It will save the product identifier for each product that has been purchased in NSUserDefaults.
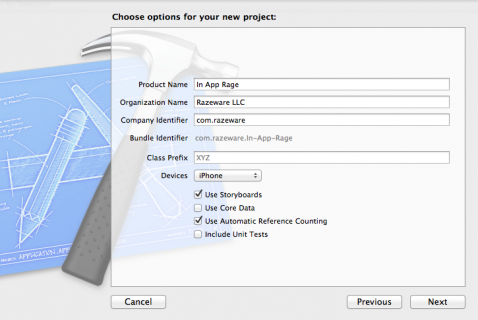
OK, so let’s try it out! In XCode, create a new project with the iOS\Application\Master-Detail Application template. Enter InAppRage for the Product Name, make sure Devices is set to iPhone, and make sure Use Storyboards and Use Automatic Reference Counting is checked.
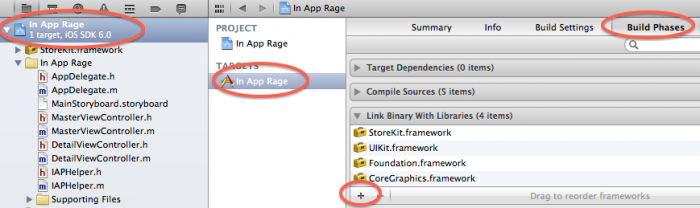
Next, you need to add library required for In-App Purchases to your project: StoreKit. To do this, select your project in the Project Navigator and select the In App Rage target. Select the Build Phases tab, expand the Link Binary with Libraries section, and click the + button. Find StoreKit.framework in the list, and click Add.
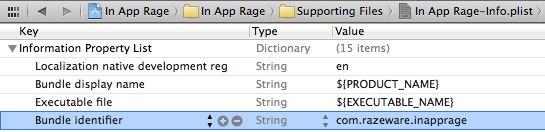
One final configuration step – open your Supporting Files\In App Rage-Info.plist and change the Bundle identifier to what you set up for your App ID:
Finally time for code! Create a file with the iOS\Cocoa Touch\Objective-C class template, and click Next. Name the class IAPHelper, make it a subclass of NSObject, and click Next and finally Create.
Open IAPHelper.h and replace it with the following:
typedef void (^RequestProductsCompletionHandler)(BOOL success, NSArray * products);

@interface IAPHelper : NSObject

- (id)initWithProductIdentifiers:(NSSet *)productIdentifiers;
- (void)requestProductsWithCompletionHandler:(RequestProductsCompletionHandler)completionHandler;

@end
This class has two methods: an initializer that takes a list of product identifiers (such as com.razeware.inapprage.nightlyrage), and a method to retrieve information about the products from iTunes Connect. This second method is asynchronous, and it takes a block as a parameter so it can notify the caller when it is complete.
Note: Are blocks still confusing to you? Check out our How To Use Blocks in iOS 5 Tutorial Series.
Next switch to IAPHelper.m and add the first part of the implementation:
// 1
#import "IAPHelper.h"
#import <StoreKit/StoreKit.h>

// 2
@interface IAPHelper () <SKProductsRequestDelegate>
@end

@implementation IAPHelper {
    // 3
    SKProductsRequest * _productsRequest;
    // 4
    RequestProductsCompletionHandler _completionHandler;
    NSSet * _productIdentifiers;
    NSMutableSet * _purchasedProductIdentifiers;
}

@end
Let’s go over what you did here section by section.
- You need to use StoreKit to access the In-App Purchase APIs, so you import the StoreKit header here.
- To receive a list of products from StoreKit, you need to implement the SKProductsRequestDelegate protocol. Here you mark the class as implementing this protocol in the class extension.
- You create an instance variable to store the SKProductsRequest you will issue to retrieve a list of products, while it is active. You keep a reference to the request so a) you can know if you have one active already, and b) you’ll be guaranteed that it’s in memory while it’s active.
- You also keep track of the completion handler for the outstanding products request, the list of product identifiers passed in, and the list of product identifers that have been previously purchased.
Next, add the initializer:
- (id)initWithProductIdentifiers:(NSSet *)productIdentifiers {

    if ((self = [super init])) {

        // Store product identifiers
        _productIdentifiers = productIdentifiers;

        // Check for previously purchased products
        _purchasedProductIdentifiers = [NSMutableSet set];
        for (NSString * productIdentifier in _productIdentifiers) {
            BOOL productPurchased = [[NSUserDefaults standardUserDefaults] boolForKey:productIdentifier];
            if (productPurchased) {
                [_purchasedProductIdentifiers addObject:productIdentifier];
                NSLog(@"Previously purchased: %@", productIdentifier);
            } else {
                NSLog(@"Not purchased: %@", productIdentifier);
            }
        }

    }
    return self;
}
This will check to see which products have been purchased or not (based on the values saved in NSUserDefaults) and keep track of the product identifiers that have been purchased in a list.
Next, add the method to retrieve the product information from iTunes Connect:
- (void)requestProductsWithCompletionHandler:(RequestProductsCompletionHandler)completionHandler {

    // 1
    _completionHandler = [completionHandler copy];

    // 2
    _productsRequest = [[SKProductsRequest alloc] initWithProductIdentifiers:_productIdentifiers];
    _productsRequest.delegate = self;
    [_productsRequest start];

}
This first squirrels a copy of the completion handler block inside the instance variable so it can notify the caller when the product request asynchronously completes.
It then creates a new instance of SKProductsRequest, which is the Apple-written class that contains the code to pull the info from iTunes Connect. It’s very easy to use – you just give it a delegate (that conforms to the SKProductsRequestDelegate protocol) and then call start to get things running.
We set the IAPHelper class itself as the delegate, which means that it will receive a callback when the products list completes (productsRequest:didReceiveResponse) or fails (request:didFailWithErorr).
Speaking of delegate callbacks, add those next! Add the following code before the @end:
#pragma mark - SKProductsRequestDelegate

- (void)productsRequest:(SKProductsRequest *)request didReceiveResponse:(SKProductsResponse *)response {

    NSLog(@"Loaded list of products...");
    _productsRequest = nil;

    NSArray * skProducts = response.products;
    for (SKProduct * skProduct in skProducts) {
        NSLog(@"Found product: %@ %@ %0.2f",
              skProduct.productIdentifier,
              skProduct.localizedTitle,
              skProduct.price.floatValue);
    }

    _completionHandler(YES, skProducts);
    _completionHandler = nil;

}

- (void)request:(SKRequest *)request didFailWithError:(NSError *)error {

    NSLog(@"Failed to load list of products.");
    _productsRequest = nil;

    _completionHandler(NO, nil);
    _completionHandler = nil;

}
Here you implement the two delegate callbacks – for success and failure. On success, you log out some information about the returned products, such as the product identifier, localized title, and price. Either way, you set the _productsRequest instance variable back to nil because you’re done with it and call the completion handler.
Go to Product\Build, and your project should compile with no errors.
Subclassing for your App
The IAPHelper class was written so that you can easily subclass it for your own app, specifying the product identifiers for your app. A lot of people recommend that you pull the list of product identifiers from a web server along with other information so you can add new in-app purchases dynamically rather than requiring an app update.
This is true and definitely recommended, but for the purposes of this tutorial you are going to keep things simple and just hard-code in the product identifiers for this app.
Create a new file with the iOS\Cocoa Touch\Objective-C class template, and click Next. Name the class RageIAPHelper, make it a subclass of IAPHelper, and click Next and finally Create.
Open RageIAPHelper.h and replace it with the following:
#import "IAPHelper.h"

@interface RageIAPHelper : IAPHelper

+ (RageIAPHelper *)sharedInstance;

@end
This just defines a static method to return the single, global instance of this class.
Next switch to RageIAPHelper.m and replace it with the following:
#import "RageIAPHelper.h"

@implementation RageIAPHelper

+ (RageIAPHelper *)sharedInstance {
    static dispatch_once_t once;
    static RageIAPHelper * sharedInstance;
    dispatch_once(&once, ^{
        NSSet * productIdentifiers = [NSSet setWithObjects:
                                      @"com.razeware.inapprage.drummerrage",
                                      @"com.razeware.inapprage.itunesconnectrage",
                                      @"com.razeware.inapprage.nightlyrage",
                                      @"com.razeware.inapprage.studylikeaboss",
                                      @"com.razeware.inapprage.updogsadness",
                                      nil];
        sharedInstance = [[self alloc] initWithProductIdentifiers:productIdentifiers];
    });
    return sharedInstance;
}

@end
The sharedInstance method implements the Singleton pattern in Objective-C to return a single, global instance of the RageIAPHelper class. It calls the superclasses initializer to pass in all the product identifiers that you created with iTunes Connect.
Don’t forget to replace these product identifiers with the actual identifiers you set up in iTunes Connect!
Go to Product\Build, and once again your project should compile with no errors.
Displaying the Products
You’ve got all of the pieces in place to return the product info, so it’s finally time to see something appear on the screen!
Open MasterViewController.m and replace the entire contents with the following:
#import "MasterViewController.h"
#import "DetailViewController.h"

// 1
#import "RageIAPHelper.h"
#import <StoreKit/StoreKit.h>

// 2
@interface MasterViewController () {
    NSArray *_products;
}
@end

@implementation MasterViewController

// 3
- (void)viewDidLoad
{
    [super viewDidLoad];

    self.title = @"In App Rage";

    self.refreshControl = [[UIRefreshControl alloc] init];
    [self.refreshControl addTarget:self action:@selector(reload) forControlEvents:UIControlEventValueChanged];
    [self reload];
    [self.refreshControl beginRefreshing];

}

// 4
- (void)reload {
    _products = nil;
    [self.tableView reloadData];
    [[RageIAPHelper sharedInstance] requestProductsWithCompletionHandler:^(BOOL success, NSArray *products) {
        if (success) {
            _products = products;
            [self.tableView reloadData];
        }
        [self.refreshControl endRefreshing];
    }];
}

#pragma mark - Table View

- (NSInteger)numberOfSectionsInTableView:(UITableView *)tableView
{
    return 1;
}

// 5
- (NSInteger)tableView:(UITableView *)tableView numberOfRowsInSection:(NSInteger)section
{
    return _products.count;
}

- (UITableViewCell *)tableView:(UITableView *)tableView cellForRowAtIndexPath:(NSIndexPath *)indexPath
{
    UITableViewCell *cell = [tableView dequeueReusableCellWithIdentifier:@"Cell" forIndexPath:indexPath];

    SKProduct * product = (SKProduct *) _products[indexPath.row];
    cell.textLabel.text = product.localizedTitle;

    return cell;
}

@end
There’s a good bit of code here, so let’s go over it section by section.
- This imports the RageIAPHelper class you just wrote, along with the StoreKit headers since it will be using the SKProduct information returned from iTunes Connect.
- Adds an instance variable to store the SKProducts returned from iTunes Connect. Each row in the table view will display a product’s title.
- This is an example of the extremely handy new iOS 6 table view pull-to-refresh control! As you can see it’s incredibly simple to use – you just create a UIRefreshControl instance and store it in the built-in refreshControl variable (a member of UITableViewController). You then register a target to be called when the user pulls the table to refresh – so in this case the reload method will be called. By default this doesn’t occur when the table view first appears, so here you trigger it by manually calling reload and telling the refresh control to start refreshing.
- When the reload is called (whether it be the first manual call, or when the user pulls to refresh) it calls the RageIAPHelper’s requestProductsWithCompletionHandler method you wrote earlier to return the In-App Purchase product info from iTunes Connect. When this completes, the block will be called. All it does is store the list of products in the instance variable, reload the table view to display them, and tells the refresh control to stop animating.
- Standard table view stuff to display the localized title of a SKProduct in each row of the table.
Build and run, and you should now see the list of products appear in the table view!

Didn’t work? If this didn’t work for you, there are a number of things to check (this list courtesy of itsme.manish and abgtan from the forums:
- Go to Settings\iTunes & App Stores, log out of any account, and try again so you’re sure you’re using a Sandbox account.
- Check this link – if it doesn’t respond, the iTunes sandbox may be down.
- Have you enabled In-App Purchases for your App ID?
- Does your project’s .plist Bundle ID match your App ID?
- Are you using the full product ID when when making an SKProductRequest?
- Have you waited several hours since adding your product to iTunes Connect?
- Are your bank details active on iTunes Connect?
- Have you tried deleting the app from your device and reinstalling?
Tried all that and still stuck? Try the old forum thread or this thread’s comments for discussion with other readers.
Show Me The Money
This is an long tutorial already but the most important part is still left – making the purchase, and collecting the money!
The basic gist of making a purchase is the following:
- You make a SKPayment object and specify what productIdentifier the user wants to purchase. You add it to a payment queue.
- StoreKit will prompt the user “are you sure?”, ask them to enter their username/password (if appropriate), make the charge, and send you a success or failure. They’ll also handle the case where the user already paid for the app and is just re-downloading it, and give you a message for that as well.
- You designate a particular object to receive purchase notifications. That object needs to start the process of downloading the content (not necessary in your case, since it’s hardcoded) and unlocking the content (which in your case is just setting that flag in NSUserDefaults and storing it in the purchasedProducts array).
Don’t worry – it’s pretty easy when you see the code. Once again, most of it’s going to be in the IAPHelper class for easy reuse. Start by making the following changes to IAPHelper.h:
// Add to the top of the file
#import <StoreKit/StoreKit.h>
UIKIT_EXTERN NSString *const IAPHelperProductPurchasedNotification;

// Add two new method declarations
- (void)buyProduct:(SKProduct *)product;
- (BOOL)productPurchased:(NSString *)productIdentifier;
Here you declare a notification you’ll use to notify listeners when a product has been purchased, a method to start buying a product, and a method to determine if a product has been purchased.
Next switch to IAPHelper.m and add the following:
- (BOOL)productPurchased:(NSString *)productIdentifier {
    return [_purchasedProductIdentifiers containsObject:productIdentifier];
}

- (void)buyProduct:(SKProduct *)product {

    NSLog(@"Buying %@...", product.productIdentifier);

    SKPayment * payment = [SKPayment paymentWithProduct:product];
    [[SKPaymentQueue defaultQueue] addPayment:payment];

}
First it checks to make sure the product is allowed to be purchased, and if so it marks the purchase as in-progress, and issues an SKPayment to the SKPaymentQueue.
That’s literally all it takes to let the user send you cold, hard cash. It’s almost as if you can hear your users saying “Shut up and take my money!”
However, if you’re letting your users give you money, you better give them something good in return! (After all, you aren’t the Greek government.)
So you need to add some code to identify when a payment “transaction” has finished, and process it accordingly.
Doing so is easy. First, modify the IAPHelper class extension to mark the class as implementing the SKPaymentTransactionObserver:
@interface IAPHelper () <SKProductsRequestDelegate, SKPaymentTransactionObserver>Then add this to the bottom of your initWithProductIdentifiers: method (inside the if statement):
[[SKPaymentQueue defaultQueue] addTransactionObserver:self];Now when the IAPHelper is initialized, it will make itself the transaction observer of the SKPaymentQueue. In other words, Apple will tell you when somebody purchased something!
There’s one really important thing about this. It could quite possibly happen that a user starts a purchase (and gets charged for it), but before Apple can respond with success or failure, the user suddenly loses network connection (or terminates your app). The user will still expect their purchase though, or lots of rage faces will ensue!
Luckily, Apple has a solution for this in mind. The idea is that Apple will keep track of any purchase transactions that haven’t yet been fully processed by your app, and will notify the transaction observer about them. But for this to work well, you should register your class as a transaction observer as early as possible in your app initialization.
To do this, switch to AppDelegate.m and add this import:
#import "RageIAPHelper.h"And then add the following line at the beginning of application:didFinishLaunchingWithOptions:
[RageIAPHelper sharedInstance];Now, as soon as your app launches it will create the singleton RageIAPHelper. This means the initWithProducts: method you just modified will be called, which registers itself as the transaction observer. So you will be notified about any transactions that were never quite finished.
You still have to implement the SKPaymentTransactionObserver protocol, so switch back to IAPHelper.m and add the following:
- (void)paymentQueue:(SKPaymentQueue *)queue updatedTransactions:(NSArray *)transactions
{
    for (SKPaymentTransaction * transaction in transactions) {
        switch (transaction.transactionState)
        {
            case SKPaymentTransactionStatePurchased:
                [self completeTransaction:transaction];
                break;
            case SKPaymentTransactionStateFailed:
                [self failedTransaction:transaction];
                break;
            case SKPaymentTransactionStateRestored:
                [self restoreTransaction:transaction];
            default:
                break;
        }
    };
}
Actually, this is the only required method of the protocol. It gives you a list of transactions that have been updated, and all you have to do is loop through them and do different things based on their state. To keep the code clean, you call different methods if the transaction has completed, failed, or successfully restored.
Completed and failed makes sense, but what about restored? Remember back in the “In-App Purchase Types” section, I mentioned that there should be a way for users to restore their non-consumable purchases. This is important if the user has the same app on multiple devices (or deletes it and reinstalls it) and wants to get access to their prior purchases. Later you’ll add a way for users to do this in the app, but for now just know when the user restores their purchases, this is where it will come through.
Next for the important stuff – implementing the completeTransaction, restoreTransaction, and failedTransaction methods. Add these to the file:
- (void)completeTransaction:(SKPaymentTransaction *)transaction {
    NSLog(@"completeTransaction...");

    [self provideContentForProductIdentifier:transaction.payment.productIdentifier];
    [[SKPaymentQueue defaultQueue] finishTransaction:transaction];
}

- (void)restoreTransaction:(SKPaymentTransaction *)transaction {
    NSLog(@"restoreTransaction...");

    [self provideContentForProductIdentifier:transaction.originalTransaction.payment.productIdentifier];
    [[SKPaymentQueue defaultQueue] finishTransaction:transaction];
}

- (void)failedTransaction:(SKPaymentTransaction *)transaction {

    NSLog(@"failedTransaction...");
    if (transaction.error.code != SKErrorPaymentCancelled)
    {
        NSLog(@"Transaction error: %@", transaction.error.localizedDescription);
    }

    [[SKPaymentQueue defaultQueue] finishTransaction: transaction];
}
completeTransaction and restoreTransaction do the same thing – they call a helper function to provide the given content (which you’ll write next).
failedTransaction is a bit different though. It calls a helper method to notify the user that the purchase failed (which you’ll also write next), marks the purchase as no longer in progress, and finishes the transaction.
Note: It is very important to call finishTransaction, or StoreKit will not know you’ve finished processing it, and will continue delivering the transaction to your app each time it launches!
Finally, add the final changes to the file:
// Add to top of file
NSString *const IAPHelperProductPurchasedNotification = @"IAPHelperProductPurchasedNotification";

// Add new method
- (void)provideContentForProductIdentifier:(NSString *)productIdentifier {

    [_purchasedProductIdentifiers addObject:productIdentifier];
    [[NSUserDefaults standardUserDefaults] setBool:YES forKey:productIdentifier];
    [[NSUserDefaults standardUserDefaults] synchronize];
    [[NSNotificationCenter defaultCenter] postNotificationName:IAPHelperProductPurchasedNotification object:productIdentifier userInfo:nil];

}
When a product is purchased, this method adds the product identifier to the list of purchaed product identifiers, marks it as purchased in NSUserDefaults, and sends a notification so others can be aware of the purchase.
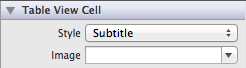
You’re done with the buying code – all you have to do is hook it up to the user interface! First open MainStoryboard.storyboard, select the prototype table view cell, and set it to Subtitle:
Then open MasterViewController.m and make the following changes:
// Add new instance variable to class extension
NSNumberFormatter * _priceFormatter;

// Add to end of viewDidLoad
_priceFormatter = [[NSNumberFormatter alloc] init];
[_priceFormatter setFormatterBehavior:NSNumberFormatterBehavior10_4];
[_priceFormatter setNumberStyle:NSNumberFormatterCurrencyStyle];

// Add to bottom of tableView:cellForRowAtIndexPath (before return cell)
[_priceFormatter setLocale:product.priceLocale];
cell.detailTextLabel.text = [_priceFormatter stringFromNumber:product.price];

if ([[RageIAPHelper sharedInstance] productPurchased:product.productIdentifier]) {
    cell.accessoryType = UITableViewCellAccessoryCheckmark;
    cell.accessoryView = nil;
} else {
    UIButton *buyButton = [UIButton buttonWithType:UIButtonTypeRoundedRect];
    buyButton.frame = CGRectMake(0, 0, 72, 37);
    [buyButton setTitle:@"Buy" forState:UIControlStateNormal];
    buyButton.tag = indexPath.row;
    [buyButton addTarget:self action:@selector(buyButtonTapped:) forControlEvents:UIControlEventTouchUpInside];
    cell.accessoryType = UITableViewCellAccessoryNone;
    cell.accessoryView = buyButton;
}
Here you display the price in the subtitle along with the help of a price formatter. Also, if the user hasn’t bought a product you put a “buy” button as an accessory view. If the user has bought a product, you put a checkmark instead.
Add this method that will be called when the buy button is tapped:
 (void)buyButtonTapped:(id)sender {

    UIButton *buyButton = (UIButton *)sender;
    SKProduct *product = _products[buyButton.tag];

    NSLog(@"Buying %@...", product.productIdentifier);
    [[RageIAPHelper sharedInstance] buyProduct:product];

}
This simply determines the product that was tapped, and calls the method you just wrote to purchase the buy button.
Remember that when a purchase completes, it will send a notification. So register for that notification, and reload the appropriate cell when it occurs so you can display the checkmark if appropriate:
- (void)viewWillAppear:(BOOL)animated {
    [[NSNotificationCenter defaultCenter] addObserver:self selector:@selector(productPurchased:) name:IAPHelperProductPurchasedNotification object:nil];
}

- (void)viewWillDisappear:(BOOL)animated {
    [[NSNotificationCenter defaultCenter] removeObserver:self];
}

- (void)productPurchased:(NSNotification *)notification {

    NSString * productIdentifier = notification.object;
    [_products enumerateObjectsUsingBlock:^(SKProduct * product, NSUInteger idx, BOOL *stop) {
        if ([product.productIdentifier isEqualToString:productIdentifier]) {
            [self.tableView reloadRowsAtIndexPaths:@[[NSIndexPath indexPathForRow:idx inSection:0]] withRowAnimation:UITableViewRowAnimationFade];
            *stop = YES;
        }
    }];

}
You’re so close you can almost taste it! But first, a brief word on accounts.
In App Purchases, Accounts, and the Sandbox
While you’re running your app in XCode, you’re not running against the real In-App Purchase servers – you’re running against the sandbox servers.
This means you can buy things without fear of getting charged, etc. But you need to set up a test account, and also make sure you’re logged out of the store on your device so you can see the whole process.
To make accounts, log onto iTunes Connect and click “Manage Users”. Click “Test User”, and follow the buttons to create a test user that you can make dummy in-app purchases with on the sandbox servers.
Then go to your iPhone and make sure you’re logged out of your current account. To do this, go to the Settings app and tap “Store”, and then click “Sign Out.”
Finally, go ahead and run your app and attempt to purchase a rage comic. Enter your test user account information and if all goes well, it should purchase with a happy check mark next to it!
But wait a minute – where’s your comic?! You didn’t pay for no check mark! I can see the rage comic now…
Well, this tutorial is way long enough, and adding the display of the rage comics wouldn’t be much related to in-app purchases, so we’re going to leave that a practice exercise :]
The resources zip for this tutorial contain images for all of the the comics, so if you’re so inclined you can wrap it up by showing the comic in a new view controller when a purchased row is tapped! If you want to do this, you can just check if the productIdentifier is in the purchasedProducts array of the InAppRageIAPHelper before allowing the user access to the content.
Restoring Transactions
But wait! There’s one more thing before I can let you go.
These days it is a requirement for any app that implements In-App Purchases to have a button to allow the user to restore their transactions. As I mentioned earlier, this is useful if users want to get access to their purchases on a different device.
The good news is this is incredibly simple since you have already laid a solid framework.
First open IAPHelper.h and declare the following method:
- (void)restoreCompletedTransactions;And implement it in IAPHelper.m as follows:
- (void)restoreCompletedTransactions {
    [[SKPaymentQueue defaultQueue] restoreCompletedTransactions];
}
LOL – can’t get any easier than that! What that will do is contact iTunes Connect and find out which non-consumable products the user has already purchased. It will then call paymentQueue:updatedTransactions for each of these, with the SKPaymentTransactionStateRestored case. And you’ve already implemented this to unlock your content!
So all that’s left is to call this method. Make the following changes to MasterViewController.m:
// Add to end of viewDidLoad
self.navigationItem.rightBarButtonItem = [[UIBarButtonItem alloc] initWithTitle:@"Restore" style:UIBarButtonItemStyleBordered target:self action:@selector(restoreTapped:)];

// Add new method
- (void)restoreTapped:(id)sender {
    [[RageIAPHelper sharedInstance] restoreCompletedTransactions];
}
Now delete the app off your device, and re-install. Note that the checkmark is no longer there because by deleting the app you removed any NSUserDefaults.
Now tap the Restore button, and it will think for a few minutes, then restore your purchase so the checkmark appears again – not bad!
Where To Go From Here?
Here is a sample project with all of the code we’ve developed in the above tutorial, including the reusable in-app purchase helper class.
As suggested above, if you’re inclined why not wrap this up by displaying the comics? If not at the very least you should check them out for a laugh – or draw me an iOS-related one of your own :]
If you want to learn more about in-app purchases, you should check out our new book iOS 6 by Tutorials. This tutorial The book contains 2 epic-length chapters on In-App Purchases covering the following:
- iOS 6 Hosted Downloads: Learn how to host your downloads on Apple’s servers!
- Fully Server-Based System: Learn how to add new In-App purchases without updating your app via your own server!
- Receipt Validation: Learn how to validate In-App Purchase receipts on your own server or embedded!
- SKStoreProductViewController: Learn how to use iOS 6’s new method to sell items from the iTunes Store in your app
- iTunes Search API: Learn how to use the iTunes Search API to dynamically find items to display in your store!
- Download progress and display: Learn how to show download progress and status, and have a well-structured purchase flow for your users!
- And much, much, more! IMHO it’s the best content on In-App Purchases available anywhere.
So definitely check out iOS 6 by Tutorials if you want to learn more. In the meantime, if any of you have questions or comments about this tutorial please join the forum discussion below!
And to end things off with a laugh, here’s a great iOS app rage comic made by Jayant C Varma! :]
原文地址:http://www.raywenderlich.com/21081/introduction-to-in-app-purchases-in-ios-6-tutorial


 4013
4013

 被折叠的 条评论
为什么被折叠?
被折叠的 条评论
为什么被折叠?
 到【灌水乐园】发言


