


https://developer.horizon.ai/forumDetail/112555512834430484
OriginBot智能机器人开源套件|23.视觉巡线(AI深度学习) - 哔哩哔哩
origincar在执行以下命令部署模型时
ros2 run line_follower_perception line_follower_perception --ros-args -p model_path:=model/resnet18_224x224_nv12.bin -p model_name:=resnet18_224x224_nv12
报错:
root@ubuntu:~/dev_ws/src/origincar/origincar_deeplearning/line_follower_perception# ros2 run line_follower_perception line_follower_perception --ros-args -p model_path:=model/resnet18_224x224_nv12.bin -p model_name:=resnet18_224x224_nv12
[INFO] [1712136670.826876413] [dnn]: Node init.
[INFO] [1712136670.827445897] [LineFollowerPerceptionNode]: path:model/resnet18_224x224_nv12.bin

[INFO] [1712136670.827541602] [LineFollowerPerceptionNode]: name:resnet18_224x224_nv12

[INFO] [1712136670.827679473] [dnn]: Model init.
[EasyDNN]: EasyDNN version = 1.6.1_(1.18.6 DNN)
[BPU_PLAT]BPU Platform Version(1.3.3)!
[HBRT] set log level as 0. version = 3.15.25.0
[DNN] Runtime version = 1.18.6_(3.15.25 HBRT)
[A][DNN][packed_model.cpp:234][Model](2024-04-03,17:31:11.265.176) [HorizonRT] The model builder version = 1.9.9
[INFO] [1712136671.404482752] [dnn]: The model input 0 width is 224 and height is 224
[INFO] [1712136671.404657414] [dnn]: Task init.
[INFO] [1712136671.406786852] [dnn]: Set task_num [4]
[INFO] [1712136671.435160111] [LineFollowerPerceptionNode]: image_height:480

[INFO] [1712136671.435210859] [LineFollowerPerceptionNode]: image_width:640

 [E][DNN][validate_util.cpp:641][Util](2024-04-03,17:31:11.436.85) left: 0 and right: 959, should be in [0, 640)
 [E][DNN][hb_dnn.cpp:595][Task](2024-04-03,17:31:11.436.287) taskHandle is invalid
[ERROR] [1712136671.436338327] [LineFollowerPerceptionNode]: hbDNNWaitTaskDone failed!
 [E][DNN][hb_dnn.cpp:615][Task](2024-04-03,17:31:11.436.645) taskHandle is invalid
[ERROR] [1712136671.436727024] [LineFollowerPerceptionNode]: release task failed!
[ERROR]["LOG"][src/utils/mem_log.c:108] [ERROR][16322.79688][680329:680329][MEM_ALLOCATOR] <hb_mem_free_buf_with_vaddr:1506> Invalid NULL virt_addr.
[ERROR]["LOG"][src/utils/mem_log.c:108] [ERROR][16322.79692][680329:680329][HBMEM] <hbmem_free:149> Fail to free buffer(ret=-16777214).
[ERROR]["LOG"][src/utils/mem_log.c:108] [ERROR][16322.79695][680329:680329][MEM_ALLOCATOR] <hb_mem_free_buf_with_vaddr:1506> Invalid NULL virt_addr.
[ERROR]["LOG"][src/utils/mem_log.c:108] [ERROR][16322.79697][680329:680329][HBMEM] <hbmem_free:149> Fail to free buffer(ret=-16777214).
root@ubuntu:~/dev_ws/src/origincar/origincar_deeplearning/line_follower_perception# ls
这里有一个错误提示如下:
[E][DNN][validate_util.cpp:641][Util](2024-04-03,17:31:11.436.85) left: 0 and right: 959, should be in [0, 640)
也就是 image_width 是0~959,超过了范围640
为什么会报这个错呢?
原来,OriginBot的摄像头是MIPI接口,而OriginCar的摄像头是USB接口,
对应受到影响的文件有以下几个:
OriginBot:
~/dev_ws/src/originbot/originbot_bringup/launch/camera.launch.py
def generate_launch_description():
    return LaunchDescription([
        Node(
            package='mipi_cam',
            executable='mipi_cam',
            output='screen',
            parameters=[
                {"mipi_camera_calibration_file_path": "/opt/tros/lib/mipi_cam/config/GC4663_calibration.yaml"},
                {"out_format": "bgr8"},
                {"image_width": 960},     # 960
                {"image_height": 544},
                {"io_method": "ros"},
                {"mipi_video_device": "GC4663"}
            ],
            arguments=['--ros-args', '--log-level', 'error']
        ),
        Node(
            package='originbot_demo',
            executable='transport_img',
            arguments=['--ros-args', '--log-level', 'error']
        ),
    ])
~/dev_ws/src/originbot/originbot_bringup/launch/camera_websoket_display.launch.py
def generate_launch_description():
    mipi_cam_device_arg = DeclareLaunchArgument(
        'device',
        default_value='GC4663',
        description='mipi camera device')

    mipi_node = IncludeLaunchDescription(
        PythonLaunchDescriptionSource(
            os.path.join(
                get_package_share_directory('mipi_cam'),
                'launch/mipi_cam.launch.py')),
        launch_arguments={
            'mipi_image_width': '960',     # 960
            'mipi_image_height': '544',
            'mipi_io_method': 'shared_mem',
            'mipi_video_device': LaunchConfiguration('device')
        }.items()
    )
~/dev_ws/src/originbot_desktop/originbot_deeplearning/line_follower_model/line_follower_model/annotation_member_function.py
OriginBot上的MIPI摄像头发布的话题是/image_raw,图像格式是bgr8,而OriginCar上的USB摄像头发布的话题是/image,图像格式是mjpeg
  def __init__(self):
    super().__init__('ImageSubscriber')
    # 创建sub节点,订阅image_raw话题
    self.subscription = self.create_subscription(
      Image,
      'image_raw',            ## image_raw 在OriginCar上应该改为image
      self.listener_callback,
      1)
    # 创建CvBridge实例
    self.bridge = CvBridge()
    self.x = -1
    self.y = -1
    self.uuid = -1
    self.image = np.zeros((960, 224, 3))    # 960
    self.initialize = False

    # 检查用户存放标定数据的image_dataset文件夹是否存在,如果不存在则创建
    if not os.path.exists('./image_dataset'):
      os.makedirs('./image_dataset')

    # 设置opecv展示窗属性
    cv.namedWindow("capture image", cv.WINDOW_NORMAL)
    cv.resizeWindow("capture image", 960, 224)    # 960
    self.subscription
~/dev_ws/src/originbot_desktop/originbot_deeplearning/line_follower_model/line_follower_model/training_member_function.py
# 创建一个torch.utils.data.Dataset的实现。因为模型输入为224*224,图像分辨率为960*224所以X方向坐标需要缩放
def get_x(path, width):
    """Gets the x value from the image filename"""
    return (float(int(path.split("_")[1])) * 224.0 / 960.0 - width/2) / (width/2)  # 960
~/dev_ws/src/orginbot/originbot_deeplearning/line_follower_perception/src/line_follower_perception.cpp
int LineFollowerPerceptionNode::PostProcess(
  const std::shared_ptr<DnnNodeOutput> &outputs) {
  int x = result->x;
  int y = result->y;
  float angular_z = -1.0 * (x - 480) / 300.0;    // MIPI
  auto message = geometry_msgs::msg::Twist();
}

void LineFollowerPerceptionNode::subscription_callback(
    const hbm_img_msgs::msg::HbmMsg1080P::SharedPtr msg) {

  ...

  hbDNNRoi roi;
  roi.left = 0;
  roi.top = 160;
  roi.right = 960 - 1;  // MIPI
  roi.bottom = 384 - 1;
}


int32_t LineCoordinateParser::Parse(
    std::shared_ptr<LineCoordinateResult> &output,
    std::vector<std::shared_ptr<InputDescription>> &input_descriptions,
    std::shared_ptr<OutputDescription> &output_description,
    std::shared_ptr<DNNTensor> &output_tensor) {
  ...
  ...

  hbSysFlushMem(&(tensor.sysMem[0]), HB_SYS_MEM_CACHE_INVALIDATE);
  float x = reinterpret_cast<float *>(tensor.sysMem[0].virAddr)[0];
  float y = reinterpret_cast<float *>(tensor.sysMem[0].virAddr)[1];
  result->x = (x * 112 + 112) * 960.0 / 224.0;    // MIPI
  result->y = 224 - (y * 112 + 112) + 272 - 112;
  RCLCPP_INFO(rclcpp::get_logger("LineFollowerPerceptionNode"),
               "coor rawx: %f,  rawy:%f, x: %f    y:%f", x, y, result->x, result->y);
  return 0;
}
OriginCar:
MIPI摄像头发布的图像的尺寸是960X544,USB摄像头发布的图像的尺寸是640X480,处理图像的时候需要裁剪掉上部和底部,只保留中部224个像素的图像,因此,在MIPI摄像头发布的图像中,上部,中部,下部的范围分别是[0, 160-1] [160, 384-1] [384, 544-1],在USB摄像头发布的图像中,上部,中部,下部的范围分别是[0, 128-1] [128, 352-1] [352, 480-1]
~/dev_ws/src/origincar/origincar_bringup/launch/usb_websocket_display.launch.py
    usb_node = IncludeLaunchDescription(PythonLaunchDescriptionSource(get_package_share_directory('hobot_usb_cam') + '/launch/hobot_usb_cam.launch.py'),
                                       launch_arguments={'usb_image_width': '640', 'usb_image_height': '480',
                                                         'usb_video_device': LaunchConfiguration('device')}.items())
~/dev_ws/src/originbot_desktop/originbot_deeplearning/line_follower_model/line_follower_model/annotation_member_function.py
OriginBot上的MIPI摄像头发布的话题是/image_raw,图像格式是bgr8,而OriginCar上的USB摄像头发布的话题是/image,图像格式是mjpeg
class ImageSubscriber(Node):

  def __init__(self):
    super().__init__('ImageSubscriber')
    # 创建sub节点,订阅image_raw话题
    self.subscription = self.create_subscription(
      Image,
      # 'image_raw',
      'image',         # USB
      self.listener_callback,
      1)

    ....

    # self.image = np.zeros((960, 224, 3))
    self.image = np.zeros((640, 224, 3))       # USB

    ....

    # cv.resizeWindow("capture image", 960, 224)
    cv.resizeWindow("capture image", 640, 224)        # USB


    ....
    # 由于USB摄像头发布的图像是MJPEG格式,需要调用cv.imdecode()解码

  # sub回调函数
  def listener_callback(self, msg):
    self.get_logger().info("Yahoo......")

    keyValue = cv.waitKey(1)
    # 检测到按下回车键,则获取一张新的图像
    if keyValue == 13:
      self.get_logger().info("key return is pressed......")

      # USB
      decompressed_image = cv.imdecode(np.frombuffer(msg.data, np.uint8), cv.IMREAD_COLOR)

      # captureImage = self.bridge.imgmsg_to_cv2(msg)
      # cropImage = captureImage[160:384,:,:].copy()
      # cropImage = decompressed_image[160:384,:,:].copy()
      cropImage = decompressed_image[128:352,:,:].copy()     # USB

    ........
~/dev_ws/src/originbot_desktop/originbot_deeplearning/line_follower_model/line_follower_model/training_member_function.py
### 创建一个torch.utils.data.Dataset的实现。因为模型输入为224*224,图像分辨率为960*224所以X方向坐标需要缩放
# 创建一个torch.utils.data.Dataset的实现。因为模型输入为224*224,图像分辨率为640*224所以X方向坐标需要缩放
def get_x(path, width):
    """Gets the x value from the image filename"""
    # return (float(int(path.split("_")[1])) * 224.0 / 960.0 - width/2) / (width/2)
    return (float(int(path.split("_")[1])) * 224.0 / 640.0 - width/2) / (width/2)   # USB
~/dev_ws/src/origincar/origincar_deeplearning/line_follower_perception/src/line_follower_perception.cpp
int LineFollowerPerceptionNode::PostProcess(
  const std::shared_ptr<DnnNodeOutput> &outputs) {
  int x = result->x;
  int y = result->y;
  // float angular_z = -1.0 * (x - 480) / 300.0;    // MIPI
  float angular_z = -1.0 * (x - 320) / 300.0;       // USB
  auto message = geometry_msgs::msg::Twist();
}


void LineFollowerPerceptionNode::subscription_callback(
    const hbm_img_msgs::msg::HbmMsg1080P::SharedPtr msg) {
  hbDNNRoi roi;
  /*  MIPI
  roi.left = 0;
  roi.top = 160;
  roi.right = 960 - 1;
  roi.bottom = 384 - 1;
  */
  // USB
  roi.left = 0;
  roi.top = 128;
  roi.right = 640 - 1;
  roi.bottom = 352 - 1;

}


int32_t LineCoordinateParser::Parse(
    std::shared_ptr<LineCoordinateResult> &output,
    std::vector<std::shared_ptr<InputDescription>> &input_descriptions,
    std::shared_ptr<OutputDescription> &output_description,
    std::shared_ptr<DNNTensor> &output_tensor) {
  float x = reinterpret_cast<float *>(tensor.sysMem[0].virAddr)[0];
  float y = reinterpret_cast<float *>(tensor.sysMem[0].virAddr)[1];
  // MIPI
  // result->x = (x * 112 + 112) * 960.0 / 224.0;
  // result->y = 224 - (y * 112 + 112) + 272 - 112;
  // USB
  result->x = (x * 112 + 112) * 640.0 / 224.0;
  result->y = 224 - (y * 112 + 112) + 240 - 112;
}
在数据采集与标注的时候,保存的图片的文件名包含了中心点的坐标
xy_[x坐标]_[y坐标]_[uuid].jpg
实际操作中,文件名包含的(x,y)坐标可能会出错,以下图为例,文件名显示的引导线中心点为(118, 105),但在实际图片中红点处于图片中心,大约(290,145),
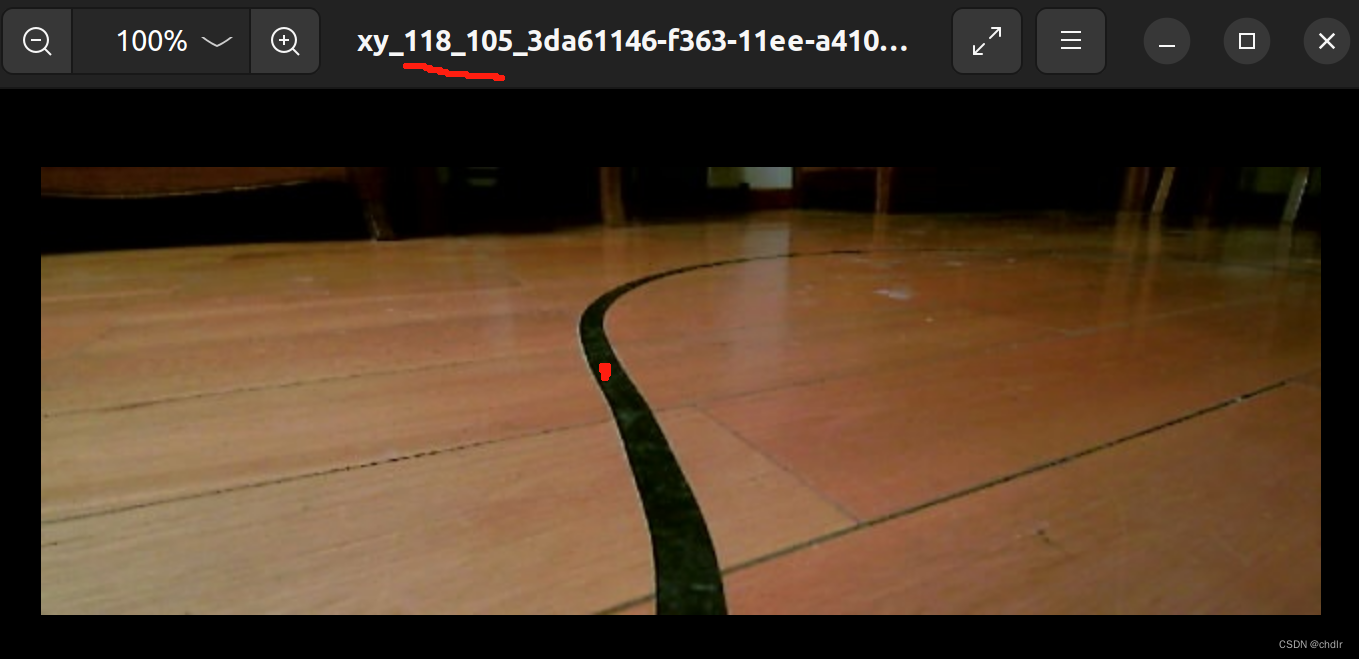
实际操作中如果出现这样的差错,测试的结果可想而知
出现以上错误的原因可能在于annotation_member_function.py文件中,保存图片的代码
      cropImage = decompressed_image[128:352,:,:].copy()
      if self.initialize == False:
        self.image = cropImage.copy()
        self.initialize = True
      # 注册鼠标回调
      cv.setMouseCallback("capture image", self.mouse_callback, cropImage)
      cv.imshow("capture image", cropImage)
      if self.x != -1 and self.y != -1:
        self.uuid = 'xy_%03d_%03d_%s' % (self.x, self.y, uuid.uuid1())
        # 保存上一次标定的结果
        cv.imwrite('./image_dataset/' + self.uuid + '.jpg', self.image)     # !!!!!!
        # 载入新的图像
        self.image = cropImage.copy()                                       # !!!!!!
        self.x = -1
        self.y = -1
cv.imwrite('./image_dataset/' + self.uuid + '.jpg', self.image) # !!!!!!
self.image = cropImage.copy() # !!!!!!
第一步保存self.image到文件,紧接着又赋值给self.image,这样存在发生错误的可能
因此,采集的数据需要校准,保存以下代码到
~/dev_ws/src/originbot_desktop/originbot_deeplearning/line_follower_model/jiaozhun.py
创建文件夹 ~/dev_ws/src/originbot_desktop/originbot_deeplearning/line_follower_model/image_dataset_new
jiaozhun.py 会逐个加载 image_dataset 目录下的图片文件,分析文件名中包含的(x, y)坐标并且用红点显示,如果图片显示的中线点位置有错误,用户只需点击图片中引导线的中心点,程序就会生成新的文件名,并且拷贝文件到 image_dataset_new 文件夹
import cv2
import uuid
import os

image = None
folder_path = './image_dataset/'
folder_path_new = './image_dataset_new/'
image_path = ''
image_path_new = ''

if not os.path.exists(folder_path):
    print("folder does not exist: %s" % folder_path)

if not os.path.exists(folder_path_new):
    os.makedirs(folder_path_new)

def get_x(path):
    """Gets the x value from the image filename"""
    return (int(path.split("_")[1]))

def get_y(path):
    """Gets the y value from the image filename"""
    return (int(path.split("_")[2]))

# 定义一个鼠标左键按下去的事件
def getpos(event, x, y, flags, param):
    if event == cv2.EVENT_LBUTTONDOWN:
        print("x: %03d, y: %03d", x, y)
        m_uuid = 'xy_%03d_%03d_%s' % (x, y, uuid.uuid1())
        # 保存上一次标定的结果
        # cv2.imwrite(folder_path_new + m_uuid + '.jpg', image)
        image_path_new = os.path.join(folder_path_new, m_uuid + '.jpg')
        os.system ("cp %s %s" % (image_path, image_path_new))
        if os.path.isfile (image_path_new):
            print("Success")

# def traverse_folder(folder_path):
for root, dirs, files in os.walk(folder_path):
    for file_name in files:
        image_path = os.path.join(folder_path, file_name)
        print(image_path)

        ptx = get_x(os.path.basename(image_path))
        pty = get_y(os.path.basename(image_path))
        print("x: %03d, y: %03d" % (ptx, pty))

        # 读取图片
        image = cv2.imread(image_path)

        point_color = (0, 0, 255)
        cv2.circle(image, (ptx, pty), 5, point_color, -1)

        # cv2.imshow('image', image)
        cv2.imshow("capture image", image)

        cv2.setMouseCallback("capture image", getpos)
        keyValue = cv2.waitKey(0)
        if keyValue == 27:        # 按 ESC 键退出校准
            print("ESC pressed")
            break;


 453
453


 被折叠的 条评论
为什么被折叠?
被折叠的 条评论
为什么被折叠?
 到【灌水乐园】发言


