


前面两篇文章的分析只是讲述了窗口创建过程,但是里面还有部分细节并没有涉及,本文接着介绍这些内容,并详细讲述如何将osg嵌入到常用的窗口系统中:
- 窗口的创建补充
在窗口创建过程中还有一个地方并没有讲述清楚,就是:为什么osg可以识别我想创建的窗口是Win32的?为什么它不会创建其他的窗口设备(如GraphicsWindowCocoa、GraphicsWindowX11)。
在osgViewer::Viewer的realize实现中,如果我们没有配置环境变量OSG_WINDOW和OSG_SCREEN,那么默认情况下osg会为我们创建一个全屏的窗口,它调用AcrossAllScreens中的configure函数进行配置,在配置函数configure代码中有下面这段代码:
unsigned int width, height;
wsi->getScreenResolution(si, width, height);
osg::ref_ptr<osg::GraphicsContext::Traits> traits = new osg::GraphicsContext::Traits(ds);
traits->hostName = si.hostName;
traits->displayNum = si.displayNum;
traits->screenNum = si.screenNum;
traits->screenNum = i;
traits->x = 0;
traits->y = 0;
traits->width = width;
traits->height = height;
traits->windowDecoration = false;
traits->doubleBuffer = true;
traits->sharedContext = 0;
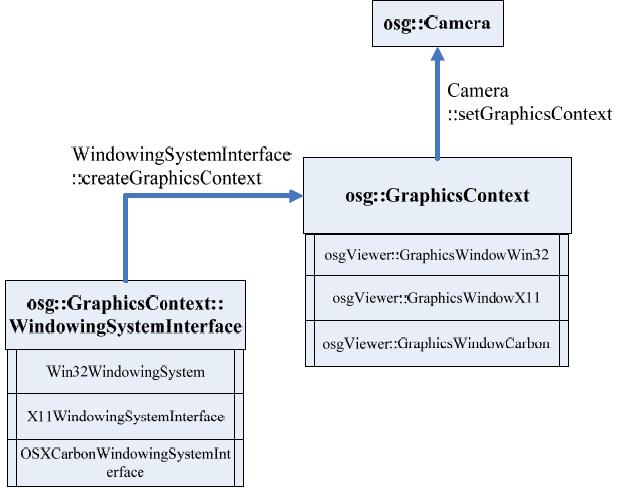
osg::ref_ptr<osg::GraphicsContext> gc = osg::GraphicsContext::createGraphicsContext(traits.get());
osg::ref_ptr<osg::Camera> camera = new osg::Camera;
camera->setGraphicsContext(gc.get());
通过配置窗口的特性(traits),在调用osg::GraphicsContext中的createGraphicsContext函数来创建设备上下文,看该函数的详细实现:
GraphicsContext* GraphicsContext::createGraphicsContext(Traits* traits)
{
    ref_ptr<GraphicsContext::WindowingSystemInterface> &wsref = windowingSystemInterfaceRef();
    if ( wsref.valid())
    {
        // catch any undefined values.
        if (traits) traits->setUndefinedScreenDetailsToDefaultScreen();

        return wsref->createGraphicsContext(traits);
    }
    else
        return 0;
}windowingSystemInterfaceRef if (traits->pbuffer)
{
osg::ref_ptr<osgViewer::PixelBufferWin32> pbuffer = new PixelBufferWin32(traits);
if (pbuffer->valid()) return pbuffer.release();
else return 0;
}
else
{
registerWindowClasses();
osg::ref_ptr<osgViewer::GraphicsWindowWin32> window = new GraphicsWindowWin32(traits);
if (window->valid()) return window.release();
else return 0;
} if (_windowClassesRegistered) return;
//
// Register the window classes used by OSG GraphicsWindowWin32 instances
//
std::ostringstream str;
str << "OSG Graphics Window for Win32 [" << ::GetCurrentProcessId() << "]";
osgGraphicsWindowWithCursorClass = str.str() + "{ with cursor }";
osgGraphicsWindowWithoutCursorClass = str.str() + "{ without cursor }";
WNDCLASSEX wc;
HINSTANCE hinst = ::GetModuleHandle(NULL);
//
// First class: class for OSG Graphics Window with a cursor enabled
//
wc.cbSize = sizeof(wc);
wc.style = CS_DBLCLKS | CS_HREDRAW | CS_VREDRAW | CS_OWNDC;
wc.lpfnWndProc = WindowProc;
wc.cbClsExtra = 0;
wc.cbWndExtra = 0;
wc.hInstance = hinst;
wc.hIcon = ::LoadIcon(hinst, "OSG_ICON");
wc.hCursor = ::LoadCursor(NULL, IDC_ARROW);
wc.hbrBackground = NULL;
wc.lpszMenuName = 0;
wc.lpszClassName = osgGraphicsWindowWithCursorClass.c_str();
wc.hIconSm = NULL;
if (::RegisterClassEx(&wc)==0)
{
unsigned int lastError = ::GetLastError();
if (lastError!=ERROR_CLASS_ALREADY_EXISTS)
{
reportError("Win32WindowingSystem::registerWindowClasses() - Unable to register first window class", lastError);
return;
}
}
那么为什么是Win32的窗口了,这是因为在编译OSG的过程中我们已经选择了一个窗口系统进行编译(在cmake中可以查看),比如我是在Win32下进行编译的,那么GraphicsWindowWin32.cpp的代码生成到了我的osgViewer.dll中,在GraphicsWindowWin32中有如下一段代码:
struct RegisterWindowingSystemInterfaceProxy
{
    RegisterWindowingSystemInterfaceProxy()
    {
        osg::GraphicsContext::setWindowingSystemInterface(Win32WindowingSystem::getInterface());
    }

    ~RegisterWindowingSystemInterfaceProxy()
    {
        if (osg::Referenced::getDeleteHandler())
        {
            osg::Referenced::getDeleteHandler()->setNumFramesToRetainObjects(0);
            osg::Referenced::getDeleteHandler()->flushAll();
        }

        osg::GraphicsContext::setWindowingSystemInterface(0);
    }
};

static RegisterWindowingSystemInterfaceProxy createWindowingSystemInterfaceProxy;
它声明了一个全局的变量,使用了
setWindowingSystemInterface
声明是Win32的窗口系统,这个语句的调用作了下面的事情:
void GraphicsContext::setWindowingSystemInterface(WindowingSystemInterface* callback)
{
    ref_ptr<GraphicsContext::WindowingSystemInterface> &wsref = windowingSystemInterfaceRef();
    wsref = callback;
    OSG_INFO<<"GraphicsContext::setWindowingSystemInterface() "<<wsref.get()<<"\t"<<&wsref<<std::endl;
}static ref_ptr<GraphicsContext::WindowingSystemInterface> &windowingSystemInterfaceRef()
{
static ref_ptr<GraphicsContext::WindowingSystemInterface> s_WindowingSystemInterface;
return s_WindowingSystemInterface;
}
当在WindowingSystemInterface这个函数在
createGraphicsContext
的时候,它会获取到这个已经被初始化的静态变量,这个变量的类型就是Win32窗口类型的,所以最终产生的窗口是Win32的。
总结一下就是: GraphicsContext这个最上层的抽象类中保留了一个用来标示窗口类型的指针,而这个指针在GraphicsWindowWin32.cpp中被赋值了(这个赋值过程由于是初始化一个全局的变量,它甚至在进入程序main函数之前就完成了),然后窗口在创建过程中调用createGraphicsWindow获取了这个指针,并依据这个指针的信息(Win32类型的窗口信息)创建了窗口(当然就是Win32的窗口)。
- win32中的使用
我们可以参考OSG中的代码将窗口嵌入到Win32的程序中:
#include <windows.h>
#include <osgViewer/Viewer>
#include <osgViewer/ViewerEventHandlers>
#include <osgViewer/api/win32/GraphicsWindowWin32>
#include <osgUtil/Optimizer>
#include <osgGA/TrackballManipulator>
#include <osgDB/ReadFile>
#include <process.h>

osg::ref_ptr<osgViewer::Viewer> viewer;
osg::observer_ptr<osgViewer::GraphicsWindow> window;
osg::ref_ptr<osg::Group> root;
osg::ref_ptr<osg::Node> loadedModel;
osgUtil::Optimizer optimizer;
osg::ref_ptr<osg::GraphicsContext::Traits> traits;
osg::ref_ptr<osg::Referenced> windata;
osg::GraphicsContext* gc;
osg::ref_ptr<osg::Camera> camera;
bool renderok;


LRESULT CALLBACK WndProc(HWND, UINT, WPARAM, LPARAM);


int WINAPI WinMain(HINSTANCE hInstance, HINSTANCE hPrevInstance, PSTR szCmdLine, int iCmdShow)
{
	static TCHAR szAppName[] = TEXT("HelloWin");
	HWND hwnd;
	MSG msg;
	WNDCLASS wndclass;
	wndclass.style = CS_HREDRAW | CS_VREDRAW;
	wndclass.lpfnWndProc = WndProc;
	wndclass.cbClsExtra = 0;
	wndclass.cbWndExtra = 0;
	wndclass.hInstance = hInstance;
	wndclass.hIcon = LoadIcon(NULL, IDI_APPLICATION);
	wndclass.hCursor = LoadCursor(NULL, IDC_ARROW);
	wndclass.hbrBackground = (HBRUSH)GetStockObject(WHITE_BRUSH);
	wndclass.lpszMenuName = NULL;
	wndclass.lpszClassName = szAppName;
	if (!RegisterClass(&wndclass))
	{
		MessageBox(NULL, TEXT("This program requires Windows NT!"), szAppName, MB_ICONERROR);
		return 0;
	}
	hwnd = CreateWindow(szAppName, // window class name
		TEXT("The Hello Program"), // window caption
		WS_OVERLAPPEDWINDOW, // window style
		100, // initial x position
		100, // initial y position
		800, // initial x size
		600, // initial y size
		NULL, // parent window handle
		NULL, // window menu handle
		hInstance, // program instance handle
		NULL); // creation parameters
	ShowWindow(hwnd, iCmdShow);
	UpdateWindow(hwnd);
	while (GetMessage(&msg, NULL, 0, 0))
	{
		TranslateMessage(&msg);
		DispatchMessage(&msg);
	}
	return (int)msg.wParam;
}


void render(void* ptr)
{
	while (!viewer->done())
	{
		viewer->frame();
	}
	renderok = true;
}


LRESULT CALLBACK WndProc(HWND hwnd, UINT message, WPARAM wParam, LPARAM lParam)
{
	switch (message)
	{
	case WM_CREATE:
		root = new osg::Group;
		loadedModel = osgDB::readNodeFile("glider.osg");
		if (!loadedModel)
			return 1;
		optimizer.optimize(loadedModel.get());
		optimizer.reset();
		root->addChild(loadedModel.get());
		traits = new osg::GraphicsContext::Traits;
		windata = new osgViewer::GraphicsWindowWin32::WindowData(hwnd);
		traits->x = 0;
		traits->y = 0;
		traits->width = 800;
		traits->height = 600;
		traits->windowDecoration = false;
		traits->doubleBuffer = true;
		traits->sharedContext = 0;
		traits->inheritedWindowData = windata;
		traits->setInheritedWindowPixelFormat = true;
		gc = osg::GraphicsContext::createGraphicsContext(traits.get());
		camera = new osg::Camera;
		camera->setGraphicsContext(gc);
		camera->setViewport(new osg::Viewport(traits->x, traits->y, traits->width, traits->height));
		viewer = new osgViewer::Viewer;
		viewer->addSlave(camera.get());
		viewer->setSceneData(root.get());
		viewer->setCameraManipulator(new osgGA::TrackballManipulator);
		viewer->addEventHandler(new osgViewer::StatsHandler);
		viewer->setThreadingModel(osgViewer::Viewer::SingleThreaded);
		viewer->realize();
		renderok = false;
		_beginthread(render, 0, NULL);
		return 0;
	case WM_PAINT:
		return 0;
	case WM_DESTROY:
		viewer->setDone(true);
		while (!renderok)
		{
			Sleep(10);
		}
		PostQuitMessage(0);
		return 0;
	}
	return DefWindowProc(hwnd, message, wParam, lParam);
}
事实上我们可以直接使用osgViewer::Viewer来创建窗口,让整个创建过程在osg中完成(也就是说在上面的Win32中的注册窗口类代码,事件处理等有osg内部实现),当我们需要窗口的时候,我们可以从GraphicsContext(Win32中是GraphicsWindowWin32)中获取到窗口的句柄(_hwnd),窗口的DC,以及OpenGL的渲染上下文HGLRC,然后对得到的句柄或其他资源进行操作(例如添加菜单、ToolBar栏等),窗口的大小如果不设置默认是全屏的,可以使用SetUpViewInWindow来设置大小和窗口的初始位置。
osg窗口创建的文章参考了网络上的一些资料,包括:
1. 王锐《最长的一帧》


 7836
7836


 被折叠的 条评论
为什么被折叠?
被折叠的 条评论
为什么被折叠?
 到【灌水乐园】发言


