


webrtc 使用了aec
In collaboration with PiXYZ, you can now host your AEC projects in Unity. This post explains how to use the PiXYZ Plugin for Unity and what you can achieve in real-time.
与PiXYZ合作,您现在可以在Unity中托管AEC项目。 这篇文章介绍了如何使用Unity的PiXYZ插件以及您可以实时实现的功能。
For architects, engineers, and construction (AEC) professionals, Unity is the ideal platform to host your creative projects. Whether you are creating photorealistic walkthroughs of environments allowing customers to envision spaces, getting everyone on the same page regardless of their background or skill level, or catching mistakes that cost time and money, you can make the right decisions before a yard of concrete is poured. Now we’re taking it one step further in order to make your lives even easier in Unity 2018.3.
对于建筑师,工程师和建筑(AEC)专业人员而言,Unity是托管您的创意项目的理想平台。 无论您是在创建逼真的环境漫游环境,使客户可以设想空间,还是让所有人都在同一页面上,无论他们的背景或技能水平如何,还是发现浪费时间和金钱的错误,您都可以在浇筑一堆混凝土之前做出正确的决定。 现在,我们正在将其进一步发展,以使您在Unity 2018.3中的生活更加轻松。
As you may know, we’ve been closely collaborating with PiXYZ. For example, with the PiXYZ Plugin and PiXYZ Studio for Unity, you can now import IFC BIM files into Unity. So in this post, we’ll demonstrate how to do that, as well as walk you through the other new features and visualization enhancements. Also, we’ll show you how to easily make adjustments in real-time.
如您所知,我们一直在与PiXYZ紧密合作。 例如,使用PiXYZ插件和PiXYZ Studio for Unity ,您现在可以将IFC BIM文件导入Unity。 因此,在这篇文章中,我们将演示如何做到这一点,并向您介绍其他新功能和可视化增强功能。 此外,我们还将向您展示如何轻松地实时进行调整。
Note that the 2018.3 versions of these PiXYZ products are available today from the Unity Store.
请注意,这些PiXYZ产品的2018.3版本今天可从Unity商店购买 。
PiXYZ的新手? 没问题! (New to PiXYZ? No problem!)
The PiXYZ Plugin for Unity is part of a software suite created by PiXYZ that is designed to edit, optimize, and import CAD files and Building Information Modeling (BIM) data straight into Unity.
PiXYZ Plugin for Unity是PiXYZ创建的软件套件的一部分,该套件旨在编辑,优化和直接将CAD文件和建筑信息模型(BIM)数据导入Unity。
Until recently, the PiXYZ Plugin was mainly used to integrate CAD models into Unity. With the Preview release of PiXYZ 2018.2 and full rollout in PiXYZ 2018.3, you can now use the Industry Foundation Class (IFC) format to import your BIM data. This bridge allows you to harness the power of BIM metadata, and optimize and create real-time renderings of CAD models using numerous Unity features.
直到最近,PiXYZ插件主要用于将CAD模型集成到Unity中。 借助PiXYZ 2018.2的预览版和PiXYZ 2018.3中的全面推出,您现在可以使用行业基础类(IFC)格式导入BIM数据。 通过此桥,您可以利用BIM元数据的功能,并使用众多Unity功能来优化和创建CAD模型的实时渲染。
To get more details about PiXYZ and to see a live demonstration, check out their presentation from last year’s Unite Los Angeles, where they provided a comprehensive showcase of the product. In addition to their session, you can watch a shorter walkthrough of a demo Project featuring Unity’s own Mike Geig, Head of Evangelism Content. In his presentation, Mike highlights the steps involved to import the data, perform spot corrections by merging geometries, use rules, adjust materials and lighting with Prefabs, and do a bit of post-processing.
要获取有关PiXYZ的更多详细信息并观看实时演示,请查看去年的Unite Los Angeles的演示,他们在该演示中提供了该产品的全面展示。 除了他们的课程外,您还可以观看一个演示项目的简短演练,该项目由Unity自己的福音派内容负责人Mike Geig主持。 在他的演讲中,Mike重点介绍了导入数据,通过合并几何体进行点校正,使用规则,使用Prefabs调整材料和照明以及进行一些后处理的步骤。
导入Unity (Importing into Unity)
This section walks you through how to import a CAD file into Unity with the PiXYZ Plugin using the .ifc file format, demonstrating how CAD data can be imported into Unity from your favorite design application. While this focuses on exporting from Autodesk Revit, note that with the IFC format, BIM data can be imported from any program that supports IFC, such as Civil 3D, Tekla, and ArchiCAD.
本节向您介绍如何使用.ifc文件格式通过PiXYZ插件将CAD文件导入到Unity中,演示如何从您喜欢的设计应用程序将CAD数据导入到Unity中。 虽然这主要是从Autodesk Revit导出,但是请注意,使用IFC格式,可以从任何支持IFC的程序(例如Civil 3D,Tekla和ArchiCAD)导入BIM数据。
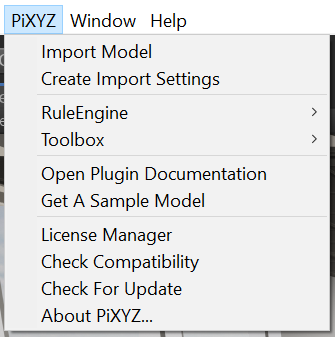
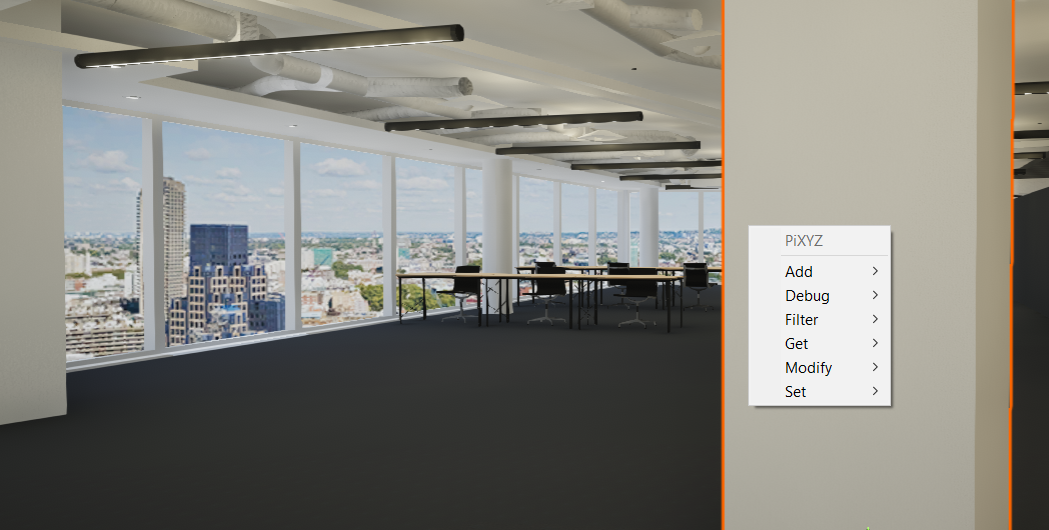
Within the Unity Editor, choosing PiXYZ expands the drop-down menu (see the first image below). Please note, a license is required to use all the features shown in this blog post. Follow this link to obtain a trial version or the full license of PiXYZ.
在Unity Editor中,选择PiXYZ会展开下拉菜单(请参见下面的第一张图片)。 请注意,使用此博客文章中显示的所有功能需要许可证。 单击此链接可获得PiXYZ的试用版或完整许可证。
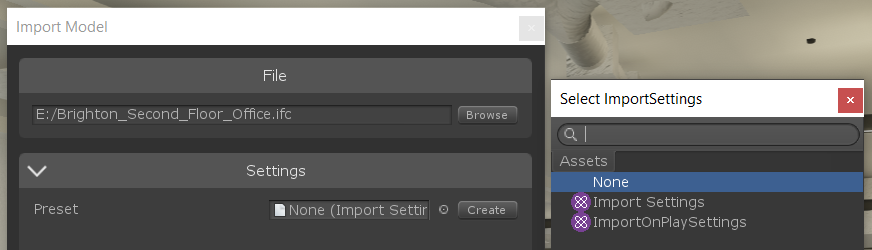
When you have access to PiXYZ, you can bring a CAD model into Unity by choosing PiXYZ > Import Model as seen in the image below. The Import CAD window lets you choose parameters that determine the overall output of the imported model.
有权使用PiXYZ时,可以通过选择PiXYZ>导入模型将CAD模型引入Unity,如下图所示。 “导入CAD”窗口使您可以选择确定导入模型的整体输出的参数。
导入参数 (Importing parameters)
Next, we’re going to walk through a few import parameters to consider when importing a CAD model.
接下来,我们将逐步介绍导入CAD模型时要考虑的一些导入参数。
规模 (Scale)

向上 (Z-up)
元数据 (Metadata)
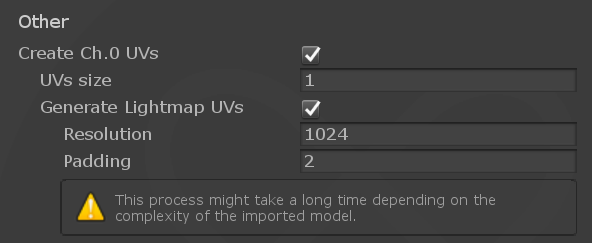
Note: Without this parameter set to Active, Unity will not import the crucial BIM data that enables the use of the Rule Engine feature.
注意:如果未将此参数设置为有效,则Unity将不会导入关键的BIM数据以启用规则引擎功能。

创建Ch.0 UV (Create Ch.0 UVs)
生成光照贴图UV (Generate Lightmap UVs)
覆盖着色器 (Override Shader)
For more information, see The High Definition Render Pipeline (HDRP): Focused on visual quality.
有关更多信息,请参见高清晰度渲染管道(HDRP):关注视觉质量 。
Additionally, check out: The High Definition Render Pipeline (HDRP): Getting Started Guide for Artists.
此外,请查看: 高清晰度渲染管道(HDRP):艺术家入门指南 。
创建预制件 (Create Prefab)
By default, PiXYZ will produce a folder called “3D Models” and store the Prefab inside. The generated folder containing the Prefabs can be changed in Project Preferences (Edit > Preferences > PiXYZ).
默认情况下,PiXYZ将生成一个名为“ 3D模型”的文件夹,并将Prefab存储在其中。 可以在项目首选项(编辑>首选项> PiXYZ)中更改生成的包含预制件的文件夹。

For more information, check out Introducing new Prefab workflows.
有关更多信息,请查看介绍新的Prefab工作流程 。
实时同步 (Live Sync)
With Live Sync active, multiple parameters are accessible within the Preferences of the current Project. Under “Live Sync Beta,” three Update Mode preferences are available:
启用实时同步后,可以在当前项目的首选项中访问多个参数。 在“ Live Sync Beta”下,三个更新模式首选项可用:
Ask on Change: When a File is overwritten or edited, Unity prompts you to confirm any edits before updating.
更改时询问:文件被覆盖或编辑后,Unity会提示您确认所有编辑,然后再进行更新。
Auto Update: Automatically updates a model without a prompt when a model is altered.
自动更新:更改模型后,无需提示即可自动更新模型。
Manual: Manually requires resynchronizing.
手动:手动需要重新同步。
Once you’ve set all the relevant parameters, choose Import, and the file will be added to your current scene as a Prefab. For additional information regarding the Import CAD window, see this documentation from PiXYZ.
设置完所有相关参数后,选择“导入”,该文件将作为Prefab添加到当前场景中。 有关“导入CAD”窗口的更多信息,请参阅PiXYZ的本文档 。
深入了解Live Sync (Deep dive into Live Sync)
Live Sync, when activated, is a valuable feature for maintaining synchronization with small to medium-sized models and your Unity scene. This updates models within a Unity project with any edits made to the imported file, saving you a lot of time in this quick and efficient solution. Also, Live Sync is compatible with any file format PiXYZ can import (for example, .IFC, .OBJ). Let’s walk you through it.
启用实时同步后,Live Sync是一项非常有用的功能,可以与中小型模型和Unity场景保持同步。 这将对导入的文件进行任何编辑来更新Unity项目中的模型,从而在此快速有效的解决方案中为您节省了大量时间。 此外,Live Sync与PiXYZ可以导入的任何文件格式兼容(例如,.IFC,.OBJ)。 让我们来指导您。
状态符号 (Status symbols)
Within the designated folder, some noticeable changes will be prominent. At the top left of the Models/Prefabs icon, a status symbol indicates the current state of the Prefab as seen below.
在指定的文件夹中,一些明显的更改将很明显。 在“模型/预制件”图标的左上方,状态符号指示预制件的当前状态,如下所示。
Green Tick: Prefab is in sync with File and the Model is up to date.
绿勾号:预制件与文件同步,并且模型是最新的。
Yellow Arrows: Prefab is not in sync with File, and the Model needs to be resynchronized.
黄色箭头: Prefab与文件不同步,需要重新同步模型。
Red X: Model does not exist.
红色X:模型不存在。
同步设定 (Sync settings)
Remember, the Live Sync Settings can be found by clicking the button on the top right of the Model/Prefab icon.
请记住,可以通过单击“模型/预制”图标右上方的按钮找到“实时同步设置”。
A pop-up window appears with information such as File Path of the Model on the machine. As well, it contains two fields where you can assign assets created for use within the Rule Engine.
随即出现一个弹出窗口,其中包含诸如机器上“模型的文件路径”之类的信息。 同样,它包含两个字段,您可以在其中分配为在规则引擎中使用而创建的资产。
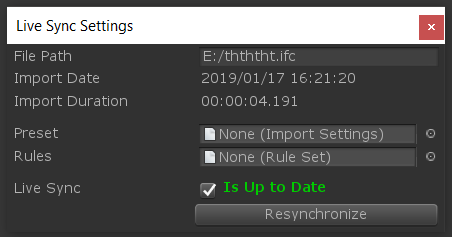
See the Rule Engine section below for more information about the use of both Preset and Rules Interaction fields.
有关使用“预设”和“规则交互”字段的更多信息,请参见下面的“规则引擎”部分。
处理BIM元数据 (Handling the BIM metadata)
Once you’ve imported your model into the project – in this case, an IFC containing BIM data – you can find the Prefab in both the Project folder and the Hierarchy, as mentioned. By expanding the Prefab within the Hierarchy window (hold ALT and click; the drop-down arrow to the right of the Prefab in the Hierarchy expands all children), all of the meshes of the imported model are children of empty GameObjects.
将模型导入项目(在本例中为包含BIM数据的IFC)后,您可以在Project文件夹和层次结构中找到该Prefab,如上所述。 通过在“层次结构”窗口中展开“预制”(按住ALT键并单击;“层次结构”中“预制”右侧的下拉箭头将展开所有子项),导入的模型的所有网格都是空GameObjects的子项。

The meshes themselves don’t contain any BIM data, they simply have a Mesh Renderer component and the material imported from Revit. It’s the empty parent GameObjects that contain the BIM data.
网格物体本身不包含任何BIM数据,它们仅具有一个网格物体渲染器组件和从Revit导入的材质。 包含BIM数据的是空的父GameObject。
When interacting with empty parent GameObjects, the Inspector displays a table containing any BIM data exported from Autodesk Revit or other BIM software packages. The BIM data displayed corresponds to BIM data within Autodesk Revit. For example “/Reference” is the name of an object’s Type Properties in Autodesk Revit.
与空的父级GameObjects交互时,检查器会显示一个表,其中包含从Autodesk Revit或其他BIM软件包导出的任何BIM数据。 显示的BIM数据与Autodesk Revit中的BIM数据相对应。 例如,“ / Reference”是Autodesk Revit中对象的“类型属性”的名称。
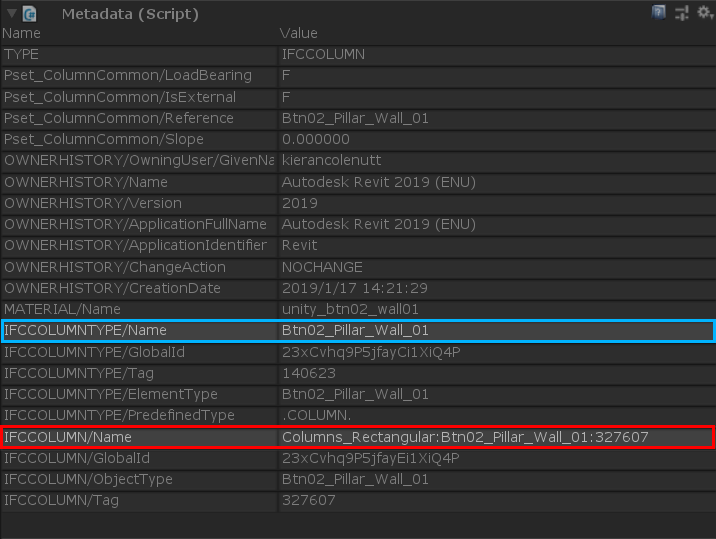
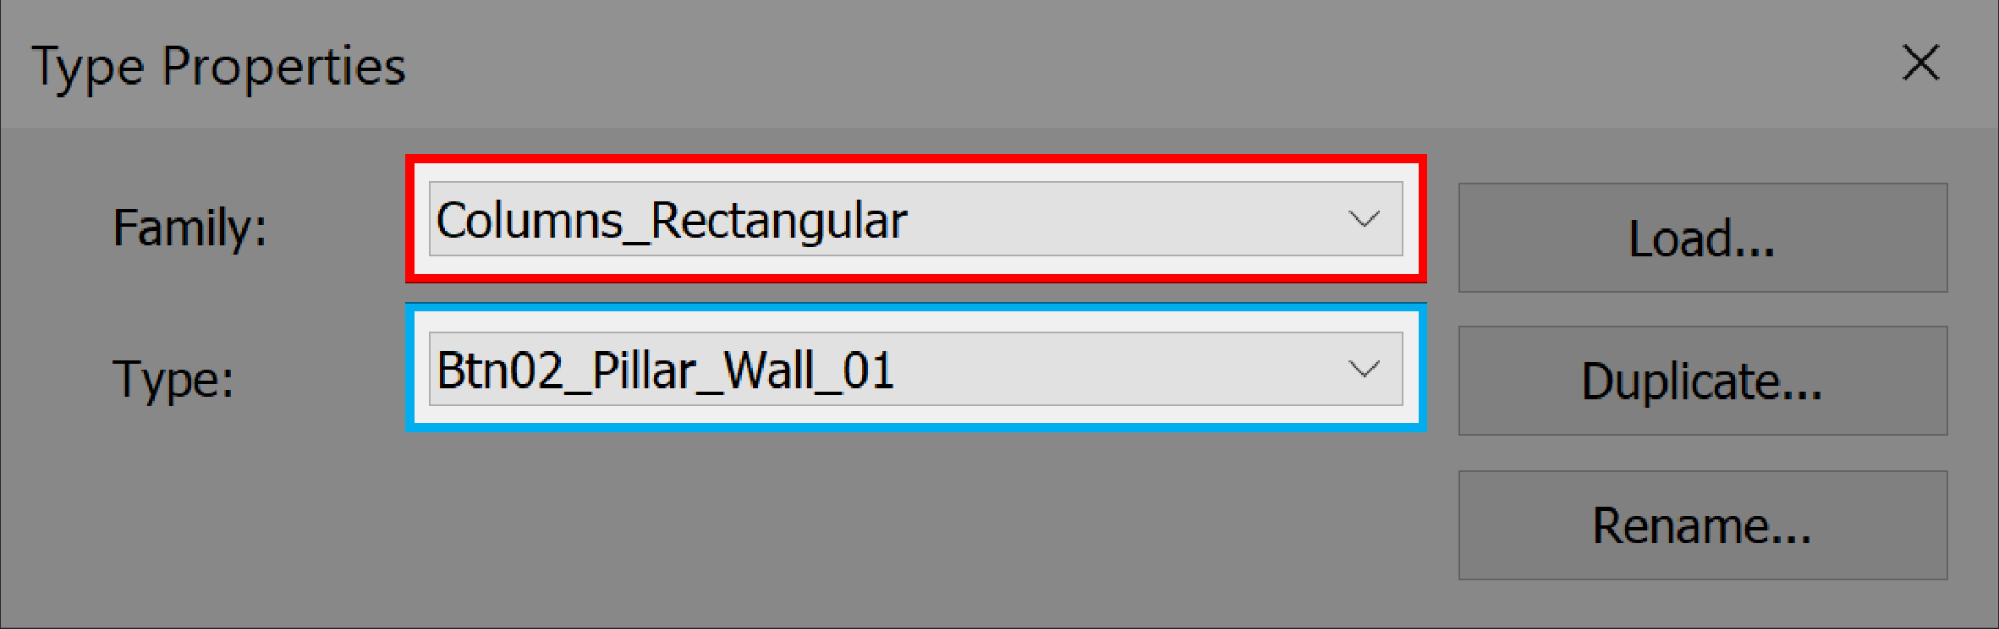
“Type Properties, Family” (Revit) = “/Name” (Unity)
“ 类型属性,族 ”(Revit)=“ / Name ”(Unity)
“Type Properties, Type” (Revit) = “/Reference” (Unity)
“ 类型属性,类型 ”(Revit)=“ /参考 ”(Unity)
You can then use this data within a Rule for imported objects within a Scene.
然后,您可以在“规则”中将此数据用于场景中的导入对象。
配备了工具箱中的大量工具 (Armed with plenty of tools in the toolbox)
Introduced in Unity 2018.3, the PiXYZ Toolbox provides you with a process to amplify and optimize geometry in an efficient manner. A tool within the Toolbox can be applied to any currently selected object within the Scene by simply right-clicking within the scene Window. With the Toolbox, you can easily manipulate objects without needing a RuleEngine Rule Set.
PiXYZ Toolbox在Unity 2018.3中引入,它为您提供了一种以有效方式放大和优化几何图形的过程。 只需在场景窗口中右键单击,即可将“工具箱”中的工具应用于场景中当前选择的任何对象。 使用工具箱,您可以轻松地操作对象,而无需RuleEngine规则集。
Note: Once the Toolbox applies an action, it cannot be undone.
注意:工具箱应用操作后,将无法撤消该操作。
Additionally, you can use the Toolbox on any GameObject within the Scene, including cameras and light emitters. To access the Manual Toolbox, right-click the selected objects either within the Scene window or within the Hierarchy.
此外,您可以在场景中的任何GameObject上使用工具箱,包括相机和发光器。 要访问“手动工具箱”,请在“场景”窗口或“层次结构”中右键单击选定的对象。
For more information regarding the use of each Toolbox tool, see the PiXYZ documentation.
有关使用每个Toolbox工具的更多信息,请参见PiXYZ文档 。
遵守PiXYZ规则引擎中的规则 (Stick to the rules in the PiXYZ Rule Engine)
Unlike the Toolbox’s manual process, the Rule Engine enables an automated process of applying a set of Rules that determine the output of a model either during import or In-Editor automatically through user-defined preferences. Upon running a Rule, it is administered sequentially according to custom Rules.
与工具箱的手动过程不同,规则引擎使自动过程能够应用一组规则,这些规则可以在导入期间或在In-Editor中通过用户定义的首选项自动确定模型的输出。 运行规则后,将根据自定义规则顺序对其进行管理。
Also, you can form a Rule in Unity and state what its function is and, when applied, it carries out the functions to a selected model. In this case, an IFC containing BIM data from Revit. For example, a Rule could replace the material of the model, replace the model, and even add to what is already there. Most importantly, this is all done with one click. Let’s walk through the steps below.
另外,您可以在Unity中形成规则并声明其功能,并在应用后将其执行到选定模型的功能。 在这种情况下,IFC包含来自Revit的BIM数据。 例如,规则可以替换模型的材料,替换模型,甚至可以添加到已有的模型中。 最重要的是,所有这些都只需单击一下即可完成。 让我们逐步执行以下步骤。
使用规则引擎 (Using the Rule Engine)
To create a new Rule Engine Set, either choose Create > PiXYZ > RuleEngine Rule Set
要创建新的规则引擎集,请选择“ 创建”>“ PiXYZ”>“ RuleEngine规则集”。

Or choose PiXYZ > Rule Engine > Create New Rule Set
或选择“ PiXYZ”>“规则引擎”>“创建新规则集”

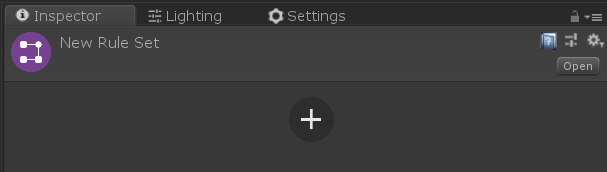
Once a New Rule Set has been generated within a designated folder, clicking it will enable new Rules to be constructed within the Inspector. Clicking the Plus (+) icon produces the foundation for a Rule.
在指定文件夹中生成新规则集后,单击它即可在检查器中构建新规则。 单击加号(+)图标将产生规则的基础。
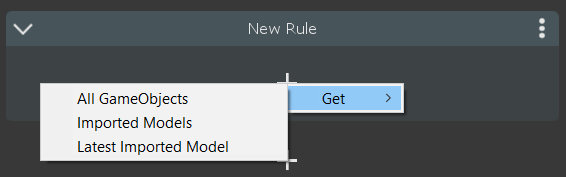
At the start of every Rule, you need to specify what is being included in the Rule. Click the Plus icon and select Get. There are three options:
在每个规则的开头,您需要指定规则中包含的内容。 单击加号图标,然后选择获取 。 共有三个选项:
All Game Objects: The Rule includes all GameObjects in the Scene (light emitters, cameras, etc).
所有游戏对象:规则包括场景中的所有游戏对象 (发光器,摄像机等)。
Imported Models: The Rule incorporates all imported models in the Scene.
导入的模型:规则在场景中合并了所有导入的模型。
Latest Imported Model: The Rule includes the most recently imported model in the Scene.
最新导入的模型:规则包括场景中最新导入的模型。
The Rule can now be further expanded since the user has full access to the Toolbox Actions within the Rule. This facilitates a Unity Project to become the platform for real-time commercial architectural visualizations. Treated as a foundation project, Rules can be reused for varying models.
由于用户可以完全访问规则中的“工具箱操作”,因此现在可以进一步扩展该规则。 这促进了Unity项目成为实时商业建筑可视化的平台。 作为基础项目,可以将规则重新用于各种模型。
By utilizing preset naming conventions established in Autodesk Revit or BIM software packages, which sync up with Rules established within Unity, visualizations can be easily instated by running a Rule once.
通过利用Autodesk Revit或BIM软件包中建立的预设命名约定,这些约定与Unity内建立的规则同步,只需运行一次规则即可轻松恢复可视化效果。
Additionally, you can integrate a custom script into the PiXYZ Toolbox and use it within a Rule.
另外,您可以将自定义脚本集成到PiXYZ工具箱中,并在规则中使用它。
For a breakdown of each action for use within a Rule, see this PiXYZ documentation.
有关在规则中使用的每个操作的详细信息,请参阅此PiXYZ文档 。
导入设置资产 (Import Settings Asset)
In addition to generating a Rule Set, implementing an Import Settings Asset will provide a vast array of import preferences, all retained within an Asset. The Asset contains the same parameters found within the Import CAD window, excluding Post-Processing and the Preset selection box.
除了生成规则集之外,实施导入设置资产还将提供大量导入首选项,所有这些都保留在资产中。 资产包含在“导入CAD”窗口中找到的相同参数,但不包括“后处理”和“预设”选择框。

|
|
|
Both the Import Settings and Rule Assets can be used in two ways:
导入设置和规则资产都可以两种方式使用:

遵守物质规则 (Playing by the Material Rules)
Now that you have a firm grasp of the Rule Engine, let’s create a Rule that replaces imported materials with Unity Materials. Here are two ways of doing this.
现在,您已经掌握了规则引擎,让我们创建一个规则,用Unity Materials替换导入的材料。 这有两种方法。
替换材料规则1 (Replace Material Rule #1)
To create a New RuleEngine Rule Set, choose Create > PiXYZ > RuleEngine Rule Set.
要创建新的RuleEngine规则集,请选择“ 创建” >“ PiXYZ” >“ RuleEngine规则集” 。
Next, add a Start node to determine what is being influenced by the Rule. Click the Plus icon and select Get then:
接下来,添加一个“开始”节点以确定该规则将影响什么。 单击 加号 图标, 然后 选择 获取, 然后:
All Game Objects
所有游戏对象
Or
要么
Import Models
导入模型
Or
要么
Latest Imported Model
最新进口型号
Within Autodesk Revit, naming conventions were established within the object’s Type Properties. The object’s Type name has been replaced with a custom name that exports into Unity as “/Reference” within the IFC.
在Autodesk Revit中,命名约定是在对象的“类型属性”中建立的。 对象的类型名称已替换为自定义名称,该自定义名称在IFC中作为“ / Reference”导出到Unity。
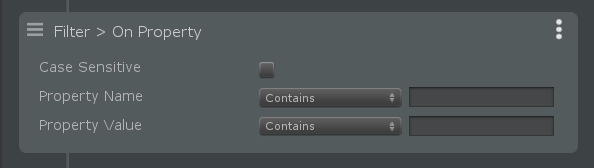
Then, in order to access the relevant BIM data within the project, we need to filter through the data. Click the Plus icon, then select Filter > On Property.
然后,为了访问项目中的相关BIM数据,我们需要对数据进行过滤。 单击 加号 图标,然后选择 过滤器 > 在属性上 。
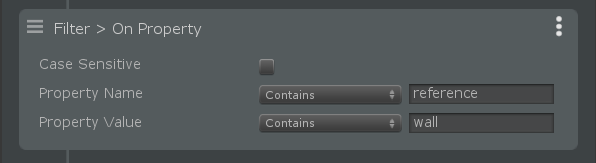
Under Property Name, input the name of the data type you want to filter through. As mentioned in the “Handling the BIM metadata” section, the Type Properties, Type name has been replaced with a custom name in Autodesk Revit, which imports into Unity as “/Reference”.
在“属性名称”下,输入要过滤的数据类型的名称。 如“处理BIM元数据”部分所述,“类型属性”,“类型”名称已在Autodesk Revit中替换为自定义名称,该名称作为“ / Reference”导入Unity。
Under Property Value, input the custom name or a word from the custom name that is unique to that type of object(s) in the project. For example, replacing the imported material for an interior window with a Unity material.
在“属性值”下,输入定制名称或定制名称中的单词,该单词对于项目中的该类型对象是唯一的。 例如,将内部窗玻璃的导入材料替换为Unity材料。
Due to the naming conventions established, “Interior-Window” is only present within the name of transparent windows within the model. This enables Interior_Window to be used as a Property value. The name used for this example is “Btn_02_Interior_Window_01”.
由于建立了命名约定,因此“内部窗口”仅出现在模型中的透明窗口名称中。 这使Interior_Window可以用作属性值。 本示例使用的名称是“ Btn_02_Interior_Window_01”。
Now the Rule will filter through all the BIM data in the project, under the Property Name “Reference,” looking for any names containing “Interior_Window”.
现在,该规则将过滤项目中所有BIM数据,在“ Reference”属性名称下,查找包含“ Interior_Window”的任何名称。
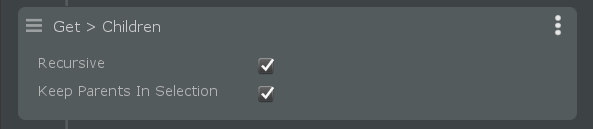
Currently, this rule only locates the empty GameObjects within the hierarchy as they are storing the BIM data, so you need to then click the Plus icon and select Get > Children. Make sure to enable “Recursive,” as this will ensure all child meshes are included, no matter the quantity.
当前,此规则仅在存储BIM数据时在层次结构中定位空的GameObject,因此您需要单击Plus图标并选择Get> Children 。 确保启用“递归”,因为这将确保包括所有子网格物体,无论数量如何。
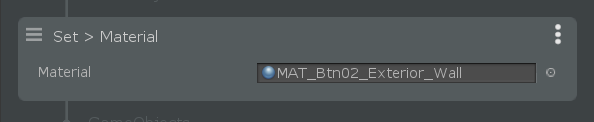
Finally, click the Plus icon and select Set > Material.
最后,单击 加号 图标,然后选择 设置 > 材质 。
Set with a Unity Material by either clicking the Selection box button on the far right or by dragging a new Material into the box.
通过单击最右侧的“选择”框按钮或将新的“材质”拖动到该框中来设置Unity材质。
At the bottom of the Inspector, click Run to apply all Rules within the RuleEngine Rule Set.
在检查器的底部,单击“运行”以应用RuleEngine规则集中的所有规则。
Note: Rules are applied sequentially, from top to bottom.
注意:规则是从上到下顺序应用的。

This Rule was structured so it can be used for other processes than just to replace material. Now the Rule calls imported objects with defined BIM data types, and further Rules can be applied to extend the functions.
该规则的结构合理,因此它不仅可以用于替换材料,还可以用于其他过程。 现在,该规则调用具有定义的BIM数据类型的导入对象,并且可以应用更多规则来扩展功能。
替换材料规则2 (Replace Material Rule #2)
Add a Start node to determine what is being influenced by the Rule.
添加一个“开始”节点以确定受规则影响的内容。
Next, click the Plus icon, then select Modify > Switch Materials.
接下来,单击加号图标,然后选择“ 修改” >“ 切换材质”。
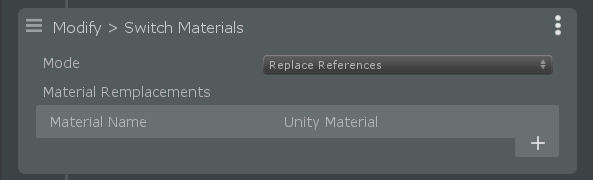
Extend Switch Materials by clicking the 3-dot icon in the far-right corner. A drop-down menu with multiple options for the Rule appears:
通过单击最右上角的3点图标来扩展Switch Materials。 出现一个带有多个“规则”选项的下拉菜单:
Add Selected Materials: Adds any materials that are currently selected in the Scene.
添加选定的材质:添加场景中当前选定的所有材质。
Fill With All Materials In Scene: Takes all materials currently in the Scene.
用场景中的所有材质填充:获取场景中当前的所有材质。
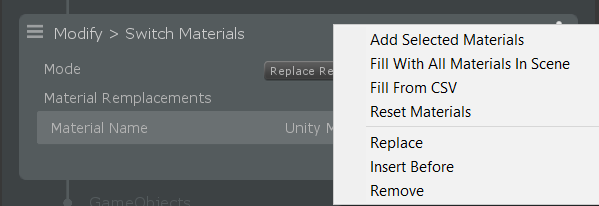
By choosing “Fill With All Materials In Scene,” the Rule Engine takes all the materials and deposits them in a table within the Rule. This results in an efficient means of replacing materials simply by placing Unity materials within the blank Selection boxes.
通过选择“在场景中填充所有材质”,规则引擎将获取所有材质并将它们存储在规则内的表格中。 通过简单地将Unity物料放置在空白的“选择”框中,可以有效地替换物料。
Finally, simply Run the resulting Rule to replace Materials within the Scene.
最后,只需 运行 结果规则即可替换场景中的材质。
即将发生什么 (What’s on the horizon)
So that was a detailed walkthrough of the updated PiXYZ features in 2018.3, including importing BIM data, setting the necessary parameters, covering Live Sync, Toolbox, Rule Engine, and finally, learning how to Replace Material Rules. We hope you enjoyed learning how to use the PiXYZ Plugin to import Revit data into Unity. This is the result of a very close collaboration between Unity and PiXYZ, in order to significantly improve the import process and save you a lot of time.
因此,这是2018.3中更新的PiXYZ功能的详细演练,包括导入BIM数据,设置必要的参数,涵盖实时同步,工具箱,规则引擎,最后学习如何替换材质规则。 我们希望您喜欢学习如何使用PiXYZ插件将Revit数据导入Unity。 这是Unity和PiXYZ之间非常紧密合作的结果,目的是显着改善导入过程并节省大量时间。
I’d like to remind you to watch the PiXYZ presentation from last year’s Unite Los Angeles, as it is a valuable walkthrough of the capabilities. Also, check out Mike Geig’s walkthrough of a Project that highlights how to import, perform spot corrections, and do a bit of post-processing.
我想提醒您观看去年Unite Los Angeles的PiXYZ演示,因为它是对功能的宝贵介绍。 另外,请查看Mike Geig的项目演练,其中重点介绍如何导入,执行点校正和进行一些后期处理。
Frequent readers of the Unity blog may also have noticed our previous post, which discusses the plan to import Revit directly into Unity. Check out our announcement during the AEC Keynote at Autodesk University, starting at minute 2:22. Stay tuned for more news on this exciting new feature coming later this year.
经常阅读Unity博客的读者可能还会注意到我们的上一篇文章,其中讨论了将Revit直接导入Unity的计划。 从2:22分钟开始, 在Autodesk University的AEC主题演讲中查看我们的公告。 请继续关注有关今年下半年即将推出的这一令人兴奋的新功能的更多新闻 。
We’re always listening to customers, and encourage you to post your ideas and requests in the comment section below. Or, if you want to talk with us directly or get access to a trial version, please contact us. If you want to get started now, please visit our store to purchase PiXYZ.
我们一直在倾听客户的意见,并鼓励您在下面的评论部分中发表您的想法和要求。 或者,如果您想直接与我们联系或获得试用版,请与我们联系 。 如果要立即开始,请访问我们的商店以购买PiXYZ 。
Finally, check out my Twitter @KieranColenutt for ongoing Unity tips, tricks and future AEC content.
最后,查看我的Twitter @KieranColenutt了解正在进行的Unity技巧,窍门和将来的AEC内容。
翻译自: https://blogs.unity3d.com/2019/01/30/design-build-and-operate-faster-with-the-pixyz-plugin-for-aec/
webrtc 使用了aec


 1131
1131

 被折叠的 条评论
为什么被折叠?
被折叠的 条评论
为什么被折叠?
 到【灌水乐园】发言


