


多面脸部追踪

When rendering a 3D object you’ll always have to assign it a material to make it visible and to give it a desired appearance, whether it is in some kind of 3D software or in real-time with WebGL.
渲染3D对象时,无论使用某种3D软件还是使用WebGL进行实时显示,您始终必须为其分配一种材料以使其可见并提供所需的外观。
Many types of materials can be mimicked with out-of-the-box programs in libraries like Three.js, but in this tutorial I will show you how to make objects appear glass-like in three steps using—you guessed it—Three.js.
可以使用Three.js之类的库中的现成程序来模仿许多类型的材料,但是在本教程中,我将向您展示如何使用三个对象(三个步骤)使对象看起来像玻璃一样。 js。
步骤1:设定和正面折射 (Step 1: Setup and Front Side Refraction)
For this demo I’ll be using a diamond geometry, but you can follow along with a simple box or any other geometry.
在本演示中,我将使用菱形几何,但是您可以跟随一个简单的盒子或任何其他几何。
Let’s set up our project. We’ll need a renderer, a scene, a perspective camera and our geometry. In order to render our geometry we will need to assign it a material. Creating this material will be the main focus of this tutorial. So go ahead and create a new ShaderMaterial with a basic vertex, and fragment shader.
让我们建立我们的项目。 我们需要一个渲染器,一个场景,一个透视相机和我们的几何图形。 为了渲染我们的几何图形,我们需要为其分配材质。 创建此材料将是本教程的主要重点。 因此,继续创建具有基本顶点和片段着色器的新ShaderMaterial。
Contrary to what you’d expect, our material will not be transparent, in fact we will sample and distort anything that’s behind our diamond. To do that we will need to render our scene (without the diamond) to a texture. I’m simply rendering a full screen plane with an orthographic camera, but this could just as well be a scene full of other objects. The easiest way to split the background geometry from the diamond in Three.js is to use Layers.
与您期望的相反,我们的材料将不是透明的,实际上,我们将对钻石后面的任何东西进行采样和变形。 为此,我们需要将场景(没有菱形)渲染为纹理。 我只是使用正交摄影机渲染全屏平面,但这也可能是充满其他对象的场景。 在Three.js中从菱形分割背景几何图形的最简单方法是使用“图层”。
this.orthoCamera = new THREE.OrthographicCamera( width / - 2,width / 2, height / 2, height / - 2, 1, 1000 );
// assign the camera to layer 1 (layer 0 is default)
this.orthoCamera.layers.set(1);

const tex = await loadTexture('texture.jpg');
this.quad = new THREE.Mesh(new THREE.PlaneBufferGeometry(), new THREE.MeshBasicMaterial({map: tex}));

this.quad.scale.set(width, height, 1);
// also move the plane to layer 1
this.quad.layers.set(1);
this.scene.add(this.quad);
Our render loop will look like this:
我们的渲染循环如下所示:
this.envFBO = new THREE.WebGLRenderTarget(width, height);

this.renderer.autoClear = false;

render() {
	requestAnimationFrame( this.render );

	this.renderer.clear();

	// render background to fbo
	this.renderer.setRenderTarget(this.envFbo);
	this.renderer.render( this.scene, this.orthoCamera );

	// render background to screen
	this.renderer.setRenderTarget(null);
	this.renderer.render( this.scene, this.orthoCamera );
	this.renderer.clearDepth();

	// render geometry to screen
	this.renderer.render( this.scene, this.camera );
};
Alright, time for a little bit of theory now. Transparent materials like glass are visible because they bend light. That is because light travels slower in glass than it does in air, when a lightwave hits a glass object at an angle, this change in speed causes the wave to change direction. This change in direction of a wave is what describes the phenomenon of refraction.
好了,现在来点理论吧。 透明材料(例如玻璃)可以弯曲,因此可见。 那是因为光在玻璃中的传播要比空气中的传播慢,所以当光波以一定角度撞击玻璃物体时,这种速度变化会导致光波改变方向。 波浪方向的这种变化描述了折射现象。
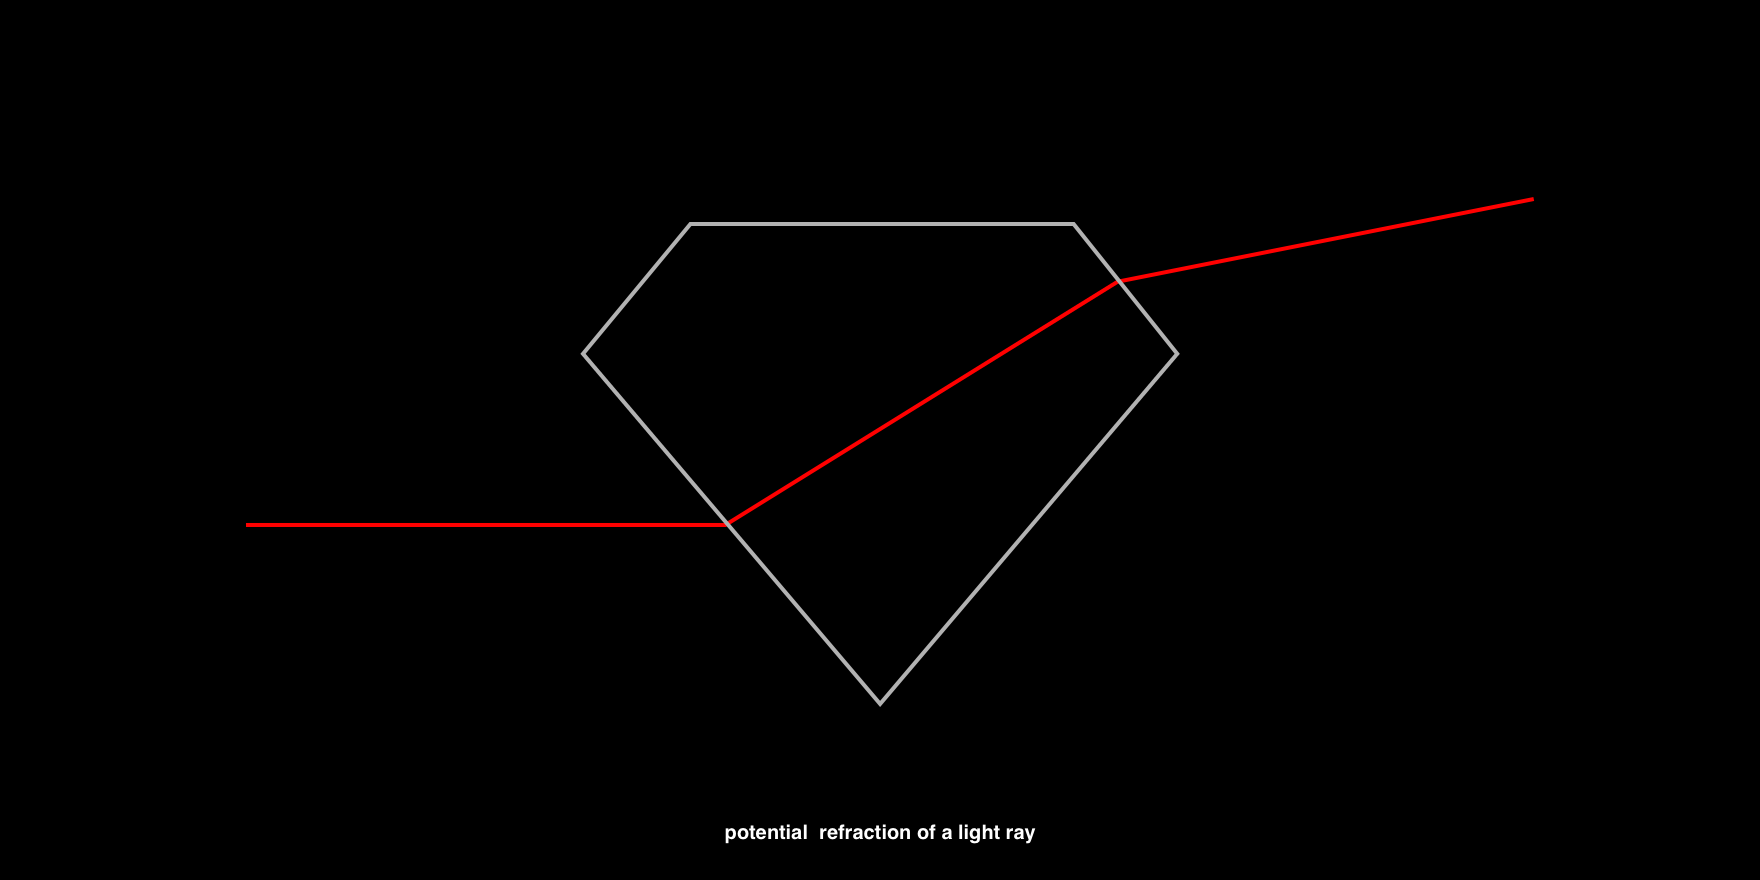
To replicate this in code we will need to know the angle between our eye vector and the surface (normal) vector of our diamond in world space. Let’s update our vertex shader to calculate these vectors.
要在代码中复制此代码,我们将需要知道世界空间中眼睛矢量与钻石表面(法线)矢量之间的角度。 让我们更新我们的顶点着色器以计算这些向量。
varying vec3 eyeVector;
varying vec3 worldNormal;

void main() {
	vec4 worldPosition = modelMatrix * vec4( position, 1.0);
	eyeVector = normalize(worldPos.xyz - cameraPosition);
	worldNormal = normalize( modelViewMatrix * vec4(normal, 0.0)).xyz;

	gl_Position = projectionMatrix * modelViewMatrix * vec4(position, 1.0);
}
In our fragment shader we can now use eyeVector and worldNormal as the first two parameters of glsl’s built-in refract function. The third parameter is the ratio of indices of refraction, meaning the index of refraction (IOR) of our fast medium—air—divided by the IOR of our slow medium—glass. In this case that will be 1.0/1.5, but you can tweak this value to achieve your desired result. For example the IOR of water is 1.33 and diamond has an IOR of 2.42.
在片段着色器中,我们现在可以使用eyeVector和worldNormal作为glsl内置折射函数的前两个参数。 第三个参数是折射率的比率,即我们的快速介质(空气)的折射率(IOR)除以我们的慢速介质(玻璃)的IOR。 在这种情况下,该值为1.0 / 1.5 ,但是您可以调整该值以获得所需的结果。 例如,水的IOR为1.33,而钻石的IOR为2.42。
uniform sampler2D envMap;
uniform vec2 resolution;

varying vec3 worldNormal;
varying vec3 viewDirection;

void main() {
	// get screen coordinates
	vec2 uv = gl_FragCoord.xy / resolution;

	vec3 normal = worldNormal;
	// calculate refraction and add to the screen coordinates
	vec3 refracted = refract(eyeVector, normal, 1.0/ior);
	uv += refracted.xy;

	// sample the background texture
	vec4 tex = texture2D(envMap, uv);

	vec4 output = tex;
	gl_FragColor = vec4(output.rgb, 1.0);
}Nice! We successfully wrote a refraction shader. But our diamond is hardly visible… That is partly because we’ve only handled one visual property of glass. Not all light will pass through the material to be refracted, in fact, part of it will be reflected. Let’s see how we can implement that!
真好! 我们成功编写了折射着色器。 但是我们的钻石几乎看不见……部分原因是我们只处理了玻璃的一种视觉特性。 并非所有的光都会穿过要折射的材料,实际上,一部分光会被反射。 让我们看看如何实现它!
步骤2:反射和菲涅耳方程 (Step 2: Reflection and the Fresnel equation)
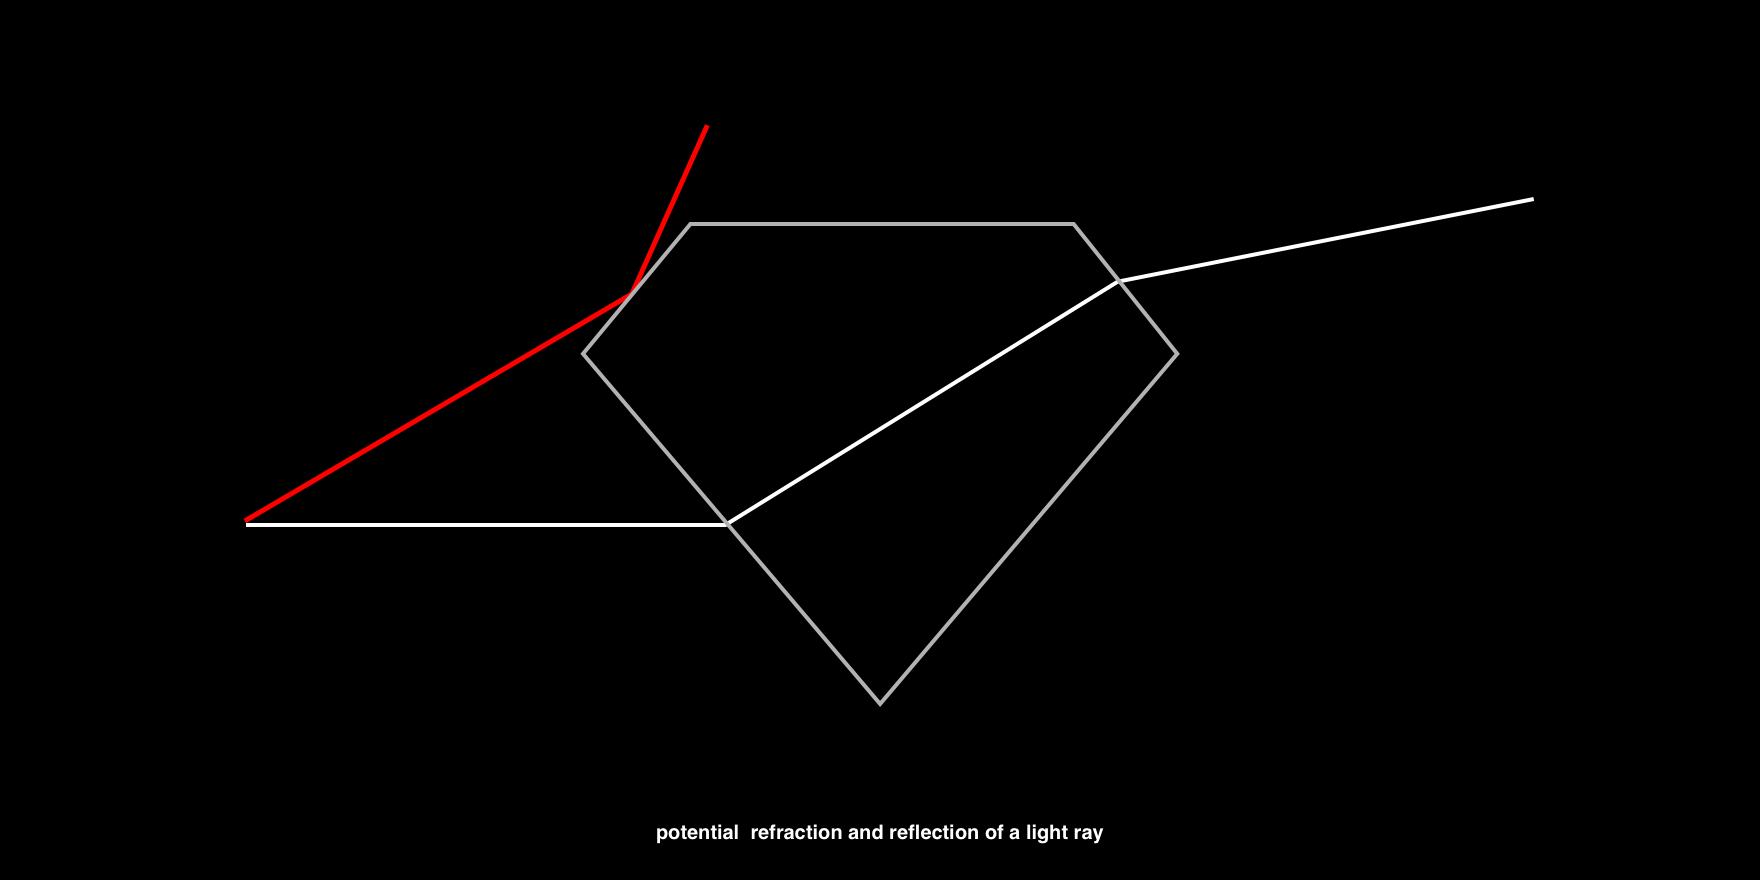
For the sake of simplicity, in this tutorial we are not going to calculate proper reflections but just use a white color for our reflected light. Now, how do we know when to reflect and when to refract? In theory this depends on the refractive index of the material, when the angle between the incident vector and the surface normal is greater than the critical angle, the light wave will be reflected.
为了简单起见,在本教程中,我们将不计算适当的反射,而仅将白色用作反射光。 现在,我们怎么知道什么时候该反思,什么时候该折射? 理论上,这取决于材料的折射率,当入射矢量和表面法线之间的角度大于临界角时,光波将被反射。
In our fragment shader we will use the Fresnel equation to calculate the ratio between reflected and refracted rays. Unfortunately, glsl does not have this equation built-in as well, but you can just copy it from here:
在片段着色器中,我们将使用菲涅耳方程来计算反射光线与折射光线之间的比率。 不幸的是,glsl也没有内置此方程式,但是您可以从这里复制它:
float Fresnel(vec3 eyeVector, vec3 worldNormal) {
	return pow( 1.0 + dot( eyeVector, worldNormal), 3.0 );
}
We can now simply mix the refracted texture color with our white reflection color based on the Fresnel ratio we just calculated.
现在,我们可以根据刚计算出的菲涅耳比率,简单地将折射纹理颜色与白色反射颜色混合。
uniform sampler2D envMap;
uniform vec2 resolution;

varying vec3 worldNormal;
varying vec3 viewDirection;

float Fresnel(vec3 eyeVector, vec3 worldNormal) {
	return pow( 1.0 + dot( eyeVector, worldNormal), 3.0 );
}

void main() {
	// get screen coordinates
	vec2 uv = gl_FragCoord.xy / resolution;

	vec3 normal = worldNormal;
	// calculate refraction and add to the screen coordinates
	vec3 refracted = refract(eyeVector, normal, 1.0/ior);
	uv += refracted.xy;

	// sample the background texture
	vec4 tex = texture2D(envMap, uv);

	vec4 output = tex;

	// calculate the Fresnel ratio
	float f = Fresnel(eyeVector, normal);

	// mix the refraction color and reflection color
	output.rgb = mix(output.rgb, vec3(1.0), f);

	gl_FragColor = vec4(output.rgb, 1.0);
}That’s already looking a lot better, but there’s still something off about it… Ah right, we can’t see the other side of transparent object. Let’s fix that!
看起来已经好多了,但是仍然有一些问题。。。嗯,我们看不到透明对象的另一面。 让我们解决这个问题!
步骤3:多边折射 (Step 3: Multiside refraction)
With the things we’ve learned so far about reflections and refractions we can understand that light can bounce back and forth a couple times inside the object before exiting it.
到目前为止,我们已经了解了有关反射和折射的知识,我们可以理解,光在离开物体之前可以在物体内部来回反弹几次。
To achieve a physically correct result we will have to trace each ray, but unfortunately this computation is way too heavy to render in real-time. So instead, I will show you a simple approximation to at least visualize the back faces of our diamond.
为了获得物理上正确的结果,我们将必须跟踪每条光线,但是不幸的是,这种计算量太大,无法实时渲染。 因此,我将向您展示一个简单的近似值,以至少可视化我们钻石的背面。
We’ll need the world normals of our geometry’s front and back faces in one fragment shader. Since we cannot render both sides at the same time we’ll need to render the back face normals to a texture first.
在一个片段着色器中,我们需要几何图形的正面和背面的世界法线。 由于我们不能同时渲染两侧,因此需要首先将背面法线渲染为纹理。
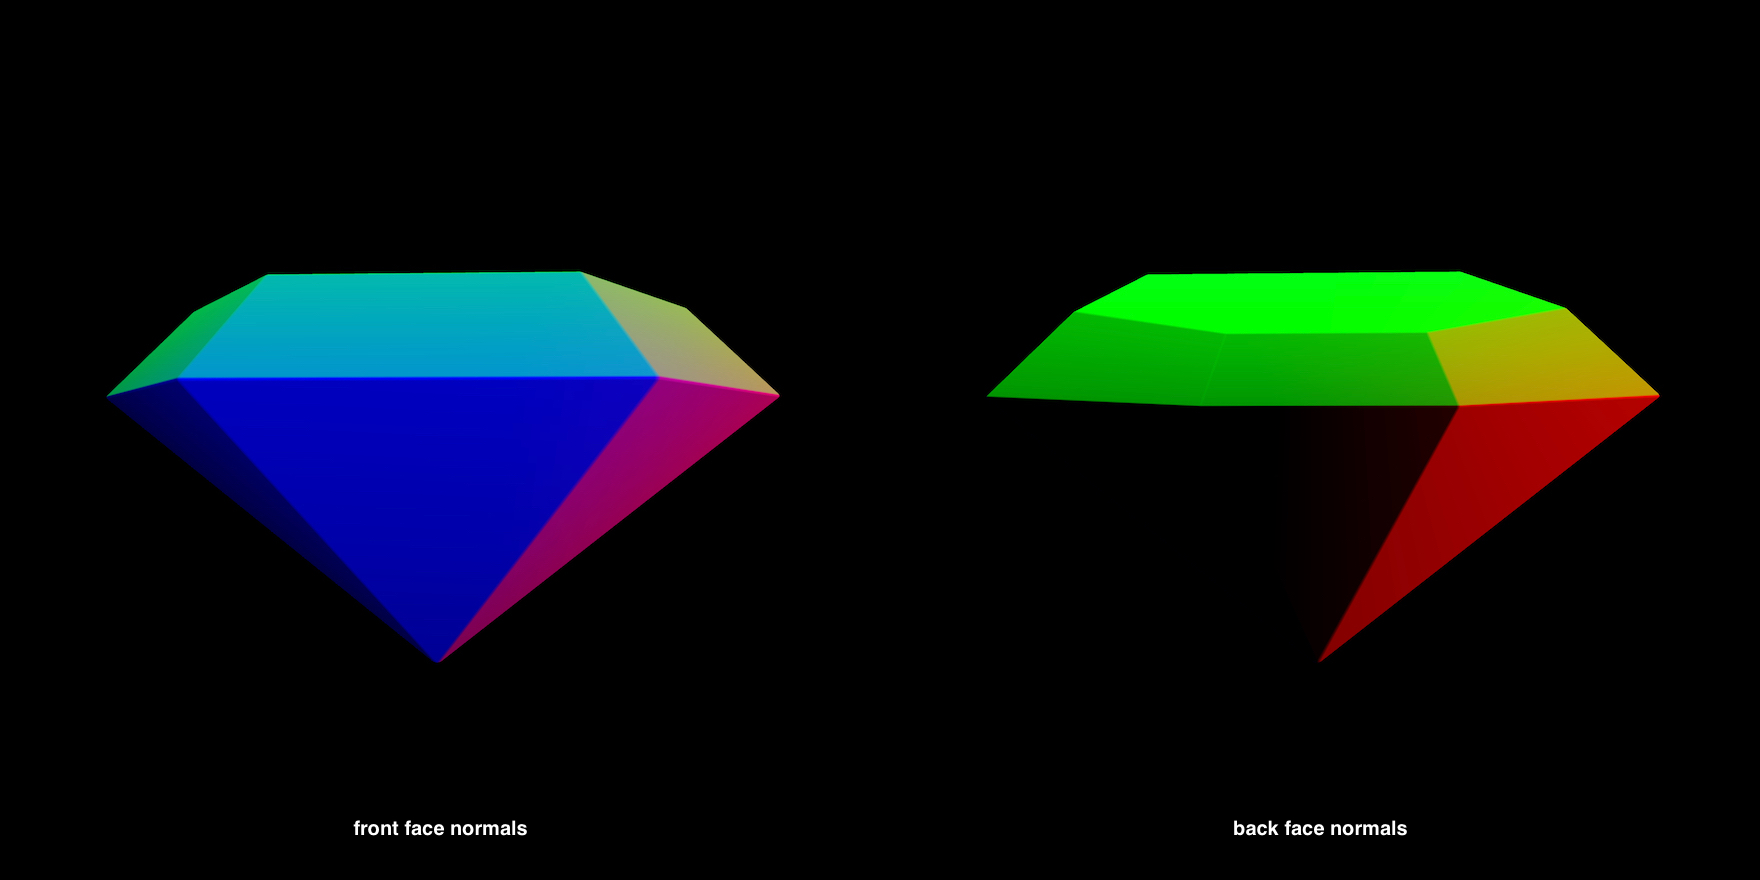
Let’s make a new ShaderMaterial like we did in step 1, but this time we will render the world normals to gl_FragColor.
让我们像在步骤1中一样创建一个新的ShaderMaterial,但是这次我们将世界法线渲染为gl_FragColor。
varying vec3 worldNormal;

void main() {
	gl_FragColor = vec4(worldNormal, 1.0);
}
Next we’ll update our render loop to include the back face pass.
接下来,我们将更新渲染循环以包括背面通道。
this.backfaceFbo = new THREE.WebGLRenderTarget(width, height);

...

render() {
	requestAnimationFrame( this.render );

	this.renderer.clear();

	// render background to fbo
	this.renderer.setRenderTarget(this.envFbo);
	this.renderer.render( this.scene, this.orthoCamera );

	// render diamond back faces to fbo
	this.mesh.material = this.backfaceMaterial;
	this.renderer.setRenderTarget(this.backfaceFbo);
	this.renderer.clearDepth();
	this.renderer.render( this.scene, this.camera );

	// render background to screen
	this.renderer.setRenderTarget(null);
	this.renderer.render( this.scene, this.orthoCamera );
	this.renderer.clearDepth();

	// render diamond with refraction material to screen
	this.mesh.material = this.refractionMaterial;
	this.renderer.render( this.scene, this.camera );
};
Now we sample the back face normal texture in our refraction material.
现在,我们在折射材料中采样背面法线纹理。
vec3 backfaceNormal = texture2D(backfaceMap, uv).rgb;And finally we combine the front and back face normals.
最后,我们结合了正面和背面法线。
float a = 0.33;
vec3 normal = worldNormal * (1.0 - a) - backfaceNormal * a;
In this equation, a is simply a scalar value indicating how much of the back face’s normal should be applied.
在此等式中, a只是标量值,指示应应用背面法线的数量。
We did it! We can see all sides of our diamond, only because of the refractions and reflections we have applied to its material.
我们做到了! 我们可以看到钻石的所有侧面,仅是因为我们对钻石的材质施加了折射和反射。
局限性 (Limitations)
As I already explained, it is not quite possible to render physically correct transparent materials in real-time with this method. Another problem occurs when rendering multiple glass objects in front of each other. Since we only sample the environment once we won’t be able to see through a chain of objects. And lastly, a screen space refraction like I demoed here won’t work very well near the edges of the canvas since rays may refract to values outside of its boundaries and we didn’t capture that data when rendering the background scene to the render target.
正如我已经解释的那样,用这种方法实时渲染物理上正确的透明材料是不可能的。 当在彼此前面渲染多个玻璃对象时会发生另一个问题。 由于我们仅对环境采样一次,因此无法看透一连串的对象。 最后,我在这里演示的屏幕空间折射在画布的边缘附近效果不佳,因为光线可能会折射到其边界之外的值,并且在将背景场景渲染到渲染目标时我们没有捕获到该数据。
Of course, there are ways to overcome these limitations, but they might not all be great solutions for your real-time rendering in WebGL.
当然,有多种方法可以克服这些限制,但是对于在WebGL中进行实时渲染,它们可能并不是全部很好的解决方案。
I hope you enjoyed following along with this demo and you have learned something from it. I’m curious to see what you can do with it! Let me know on Twitter. Also don’t hesitate to ask me anything!
我希望您喜欢这个演示,并从中学习了一些东西。 我很好奇,看看您能用它做什么! 在Twitter上让我知道。 也不要犹豫,问我什么!
翻译自: https://tympanus.net/codrops/2019/10/29/real-time-multiside-refraction-in-three-steps/
多面脸部追踪


 2250
2250

 被折叠的 条评论
为什么被折叠?
被折叠的 条评论
为什么被折叠?
 到【灌水乐园】发言


