


 本文介绍了一个使用jQuery.kinetic插件实现的全屏网格布局模板,该模板包含可拖动的图像网格。用户点击缩略图后,大图会平滑展开,同时内容区域也会展示详细信息。模板受到Stephen Hamilton的Flash网站启发,具有平滑过渡和动画效果。点击内容链接会显示全屏内容预览,同时提供了导航、关闭和加载指示器等功能。
spine网格拖动
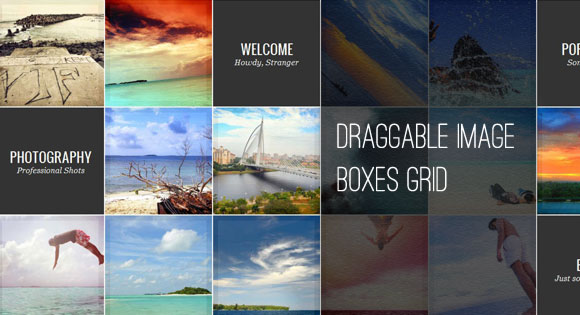
Today we want to create a template with a fullscreen grid of images and content areas. The idea is to have a draggable grid that shows boxes of thumbnails and menu like items. Once clicked, the thumbnail will expand to the full size image and the menu item box will expand to a fullscreen content area.
今天,我们要创建一个具有全屏图像和内容区域网格的模板。 想法是要有一个可拖动的网格,其中显示缩略图框和类似项目的菜单。 单击后,缩略图将扩展为全尺寸图像,菜单项框将扩展为全屏内容区域。
The main idea for this template and its effects comes from the beautiful Flash-based website of Stephen Hamilton.
该模板及其效果的主要思想来自于基于Flash的漂亮Flash网站Stephen Stephen 。
To make the grid draggable, we used jQuery.kinetic by Dave Taylor. The jQuery plugin allows smooth drag scrolling and it’s just what we need in our grid.
为了使网格可拖动,我们使用了Dave Taylor的jQuery.kinetic 。 jQuery插件允许平滑的拖动滚动,而这正是我们在网格中所需要的。
The beautiful images in the demo are by Ibrahim Iujaz. Check out his Flickr photostream.
演示中的精美图片由Ibrahim Iujaz撰写。 查看他的Flickr照片流。
So, let’s begin!
所以,让我们开始吧!
标记 (The Markup)
The main container will be a div with the class and ID ib-main-wrapper. We will add another div element inside since we will need this structure for applying the jQuery.kinetic plugin. Inside of that div which has the class ib-main, we will place two types of link elements: the thumbnail links and the content links. The content links are the menu like boxes that will expand to a fullscreen content area:
主容器将是一个div,其类别为ID ib-main-wrapper 。 我们将在内部添加另一个div元素,因为我们需要此结构来应用jQuery.kinetic插件。 在具有ib-main类的div内,我们将放置两种类型的链接元素:缩略图链接和内容链接。 内容链接是类似于框的菜单,它将扩展到全屏内容区域:
<div id="ib-main-wrapper" class="ib-main-wrapper">
	<div class="ib-main">
		<a href="#">
			<img src="images/thumbs/1.jpg" data-largesrc="images/large/1.jpg" alt="image01"/>
			<span>Crabbed Age and Youth</span>
		</a>
		<a href="#">
			<img src="images/thumbs/2.jpg" data-largesrc="images/large/2.jpg" alt="image02"/>
			<span>Cannot live together</span>
		</a>
		<a href="#" class="ib-content">
			<div class="ib-teaser">
				<h2>Welcome <span>Howdy, Stranger</span></h2>
			</div>
			<div class="ib-content-full">
				<!-- Some content -->
			</div>
		</a>
		...
	</div>
</div>
The boxes for the content will have the class ib-content. The path to the large image for the thumbnails will be saved in the data attribute data-largesrc.
内容框将具有ib-content类。 缩略图的大图像的路径将保存在data属性data-largesrc中。
For the content and image preview we will use jQuery templates. The template for the large image preview is the following:
对于内容和图像预览,我们将使用jQuery模板。 大图像预览的模板如下:
<div id="ib-img-preview" class="ib-preview">
	<img src="${src}" alt="" class="ib-preview-img"/>
	<span class="ib-preview-descr" style="display:none;">${description}</span>
	<div class="ib-nav" style="display:none;">
		<span class="ib-nav-prev">Previous</span>
		<span class="ib-nav-next">Next</span>
	</div>
	<span class="ib-close" style="display:none;">Close Preview</span>
	<div class="ib-loading-large" style="display:none;">Loading...</div>
</div>
We will have the large image, the navigation buttons, a closing cross and a loading element.
我们将看到大图像,导航按钮,一个十字叉和一个加载元素。
The template for the fullscreen content preview looks like this:
全屏内容预览的模板如下所示:
<div id="ib-content-preview" class="ib-content-preview">
	<div class="ib-teaser" style="display:none;">{{html teaser}}</div>
	<div class="ib-content-full" style="display:none;">{{html content}}</div>
	<span class="ib-close" style="display:none;">Close Preview</span>
</div>
Now, let’s style the grid.
现在,让我们为网格设置样式。
CSS (The CSS)
First, we will style the wrapping container. It will occupy all the page’s width and we will set the height dynamically to fit the visible area:
首先,我们将对包装容器进行样式设置。 它将占据页面的所有宽度,我们将动态设置高度以适合可见区域:
.ib-main-wrapper{
    width: 100%;
    overflow: hidden;
    margin-top: 40px;
    outline: none;
    /*height dynamic*/
}
The main container will have a preset width. We chose this value because we want most visitors to be able to actually drag the grid. If you would set it to less and the user has a larger screen, then the container would be too small:
主容器将具有预设的宽度。 我们选择此值是因为我们希望大多数访问者能够实际拖动网格。 如果将其设置为较小,并且用户的屏幕较大,则容器将太小:
.ib-main{
    position: relative;
    width: 2546px;
}
Each box element will be floating and have a background image (for the thumbs) that we’ll stretch to be a bit larger than the box. We’ll add a nice transition which will make the background image contract on hover:
每个box元素将是浮动的,并且具有一个背景图像(用于拇指),我们将其拉伸到比box大一点的位置。 我们将添加一个不错的过渡,它将使背景图像在悬停时收缩:
.ib-main a{
    float: left;
    width: 210px;
    height: 210px;
    position: relative;
    overflow: hidden;
    margin: 0px 0px 2px 2px;
    cursor: move;
    background: #fff url(../images/thumb_bg.jpg) no-repeat center center;
    background-size: 110% 110%;
    -webkit-transition: all 0.2s ease-in-out;
    -moz-transition: all 0.2s ease-in-out;
    -o-transition: all 0.2s ease-in-out;
    -ms-transition: all 0.2s ease-in-out;
    transition: all 0.2s ease-in-out;
}
.ib-main a:hover{
    background-size: 100% 100%;
}
The thumbnail will be slightly transparent so that we can see the background image (which is a thick border). We’ll also add some CSS3 transition here to animate the opacity on hover:
缩略图将略微透明,以便我们可以看到背景图像(粗边框)。 我们还将在此处添加一些CSS3过渡,以动画化悬停时的不透明度:
.ib-main a img{
    opacity: 0.95;
    -webkit-transition: all 0.2s ease-in-out;
    -moz-transition: all 0.2s ease-in-out;
    -o-transition: all 0.2s ease-in-out;
    -ms-transition: all 0.2s ease-in-out;
    transition: all 0.2s ease-in-out;
}
.ib-main a:hover img{
    opacity: 0.8;
}
The description will be positioned absolutely and we’ll place it out of the box. Then, on hover, we will make it slide in:
说明将绝对定位,我们将其开箱即用。 然后,在悬停时,我们将其滑入:
.ib-main > a > span{
    display: block;
    position: absolute;
    width: 100%;
    height: 20px;
    line-height: 22px;
    text-align: center;
    font-size: 11px;
    bottom: -20px;
    left: 0px;
    text-shadow: 1px 1px 1px rgba(0,0,0,0.4);
    -webkit-transition: all 0.2s ease-in-out;
    -moz-transition: all 0.2s ease-in-out;
    -o-transition: all 0.2s ease-in-out;
    -ms-transition: all 0.2s ease-in-out;
    transition: all 0.2s ease-in-out;
}
.ib-main a:hover > span{
    bottom: 0px;
}
When we click on the thumbnail box, we’ll change the background image in order to show the loading image:
当单击缩略图框时,我们将更改背景图像以显示正在加载的图像:
.ib-main a.ib-loading,
.ib-main a.ib-loading:hover{
    background: #fff url(../images/ajax-loader.gif) no-repeat center center;
    background-size: 31px 31px;
}
.ib-main a.ib-loading img,
.ib-main a.ib-loading:hover img{
    opacity: 0.5;
}
When the thumbnail is in the loading state, we don’t want to show the description:
当缩略图处于加载状态时,我们不想显示说明:
.ib-main > a.ib-loading > span,
.ib-main a.ib-loading > span{
    display: none;
}
Now we’ll style the content boxes. The background is going to be dark:
现在,我们将对内容框进行样式设置。 背景将是黑暗的:
.ib-content{
    background: #f9f9f9;
}
The teaser is the text we’ll be showing in each content box. On hover we want to animate the background color:
前导广告是我们将在每个内容框中显示的文本。 悬停时,我们要设置背景颜色的动画:
.ib-content .ib-teaser{
    text-align: center;
    background: #333;
    width: 100%;
    height: 100%;
    -webkit-transition: all 0.2s ease-in-out;
    -moz-transition: all 0.2s ease-in-out;
    -o-transition: all 0.2s ease-in-out;
    -ms-transition: all 0.2s ease-in-out;
    transition: all 0.2s ease-in-out;
}
.ib-content .ib-teaser:hover{
    background: #000;
}
The headline and the subline will have the following style:
标题和子行将具有以下样式:
.ib-teaser h2{
    color: #fff;
    font-size: 26px;
    line-height: 26px;
    padding-top: 40%;
    text-shadow: 1px 0px 2px rgba(0,0,0,0.2);
}
.ib-teaser h2 span{
    text-transform: none;
    font-size: 16px;
    font-family: Georgia, serif;
    font-style: italic;
    display: block;
}
When the content area gets expanded, we will show the preview container and it will have an absolute position and a dynamic height:
当内容区域扩展时,我们将显示预览容器,它将具有绝对位置和动态高度:
.ib-content-preview{
    position: absolute;
    top: 44px;
    left: 0px;
    background: #000;
    width: 100%;
    /* height dynamic*/
    display: none;
}
The text elements will get some styling:
文本元素将具有一些样式:
.ib-content-preview .ib-teaser h2{
    font-size: 50px;
    padding: 85px 40px 20px 40px;
}
.ib-content-preview .ib-teaser span{
    padding: 20px 0px 0px 5px;
    font-size: 22px;
}
.ib-content-full{
    font-family:'Oswald', serif;
    text-transform: none;
    line-height: 26px;
    margin: 0px 40px;
    border-top: 1px solid #333;
    padding: 20px 0px;
	font-size: 16px;
}
.ib-content-full p{
	padding: 5px 0px;
}
The large preview for the thumbnails will also be of absolute position
缩略图的大预览也将是绝对位置
.ib-preview{
    overflow: hidden;
    position: absolute;
    top: 40px;
    display: none;
}
The description for the large image will be placed in the bottom left corner. We want big letters:
大图像的说明将位于左下角。 我们想要大字母:
.ib-preview-descr{
    position: absolute;
    bottom: 30px;
    left: 10px;
    z-index: 999;
    font-size: 50px;
    text-shadow: 1px 0px 2px rgba(0,0,0,0.2);
}
The image itself will be absolute and the width and height will be set dynamically in the JavaScript:
图片本身将是绝对的,宽度和高度将在JavaScript中动态设置:
.ib-preview img{
	position: absolute;
}
The navigation for the images will be placed on the left and the right side of the screen:
图像的导航将放置在屏幕的左侧和右侧:
.ib-nav span{
	width: 53px;
	height: 87px;
	position: absolute;
	top: 50%;
	margin-top: -43px;
	cursor: pointer;
    text-indent: -9000px;
	opacity: 0.6;
	z-index: 999;
    background: transparent url(../images/nav.png) no-repeat top right;
	right: 10px;
	-webkit-user-select: none;
	-khtml-user-select: none;
	-moz-user-select: none;
	-o-user-select: none;
	user-select: none;
}
.ib-nav span.ib-nav-prev{
	background-position: top left;
	left: 10px;
    right: auto;
}
The closing element will be at the top right corner:
结束元素将在右上角:
.ib-close{
	top: 7px;
	right: 7px;
	background: transparent url(../images/close.png) no-repeat center center;
	position: absolute;
	width: 24px;
	height: 24px;
	cursor: pointer;
	opacity: 0.2;
	z-index: 999;
    text-indent: -9000px;
}
.ib-nav span:hover, .ib-close:hover{
	opacity: 1;
}
Last, but not least, we’ll style the loading element for the large image. We’ll place it in the center of the screen with our 50% and negative margin trick and give it some rounded borders:
最后但并非最不重要的一点,我们将为大图像设置loading元素的样式。 我们将使用50%和负边距技巧将其放置在屏幕中央,并给它一些圆角边框:
.ib-loading-large{
    text-indent: -9000px;
    width: 60px;
    height: 60px;
    background: #fff url(../images/ajax-loader.gif) no-repeat center center;
    position: absolute;
    top: 50%;
    left: 50%;
    margin: -30px 0 0 -30px;
    z-index: 999;
    -moz-border-radius: 10px;
    -webkit-border-radius: 10px;
    border-radius: 10px 10px 10px 10px;
    opacity: 0.9;
}
And that was all the style. Now, let’s take a look at the JavaScript.
这就是所有样式。 现在,让我们看一下JavaScript。
JavaScript (The JavaScript)
Let’s define our template function:
让我们定义我们的模板函数:
var $ibWrapper	= $('#ib-main-wrapper'),

	Template	= (function() {
		...
})();

Template.init();
First, we will set some variables and cache some elements:
首先,我们将设置一些变量并缓存一些元素:
var kinetic_moving				= false,
	// current index of the opened item
	current						= -1,
	// true if the item is being opened / closed
	isAnimating					= false,
	// items on the grid
	$ibItems					= $ibWrapper.find('div.ib-main > a'),
	// image items on the grid
	$ibImgItems					= $ibItems.not('.ib-content'),
	// total image items on the grid
	imgItemsCount				= $ibImgItems.length,
The init function will add a class to all the image items and call the jQuery.kinetic plugin and initialize our main events:
init函数将向所有图像项添加一个类,并调用jQuery.kinetic插件并初始化我们的主要事件:
init						= function() {

		// add a class ib-image to the image items
		$ibImgItems.addClass('ib-image');
		// apply the kinetic plugin to the wrapper
		loadKinetic();
		// load some events
		initEvents();

	},
loadKinetic will set the size of the main wrapper and apply the jQuery.kinetic plugin:
loadKinetic将设置主包装的大小并应用jQuery.kinetic插件:
loadKinetic					= function() {

	setWrapperSize();

	$ibWrapper.kinetic({
		moved	: function() {

			kinetic_moving = true;

		},
		stopped	: function() {

			kinetic_moving = false;

		}
	});

},
setWrapperSize will set the height of the main wrapper by taking the window height and removing the top bar and the bottom bar (which is our demo header actually):
setWrapperSize将通过获取窗口高度并移除顶部栏和底部栏(实际上是我们的演示标题)来设置主包装器的高度:
setWrapperSize				= function() {

	var containerMargins	= $('#ib-top').outerHeight(true) + $('#header').outerHeight(true) + parseFloat( $ibItems.css('margin-top') );
	$ibWrapper.css( 'height', $(window).height() - containerMargins )

},
initEvents calls the openItem function when we click on a box (unless we are dragging) and takes care of the resizing when we change the window size:
当我们单击一个框时(除非我们拖动), initEvents调用openItem函数,并在更改窗口大小时负责调整大小:
initEvents					= function() {

	// open the item only if not dragging the container
	$ibItems.bind('click.ibTemplate', function( event ) {

		if( !kinetic_moving )
			openItem( $(this) );

		return false;

	});

	// on window resize, set the wrapper and preview size accordingly
	$(window).bind('resize.ibTemplate', function( event ) {

		setWrapperSize();

		$('#ib-img-preview, #ib-content-preview').css({
			width	: $(window).width(),
			height	: $(window).height()
		})

	});

},
When we click on an item, depending on which item we clicked, we’ll load a full image or a content area:
当我们单击一个项目时,根据我们单击的项目,我们将加载完整图像或内容区域:
openItem					= function( $item ) {

	if( isAnimating ) return false;

	// if content item
	if( $item.hasClass('ib-content') ) {

		isAnimating	= true;
		current	= $item.index('.ib-content');
		loadContentItem( $item, function() { isAnimating = false; } );

	}
	// if image item
	else {

		isAnimating	= true;
		current	= $item.index('.ib-image');
		loadImgPreview( $item, function() { isAnimating = false; } );

	}

},
If we click on a thumbnail, we’ll load and expand to the respective large image. We will use the jQuery template for the large image preview and set it to the same position like the currently clicked item. Initially having the same size, it will then expand first in width to fit the window and then in height:
如果单击缩略图,则将加载并扩展到相应的大图像。 我们将使用jQuery模板进行大图像预览,并将其设置为与当前单击的项目相同的位置。 最初具有相同的大小,然后将首先在宽度上扩展以适合窗口,然后在高度上扩展:
loadImgPreview				= function( $item, callback ) {

	var largeSrc		= $item.children('img').data('largesrc'),
		description		= $item.children('span').text(),
		largeImageData	= {
			src			: largeSrc,
			description	: description
		};

	// preload large image
	$item.addClass('ib-loading');

	preloadImage( largeSrc, function() {

		$item.removeClass('ib-loading');

		var hasImgPreview	= ( $('#ib-img-preview').length > 0 );

		if( !hasImgPreview )
			$('#previewTmpl').tmpl( largeImageData ).insertAfter( $ibWrapper );
		else
			$('#ib-img-preview').children('img.ib-preview-img').attr( 'src', largeSrc );

		//get dimentions for the image, based on the windows size
		var	dim	= getImageDim( largeSrc );

		$item.removeClass('ib-img-loading');

		//set the returned values and show/animate preview
		$('#ib-img-preview').css({
			width	: $item.width(),
			height	: $item.height(),
			left	: $item.offset().left,
			top		: $item.offset().top
		}).children('img.ib-preview-img').hide().css({
			width	: dim.width,
			height	: dim.height,
			left	: dim.left,
			top		: dim.top
		}).fadeIn( 400 ).end().show().animate({
			width	: $(window).width(),
			left	: 0
		}, 500, 'easeOutExpo', function() {

			$(this).animate({
				height	: $(window).height(),
				top		: 0
			}, 400, function() {

				var $this	= $(this);
				$this.find('span.ib-preview-descr, span.ib-close').show()
				if( imgItemsCount > 1 )
					$this.find('div.ib-nav').show();

				if( callback ) callback.call();

			});

		});

		if( !hasImgPreview )
			initImgPreviewEvents();

	} );

},
With the same effect of expanding, we’ll open a content area, too. Here we have to take care of the text elements:
具有相同的扩展效果,我们还将打开内容区域。 在这里,我们必须注意文本元素:
loadContentItem				= function( $item, callback ) {

	var hasContentPreview	= ( $('#ib-content-preview').length > 0 ),
		teaser				= $item.children('div.ib-teaser').html(),
		content				= $item.children('div.ib-content-full').html(),
		contentData			= {
			teaser		: teaser,
			content		: content
		};

	if( !hasContentPreview )
		$('#contentTmpl').tmpl( contentData ).insertAfter( $ibWrapper );

	//set the returned values and show/animate preview
	$('#ib-content-preview').css({
		width	: $item.width(),
		height	: $item.height(),
		left	: $item.offset().left,
		top		: $item.offset().top
	}).show().animate({
		width	: $(window).width(),
		left	: 0
	}, 500, 'easeOutExpo', function() {

		$(this).animate({
			height	: $(window).height(),
			top		: 0
		}, 400, function() {

			var $this	= $(this),
				$teaser	= $this.find('div.ib-teaser'),
				$content= $this.find('div.ib-content-full'),
				$close	= $this.find('span.ib-close');

			if( hasContentPreview ) {
				$teaser.html( teaser )
				$content.html( content )
			}

			$teaser.show();
			$content.show();
			$close.show();

			if( callback ) callback.call();

		});

	});

	if( !hasContentPreview )
		initContentPreviewEvents();

},
A little helper function for preloading images:
一个用于预加载图像的辅助功能:
// preloads an image
preloadImage				= function( src, callback ) {

	$('<img/>').load(function(){

		if( callback ) callback.call();

	}).attr( 'src', src );

},
The next function takes care of loading the events for the large image preview : navigation, close button, and window resize:
下一个功能负责为大图像预览加载事件:导航,关闭按钮和窗口调整大小:
initImgPreviewEvents		= function() {

	var $preview	= $('#ib-img-preview');

	$preview.find('span.ib-nav-prev').bind('click.ibTemplate', function( event ) {

		navigate( 'prev' );

	}).end().find('span.ib-nav-next').bind('click.ibTemplate', function( event ) {

		navigate( 'next' );

	}).end().find('span.ib-close').bind('click.ibTemplate', function( event ) {

		closeImgPreview();

	});

	//resizing the window resizes the preview image
	$(window).bind('resize.ibTemplate', function( event ) {

		var $largeImg	= $preview.children('img.ib-preview-img'),
			dim			= getImageDim( $largeImg.attr('src') );

		$largeImg.css({
			width	: dim.width,
			height	: dim.height,
			left	: dim.left,
			top		: dim.top
		})

	});

},
For the content preview we’ll also have to load the event for the closing functionality:
对于内容预览,我们还必须加载事件以提供关闭功能:
initContentPreviewEvents	= function() {

	$('#ib-content-preview').find('span.ib-close').bind('click.ibTemplate', function( event ) {

		closeContentPreview();

	});

},
Next, we’ll define the function that takes care of navigating through the large images in fullscreen:
接下来,我们将定义用于全屏浏览大图像的函数:
// navigate the image items in fullscreen mode
navigate					= function( dir ) {

	if( isAnimating ) return false;

	isAnimating		= true;

	var $preview	= $('#ib-img-preview'),
		$loading	= $preview.find('div.ib-loading-large');

	$loading.show();

	if( dir === 'next' ) {

		( current === imgItemsCount - 1 ) ? current	= 0 : ++current;

	}
	else if( dir === 'prev' ) {

		( current === 0 ) ? current	= imgItemsCount - 1 : --current;

	}

	var $item		= $ibImgItems.eq( current ),
		largeSrc	= $item.children('img').data('largesrc'),
		description	= $item.children('span').text();

	preloadImage( largeSrc, function() {

		$loading.hide();

		//get dimentions for the image, based on the windows size
		var	dim	= getImageDim( largeSrc );

		$preview.children('img.ib-preview-img')
						.attr( 'src', largeSrc )
						.css({
			width	: dim.width,
			height	: dim.height,
			left	: dim.left,
			top		: dim.top
						})
						.end()
						.find('span.ib-preview-descr')
						.text( description );

		$ibWrapper.scrollTop( $item.offset().top )
				  .scrollLeft( $item.offset().left );

		isAnimating	= false;

	});

},
The following function is for closing the fullscreen image preview:
以下功能用于关闭全屏图像预览:
closeImgPreview				= function() {

	if( isAnimating ) return false;

	isAnimating	= true;

	var $item	= $ibImgItems.eq( current );

	$('#ib-img-preview').find('span.ib-preview-descr, div.ib-nav, span.ib-close')
					.hide()
					.end()
					.animate({
						height	: $item.height(),
						top		: $item.offset().top
						}, 500, 'easeOutExpo', function() {

						$(this).animate({
							width	: $item.width(),
							left	: $item.offset().left
							}, 400, function() {

								$(this).fadeOut(function() {isAnimating	= false;});

						} );

					});

},
For the content preview we will also need such a function:
对于内容预览,我们还将需要这样的功能:
// closes the fullscreen content item
closeContentPreview			= function() {

	if( isAnimating ) return false;

	isAnimating	= true;

	var $item	= $ibItems.not('.ib-image').eq( current );

	$('#ib-content-preview').find('div.ib-teaser, div.ib-content-full, span.ib-close')
							.hide()
							.end()
							.animate({
								height	: $item.height(),
								top		: $item.offset().top
							}, 500, 'easeOutExpo', function() {

								$(this).animate({
									width	: $item.width(),
									left	: $item.offset().left
								}, 400, function() {

									$(this).fadeOut(function() {isAnimating	= false;});

								} );

							});

},
getImageDim will get the size of an image and make it centered in fullscreen:
getImageDim将获取图像的大小并将其置于全屏中心:
getImageDim					= function( src ) {

	var img     	= new Image();
	img.src     	= src;

	var w_w	= $(window).width(),
		w_h	= $(window).height(),
		r_w	= w_h / w_w,
		i_w	= img.width,
		i_h	= img.height,
		r_i	= i_h / i_w,
		new_w, new_h,
		new_left, new_top;

	if( r_w > r_i ) {

		new_h	= w_h;
		new_w	= w_h / r_i;

	}
	else {

		new_h	= w_w * r_i;
		new_w	= w_w;

	}

	return {
		width	: new_w,
		height	: new_h,
		left	: (w_w - new_w) / 2,
		top		: (w_h - new_h) / 2
	};

};
And that’s it! I hope you enjoyed making this template with me and find it useful!
就是这样! 希望您喜欢与我一起制作此模板,并发现它有用!
翻译自: https://tympanus.net/codrops/2011/10/07/draggable-image-boxes-grid/
spine网格拖动


 4238
4238

 被折叠的 条评论
为什么被折叠?
被折叠的 条评论
为什么被折叠?
 到【灌水乐园】发言


