


If you’ve set up a mapped network drive on Windows 10, Windows Defender won’t scan it for viruses or malware by default during its scheduled scans. Here’s how to ensure your network drives are scanned.
如果您已在Windows 10上设置了映射的网络驱动器,则默认情况下,Windows Defender在其计划扫描期间将不会对其进行扫描,以查看是否有病毒或恶意软件。 这是确保扫描网络驱动器的方法。
家庭用户:通过注册表启用映射的网络驱动器扫描 (Home Users: Enable Mapped Network Drive Scanning via the Registry)
If you have Windows 10 Home, you’ll have to edit the Windows Registry—or use PowerShell, which we’ll cover later—to make this change. You can also do it this way if you have Windows 10 Professional or Enterprise but just feel more comfortable working in the Registry as opposed to Group Policy Editor. (If you have Windows 10 Pro or Enterprise, however, we recommend using the easier Group Policy Editor, as described in the next section.)
如果您使用Windows 10 Home,则必须编辑Windows注册表(或使用稍后将介绍的PowerShell)进行此更改。 如果您使用的是Windows 10专业版或企业版,但与组策略编辑器相比,在注册表中工作更自在,则也可以通过这种方式进行操作。 (但是,如果您使用Windows 10 Pro或Enterprise,我们建议使用更简单的组策略编辑器,如下一节所述。)
Here’s our standard warning: Registry Editor is a powerful tool, and misusing it can render your system unstable or even inoperable. This is a pretty simple hack, and as long as you stick to the instructions, you shouldn’t have any problems. That said, if you’ve never worked with it before, consider reading about how to use the Registry Editor before you get started. And, definitely back up the Registry (and your computer!) before making changes.
这是我们的标准警告:注册表编辑器是一个功能强大的工具,滥用它会使您的系统不稳定甚至无法运行。 这是一个非常简单的技巧,只要您按照说明进行操作,就不会有任何问题。 也就是说,如果您以前从未使用过它,请在开始之前考虑阅读有关如何使用注册表编辑器的信息。 并且,在进行更改之前,一定要备份注册表(和您的计算机!)。
You should also make a System Restore point before continuing. Windows will probably do this automatically when you install an update, but it couldn’t hurt to make one manually—that way, if something goes wrong, you can always roll back.
您还应该在继续之前创建系统还原点。 Windows可能会在安装更新时自动执行此操作,但手动进行更新不会有任何伤害-这样,如果出现问题,您可以随时回滚。
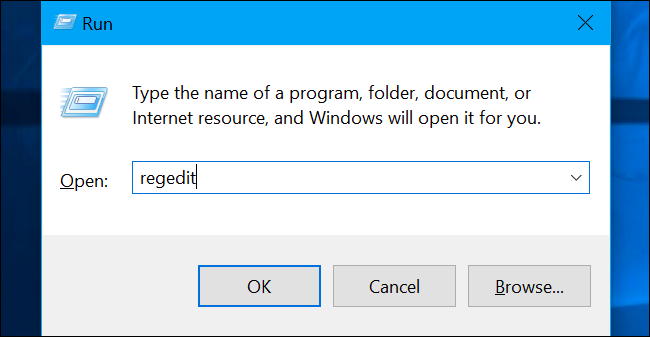
When you’re ready, open the Registry Editor by pressing Windows+R on your keyboard, typing “regedit” into the box, and then pressing Enter.
准备就绪后,通过按键盘上的Windows + R并在框中键入“ regedit”,然后按Enter打开注册表编辑器。
Navigate to the following key in the left sidebar:
导航到左侧栏中的以下键:
Computer\HKEY_LOCAL_MACHINE\SOFTWARE\Policies\Microsoft\Windows Defender\Scan
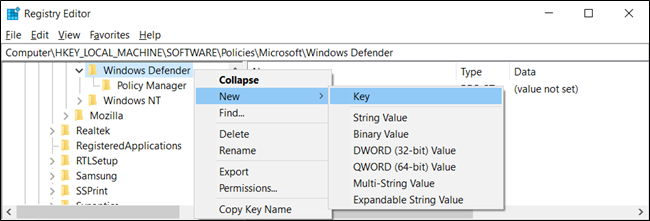
If you don’t see a “Scan” key (folder) below the Windows Defender folder, right-click the Windows Defender folder and select New > Key. Name it “Scan”.
如果在Windows Defender文件夹下面没有看到“扫描”键(文件夹),请右键单击Windows Defender文件夹,然后选择“新建”>“键”。 将其命名为“扫描”。
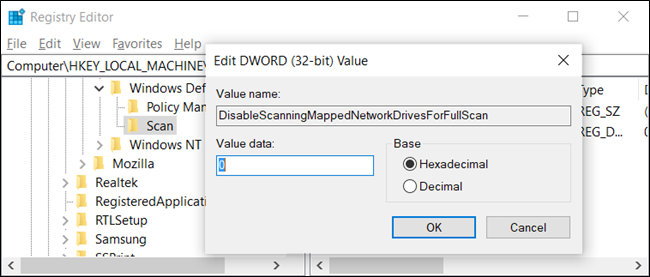
Right-click the “Scan” key (folder) in the left pane and select New > DWORD (32-bit) Value.
右键单击左窗格中的“扫描”键(文件夹),然后选择“新建”>“ DWORD(32位)值”。
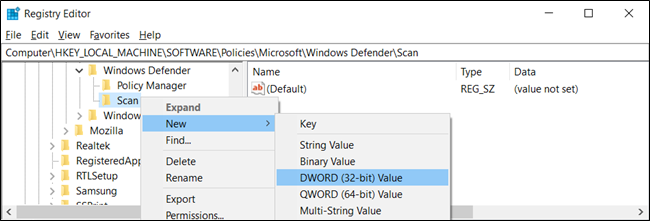
Name the value “DisableScanningMappedNetworkDrivesForFullScan”. Double-click it and set the Value data to “0”.
将值命名为“ DisableScanningMappedNetworkDrivesForFullScan”。 双击它,然后将数值数据设置为“ 0”。
You can now close the Registry Editor and restart your computer to apply the settings to Windows Defender.
现在,您可以关闭注册表编辑器并重新启动计算机,以将设置应用于Windows Defender。
下载我们的一键式注册表黑客 (Download Our One-Click Registry Hack)
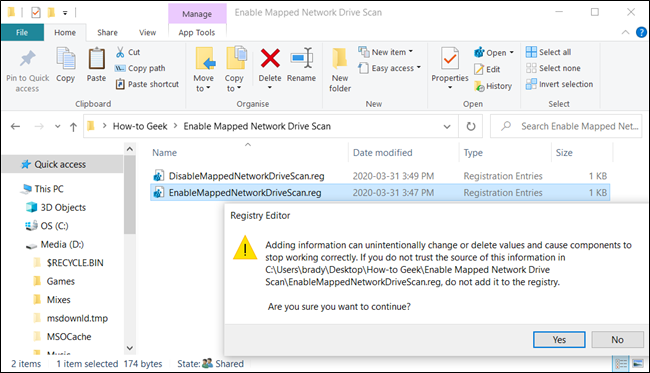
Rather than editing the registry yourself, you can download our Enable Mapped Network Drive Scan registry hack. Just open the downloaded ZIP file, double-click the “EnableMappedNetworkDriveScan.reg” file, and agree to add the information to your registry. We’ve also included a “DisableMappedNetworkDriveScan.reg” if you’d like to disable it again.
您可以下载我们的Enable Mapped Network Drive Scan注册表hack ,而不必自己编辑注册表。 只需打开下载的ZIP文件,双击“ EnableMappedNetworkDriveScan.reg”文件,然后同意将信息添加到您的注册表即可。 如果您想再次禁用它,我们还将包含一个“ DisableMappedNetworkDriveScan.reg”。
These REG files just change the same registry setting we outlined above. If you’d like to see what this or any other REG file will do before you run it, you can right-click the file .reg and select “Edit” to open it in Notepad. You can easily make your own Registry hacks.
这些REG文件只是更改了我们上面概述的注册表设置。 如果您想在运行此文件或任何其他REG文件之前先查看其功能,则可以右键单击.reg文件,然后选择“编辑”以在记事本中打开它。 您可以轻松地创建自己的注册表黑客。
家庭用户:通过PowerShell启用映射的网络驱动器扫描 (Home Users: Enable Mapped Network Drive Scanning via PowerShell)
If you don’t feel comfortable editing keys in the Windows Registry, you can enable the option to scan network drives with PowerShell instead. There’s less risk using PowerShell, and you won’t have to worry about potentially messing with critical system settings. Just copy/paste the premade cmdlets we’ve prepared for this guide.
如果您不满意在Windows注册表中编辑密钥,则可以启用该选项,以使用PowerShell扫描网络驱动器。 使用PowerShell的风险较小,您不必担心可能会危及关键系统设置。 只需复制/粘贴我们为本指南准备的预制cmdlet。
Start by opening an elevated instance of PowerShell. To do so, click the Start button, and then type “Powershell”. Right-click “Windows PowerShell,” and then select “Run as Administrator” from the menu.
首先打开PowerShel l的提升实例。 为此,请单击“开始”按钮,然后键入“ Powershell”。 右键单击“ Windows PowerShell”,然后从菜单中选择“以管理员身份运行”。

Click “Yes” in the prompt that appears to allow access to your computer.
在出现的提示中单击“是”以允许访问您的计算机。
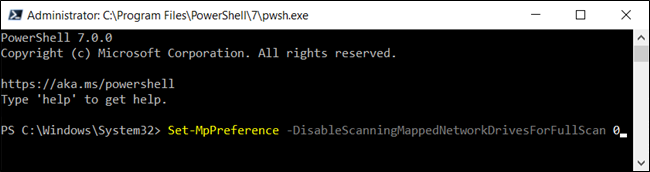
In the PowerShell window, type the following cmdlet:
在PowerShell窗口中,键入以下cmdlet:
Set-MpPreference -DisableScanningMappedNetworkDrivesForFullScan 0
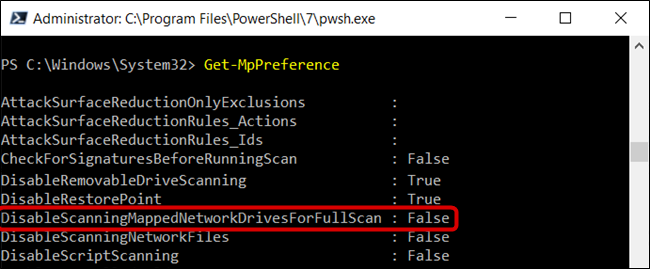
Press Enter to run the command. The PowerShell console won’t confirm the option is set, but you can check it yourself. Type in the following command, look for the value “DisableScanningMappedNetworkDrivesForFullScan” and make sure it’s set to “False.”
按Enter键运行命令。 PowerShell控制台不会确认设置了该选项,但是您可以自己检查它。 键入以下命令,查找值“ DisableScanningMappedNetworkDrivesForFullScan”,并确保将其设置为“ False”。
Get-MpPreference
If you want to disable the mapped network drive scan again, retype the command but put a “1” instead of a “0” before pressing the enter key.
如果要再次禁用映射的网络驱动器扫描,请重新输入命令,但在按Enter键之前输入“ 1”而不是“ 0”。

You can now close PowerShell safely.
现在,您可以安全地关闭PowerShell。
专业版和企业版用户:通过组策略启用映射的网络驱动器扫描 (Pro and Enterprise Users: Enable Mapped Network Drive Scan via Group Policy)
If you’re using Windows 10 Professional or Enterprise, the easiest way to enable the mapped network drive scan is by using the Local Group Policy Editor. It’s a pretty powerful tool, so if you’ve never used it before, it’s worth taking some time to learn what it can do. Also, if you’re on a company network, do everyone a favor and check with your admin first. If your work computer is part of a domain, it’s also likely that it’s part of a domain group policy that will supersede the local group policy, anyway.
如果您使用的是Windows 10专业版或企业版,则启用映射的网络驱动器扫描的最简单方法是使用本地组策略编辑器。 这是一个非常强大的工具,因此,如果您以前从未使用过它,那么值得花一些时间来学习它可以做什么。 另外,如果您在公司网络中,请给所有人一个帮助,并首先与您的管理员联系。 如果您的工作计算机是域的一部分,则它也很可能是域组策略的一部分,无论如何,该组策略将取代本地组策略。
You should also make a System Restore point before continuing. Windows will probably do this automatically when you install the Anniversary Update. Still, it couldn’t hurt to make one manually—that way, if something goes wrong, you can always roll back.
您还应该在继续之前创建系统还原点。 安装周年更新时,Windows可能会自动执行此操作。 尽管如此,手动制作也不会有任何伤害-这样,如果出现问题,您可以随时回退。
First, launch the group policy editor by pressing Windows+R, typing “gpedit.msc” into the box and pressing the Enter key.
首先,通过按Windows + R,在框中键入“ gpedit.msc”并按Enter键,启动组策略编辑器。

Navigate to Computer Configuration > Administrative Templates > Windows Components > Windows Defender Antivirus > Scan.
导航到计算机配置>管理模板> Windows组件> Windows Defender防病毒>扫描。
Update: According to a commenter, you might instead have to navigate to Computer Configuration > Administrative Templates > Windows Components > Microsoft Defender Antivirus > Scan depending on which version of Windows 10 is running on your machine.
更新:根据评论者的说法,您可能不得不导航到计算机配置>管理模板> Windows组件> Microsoft Defender防病毒>扫描,具体取决于计算机上正在运行的Windows 10版本。
Locate the “Run full scan on mapped network drives” setting in the right-hand pane and double-click on it.
在右侧窗格中找到“在映射的网络驱动器上运行全面扫描”设置,然后双击它。

Set “Run full scan on mapped network drives” to “Enabled” and click “OK” to save the changes.
将“在映射的网络驱动器上运行全面扫描”设置为“启用”,然后单击“确定”以保存更改。

All changes have been saved and will take effect immediately. You can now close the group policy editor, and there is no need to restart your PC.
所有更改已保存,将立即生效。 现在,您可以关闭组策略编辑器,而无需重新启动PC。
To disable mapped network drive scans, return here, double-click the “Run full scan on mapped network drives” setting, and change it to “Not configured” or “Disabled”.
要禁用映射的网络驱动器扫描,请返回此处,双击“在映射的网络驱动器上运行全面扫描”设置,然后将其更改为“未配置”或“禁用”。
翻译自: https://www.howtogeek.com/665755/how-to-scan-mapped-network-drives-with-windows-defender/


 1717
1717

 被折叠的 条评论
为什么被折叠?
被折叠的 条评论
为什么被折叠?
 到【灌水乐园】发言


