Social media is an important source of traffic for many websites including our own. We have extensively covered social media integration in WordPress. Whether you want to add a twitter button, google+ button or facebook Like / fan box, we have got you covered. One of our readers recently asked us if there was a tool that allows you to automatically schedule WordPress posts for social media. The first one that comes to mind is BufferApp because we use it for our projects. In this article, we will show you how to schedule WordPress posts for social media with BufferApp.
社交媒体是许多网站(包括我们自己的网站)的重要流量来源。 我们已经广泛介绍了WordPress中的社交媒体集成。 无论您是要添加Twitter按钮 , Google +按钮还是Facebook Like / fan box ,我们都可以满足您的要求。 我们的一位读者最近问我们是否有一种工具可以让您自动安排社交媒体的WordPress帖子。 想到的第一个是BufferApp,因为我们在项目中使用它。 在本文中,我们将向您展示如何使用BufferApp安排社交媒体的WordPress帖子。
什么是BufferApp? (What is BufferApp?)

BufferApp is a web based status scheduling service that allows you to post across various social networks. In their own words, BufferApp is a smarter way to share things. It allows you to integrate your Facebook, Twitter, and Linkedin to one single BufferApp account. You can use one single dashboard to share things on all your networks. It also offers analytics, easy scheduling of posts, and URL shortening. BufferApp also allows you to add team members, which is great for dividing up social media activities.
BufferApp是一项基于Web的状态调度服务,可让您在各种社交网络中发布信息。 用自己的话说,BufferApp是一种共享事物的更智能的方式。 它使您可以将Facebook,Twitter和Linkedin集成到一个BufferApp帐户。 您可以使用一个仪表板在所有网络上共享内容。 它还提供分析,轻松安排帖子和缩短URL的功能 。 BufferApp还允许您添加团队成员,这对于划分社交媒体活动非常有用。
影片教学 (Video Tutorial)
If you don’t like the video or need more instructions, then continue reading.
如果您不喜欢该视频或需要更多说明,请继续阅读。
设置WordPress进行缓冲 (Setting up WordPress to Buffer)
First thing you need to do is sign up for a Buffer account. Go to BufferApp and sign up. You can also sign up using your Twitter, Facebook, or Linkedin account. Once you have signed up, you will be taken to your Buffer Dashboard.
您需要做的第一件事是注册一个Buffer帐户。 转到BufferApp并注册。 您也可以使用您的Twitter,Facebook或Linkedin帐户进行注册。 注册后,您将被带到缓冲区仪表板。
Now that we have created a Buffer account, the next thing is to connect WordPress to your Buffer account. To do that, install and activate WP to Buffer plugin on your site. After activating the plugin, go to Settings » Buffer.
既然我们已经创建了一个Buffer帐户,下一步就是将WordPress连接到您的Buffer帐户。 为此,请在您的站点上安装并激活WP到Buffer插件。 激活插件后,转到设置»缓冲区 。

In order to connect your WordPress site to your Buffer account, you need to create a Buffer App. The plugin will show you a link to create an app. Below the link it will also show you a callback URL which you need to copy because you will need it in the next step. Click on ‘Registering an Application’ link which will take you to Buffer App’s developer website.
为了将您的WordPress网站连接到您的Buffer帐户,您需要创建一个Buffer App。 该插件将为您显示创建应用程序的链接。 在链接下方,它还将显示一个您需要复制的回调URL,因为下一步将需要它。 单击“注册应用程序”链接,该链接将带您到Buffer App的开发人员网站。
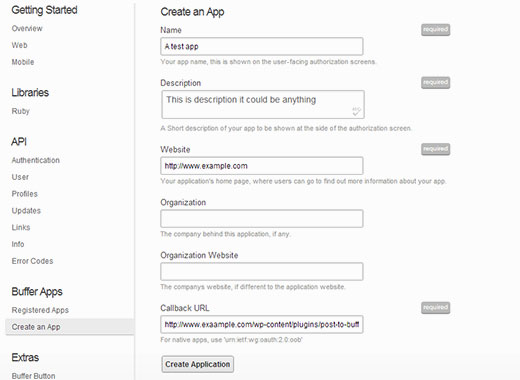
Provide a name and description for your app, for e.g. your website title and description. In the website field provide the URL of your site. In the callback URL field enter the URL shown by WP to Buffer plugin. After filling all the required fields, press the create application button. Buffer will now send you an email with a link to access your token. Clicking on that link will take you back to Buffer’s website where you can see your Client ID and Access token. Copy these and paste them into your WP to Buffer settings page.
提供您的应用程序的名称和描述,例如您的网站标题和描述。 在网站字段中,提供您网站的URL。 在回调URL字段中,输入WP到Buffer插件显示的URL。 填写所有必填字段后,按创建应用程序按钮。 缓冲区现在将向您发送一封电子邮件,其中包含用于访问您的令牌的链接。 单击该链接将带您回到Buffer的网站,您可以在其中看到您的客户端ID和访问令牌。 复制这些并将它们粘贴到WP的“缓冲区设置”页面中。
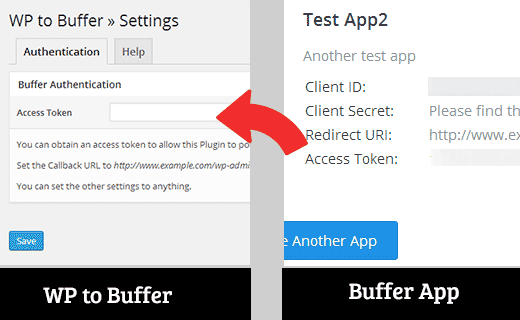
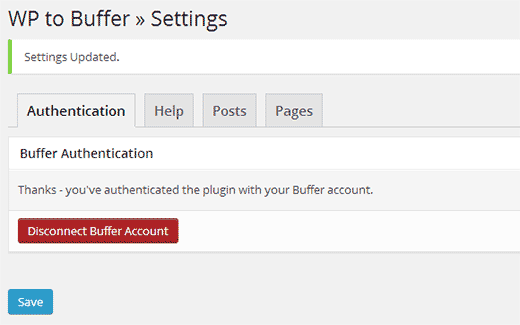
That’s all, your WordPress site is now connected to the Buffer App.
就是这样,您的WordPress网站现在已连接到Buffer App。
使用缓冲区计划或发布社交媒体的帖子 (Schedule or Publish Posts for Social Media using Buffer)
To automatically share posts when they are published, you need to go to WP 2 Buffer settings page and click on Posts tab. You can auto share your posts via Buffer when they are published or updated. Select On Publish and then choose your social media accounts to post to before saving your changes.
要在发布时自动共享帖子,您需要转到WP 2缓冲区设置页面,然后单击“帖子”选项卡。 发布或更新帖子时,您可以通过Buffer自动共享它们。 选择“发布时”,然后选择要保存到其中的社交媒体帐户。
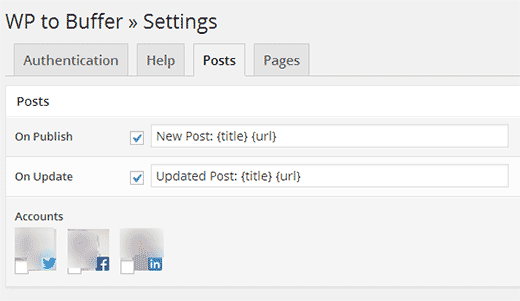
If you haven’t turned on scheduling on Buffer, then your WordPress posts will be shared on selected social media websites as soon as you hit the publish button.
如果您尚未在Buffer上打开计划,则您的WordPress帖子将在您点击“发布”按钮后立即在选定的社交媒体网站上共享。
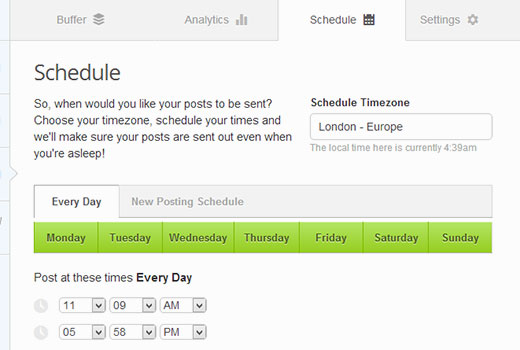
To enable scheduling, go to BufferApp dashboard and click on Scheduling tab. You can set a timezone and select different times to share your posts.
要启用调度,请转到BufferApp仪表板,然后单击“调度”选项卡。 您可以设置时区并选择其他时间来分享您的信息。
We hope that this article helped you schedule WordPress posts for social media using BufferApp. Let us know what you are using to connect WordPress to your social media accounts by leaving a comment below.
我们希望本文能帮助您使用BufferApp为社交媒体安排WordPress帖子。 通过在下面留下评论,让我们知道您正在使用什么将WordPress连接到您的社交媒体帐户。
翻译自: https://www.wpbeginner.com/plugins/how-to-schedule-wordpress-posts-for-social-media-with-bufferapp/


 497
497

 被折叠的 条评论
为什么被折叠?


