wordpress添加媒体
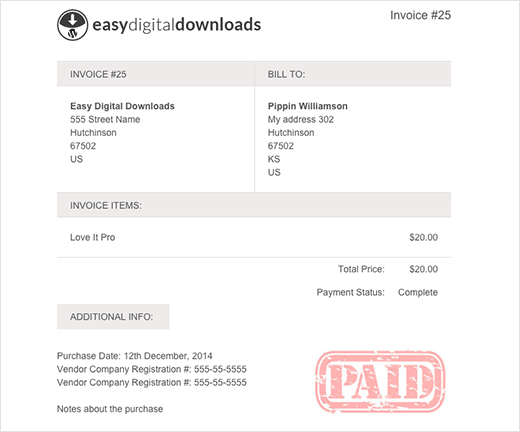
If you run an eCommerce site, then your customers may want to print out invoices for their purchase. We use Easy Digital Downloads on our OptinMonster website. Easy Digital Downloads is an eCommerce plugin for WordPress, which allows you to sell things online. In this article, we will show you how to add customer invoices to Easy Digital Downloads in WordPress.
如果您经营一个电子商务网站,那么您的客户可能希望打印出购买的发票。 我们在OptinMonster网站上使用Easy Digital Downloads 。 Easy Digital Downloads是WordPress的电子商务插件,可让您在线销售商品。 在本文中,我们将向您展示如何在WordPress中将客户发票添加到Easy Digital Downloads。

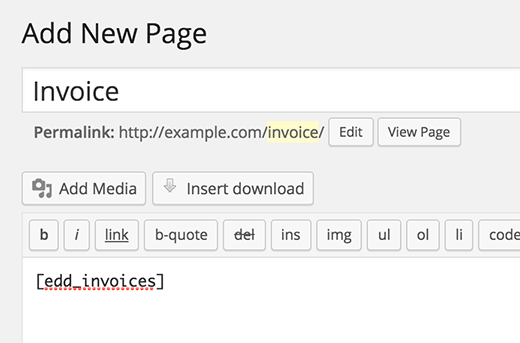
First thing you need to do is install and activate EDD Invoices plugin. Upon activation, simply create a new page in WordPress. This page will be used to display invoices to users.
您需要做的第一件事是安装并激活EDD Invoices插件。 激活后,只需在WordPress中创建一个新页面 。 此页面将用于向用户显示发票。
Give this page an appropriate title, and enter [edd_invoices] shortcode.
给这个页面适当的标题,并输入[edd_invoices] 简码 。

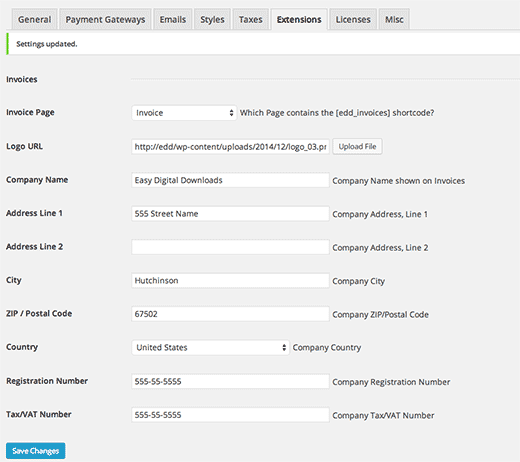
Now its time to configure the invoice settings. Simply visit Easy Digital Downloads settings page under Downloads » Settings and click on the Extensions tab.
现在可以配置发票设置了。 只需访问下载»设置下的轻松数字下载设置页面,然后单击扩展选项卡。

Next, select the page you just created as your invoice page and fill out your company information. Don’t forget to press ‘Save changes’ button to store your settings.
接下来,选择刚创建的页面作为发票页面,并填写公司信息。 不要忘记按“保存更改”按钮来保存您的设置。
That’s all. Your customers will now be able to see a ‘Generate Invoice’ link on their purchase history page.
就这样。 您的客户现在将能够在其购买历史记录页面上看到“生成发票”链接。

If you want to place a link to the invoice generator in customer’s purchase receipt email, then follow the steps below.
如果要在客户的购买收据电子邮件中放置到发票生成器的链接,请按照以下步骤操作。
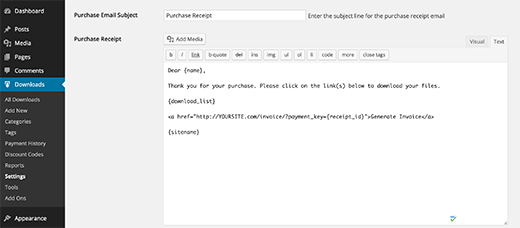
To edit the email user receive for their purchase, you need to visit Downloads » Settings and click on the Emails tab.
要编辑用户收到的购买电子邮件,您需要访问下载»设置 ,然后单击电子邮件选项卡。

Next, switch to the plain Text editor and add the link in this format:
接下来,切换到纯文本编辑器并以这种格式添加链接:
<a href="http://example.com/invoice/?payment_key={receipt_id}">Generate Invoice</a>
<a href="http://example.com/invoice/?payment_key={receipt_id}">Generate Invoice</a>
Don’t forget to replace example.com with your own domain name and press the save changes button to store your settings.
不要忘记用您自己的域名替换example.com ,然后按保存更改按钮以存储您的设置。
We hope this article helped you add invoices to Easy Digital Downloads in WordPress. You may also want to checkout our guide on how to create invoices for clients using WordPress.
我们希望本文能帮助您将发票添加到WordPress中的Easy Digital Downloads。 您可能还需要查看有关如何使用WordPress 为客户创建发票的指南。
If you liked this article, then please subscribe to our YouTube Channel for WordPress video tutorials. You can also find us on Twitter and Google+.
如果您喜欢这篇文章,请订阅我们的YouTube频道 WordPress视频教程。 您也可以在Twitter和Google+上找到我们。
wordpress添加媒体


 576
576

 被折叠的 条评论
为什么被折叠?


