Do you want to add custom styles in the WordPress visual editor? Adding custom styles allows you to quickly apply formatting without switching to text editor. In this article, we will show you how to add custom styles to the WordPress visual editor.
您是否要在WordPress视觉编辑器中添加自定义样式? 添加自定义样式使您无需切换到文本编辑器即可快速应用格式。 在本文中,我们将向您展示如何向WordPress可视编辑器添加自定义样式。

Note: This tutorial requires basic working knowledge of CSS.
注意:本教程需要CSS的基本工作知识。
为什么以及何时需要WordPress Visual Editor的自定义样式 (Why and When You Need Custom Styles for WordPress Visual Editor)
By default, WordPress visual editor comes with some basic formatting and style options. However, sometimes you may need custom styles of your own to add CSS buttons, content blocks, taglines, etc.
默认情况下,WordPress 可视编辑器附带一些基本的格式和样式选项。 但是,有时您可能需要自己的自定义样式来添加CSS按钮 , 内容块 ,标语等。
You can always switch from visual to text editor and add custom HTML and CSS. But if you regularly use some styles, then it would be best to add them into visual editor so that you can easily reuse them.
您始终可以从视觉编辑器切换到文本编辑器,并添加自定义HTML和CSS。 但是,如果您经常使用某些样式,则最好将它们添加到可视化编辑器中,以便您可以轻松地重用它们。
This will save you time spent on switching back and forth between text and visual editor. It will also allow you to consistently use the same styles throughout your website.
这样可以节省您在文本和可视编辑器之间来回切换的时间。 它还将允许您在整个网站中始终使用相同的样式。
Most importantly, you can easily tweak or update styles without having to edit posts on your website.
最重要的是,您可以轻松地调整或更新样式,而无需编辑网站上的帖子。
Having said that, let’s take a look at how to add custom styles in WordPress visual editor.
话虽如此,让我们看一下如何在WordPress可视编辑器中添加自定义样式。
方法1:使用插件在Visual Editor中添加自定义样式 (Method 1: Add Custom Styles in Visual Editor Using Plugin)
First thing you need to do is install and activate the TinyMCE Custom Styles plugin. For more details, see our step by step guide on how to install a WordPress plugin.
您需要做的第一件事是安装并激活TinyMCE自定义样式插件。 有关更多详细信息,请参阅有关如何安装WordPress插件的分步指南。
Upon activation, you need to visit Settings » TinyMCE Custom Styles page to configure the plugin settings.
激活后,您需要访问设置»TinyMCE自定义样式页面来配置插件设置。

The plugin allows you to choose the location of stylesheet files. It can use your theme or child theme’s stylesheets, or you can choose a custom location of your own.
该插件允许您选择样式表文件的位置。 它可以使用主题或子主题的样式表,也可以选择自己的自定义位置。
After that, you need to click on the ‘Save All Settings’ button to store your changes.
之后,您需要单击“保存所有设置”按钮来存储您的更改。
Now you can add your custom styles. You need to scroll down a little to the style section and click on the Add new style button.
现在,您可以添加自定义样式。 您需要向下滚动到样式部分,然后单击添加新样式按钮。
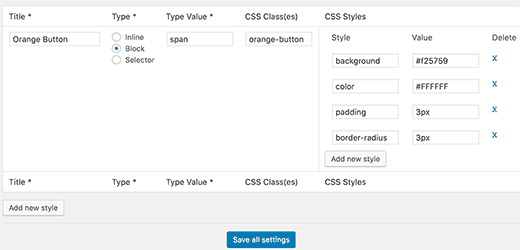
First you need to enter a title for the style. This title will be displayed in the drop down menu. Next, you need to choose whether it is an inline, block, or selector element.
首先,您需要输入样式的标题。 该标题将显示在下拉菜单中。 接下来,您需要选择它是内联元素,块元素还是选择器元素。
After that add a CSS class and then add your CSS rules as shown in the screenshot below.
之后,添加一个CSS类,然后添加您CSS规则,如下面的屏幕快照所示。

Once you have added a CSS style, simply click on the ‘Save All Settings’ button to store your changes.
添加CSS样式后,只需单击“保存所有设置”按钮以存储您的更改。
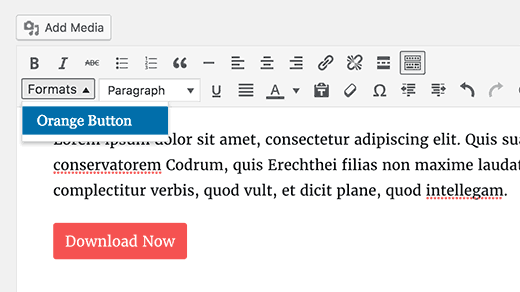
You can now edit an existing post or create a new one. You will notice a Format drop down menu in the second row of WordPress visual editor.
现在,您可以编辑现有帖子或创建新帖子。 您会在WordPress可视编辑器的第二行中看到格式下拉菜单。

Simply select some text in the editor and then select your custom style from the Formats dropdown menu to apply it.
只需在编辑器中选择一些文本,然后从“格式”下拉菜单中选择您的自定义样式即可应用它。
You can now preview your post to see that your custom styles are applied correctly.
现在,您可以预览您的帖子,以查看您的自定义样式已正确应用。
方法2:手动将自定义样式添加到WordPress可视编辑器 (Method 2: Manually Add Custom Styles to WordPress Visual Editor)
This method requires you to manually add code to your WordPress files. If this is your first time adding code to WordPress, then please see our guide on adding code snippets from web into WordPress.
此方法要求您手动将代码添加到WordPress文件中。 如果这是您第一次向WordPress添加代码,请参阅我们的指南,以将网络中的代码片段添加到WordPress中 。
Step 1: Add a custom styles drop down menu in WordPress Visual Editor
步骤1:在WordPress视觉编辑器中添加自定义样式下拉菜单
First, we will add a Formats drop down menu in the WordPress visual editor. This drop down menu will then allow us to select and apply our custom styles.
首先,我们将在WordPress可视编辑器中添加“格式”下拉菜单。 然后,该下拉菜单将允许我们选择并应用我们的自定义样式。
You need to add the following code to your theme’s functions.php file or a site-specific plugin.
您需要将以下代码添加到主题的functions.php文件或特定于站点的插件中 。
function wpb_mce_buttons_2($buttons) {
	array_unshift($buttons, 'styleselect');
	return $buttons;
}
add_filter('mce_buttons_2', 'wpb_mce_buttons_2');
Step 2: Add select options to drop down menu
步骤2:添加选择选项以下拉菜单
Now you will need to add the options to the drop down menu you just created. You will then be able to select and apply these options from the Formats drop down menu.
现在,您需要将选项添加到刚创建的下拉菜单中。 然后,您将能够从“格式”下拉菜单中选择并应用这些选项。
For the sake of this tutorial, we are adding three custom styles to create content block and buttons.
为了本教程的缘故,我们添加了三种自定义样式来创建内容块和按钮。
You will need to add the following code to your theme’s functions.php file or a site-specific plugin.
您将需要在主题的functions.php文件或特定于站点的插件中添加以下代码。
/*
* Callback function to filter the MCE settings
*/

function my_mce_before_init_insert_formats( $init_array ) {

// Define the style_formats array

	$style_formats = array(
/*
* Each array child is a format with it's own settings
* Notice that each array has title, block, classes, and wrapper arguments
* Title is the label which will be visible in Formats menu
* Block defines whether it is a span, div, selector, or inline style
* Classes allows you to define CSS classes
* Wrapper whether or not to add a new block-level element around any selected elements
*/
		array(
			'title' => 'Content Block',
			'block' => 'span',
			'classes' => 'content-block',
			'wrapper' => true,

		),
		array(
			'title' => 'Blue Button',
			'block' => 'span',
			'classes' => 'blue-button',
			'wrapper' => true,
		),
		array(
			'title' => 'Red Button',
			'block' => 'span',
			'classes' => 'red-button',
			'wrapper' => true,
		),
	);
	// Insert the array, JSON ENCODED, into 'style_formats'
	$init_array['style_formats'] = json_encode( $style_formats );

	return $init_array;

}
// Attach callback to 'tiny_mce_before_init'
add_filter( 'tiny_mce_before_init', 'my_mce_before_init_insert_formats' );
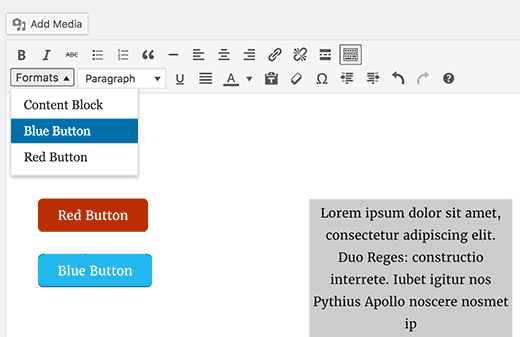
You can now add a new post in WordPress and click on the Formats drop down menu in the Visual editor. You will notice that your custom styles are now visible under formats.
现在,您可以在WordPress中添加新帖子,然后在视觉编辑器中单击“格式”下拉菜单。 您会注意到,自定义样式现在在格式下可见。
However, selecting them does not make any difference in the post editor right now.
但是,选择它们现在在帖子编辑器中没有任何区别。
Step 3: Add CSS Styles
步骤3:添加CSS样式
Now the final step is to add CSS style rules for your custom styles.
现在,最后一步是为您的自定义样式添加CSS样式规则。
You will need to add this CSS into your theme or child theme’s style.css and editor-style.css files.
您将需要将此CSS添加到主题或子主题的style.css和editor-style.css文件中。
.content-block {
    border:1px solid #eee;
    padding:3px;
    background:#ccc;
    max-width:250px;
    float:right;
    text-align:center;
}
.content-block:after {
    clear:both;
}
.blue-button {
	background-color:#33bdef;
	-moz-border-radius:6px;
	-webkit-border-radius:6px;
	border-radius:6px;
	border:1px solid #057fd0;
	display:inline-block;
	cursor:pointer;
	color:#ffffff;
	padding:6px 24px;
	text-decoration:none;
}

.red-button {
	background-color:#bc3315;
	-moz-border-radius:6px;
	-webkit-border-radius:6px;
	border-radius:6px;
	border:1px solid #942911;
	display:inline-block;
	cursor:pointer;
	color:#ffffff;
	padding:6px 24px;
	text-decoration:none;
}

The editor stylesheet controls the appearance of your content in the visual editor. Check your theme’s documentation to find out the location of this file.
编辑器样式表控制视觉编辑器中内容的外观。 检查主题的文档以找出此文件的位置。
If your theme doesn’t have an editor stylesheet file, then you can always create one. Simply create a new CSS file and name it custom-editor-style.css.
如果您的主题没有编辑器样式表文件,则始终可以创建一个。 只需创建一个新CSS文件并将其命名为custom-editor-style.css 。
You need to upload this file to your theme’s root directory and then add this code in your theme’s functions.php file.
您需要将此文件上传到主题的根目录,然后将此代码添加到主题的functions.php文件中。
function my_theme_add_editor_styles() {
    add_editor_style( 'custom-editor-style.css' );
}
add_action( 'init', 'my_theme_add_editor_styles' );
That’s all. You have successfully added your custom styles into WordPress visual editor. Feel free to play around with the code by adding your own elements and styles.
就这样。 您已成功将自定义样式添加到WordPress可视编辑器中。 通过添加自己的元素和样式来随意使用代码。
We hope this article helped you learn how to add custom styles to WordPress visual editor. You may also want to see our guide on how to add custom styles to WordPress widgets.
我们希望本文能帮助您学习如何向WordPress可视编辑器添加自定义样式。 您可能还想查看有关如何向WordPress小部件添加自定义样式的指南。
If you liked this article, then please subscribe to our YouTube Channel for WordPress video tutorials. You can also find us on Twitter and Facebook.
如果您喜欢这篇文章,请订阅我们的YouTube频道 WordPress视频教程。 您也可以在Twitter和Facebook上找到我们。
翻译自: https://www.wpbeginner.com/wp-tutorials/how-to-add-custom-styles-to-wordpress-visual-editor/


 798
798


 被折叠的 条评论
为什么被折叠?


