


根据飞控盒的型号,找到相对应的串口信息,我的飞控盒型号:Nora+,故串口映射信息: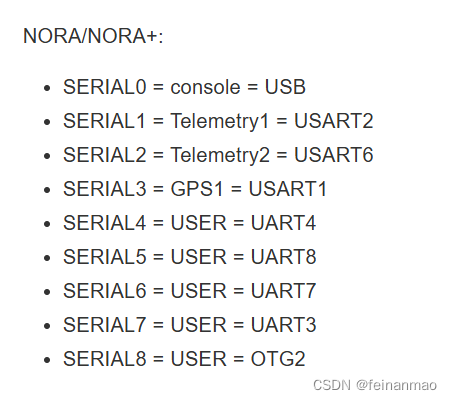
以上信息在CUAV官方文档中查询:CUAV 官方文档 · CUAV 官方文档
查询完后可以在参考APM源码文档中关于UART串口相关部分的介绍,并根据文档提供的例程学习相关接口:UARTs and the Console — Dev documentation (ardupilot.org)
例程可以单独烧录测试串口能否正常使用:
./waf build --target examples/UART_test --upload
该例程相关代码:
/*
  simple test of UART interfaces
 */

#include <AP_HAL/AP_HAL.h>

#include <stdio.h>

void setup();
void loop();

const AP_HAL::HAL& hal = AP_HAL::get_HAL();

/*
  setup one UART at 57600
 */
static void setup_uart(AP_HAL::UARTDriver *uart, const char *name)
{
    if (uart == nullptr) {
        // that UART doesn't exist on this platform
        return;
    }
    uart->begin(57600);
}


void setup(void)
{
    /*
      start all UARTs at 57600 with default buffer sizes
    */

    hal.scheduler->delay(1000); //Ensure that hal.serial(n) can be initialized

    setup_uart(hal.serial(7), "SERIAL7");  // console
    setup_uart(hal.serial(1), "SERIAL1");  // telemetry 1
    setup_uart(hal.serial(2), "SERIAL2");  // telemetry 2
    setup_uart(hal.serial(3), "SERIAL3");  // 1st GPS
    setup_uart(hal.serial(4), "SERIAL4");  // 2nd GPS
}

static void test_uart(AP_HAL::UARTDriver *uart, const char *name)
{
    if (uart == nullptr) {
        // that UART doesn't exist on this platform
        return;
    }
    uart->printf("Hello on UART %s at %.3f seconds\n",
                 name, (double)(AP_HAL::millis() * 0.001f));
}

void loop(void)
{
    test_uart(hal.serial(1), "SERIAL1");
    test_uart(hal.serial(2), "SERIAL2");
    test_uart(hal.serial(3), "SERIAL3");
    test_uart(hal.serial(4), "SERIAL4");

    // also do a raw printf() on some platforms, which prints to the
    // debug console
    ::printf("Hello on debug console at %.3f seconds\n", (double)(AP_HAL::millis() * 0.001f));

    hal.scheduler->delay(1000);
}

AP_HAL_MAIN();
后面发现,在初始化时Copter的初始化函数已经将相关串口波特率初始化完毕,若要调用串口无需再次uart->begin(57600)
注意:
烧录完例程可能将飞控连接电脑的端口占用,导致后续无法再次烧录,只能通过地面站进行烧录固件,详细步骤参考CUAV官方文档:ArduPilot固件使用指南 · cuav x7
将例子烧录完成后,则只需要调用接口:
hal.serial(i) ->printf();
hal.serial(i)->write();
hal.serila(i)->read();
既可以实现串口的使用,关于printf()、write()、read()具体使用可转到定义进行查看,有多种重载方法支持多种数据格式
注意:
若使用例程进行测试时候串口能正常使用,但烧录源码串口无法正常发送与接收消息,有可能是串口设置并没有赋值,在地面站或APM源码中可以查看:
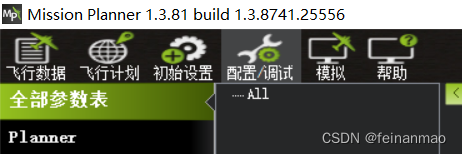
地面站查看:
连接飞控后在配置/调试的全部参数表中搜索Serial(i),查看是否被赋值为-1,被赋值为-1时无法正常调用,修改赋值即可正常调用串口
APM中查看:
APM可在/ardupilot/libraries/AP_SerialManager/AP_SerialManager.h中的enum SerialProtocol中查看每个值所代表的功能:
enum SerialProtocol {
        SerialProtocol_None = -1,
        SerialProtocol_Console = 0, // unused
        SerialProtocol_MAVLink = 1,
        SerialProtocol_MAVLink2 = 2,                 // do not use - use MAVLink and provide instance of 1
        SerialProtocol_FrSky_D = 3,                  // FrSky D protocol (D-receivers)
        SerialProtocol_FrSky_SPort = 4,              // FrSky SPort protocol (X-receivers)
        SerialProtocol_GPS = 5,
        SerialProtocol_GPS2 = 6,                     // do not use - use GPS and provide instance of 1
        SerialProtocol_AlexMos = 7,
        SerialProtocol_Gimbal = 8,                   // SToRM32, Siyi custom serial protocols
        SerialProtocol_Rangefinder = 9,
        SerialProtocol_FrSky_SPort_Passthrough = 10, // FrSky SPort Passthrough (OpenTX) protocol (X-receivers)
        SerialProtocol_Lidar360 = 11,                // Lightware SF40C, TeraRanger Tower or RPLidarA2
        SerialProtocol_Aerotenna_USD1      = 12, // USD1 support - deprecated, users should use Rangefinder
        SerialProtocol_Beacon = 13,
        SerialProtocol_Volz = 14,                    // Volz servo protocol
        SerialProtocol_Sbus1 = 15,
        SerialProtocol_ESCTelemetry = 16,
        SerialProtocol_Devo_Telem = 17,
        SerialProtocol_OpticalFlow = 18,
        SerialProtocol_Robotis = 19,
        SerialProtocol_NMEAOutput = 20,
        SerialProtocol_WindVane = 21,
        SerialProtocol_SLCAN = 22,
        SerialProtocol_RCIN = 23,
        SerialProtocol_EFI = 24,                   // EFI serial protocol
        SerialProtocol_LTM_Telem = 25,
        SerialProtocol_RunCam = 26,
        SerialProtocol_Hott = 27,
        SerialProtocol_Scripting = 28,
        SerialProtocol_CRSF = 29,
        SerialProtocol_Generator = 30,
        SerialProtocol_Winch = 31,
        SerialProtocol_MSP = 32,
        SerialProtocol_DJI_FPV = 33,
        SerialProtocol_AirSpeed = 34,
        SerialProtocol_ADSB = 35,
        SerialProtocol_AHRS = 36,
        SerialProtocol_SmartAudio = 37,
        SerialProtocol_FETtecOneWire = 38,
        SerialProtocol_Torqeedo = 39,
        SerialProtocol_AIS = 40,
        SerialProtocol_CoDevESC = 41,
        SerialProtocol_MSP_DisplayPort = 42,
        SerialProtocol_MAVLinkHL = 43,
        SerialProtocol_Tramp = 44,
        SerialProtocol_DDS_XRCE = 45,
        SerialProtocol_IMUOUT = 46,
        // Reserving Serial Protocol 47 for SerialProtocol_IQ
        SerialProtocol_PPP = 48,
        SerialProtocol_NumProtocols                    // must be the last value
    };
给串口赋值后,串口即可正常调用。


 1585
1585

 被折叠的 条评论
为什么被折叠?
被折叠的 条评论
为什么被折叠?
 到【灌水乐园】发言


