


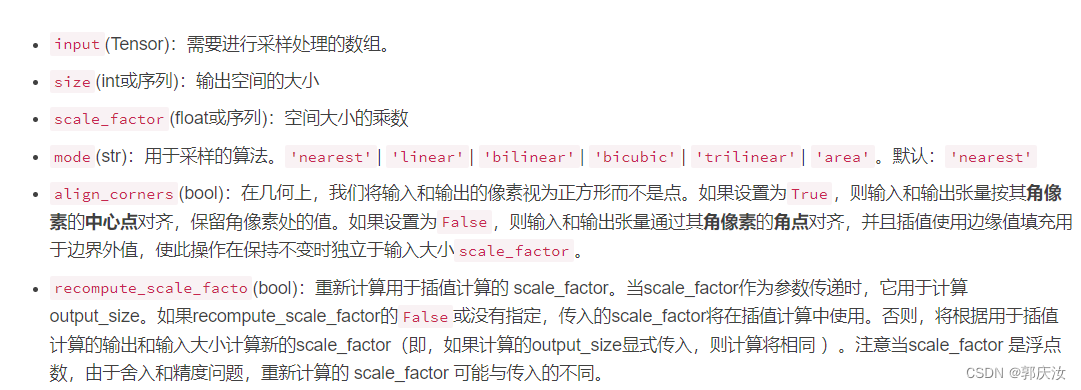
深度学习基础知识 最近邻插值法、双线性插值法、双三次插值算法
0、pytorch函数实现方法:
import torch.nn.functional as F
image_arr=(np.random.rand(3,2,2)).astype(np.float32)
# print(image_arr)

image_tensor=torch.tensor(image_arr.copy(),dtype=torch.float32).unsqueeze(0)
# print(image_tensor)

# 使用pytorch的函数方法实现
result=F.interpolate(image_tensor,size=(3,3),mode="bilinear",align_corners=False)
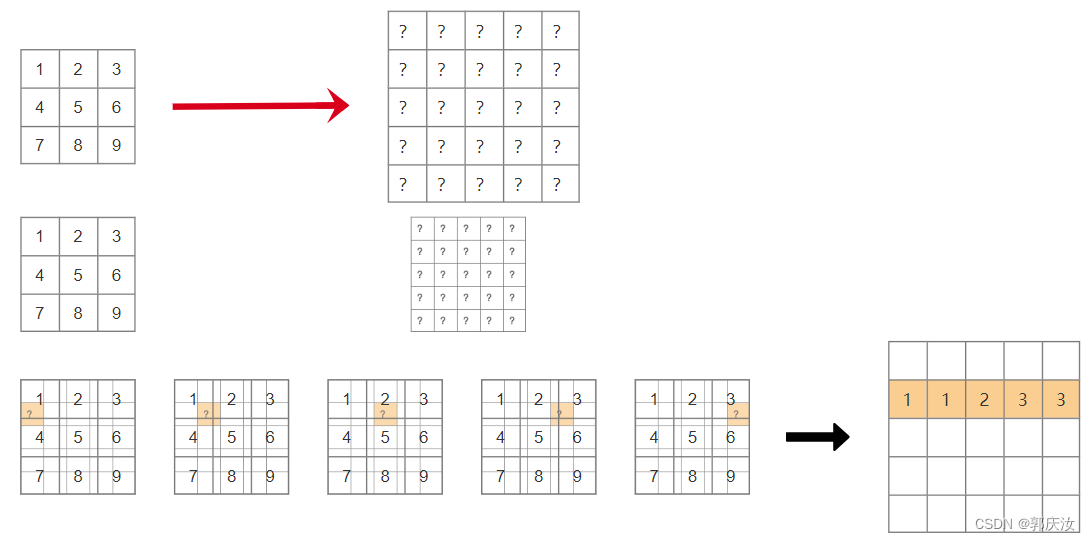
1、最近邻插值法
最邻近插值:将每个目标像素找到距离它最近的原图像素点,然后将该像素的值直接赋值给目标像素
- 优点:实现简单,计算速度快
- 缺点:插值结果缺乏连续性,可能会产生锯齿状的边缘,对于图像质量影响较大,因此当处理精度要求较高的图像时,通常会采用更加精细的插值算法,例如:双线性插值、三次插值。
- 代码示例:

import numpy as np
from PIL import Image


def nearest_neighbor_interpolation(image,scale_factor):
    """
        image:输入图像数组
        scale_factor:图像缩放因子

    """

    # 得到输入图像的高与宽
    height,width=image.shape[:2]
    # 计算输出图像的高与宽
    out_height=int(height * scale_factor)
    out_width=int(width * scale_factor)

    # 创建爱你输出图像
    output_imaage=np.zeros((out_height,out_width,3),dtype=np.uint8)
    print(output_imaage.shape)

    # 遍历输出的每个像素,分别计算其在图像中最近邻的像素坐标,并将其像素值赋给当前像素
    for out_y in range(out_height):
        for out_x in range(out_width):
            # 计算当前像素在输入图像中的坐标
            input_x=int(round(out_x / scale_factor))
            input_y=int(round(out_y / scale_factor))
            # 判断计算出来的输入像素坐标是否越界,如果越界则赋值为边界像素
            input_x=min(input_x,width - 1)
            input_y=min(input_y,height - 1)
            # 将输入图像的像素值赋值给输出图像的对应位置上的像素值
            output_imaage[out_y,out_x]=image[input_y,input_x]

    return output_imaage


# 读取原始图像
input_image=Image.open("./test_image.PNG").convert("RGB")
print(input_image)

image_array=np.array(input_image)
print(image_array.shape)


output_imaage=nearest_neighbor_interpolation(image_array,5.0)


out_image_pil=Image.fromarray(output_imaage.astype("uint8"))
print(out_image_pil)

out_image_pil.save("./result.jpg")   # 保存数据图像
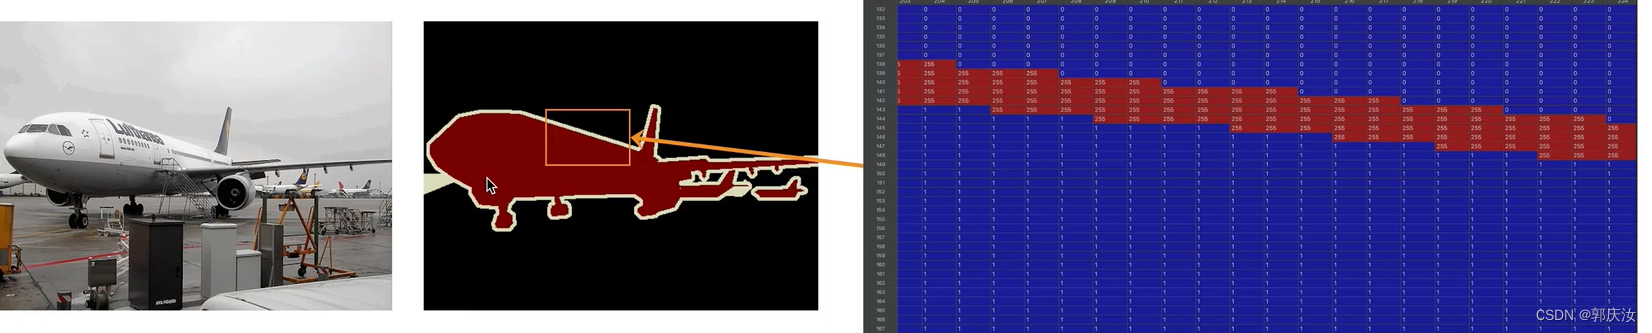
结果:
- 使用场景:
虽然最近邻插值算法会导致处理后的图像出现锯齿失真,但最进行图像分割模型训练时,为了避免引入其他像素值的干扰,必须采用最近邻插值算法。
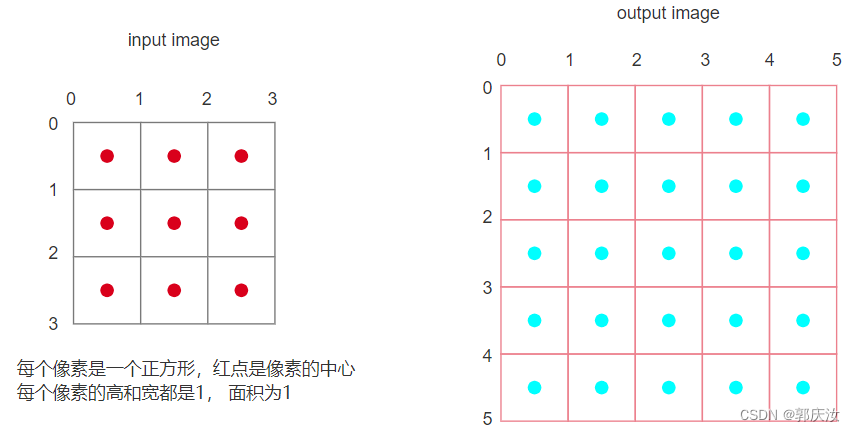
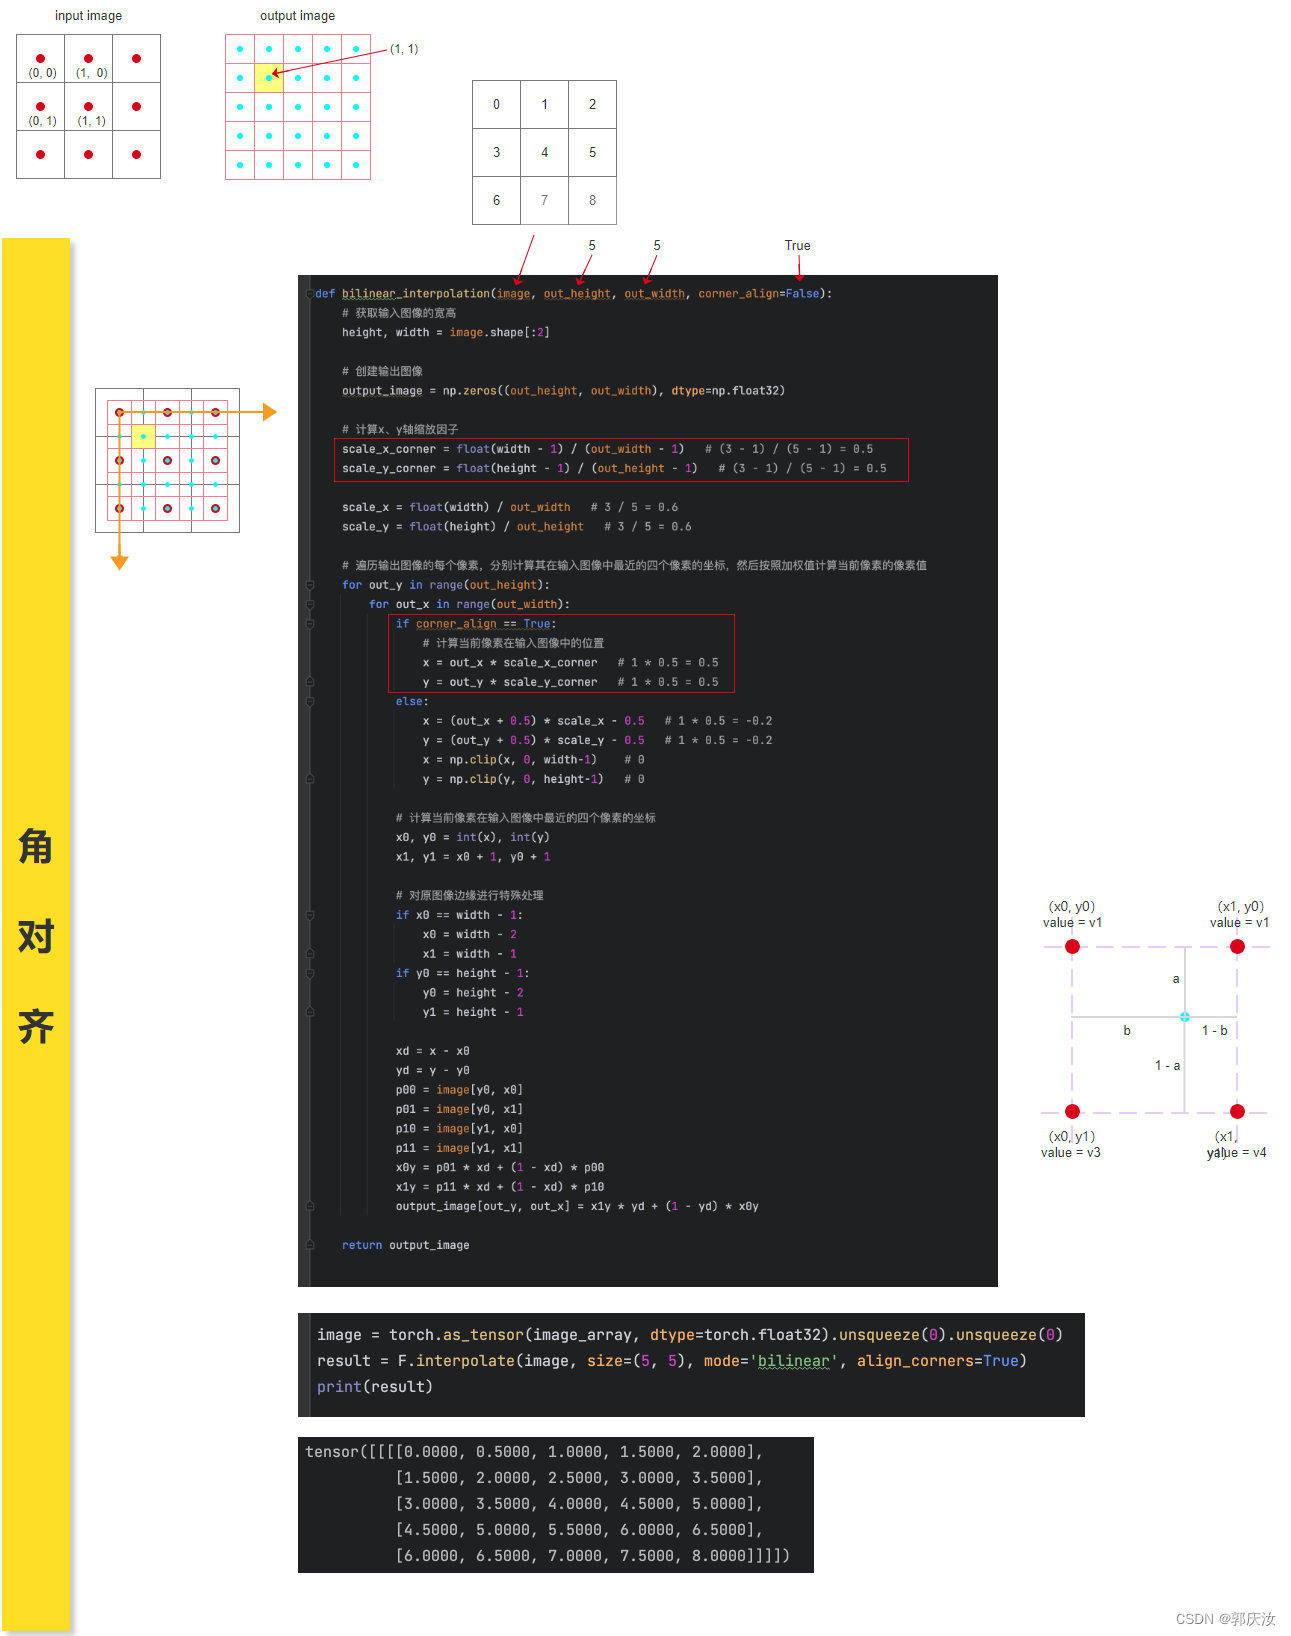
2、双线性插值
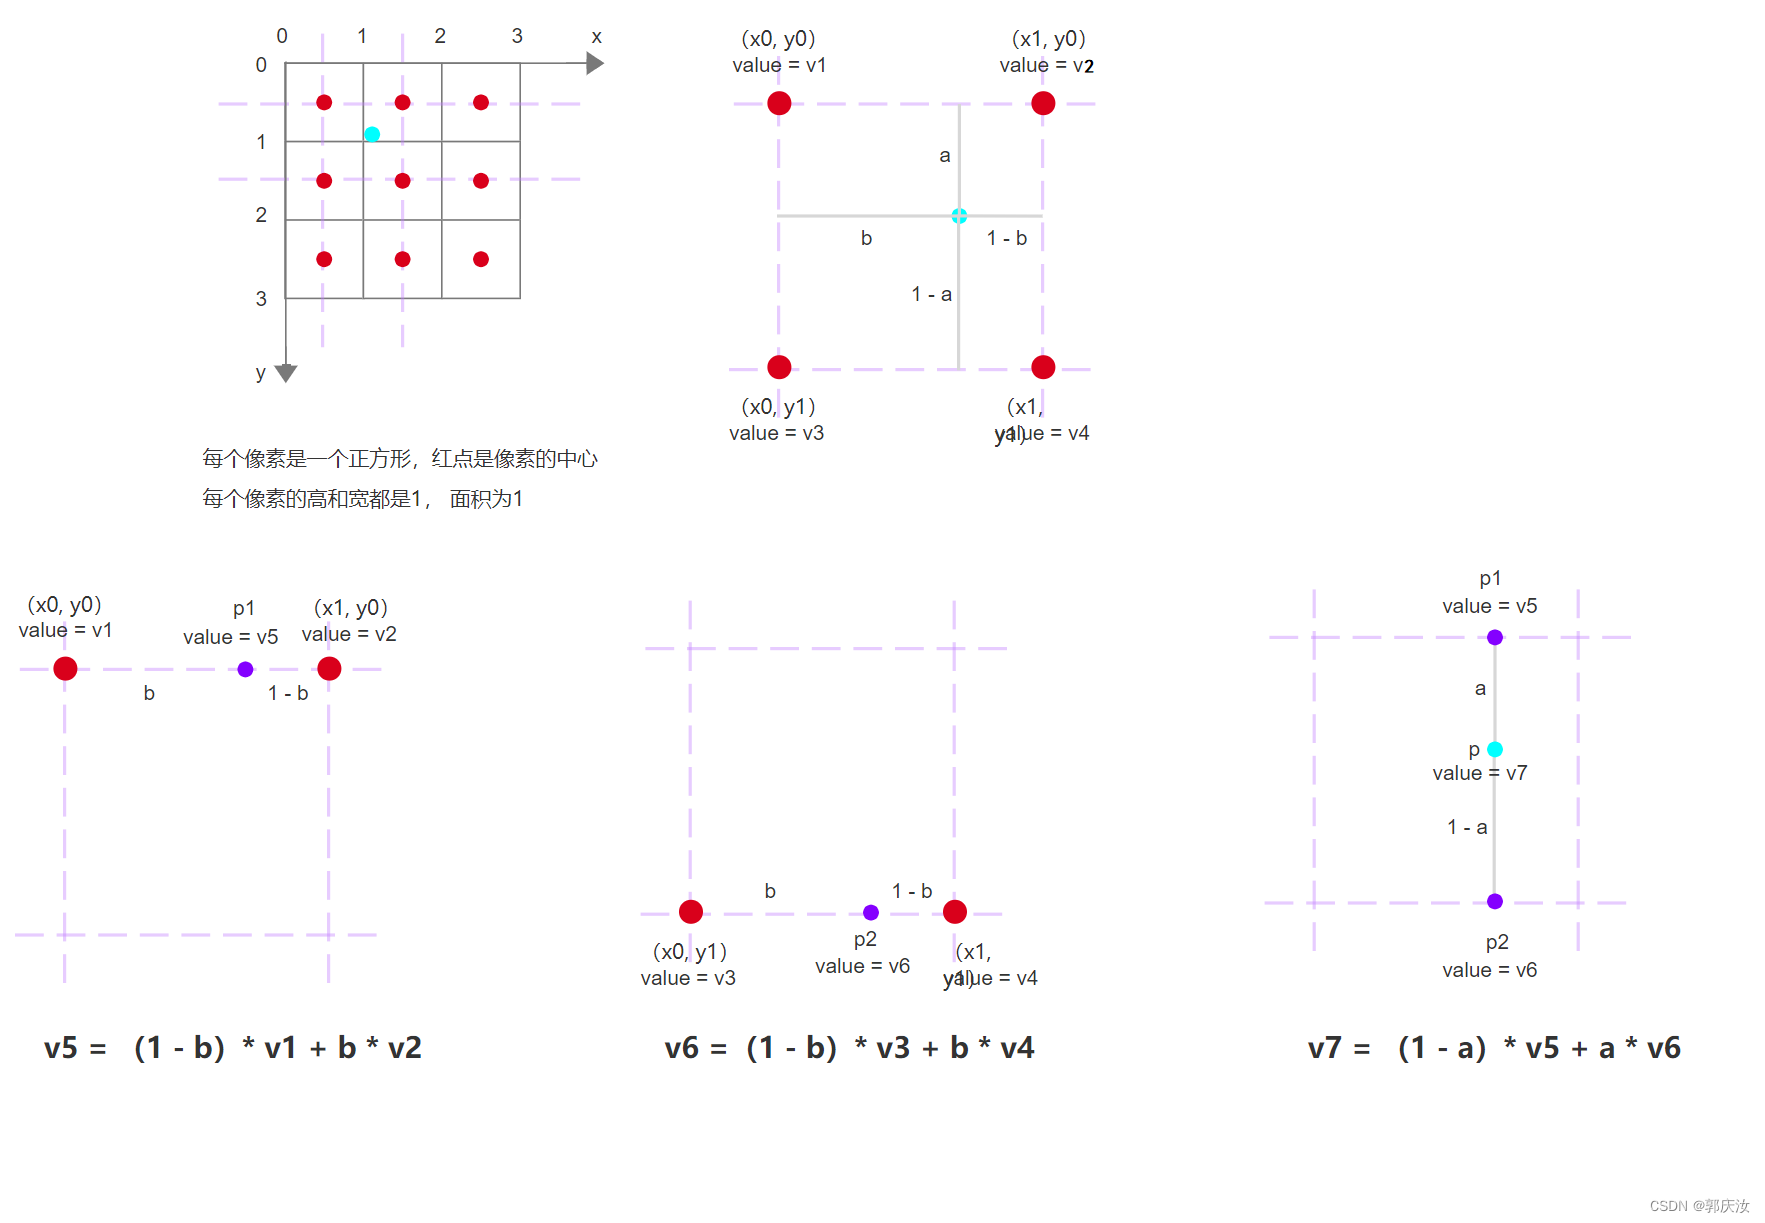
每个像素是一个正方形,红点是像素的中心
每个像素的高和宽都是1, 面积为1
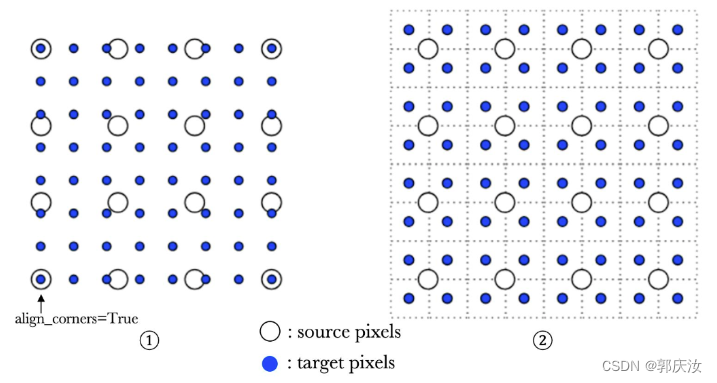
双线性插值算法,包含两种模式:角对齐模式与边对齐模式
计算过程:
代码实现:
import torch
import numpy as np
import torch.nn.functional as F
def bilinear_interpolation(image,out_height,out_width,corner_align=False):
# 获取输入图像的高与宽
height,width=image.shape[:2]
# 创建输出图像
output_image=np.zeros((out_height,out_width,image.shape[-1]),dtype=np.float32)
# print(output_image)
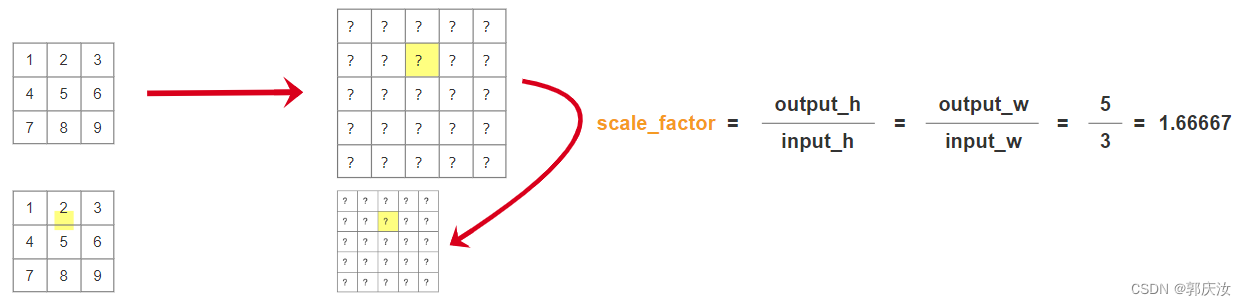
# 计算x,y轴的缩放因子
scale_x_corner=float(width - 1) / (out_width - 1) # (3-1) / (5-1) = 0.5
scale_y_corner=float(height - 1) / (out_height - 1) # (3-1) / (5-1) = 0.5
scale_x=float(width) / out_width # 3 / 5 = 0.6
scale_y=float(height) / out_height
# 遍历输出图像的每个像素,分别计算其在输入图像中最近的四个像素的坐标,然后按照加权计算当前像素的像素值
for out_y in range(out_height):
for out_x in range(out_width):
if corner_align == True:
# 计算当前像素在输入像素中的位置
x = out_x * scale_x_corner # 1 * 0.5 = 0.5
y = out_y * scale_y_corner # 1 * 0.5 = 0.5
else:
x=(out_x + 0.5) * scale_x - 0.5
y=(out_y + 0.5) * scale_y - 0.5
x=np.clip(x,0,width - 1)
y=np.clip(y,0,height-1)
# 计算当前像素在输入图像中最近邻的四个像素的坐标
x0,y0=int(x),int(y)
x1,y1=x0 + 1,y0 + 1
# 对原图像边缘进行特殊处理
if x0 == width - 1:
x0 = width - 2
x1 = width - 1
if y0 == height - 1:
y0 = height - 2
y1 = height - 1
xd = x - x0
yd = y - y0
p00=image[y0,x0]
p01=image[y0,x1]
p10=image[y1,x0]
p11=image[y1,x1]
x0y=p01 * xd + (1 - xd) * p00
x1y=p11 * xd + (1 - xd) * p10
output_image[out_y,out_x] = x1y * yd + (1 - yd) * x0y
return output_image
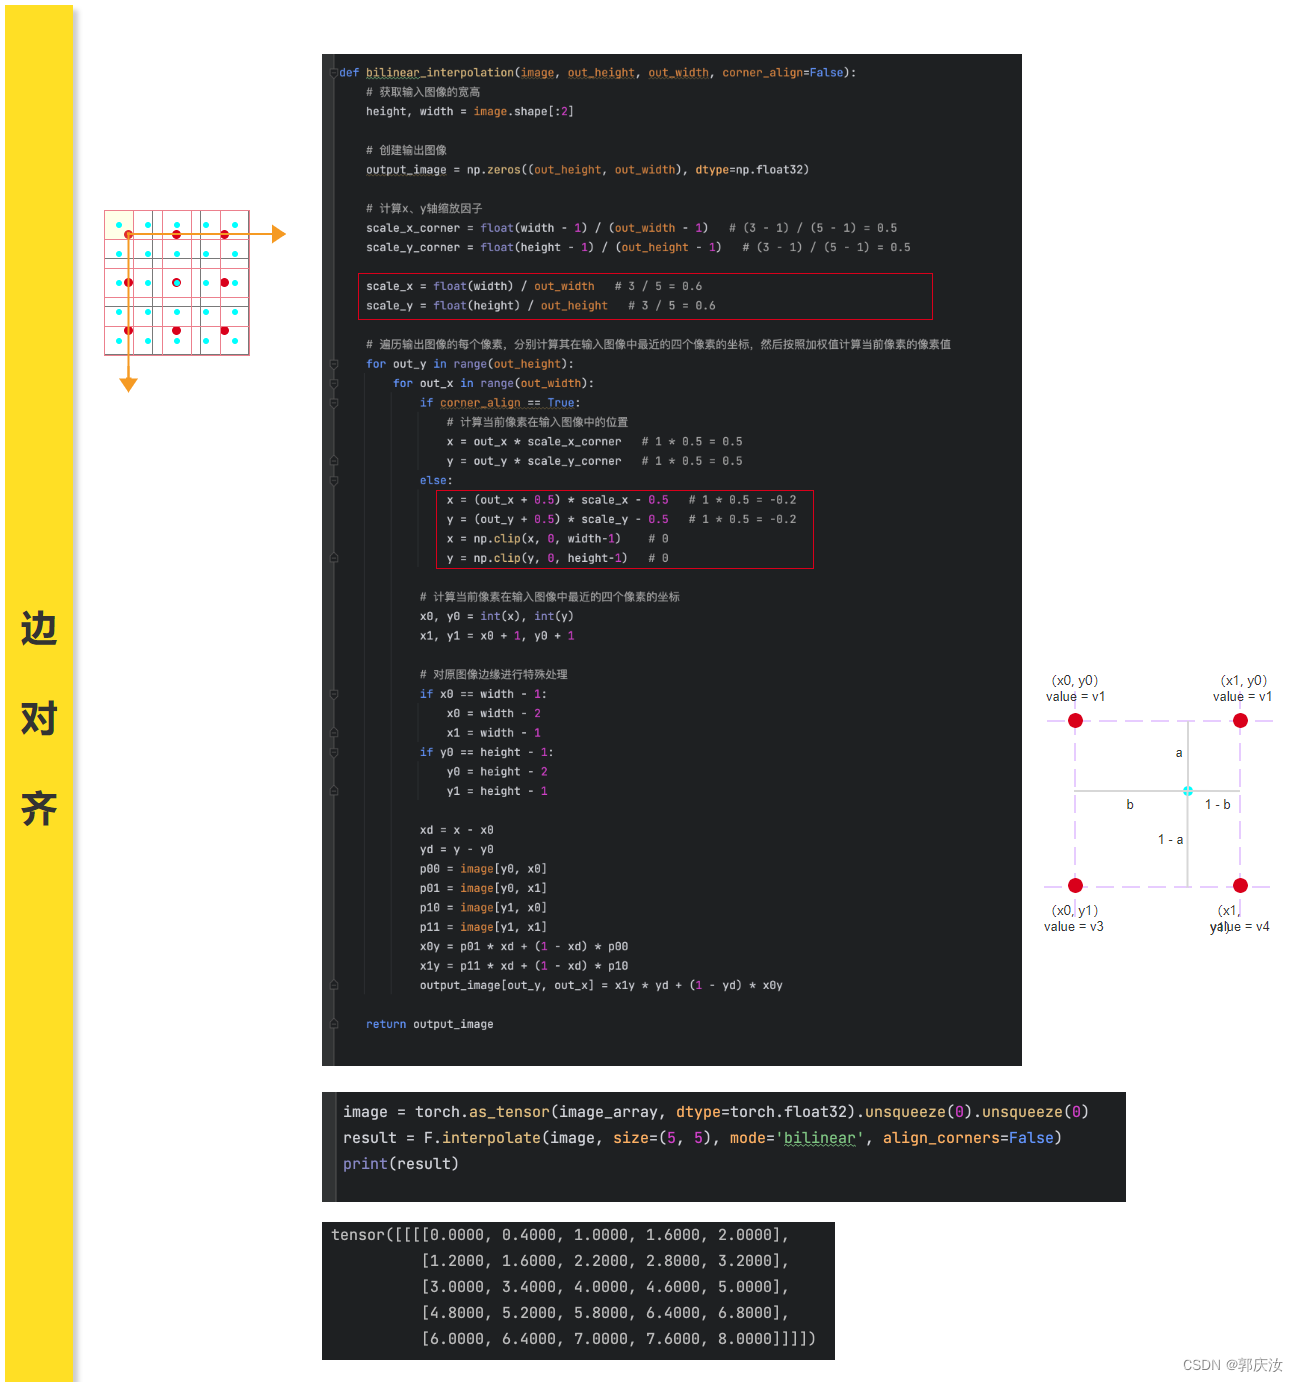
image_arr=(np.random.rand(2,3,3)).astype(np.float32)
# print(image_arr)
image_tensor=torch.tensor(image_arr.copy(),dtype=torch.float32).unsqueeze(0)
# print(image_tensor)
# 使用pytorch的函数方法实现
result=F.interpolate(image_tensor,size=(4,4),mode="bilinear",align_corners=False) # align_corners:True:角点对齐;False:为边对齐
print(result.shape)
image_pytorch_result=result.squeeze(0)
print(image_pytorch_result.shape)
imge_torch2numpy=image_pytorch_result.numpy().transpose(1,2,0)
print(imge_torch2numpy.shape)
print(imge_torch2numpy)
print("\n","*"*40,"\n")
image_arr_=image_arr.transpose(1,2,0) # 转成 H,W,C
# 自己代码实现的版本
image_result=bilinear_interpolation(image_arr_,4,4,corner_align=False) # align_corners:True:角点对齐;False:为边对齐
print(image_result)
print(image_result.shape)
输出结果:
torch.Size([1, 2, 4, 4])
torch.Size([2, 4, 4])
(4, 4, 2)
[[[0.01729881 0.46345708]
  [0.6254483  0.23894069]
  [0.9647001  0.25322512]
  [0.92197037 0.5015489 ]]

 [[0.23900598 0.34148777]
  [0.39870048 0.45681208]
  [0.47503293 0.50936383]
  [0.44255918 0.48162583]]

 [[0.42145333 0.25761825]
  [0.26364937 0.51880765]
  [0.14657585 0.64366746]
  [0.10925723 0.59057784]]

 [[0.50382507 0.23980509]
  [0.265312   0.40426224]
  [0.08881453 0.6113682 ]
  [0.03316517 0.7920877 ]]]

 ****************************************

[[[0.01729881 0.46345708]
  [0.6254483  0.23894069]
  [0.9647001  0.25322512]
  [0.92197037 0.5015489 ]]

 [[0.23900598 0.34148777]
  [0.39870048 0.45681208]
  [0.47503293 0.50936383]
  [0.44255918 0.4816258 ]]

 [[0.42145333 0.25761825]
  [0.26364937 0.51880765]
  [0.14657584 0.64366746]
  [0.10925723 0.59057784]]

 [[0.50382507 0.23980509]
  [0.265312   0.40426219]
  [0.08881453 0.6113682 ]
  [0.03316517 0.7920877 ]]]
(4, 4, 2)
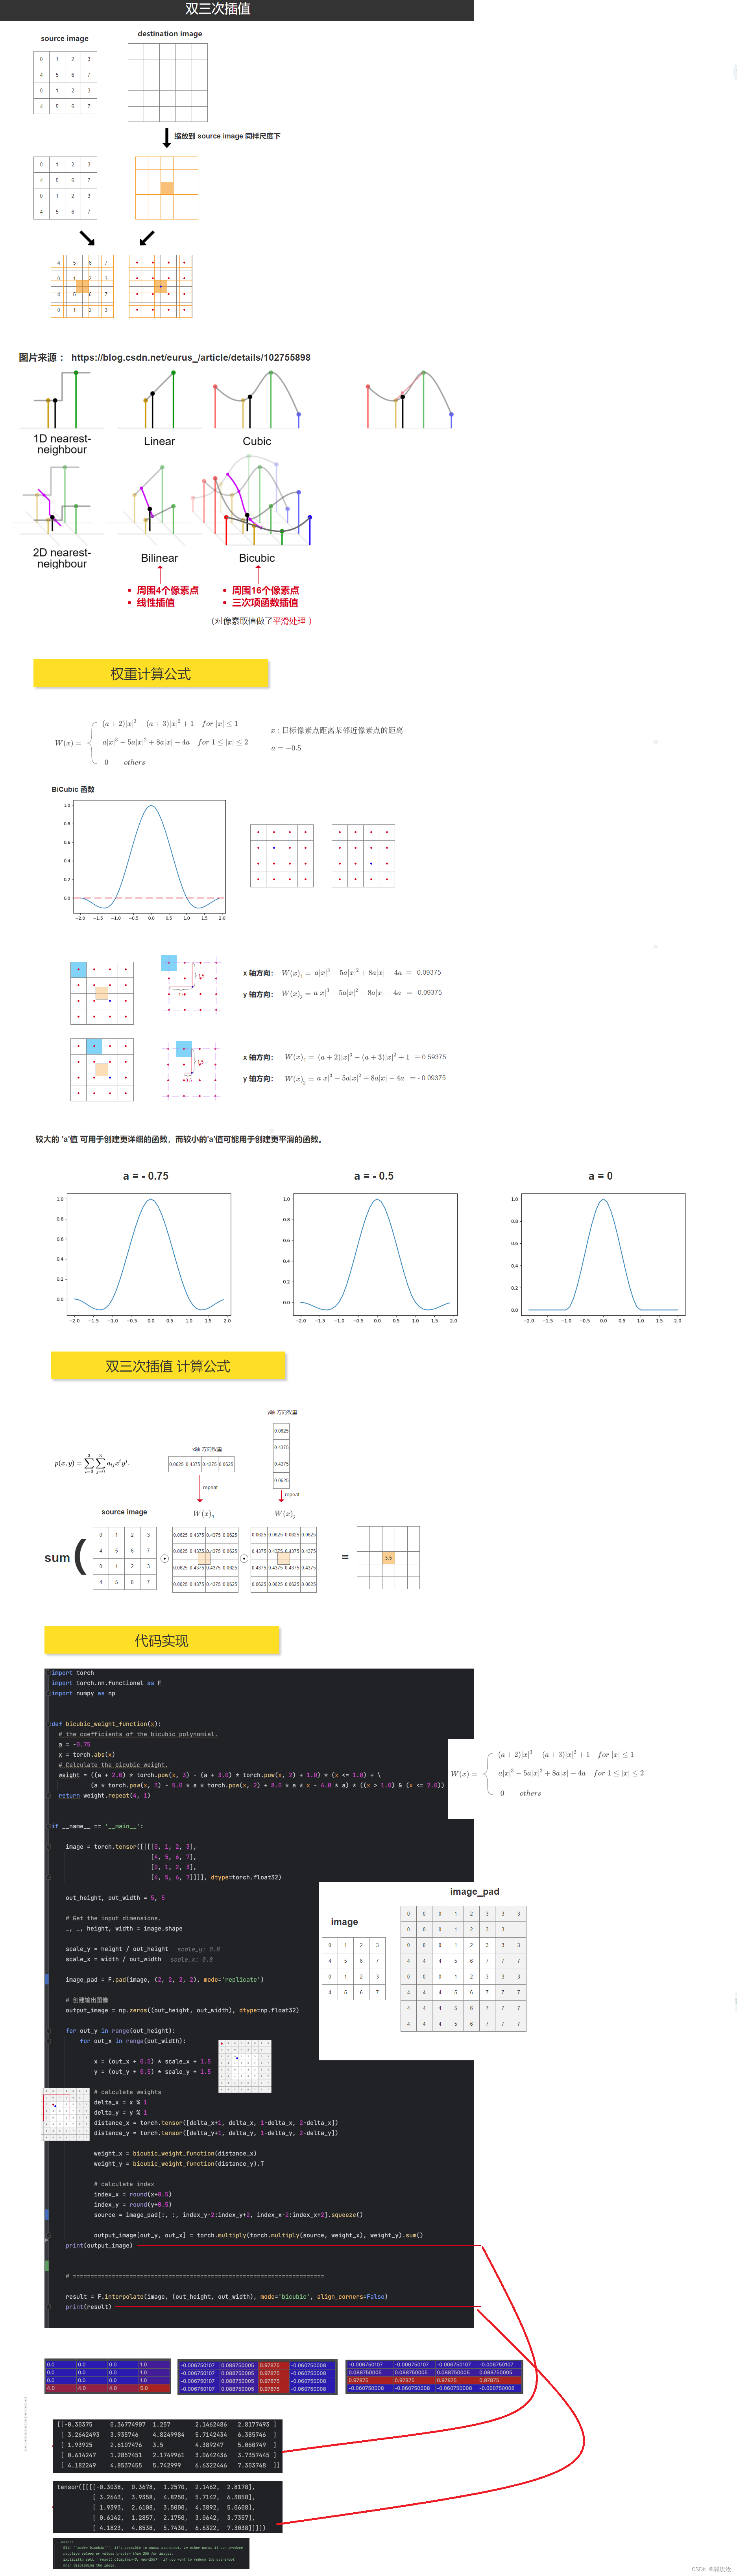
4、双三次插值算法


 1万+
1万+


 被折叠的 条评论
为什么被折叠?
被折叠的 条评论
为什么被折叠?
 到【灌水乐园】发言


