


原文链接:图像处理基础--图像缩放(原理、C++代码)_图像缩放算法代码-CSDN博客
1、最近邻插值(最最基础的方法了)
举例
假设我们有一张原始图(源图,source),大小为3*3。
| 225 | 46 | 77 |
| 56 | 88 | 77 |
| 45 | 125 | 35 |
想要放大为4*4的目标图(destination)。
| ? | ? | ? | ? |
| ? | ? | ? | ? |
| ? | ? | ? | ? |
| ? | ? | ? | ? |
接着就该考虑怎么由源图填充目标图的像素了。
以左上角(0,0)为例,由公式
srcX=dstX∗(srcWidth/dstWidth);
srcY=dstY∗(srcHeight/dstHeight);
得到应该由源图中的(0,0)点像素值进行填充。以此类推目标图片中(1,0)点由源图中(1*(3/4),0*(3/4))=>(0.75,0)=>(1,0)填充(四舍五入),其它点类推可得到放大的图。
这种放大图像的方法会引起严重的失真,根源在于当坐标是浮点数时直接四舍五入取最近的整数。
代码:
# include<iostream>
# include<opencv2/highgui/highgui.hpp>

using namespace std;
using namespace cv;

Mat NearInter(Mat &srcImage, double kx, double ky)
{
	int rows = cvRound(srcImage.rows*kx);
	int cols = cvRound(srcImage.cols*ky);
	Mat resultImg(rows, cols, srcImage.type());
	int i, j, x, y;
	for (i = 0; i < rows; i++)
	{
		x = static_cast<int>((i + 1) / kx + 0.5) - 1;
		for (j = 0; j < cols; j++)
		{
			y = static_cast<int>((j + 1) / ky + 0.5) - 1;
			resultImg.at<Vec3b>(i, j) = srcImage.at<Vec3b>(x, y);
		}
	}
	return resultImg;
}

int main()
{
	Mat srcImg = imread("文件路径");
	Mat resultImg = NearInter(srcImg, 0.6, 1.2);
	imshow("src", srcImg);
	imshow("0.6,1.2", resultImg);
	waitKey(0);
	return 0;
}
2、 双线性插值
在最近邻插值时,对于源图中坐标为浮点数的点,直接四舍五入取整带来了严重的失真。比如0.75直接取1,更科学的方法是,0.75距离1为0.25,距离0为0.75,按照距离的占比取相应点像素值的找比。
对于目标图通过反向变换得到的源图中浮点坐标为(i+u,j+v)(其中i,j为浮点数的整数部分,u,v为浮点数的小数部分);
这个点的像素值f(i+u,j+v)=(1-u)(1-v)f(i,j)+(1-u)vf(i,j+1)+u(1-v)f(i+1,j)+uvf(i+1,j+1),临近四个点按照横纵轴离(i+u,j+v)的距离的占比得到需要点的像素值。

则点P处像素值:
![]()
代码:
# include<iostream>
# include<opencv2/highgui/highgui.hpp>
using namespace cv;
Mat LinerInter(Mat &srcImage, double kx, double ky);
int main()
{
Mat srcImg = imread("图片路径");
Mat resultImg = LinerInter(srcImg, 0.6, 1.2);
imshow("src", srcImg);
imshow("0.6, 1.2", resultImg);
waitKey(0);
return 0;
}
Mat LinerInter(Mat &srcImage, double kx, double ky)
{
int rows = cvRound(srcImage.rows*kx);
int cols = cvRound(srcImage.cols*ky);
Mat resultImg(rows, cols, srcImage.type());
int i, j;
int xi;
int yi;
int x11;
int y11;
double xm;
double ym;
double dx;
double dy;
for (i = 0; i < rows; i++)
{
xm = i / kx;
xi = (int)xm;
x11 = xi + 1;
dx = xm - xi;
for (j = 0; j < cols; j++)
{
ym = j / ky;
yi = (int)ym;
y11 = yi + 1;
dy = ym - yi;
//判断边界
if (x11 >(srcImage.rows - 1))
{
x11 = xi - 1;
}
if (y11 > (srcImage.cols - 1))
{
y11 = yi - 1;
}
//bgr
resultImg.at<Vec3b>(i, j)[0] = (int)(srcImage.at<Vec3b>(xi, yi)[0] * (1 - dx)*(1 - dy)
+ srcImage.at<Vec3b>(x11, yi)[0] * dx*(1 - dy)
+ srcImage.at<Vec3b>(xi, y11)[0] * (1 - dx)*dy
+ srcImage.at<Vec3b>(x11, y11)[0] * dx*dy);
resultImg.at<Vec3b>(i, j)[1] = (int)(srcImage.at<Vec3b>(xi, yi)[1] * (1 - dx)*(1 - dy)
+ srcImage.at<Vec3b>(x11, yi)[1] * dx*(1 - dy)
+ srcImage.at<Vec3b>(xi, y11)[1] * (1 - dx)*dy
+ srcImage.at<Vec3b>(x11, y11)[1] * dx*dy);
resultImg.at<Vec3b>(i, j)[2] = (int)(srcImage.at<Vec3b>(xi, yi)[2] * (1 - dx)*(1 - dy)
+ srcImage.at<Vec3b>(x11, yi)[2] * dx*(1 - dy)
+ srcImage.at<Vec3b>(xi, y11)[2] * (1 - dx)*dy
+ srcImage.at<Vec3b>(x11, y11)[2] * dx*dy);
}
}
return resultImg;
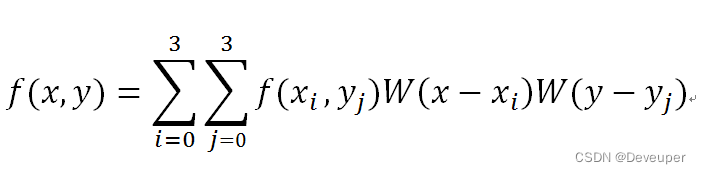
}3、双三次插值
思想同二次插值一样,不过是使用了周围的16个点的像素值。
双三次插值又称立方卷积插值。三次卷积插值是一种更加复杂的插值方式。该算法利用待采样点周围16个点的灰度值作三次插值,不仅考虑到4 个直接相邻点的灰度影响,而且考虑到各邻点间灰度值变化率的影响。三次运算可以得到更接近高分辨率图像的放大效果,但也导致了运算量的急剧增加。这种算法需要选取插值基函数来拟合数据,其最常用的插值基函数(BiCubic基函数)如图1所示.

构造BiCubic函数:(其中a=-0.5)

对待插值的像素点(x,y)(x和y可以为浮点数),取其附近的4x4邻域点(xi,yj), i,j = 0,1,2,3。按如下公式进行插值计算:

代码:
#include "opencv2/imgproc/imgproc.hpp"
#include "opencv2/highgui/highgui.hpp"
#include <iostream>
#include <cmath>
#include <fstream>
using namespace cv;
using namespace std;
#define PI 3.14159265
float BiCubicPoly(float x);
void MyScaleBiCubicInter(Mat& src, Mat& dst, float TransMat[3][3]);
/**
 * @function main
 */
int main( int argc, char** argv )
{
  // load image
  char* imageName = "images/Lenna_256.png";
  Mat image;
  image = imread(imageName,1);

  if(!image.data)
  {
	  cout << "No image data" << endl;
	  return -1;
  }
  // show image
  namedWindow("image", CV_WINDOW_AUTOSIZE);
  imshow("image", image);
  Mat dst;
  float transMat[3][3] = { {2.0, 0, 0}, {0, 2.0, 0}, {0, 0, 1} };

  MyScaleBiCubicInter(image, dst, transMat);
  namedWindow("out_image", CV_WINDOW_AUTOSIZE);
  imshow("out_image", dst);
  imwrite("Lenna_scale_biCubic2.jpg", dst);
  waitKey(0);
  return 0;
}
float BiCubicPoly(float x)
{
	float abs_x = abs(x);
	float a = -0.5;
	if( abs_x <= 1.0 )
	{
		return (a+2)*pow(abs_x,3) - (a+3)*pow(abs_x,2) + 1;
	}
	else if( abs_x < 2.0 )
	{
		return a*pow(abs_x,3) - 5*a*pow(abs_x,2) + 8*a*abs_x - 4*a;
	}
	else
		return 0.0;
}

void MyScaleBiCubicInter(Mat& src, Mat& dst, float TransMat[3][3])
{
	CV_Assert(src.data);
	CV_Assert(src.depth() != sizeof(uchar));

	// calculate margin point of dst image
	float left =  0;
	float right =  0;
	float top =  0;
	float down =  0;

	float x = src.cols * 1.0f;
	float y = 0.0f;
	float u1 = x * TransMat[0][0] + y * TransMat[0][1];
	float v1 = x * TransMat[1][0] + y * TransMat[1][1];
	x = src.cols * 1.0f;
	y = src.rows * 1.0f;
	float u2 = x * TransMat[0][0] + y * TransMat[0][1];
	float v2 = x * TransMat[1][0] + y * TransMat[1][1];
	x = 0.0f;
	y = src.rows * 1.0f;
	float u3 = x * TransMat[0][0] + y * TransMat[0][1];
	float v3 = x * TransMat[1][0] + y * TransMat[1][1];

	left =  min( min( min(0.0f,u1), u2 ), u3);
	right =  max( max( max(0.0f,u1), u2 ), u3);
	top =  min( min( min(0.0f,v1), v2 ), v3);
	down =  max( max( max(0.0f,v1), v2 ), v3);

	// create dst image
	dst.create(int(abs(right-left)), int(abs(down-top)), src.type());

	CV_Assert( dst.channels() == src.channels() );
	int channels = dst.channels();

	int i,j;
	uchar* p;
	uchar* q0;
	uchar* q1;
	uchar* q2;
	uchar* q3;
	for( i = 0; i < dst.rows; ++i)
	{
		p = dst.ptr<uchar>(i);
		for ( j = 0; j < dst.cols; ++j)
		{
			//
			x = (j+left)/TransMat[0][0]  ;
			y = (i+top)/TransMat[1][1] ;

			int x0 = int(x) - 1;
			int y0 = int(y) - 1;
			int x1 = int(x);
			int y1 = int(y);
			int x2 = int(x) + 1;
			int y2 = int(y) + 1;
			int x3 = int(x) + 2;
			int y3 = int(y) + 2;

			if( (x0 >= 0) && (x3 < src.cols) && (y0 >= 0) && (y3 < src.rows) )
			{
				q0 = src.ptr<uchar>(y0);
				q1 = src.ptr<uchar>(y1);
				q2 = src.ptr<uchar>(y2);
				q3 = src.ptr<uchar>(y3);

				float dist_x0 = BiCubicPoly(x-x0);
				float dist_x1 = BiCubicPoly(x-x1);
				float dist_x2 = BiCubicPoly(x-x2);
				float dist_x3 = BiCubicPoly(x-x3);
				float dist_y0 = BiCubicPoly(y-y0);
				float dist_y1 = BiCubicPoly(y-y1);
				float dist_y2 = BiCubicPoly(y-y2);
				float dist_y3 = BiCubicPoly(y-y3);

				float dist_x0y0 = dist_x0 * dist_y0;
				float dist_x0y1 = dist_x0 * dist_y1;
				float dist_x0y2 = dist_x0 * dist_y2;
				float dist_x0y3 = dist_x0 * dist_y3;
				float dist_x1y0 = dist_x1 * dist_y0;
				float dist_x1y1 = dist_x1 * dist_y1;
				float dist_x1y2 = dist_x1 * dist_y2;
				float dist_x1y3 = dist_x1 * dist_y3;
				float dist_x2y0 = dist_x2 * dist_y0;
				float dist_x2y1 = dist_x2 * dist_y1;
				float dist_x2y2 = dist_x2 * dist_y2;
				float dist_x2y3 = dist_x2 * dist_y3;
				float dist_x3y0 = dist_x3 * dist_y0;
				float dist_x3y1 = dist_x3 * dist_y1;
				float dist_x3y2 = dist_x3 * dist_y2;
				float dist_x3y3 = dist_x3 * dist_y3;

				switch(channels)
				{
					case 1:
						{
							break;
						}
					case 3:
						{
							p[3*j] =    (uchar)(q0[3*x0] * dist_x0y0 +
												q1[3*x0] * dist_x0y1 +
												q2[3*x0] * dist_x0y2 +
												q3[3*x0] * dist_x0y3 +
												q0[3*x1] * dist_x1y0 +
												q1[3*x1] * dist_x1y1 +
												q2[3*x1] * dist_x1y2 +
												q3[3*x1] * dist_x1y3 +
												q0[3*x2] * dist_x2y0 +
												q1[3*x2] * dist_x2y1 +
												q2[3*x2] * dist_x2y2 +
												q3[3*x2] * dist_x2y3 +
												q0[3*x3] * dist_x3y0 +
												q1[3*x3] * dist_x3y1 +
												q2[3*x3] * dist_x3y2 +
												q3[3*x3] * dist_x3y3 ) ;

							p[3*j+1] =  (uchar)(q0[3*x0+1] * dist_x0y0 +
												q1[3*x0+1] * dist_x0y1 +
												q2[3*x0+1] * dist_x0y2 +
												q3[3*x0+1] * dist_x0y3 +
												q0[3*x1+1] * dist_x1y0 +
												q1[3*x1+1] * dist_x1y1 +
												q2[3*x1+1] * dist_x1y2 +
												q3[3*x1+1] * dist_x1y3 +
												q0[3*x2+1] * dist_x2y0 +
												q1[3*x2+1] * dist_x2y1 +
												q2[3*x2+1] * dist_x2y2 +
												q3[3*x2+1] * dist_x2y3 +
												q0[3*x3+1] * dist_x3y0 +
												q1[3*x3+1] * dist_x3y1 +
												q2[3*x3+1] * dist_x3y2 +
												q3[3*x3+1] * dist_x3y3 ) ;

							p[3*j+2] =  (uchar)(q0[3*x0+2] * dist_x0y0 +
												q1[3*x0+2] * dist_x0y1 +
												q2[3*x0+2] * dist_x0y2 +
												q3[3*x0+2] * dist_x0y3 +
												q0[3*x1+2] * dist_x1y0 +
												q1[3*x1+2] * dist_x1y1 +
												q2[3*x1+2] * dist_x1y2 +
												q3[3*x1+2] * dist_x1y3 +
												q0[3*x2+2] * dist_x2y0 +
												q1[3*x2+2] * dist_x2y1 +
												q2[3*x2+2] * dist_x2y2 +
												q3[3*x2+2] * dist_x2y3 +
												q0[3*x3+2] * dist_x3y0 +
												q1[3*x3+2] * dist_x3y1 +
												q2[3*x3+2] * dist_x3y2 +
												q3[3*x3+2] * dist_x3y3 ) ;

							float thre = 198.0f;
							if( (abs(p[3*j]-q1[3*x1]) > thre) || (abs(p[3*j+1]-q1[3*x1+1]) > thre) ||
								(abs(p[3*j+2]-q1[3*x1+2]) > thre) )
							{
								p[3*j] = q1[3*x1];
								p[3*j+1] = q1[3*x1+1];
								p[3*j+2] = q1[3*x1+2];
							}
							break;
						}
				}
			}
		}
	}
}


 3249
3249

 被折叠的 条评论
为什么被折叠?
被折叠的 条评论
为什么被折叠?
 到【灌水乐园】发言


