


目录
- 别人的笔记
- QA
- 第二十节 现代游戏引擎架构:面向数据编程与任务系统
- 第二十一节 动态全局光照和 Lumen
- Global Illumination
- Lumen
- Phase 1 : Fast Ray Trace in Any Hardware
- Phase 2 : Radiance Injection and Caching
- Mesh card – orthogonal camera on 6-Axis Aligned directions
- Generate Surface Cache
- View Dependent Per-Object Card Resolution
- How can we “freeze” lighting on Surface Cache
- Lighting Cache Pipeline
- Direct Lighting
- Voxel Clipmap for Radiance Caching of the Whole Scene
- Build Voxel Faces by Short Ray cast
- Inject light into clipmap
- Indirect Lighting
- Ligting Update Strategy
- Phase 3 : Build a lot of Probes with Different Kinds
- Importance Sampling
- Denoising and Spatial Probe Filtering
- World Space Probes and Ray Connecting
- Phase 4 : Shading Full Pixels with Screen Space Probes
- Overall, Performance and Result
- 参考资料
- QA
- 第二十二节 GPU 驱动的几何管线 Nanite
- QA
- Introduction
- GPU Driven Pipeline in Assassins Creed
- Visibility Buffer
- Virtual Geometry - Nanite
- Nanite Geometry Representation
- Naïve Solution
- Nanite Solution
- Nanite Rasterization
- Nanite Deferred Material
- Virtual Shadow Map
- Streaming and Compression
- 参考资料
别人的笔记
https://peng00bo00.github.io/archive.html
https://elderlyaugustus.github.io/
QA
怎么架设全球联网游戏
主要是要知道全球光线分布,知道在哪里架设分布式服务器,尽量在服务器之间使用光纤直接相连,或者使用服务商提供的虚拟链路相连
第二十节 现代游戏引擎架构:面向数据编程与任务系统
现代游戏引擎对于性能的需求非常高,为了保证游戏的实时性需要使用大量的高性能编程技术。
Basics of Parallel Programming
随着硬件技术的发展,芯片中晶体管的数量已经接近了物理极限。因此在现代计算机中会使用多核(multi-core)处理器来进一步提升计算性能。
Process and Thread
进程(process)和线程(thread)是并行编程会涉及到的基本概念。简单来说一个程序就是一个进程,它拥有自己的内存空间;而一个进程可以拥有很多线程,它们会共享进程指向的同一片内存数据。
Types of Multitasking
对于多核的计算机我们希望能够充分利用不同的计算核心来提升程序的性能。根据处理器管理任务的不同可以把进程调度分为两种:抢占式(preemptive multitasking)和非抢占式(non-preemptive multitasking)式。preemptive multitasking 是由调度器来控制任务的切换,而 non-preemptive multitasking 则是由任务自身来进行控制。
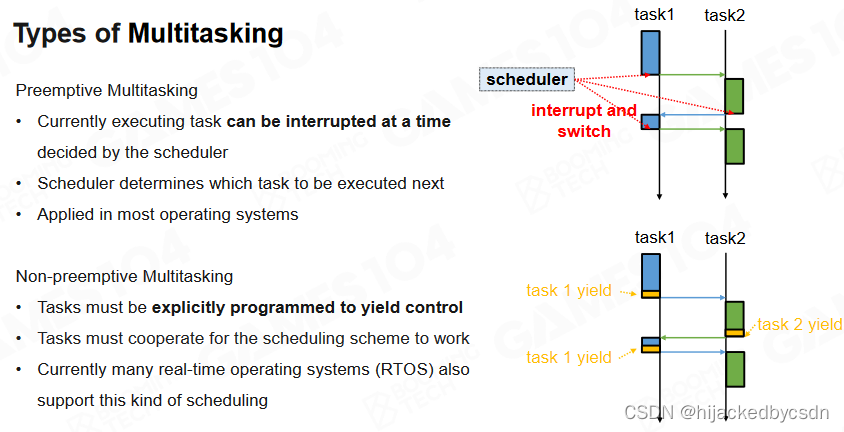
“由任务自身来控制”应该指的是代码中的 yield?
Thread Context Switch
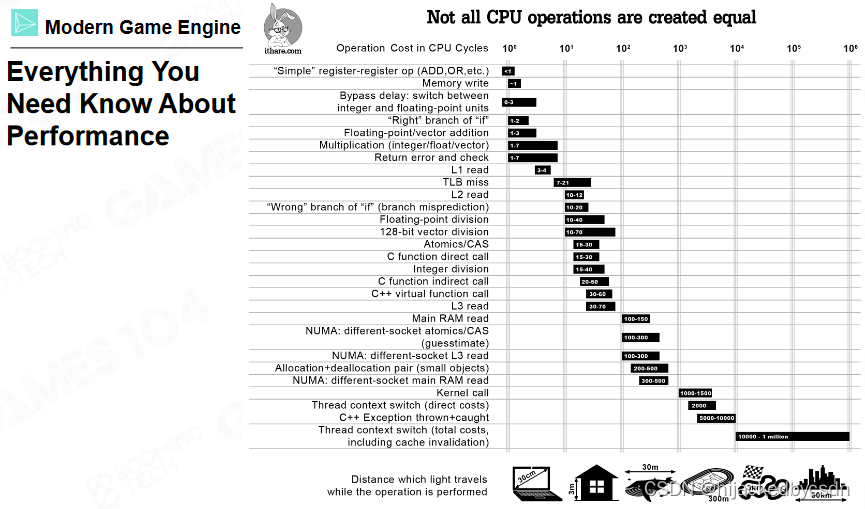
线程在进行切换时会产生额外的开销,因此在游戏引擎中我们希望尽可能减少线程的上下文切换。
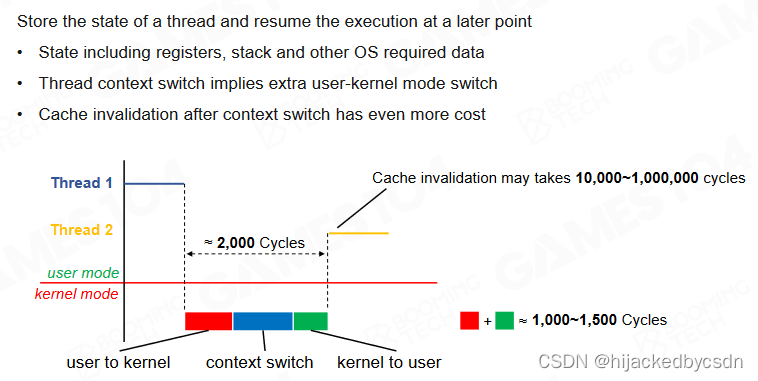
切换进程要大概 2000 时钟周期
因为是新内存,所以需要的数据可能不在内存中,所以还需要把数据调入内存,需要大概 10000~1000000 时钟周期
Parallel Problems in Parallel Computing
在并行程序中我们希望不同的任务之间互不打扰,只需要在程序最后把所有的计算结果进行汇总就好。这样的程序往往有着非常高的运行效率,比如说 Monte Carlo 模拟就是典型的例子。不过现实中的程序往往不会这样理想,很多任务之间存在各种相互依赖,这会降低程序的运行效率。
Data Race in Parallel Programming
data race 是编写并行程序中最常见的问题,当不同的线程想要访问并修改同一块内存时就会产生 data race。由于线程的调度是不可预料的,data race 会导致程序的计算结果出现各种各样的问题。
Blocking Algorithm
处理 data race 最简单的方式是给程序上锁(lock),这样可以保证同一时间只能有一个线程对指定的内存区域进行访问。锁之间的程序片断称为 critical section,当某个线程执行 critical section 时其它需要访问同一内存的线程会被强制等待。
尽管使用锁可以保证程序的正确执行,但锁的存在会影响程序的并行性。更严重的是它可能会产生死锁(dead lock)的现象从而阻塞程序的运行。因此在编写并行程序时需要注意尽可能减少锁的使用。
死锁不单单可能是由分配不合理导致的,也可能是给资源上锁的进程由于意外 crash 了
在使用优先级进程调度的场合,假设存在一个高优先级的进程要打断一个低优先级的进程,如果这个低优先级的进程在给资源上锁,那么就无法打断这个低优先级的进程
(这里说的锁应该是中断锁?会关全局中断的那种)
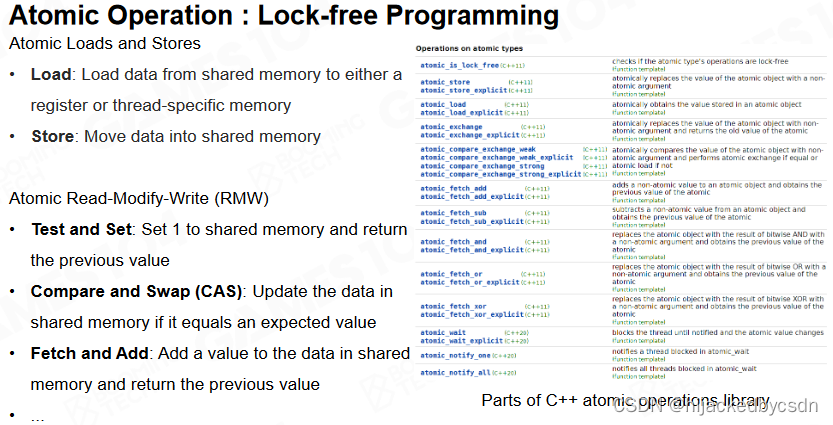
Atomic Operation
处理 data race 的另一种常用方法是使用原子操作(atomic operation)。原子操作是硬件层面实现的最基本操作,它无法同时被多个 CPU 一起执行。利用原子操作可以实现无锁的程序并行,从而极大地提升运行效率。
Compiler Reordering Optimizations
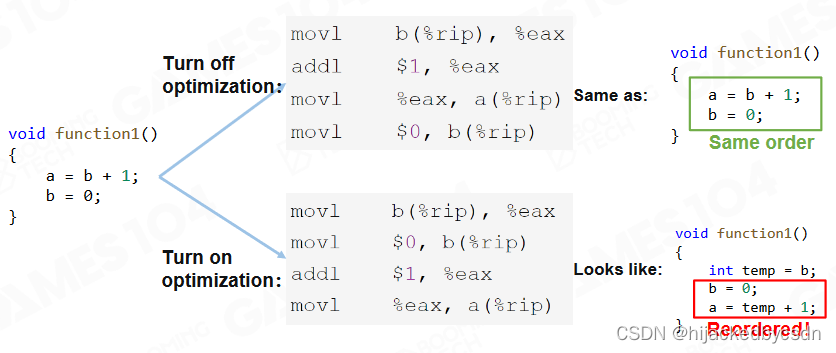
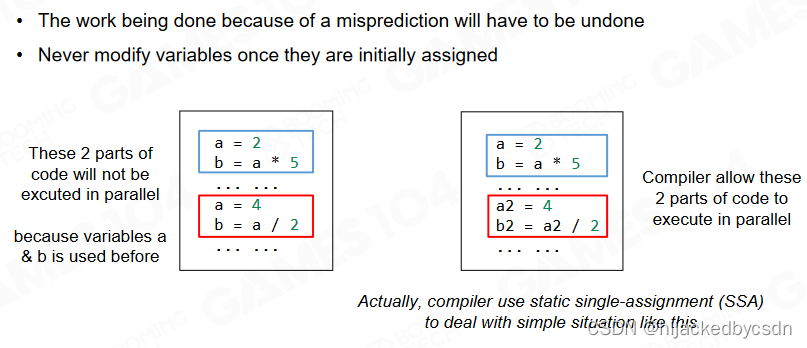
另一方面需要注意的是现代编译器对于高级语言是可以进行自动优化的。通过调整代码的执行顺序可以提升单线程程序的运行效率,但对于多线程的情况这种调整则可能会导致一些问题。
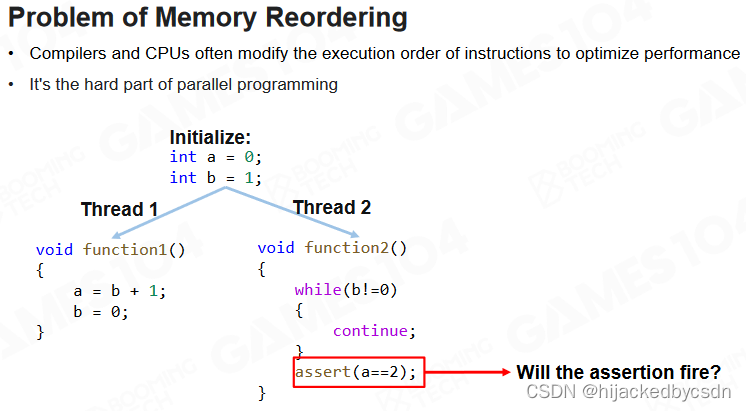
例如左边的线程,正确的执行结果是 a = 2, b = 0,右边的线程,正确的执行结果是检查到 b != 0 的时候判断 a 是否等于 2
如上图,左边的线程有可能先令 b = 0 后令 a = 2,使得右边的线程无法达到预期的效果
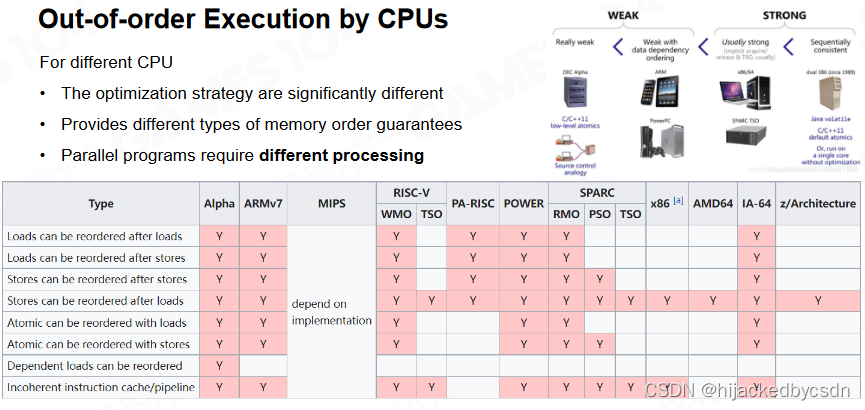
实际上很多的现代芯片出于种种方面的考虑都无法保证多线程情况下编译后代码的执行顺序。
编写成 Release 版就出错了,或者电脑上没问题,手机上就有问题了,可能就是代码乱序的原因
Parallel Framework of Game Engine
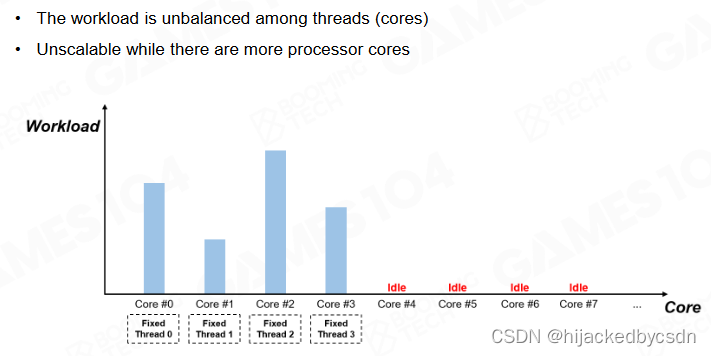
Fixed Multi-Thread
游戏引擎在使用多线程时最经典的架构是 fixed multi-thread,此时引擎中的每个系统都各自拥有一个线程。在每一帧开始时会通过线程间的通信来交换数据,然后各自执行自己的任务。
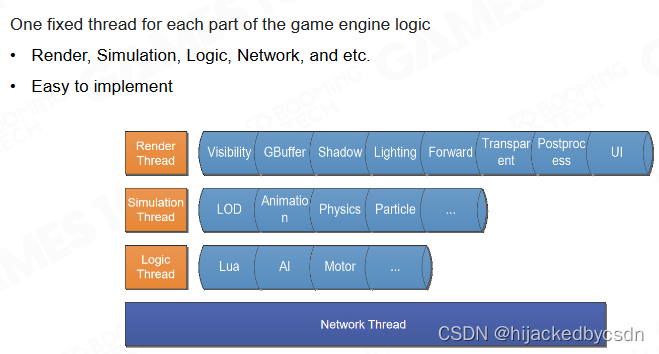
fixed multi-thread 的一个缺陷在于它很难保证不同线程上负载是一致的。实际上不同线程之间负载的差异往往非常巨大,很多时候一些线程已经完成了自己的任务却必须要等待其它线程结束。这就造成了计算资源的浪费。
而且有些线程是根据场景的不同,会有不同的耗时,所以也不能单单针对一种场景来调整
Thread Fork-Join
另一种并行处理的方式是 fork-join。对于某些负载比较高的系统我们可以实现申请一系列线程,当需要执行计算时通过 fork 操作把不同的计算任务分配到各个线程中并最后汇总到一起。
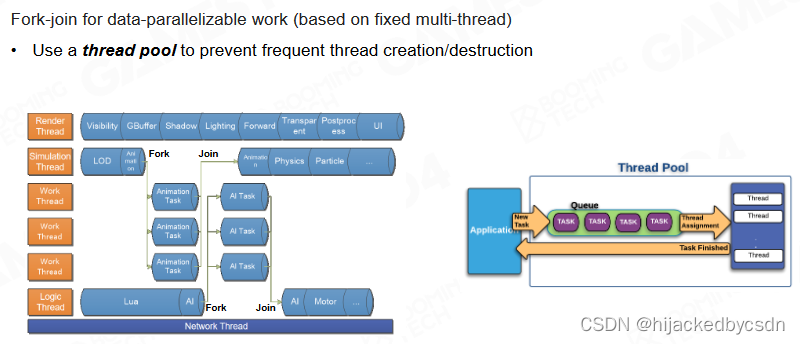
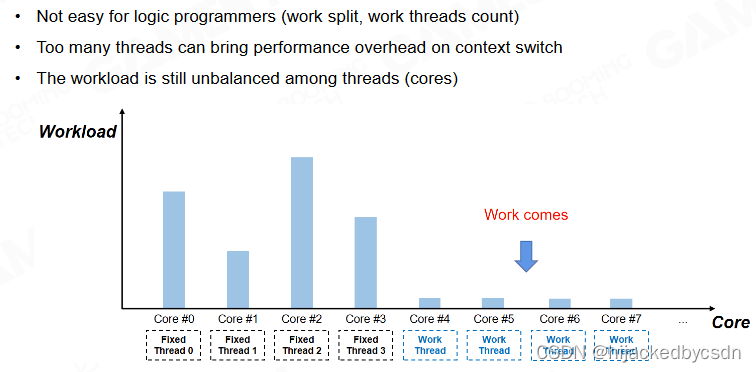
fork-join 的缺陷在于有很多的任务是无法事先预测具体的负载的。
线程的切换也有消耗
虚幻的线程:
在虚幻引擎中设计了 name thread 和 worker thread 两种类型的线程。其中 name thread 对应引擎中的不同系统,而 worker thread 则是系统中具体计算任务的线程。

Task Graph
除此之外还可以使用 task graph 来处理多线程,task graph 会根据不同任务之间的依赖性来决定具体的执行顺序以及需要进行并行的任务。
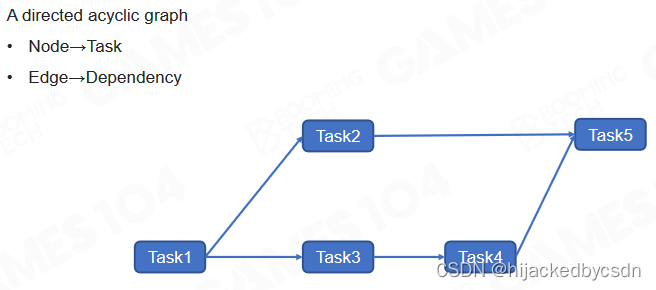
Building Task Graph by Links
task 的连接可以是 hardcode 的
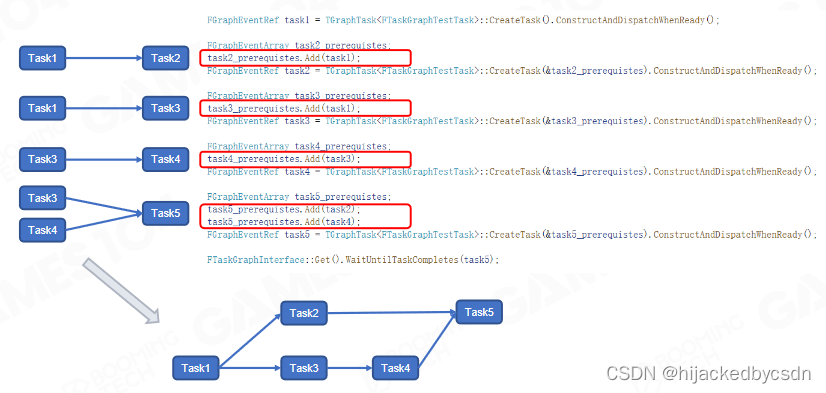
但是这样就没有,任务做到一半,需要等到其他任务结束才能继续本人任务,也没有动态链接任务的功能
Job System
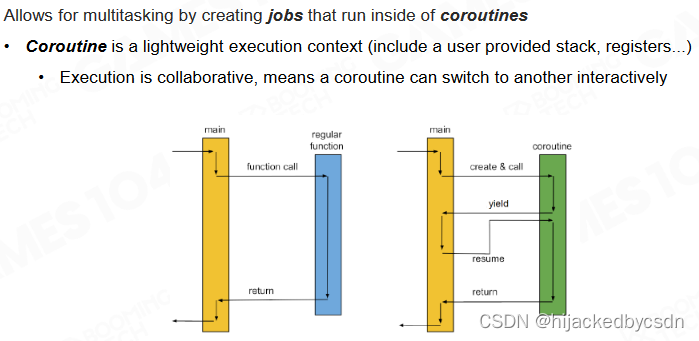
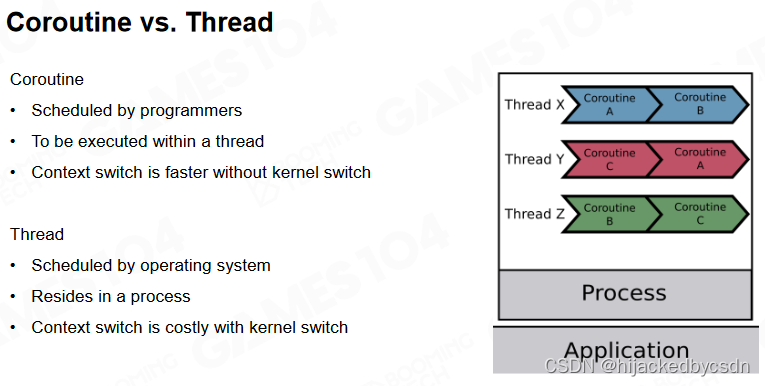
Coroutine
协程(coroutine)是一种轻量的线程上下文切换机制,它允许函数在执行过程中临时切换到协程上然后再切换回来。和线程相比,协程无需硬件层面上的数据切换,可以由程序自己进行定义,也不需要进入系统内核执行 interruption。因此协程要比线程切换高效的多。
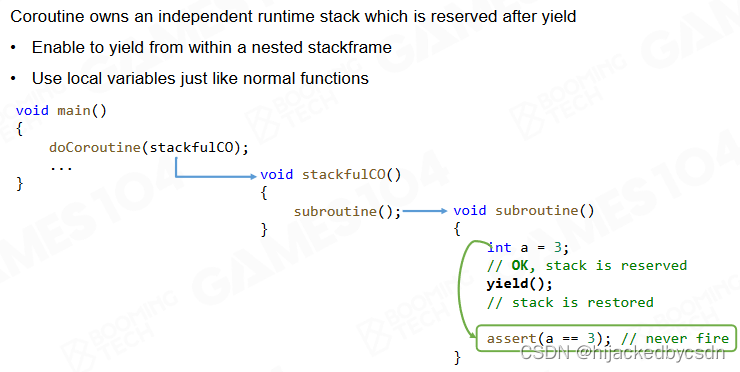
Stackful Coroutine
协程有两种实现方式。首先是使用栈来保存函数切换时的状态,当协程切换回来后根据栈上的数据来恢复之前的状态。
另一种实现方式是不保存函数切换时的状态,当协程切换回来后按照当前的状态继续执行程序。
最简单的 stackless coroutine 就是 goto
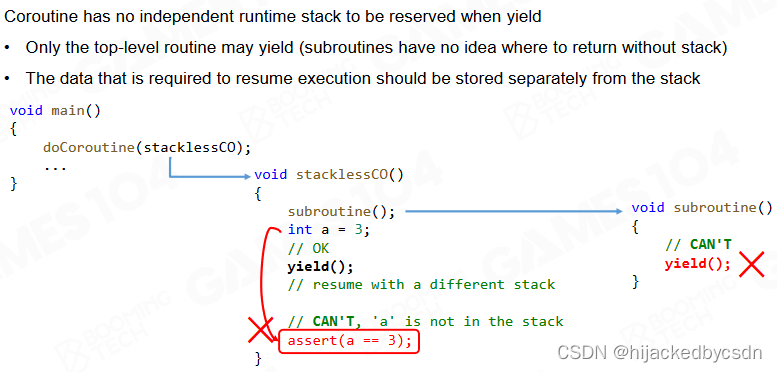
在实践中一般推荐使用基于栈来实现的协程。尽管它在进行切换时的开销要稍微多一些,但可以避免状态改变导致的各种问题。
Fiber-Based Job System
基于协程的思想可以实现 fiber-based job system。在这种任务系统中 job 会通过 fiber 来进行执行,在线程进行计算时通过 fiber 的切换来减少线程调度的开销。
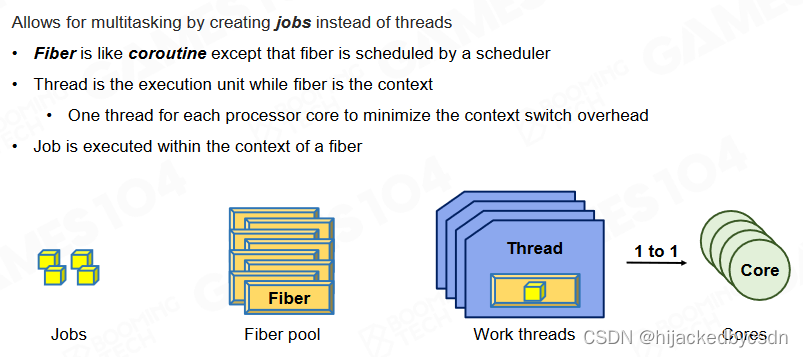
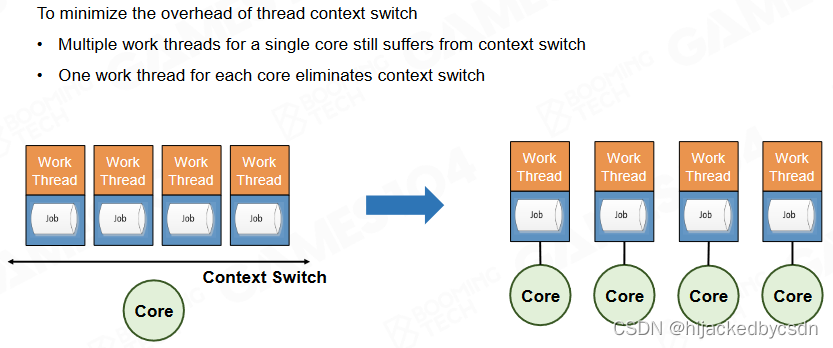
对于多核的情况我们希望尽可能保证一个线程对应一个核(包括逻辑核),这样可以进一步减少线程切换带来的额外开销。
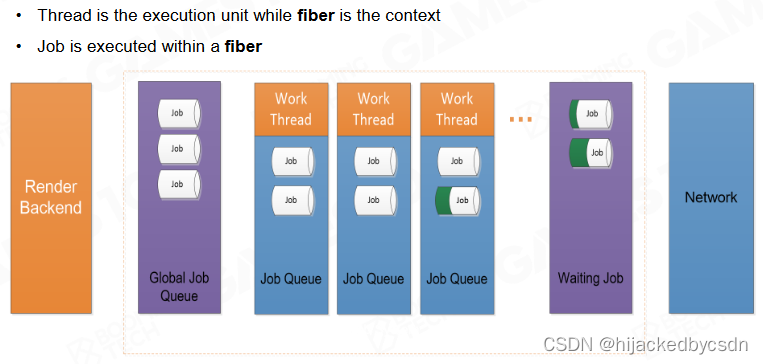
Job Scheduler - Global Job
在执行计算时根据程序的需要生成大量的 job,然后调度器根据线程负载分配到合适的线程以及线程上的 fiber 中。
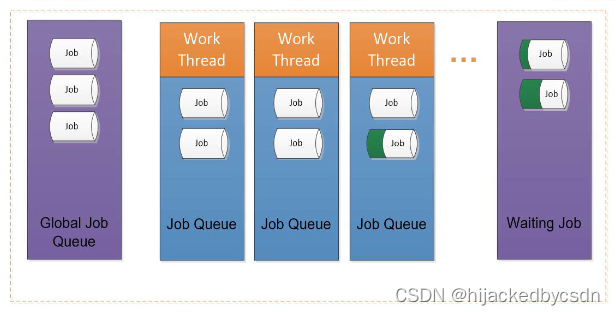
LIFO and FIFO Mode
既然有调度器那就会有调度策略
一般用 LIFO 后进先出
因为可能有一个 job 依赖于它生成的多个 job 先完成,自身才能完成

Job Dependency
当 job 出现依赖时会把当前的 job 移动到等待区然后执行线程中的下一个 job。这样的方式可以减少 CPU 的等待,提高程序效率。
Job Stealing
如果出现了线程闲置的情况,调度器会把其他线程中的 job 移动到闲置线程中进行计算。
可能是其中某个 job 很复杂,或者这个 job 不复杂,但是有很多依赖 job

总结
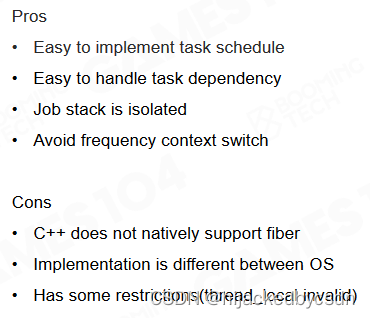
和上面介绍过的多线程方法相比,任务系统可以更好地利用多核并且避免线程切换从而提升计算性能。不过目前原生 C++ 暂不支持协程,而且在不同的操作系统中任务系统的实现往往是不同的。
https://blog.csdn.net/u012834750/article/details/69387975/
ABA 问题
多用公式推导,证明这个并行策略是对的
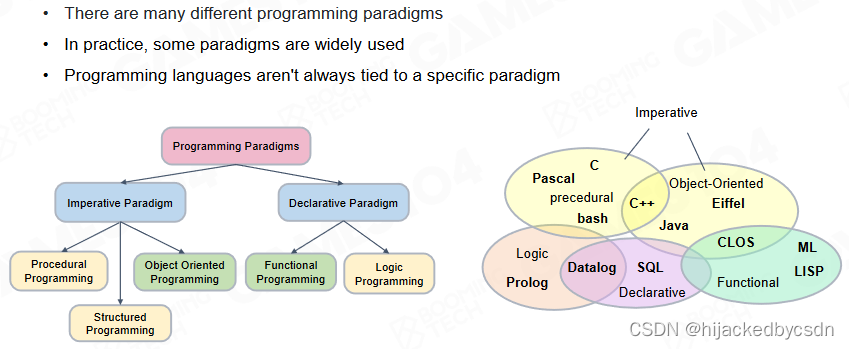
Programming Paradigms
除了硬件之外,编程范式(programming paradigms)对于程序的性能也会有一定的影响。在游戏引擎中我们会使用各种类型的编程范式来实现各种各样的功能。
Programming Paradigm of Game Engine
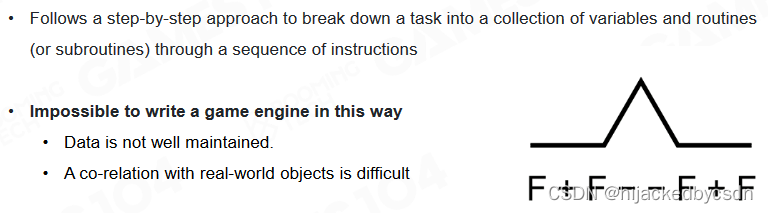
Procedural Oriented Programming (POP)
早期的游戏一般是使用面向过程编程(procedural-oriented programming, POP)来实现的。
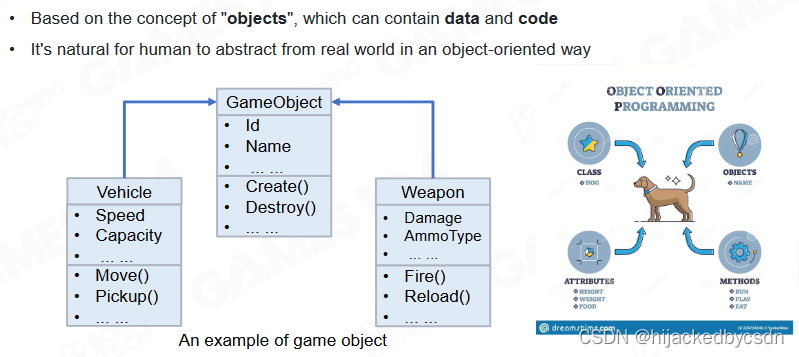
Object-Oriented Programming (OOP)
随着游戏系统变得不断复杂,面向对象编程(object-oriented programming, OOP)的思想在现代游戏引擎中起着越来越重要的作用。
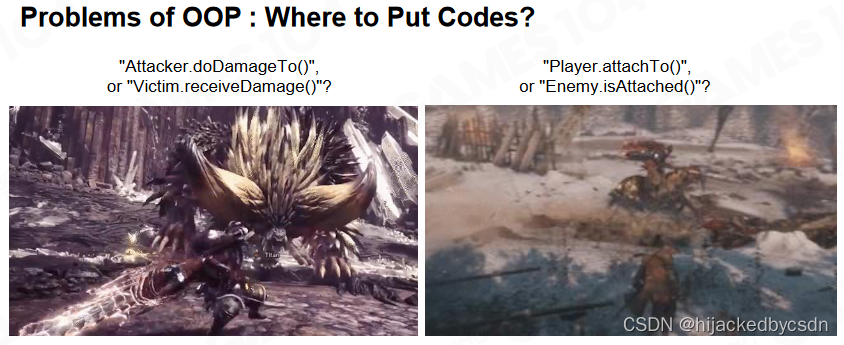
Problems of OOP
然而在大量的实践中人们发现OOP也不是完美的,一个最常见的问题是OOP存在二义性:角色的攻击行为既可以写在角色身上,也可以写在被攻击者身上。
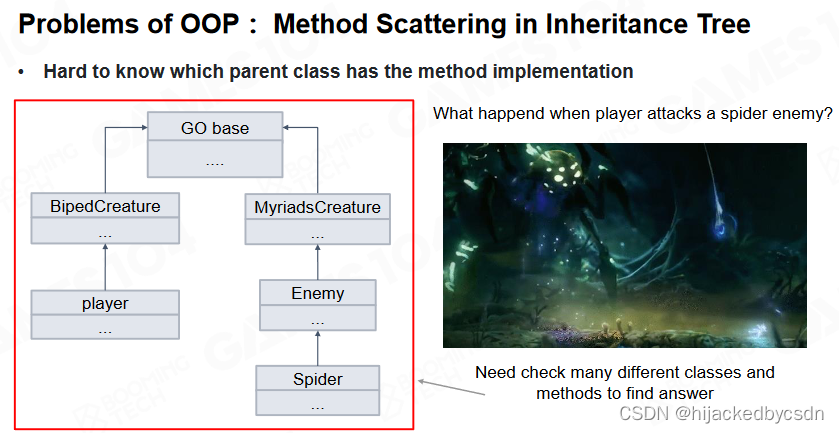
同时 OOP 中存在大量的继承关系,有时很难去查询对象的方法具体是在那个类中实现的。
另外 OOP 中的基类往往需要提供非常多的功能,对于很多派生子类来说这样的基类实在过于臃肿了。

OOP 最大的问题在于它的性能可能是很低的。尽管 OOP 很符合人的认识,但对象的数据往往分布在不同的内存区域上。这就导致程序运行时会浪费大量的时间来读取数据。

每一个对象的构造都是异构的
虚函数会重载,虚函数的查找也是用指针来找的,会有很多指针跳跃
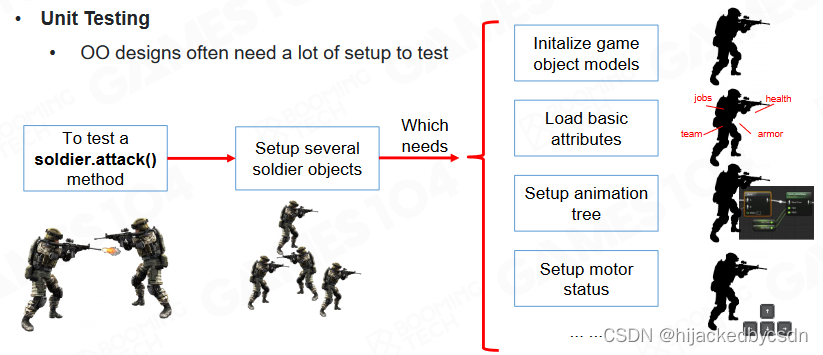
最后,OOP的可测试性非常差。当我们想要去测试对象的某个方法是否按照我们的期望运作时,往往需要从头创建出整个对象,这与单元测试的思想是相违背的。
或者说,因为所有的数据都放到对象中了,所以要测试某一个函数的时候需要把对象适用的整个环境都搭建起来
Data-Oriented Programming
面向数据编程(data-oriented programming, DOP)是现代游戏引擎中越来越流行的一种编程范式。现代计算机的发展趋势是 CPU 运行速度越来越快,但是相对地内存访问的速度却跟不上 CPU 计算的速度。
Cache
为了解决的问题人们设计了缓存(cache)这样的机制来加快内存的访问。一般来说现代计算机都有多级缓存系统,越底层的缓存容量越小但访问速度越快。通过缓存机制我们可以把内存中的数据先放到缓存中来加快 CPU 的访问速度。
Principle of Locality
利用缓存机制进行编程时就需要考虑数据的 locality。
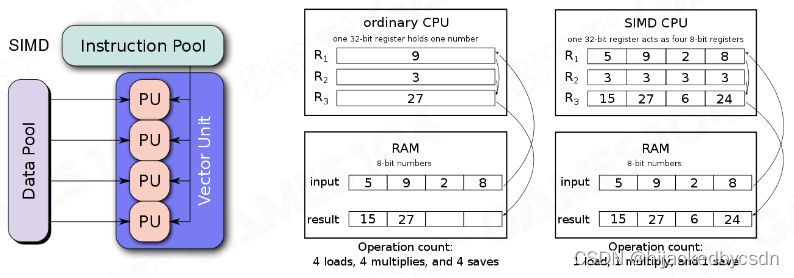
Single Instruction Multiple Data
SIMD 是利用缓存机制实现高性能编程的经典案例。现代 CPU 基本都实现了 SIMD 机制,这样可以在一个指令中同时处理4个操作。因此我们可以把数据尽可能组织成 SIMD 的格式来对程序进行加速。
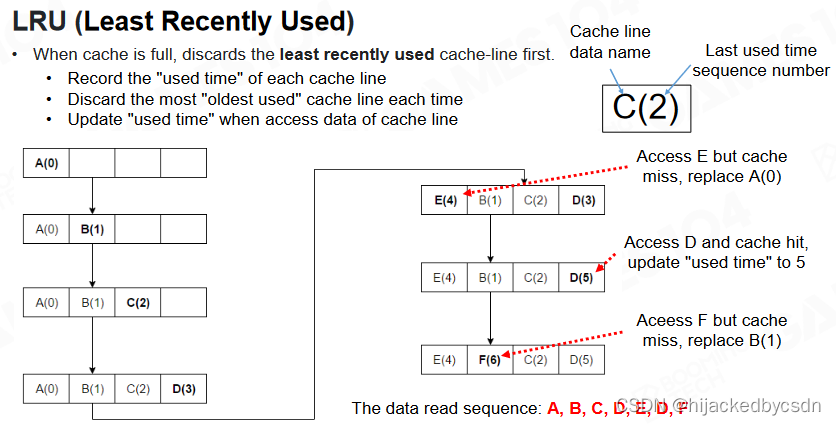
Least Recently Used
LRU 同样是高性能编程中的常用的技巧。当缓存满了后系统会把最不常用的数据置换出去,只留下近期用过的数据从而提升缓存的利用率。在实践中也会采用随机丢弃数据的策略,可以证明这样的策略拥有更好的性能。
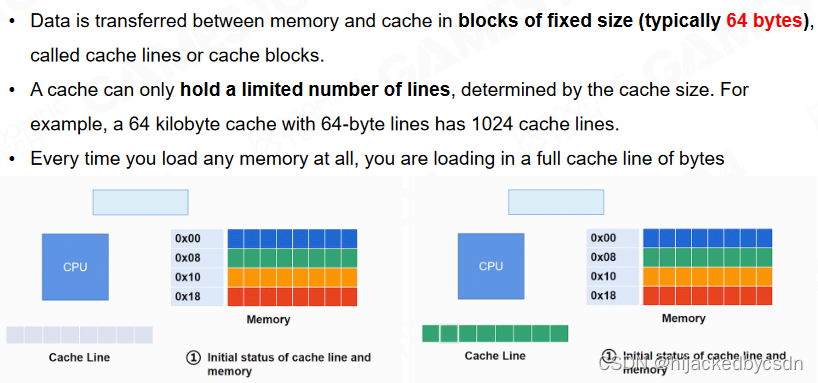
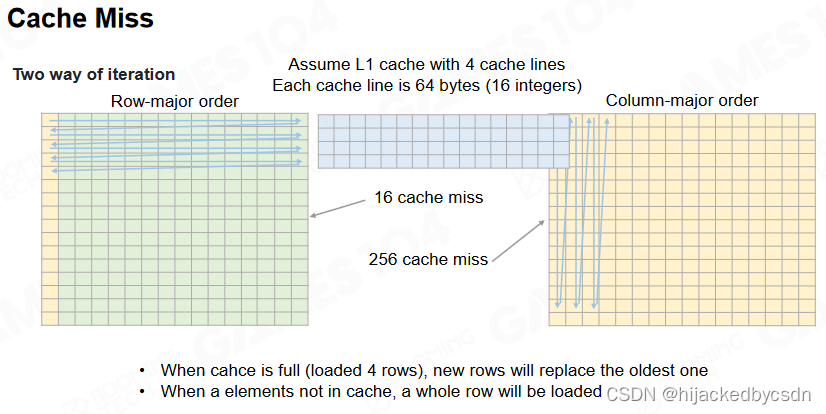
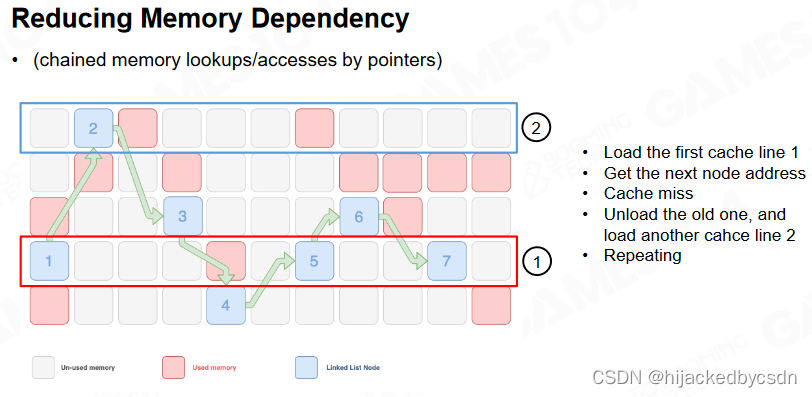
Cache Line
当缓存中的数据进行读写时,不是对单个数据进行操作而是直接读写一条 cache line 上的全部数据(一般是 64 byte)。实际上 CPU 的读写操作都是以 cache line 作为单位来执行的,因此需要操作系统来保证 CPU 读写缓存以及内存数据时的顺序和一致性。
因此我们在设计数据的存储形式时就可以利用 cache line 的机制来加速访问。以矩阵这种数据格式为例,按照行来进行存储的矩阵往往要比按照列来存储的有更高的读写效率。
Data-Oriented Programming
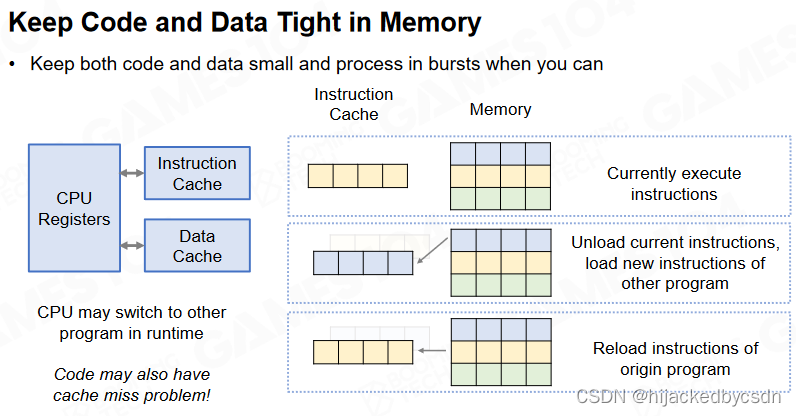
DOP 的核心思想在于把游戏世界(包括代码)认为是数据的集合,在编写程序时要尽可能利用缓存同时避免 cache miss。
因此在 DOP 中我们会把数据和代码看做一个整体,同时使它们在缓存中的分布尽可能地集中。
Performance-Sensitive Programming
Reducing Order Dependency
那么如何基于 DOP 的思想来设计高性能的程序呢?首先我们需要避免程序对于代码执行顺序的依赖。
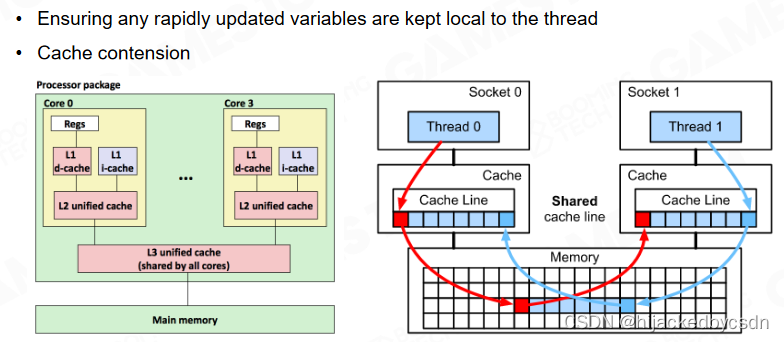
False Sharing in Cache Line
对于多线程的程序要避免两个线程同时访问同一块数据,或者说在同一个 cache line 里面,我们希望不同的线程之间尽可能地相互独立。
因为如果两个核都要同一份数据的话,就需要数据从主存送到两个核各自的 l1 cache,数据会被运送两遍
Branch prediction
对于包含分支的程序,CPU 会对程序可能选择的分支进行预测并把最有可能直线的指令提前送到缓存中,如果程序选择了不常见的分支则往往需要从内存中重新读取相应的指令从而降低程序性能。
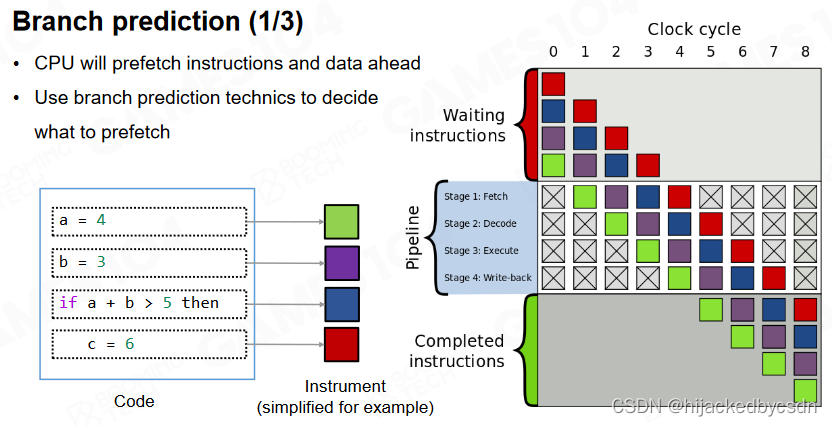
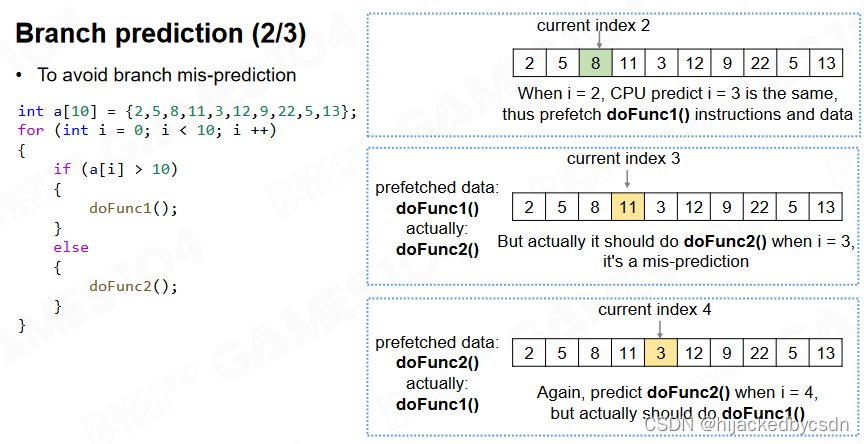
因此在设计程序时要尽可能保证具有相同分支的程序在一起执行,比如说可以通过对数据进行排序的方式来避免错误的分支预测。
排序之前:
排序之后:
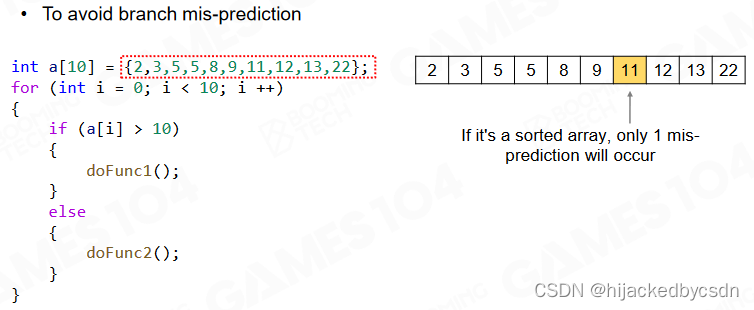
排序的时间消耗可能小于栈帧的切换
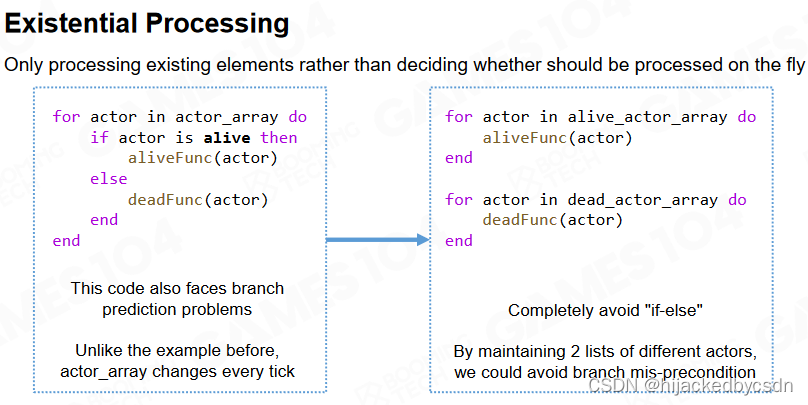
更通用的方法是按照业务逻辑对数据进行分组,每一组中只使用相同的函数进行处理。这样可以完全避免分支判断从而极大地提升程序性能。
Performance-Sensitive Data Arrangements
当然数据的组织方式对于程序性能也有巨大的影响。
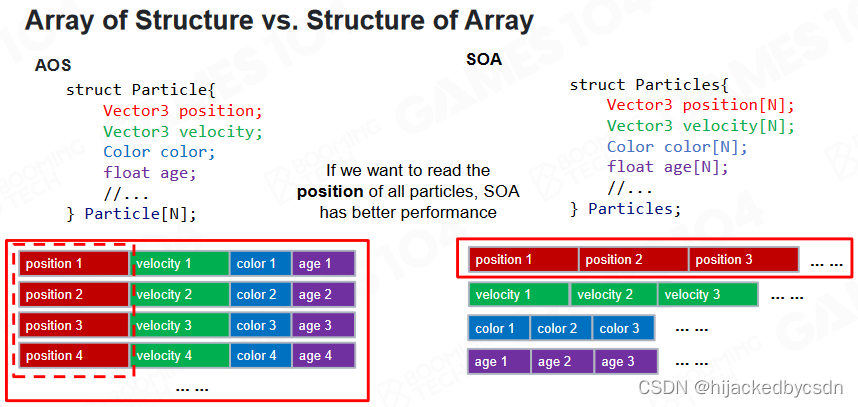
一个经典的案例是 AOS 和 SOA。
根据 OOP 的思想,我们可以把数据封装到不同对象中然后使用一个数组作为这些对象的容器,这种组织方式称为 AOS(array of structure);或者直接对数据进行封装把所有数据放到一个巨大的对象中,称为 SOA(structure of array)。
当程序需要对数据进行访问时 AOS 往往会产生大量的 cache miss,因此在高性能编程中更推荐使用 SOA 的组织方式。
Entity Component System
本节课最后介绍了现代游戏引擎中的 ECS 架构(entity component system)。回忆在前面的课程中我们介绍过基于 OOP 来对组件进行编程,然后通过继承的方式来实现具体的 GO。就像前面介绍过的那样,这种编程范式是相对低效的。
而在 ECS 架构中则使用了 entity 的概念将不同的组件组织起来。entity 实际上只是一个 ID,用来指向一组 component。而 ECS 架构中的 component 则只包括各种类型的数据,不包含任何具体的业务逻辑。当需要执行具体的计算和逻辑时则需要调用 system 来修改 component 中的数据。这样游戏中的数据可以集中到一起进行管理,从而极大地提升数据读写的效率。
一个 system 可能修改多个 component 的数据
Unity Data-Oriented Tech Stacks
https://blog.csdn.net/mango9126/article/details/105220931
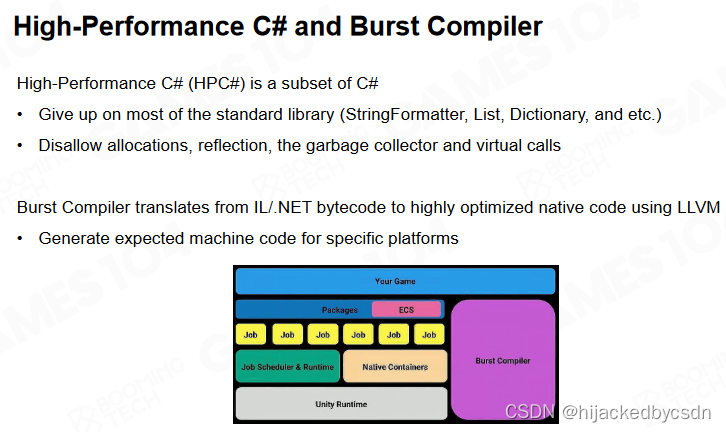
unity 中的 DOTS 系统(data-oriented tech stacks)就是基于 ECS 架构来实现的,同时它还结合了 C# 任务系统用来进行并行化以及设计了 burst 编译器来优化代码。
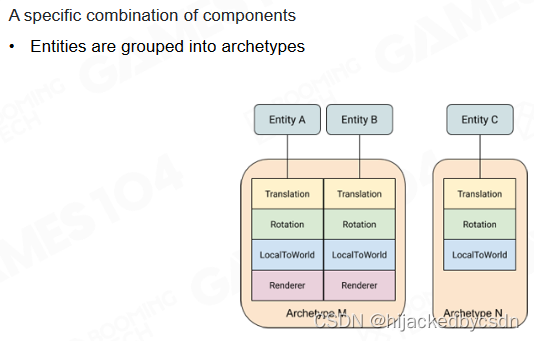
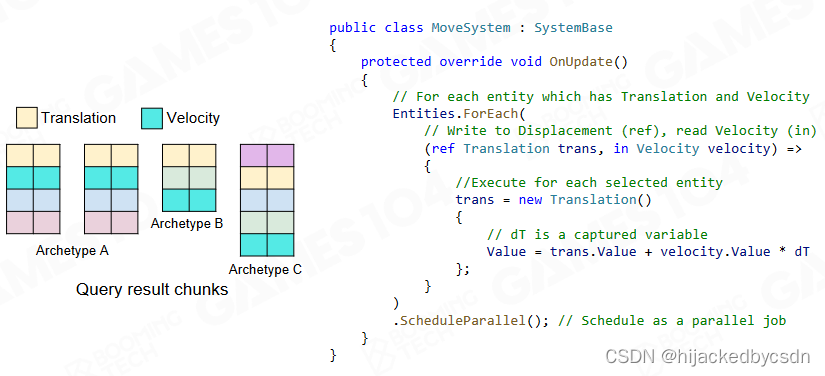
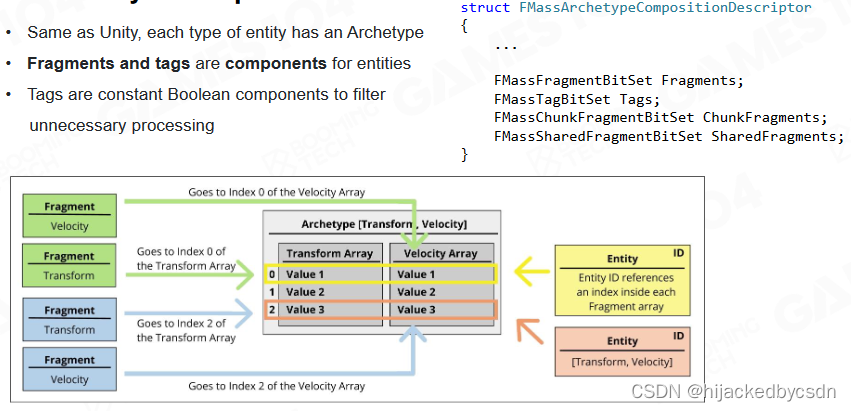
在 unity 的 ECS 架构中设计了 archetype 来对不同类型的 entity 进行抽象,这样具有相似功能的 entity 可以组织到一起方便管理。
在内存中系统会为不同的 archetype 分配不同大小的存储空间,称为 chunk。
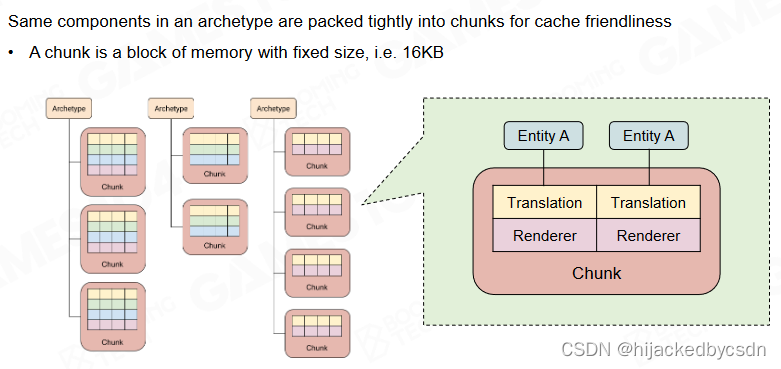
对于 system 而言只需要一次性更新 chunk 中的相关数据即可。
为什么不一次性处理同类型的 component?
首先同类型的 component 的数据是很大的,也不符合数据局部性的要求
而且我觉得应该是,每一个 system 的逻辑只局限在 chunk 里面,所以
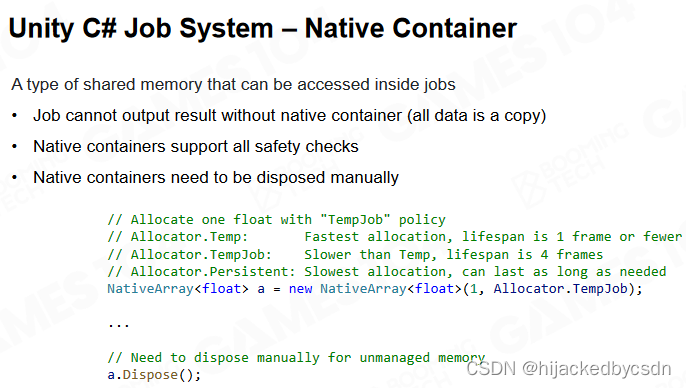
C# 的容器经历了 C# 的注册分配释放
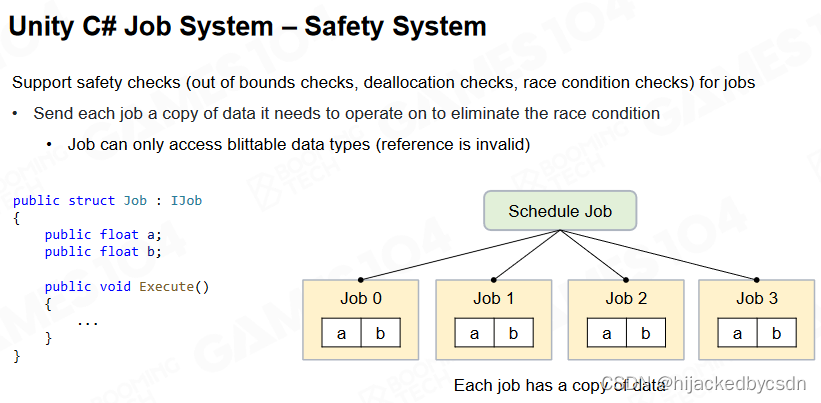
而为了支持这样的高性能架构还需要 native 级别的任务系统、容器以及安全检查,也因此 unity 需要定制编译器来把 C# 代码编译成更底层的代码。
相当于只使用 C# 语法
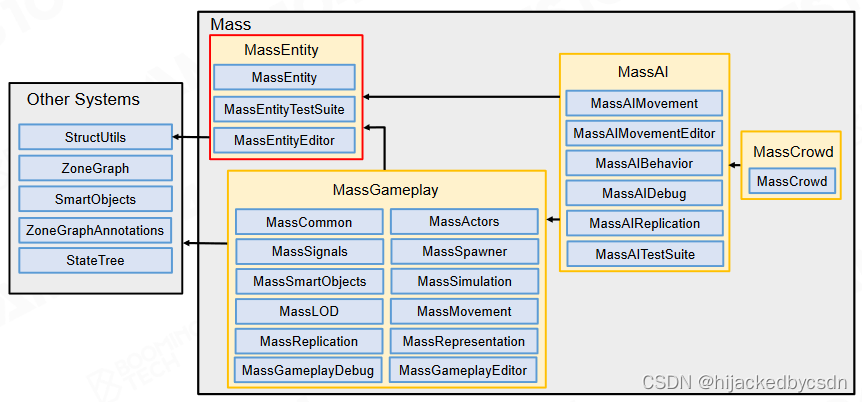
Unreal Mass System
虚幻引擎中使用了 Mass 系统来实现 ECS 架构。
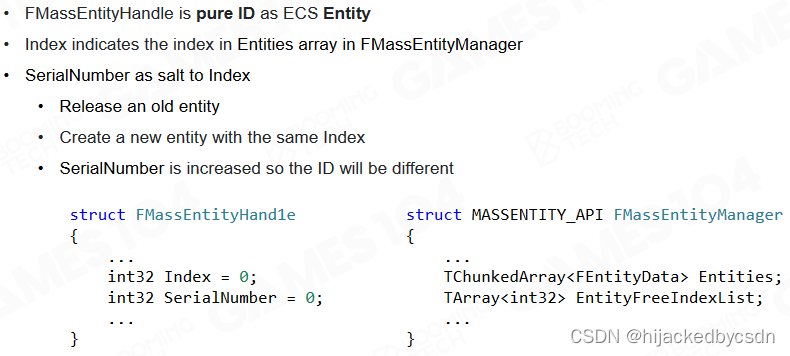
Entity
Mass系统与DOTS非常类似,都使用了 entity 作为 component 的索引 ID。
Component
Mass 系统中的 component 称为 fragment,用来强调它只具有数据的属性。
也可以和 OOP 中的 component 相区别
Systems
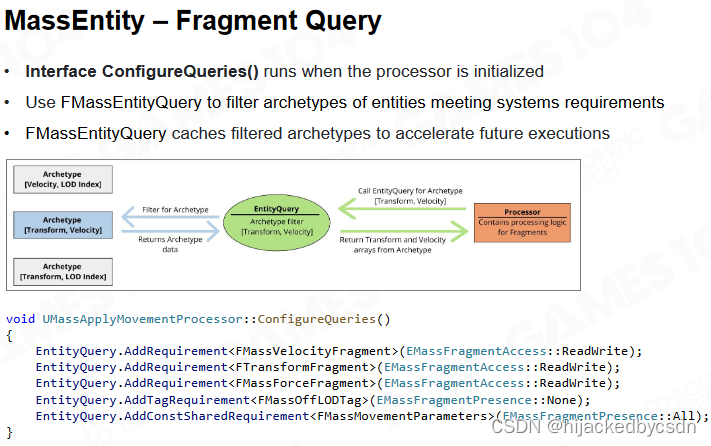
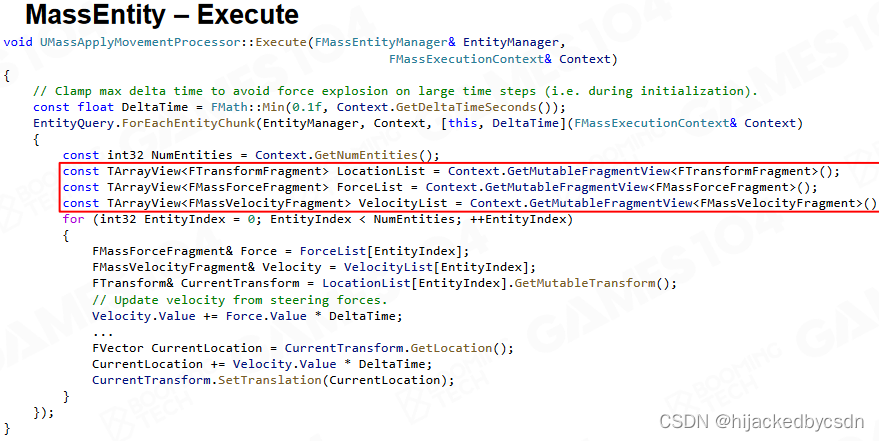
而 system 则称为 processor,这表示它只承担业务逻辑的功能。
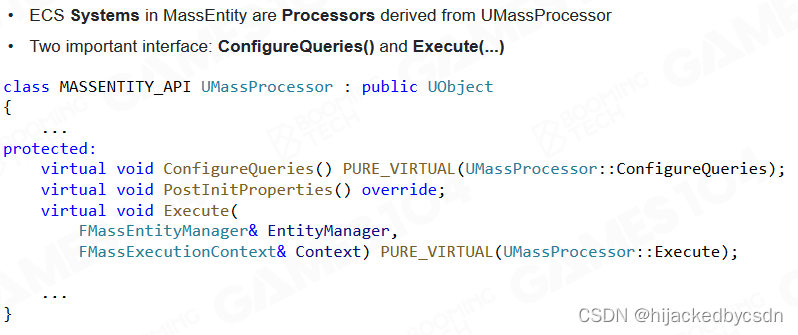
processor 需要实现 query 和 excute 两个接口。前者表示在内存中选出所需的 entity,而后者则是不同 system 执行的逻辑。
这个 query 也会有缓存,如果两次 query 没有区别,就可以使用上一次 query 的缓存
总结
这两个的区别
fiber-based job system 任务调度
ecs 面向数据组织运算
钻研这张图
参考资料
Cache
• Entity Component Systems & Data Oriented Design, Unity Training Academy 2018-2019, #3
https://aras-p.info/texts/files/2018Academy%20-%20ECS-DoD.pdf
• Computer Architecture: A Quantitative Approach 5th Edition by John L. Hennessy , David A.
Patterson
• What is the bandwith speed of L1,L2 and L3 Cache
https://linustechtips.com/topic/34636-what-is-the-bandwith-speed-of-l1l2-and-l3-cache/
• Intel Core i9-9900K CPU Review: More Cores, Speed, and Higher Price
https://www.overclockers.com/intel-core-i9-9900k-cpu-review-more-cores-speed-and-
higher-price/
• Wikipedia - Cache replacement policies
https://en.wikipedia.org/wiki/Cache_replacement_policies#Least_recently_used_(LRU)
Parallel Programming
• Operating System Basics (Brian Will)
https://linuxwheel.com/operating-system-basics-brian-will/
• Parallel computing via multicore computers allow high processing capacity
https://www.teldat.com/blog/parallel-computing-bit-instruction-task-level-parallelism-
multicore-computers/
• Internals of a Thread Pool
https://salonegupta.wordpress.com/2017/12/28/internals-of-a-java-thread-pool/
• CPP Reference - Atomic https://en.cppreference.com/w/cpp/atomic
• TBB Tutorial https://www.inf.ed.ac.uk/teaching/courses/ppls/TBBtutorial.pd
• Parallel Programming Models and Paradigms
http://www.cse.hcmut.edu.vn/~hungnq/courses/pp/backup.2/thamkhao/Parallel%20Program
ming%20Paradigms.pdf
• Parallel Paradigms and Parallel Algorithms https://pdc-support.github.io/introduction-to-
mpi/05-parallel-paradigms/index.html
• Developing Parallel Programs - A Discussion of Popular Models
https://www.oracle.com/technetwork/server-storage/solarisstudio/documentation/oss-
parallel-programs-170709.pdf
• Modern Fortran: Building efficient parallel applications MEAP V13
https://livebook.manning.com/book/modern-fortran/welcome/v-13/
• Priority Inversion http://www.embeddedlinux.org.cn/rtconforembsys/5107final/LiB0101.html
• What is a Thread in OS and what are the differences between a Process and a Thread?
https://afteracademy.com/blog/what-is-a-thread-in-os-and-what-are-the-differences-
between-a-process-and-a-thread
• Understanding operating systems https://www.uow.edu.au/student/learning-co-
op/technology-and-software/operating-systems/
Parallel Frameworks in Game Engine
• GDC2015 - Parallelizing the Naughty Dog Engine Using Fibers
https://www.gdcvault.com/play/1022186/Parallelizing-the-Naughty-Dog-Engine
• GCAP 2016: Parallel Game Engine Design - Brooke Hodgman
https://www.youtube.com/watch?v=JpmK0zu4Mts
• Java - Thread Pools https://www.logicbig.com/tutorials/core-java-tutorial/java-multi-
threading/thread-pools.html
• C++20: Building a Thread-Pool With Coroutines https://blog.eiler.eu/posts/20210512/
• Processes, threads, and coroutines
https://subscription.packtpub.com/book/programming/9781788627160/1/ch01lvl1sec02/proc
esses-threads-and-coroutines
• UE并发-TaskGraph的实现和用法
https://zhuanlan.zhihu.com/p/398843895?utm_medium=social&utm_oi=1447486643037528
064&utm_psn=1546525648855732224&utm_source=ZHShareTargetIDMore
• Unreal Engine 5.0 Documentation - Tasks System https://docs.unrealengine.com/5.0/en-
US/tasks-systems-in-unreal-engine/
• UE4/UE5的TaskGraph https://cloud.tencent.com/developer/article/1897046
DOP
• Programming Paradigms – Paradigm Examples for
Beginnershttps://www.freecodecamp.org/news/an-introduction-to-programming-
paradigms/#what-is-a-programming-paradigm
• GDC’cn 为实现极限性能的面向数据编程范式 叶劲峰https://ubm-
twvideo01.s3.amazonaws.com/o1/vault/gdcchina14/presentations/833779_MiloYip_ADataOrie
ntedCN.pdf
• Timeline of Computer History
https://www.computerhistory.org/timeline/computers/
• The Fetch and Execute Cycle: Machine Language
https://math.hws.edu/javanotes-swing/c1/s1.html
• Wikipedia-Single instruction, multiple data
• Linked List (Data Structure) https://devopedia.org/linked-list-data-structure
• Sekiro: Shadows Die Twice - All Bosses [No Damage]
https://www.youtube.com/watch?v=KPAvM2hcSH8
• Ori 2 - Boss - Mora (Giant Spider) - Hard Difficulty
https://www.youtube.com/watch?v=tuhrtBRLQPw
• The Greatest Frame Loss of All Time
https://www.youtube.com/watch?v=4efRYXuhVTA
• Monster Hunter World | Great Sword Tutorial
https://www.youtube.com/watch?v=X2vr8M3lQ88
• Data-Oriented Design, Fabian R, CRC Press, 2018.
https://www.dataorienteddesign.com/dodbook.pdf
• OOP Is Dead, Long Live Data-oriented Design. Nikolov S, Coherent Labs. CppCon 2018.
https://www.bilibili.com/video/BV1kW41117uw?p=66&vd_source=f12a5db552661d28e85078
75c37983cd
• Data-Oriented Design and C++, Acton M. Insomniac Games. CppCon 2014.
https://www.youtube.com/watch?v=rX0ItVEVjHc
• Data-Oriented Design Resources: https://github.com/dbartolini/data-oriented-design
Unity DOTS
• Getting Started with Unity DOTS https://nikolayk.medium.com/getting-started-with-unity-
dots-part-1-ecs-7f963777db8e
• Unity Manual - ParallelFor Jobs
https://docs.unity3d.com/Manual/JobSystemParallelForJobs.html
• Unity Learn - What is DOTS and why is it important https://learn.unity.com/tutorial/what-is-
dots-and-why-is-it-important#
• On DOTS: Entity Component System https://blog.unity.com/technology/on-dots-entity-
component-system
• Unite Los Angeles 2018 Keynote
https://www.youtube.com/watch?v=alZ6wmwvck0&t=6434s
• Building a Data-Oriented Future - Mike Acton
https://www.youtube.com/watch?v=u8B3j8rqYMw
• Getting started with Unity DOTS — Part 2: C# Job System
https://nikolayk.medium.com/getting-started-with-unity-dots-part-2-c-job-system-
6f316aa05437
Unreal Engine Mass Architecture
• UE5 MassEntity Documentation, https://docs.unrealengine.com/5.0/en-US/overview-of-
mass-entity-in-unreal-engine/
• UE5的ECS:MASS框架(一), quabqi, 2022, https://zhuanlan.zhihu.com/p/441773595
• UE5的ECS:MASS框架(二), quabqi, 2022, https://zhuanlan.zhihu.com/p/446937133
• UE5的ECS:MASS框架(三), quabqi, 2022, https://zhuanlan.zhihu.com/p/477803528
Multimedia Material List
• Sekiro: Shadows Die Twice - All Bosses [No Damage]
https://www.youtube.com/watch?v=KPAvM2hcSH8
• Ori 2 - Boss - Mora (Giant Spider) - Hard Difficulty
https://www.youtube.com/watch?v=tuhrtBRLQPw
• Monster Hunter World | Great Sword Tutorial
https://www.youtube.com/watch?v=X2vr8M3lQ88
• Review in Progress: Battlefield 2042 https://www.destructoid.com/review-in-progress-
battlefield-2042-ps5-version/
• Infographics: Operation Costs in CPU Clock Cycles, http://ithare.com/infographics-operation-
costs-in-cpu-clock-cycles/
QA
并行编程有没有比较好的 debug 方法
打 log
渲染线程和逻辑线程的同步怎么做
为了防止二义性,渲染线程等逻辑线程
第二十一节 动态全局光照和 Lumen
Global Illumination
The Rendering Equation
全局光照(global illumination, GI)是渲染中的重要问题。在介绍 GI 在游戏引擎的实现方法前我们先回顾一下渲染方程(the rendering equation):

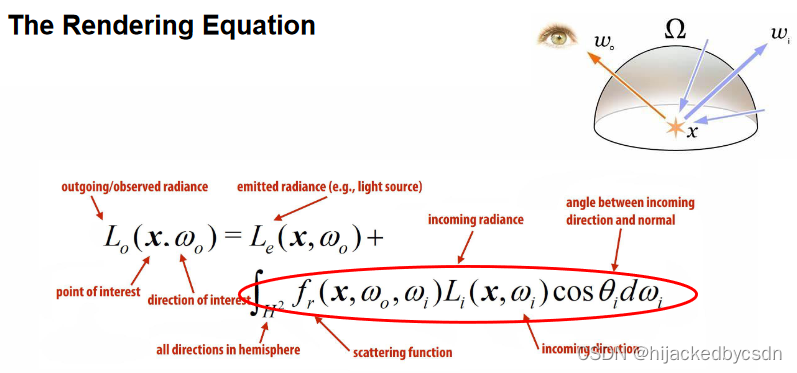
可以说一切渲染问题的本质在于求解渲染方程,而求解渲染方程的难点在于方程自身的递归形式。当场景中的物体被光源照亮后,被照亮的物体又会成为新的光源再次照亮其它物体。以 Cornell box 为例,来自屋顶的灯光会照亮左右两侧红色和绿色的墙壁,然后墙壁反射的光线又会照亮盒子使得盒子的两侧呈现红色或是绿色,这样的现象称为 color bleeding。
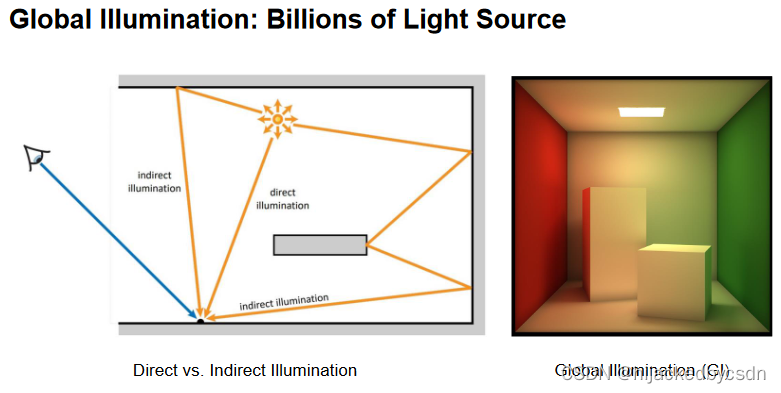
在复杂的游戏场景中通过 GI 会极大地提升画面表现力。

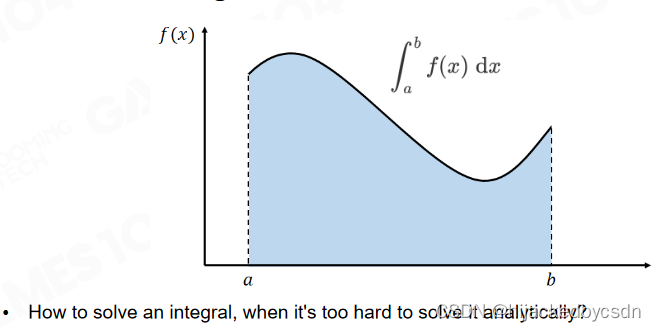
Monte Carlo Integration
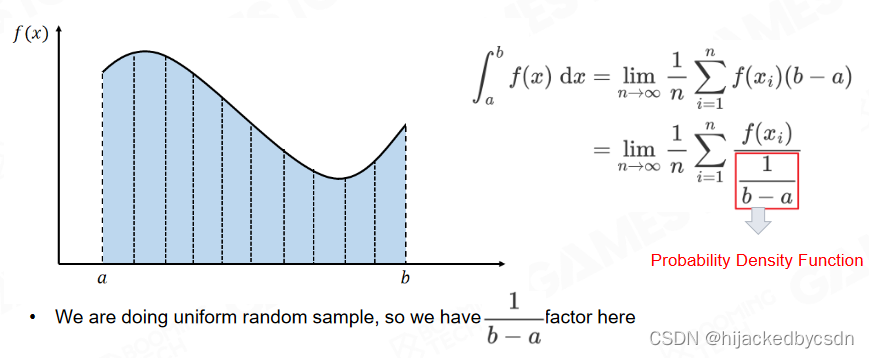
作为积分方程,求解渲染方程的经典方法是 Monte Carlo 积分(Monte Carlo integration)。对于可积函数 f ( x ) f(x) f(x),我们可以通过采样的方法来逼近 f ( x ) f(x) f(x) 的积分。
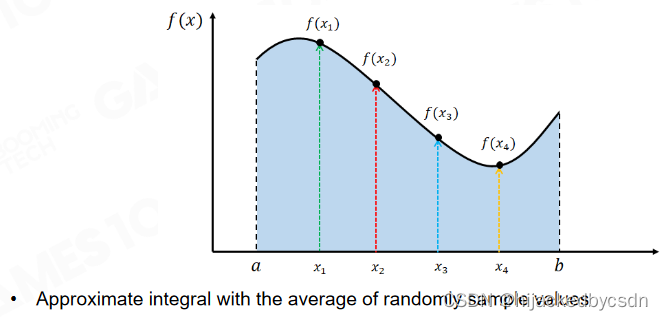
光线追踪(ray tracing)算法的本质就是通过 Monte Carlo 积分来求解渲染方程。
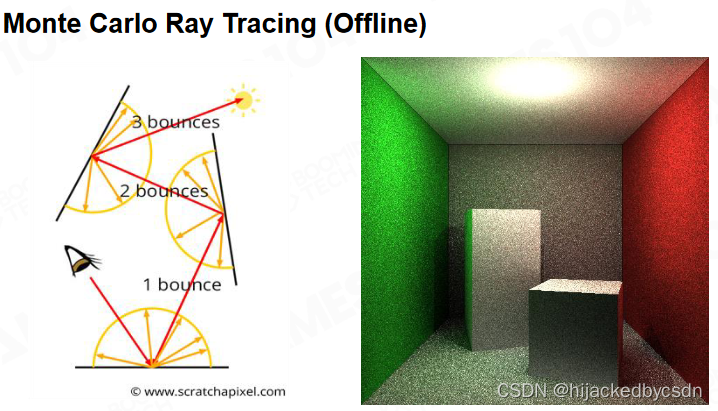
一次 bounce 发射出若干个 ray 采样进行蒙特卡洛积分
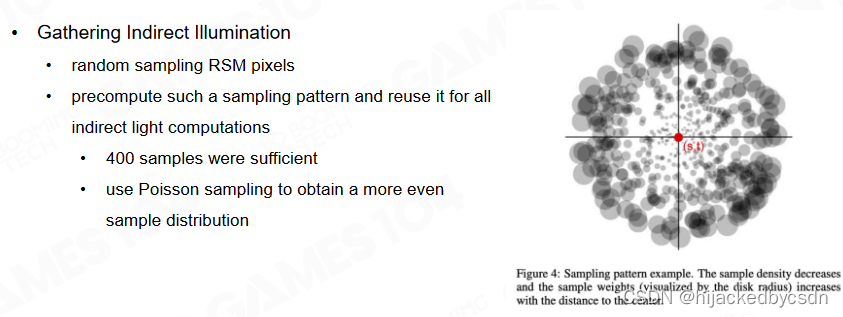
Importance Sampling
Monte Carlo 积分的效率和精度取决于如何设计采样的样本。当样本的数量比较少或是质量比较低时,通过光线追踪渲染出的图像往往会具有非常多的噪声。
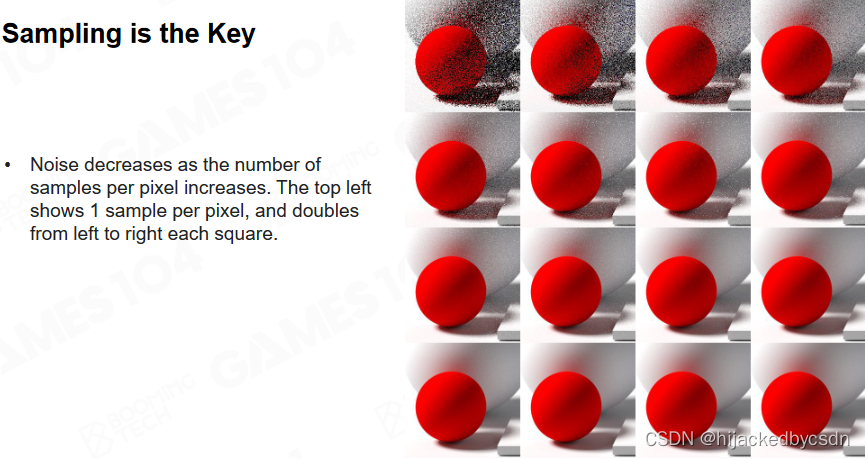
因此如何设计采样的分布对于提升渲染质量有着非常重要的意义,其中最简单的采样方法是均匀采样。
现代高质量渲染的核心技术在于重要性采样(importance sampling)的大规模应用。重要性采样理论指出当我们的采样函数接近于被积函数时只需要相对少的样本就可以很好地近似被积函数的积分,而在计算 Monte Carlo 积分时只需要对样本按照 pdf 进行加权求和即可。
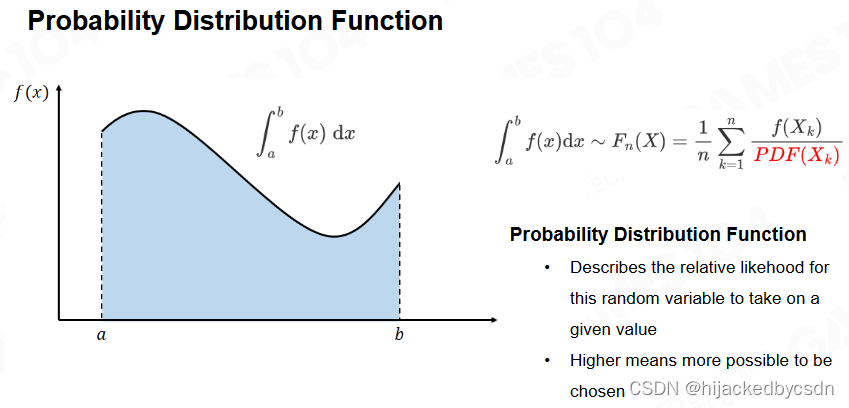
问题就是怎么找到这样的 pdf
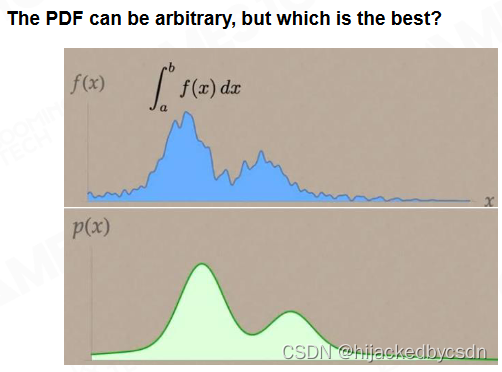
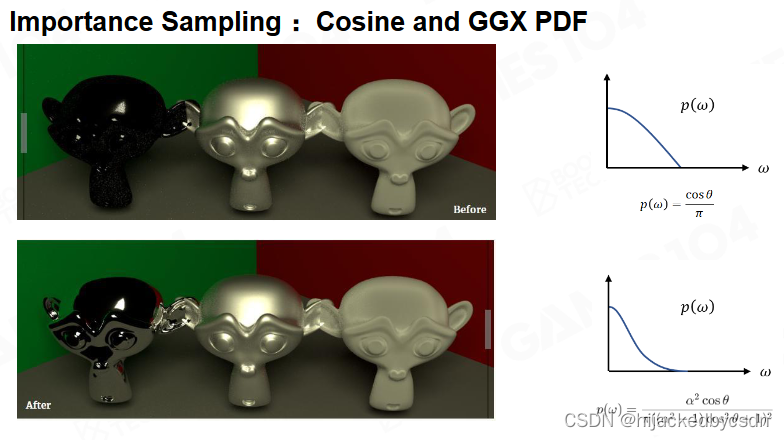
回到渲染方程中,被积函数包含余弦项 cos θ i \cos \theta_i cosθi,因此一个常见技巧是根据余弦项进行采样;类似地也可以按照 BRDF 来进行采样,这种采样方式对于光泽表面的物体往往有着更高的积分效率。
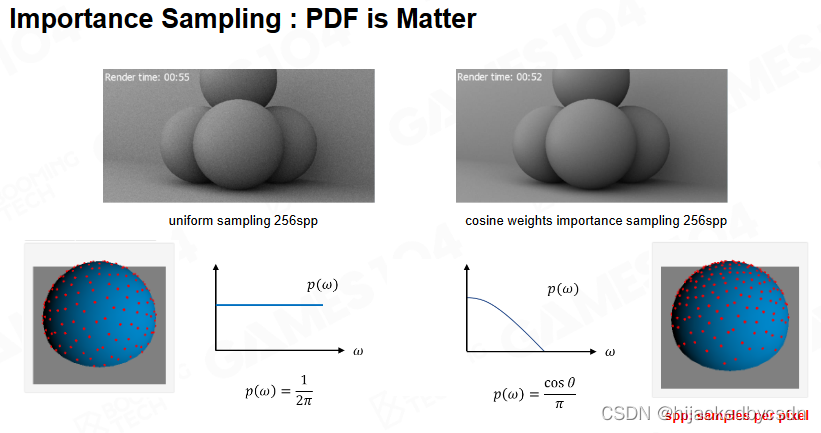
在这个情况下,靠近天顶的地方的重要程度比靠近地平的重要成都要高一点
Reflective Shadow Maps
尽管通过光线追踪可以解决 GI 的问题,但它的主要缺陷在于光线追踪基本无法应用在游戏这样有实时性要求的场景中。为了实现实时的 GI 人们设计了各种各样的算法来进行近似,其中最早的工作可以追溯到 2005 年的 reflective shadow maps(RSM) 算法。
从实现的层面上讲,RSM 更接近于光子映射(photon mapping)。光子映射理论认为相机接收到的 radiance 本质是由光源发射的光子经过场景不断的吸收和反射最终的被相机捕获的结果,因此我们可以从光源出发发射大量的光子然后计算光子在场景上的分布,然后通过相机来进行收集即可。
在 RSM 中我们需要从光源的位置首先渲染一张 shadow map,它表示场景中所有被光源直接照射的部分。(所以 shadow map 这个名字有点困惑性)
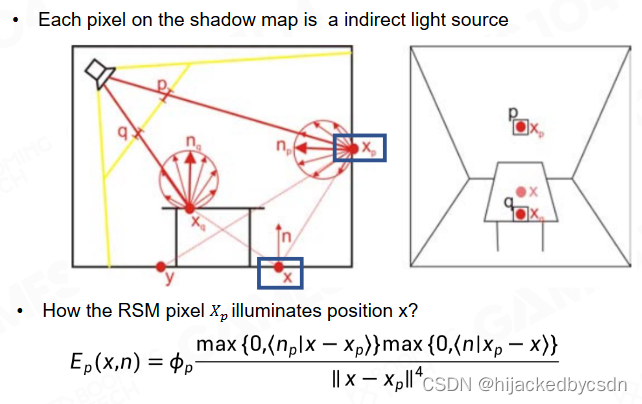
shadow map 记录了这些区域在直接光照下反射的 radiance,这样当我们需要考虑 GI 时只需要把直接光照和 shadow map 上记录的来自其它物体的反射光线进行相加即可。
这里的 x - xp 为什么是四次方,而不是距离的平方?
我听得也不懂,感觉好像 ||x-xp||^2 才是距离的一次方
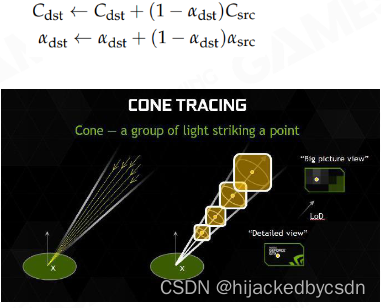
Cone Tracing with RSM
直接计算来自场景中其它物体的反射光线仍然需要非常多的计算量,在 RSM 中使用了 cone tracing 的技术来进行简化。
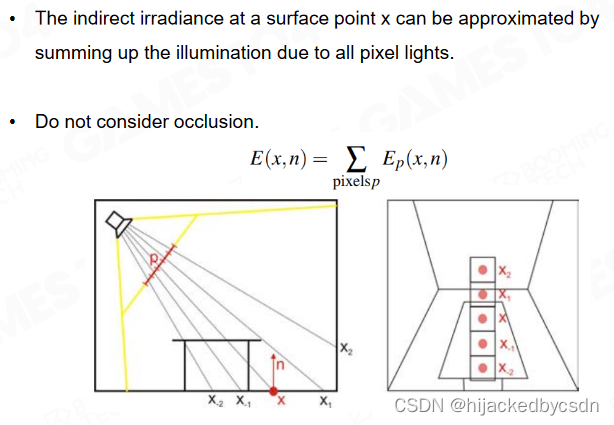
Acceleration with Low-Res Indirect Illumination
由于间接光照一般来说是相对低频的,在渲染时还可以降低输出的分辨率进一步提升效率。然后在与直接光照相加时通过插值的方式来获得完整分辨率下的间接光照。
还有一个就是因为次级光源都是比较低频的,所以其实我们每 4 个或者 6 个 pixel 采样一次,然后周围一圈的pixel都可以公用;
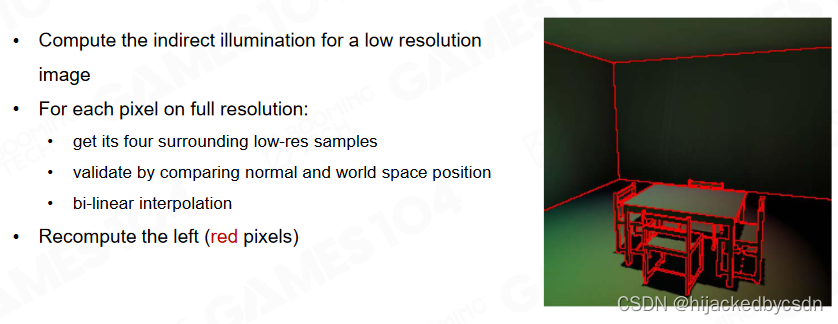
如果采样点与摄像机的位置距离很大,或者法向位置不共面,那就认为这是一个无效插值,就对这些点做一个完整采样
也就是主要思想是,要获得一个低频的东西,就先用低分辨率来做,然后再用插值变回高分辨率,如果在某些位置出现了瑕疵,就在这些位置做完整采样
通过 RSM 实现的 GI 可以明显提升游戏画面中阴影部分的细节。
总结一下,RSM 作为实时 GI 的早期工作非常容易进行实现而且很高的计算效率;而它的缺陷在于 RSM 只能考虑光线的一次反射,而且在计算间接光照时没有进行可见性检测。
Light Propagation Volumes
light propagation volumes(LPV) 是考虑光线在场景中不断传播的一种 GI 算法,最早在 2009 年提出。
LPV 的核心在于把场景使用三维的网格进行表示,并以此来计算光线在场景中的分布。
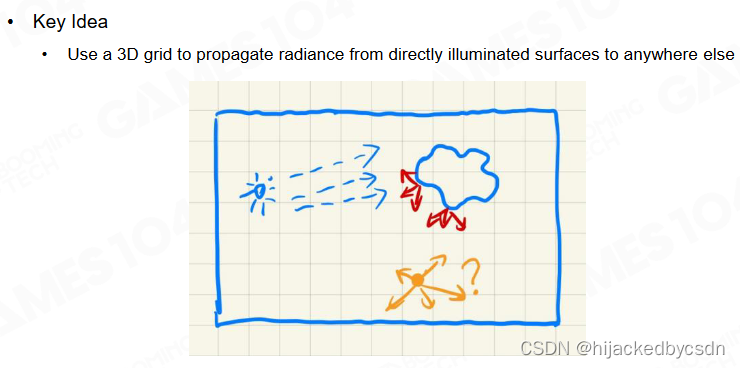
核心在于怎么在空间中扩散
LPV 在计算时会记录每个格子上当光线传播到物体表面后散射的 radiance,然后以此为中心向其它格子进行扩散。

每一个格子里面存储的是一个三维的光线分布
因为要表示一个三维空间中的分布,所以可以用球谐函数来表示
球谐函数就是球坐标系中的基函数
这里使用前两阶的球谐函数
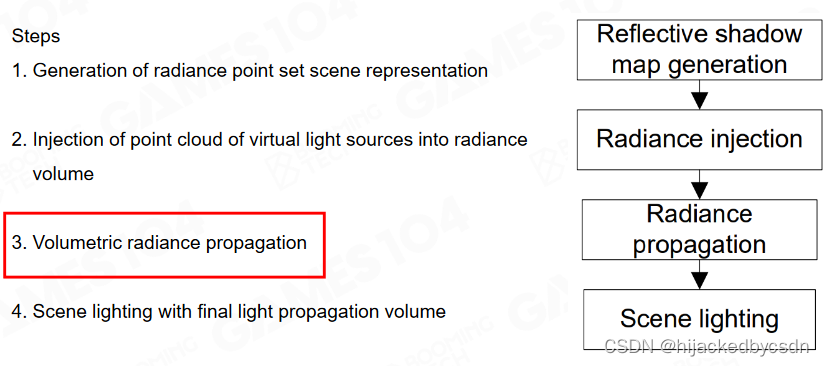
Radiance Propagation
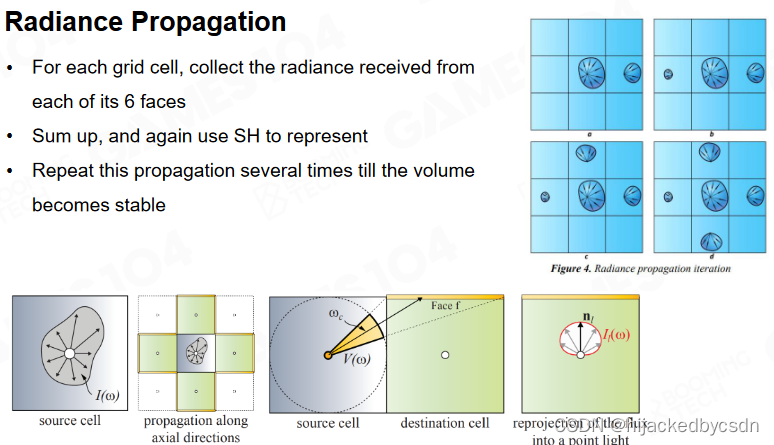
某种意义上讲 LPV 把光线的传播视为扩散过程,严格来说这样的处理是不完全遵循物理法则的。
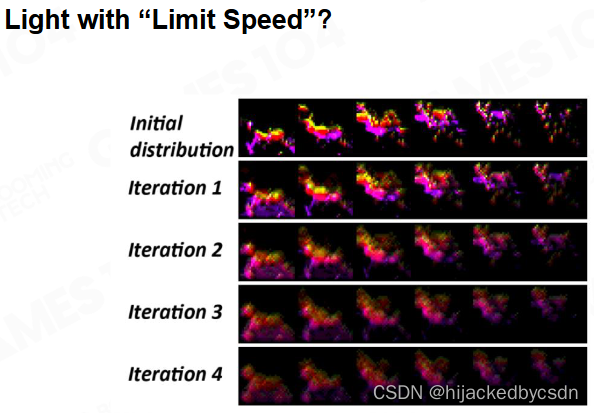
总之这个算法的意义在于,他是第一个想到把空间用格子划分,把光线的分布存在每一个格子里,让光线在格子中传播,用球谐函数来表示光线分布
Sparse Voxel Octree for Real-time Global Illumination
SVOGI 的思路与 LPV 非常接近,都使用了网格的方式来对场景空间进行划分。
但是你不知道具体将空间划分多大,有些空间可能是空的,有些空间只需要存物体的表面,不需要存物体的内部
Voxelization Pass
在 SVOGI 中使用了保守光栅化(conservative rasterization)的方法来获取场景的体素表达,从而得到场景中所有表面的体素。
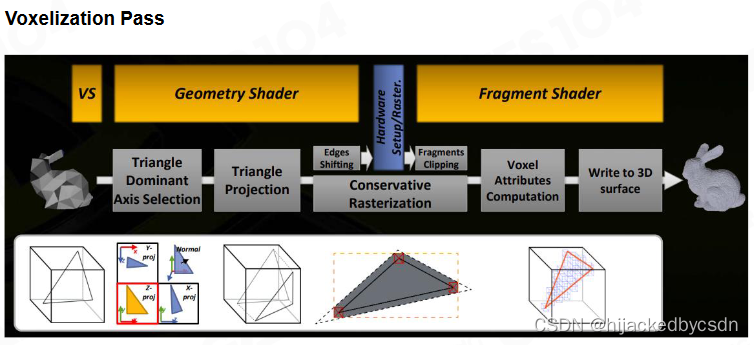
https://learn.microsoft.com/zh-cn/windows/win32/direct3d12/conservative-rasterization
感觉这个保守光栅化就是向外扩一圈
Collect Surface Voxels
为了更高效地管理场景中的体素,SVOGI 使用了八叉树这样的数据结构来把体素组织起来。
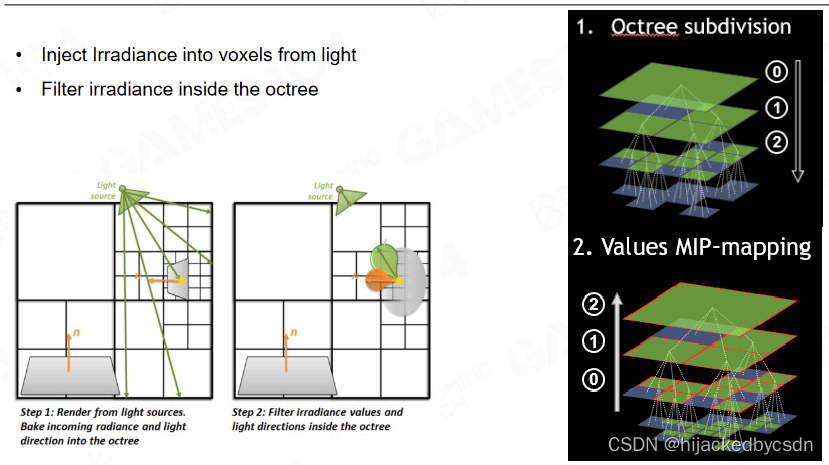
原文的实现还有一点复杂,对于每一个节点,他不单单存了自己,还存了周围的三个邻居,方便 filtering 和 bilinear 插值
Shading with Cone Tracing in Voxel Tree
在进行 shading 时则使用了 cone tracing 的方式来对八叉树进行查询。
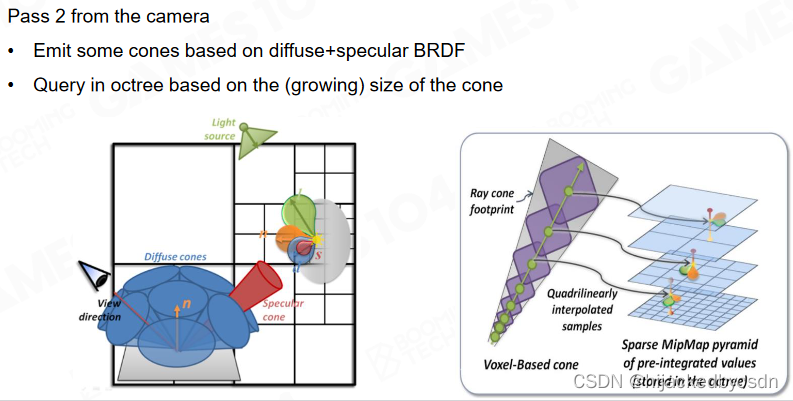
根据法向知道哪里比较重要
对于重要的方向,采的不是一个 ray 而是一个 cone
对于 cone 来说,距离圆锥顶点越远,圆锥的横截面的面积越大
而在八叉树中,越靠近根节点,表达的的范围越大
所以圆锥里距离圆锥顶点特定距离的点就和八叉树中某一个层级建立了联系
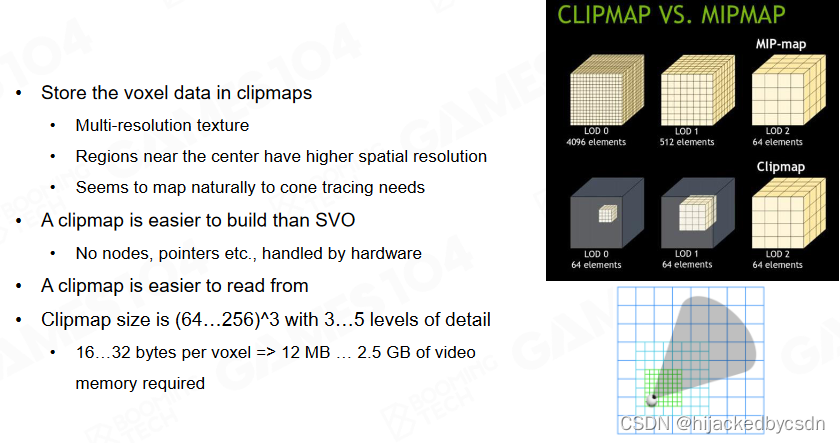
Voxelization Based Global Illumination (VXGI)
VXGI 可以看做是对 SVOGI 的简化。在 VXGI 中使用了 clip map 这样的数据结构来描述场景,离相机越近就具有越高的分辨率。
Voxel Update and Toroidal Addressing
当相机发生运动时无需更新 clip map,只需要更新相机采样的范围即可。
用空间的 x y z 去取 clip map 的 x y z
当相机发生变化的时候,原来的数据不用在内存中更新位置
只用覆盖掉另外一边的数据,sampling 的时候就不会发生错误
(没听懂……)
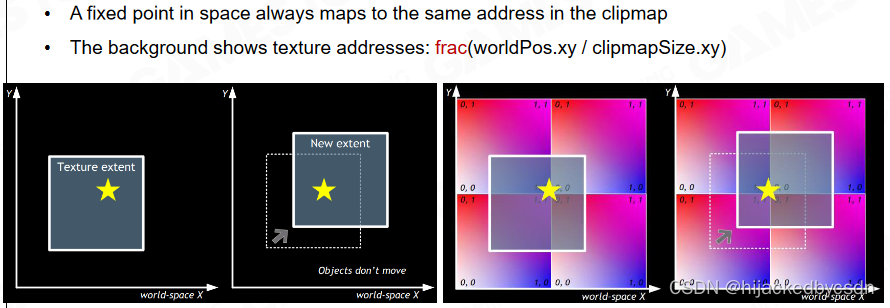
我个人的理解是,以某一个点为中心,做一个立方体,当中心点移动的时候,新的立方体相比于旧的立方体,只需要更新边缘的数据
这个我理解
边缘的数据又反向写回来了
这个没懂……
两个立方体重合的部分在内存中不用移动,这个我理解
那他说的可能是立方体边缘的数据在内存中移动的时候会写回来
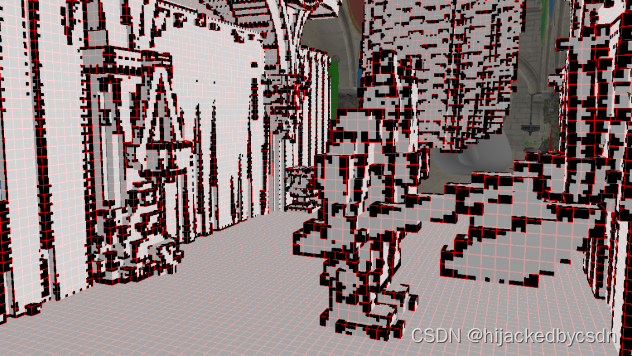
这样整个场景就得到了一个体素化表达,离相机近的地方体素越稠密,越远的地方体素越稀疏。
表面上看,好像整个图像上格子密度差不多
实际上这个格子密度是屏幕空间上的格子密度,实际上,映射在屏幕空间的相同大小的格子,世界中的格子距离屏幕越远,实际尺寸越大,也就是越稀疏
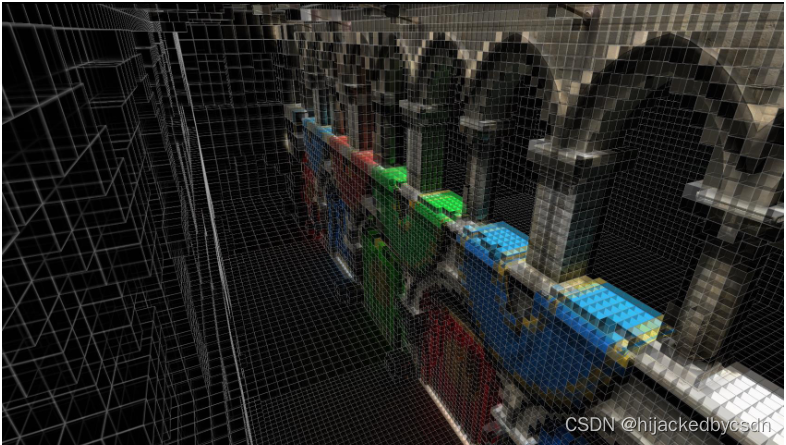
Voxelization for Opacity
对于每个体素我们还需要计算该体素遮挡了多少的光线,这里会记录体素在三个方向上的可见性。
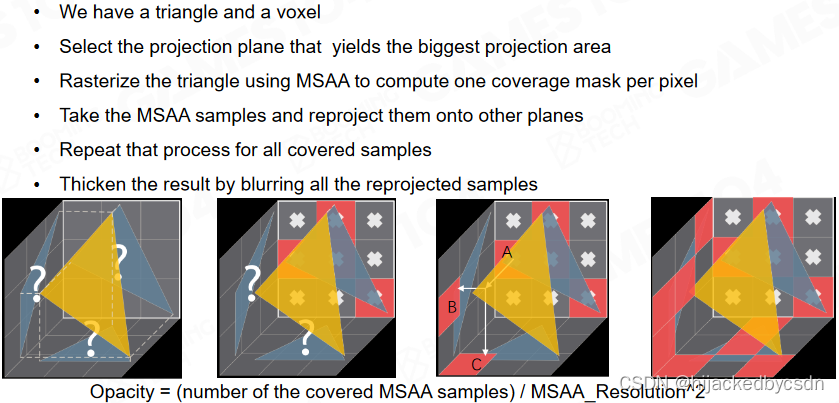
Voxelization: Directional Coverage
Light Injection

当来自光源的光线注入到场景中时需要记录每个体素的表面上接收到的直接光照。
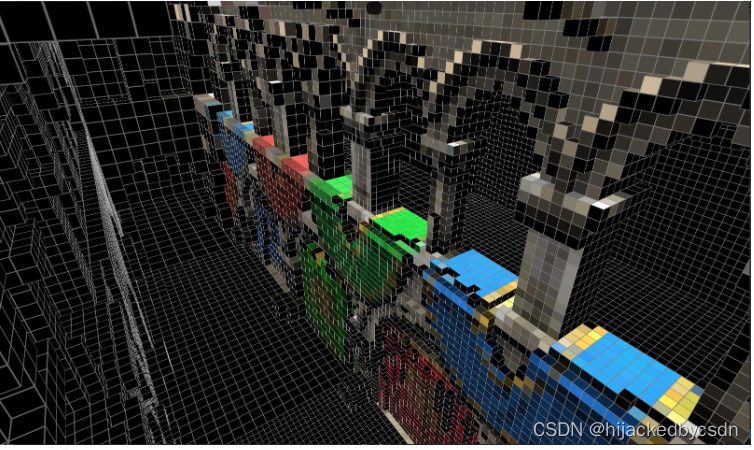
其他的点没有颜色是因为没有直接光照
我猜这里应该是太阳倾斜角比较高吧,才会有这种,一边的墙壁上有光,墙壁后面的走廊却没被照到
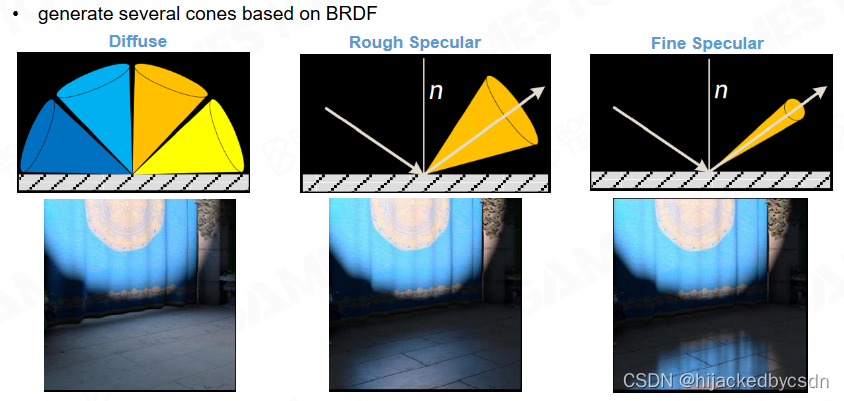
Shading with Cone Tracing
而对于屏幕上的像素则通过 cone tracing 的方式来计算间接光照,通过叠加整条光路上的 radiance 来获得间接光照。
Accumulate Voxel Radiance and Opacity along the Path
VXGI 的主要缺陷在于 cone tracing 的结构仍然是对间接光照的一种近似,而且它非常容易出现漏光的问题。
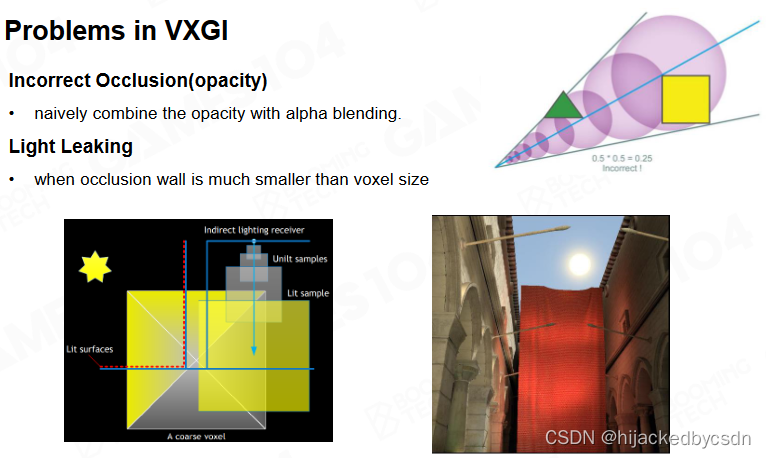
例如右上角图片的三角形和正方形,假设他们都是完全不透明的,那么他们应该完全挡住它们身后的光,而实际上 cone tracing 的时候会在它们身后继续采样
RSM, LPV, SVOGI, VXGI 一脉相承的思路:光子注入场景
用 mipmap 采集,相当于做了模糊
(没听懂)
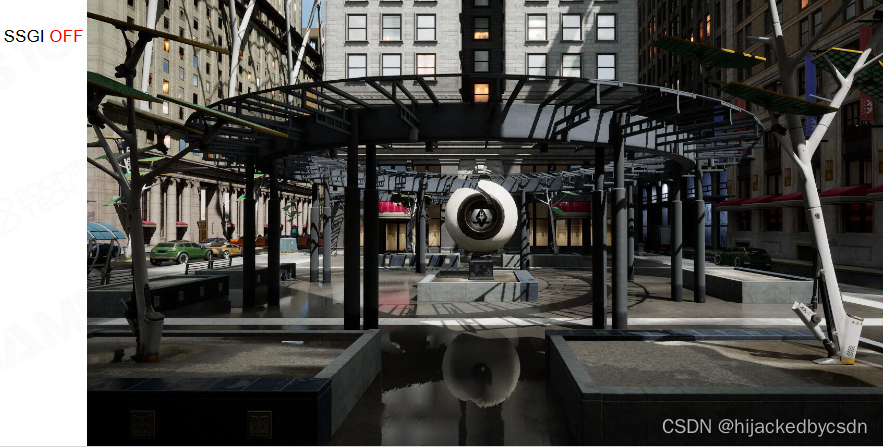
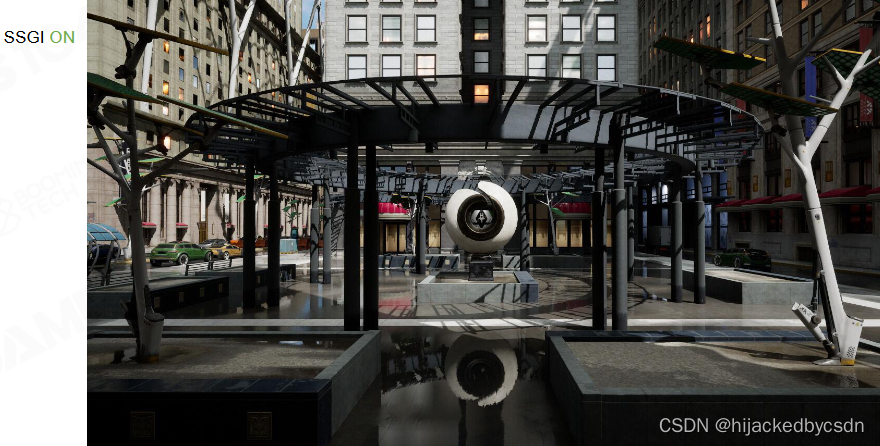
Screen Space Global Illumination (SSGI)
SSGI 和前面介绍过的方法相比是基于屏幕空间的 GI 技术。在现代 GPU 渲染管线中我们可以快速地渲染出屏幕空间上的各种物理量,通过重用屏幕空间的数据就可以实现 GI。
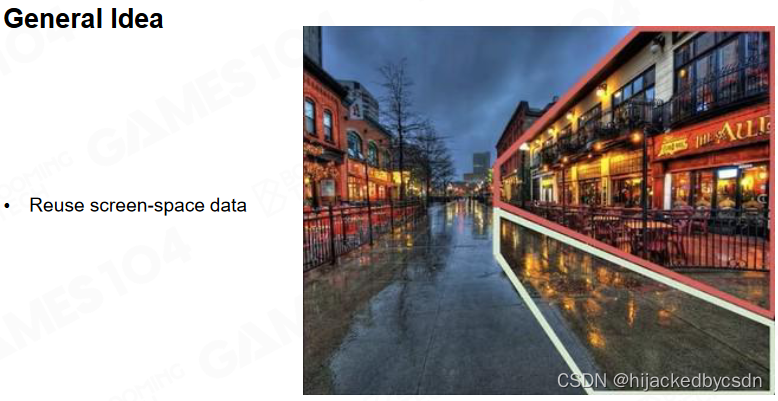
例如上图中的红框和白框,要渲染白框,完全可以用已经渲染好的红框中的内容
当我们渲染得到屏幕空间上的直接光照时,可以利用屏幕空间上像素的法向信息来继续计算间接光照。
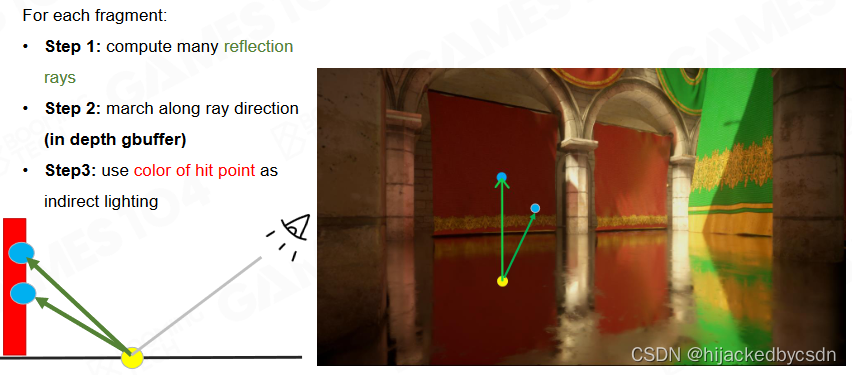
ray marching
计算间接光照时可以利用 ray marching 的方式来计算光线和平面空间中物体的交点。
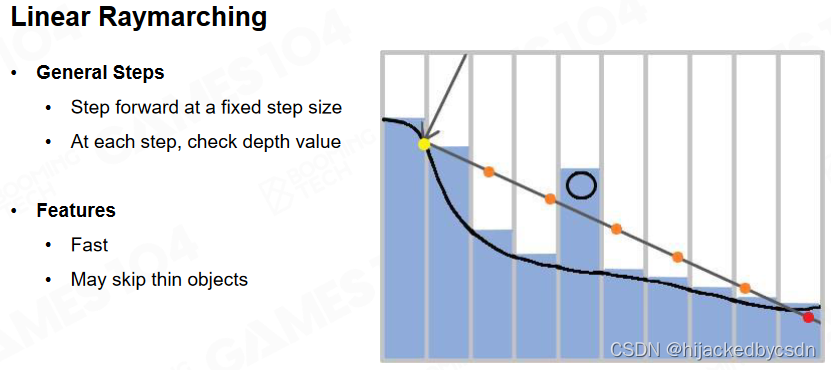
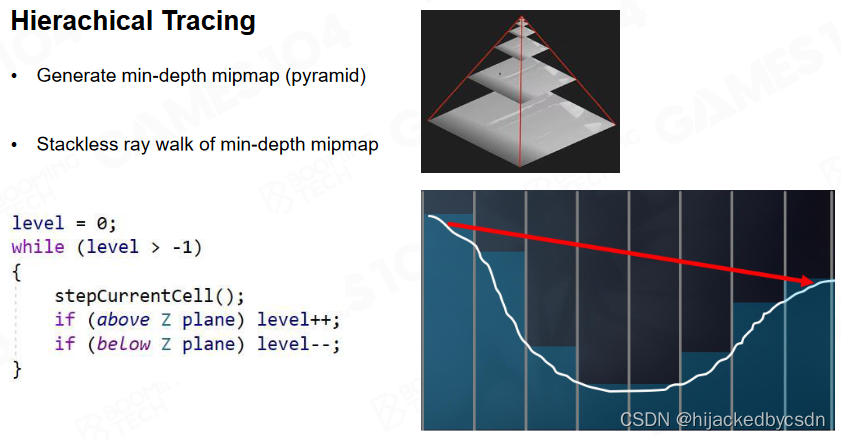
为了进一步提升 ray marching 的效率,SSGI 还使用了 z-buffer 的 mipmap 来进行加速。
下一级 mipmap 取的是这一级的四个点的最小值
也就是每一级都是下一级的上界
那么如果如果与某一个 mipmap 上的一点不相交,那么一定与上一级的 mipmap 的对应位置不相交;如果与某一个 mipmap 上的一点相交,那么可能与上一级的 mipmap 的对应位置相交
易见这里的 ray matching 的时间复杂度是
O
(
l
o
g
2
n
)
O(log_2 n)
O(log2n)
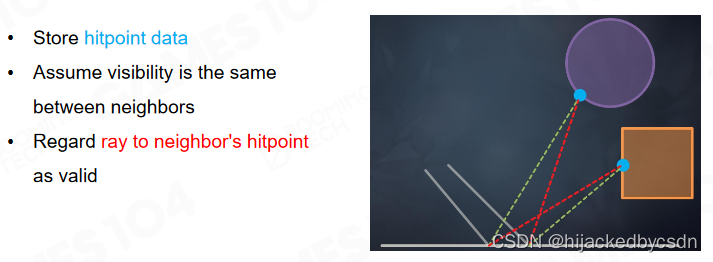
同时 SSGI 还会对每一个像素来重复使用其相邻像素采样的间接光照,这样可以减少采样的光线数量从而进一步提升渲染效率。
这个 ray matching 思想也是很有价值的
Ray Reuse among Neighbor Pixels
因为像素点很多,所以还希望加速
于是考虑相邻的像素点的可见性是相同的,那么它们可以复用击中的光源信息
也就是我只需要对一个像素点往外发射 ray 找光源,之后我的邻居都复用我这次找到的光源的信息
时序上也可以复用
这个思想也是很有价值的,节省时间的方法
Cone Tracing with Mipmap Filtering
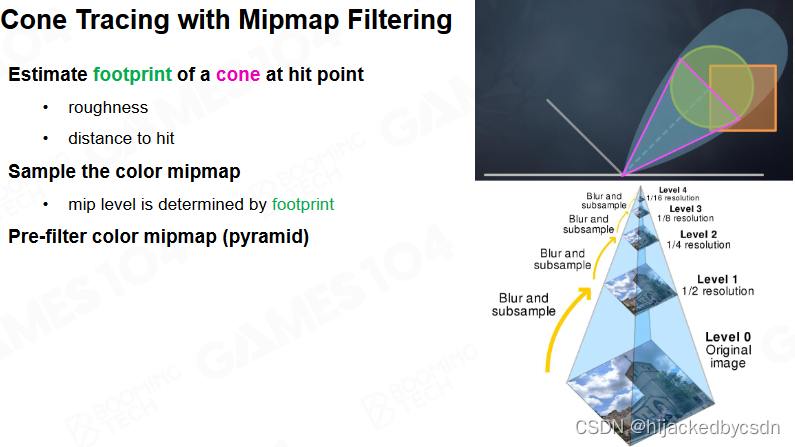
之前也讲过的,mipmap 的层级与 cone 中到 hit point 的距离有关系
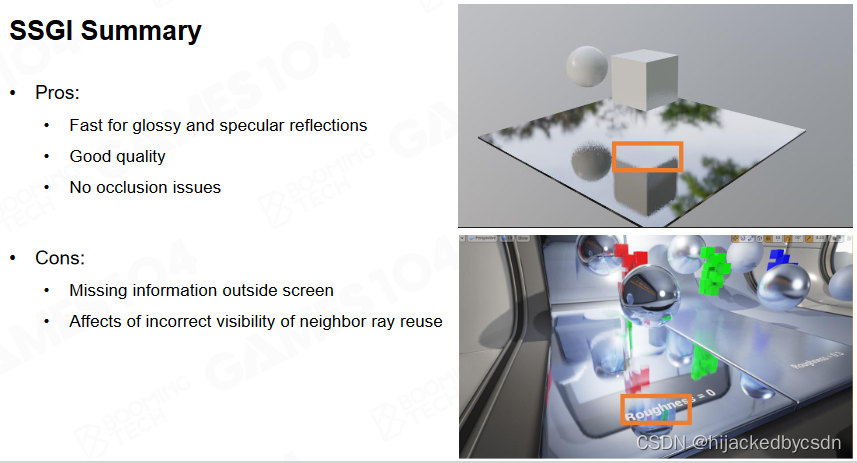
SSGI Summary
和前面介绍过的基于体素的 GI 技术相比,SSGI 对于光泽表面有非常好的渲染效果;但需要注意的是 SSGI 无法处理屏幕空间之外的物体,这容易导致各种错误的渲染结果。
例如物体底面本来应该是黑色的,但是屏幕空间中没有包含物体底面,所以对物体底面的反射出错
Unique Advantages of SSGI
因为用了 hierarchy z-buffer,精度比较高,所以
-
很方便处理相近的接触阴影
-
hit point 计算的精度也比较高
-
与场景复杂程度无关 因为一开始就是一遍 z-buffer
-
可以处理动态物体
Lumen
Lumen 是虚幻5引擎提出的最新实时GI技术。尽管实时光线追踪也可以实现实时 GI,但它依赖于硬件层面的实现而且需要大量的采样才能实现比较好的渲染效果。而 Lumen 不依赖于硬件实现,可以应用到大量对实时性有需求的环境中。
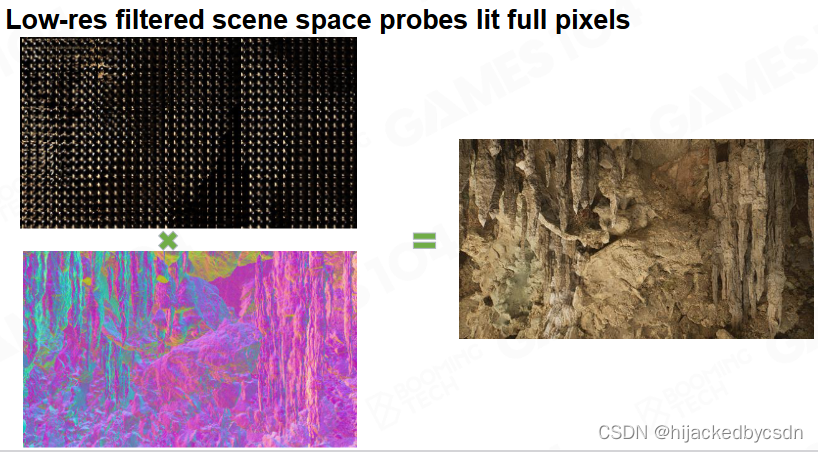
interplighting 可以在低分辨率上采出来
在 screen space 放一堆 probe
因为 screen space 的特点是紧贴被照亮的物体表面
然后高频的信息通过法线做出来
(没听懂)
总结三点
-
不用 ray tracing 要确保在什么硬件都能跑起来
-
在低分辨率采样
-
probe 尽可能贴近物体真实表面
Phase 1 : Fast Ray Trace in Any Hardware
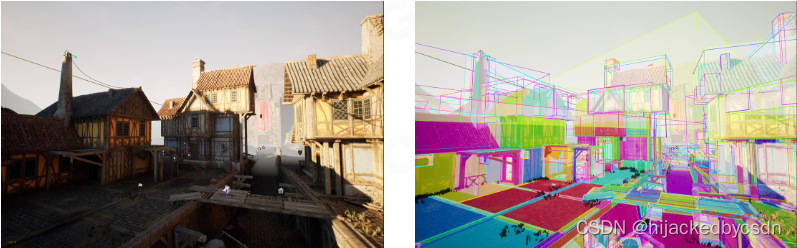
Luman 的渲染过程可以大致划分为 4 个部分,首先是进行高效的路径追踪。考虑到不是所有的硬件都支持光线追踪的加速,Luman 使用了 SDF 的方式来实现这一过程。
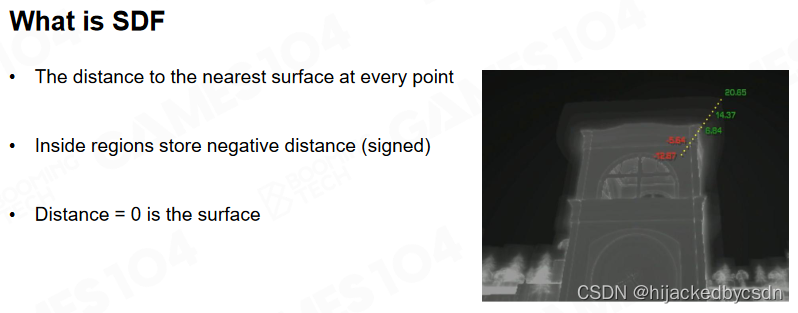
SDF 是空间物体的对偶形式的表达
展开成对偶形式就可以方便计算
例如用三角形定义的物体,它的顶点数据和三角形的面的数据之间是没有关系的,三角形和三角形之间的连接,也是不存在的,只有它们公用了顶点我才知道这两个三角形是连接起来的
而 SDF 在空间上是均匀的,是一个连续的场,并且是那种可微的连续
Per-Mesh SDF
由于直接把场景转换成 SDF 往往是比较复杂的,我们可以先对每个物体转换为 SDF。对于平移变换和等比例的放缩,物体坐标系下的 SDF 都可以很容易地转换为场景坐标系下的 SDF。
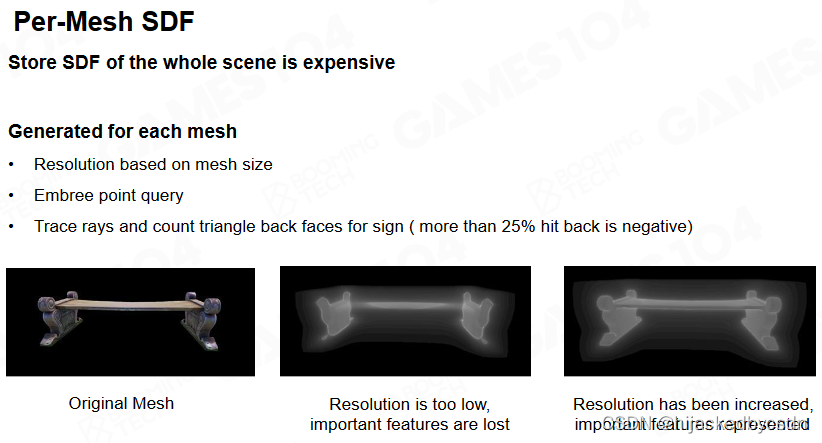
问题:不等比例的放缩?
SDF for Thin meshes
需要注意的是当物体比较薄时要进行一些额外的处理。
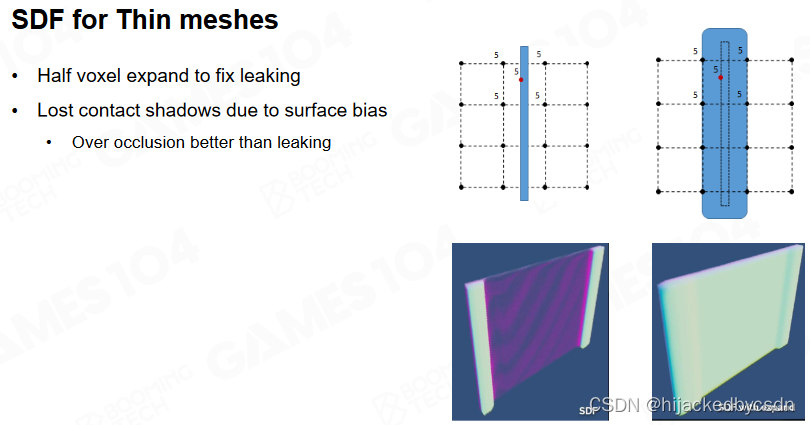
对于特别细的面,任何一个网格采样点都查询不到这个面
因此把这个面展开
Ray Tracing with SDF
SDF 的一大优势在于它可以非常容易地得到光线步进的长度:在任意 p 位置前进 SDF§ 的距离总是可以保证不会和场景出现相交。
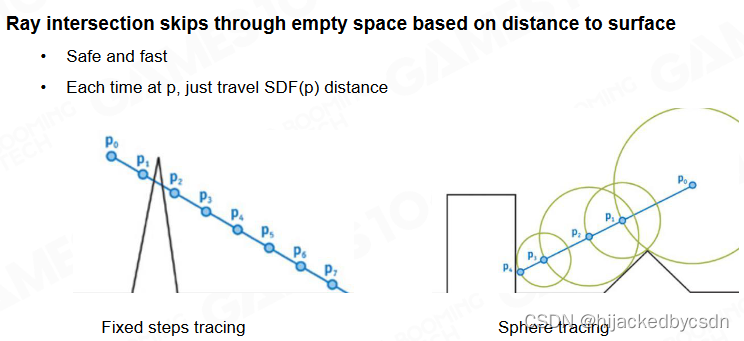
就算穿进物体了,也可以根据 sdf 变成负号,知道现在在物体内了,这时可以再后退
我看他这个图的意思是用 sdf 找 sdf 为 0 的点,也就是找物体表面,对于 ray 上的一点,以这点为球心,做一个与物体表面相切的球,球与 ray 的交点就是 ray 上的下一步的点,如此循环直到球的半径足够小
但是视频里老师没讲,我也没搜,我就是这么想想
Cone Tracing with SDF(ie. Soft Shadow)
同时,SDF 在进行 cone tracing 时也可以很容易地计算出遮挡面积比例的估计。
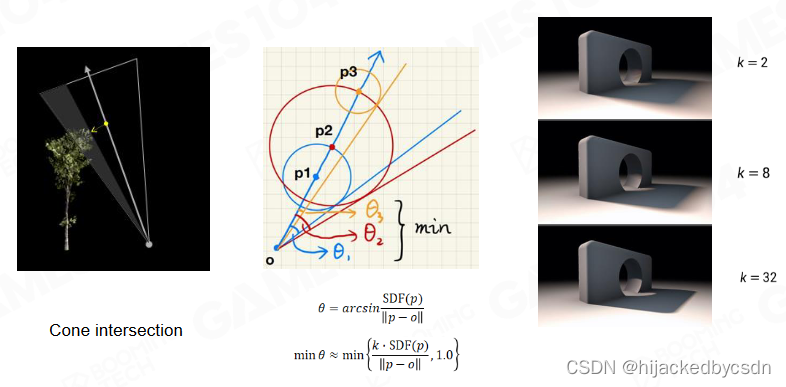
假设天空中一个面积光源,那么我从一个点看向这个面积光源的时候,点到面积形成了一个 cone,我需要知道这个 cone 有多少被遮挡了,这样就可以判断这个点有多少阴影,这也就做出了软阴影
画三个圆
在 cone 中,取轴线上从出发点到 mesh 最近的距离,垂直于轴线的横截面
之后的……有点看不懂
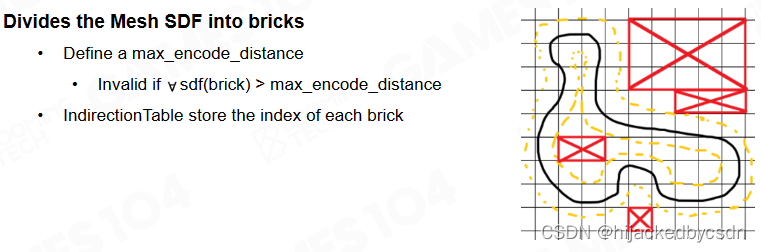
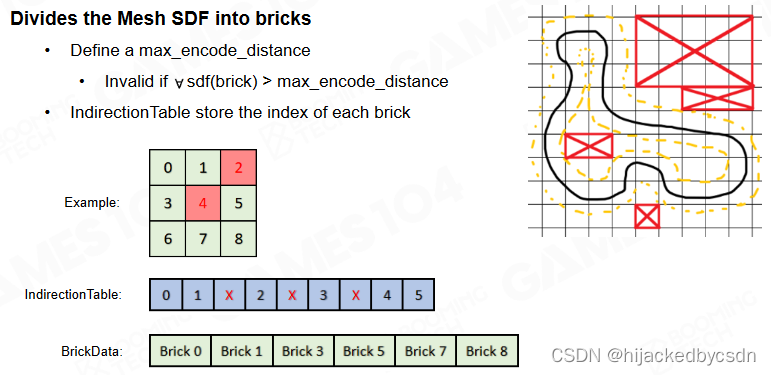
Sparse Mesh SDF
生成 SDF 时可以考虑使用一些稀疏的数据结构进行表示。
但是这种表示能不能用 ray tracing 就是一个问题了
Mesh SDF LoD
SDF 甚至可以表达物体的不同 LOD。
因为 SDF 是连续可导的,导数就是物体的法向
如果用一个 uniform 均匀的表达,就可以表达出一个无限精度的 mesh,既能得到面积,也能快速求交,还能得到连续的法线方向
用了 SDF,对物体做 LOD 就是一个降采样的问题
Sparse Mesh SDF
在低 LOD 下结合 sparse mesh 能省下非常多的存储空间,这在硬件上还是非常非常可观的;这种情况下,比如近处的模型,我们就用精度比较高的模型,远处的模型,我们就用精度比较低的模型,这样就能很好的简化渲染的开销;
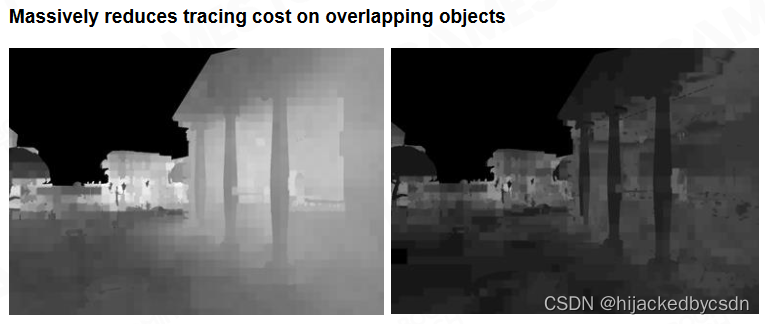
Ray Tracing Cost in Real Scene
当然,直接将场景中物体的SDF组合到一起在进行计算时仍然是过于复杂的。
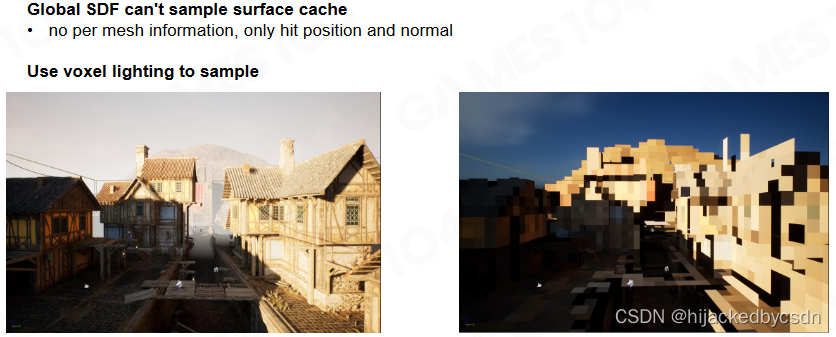
Global SDF
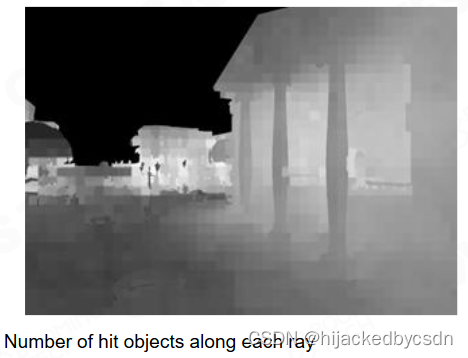
这里可以结合屏幕空间的概念只考虑相机视野范围内的物体,将它们的 SDF 融合为一个低精度的全局 SDF。
全局 SDF 在近平面是不准的,所以在 cone 的开始位置附近用物体的 sdf,在远处用全局 sdf
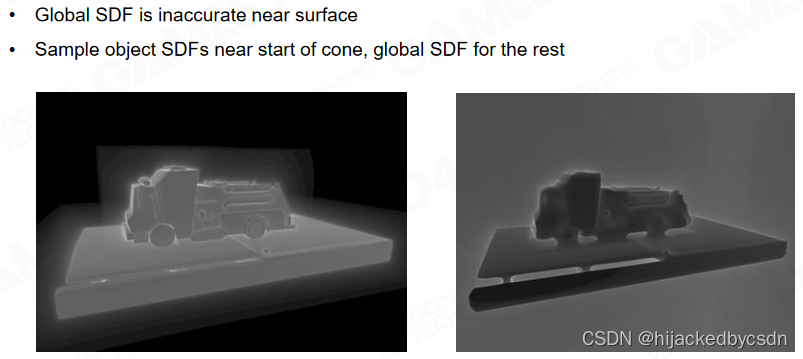
物体 sdf 怎么合成全局 sdf 的需要算法
物体移动的时候需要更新全局 sdf 的算法
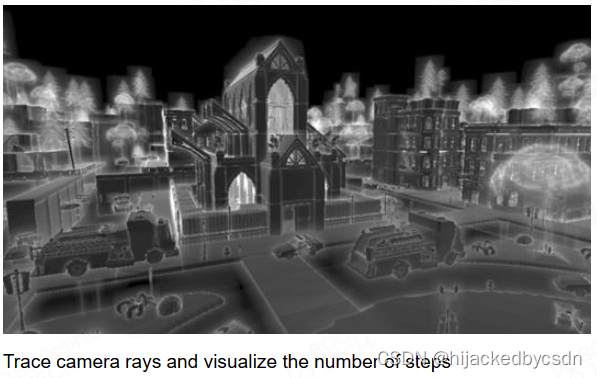
在这个低精度的全局 SDF 上进行 ray tracing 可以极大地降低计算压力。
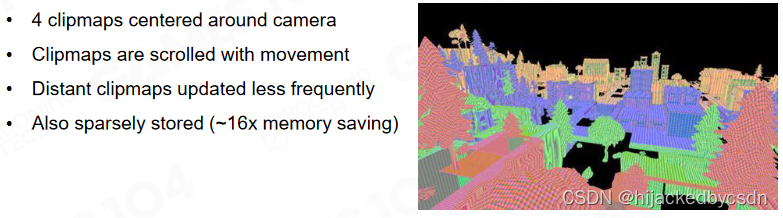
Cache Global SDF around Camera
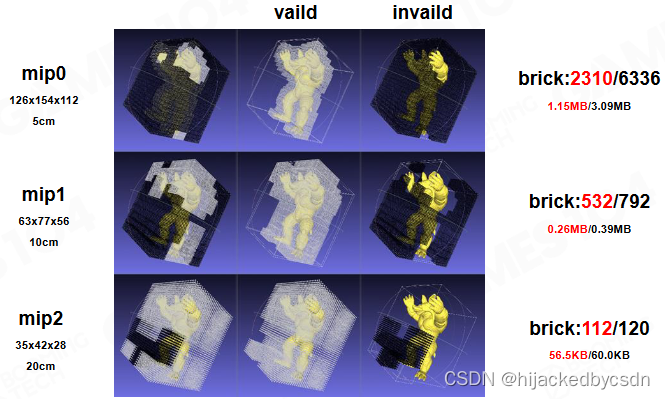
除此之外 SDF 也可以结合 mip 的思想,近处的精度高而远处精度低。
也是因为 sdf 是均匀的 uniform 的
回顾物体的表达方式:
隐式表面是连续的
三角形表达是离散的,是不规则的
点云是均匀的,是离散的
sdf 是均匀的,是连续可导的,不能直接用于渲染,但是可以加速渲染
Phase 2 : Radiance Injection and Caching
Mesh card – orthogonal camera on 6-Axis Aligned directions
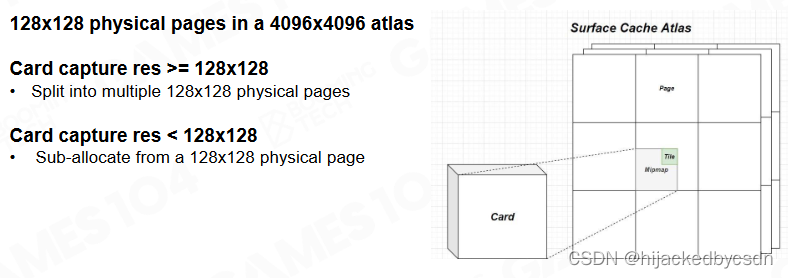
接下来我们需要把光照信息注入到场景中。在 Lumen 中使用了 mesh card 来保存物体在 6 个正方形上被光照亮后的结果。
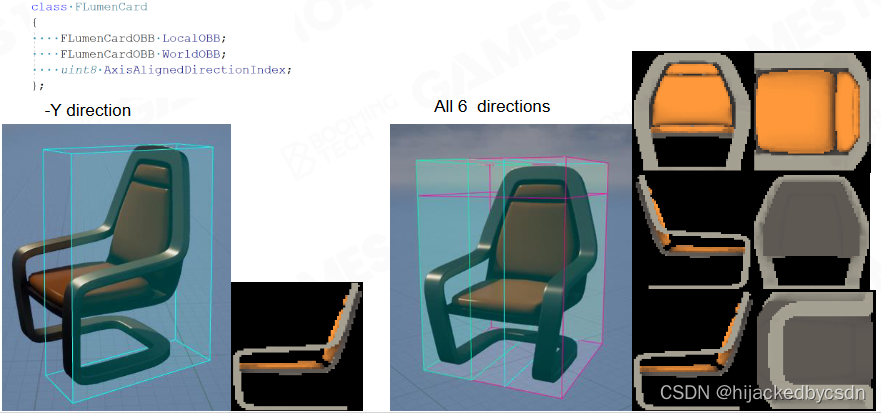
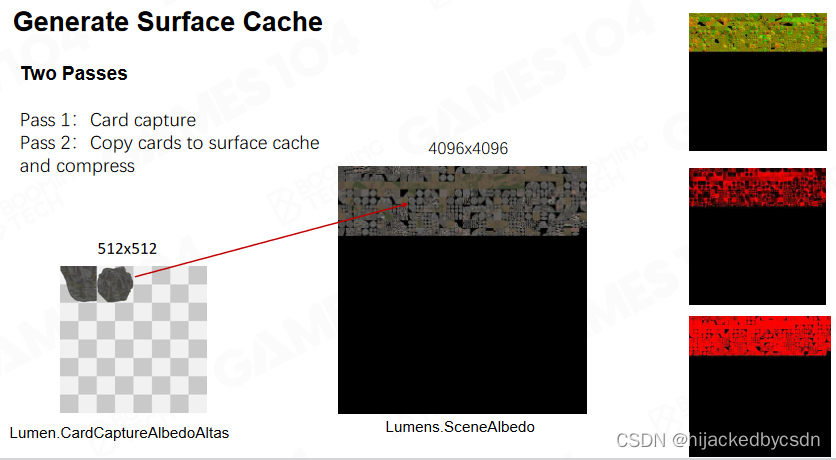
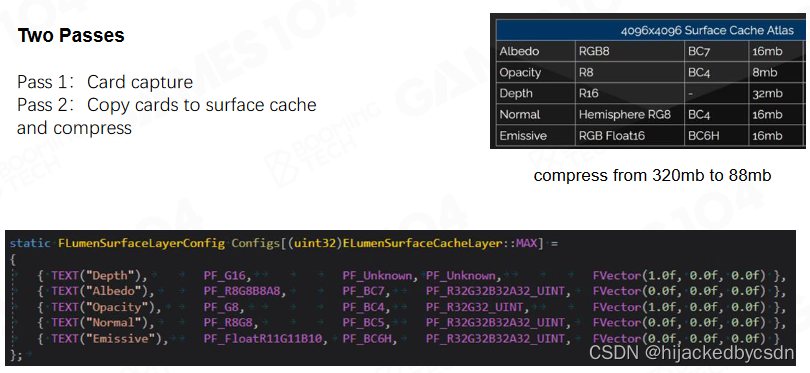
Generate Surface Cache
对于每个 card 我们还需要记录物体表面的 albedo、法向以及深度等信息。
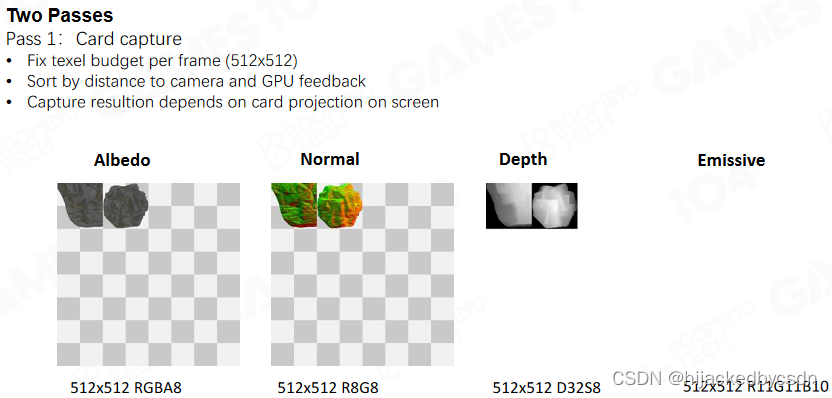
所有物体的表面信息会统一记录到一张标准大小的纹理图像上,称为 surface cache。
View Dependent Per-Object Card Resolution
根据物体距离相机的远近还可以设置不同的 card 分辨率以降低存储和计算需求。
How can we “freeze” lighting on Surface Cache
前面做的事情是,外面输入的光可能照亮物体的六个面,也可能在物体的六个面之间反射,我暂时都不理会,但是我希望这些 radiance 最终能存储到我的 surface cache 上面
世界本来是很多复杂几何,全局光照的问题是,去采样某一点的 radiance 的话,如果在几何世界蒙特卡罗积分中查询,会查询到很多材质不一样的点
现在我在将最初的光照信息用一个 uniform 均匀的方式表达,也就是用 surface cache 表达,在这个世界不管做什么蒙特卡洛积分的 ray tracing,都能采样到那个点的表达
可以理解成 surface cache 提供了间接光照的表达,把 radiance 固化在上面
类似 photon mapping
之后的问题就是,怎么知道像素的阴影,怎么处理多次光照
Lighting Cache Pipeline
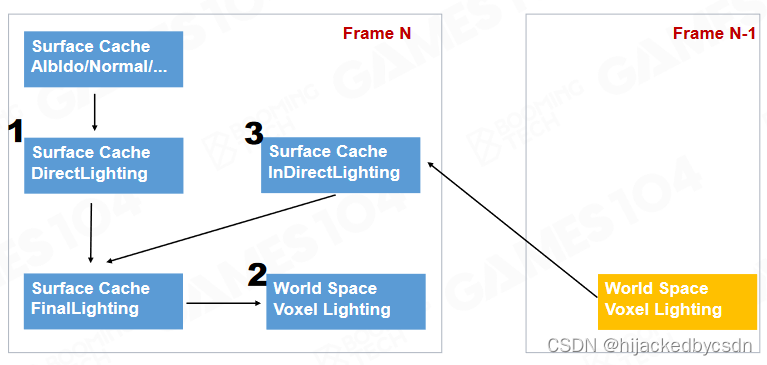
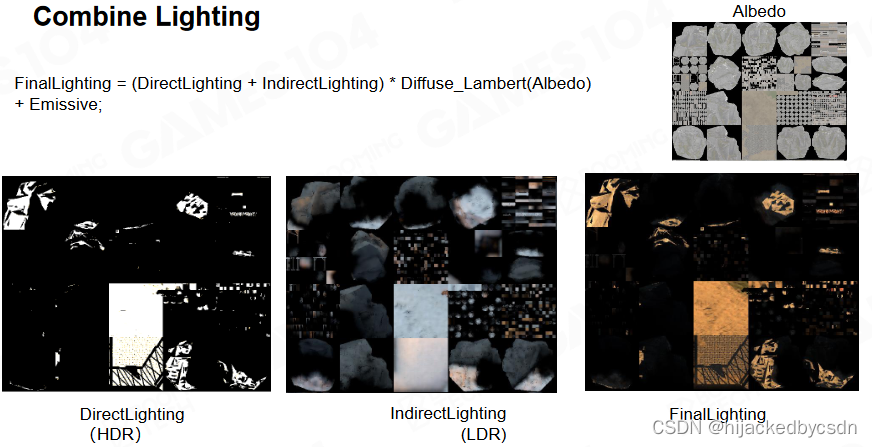
之前的 mesh card 是记录了 albedo、法向、深度、emission,现在要合成一个 final lighting 的光照图
在 Lumen 中整个光照可分解为直接光照、体素化光照以及间接光照三部分。计算步骤在图中标出
第一步是做直接光照,使用 shadow map 做阴影
第二步做 voxel 的光线表达,这样就可以猜出物体表面上的间接光照的表达
得到间接光照的表达之后与直接光照合成 final lighting
得到的 final lighting 在下一帧又生成 voxel lighting,又根据 voxel lighting 获得物体表面上的间接光照,再更新 final lighting
也就是,第一帧我只有一次 bouncing,下一帧用我上一帧的一次 bouncing 做一次间接光照,就相当于多了一次 bouncing,那就是总共两次 bouncing,再下一帧就是三次……
类似 DDGI
https://zhuanlan.zhihu.com/p/597206371
Direct Lighting
直接光照相对比较简单,我们只需要考虑光源直接照射到物体上反射的 radiance 即可。对于阴影中的物体则可以结合 shadow map 来进行处理。
shadow map 的做法:摄像机看到的点与光的连线,使用 SDF 查询,就知道这个连线是否被阻挡,也就是这个点是否有阴影
如果有多个光源,就遍历多光源,累加
之前也说过,如果 ray 可能击中很远的物体,那么就很可能在这个较长的距离上集中很多物体,计算时间较长
所以引入了全局的 SDF
全局的 SDF 丢失了 Mesh 的信息,所以使用全局的 SDF 来做 ray tracing,只能知道击中点的位置和法向,不知道击中点所属的 Mesh
所以这个时候,在近处,我们使用逐物体的 sdf(之前说的原因是“全局 SDF 在近平面是不准的”?),可以取到击中点的位置和法向和所属物体
在远处,整个场景以相机为中心,做一个体素化的表达
只要使用全局 sdf 的 ray 击中了远处的体素,就提供一个亮度,作为一个灯泡
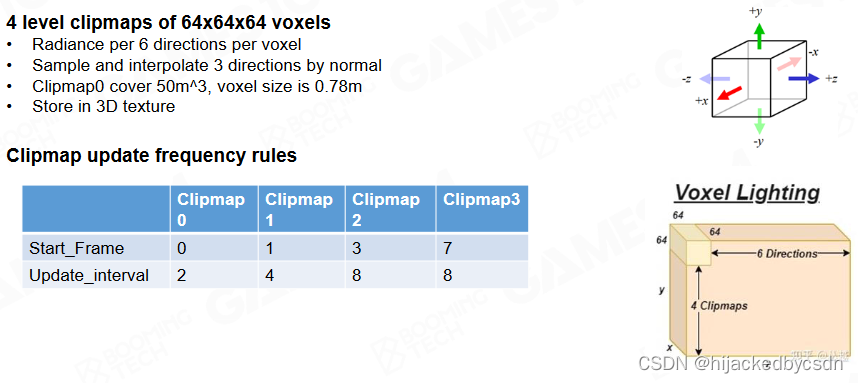
Voxel Clipmap for Radiance Caching of the Whole Scene
得到直接光照后 Lumen 会对场景进行体素化来存储物体在 6 个方向上直接光照的亮度。而且体素化后的光照信息会在相邻帧上进行传递,随着时间的积累会得到光线多次弹射的效果。
Build Voxel Faces by Short Ray cast
怎么对空间进行采样
SVOGI, VXGI 中使用的是保守光栅化的方法
Lumen 认为既然整个空间都用了 SDF 来表达,那就用 SDF 来……干嘛?
(这里没听懂)
把 voxel 世界分成若干个 tile,一个 tile 里面有多个 voxel 块
从 tile 的边上射出一个随机的 ray,如果能够击中一个 mesh 的话,那就说明这个 voxel 里面不是空的,那就能采样出颜色,法向等信息
这就没有用到硬件的 Rasterizater 光栅化器,用 mesh 的 sdf 就可以获得世界的体素化的 voxelize 的世界的表达
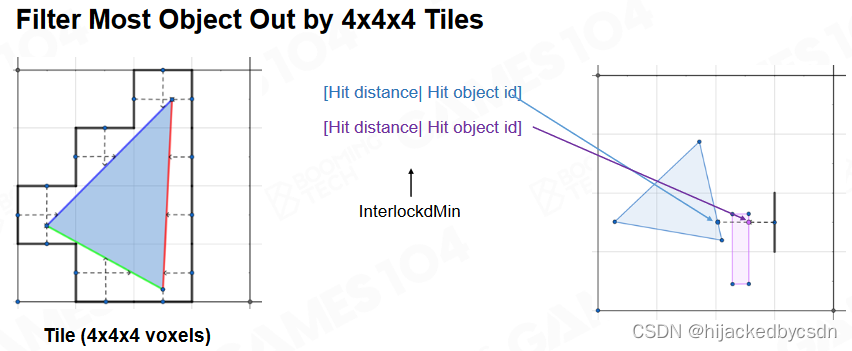
细节:假设做了多次采样,取到了很多面,或者沿途采到了很多的点怎么办
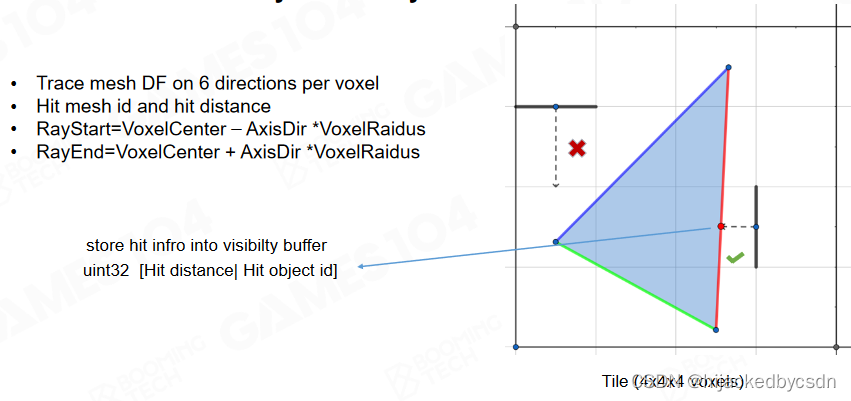
大部分 tile 的长宽高是 4 voxel
这样可以保证一个 tile 里面只有几个物体,从 tile 的边上射出一个随机的 ray,这个求交效率就会比较快,世界体素化的速度也会快
当世界中的物体移动的时候,不需要更新整个体素世界,只需要更新移动中的物体弄脏的范围就好了
Inject light into clipmap
看前面的那个 pipeline 的图
一开始,第一帧的时候,第一帧进入初始化阶段
初始化的时候,计算 direct lighting,设为 final lighting
这个时候 voxel lighting 是空的,也就是黑的
之后就进入循环,每一帧用 final lighting 去照亮 voxel lighting,voxel lighting 生成 indirect lighting,更新 final lighting
这里的 voxel lighting 是每一个 voxel 存六个面的亮度,其他不存,是记录自己有多亮
之后要讲的 voxel probe 是存了一个光场分布,是负责照亮别人的
细节比如 terrain,terrain 不能用 voxel 表达,还有比如半透明的雾
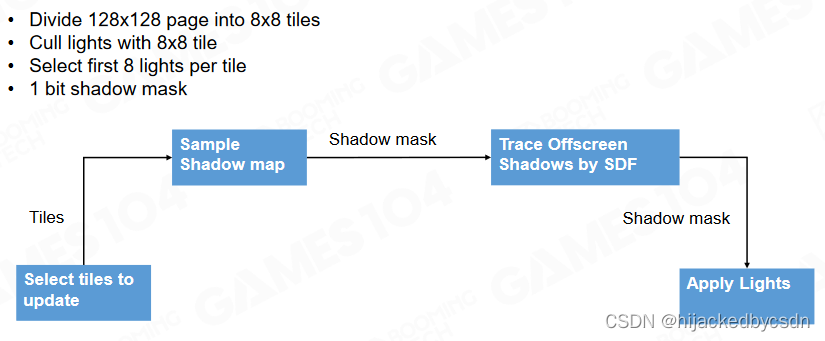
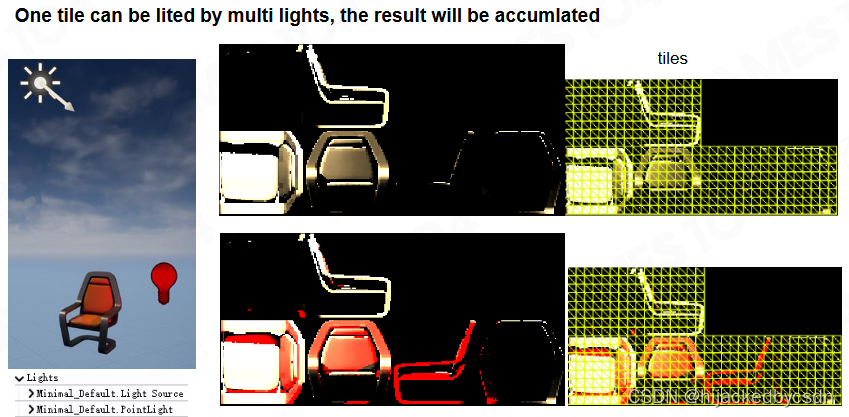
Indirect Lighting
对于 surface cache 每 8 * 8 设为一个 tile
这个 tile 和体素化时的 tile 不同
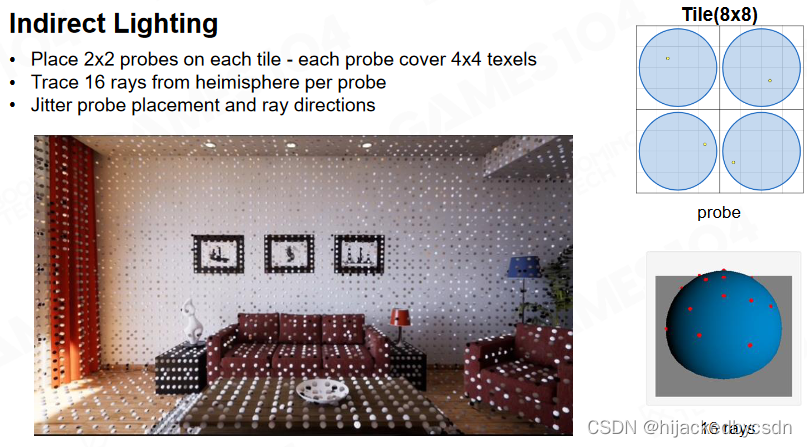
每一个 tile 取 2 * 2 的 probe,每一个 probe 占据 4 * 4 的空间
每一个 probe 的半球射出 16 个 ray,每一个 ray 与 voxel 求交
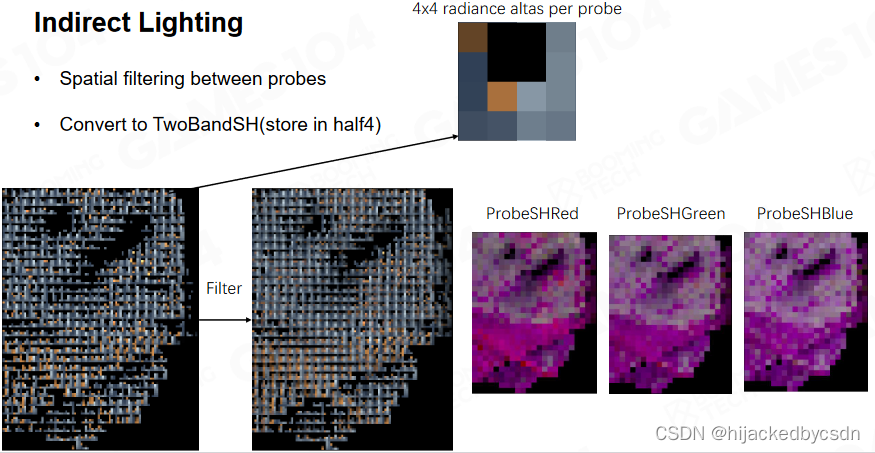
把间接光存成 Spherical harmonics 球谐函数
老师这里说的是 8 * 8 的 tile 有 64 个点,而这里只有 4 个采样,所以要插值,所以要用球谐函数来插值
我觉得……emmmm,感觉有点不对呢,这里的只有四个,是只有四个 probe 啊,每个 probe 都是 4 * 4,其实 4 个 probe 已经占满了 64 个点的体积了
之后我猜,他不是说的 64 个点中间稀疏地分布 4 个点,他想说的也跟这个 64 个点没有关系
他只是想说,在空间中采样的时候,一个 probe 存储了一个光线的分布结果,所以我需要在 probe 之间插值
然后他是逐 tile 采样,所以他就在 4 个 probe 中插值,代表这个 tile 的采样值
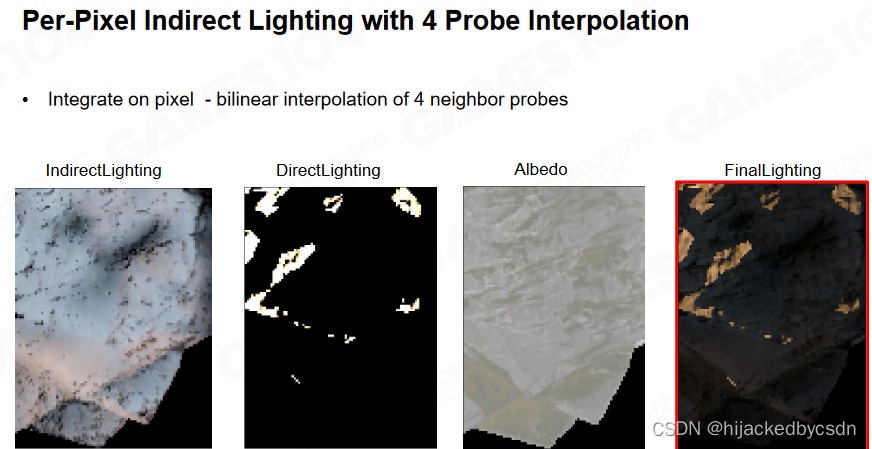
把直接光照和间接光照相加就得到了环境中光照的信息。
surface cache 还顺便解决了自发光效果
Ligting Update Strategy

Phase 3 : Build a lot of Probes with Different Kinds
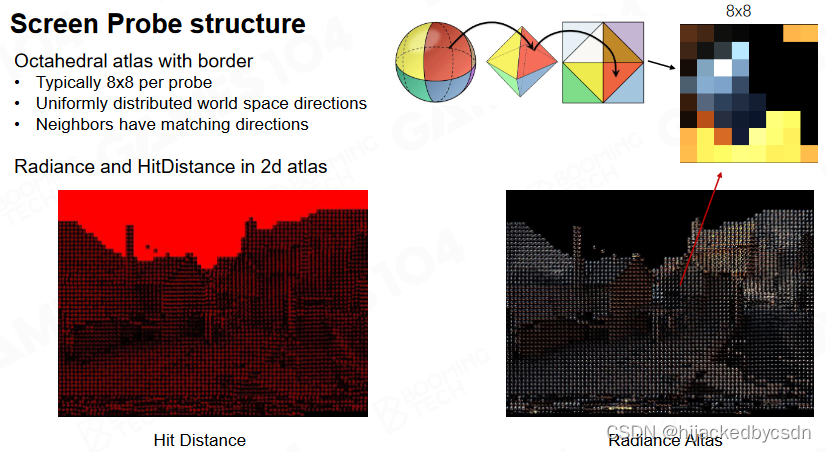
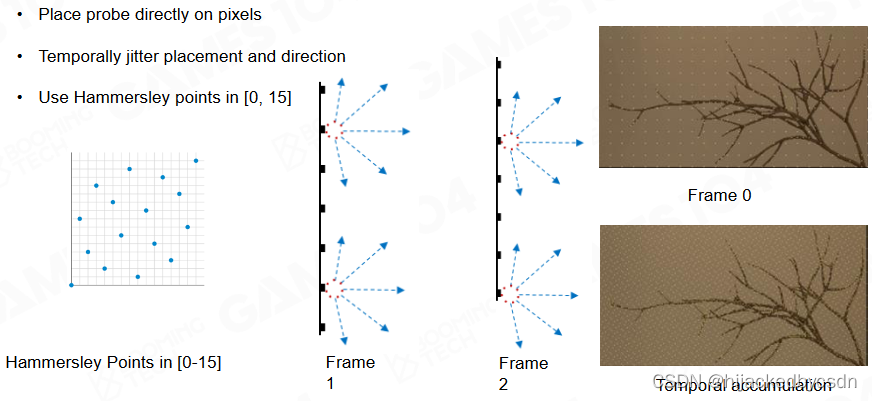
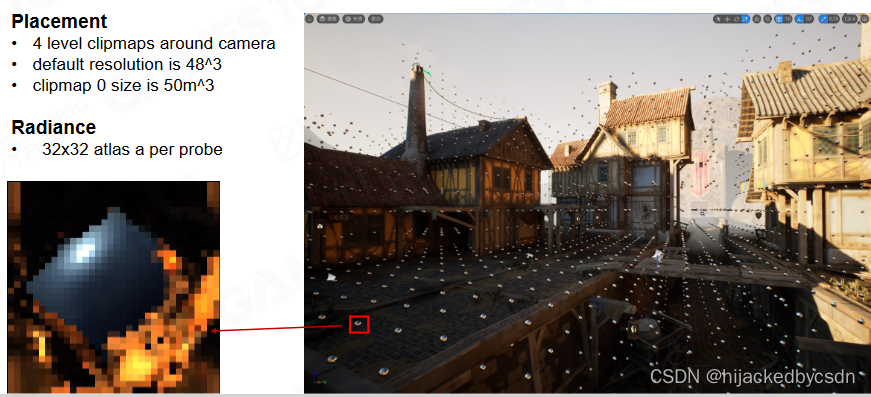
Screen Space Probe
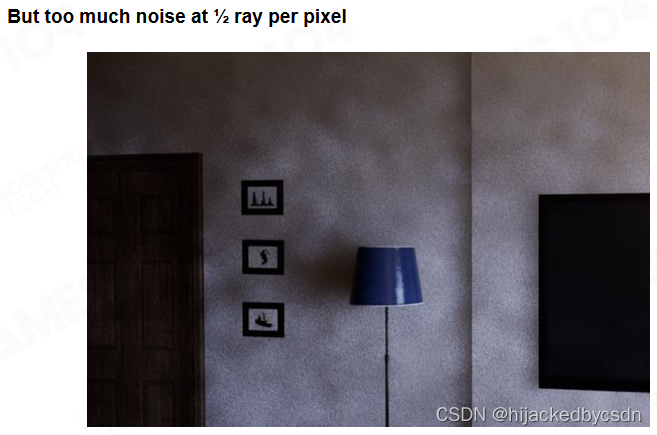
有了光照后我们需要在物体表面通过采样来计算着色,此时我们需要在场景中放置探针(probe)来采样光照。Lumen 中直接在屏幕空间里放置 probe,每个 probe 会同时记录光线前进的距离以及收集到的 radiance。
如果没有准确反应光照变化,渲染结果看上去就会很“平”
如果要完全反应光照变化,那么就在摄像机上每一个像素都放一个 probe
但是这样肯定太费了
这里是每隔一段距离放一个 screen probe
因为间接光照信息是低频的
Octahedron mapping
对球面采样,常见的采样是用经纬度采样
但是经纬度采样的问题是,天顶的采样率比较高,靠近赤道的采样率比较低
采样还需要满足一个特性:在球面中给定一个方向,需要迅速知道这个方向在 UV 中的位置
这在数学上就要求是连续的,并且非常简单
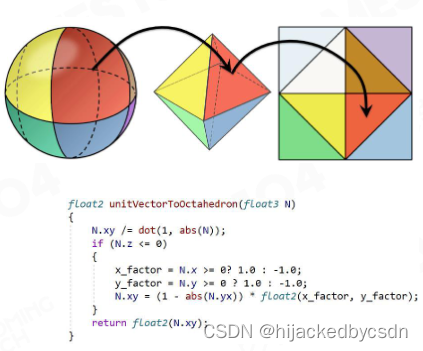
从球面到八面体的映射就是,简单,并且可以双线性插值
Screen Probe Placement
在 screen 上相近的像素对应的物体,在空间上可能相距很远
如果直接采样,就会把光照模糊
想到了 SSAO,也是有这个问题
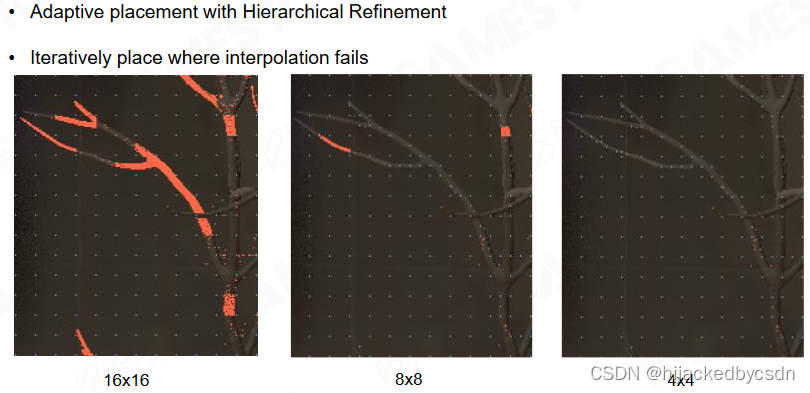
那么这里给出的解决方法是,如果在当前分辨率下法线相邻的采样点的深度相差比较大,那就进一步细分采样密度,直到密度比较合理
Plane distance weighting of Probe Interpolation
具体我该怎么知道什么时候细分呢
在采样 tile 的时候,不是要对 4 个 probe 插值嘛
插值的时候,我其实是知道采样点的位置和法向方向的
所以我就知道采样点和法向确定的平面
把四个 probe 的中心点投影到这个平面上,去看投影距离的权重
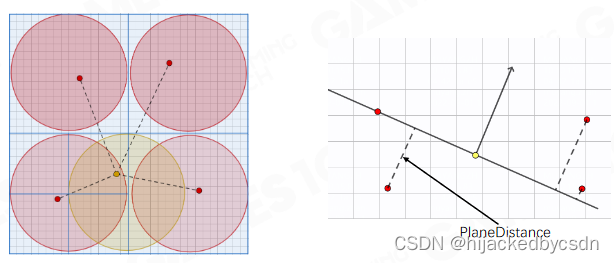
这时作者就开发了一个 hack 的函数
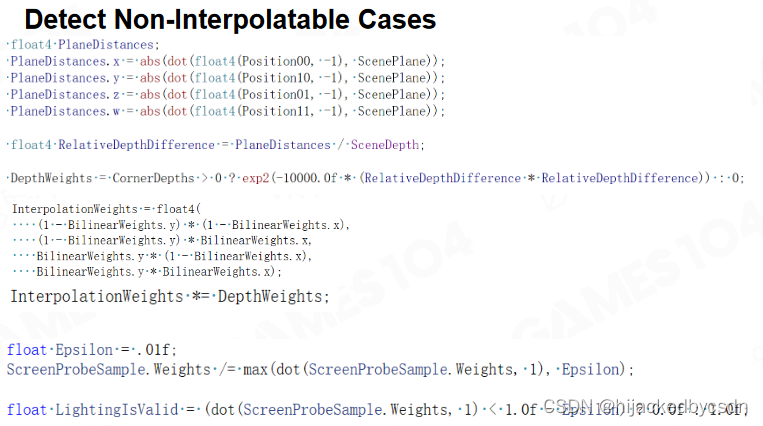
总之就是得出,如果这四个点的距离很大,就认为这个采样点不能用了,也就是这个插值是无效的
否则有效,根据 probe 的中心点到平面的距离作为权重来插值
Screen Probe Atlas
因为屏幕空间是长方形的
但是 tile 是正方形的,所以屏幕空间下面有一部分没有用到
(这么理解合适吗……?)
所以就把细分的 tile 放到纹理集 atlas 的下面
(感觉应该是,一开始是把长方形的屏幕划分成 tile 啊,所以 atlas 会空出一部分,应该是atlas 本身就设置地比屏幕尺寸高那么一点把)
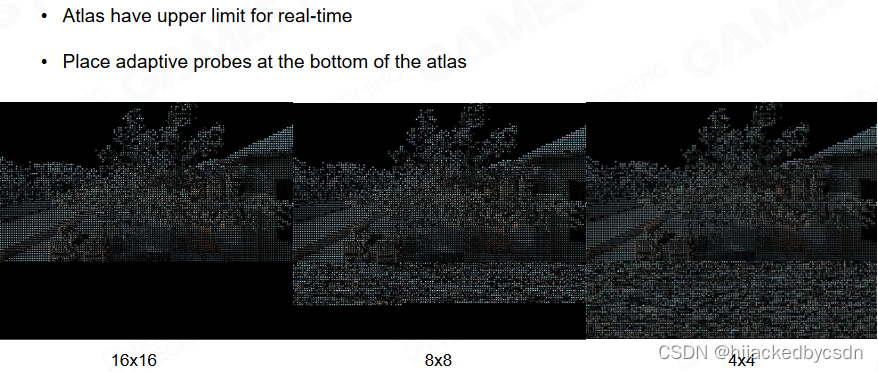
总之就是,不够的话就往下采,实现了 adaptive 自适应的采样
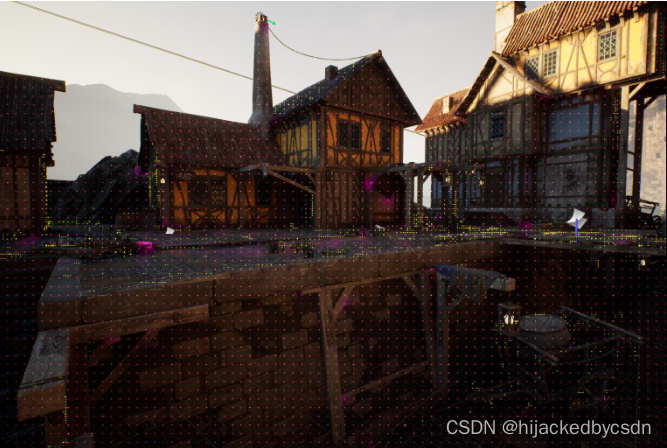
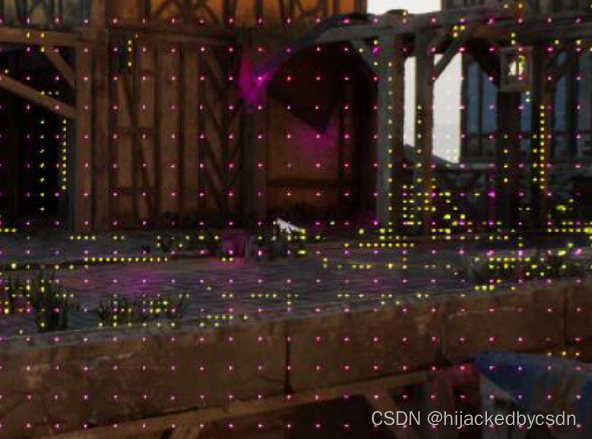
实际运行结果:
Screen Probe Jitter
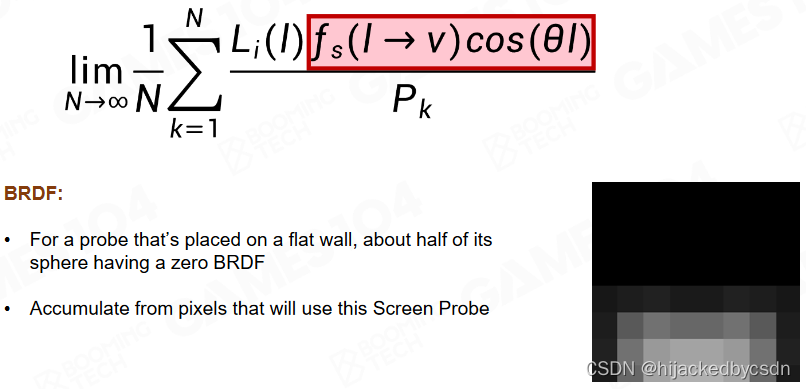
Importance Sampling
如果没有重要性采样
要向着光源的方向采
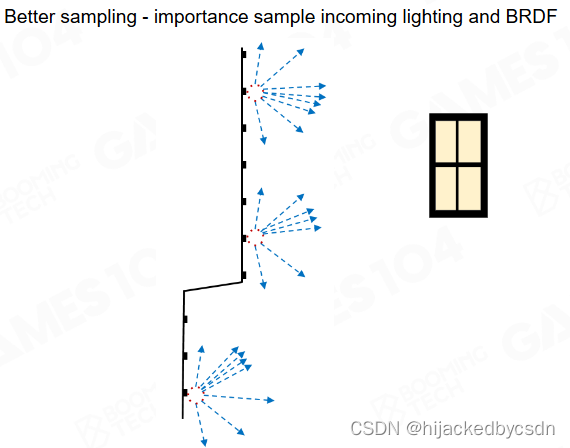
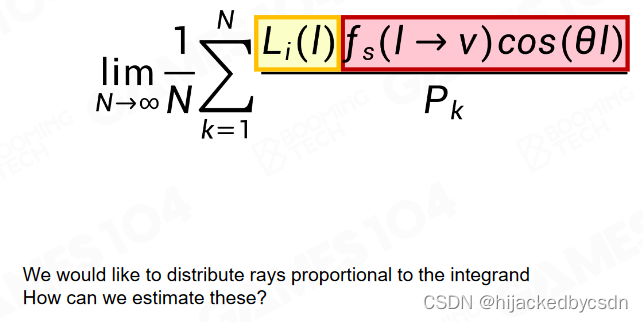
重要性采样的公式
f s ( l → v ) cos ( θ l ) f_s(l \rightarrow v)\cos(\theta l) fs(l→v)cos(θl) 表示法向在哪里更重要一点, L i ( l ) L_i(l) Li(l) 表示光在哪里更亮一点
Approximate Radiance Importance from Last Frame Probes
我现在不知道光在哪里,但是我假设光源变化的没有那么快
我就去采样上一帧的 probe

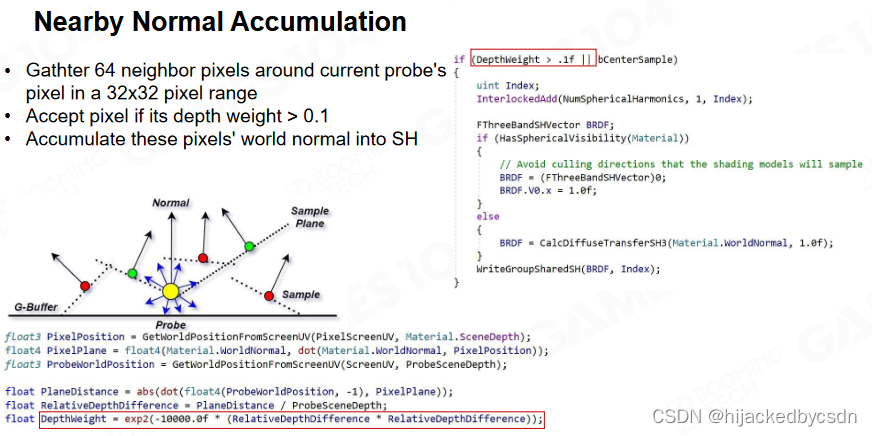
Accumulate Normal Distribution Nearby
在 framebuffer 里面拿到的一个像素的 normal 会变化很快
所以应该是在采样点的一定范围内,求一个范围的法线分布
一个 tile 是 8 * 8 啊……不知道这里为什么是 32 * 32 的范围
总之在这个 32 * 32 的范围内撒 64 个点去采样,这 64 个点不是随机的,而是要确保它们之间的 depthweight 不要相差太大
每个 normal 是一个 SH,把这些 SH 积在一起
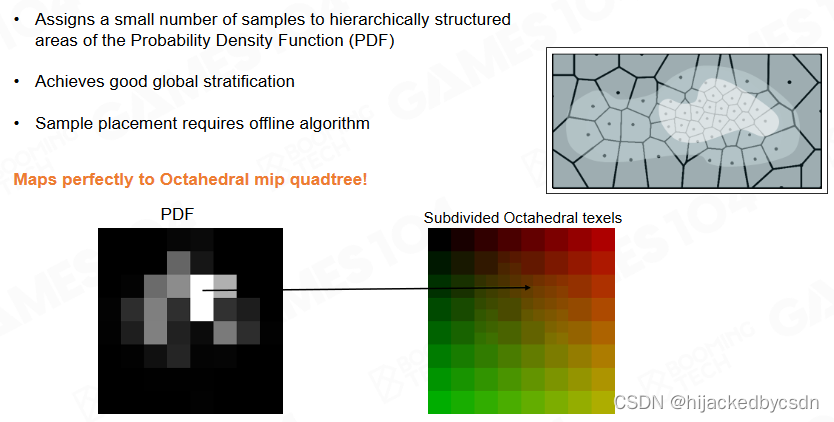
Structured Importance Sampling
对于每一个 screen probe,还是最多只采样 64 个点
在需要采样的地方加密,就是射线射的多一点,最终射线的都返回一个 texel
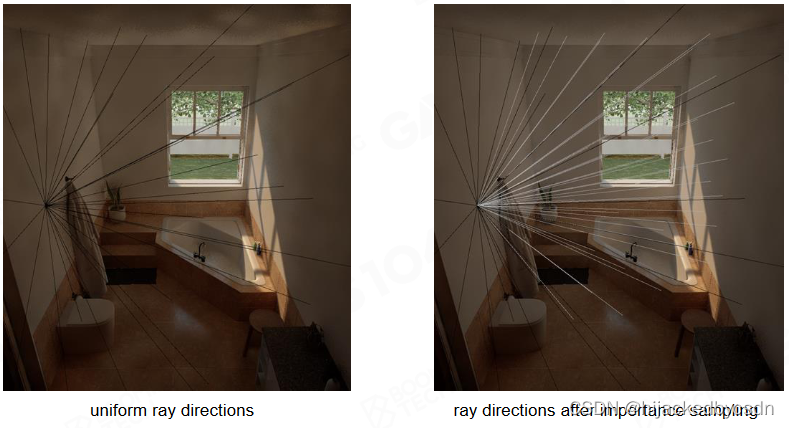
Fix Budget Importance Sampling based on Lighting and BRDF
固定每一个 probe 只射 64 个射线
将 BRDF 和 Lighting 的 pdf 分布加在一起,就知道整体的重要性分布
然后对这个整体 pdf 上的点进行排序,就能知道最不重要的方向和最重要的方向。
设置一个 pdf 阈值,从最不重要的方向开始找,直到找到超过 pdf 阈值的方向,那么这个时候剩下的满足条件的方向小于 64 个,有些比较重要的方向就能分配到大于 1 的光线数量
效果:
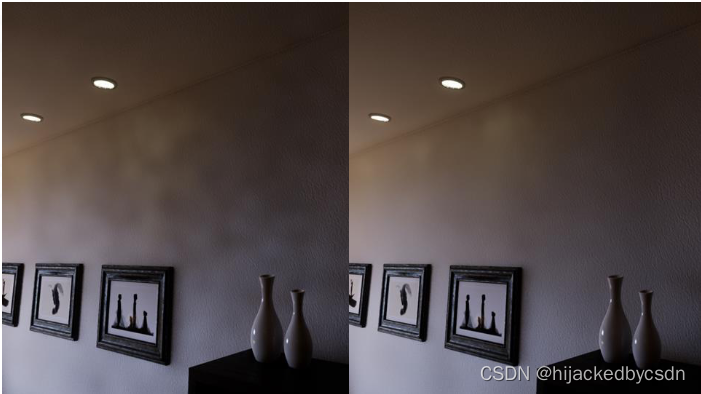
Denoising and Spatial Probe Filtering
为了进一步提升渲染效果我们还需要对图像进行滤波降噪。
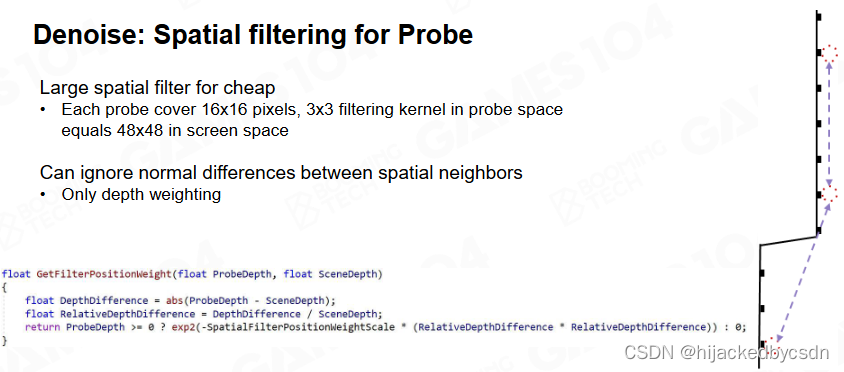
Denoise: Spatial filtering for Probe
对于一个覆盖了 16 * 16 的 probe,使用 3 * 3 的卷积核,那么相当于覆盖了 48 * 48 的像素
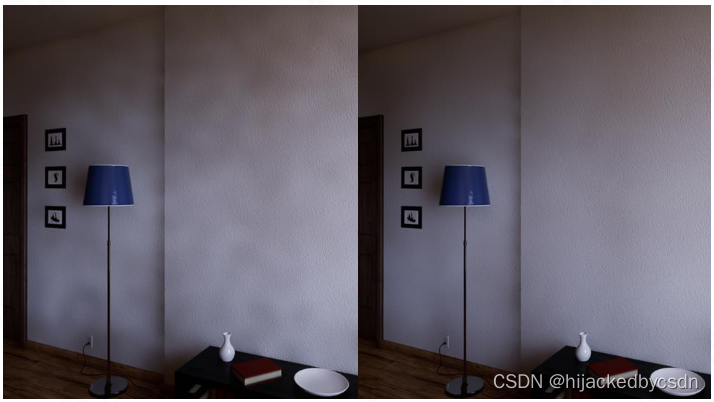
Denoise: Gather Radiance from neighbors
每一个 probe 射出 64 个射线
那么对于某一个 probe,它的邻居 probe 的同方向的射线直接加在一起对不对呢,是不对的
(为什么默认我们第一个思路是同方向的 ray 相加?因为之前说要卷积吗?)
因为假设两个 probe 距离一个很近的物体,那么两个 probe 看向这个物体同一点的方向是不一样的
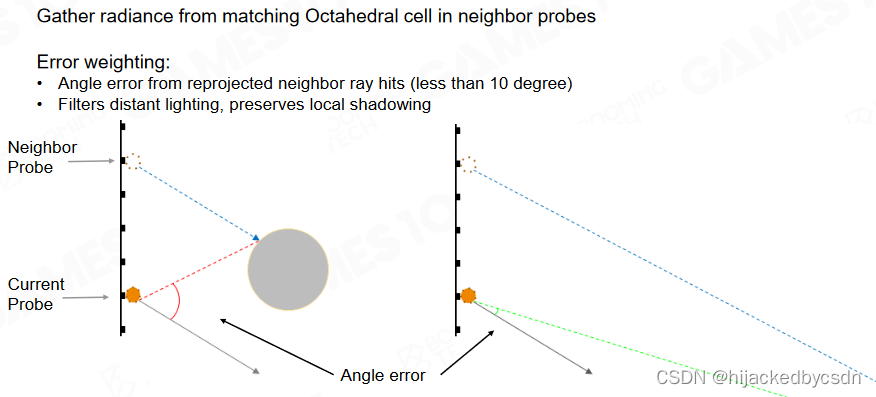
这里 hardcode 了一个逻辑,如果两个方向之间的角度超过十度,就不用了,只相信自己
结果:
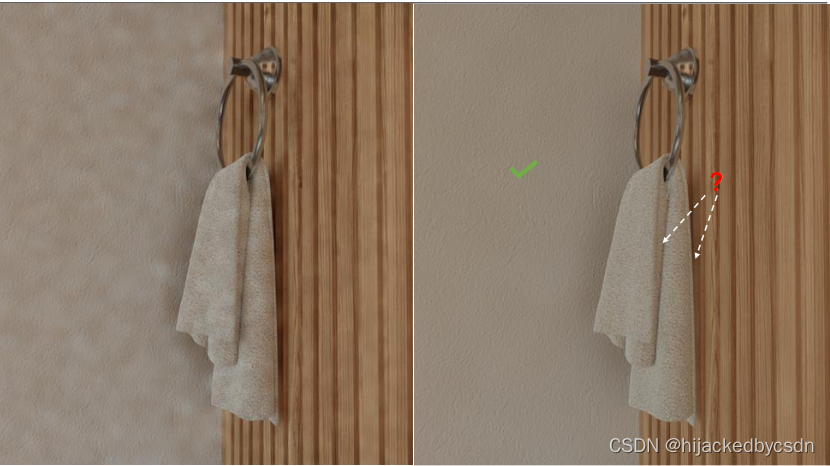
但是这个时候出现了漏光的问题,物体遮挡住的地方本来应该有阴影的,但是现在阴影变少了,出现了漏光
Clamp Distance Mismatching
物体距离两个 probe 很近的时候,还有一种情况是,一个 probe 的某一个 ray 可以击中物体,而另一个 probe 的同方向的 ray 没有击中这个物体
这时,两个 ray 的 distance 差距会比较大
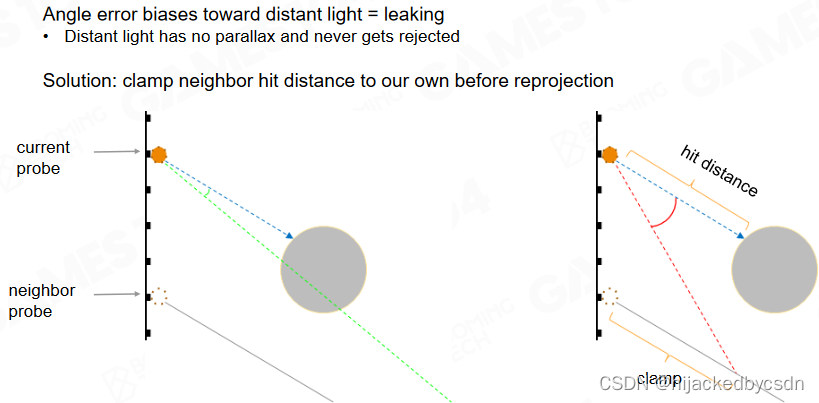
这时又 hardcode 一个逻辑,判断两个 probe 的同方向的 ray 击中物体的距离是否相差过大,如果相差过大,就只相信自己
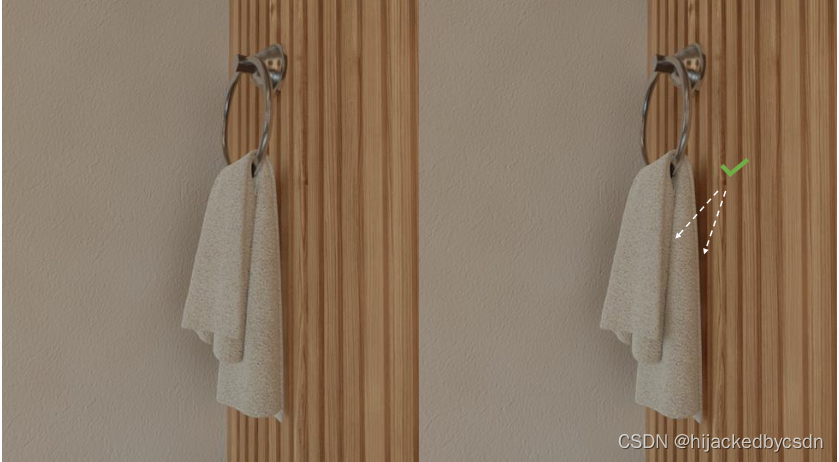
这就解决了漏光的问题
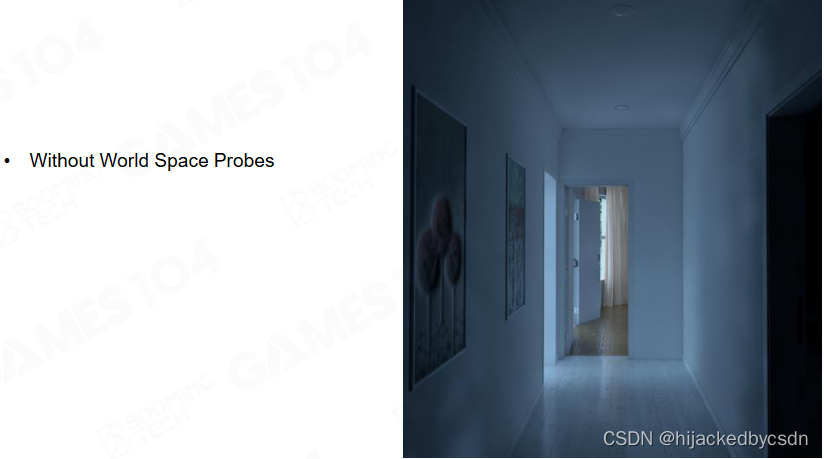
World Space Probes and Ray Connecting
虽然在 screen space 中可以做 probe,但是 probe 的数量有点多
其实,shading 的 ray 如果太远,那么效率不高
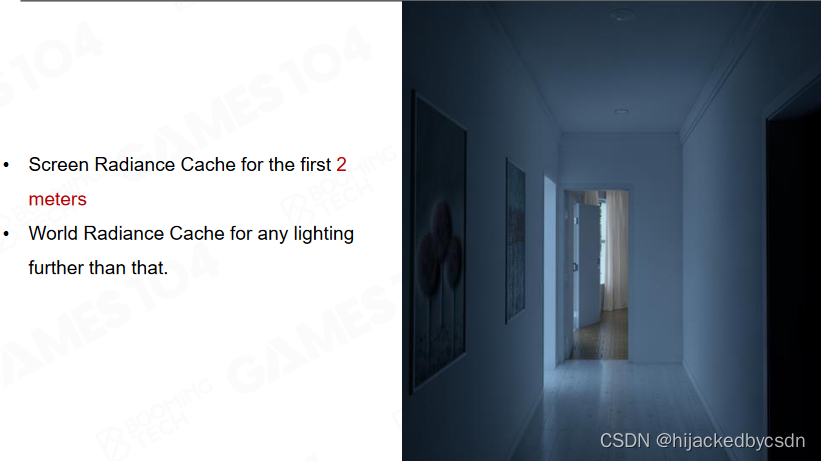
World Space Radiance Cache
那么就让 screen space 中的 probe,就只找周围的物体,也就是近处的物体
对于远处的物体,从屏幕来看,看过去的方向都是大致相似的
ray tracing 的性能不单单收到 ray 的条数的影响,还受到场景复杂度的影响,还受到 ray 的可达长度的影响
因此有一个想法是,在 world space 中预先放一些 probe,这些 probe 缓存 cache 了远处的光照信息
当 screen space probe 要取一个方向的 ray 的时候,在远处,就取沿途的 world space probe,在这个 world space probe 中取出这个 ray 的方向的光线信息
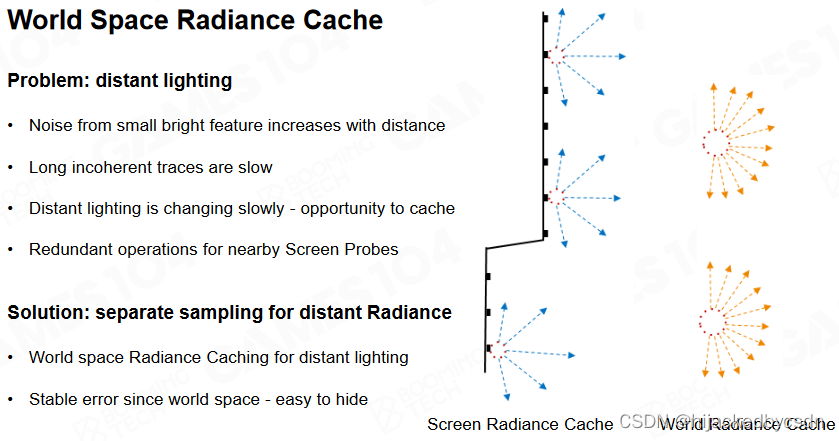
如果场景相对静态,world space probe 只需要在移动物体空出来的位置上增加,在移动物体新占据的位置上减少,也就是把移动物体新占据的位置上的 probe 移动到移动物体空出来的位置,因此 world space probe 是方便更新的
因此 world space probe 就解决了远处的光照信息采集的问题
world space probe 是为 screen space probe 提供采样信息的,所以 world space probe 的密度应该比 screen space probe 的密度更大
(为了防止走样?)
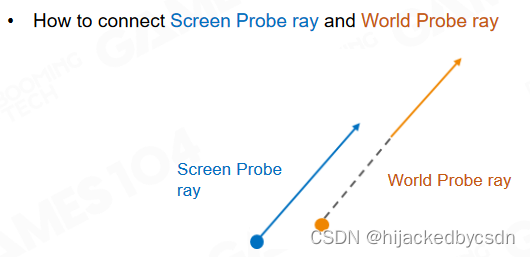
Connecting rays
现在已经确定策略是近处用 screen space probe 远处用 world space probe
这两种射线怎么连接起来呢?
(虽然我感觉不应该是射线从 screen space probe 出发,然后沿途对 world space probe 采样吗,那怎么会有两种 ray 呢,不是一直都只有一种吗?难道这里说的是什么时候切换 ray 的采样方式?)
(好吧,之后知道了,是从 screen space probe 射出光线时候,如果遇到了 world space probe,那么这条 ray 就停住,转而去询问 world space probe 中相同方向射出的 ray)
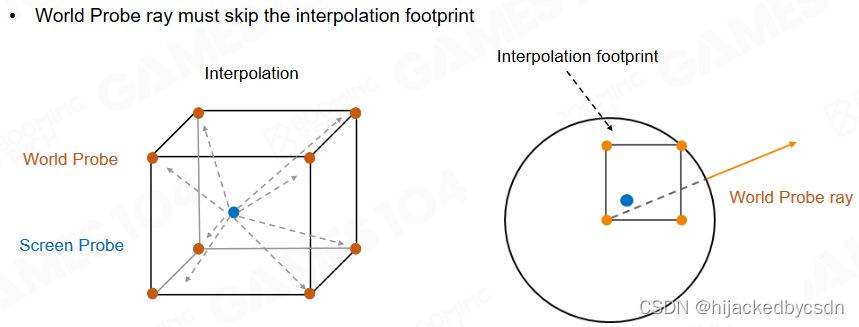
取 Screen Space Probe 邻近 8 个 World Space Probe,距离权重插值。
(Cube 半径两倍范围内已采样,向更远处 raycast 时可以 skip 这段距离)
screen space probe 的 ray 走的长度是不是定值?不是,因为在近处的 screen space probe 的 World Space Probe 组成的 voxel 密度会高一点,如果到了远处,World Space Probe 组成的 voxel 已经比较大了,那么 ray 就会跑的比较远
同时,World Space Probe 的 ray 也会 skip 掉自己的对角线长的距离
因为近处的不需要采,相当于把 World Space Probe 的 ray 的起点往外推,避免重复采样
(没懂)
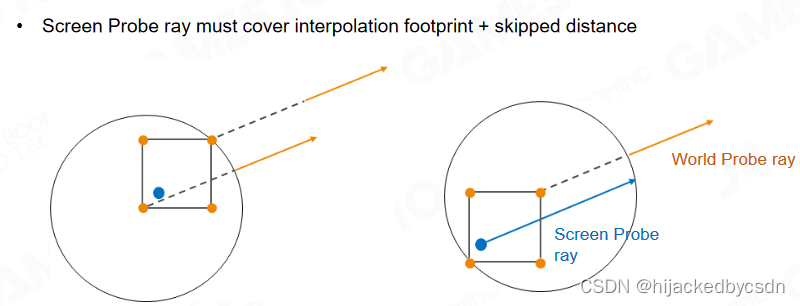
World Space Probe 的 ray 和 screen space probe 的 ray 可能不在一条射线上
那么如果直接把这两个射线的结果相加,可能就会跳过一些物体,产生漏光
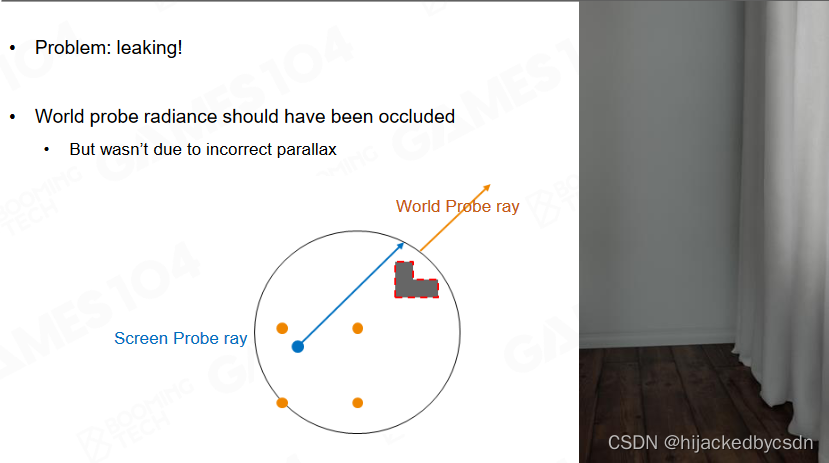
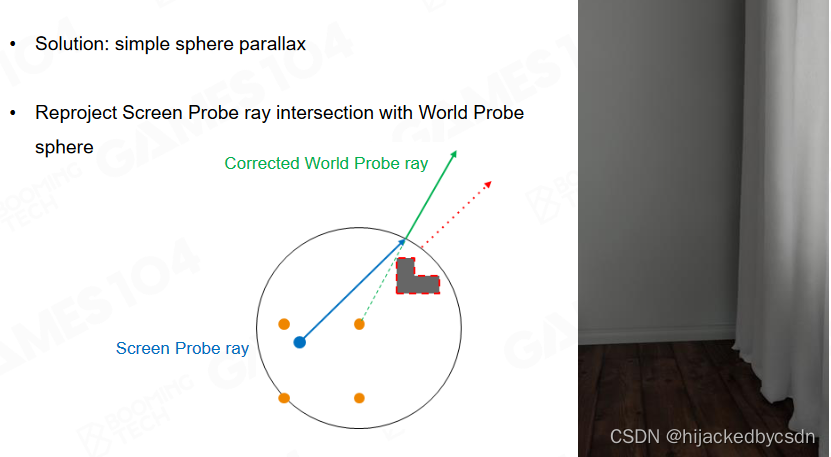
hack 的解决方法是,不追求物理正确,直接将 World Space Probe 的 ray 的起点设为 screen probe ray 与球相交的点
这样就把光路偏折了,没有物理正确,但是起码光路现在是连续的
他这里说的是与 world probe sphere 这个球相交……但是我不知道为什么是这个球……?
或者说如果这个球是 world probe,那么,哦我知道了,图中橙色的点是 world probe,这个球是以其中一个 world probe 为球心,一定半径做的,应该是以跳过的距离为半径
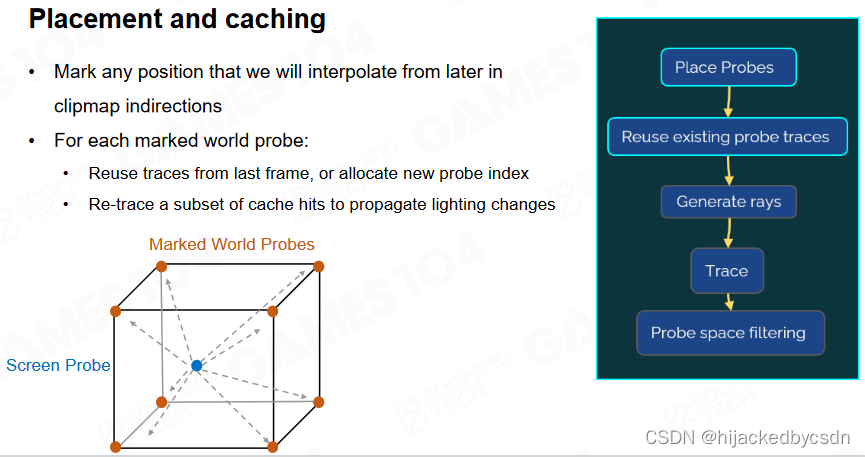
Placement and caching
每一帧要更新多少 world space 的 probe?
shading 还是用 screen space probe,world space probe 只是用来帮助我获取远处的光线
如果有一篇很大的空间里面没有物体,也不在 screen space,就不需要在这篇空间的 world space probe 中采样
(为啥……?world space probe 记录的不是光场吗?虽然没有物体,但是可能有光进来呀)
所以只有那些在 screen space probe 所在的 world space probe 构成的立方体里面的 world space probe 才是 marked 的,才是需要采样的 world space probe
Phase 4 : Shading Full Pixels with Screen Space Probes
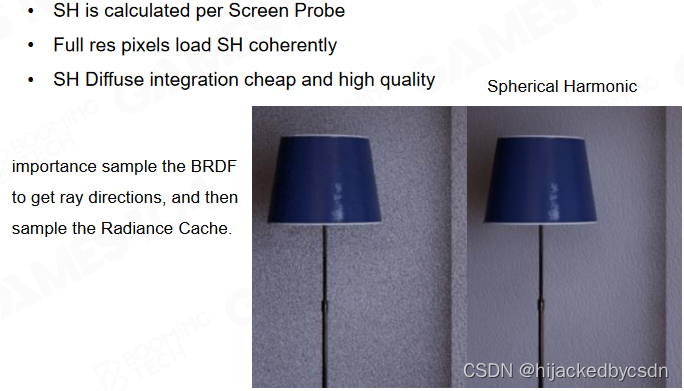
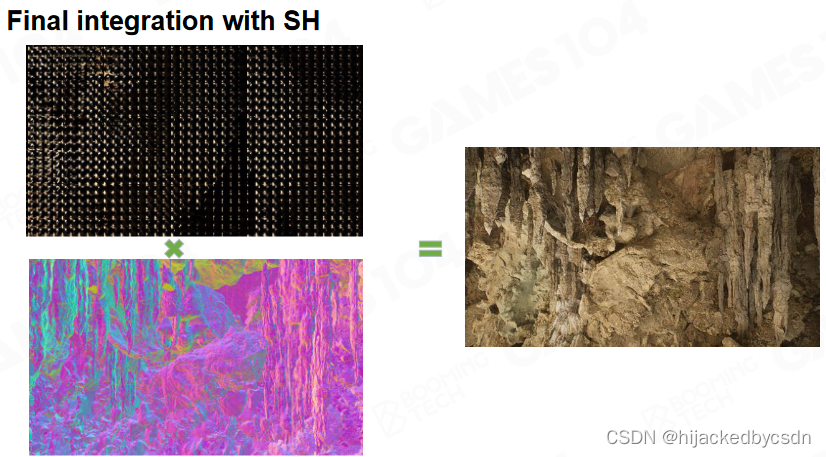
Convert Probe Radiance to 3rd order Spherical Harmonic
将 Probe Radiance 转换为三阶 SH
-
相当于对 Radiance 做低通滤波,效果更柔和
-
SH 积分更快速友好,质量也更高
-
最后利用 SH 着色
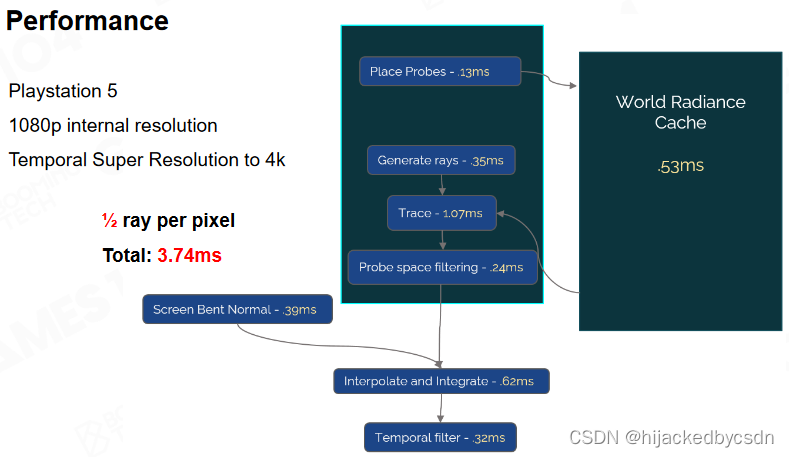
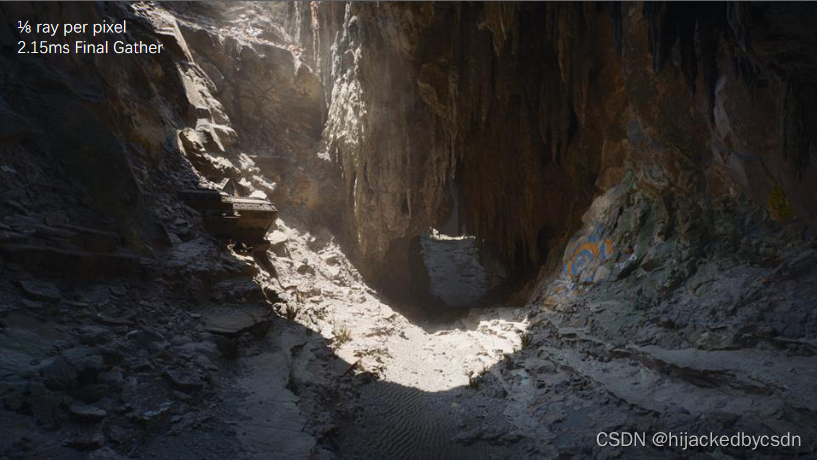
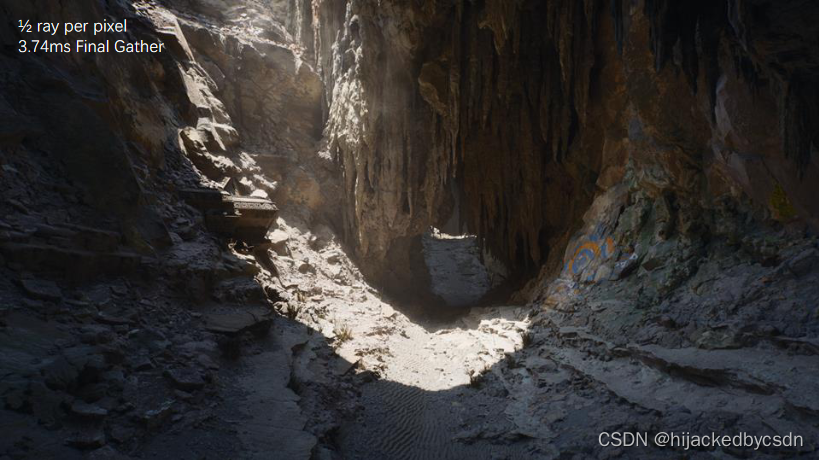
Overall, Performance and Result
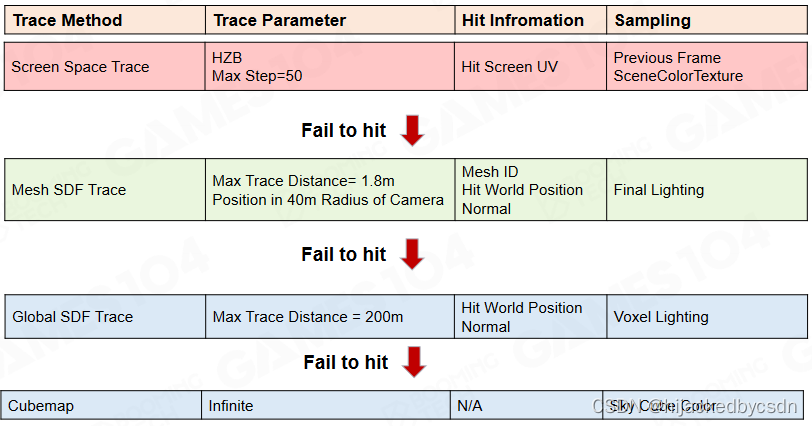
Speed of Different Tracing Methods
核心思想是,对于不同的硬件,ray tracing 的成本是不一样的
最快的是基于 global sdf,其次是基于屏幕空间线性插值
稍微慢一点的就是用 mesh sdf 插值,前提是 ray 的每一步跨越的 mesh 不要太大
HZB Screen 准确度稍微比 Mesh SDF 高一点
硬件光追 Hardware Ray Tracing + surface cache 最高
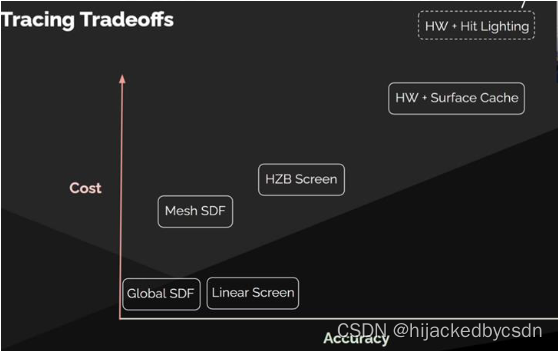
根据具体情况应用不同的方式
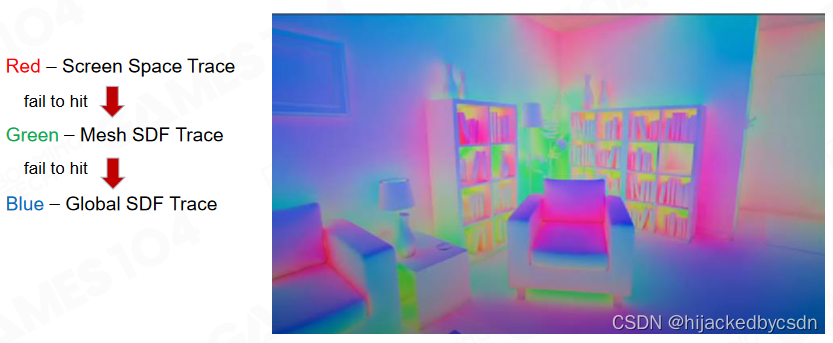
如果每一个像素点只用一种 tracing 方法,那么这个图像中不应该有渐变的
所以猜测这个渐变是因为,对于每一个 screen space probe 都要采 64 个方向,对于这 64 个方向,可能三种 tracing 方式有一个分配
小的 tracing 距离的方法失败之后,就使用更远的 tracing 方法
最终采无限远的时候采的是天光,天光对世界也有影响

参考资料
Monte Carlo Integration
• Importace Sampling: https://patapom.com/blog/Math/ImportanceSampling/
• Notes on importance sampling: https://www.tobias-
franke.eu/log/2014/03/30/notes_on_importance_sampling.html
• Chinagraph 2020会前课程
3:https://www.bilibili.com/video/BV1my4y1z76s?p=3&vd_source=5e38e5c84aa6ff6cff3b802
b3eecb8bc
• Probability density function: https://en.wikipedia.org/wiki/Probability_density_function
• Microfacet Models for Refraction through Rough Surfaces:
https://www.cs.cornell.edu/~srm/publications/EGSR07-btdf.pdf
GI
• SSGI: https://www.ea.com/frostbite/news/stochastic-screen-space-reflections
• DDGI: https://zhuanlan.zhihu.com/p/404520592
• DDGI:
https://developer.download.nvidia.com/video/gputechconf/gtc/2019/presentation/s9900-
irradiance-fields-rtx-diffuse-global-illumination-for-local-and-cloud-graphics.pdf
• DDGI: https://www.jcgt.org/published/0008/02/01/paper-lowres.pdf
• Reflective Shadow Maps:
https://users.soe.ucsc.edu/~pang/160/s13/proposal/mijallen/proposal/media/p203-
dachsbacher.pdf
• Light Propagation Volumes: https://ericpolman.com/
• VXGI: https://on-demand.gputechconf.com/gtc/2014/presentations/S4552-rt-voxel-based-
global-illumination-gpus.pdf
• Lumen:
https://advances.realtimerendering.com/s2021/Radiance%20Caching%20for%20real-
time%20Global%20Illumination%20(SIGGRAPH%202021).pptx
Hardware Ray Tracing
• Ray Tracing Gems II: https://link.springer.com/content/pdf/10.1007/978-1-4842-7185-8.pdf
• The six levels of ray tracing acceleration:
https://f.hubspotusercontent10.net/hubfs/2426966/Gated%20Files/imagination-raytracing-
primer-sept2020.pdf
• Hybrid Rendering for Real-Time Ray Tracing:
https://link.springer.com/content/pdf/10.1007/978-1-4842-4427-2_25.pdf
• Ray Traced Reflections in ‘Wolfenstein: Youngblood’:
https://www.gdcvault.com/play/1026723/Ray-Traced-Reflections-in-Wolfenstein
• DirectX Raytracing (DXR) Functional Spec: https://microsoft.github.io/DirectX-
Specs/d3d/Raytracing.html
• VulkanRayTracingFinalSpecificationRelease
Signed Distance Field
• Dynamic Occlusion With Signed Distance Fields:
http://advances.realtimerendering.com/s2015/DynamicOcclusionWithSignedDistanceFields.pdf
• Lectrue5 Real-time Environment Mapping:
https://www.bilibili.com/video/BV1YK4y1T7yY?p=5&vd_source=5e38e5c84aa6ff6cff3b802b3eecb8bc
• DX12渲染管线(5) - 距离场 : 建场: https://zhuanlan.zhihu.com/p/89701518?utm_id=0
• GPU Gems 2 - Chapter 8.Per-Pixel Displacement Mapping with Distance Functions:
https://developer.nvidia.com/gpugems/gpugems2/part-i-geometric-complexity/chapter-8-pixel-
displacement-mapping-distance-functions
• Unreal Engine 5.0 Documentation: https://docs.unrealengine.com/5.0/en-US/mesh-distance-fields-in-
unreal-engine/
• Advances in Real-Time Rendering in Games: Part I - SIGGRAPH 2022:
https://advances.realtimerendering.com/s2022/index.htmlf
QA
在硬件光追飞速发展的今天,lumen 仍然开发了距离场和软件光追,那么对于当下的引擎开发来说,是否距离场和软件光追也是必须的?
lumen 首先是一个精心调教过的复杂系统,要大幅替换很难
硬件光追的性能是否能发展到满足性能也是个问题
市场用户的硬件更换速度也是问题
lumen 的效果很好,但是听老师的讲解感觉是一个非常复杂的系统,会不会很难维护?
地形,半透明气体,运动速度很快的场景,都是挑战
实时动态 GI 是否是下一代 3A 游戏的标配?
因为人眼适应了好的效果,就很难接受这个效果没有
第二十二节 GPU 驱动的几何管线 Nanite
QA
ECS 怎么处理 entities 的删除
只是把这个 entities 的 id 置空,等到有新物体的时候就重用这个 id
那么怎么分辨新版的 id 和老版的 id 呢
(他这里说的应该是,对于同一个 entity id,怎么区别这是被删除之间的 entity 还是新增的 entity?)
设置一个 source(我不知道老师念的是不是这个单词?) 值
如果我看到 entity id 是一样的但是 source 值不一样,那么指向旧的 entity 的 handle 就是无效的
在高频的系统里面,会尽量减少 allocate 和 deallocate
怎么测量缓存没命中
基于 GPU 厂商的工具
我们怎么给设计师提供基于面向对象的设计工具
不替他做选择,告诉他每一个选择的成本
Lumen 怎么处理自发光
surface cache 里面
在 final light 和 indirect light 的互相迭代中处理了
Introduction
Traditional Rendering Pipeline
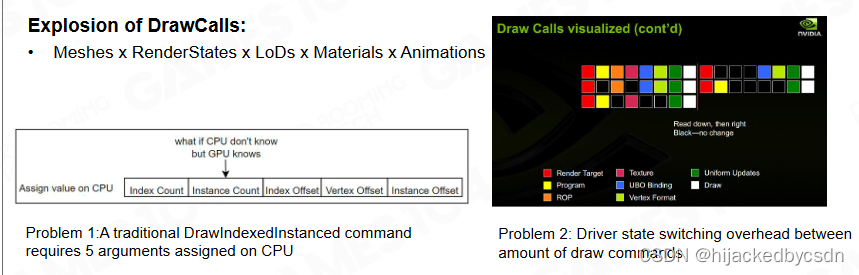
Nanite 是虚幻 5 引擎中提出的虚拟几何系统用来实现渲染超高精度的网格。要理解Nanite 首先要回顾一下经典渲染管线:当我们从 CPU 端发出渲染指令(Draw Call)时会首先由 CPU 来准备各种渲染所需的资源,例如材质,alpha 混合模式,等等 render state 然后 GPU 会接收这些数据并计算实际的着色,例如进行 VS,PS。这种模式的缺陷在于 CPU 可能无法跟上 GPU 的计算速度,而且 CPU 的算力会浪费在准备渲染素材这一过程中。
随着渲染场景的复杂度逐渐提升,CPU 端的计算开销会成为整个渲染过程的瓶颈。
Bottleneck of Traditional Rendering Pipeline
现代场景是几何非常丰富,现代游戏 Draw Call 越来越复杂,每一个材质的组合都需要一次 Draw Call,已经成为现代渲染管线瓶颈
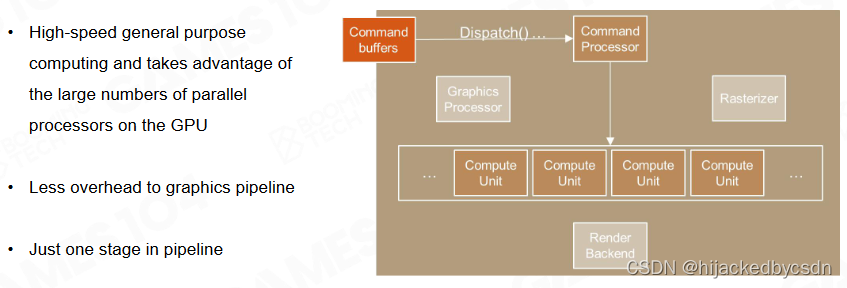
Compute Shader - General Computation on GPU
解决问题的第一道曙光是 Compute Shader 不再需要在 CPU、GPU 之间来回传递数据,直接在 GPU 中执行通用计算
Draw-Indirect Graphics API
在图形 API 层面上过去只能一次绘制一个网格,而现代图形 API 则支持在一次 DrawCall 中同时绘制多个网格。

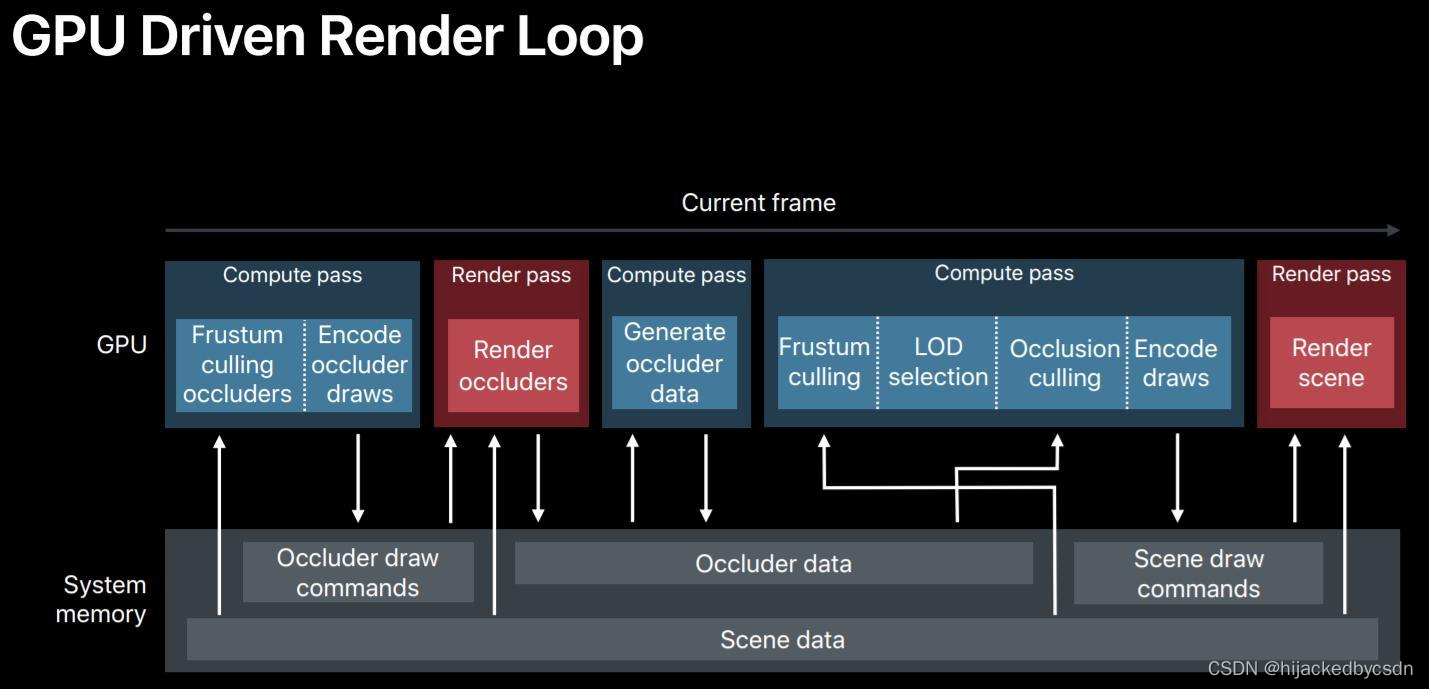
GPU Driven Rendering Pipeline
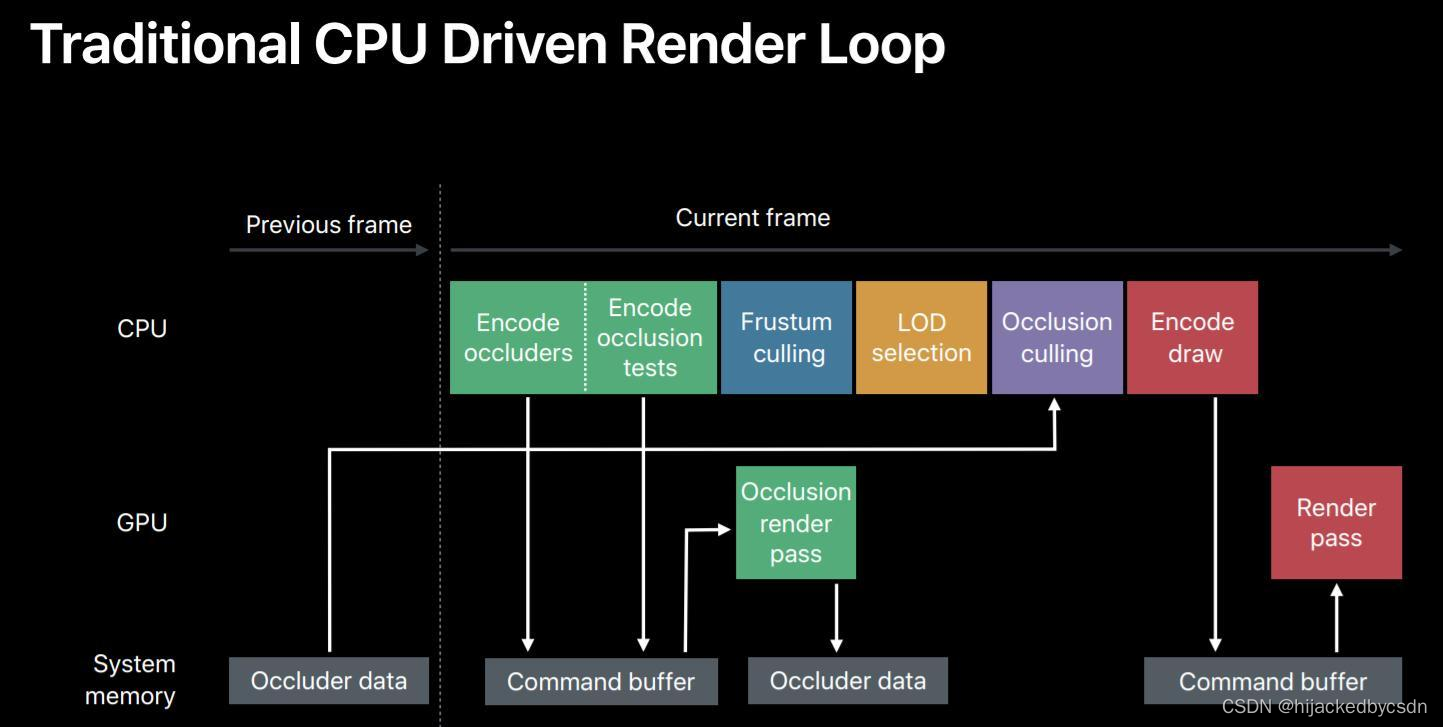
总结一下,现代 GPU 驱动的渲染管线核心思想在于把 CPU 端的计算直接移动到 GPU 端,同时渲染所需的数据也会直接由 GPU 进行加载。在理想情况下 CPU 端只负责发出绘制指令,一切渲染数据加载和计算,例如视锥裁剪,LOD 选择,可见性都在 GPU 端直接完成。
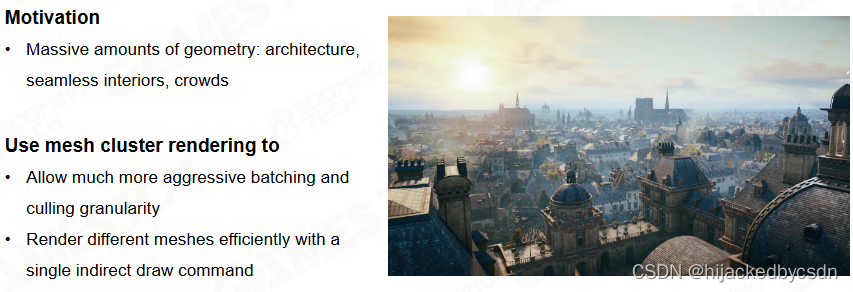
GPU Driven Pipeline in Assassins Creed
游戏工业对 GPU 驱动渲染管线的大规模应用可以追溯到《刺客信条:大革命》。在游戏中我们可以看到大量的拥有真实细节的建筑和场景,如何渲染这些极其复杂的几何对象是整个渲染管线的巨大挑战。
Mesh Cluster Rendering
游戏开发团队提出了 mesh cluster rendering 的技术来提升渲染效率。mesh cluster rendering 的思想在于对同一物体上的面片进行聚类,在渲染时首先根据 cluster 来判断面片的可见性
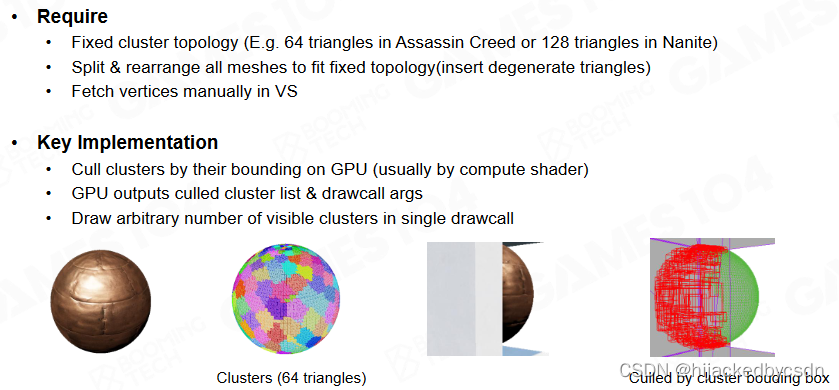
以前画 instance 不管这个东西可见不可见,只要这个东西有一个角可见,整个物体都会渲染一遍
现在根据 cluster 来判断,就摆脱了这个物体的限制,不可见的 cluster 就不会绘制,不会受到物体其他部分的影响
GPU Driven Pipeline
整个游戏的渲染管线如下图所示。通过 clustering 的方法可以去除掉大量不可见的对象以及三角形,从而极大地缓解了 GPU 的渲染压力。
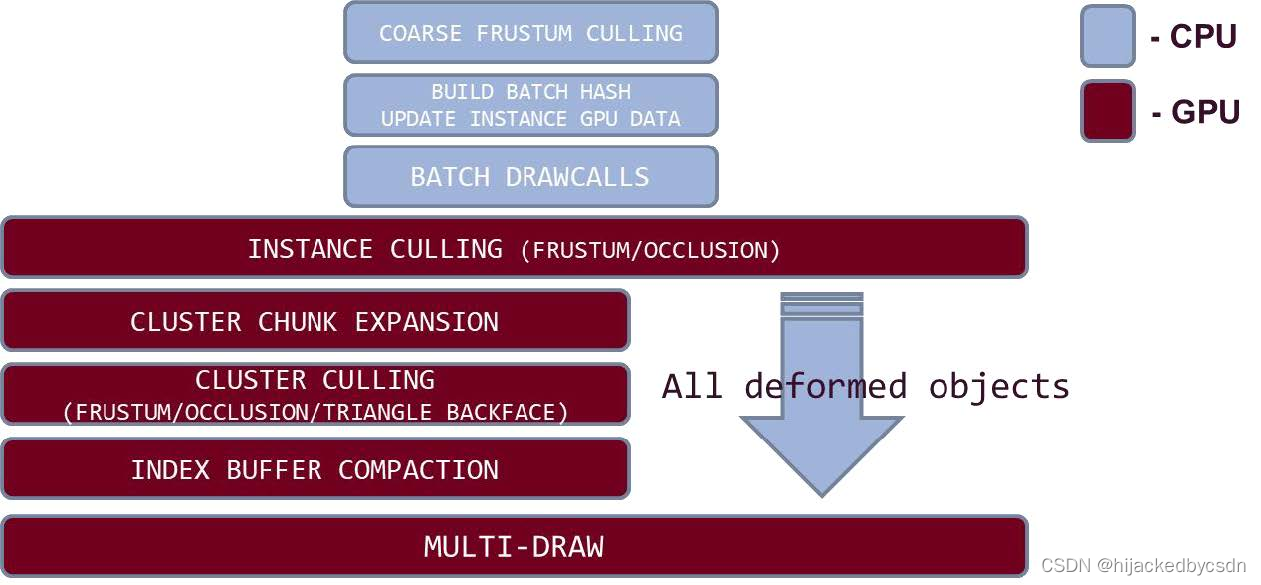
CPU 端:
-
根据材质不同组合 Instance
-
根据相机距离 LoD
-
打包交给 GPU 做后续处理
GPU Instance Culling
-
Instance Culling
-
将(64个)Cluster 组成一个 Chunk,再次 Culling,以加速
GPU Cluster Culling
- Chunk -> Cluster -> Triangle 一步步裁剪,将视锥外、背面的全部裁剪
Index Buffer Compaction 将可见的 Instance 中的可见的 Cluster 的可见的三角形依次写入备用 Index Buffer
-
三角形顶点顺序不统一时,可能导致前后帧三角形顶点顺序不一致,由于 Z-Buffer 精度有限,导致 Z-Fighting 问题 => 硬件 Multi-Indirect Draw Call 或可解决此问题
-
对高精度的 Mesh 效率非常高
Works on CPU side
在 CPU 端只负责非常少量的视锥剔除等工作,初步过滤掉不可见的物体。
根据材质等 instance data 的 hash 来合并 draw call
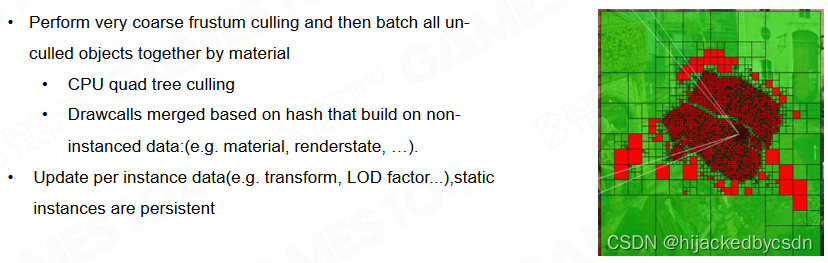
还要更新 instance data
GPU Instance Culling
然后 GPU 端会把过滤后物体上的 cluster 拓展为 chunk,每个 instance 可以属于不同的 chunk 而每个 chunk 可以包含不同的 cluster。
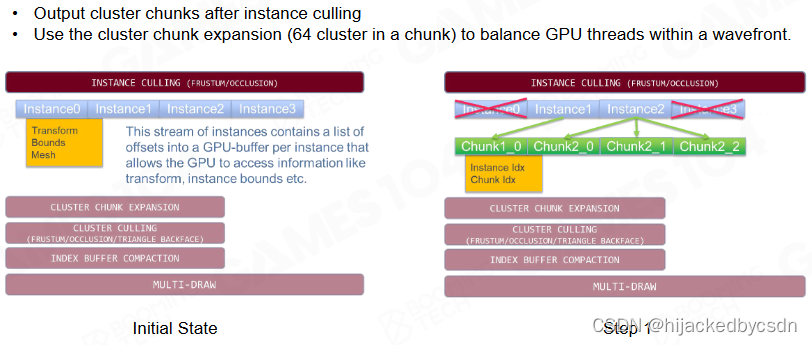
wavefront 可以一次发出一批数据, 把所有的 working thread 吃满
跟之后的 cluster group 类似
GPU 端进行实际的可见性剔除时会先检查 chunk 的可见性然后计算 cluster 的可见性。除了利用 bounding box 进行剔除外,还会同时结合三角形的朝向进行过滤,最后得到所有可见的三角形编号。也就是最后得到一个超大的 index buffer
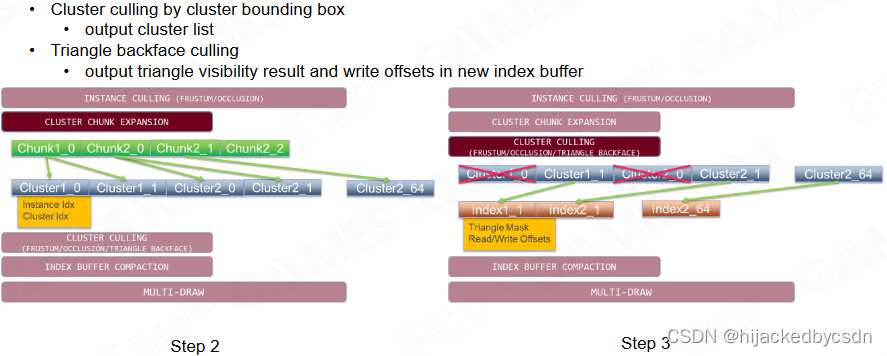
Index Buffer Compaction
所有可见三角形的编号会存储在一个事先申请的巨大 buffer 中。写入过程是原子化的,因此可以利用 GPU 并行计算来高效处理。而在进行渲染时可以利用这个 buffer 来并行处理所有的三角形,从而实现对场景的渲染。
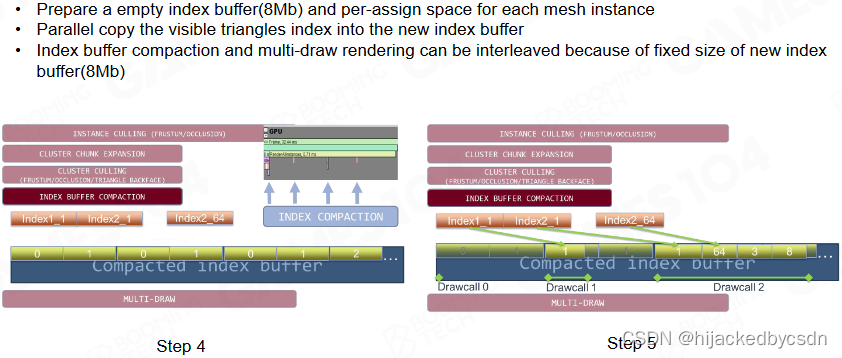
因为并行写入 index buffer 是乱序的,所以可能导致前后帧遍历三角形 index 的顺序不一致,由于 Z-Buffer 精度有限,导致 Z-Fighting 问题 => 硬件 Multi-Indirect Draw Call 或可解决此问题
一般我们希望前后帧遍历三角形的 index 的顺序是确定的
例如墙上加一个贴花,那么 Z-buffer 精度不够的时候,先画贴花还是先画墙壁就可能有不同
Codec Triangle Visibility in Cube : Backface Culling

在一个 cube 上 codec 编码解码
128 个面,每一个面,对于 cube 的六个面,判断可见性
对于 cube 的六个面,因为三个面可见,只要这三个面中有一个 bit 是亮的,那这个东西就是亮的
总共是 64 个三角形,那么 6 * 64 个 vector,就可以表达这个三角形的可见性
(完全没懂……)
-
每个 Cluster 存储每个三角形对两个方向的可见性
-
利用这一数据快速做 Backface Culling
(完全没懂……)
Occlusion Culling for Camera and Shadow
视锥内的,物体背后被遮挡的物体应该被剔除
所以现在用 cluster,也是一样要做遮挡剔除
shadow map 是从光源渲染一帧,那么其实 shadow map 的耗费是与几何有关的
为了进一步提升渲染效率,除了剔除掉视野外的三角形外我们还希望能够把被遮挡住的三角形也同时剔除掉,这一过程称为 occlusion culling。当相机在场景中的运动比较光滑时可以把前一帧的深度图投影到当前相机位置上,再结合 hierarchy z-buffer 就可以估计哪些 cluster 和三角形是可见的。
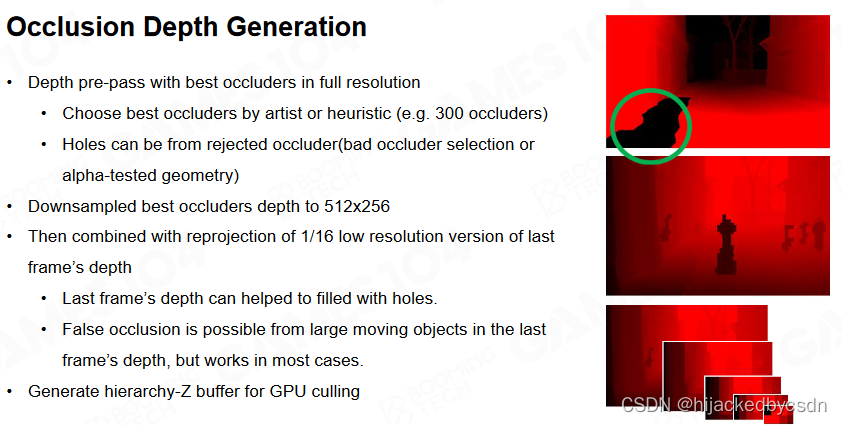
写一个启发式的算法, 判断哪些物体很大,并且距离相机很近,作为遮挡物 occluder 例如选择 300 个遮挡物,先把这些遮挡物的 z-buffer 渲染出来
然后把他们 downsample 到 512*256
然后把上一帧的 Z-buffer 重新投影过来
因为这一帧只选择了 300 个遮挡物,所以这一帧的 Z-buffer 还有一些空洞没有填充
上一帧的 Z-buffer 重新投影过来之后就去填充那些空洞
然后用得到的 Z-buffer 创建 hierarchy-Z-buffer 也就是之前在创建 AI NavMesh 用过的,一层一层填充的那个算法
如果跟 HierZ test 通过了,说明你没有被遮挡,否则可能会遮挡
instance 是否可见,再问 chunk 是否可见,再问 cluster 是否可见
高速运动的物体?
Two-Phase Occlusion Culling
更现代的 occlusion culling 方法是使用上一帧和这一帧的两个 z-buffer 来实现。首先利用前一帧的 z-buffer 来快速选取可能可见的物体,然后使用这些物体来渲染新的 z-buffer。显然此时的深度图会有非常多的洞等待填充,而且很多像素的深度可能是错误的。为了修正这个问题还需要再利用这一帧的深度图来测试前面过滤掉的其它物体。
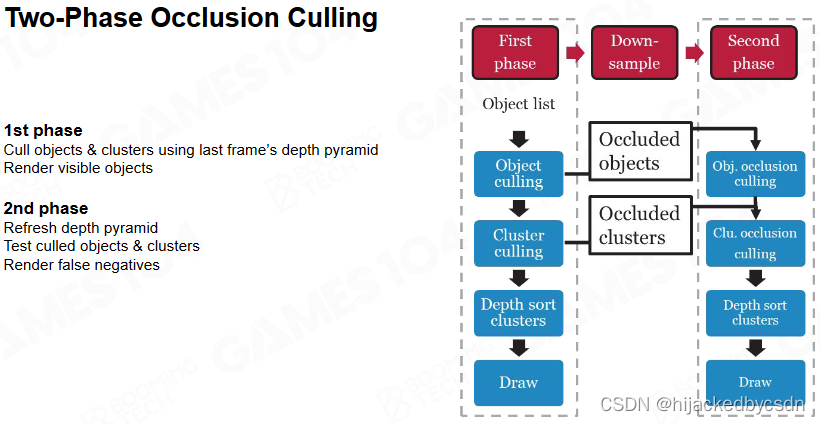
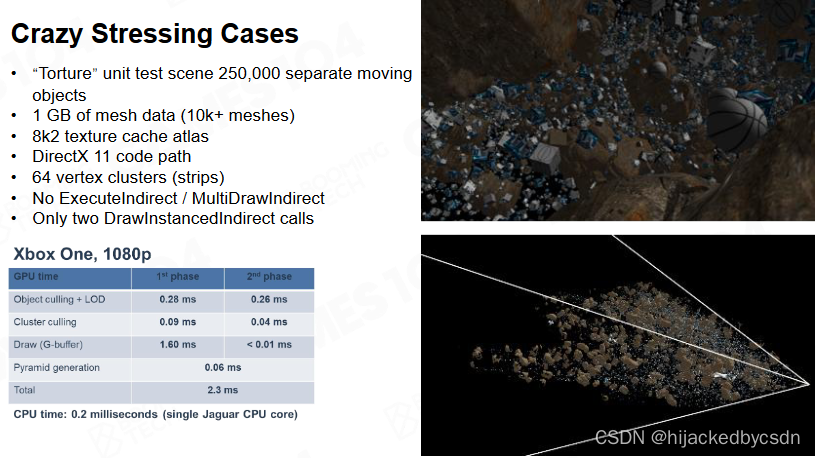
这种 two-phase occlusion culling 方法对于非常复杂的场景以及动态物体都有很好的性能。
这些算法都是用尽可能低的成本去生成过滤物体所需要的挡板
压力测试:
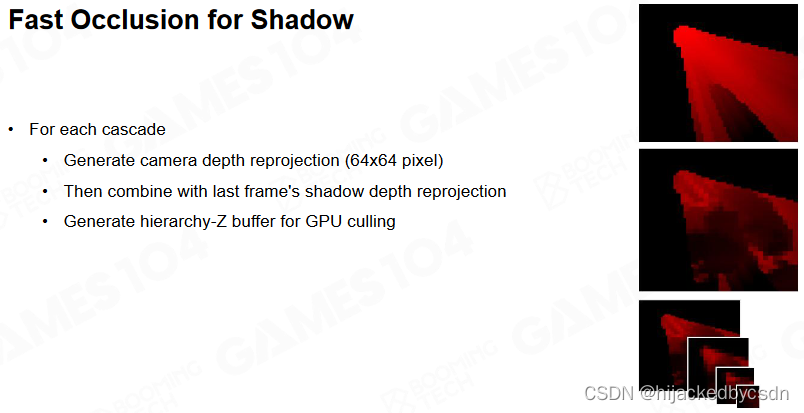
Fast Occlusion for Shadow
shadow caster 的精度需要和摄像机的精度是一致的
Shadow 中生成深度时对几何细节量敏感
对每个 Cascade,将上一帧相机深度重投影至当前帧 Shadow 深度
混合上一帧 Shadow 深度重新投影
并结合 hierarchy z-buffer 来进行剔除
只有摄影机可见区域内需要生成阴影:只对相机可见的 Instance 生成 Shadow 的 Z-Buffer
Camera Depth Reprojection for Shadow Culling
结合相机的可见性,把所有相机方向不可见的物体全部剔除掉。
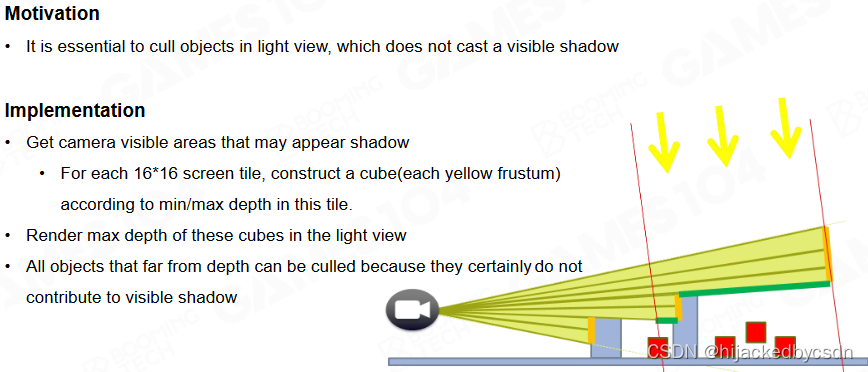
例如几栋建筑就把身后的不可见的建筑挡住了

思路:在 camera space 在 光的 space 快速裁剪
Visibility Buffer
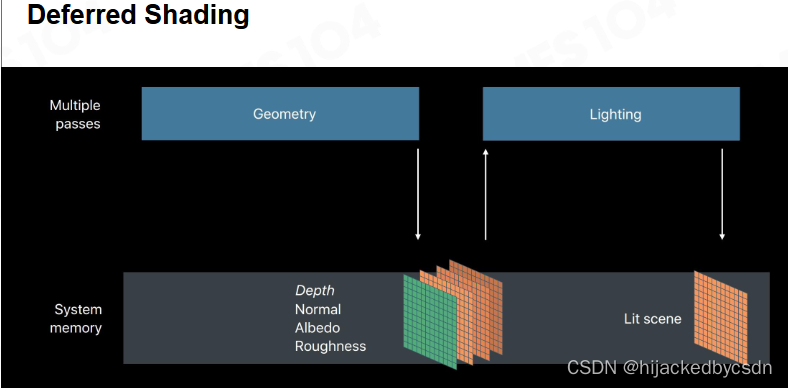
和 Nanite 相关的另一个技术是课程前面提到过的 G-buffer 和延迟渲染,我们可以把场景中的各种几何信息记录在 G-buffer 中从而方便渲染时的计算。
Forward Rendering:所有互相遮挡、透明的物体需要做重复计算
Deferred Shading:用 G-Buffer 存储可见 Pixel 的各种数据,只对 G-Buffer 做光照计算

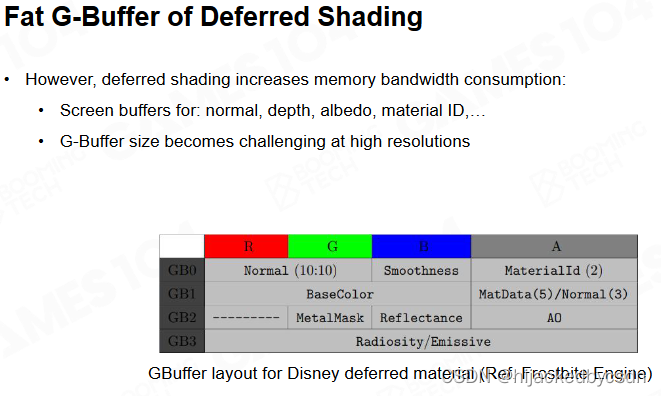
问题:
- G-Buffer 的存储、IO 开销大
之后还因为手机带宽,hack 出了 tile-based 方法
总之之前讲过
- 复杂场景下,因为难以判断可见性,在生成 G-Buffer 时产生 Over draw,多次绘制同一像素时开销大
例如,从屏幕上找一点选一个方向出射,植物的叶子会层叠很多,因为没有办法保证这些叶子优先从靠近我的相机的位置开始渲染;如果能够优先从相机的位置开始渲染,那么其他的叶子都看不见,不会产生性能问题
但是我们不知道这些几何提交到显卡的顺序,那就可能,在屏幕上一个像素,可能会绘制十几次
对每一次 pixel,都需要把纹理提取出来,需要 albedo,normal 等,需要转成 local space,每次纹理采样是一次三次采样,得到将近 100 b 的数据,需要写入 G-Buffer
这个时候就会有问题
V-buffer 是为了提升数据读取效率和缓存利用率而提出的一种技术。V-buffer 中不会记录太多的几何信息,一般只保存像素上物体的各种编号。
第一帧,不要像 deferred shading 那样对材质等等全部采样
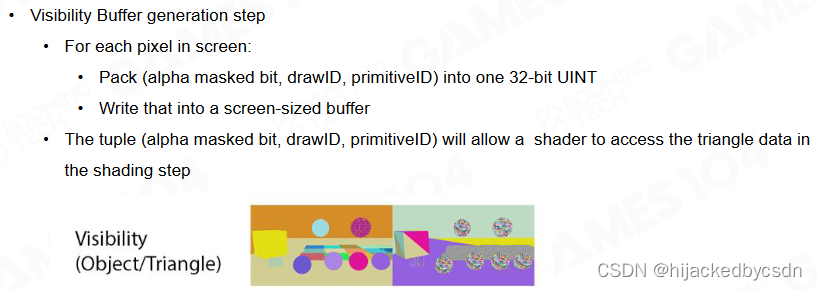
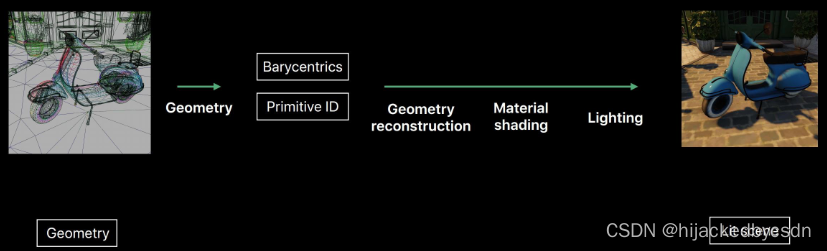
第一遍渲染时,只在 Buffer 中存储: (Alpha masked bit, DrawID, PrimitiveID, MaterialID, …)
Alpha masked bit 类似 material ID
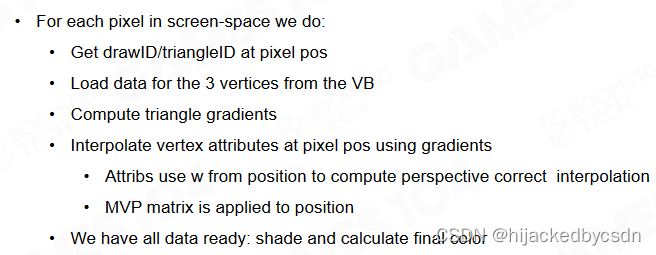
在进行着色时对每个像素需要先获取该处对应的三角形信息,然后通过插值来得到像素上相应的各种几何材质数据。这种渲染方式的优势在于计算量只与分辨率有关,而与场景的几何复杂度无关,因此拥有非常高的计算效率。
几乎没有 Over Draw
屏幕上的几个像素可能属于同一个三角形,反复取同一个三角形的数据,Cache Miss 率低
弹幕:更重要的是避免了quad over draw, overdraw 可以用之前的gpu culling 避免 但是有quad over draw issue
Visibility Buffer + Deferred Shading
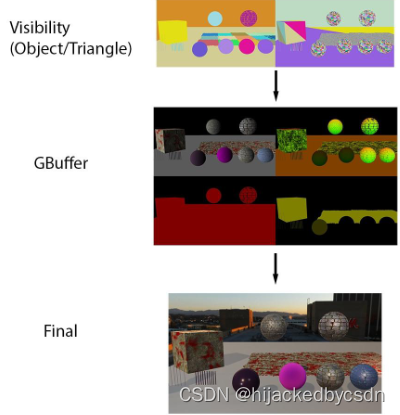 V-buffer可以很容易地和延迟渲染管线进行结合。我们只需要利用 V-buffer 中可见物体的编号来重新写入 G-buffer 就可以完美融入延迟渲染管线中。
一般来说,草丛等复杂细节情况可直接用 Visibility Buffer 渲染,主角等主要内容 Gather 到 G-Buffer 再渲染
树叶挡住了之后的树叶,但是树叶上可能有洞之类的
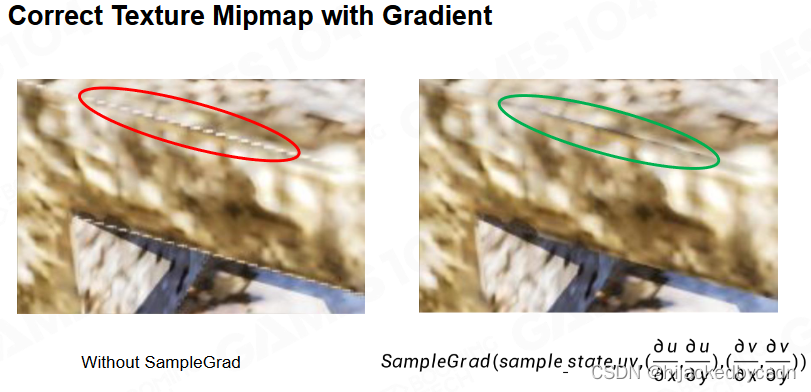
Correct Texture Mipmap with Gradient
当然 V-buffer 在实际使用时还有很多的细节要处理,比如说如何考虑纹理的梯度、如何选取合适的 mip-map 等。
以前是光栅化器自动选择正确的 mipmap
现在如果只是把三角形的 id 打印到像素
知道这个点,根据三角形的三个点的 UV,投影到 screen space,可以反算出 pixel 在 screen space 上的梯度,这样就能得到取采哪一层的 mipmap
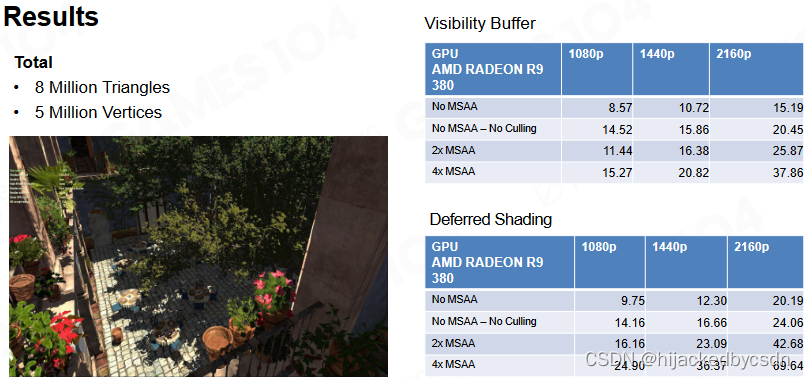
原作者对 V-Buffer 的结果展示
Virtual Geometry - Nanite
Overview
Nanite 的核心任务是实现实时电影级高精度几何模型的渲染,我们希望能够尽可能还原有着无限细节的真实世界。
Virtual Texture
Idea:将场景中所有贴图加载到内存中开销非常大,能否只加载可见部分且 LoD 后精度的贴图
传统的 pipeline 切换一次材质就要切换一次 render state
所有材质加载到同一张“大贴图”中,并对整个贴图做 MIPMAP
预烘焙这张“大贴图”,并做 MIPMAP
这样的话只需要切换一次 render state
根据 View 区域动态加载所需的部分
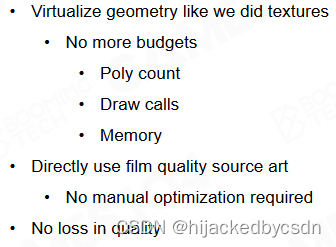
Idea of Nanite
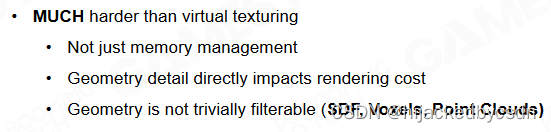
Nanite 的思想与 virtual texture 非常相似,不过 Nanite 更关心的是如何建立虚拟的几何表示。当然几何数据本身要比纹理贴图要复杂得多,如何建立规范的几何表示至今仍然是一个难题。
挑战:几何数据是非 Uniform 的、互相之间可能没有关联性、Mesh 数据难以Filter(SDF、Voxel、Point Cloud 可以 Filter)(Filter 的作用就是可以调整密度,可以实现近处细远处粗)
以体素化表示为例,尽管体素本身是相对规范的但由于其巨大的数据量我们很难在游戏引擎中来直接使用。
并且像硬边界这种高频的信息会要求 voxel 的精度很高
八叉树对世界的表达可能会很复杂
并且现在的美术工具都不是体素化的表达的,如果要更换工作流的话就要让所有美术都更换美术工具,成本很高
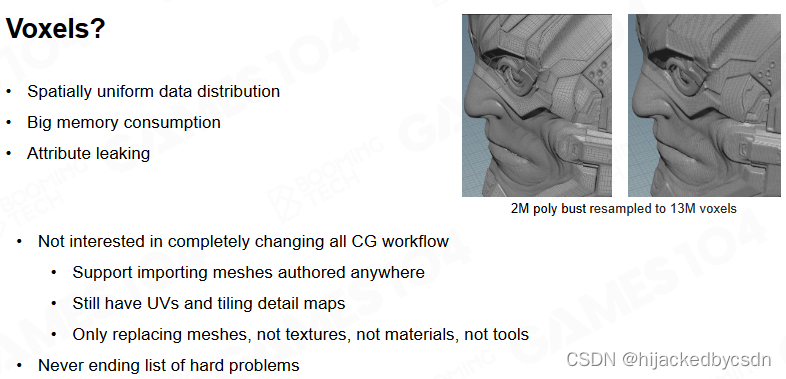
这里写的属性泄露不知道是啥意思
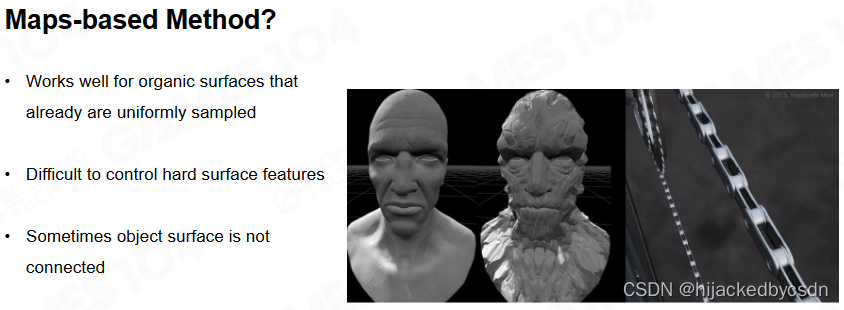
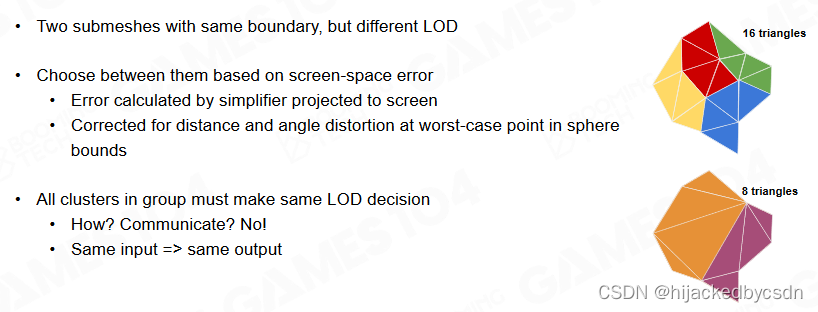
另一种流行的几何表示方法是曲面细分(surface subdivision),基于这样的技术我们可以把粗略的几何表面细分为高精度包含各种细节的曲面。然而曲面细分的一个缺陷在于很难对曲面进行降采样,即从高精度曲面来获得低精度表示。

其它的几何表达方式包括 displacement map 或是点云也都无法满足我们的需求。
displacement map
很难做硬表面
怎么从已知的精细的几何生成一个 displacement map
NVIDIA 正在从硬件上做这方面的更多工作,或许还有发展的可能
硬件生成几何,兼容光照
点云的话
效果不好
Over Draw
材质如何绑定
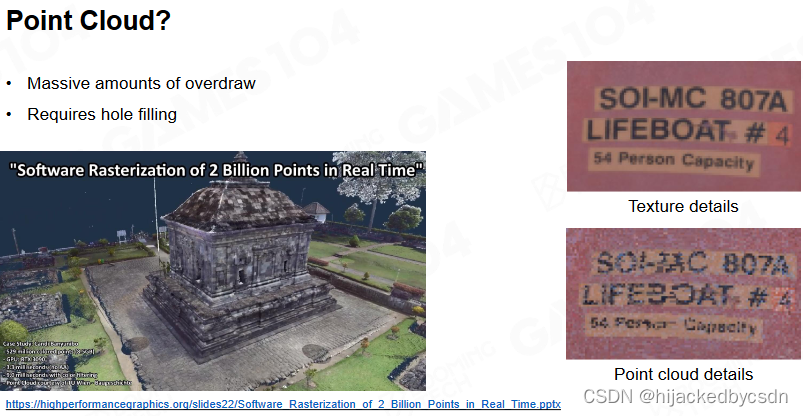
所以最终还是选择三角形
Nanite Geometry Representation
Nanite 的一个重要想法是利用屏幕的精度来控制渲染时所需计算三角形的数量。尽管三角形的数量可以随着模型精度的提高不断增长,但只要屏幕分辨率不变所需绘制的三角形数量应该是比较稳定的。

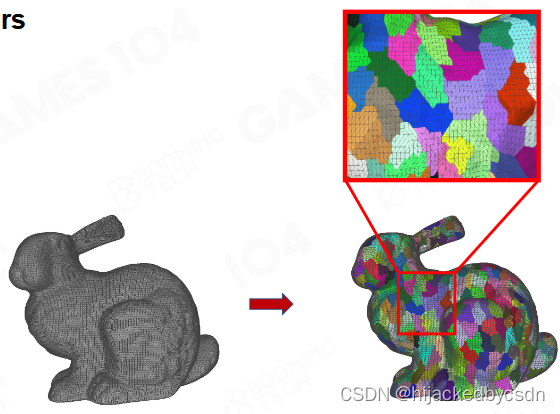
Represent Geometry by Clusters
因此可以结合前面介绍过的 mesh cluster 来控制模型的细节。

View Dependent LOD Transitions – Better than AC Solutions
然后根据相机与模型的相对远近关系来生成 cluster 在不同 LoD 下的几何表示。
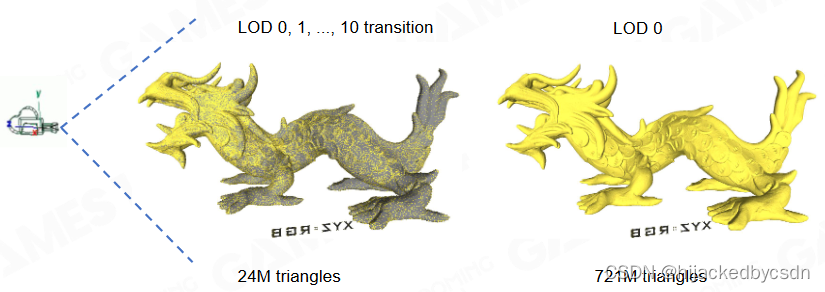
之前在刺客信条大革命中,每一个物体的 LOD 决定了这个物体的所有 cluster 都是这个 LOD
在 Nanite 中实现了基于视野的 LOD
Naïve Solution
Cluster LoD Hierarchy
Cluster 两两合并,减少一半三角形,得到简单的 Cluster Hierarchy
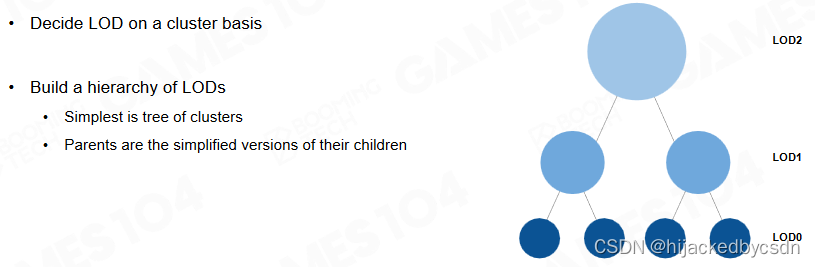
Decide Cluster LOD Run-time
根据 View 得到 Cluster 的 bounding,得到误差不大于一个 pixel 的 error tolerance 是多少,如果 cluster 做几何简化的时候,和原始的几何之间的误差小于一个 sub pixel 就可以绘制了,否则继续往下走
得到 Cut Line,选择对应精度的 Cluster
也就是当误差小于 1px 时选择当前层的 LoD,否则选取下一层的 LoD。

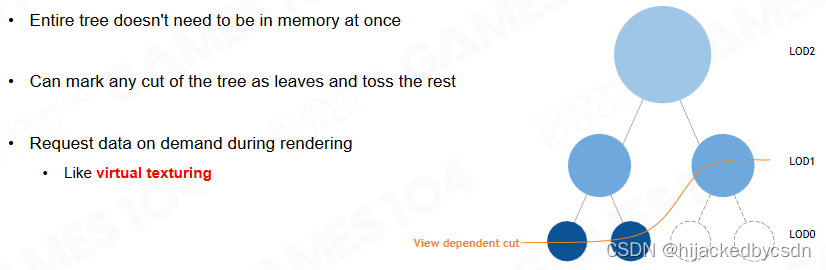
Simple Streaming Idea
Like Virtual Texturing,流式加载数据
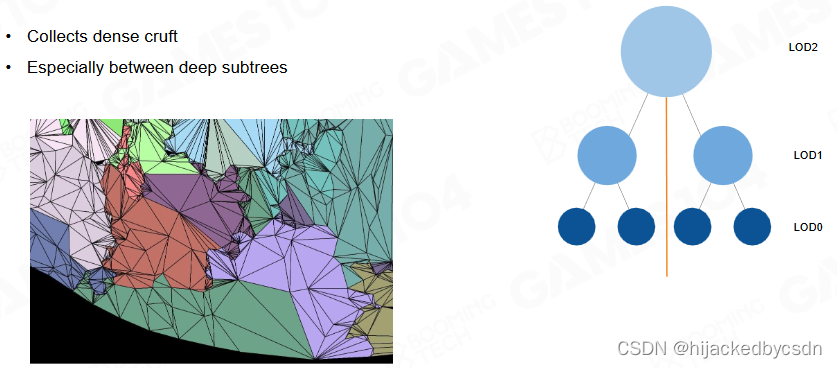
LOD Cracks
问题:不同 Cluster 之间的 Juction 问题
或者说不同 LOD 的 Cluster 之间

Locked Boundaries? Bad Results
锁住 Cluster 的边:这就导致了边缘处的 Triangle 一直都是 LOD0 的情况,密度很高,导致了面片简化利用率不高;密度不均匀,产生画面 Artifact(缝合线感)
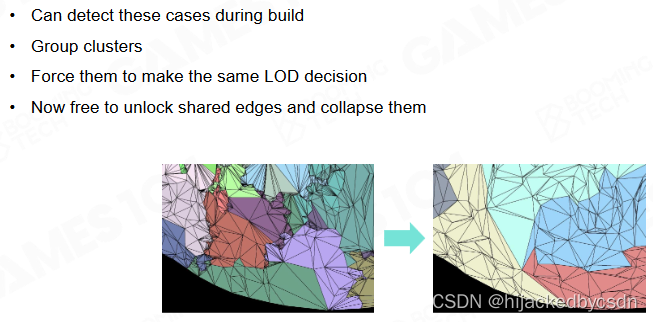
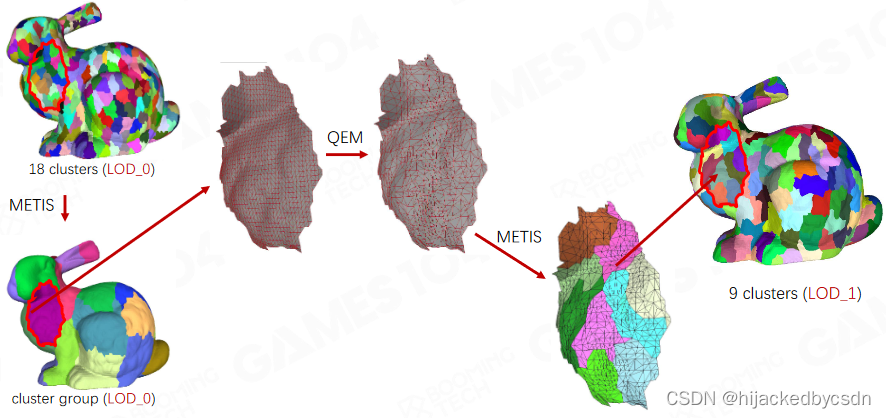
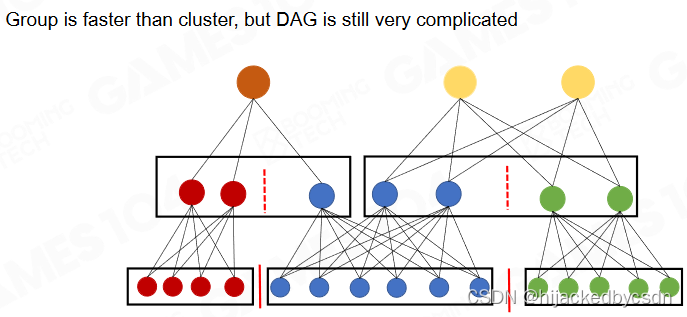
Nanite Solution
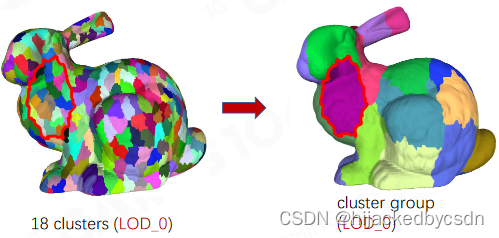
Cluster Group
Nanite 中提出了 cluster group 的概念来处理 cluster 之间的缝隙。cluster group 之间的边界会被锁住,而内部的 cluster 会在生成 LoD 时一起进行简化。
-
将一定数量的 Cluster 组成一个 Group,只锁 cluster group 的边,内部的 cluster 之间的边打碎简化
-
每个 Group 选择同样的 LoD 级别
-
简化后重新生成 cluster
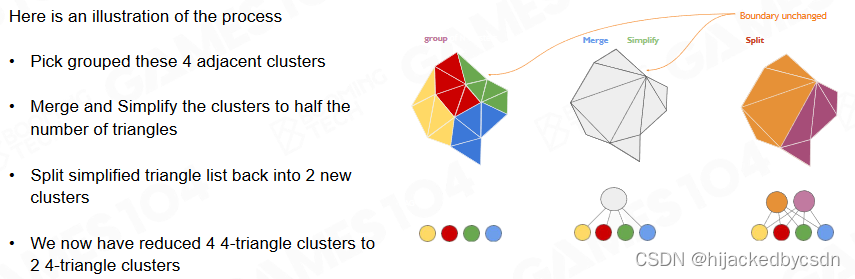
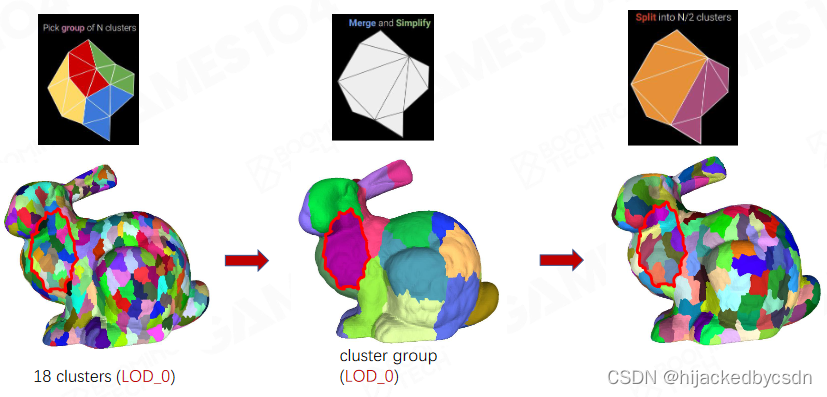
Build Operations
整个 cluster 简化的过程如下。需要注意的是简化后的 cluster 与原始 cluster 之间并不是一对多的关系,而是多对多的关系。即不同的简化后的 cluster 可以对应同一个原始 cluster。
每一级 LoD,选择的 Group 的边界是不保证一致的
这就是核心思想,这样就保证了 LOD 切换的时候没有一个持续存在的边界
例子:
1.Build Clusters
2.Simplification on Cluster Group
如图 Cluster Group 简化之后再分 cluster,新旧 cluster 之间是多对多的关系
Alternate Group Boundaries between Levels
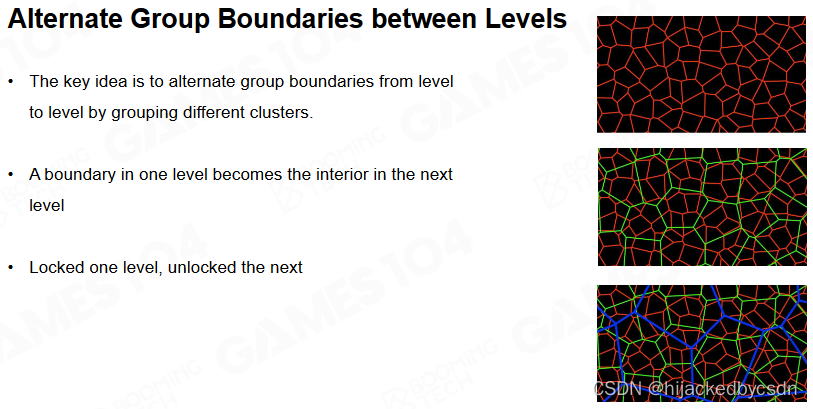
随着 LoD 的提高不同 cluster group 的边界也会发生相应的变化,这样可以避免出现高频噪声。
(不是 cluster 的边界,而是 cluster group 的边界)
类似 SSAO 采样 ray 的分布,每一个 pixel 都需要一个抖动,不然噪声会有一个 pattern
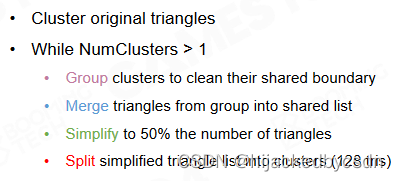
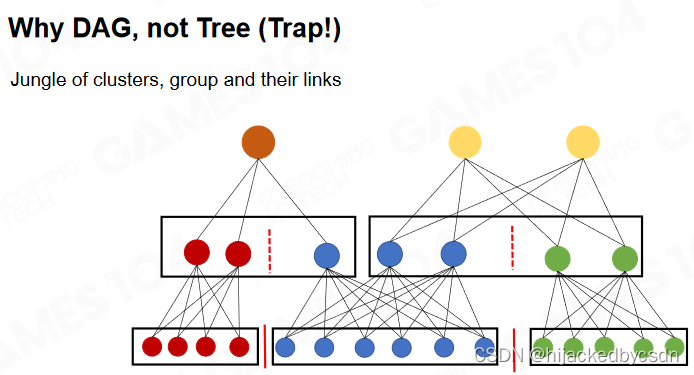
DAG for Cluster Groups
Cluster 组合成 Group,锁 Group 的边,简化 Group,Group 再划分 cluster,实际上是构建 DAG(有向无环图)的过程
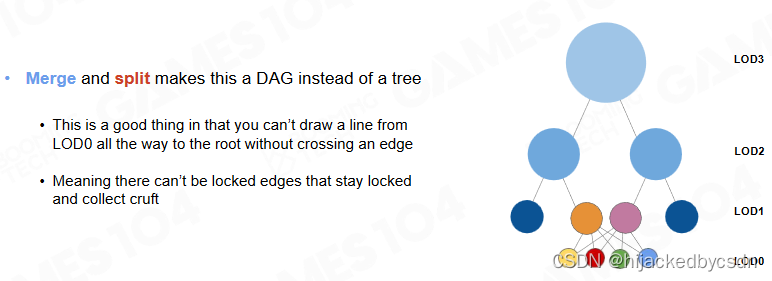
虽然这个图看上去很像一个树,但是当然不是树
新旧 cluster 之间是多对多的关系
一对多才是树
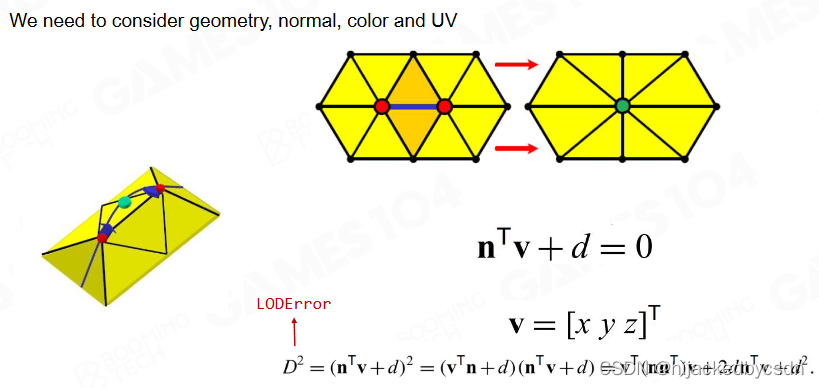
Detail of Simplification - QEM
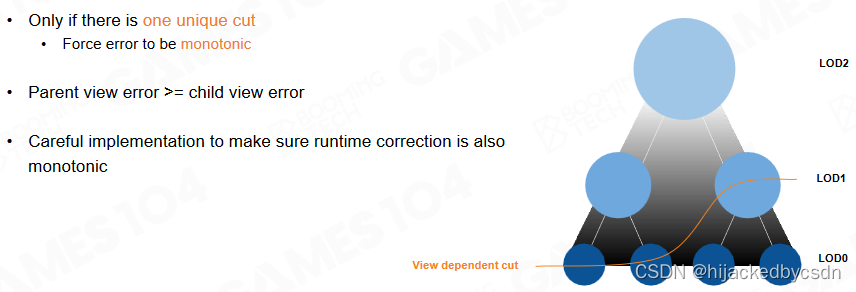
要保证每一次的 error 都是 sub pixel
要保证每一次 error 往上传递的时候是单向累加的,要有这个单调性
简化流程:
简化算法:
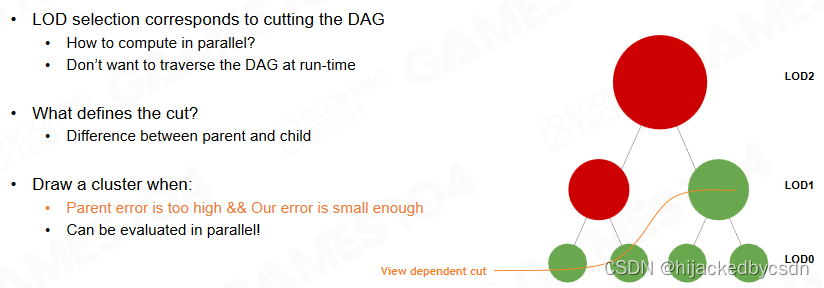
Runtime LoD Selection
View-Dependent LoD Selection on DAG?
从 DAG 的根节点(一个 cluster),根据 view 不断判断 error 够不够往下走
这里做了加速,把同一个 group 的 cluster 做成了一个虚拟节点
在这里遍历还是比较复杂
LOD Selection for Cluster Group
对于某些属于一个 group 的 cluster,如果 cluster group 要往下去绘制,那么所有的 cluster in the same group 都要画成低 LOD
如果我不是低 LOD 我就不画(啥意思……?)
LOD Selection in Parallel
希望决策是独立的,确定的
从树的根节点往下走也可以遍历 DAG,但是很难并行化,虽然之后也有一个这样的并行化方法
他把所有的节点拍平,变成一个列表,用这个方程去验证一遍列表中的每一个元素
把一个树的遍历变成了一个列表的遍历
这就使得每一个节点的 LOD 判断能够并行化地进行
树的访问效率会随着树的深度的增大而下降
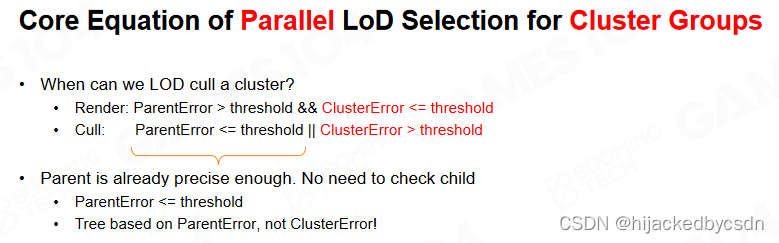
Render : ParentErr > threshold && ClusterErr <= threshold
Cull : ParentErr <= threshold || Cluster > threshold
若 Parent 已经足够精确,则无需再 Check Child
ParentErr <= threshold
Isolated LoD Selection for Each Cluster Group
每一次 LOD Selection 的单位是什么?是 Cluster 还是 Cluster Group
代码是,以 Cluster Group 为单位,但是又精准到每一个 Cluster
核心的想法是,每一次检测都是 Isolated 的
现在已经是把每一个 cluster group 变成了一个虚拟节点
把这些虚拟节点拍平
每一个节点存两种数据。第一组数据:Parent……
(应该是 parent error 和 cluster error?)
两个来自 LOD0 的 LOD1 中的 cluster 虽然分属于不同的 group,但是这两个 cluster 的 error 是一模一样的
因为在往上合并,简化,重划分 cluster 的过程中,新的 cluster 都是取的这个过程中最大的 error
这就使得每一个 cluster group 都可以产生独立的判断
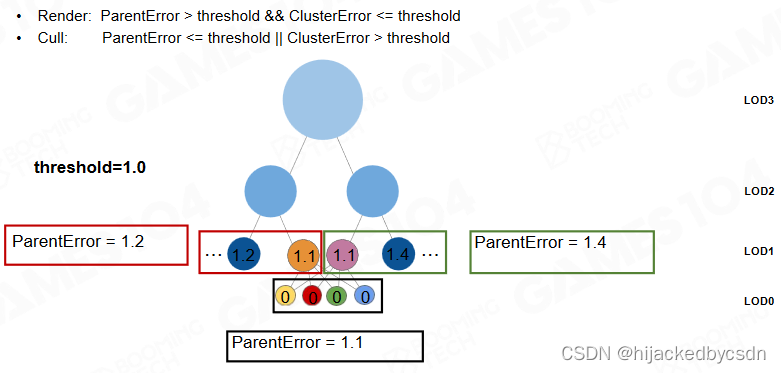
先判断 cluster group 的 parent error
然后 foreach cluster in cluster group,判断 cluster error 和 threshold
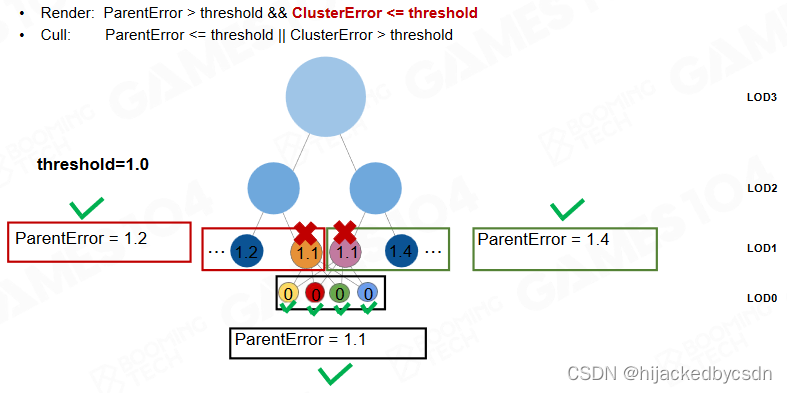
对于 LOD1 中橙色和紫色的点,parent error 分别是 1.2 1.4,大于 threshold,但是自身的 cluster error 都是 1.1 大于 threshold 不满足 render 的条件
一般的想法是,如果某一个 LOD 的 cluster 不 render,就去激活这个 cluster 的 children
但是这个想法就不是并行化的
每一个 cluster group 中的 cluster 只判断自己绘不绘制
每一个 Cluster Group 的每一次 LoD Selection 是独立的,不会“上一级没通过再看下一级”,他是把树拍平了
只要保证 error 向上传递是单调递增的,并且低等级的 LOD(例如 LOD0)的 parent error 一定等于高等级(例如 LOD1)的相应的 cluster 的 cluster error(就例如上图中的橙色和紫色点的 cluster error 等于孩子的 parent error = 1.1,error 向上传递,parent error 大于 1.1)
这个 LOD 决策并行化的方法是很有价值的
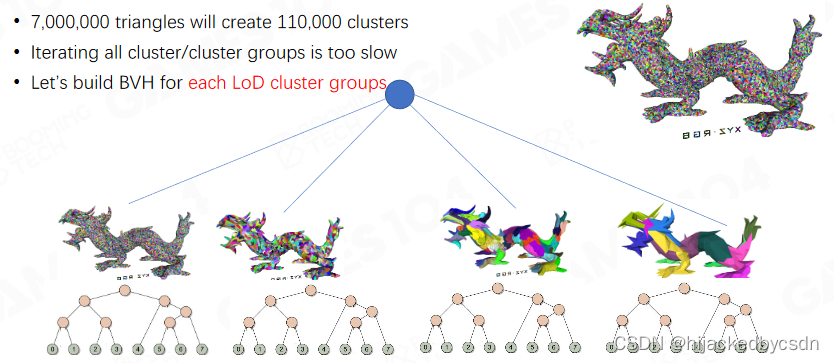
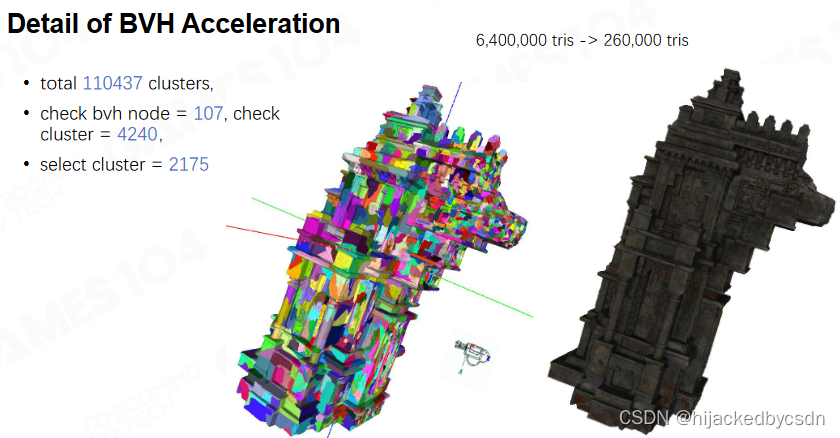
Modern Game Engine - Theory and Practice BVH Acceleration for LoD Selection
例如有 11 万个 cluster group 数量还是很大
Really Bad Explanation of Why and How about BVH
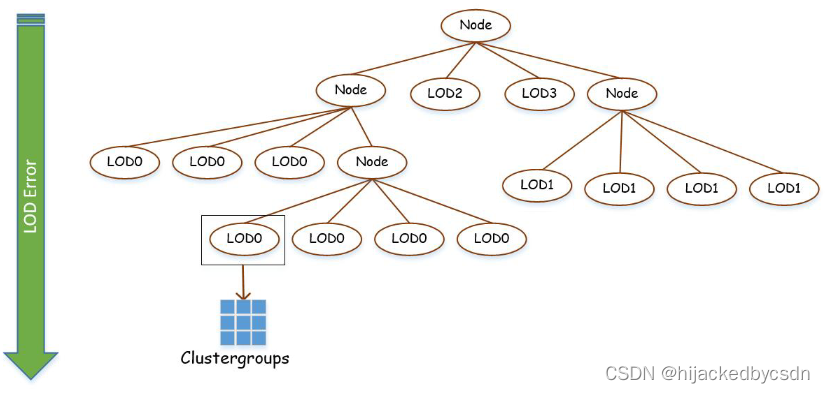
Build BVH for Acceleration of LoD Selection
所有的 LOD0 的 cluster group 可以形成一个 BVH 树,所有的 LOD1 的 cluster group 也可以,诸如此类
然后把每一个 LOD 的 cluster group 形成的 BVH 树再都连接到一个共同的节点
方便地取 BVH 的 Bounding,做相机剔除后再 Check,节省了非常多计算量
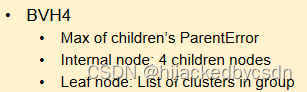
Balance BVH for 4 Nodes
尽可能变成平衡树
树的节点又变成了 cluster groups 而不是单个 cluster group
这也是关键的一步
Hierarchical Culling - Naive Approach
怎么遍历?传统方法是一层一层遍历
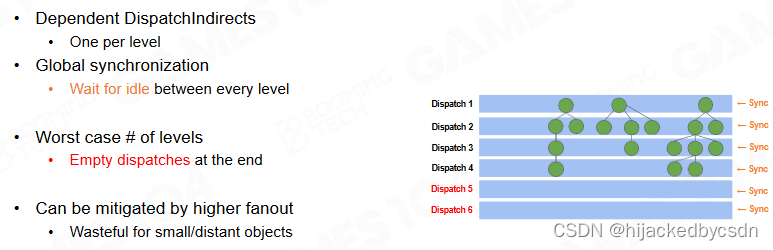
Persistent Threads
BVH 的构建过程还可以使用 job system 来进行加速。
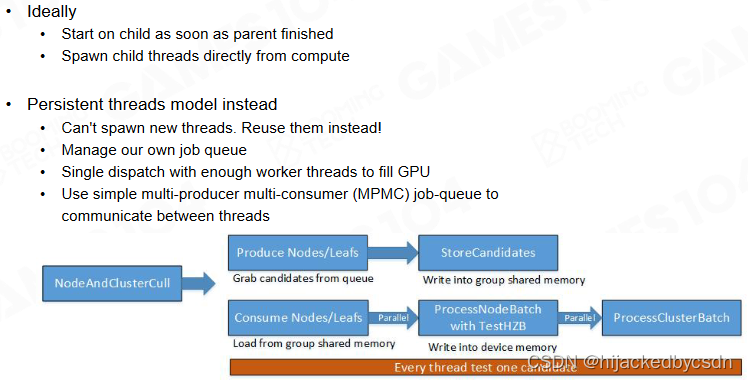
job system 就是理解为可以往 working thread 中一头放任务一头取任务
Nanite Rasterization
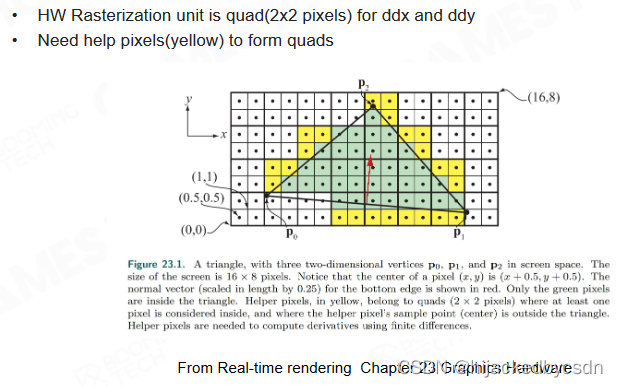
Hardware Rasterization
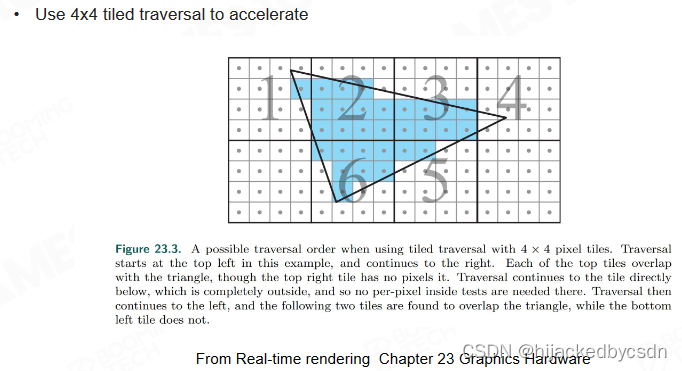
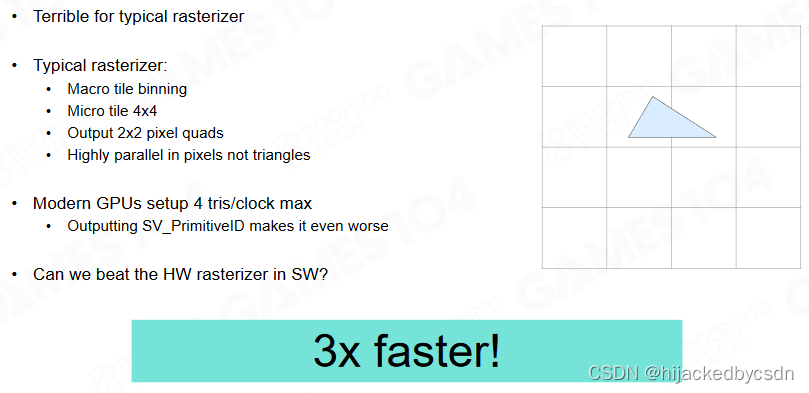
硬件光栅化:光栅化单元是 22 的 Quad(为了算 ddx 和 ddy),用 44 的 Tile 遍历加速,剔除不参与渲染的 Tile
Triangle 小到 1 个 pixel 的大小时 —— 上述优化均失效
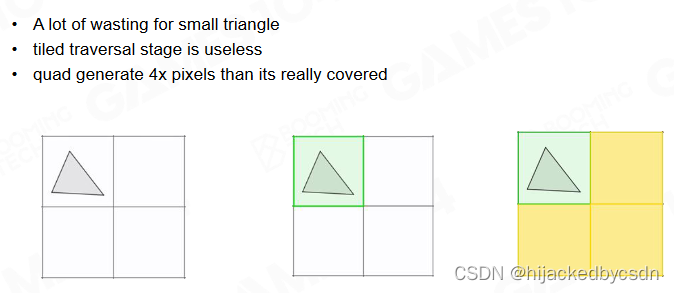
Software Rasterization for Tiny Triangles
传统光栅化对于小三角形的支持不够好,在 Nanite 中会结合 compute shader 来实现软光栅。
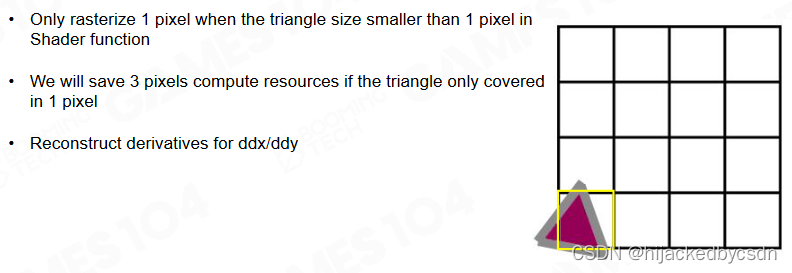
Nanite – Rasterization
Compute Shader 直接接管小三角形的光栅化
已知三角形的投影面积,如果小于一个 pixel,那么就只渲染一个 pixel
根据 uv 算出 ddx ddy
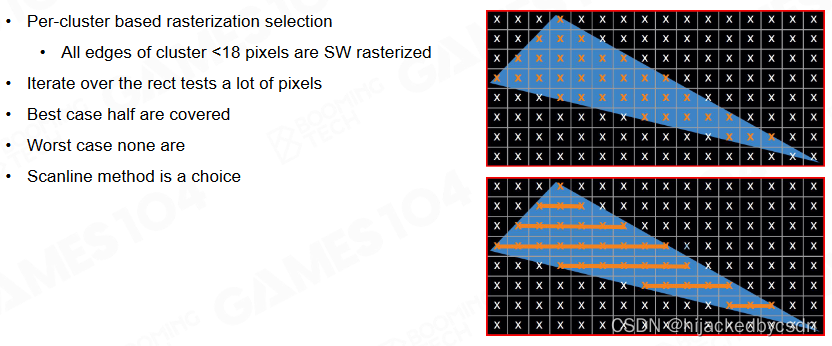
Scanline Software Rasterizer
若三角形边长小于 18pixel,则使用软件光栅化(Scanline),反之回到硬件光栅化
How To Do Depth Test?
对于重叠的三角形,传统的有 early-Z
那么软光栅怎么 early 地干掉重叠部分呢
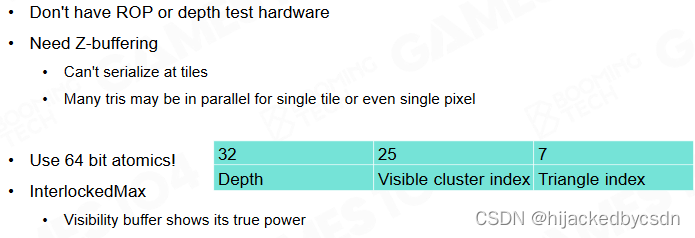
写了一个 64 bit 的原子操作
深度测试:存储 64bit 的 atomic 数据 —— 32bit Depth + 25bit Visible Cluster Index + 7bit Triangle Index (Visibility Buffer)
也就是手动模拟了 Z-test 的过程
Nanite Visibility Buffer
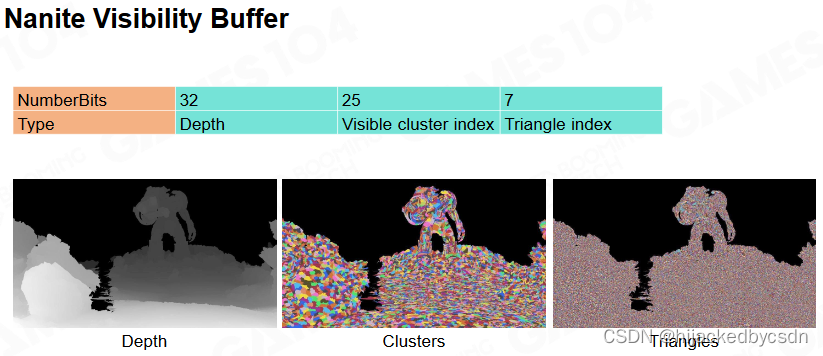
类似 V-Buffer,这个 64 位的数据写了几何信息
根据几何信息就能得到材质信息
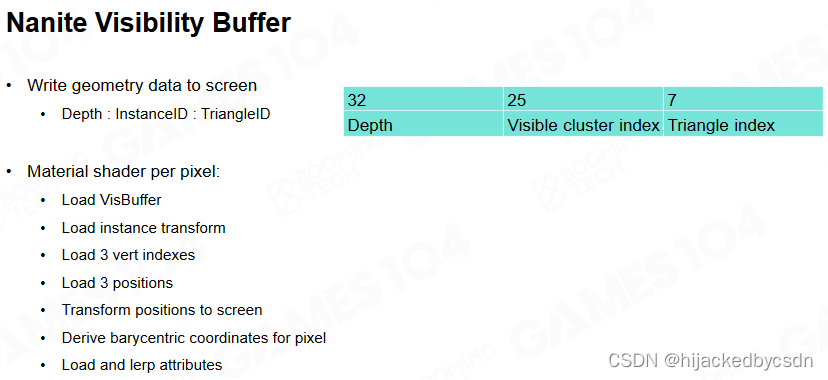
deferred shading 和 nanite 混合
Hardware Rasterization

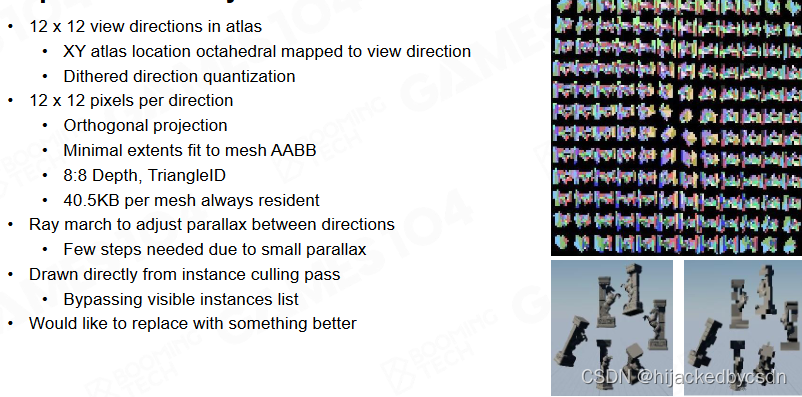
Imposters for Tiny Instances
足够远的时候 LOD 会不成样子,怎么办
Imposter:对足够远、足够小的 Instance,生成 1212 个方向的 1212 大小的各种贴图(Aldobe、Normal、…)
足够远的时候 nanite 不启动,直接用 imposter 来渲染,渲染结果也是对的
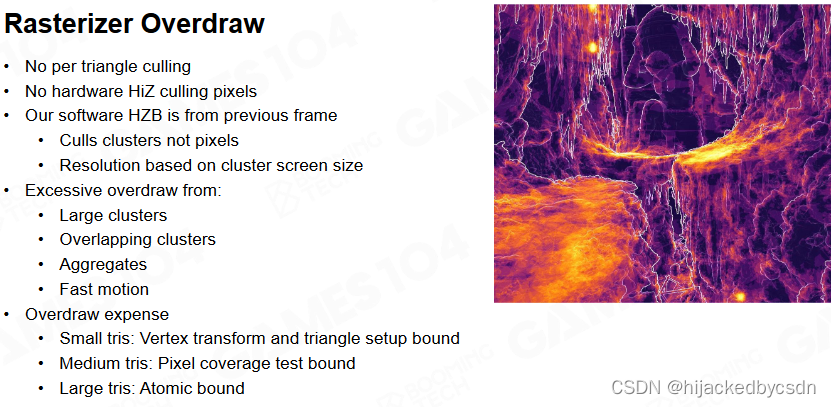
Rasterizer Overdraw
Overdraw:
-
没有逐像素剔除
-
没有硬件 HiZ 像素剔除
-
软件 HZB 来自上一帧
-
大 Cluster、重叠 Cluser、聚合、快速移动等带来的 Overdraw
-
…
Nanite Deferred Material
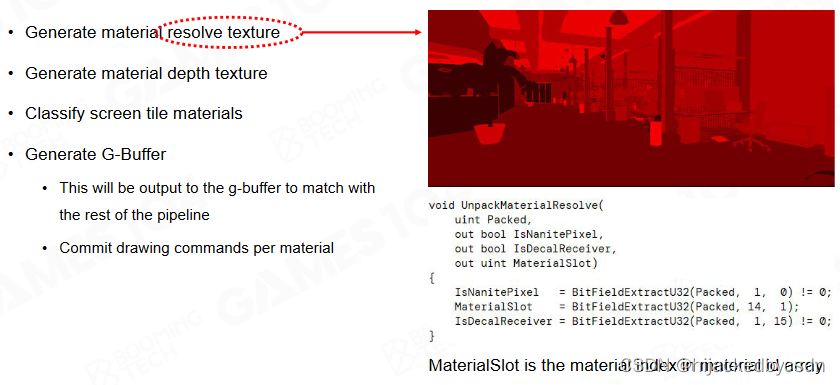
Deferred Material
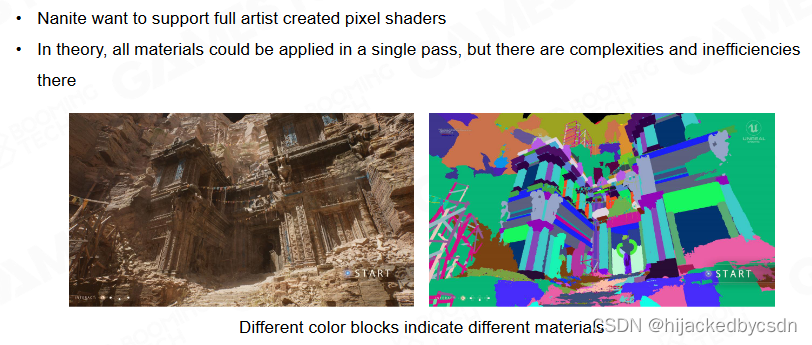
Material Shading
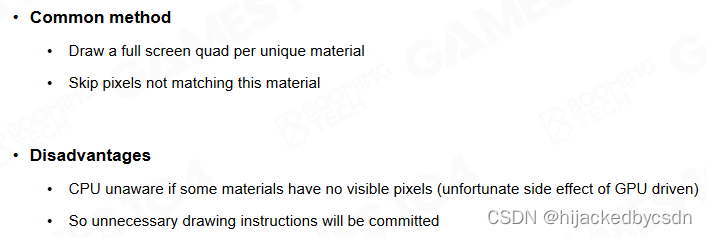
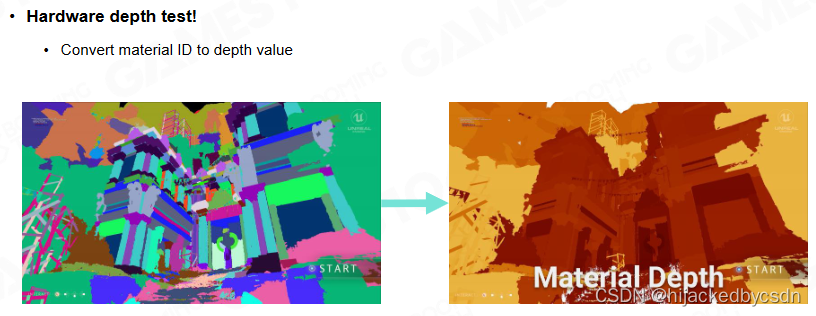
-
将每个 Material ID 转换为一个 Depth 值,记录为一张 Depth Buffer
-
扫描整张 Buffer,判断 Depth 与 Material ID 相等时,用对应 Material 绘制

消耗较大
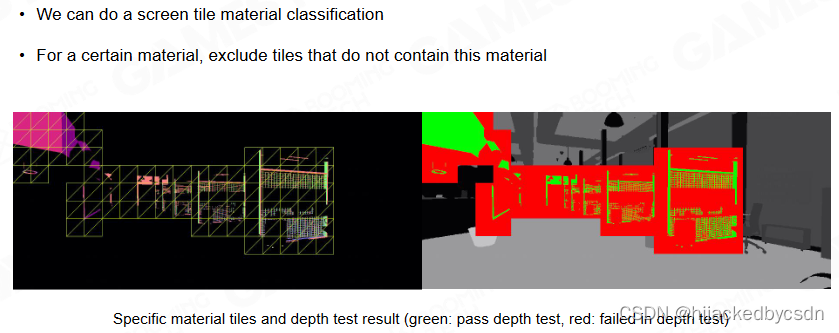
Material Sorting with Tile-Based Rendering
Tiled Based 的思想
使用 tile 来对材质分类:将全屏幕分为多个 Tile,标记每个材质是否在 Tile 中出现
对于某一种材质,排除掉那些不包含这个材质的 tile
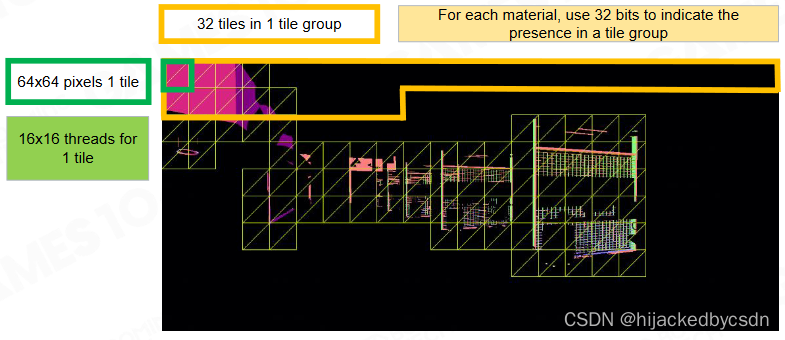
Material Classify - Material Tile Remap Table

将全屏幕分为多个 Tile,标记每个材质是否在 Tile 中出现
Deferred Material Overall Process
所以现代的渲染用 tile-based 很有优势
这里是材质,那么对于光源也是一样的道理
如果材质放入了 Virtual Texture 那么材质数量还可以进一步下降
Virtual Shadow Map
Micropoly Level Detail for Shadows
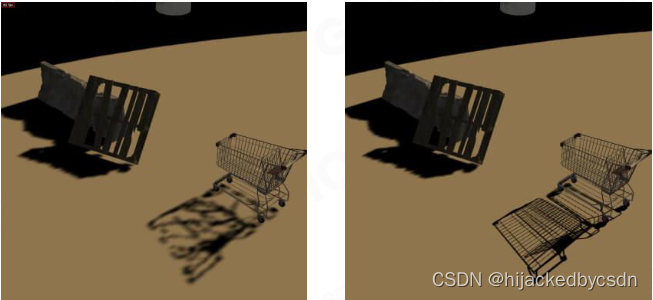
Nanite Shadows - Ray Trace
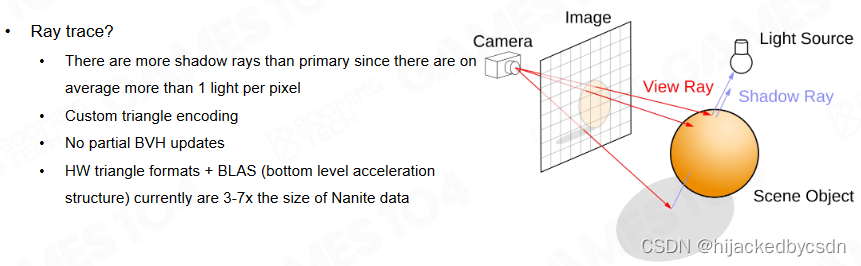
nanite 的几何表示比较复杂,没有办法在显卡中 ray tracing
Recap Cascaded Shadow Map
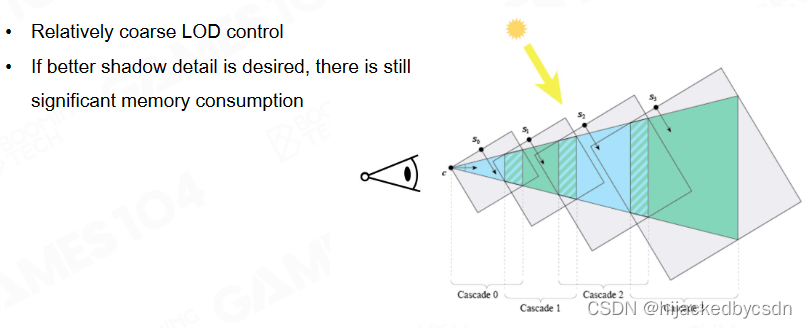
Cascaded Shadow Map 本质:View-dependent Sampling
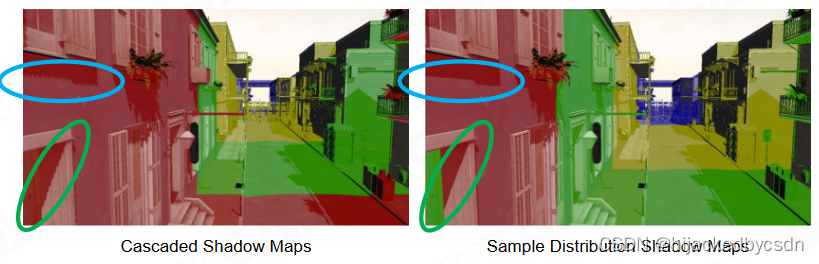
Sample Distribution Shadow Maps
相当于将 Cascaded Shadow Maps 中重复的、视锥外的像素去除的 Shadow Maps
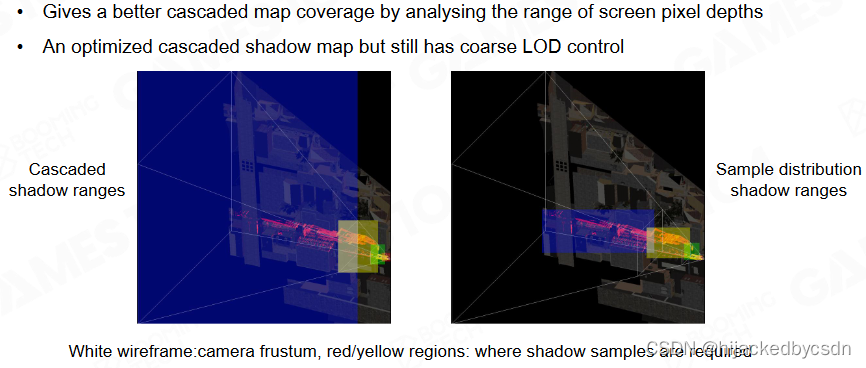
Shadow Map 的本质:根据相机视空间的精度,采样光空间
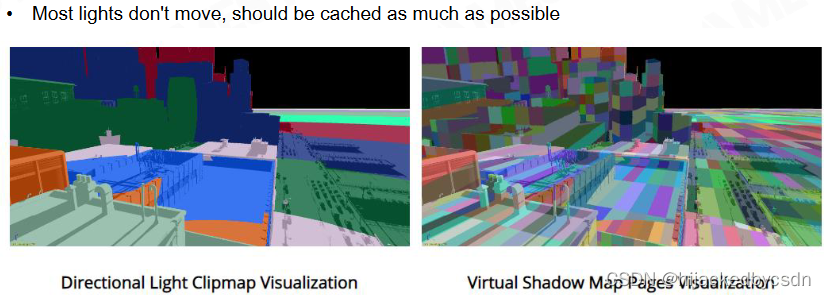
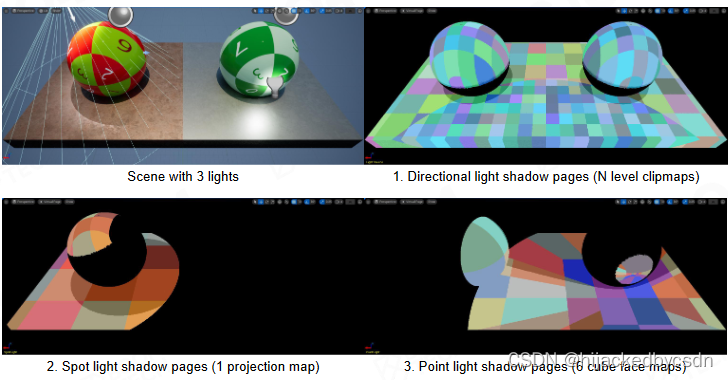
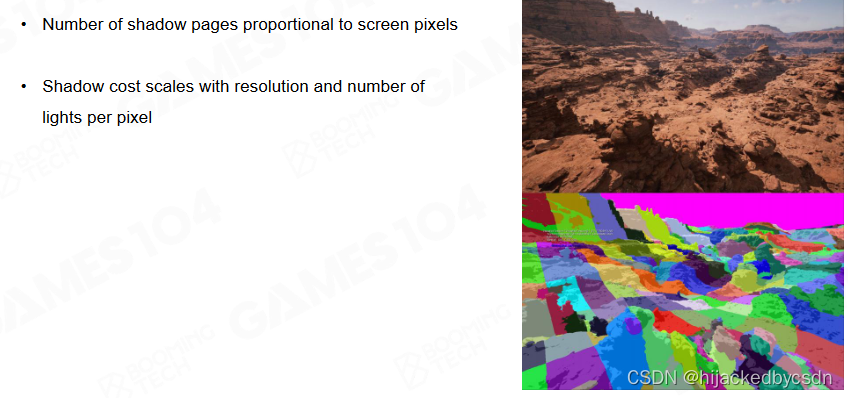
Virtual Shadow Map - A Cached Shadow System
近处采样率高,远处采样率高
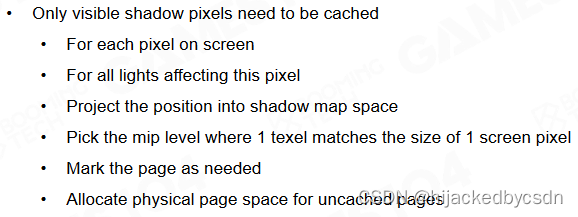
核心思想:将 Shadow Map 切成足够小的块,确保每一小块与视空间的采样率高度一直,且只更新产生光照变化的块
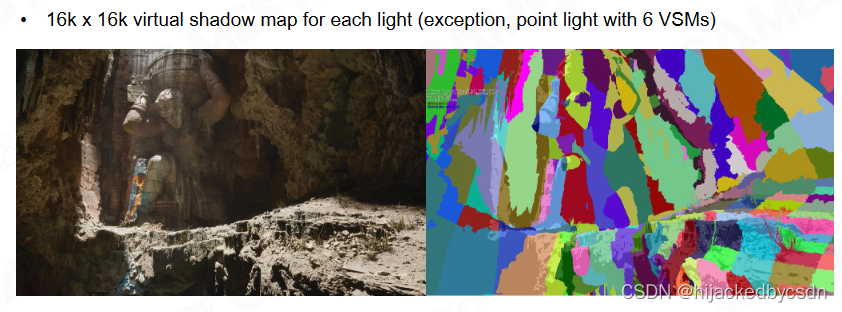
实际:给每个光源一张 16k 的 VSM(点光源为 6 个方向的 6 张),仅可见像素会被 Cache
相机运动、光照几何变化时,更新部分 Tile 即可
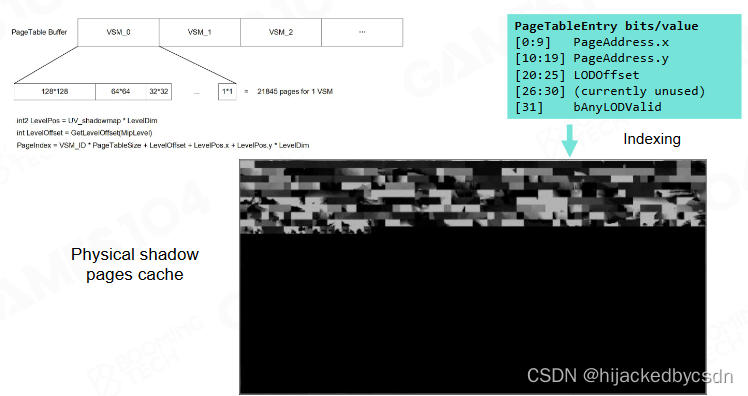
Shadow Page Allocation
当相机和光源都不变时我们可以把 shadow map 相关的信息写入 page 中方便下一帧读取。而如果相机和光源发生变化则只需更新一部分 page 即可。
当然这种 virtual shadow map 在场景光源发生变化时会出现一些问题,因此比较适合主光源不变的场景。
Shadow Page Cache Invalidation

Conclusions
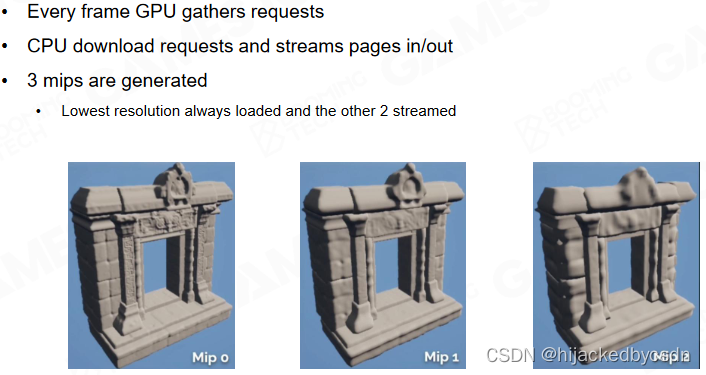
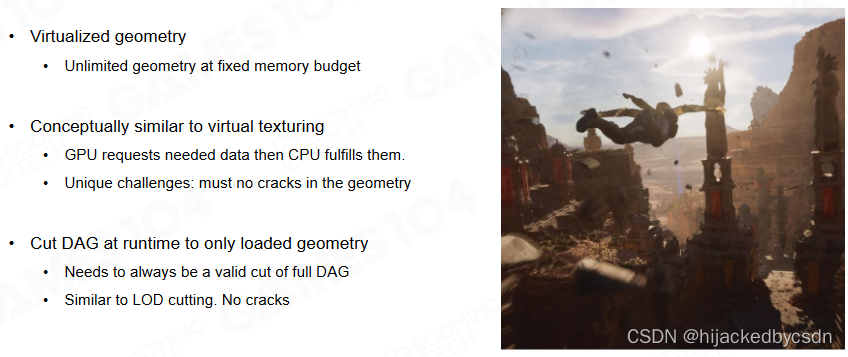
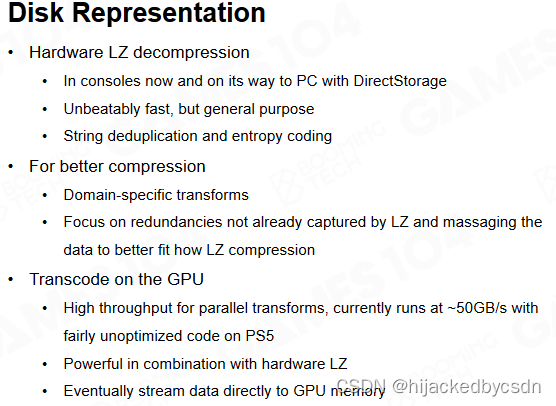
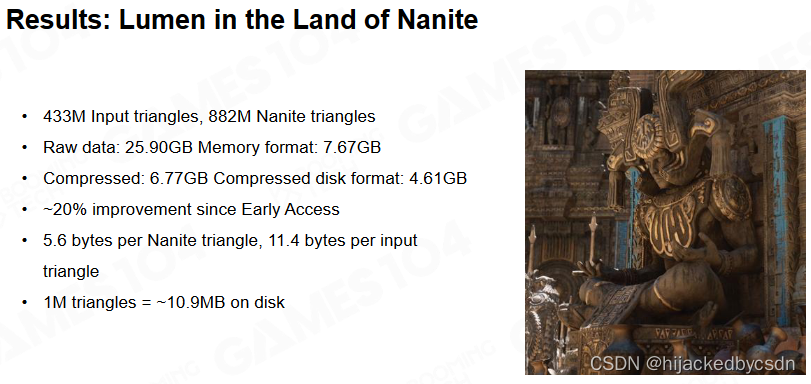
Streaming and Compression
Streaming
流送的核心:只 Load 需要的数据到内存中
构建成逐个 Page,动态加载
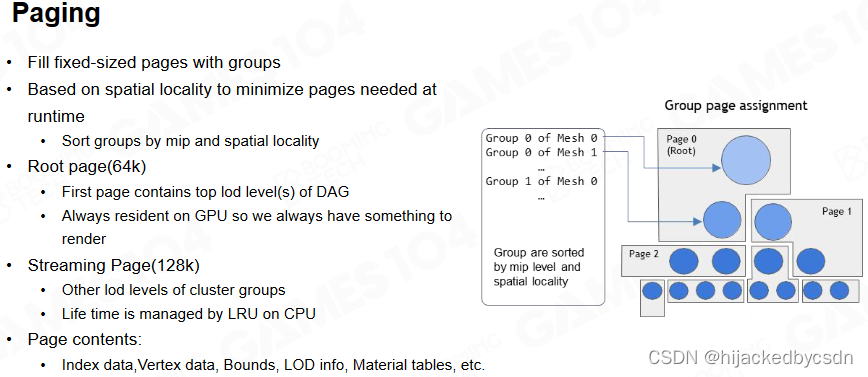
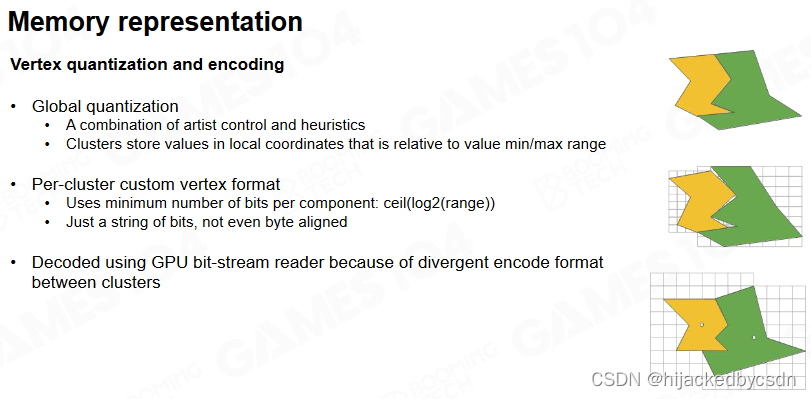
Compression
内存数据:Quantization
- 浮点变定点等
硬盘数据
-
LZ Compression
-
显存加载自动解压缩
参考资料
• The Nanite 2021:
https://advances.realtimerendering.com/s2021/Karis_Nanite_SIGGRAPH_Advances_2021_final
• Journey to Nanite: https://www.highperformancegraphics.org/slides22/Journey_to_Nanite
• GPU-Driven Rendering Pipelines:
https://advances.realtimerendering.com/s2015/aaltonenhaar_siggraph2015_combined_final
• The Visibility Buffer: A Cache-Friendly Approach to Deferred Shading
https://jcgt.org/published/0002/02/04/
• The filtered and culled Visibility Buffer: http://www.conffx.com/Visibility_Buffer_GDCE
• Optimizing the Graphics Pipeline with Compute: https://frostbite-wp-prd.s3.amazonaws.com/wp-
content/uploads/2016/03/


 846
846

 被折叠的 条评论
为什么被折叠?
被折叠的 条评论
为什么被折叠?
 到【灌水乐园】发言


