本文系 学习 DirectX tutorial 笔记 ,原文及代码参考 directxtutorial.com/Lesson.aspx?lessonid=9-4-4
//------------------------------------------------------------------------------------------------------------------------------------------
初始化
DirectX是一系列COM 对象,其中一种是Direct3D,其创建释放也比较简单
d3d->CreateDevice()
d3d->Release()
Swap Chain and Page Swapping
Direct3D 先是把图像画到后台缓存(back buffer),然后根据后台缓存更新前台缓存(front buffer)。不断的交换两buffer,可以快速的
显示图片。
The Basic Direct3D Program
1. 创建全局变量以及函数原型;
2. 创建D3D初始化程序;
3. 创建render frame函数;
4. 关闭释放资源
// include the basic windows header files and the Direct3D header file
#include <windows.h>
#include <windowsx.h>
#include <d3d9.h>
// include the Direct3D Library file
#pragma comment (lib, "d3d9.lib")
// global declarations
LPDIRECT3D9 d3d;    // the pointer to our Direct3D interface
LPDIRECT3DDEVICE9 d3ddev;    // the pointer to the device class
// function prototypes
void initD3D(HWND hWnd);    // sets up and initializes Direct3D
void render_frame(void);    // renders a single frame
void cleanD3D(void);    // closes Direct3D and releases memory
// the WindowProc function prototype
LRESULT CALLBACK WindowProc(HWND hWnd, UINT message, WPARAM wParam, LPARAM lParam);
其中
D3D初始化
// this function initializes and prepares Direct3D for use
void initD3D(HWND hWnd)
{
    d3d = Direct3DCreate9(D3D_SDK_VERSION);    // create the Direct3D interface
    D3DPRESENT_PARAMETERS d3dpp;    // create a struct to hold various device information
    ZeroMemory(&d3dpp, sizeof(d3dpp));    // clear out the struct for use
    d3dpp.Windowed = TRUE;    // program windowed, not fullscreen
    d3dpp.SwapEffect = D3DSWAPEFFECT_DISCARD;    // discard old frames
    d3dpp.hDeviceWindow = hWnd;    // set the window to be used by Direct3D
    // create a device class using this information and information from the d3dpp stuct
    d3d->CreateDevice(D3DADAPTER_DEFAULT,   //Adapter,
                      D3DDEVTYPE_HAL,                 //Device Type
                      hWnd,
                      D3DCREATE_SOFTWARE_VERTEXPROCESSING,
                      &d3dpp,                         // D3DPRESENT_PARAMETERS
                      &d3ddev);
}
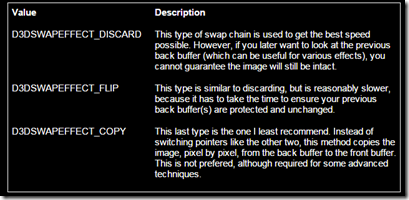
关于swapEffect ,定义使用的交换链类型,有三种交换链
createDevice()
Flexible Vertex Formats
Direct3D使用灵活顶点格式Flexible Vertex Format(FVF),可以按需要进行修改。在定义顶点格式时,常包含顶点的location以及
diffuse color。比如我们可以定义
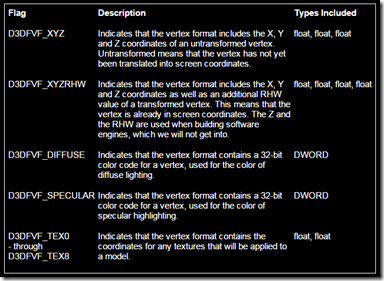
#define CUSTOMFVF (D3DFVF_XYZRHW | D3DFVF_DIFFUSE) 我们在书写灵活顶点改格式要按这个顺序来 顶点位置信息>RHW值>顶点混合权重>顶点法向量>漫反射颜色>镜面反射>纹理坐标
在Direct3D中常用的FVF格式取如下表格
根据上面的定义的 CUMSTOMFVF,我们可以创建如下的顶点格式
struct CUSTOMVERTEX
{
    FLOAT x, y, z, rhw;    // from the D3DFVF_XYZRHW flag
    DWORD color;    // from the D3DFVF_DIFFUSE flag
}
创建三角形的三个顶点
CUSTOMVERTEX OurVertices[] =
{
    {320.0f, 50.0f, 1.0f, 1.0f, D3DCOLOR_XRGB(0, 0, 255),},
    {520.0f, 400.0f, 1.0f, 1.0f, D3DCOLOR_XRGB(0, 255, 0),},
    {120.0f, 400.0f, 1.0f, 1.0f, D3DCOLOR_XRGB(255, 0, 0),},
};
随后,顶点缓存, 顶点缓存是存储游戏中的顶点/模型接口。通常使用CreateVertexBuffer()。其函数的定义如下所示
HRESULT CreateVertexBuffer(
    UINT Length,             //the size of the buffer
    DWORD Usage,       //sometimes there are special ways to use vertices
    DWORD FVF,            //this is the FVF code we constructed earlier
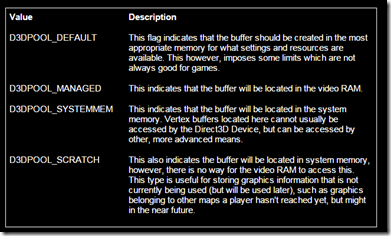
    D3DPOOL Pool,      //where to create  the vertex buffer and how
    LPDIRECT3DVERTEXBUFFER9 ppVertexBuffer,
    HANDLE* pSharedHandle);     //“Reserved, set this parameter to NULL ”
根据该函数定义,我们可以定义出程序需要的顶点缓存如下:
LPDIRECT3DVERTEXBUFFER9 v_buffer;
d3ddev->CreateVertexBuffer(3*sizeof(CUSTOMVERTEX),
                           0,
                           CUSTOMFVF,
                           D3DPOOL_MANAGED,
                           &v_buffer,
                           NULL);
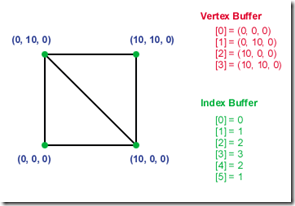
当模型很复杂、顶点数量很大时,我们需要使用索引缓存,其原理也很简单,如下所示(图片来自 google),我们可以用4个顶点,6个索引表示一个正方形
为保证顶点缓存完好不可为其他程序修改,我们需要lock,
HRESULT Lock(UINT OffsetToLock,
             UINT SizeToLock,            //if only want to lock part,tell how bytes far should start
             VOID** ppbData,           // void*
             DWORD Flags);
VOID* pVoid;    // the void* we were talking about
v_buffer->Lock(0, 0, (void**)&pVoid, 0);    // locks v_buffer, the buffer we made earlier
拷贝顶点到顶点缓存,拷贝完,可以解锁,从而对该部分进行操作
memcpy(pVoid, OurVertices, sizeof(OurVertices)); // copy vertices to the vertex buffer最终的程序段即是如下:
void init_graphics(void)
{
    // create three vertices using the CUSTOMVERTEX struct built earlier
    CUSTOMVERTEX vertices[] =
    {
        { 320.0f, 50.0f, 0.5f, 1.0f, D3DCOLOR_XRGB(0, 0, 255), },
        { 520.0f, 400.0f, 0.5f, 1.0f, D3DCOLOR_XRGB(0, 255, 0), },
        { 120.0f, 400.0f, 0.5f, 1.0f, D3DCOLOR_XRGB(255, 0, 0), },
    };
    // create the vertex and store the pointer into v_buffer, which is created globally
    d3ddev->CreateVertexBuffer(3*sizeof(CUSTOMVERTEX),
                               0,
                               CUSTOMFVF,
                               D3DPOOL_MANAGED,
                               &v_buffer,
                               NULL);
    VOID* pVoid;    // the void pointer
    v_buffer->Lock(0, 0, (void**)&pVoid, 0);    // lock the vertex buffer
    memcpy(pVoid, vertices, sizeof(vertices));    // copy the vertices to the locked buffer
    v_buffer->Unlock();    // unlock the vertex buffer
}
Drawing the primitive
在开始画之前,需要认识这三个函数
setFVF() 告诉D3D 使用什么FVF,因为我们可以定义不同的顶点格式。
SetStreamSource()
HRESULT SetStreamSource(UINT StreamNumber,        //which vertex buffer we are drawing from
                        LPDIRECT3DVERTEXBUFFER9 pStreamData,    // pointer to the vertex buffer we create earlier
                        UINT OffsetInBytes,                  //the number of bytes into the vertex buffer we should start from
                        UINT Stride);                          // the size of each vertex
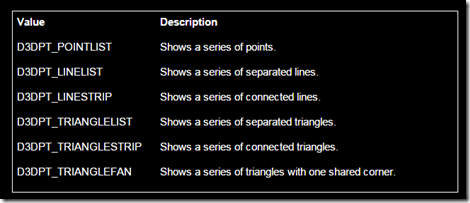
DrawPrimitive()
HRESULT DrawPrimitive(D3DPRIMITIVETYPE PrimitiveType,    // type of primitive that is used
                      UINT StartVertex,                            // the number of first vertex we will put on the screen
                      UINT PrimitiveCount);
最后释放资源:
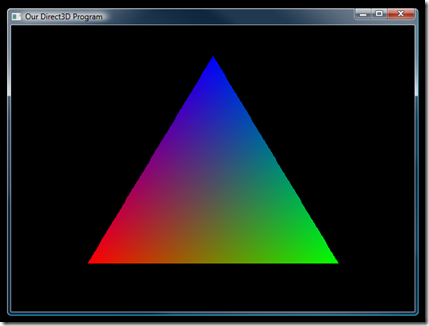
最后画出来的就是这样的了:




 1015
1015

 被折叠的 条评论
为什么被折叠?


