模型速度与计算量分析
模型速度与计算量分析这里介绍两个工具:
1、Pytorch自带的API:torch.autograd.profiler,分析每个算子的速度
2、flops-counter:计算参数量和MAC(计算卷积神经网络中参数的数量和打印给定网络的每层计算成本)
1、torch.autograd.profiler
torch.autograd.profiler.profile(enabled=True,use_cuda=False,record_shapes=False,with_flops=False,profile_memory=False,with_stack=False,use_kineto=False,use_cpu=True)
enabled:将当前上下文设置为no-op操作
use_cuda:是否使用GPU
record_shapes:是否收集形状信息
with_flops:是否统计flops
profile_memory:是否追踪内存使用情况
with_stack:收集其他信息,如文件与行数
use_kineto:是否kineto
use_cpu:统计CPU事件
下面是具体的实例:
网络:(这个网络是三层网络,输入图片大小为:3X48X48的)
import torch
import torch.nn as nn
import torch.nn.functional as F
import numpy as np


class simpleconv3(nn.Module):
    def __init__(self,nclass):
        super(simpleconv3,self).__init__()
        self.conv1 = nn.Conv2d(3, 12, 3, 2)
        self.bn1 = nn.BatchNorm2d(12)
        self.conv2 = nn.Conv2d(12, 24, 3, 2)
        self.bn2 = nn.BatchNorm2d(24)
        self.conv3 = nn.Conv2d(24, 48, 3, 2)
        self.bn3 = nn.BatchNorm2d(48)
        self.fc1 = nn.Linear(48 * 5 * 5 , 1200)
        self.fc2 = nn.Linear(1200 , 128)
        self.fc3 = nn.Linear(128 , nclass)

    def forward(self , x):
        # print(x.shape)
        x = F.relu(self.bn1(self.conv1(x)))
        # print(x.shape)
        #print "bn1 shape",x.shape
        x = F.relu(self.bn2(self.conv2(x)))
        # print(x.shape)
        x = F.relu(self.bn3(self.conv3(x)))
        # print(x.shape)
        x = x.view(-1 , 48 * 5 * 5)
        x = F.relu(self.fc1(x))
        x = F.relu(self.fc2(x))
        x = self.fc3(x)
        return x
torch.autograd.profiler(这里可以使用GPU也可以使用CPU,改变use_cuda即可)
if __name__ == '__main__':
    model = simpleconv3(2)
    device = torch.device('cuda')
    model.eval()
    model.to(device)
    dump_input = torch.rand(1,3,48,48).to(device)
    with torch.autograd.profiler.profile(enabled=True, use_cuda=False, record_shapes=False, profile_memory=False) as prof:
        outputs = model(dump_input)
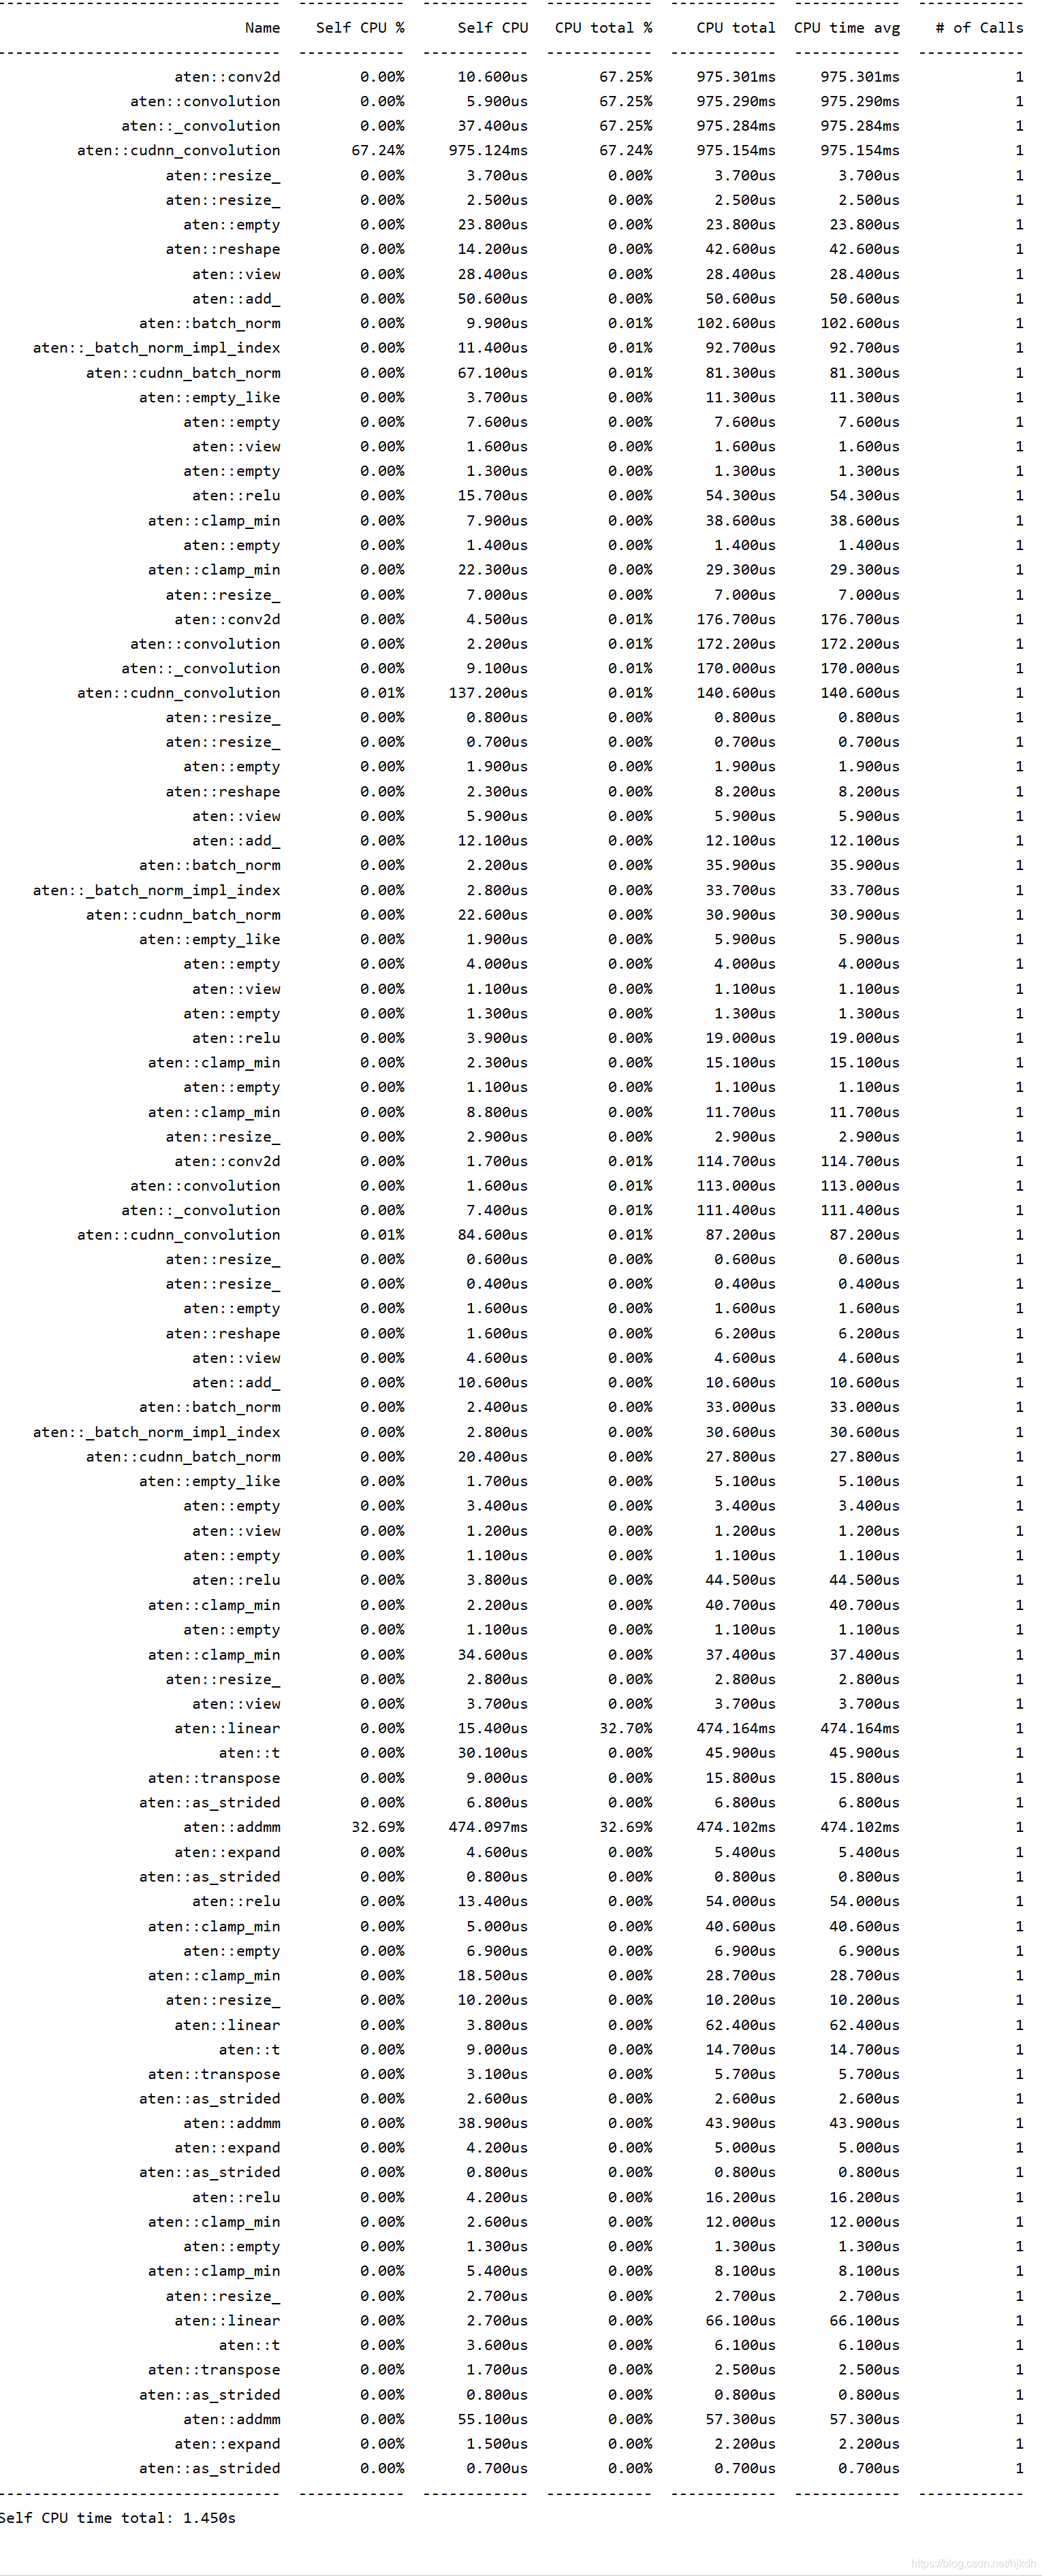
    print(prof.table())
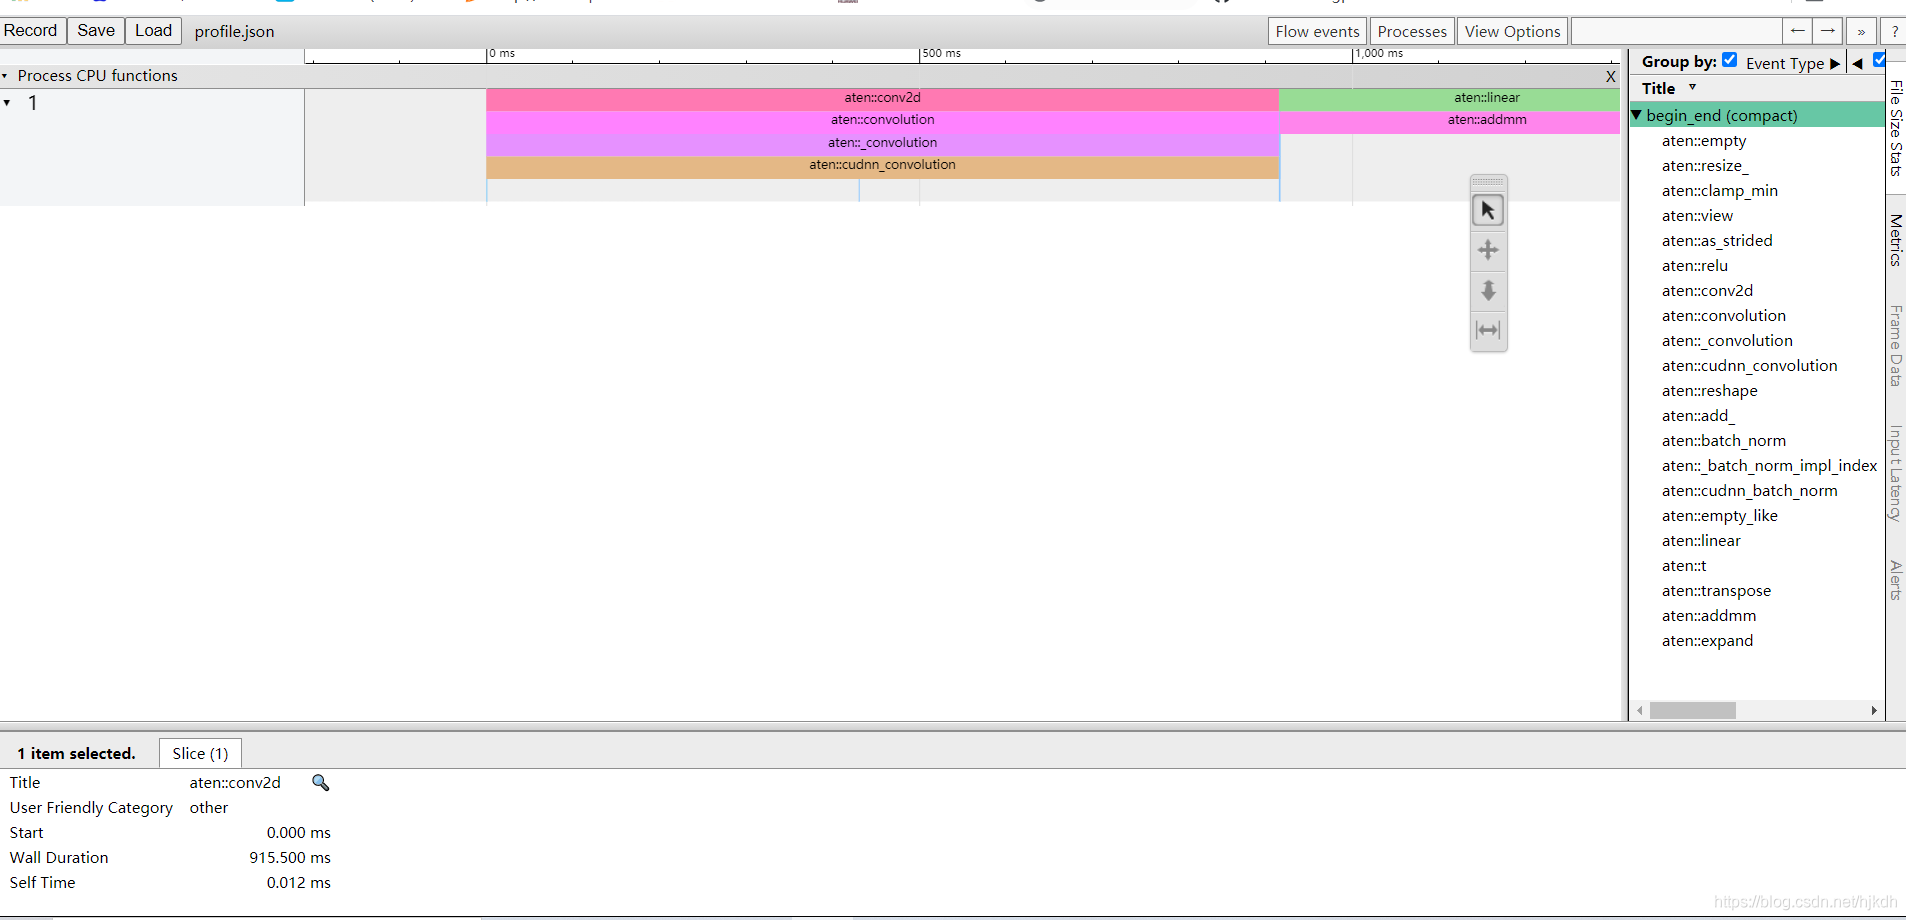
    prof.export_chrome_trace('profile.json') #将其保存在profile.json文件中。
结果:

浏览器中打开chrome://tracing/,然后Load所保存的模型(profile.json)结果如图所示

2、flops-counter
参考如下链接:
github链接
pip install ptflops
from ptflops import get_model_complexity_info
with torch.cuda.device(0):
  net = simpleconv3(2)
  macs, params = get_model_complexity_info(net, (3, 48, 48), as_strings=True,
                                           print_per_layer_stat=True, verbose=True)
  print('{:<30}  {:<8}'.format('Computational complexity: ', macs))
  print('{:<30}  {:<8}'.format('Number of parameters: ', params))
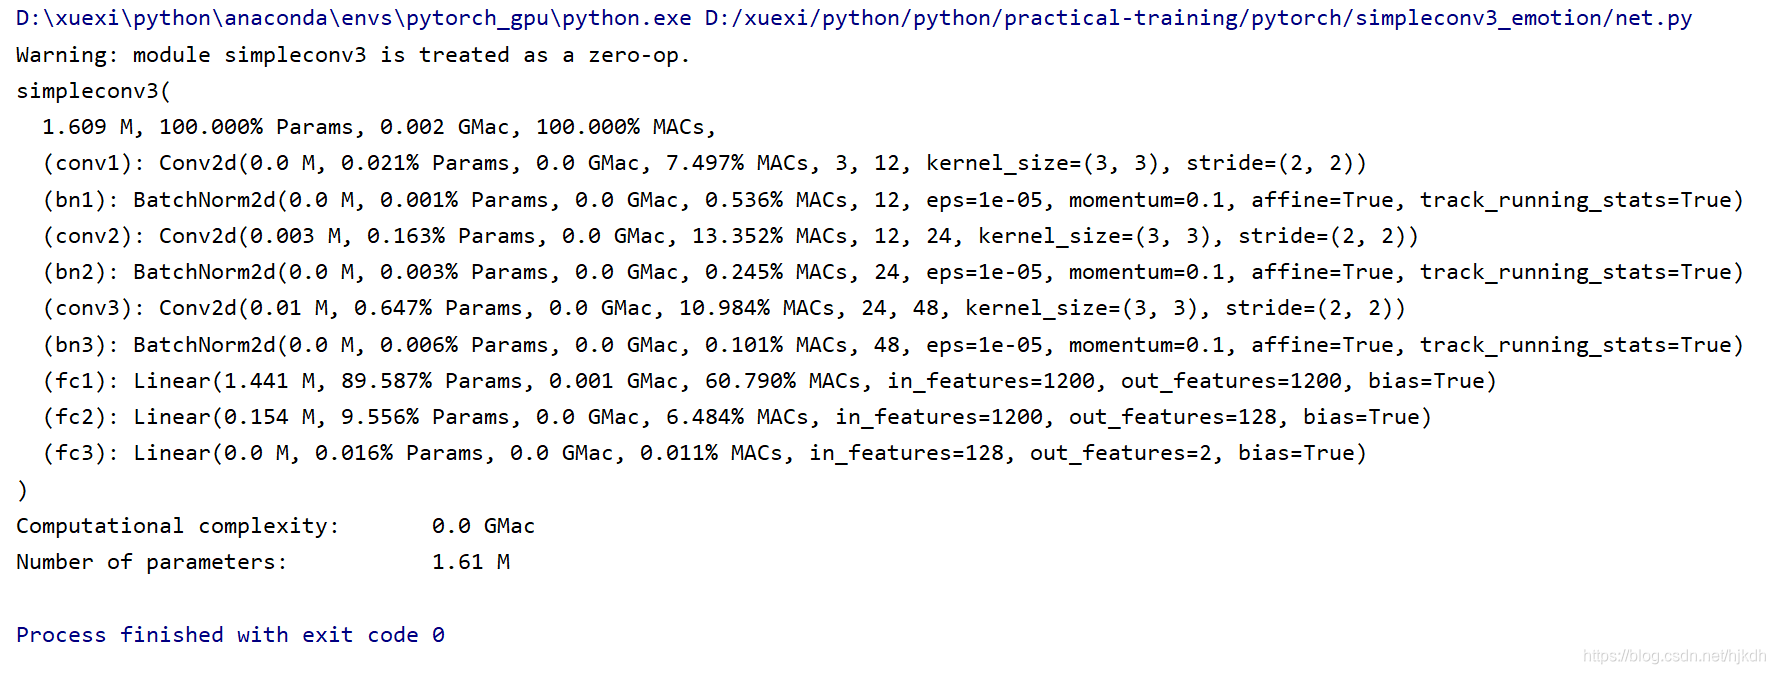
结果:

从图中可以看到,simpleconv3在输入图像尺寸为(3, 48, 48)的情况下将会产生1.609MB的参数,算力消耗为0.002 G,同时打印出了每个层所占用的算力,权重参数数量。模型的算力大小与模型大小也被存到了变量ops与params中。


 本文介绍了如何使用Pytorch的torch.autograd.profiler和flops-counter工具来分析深度学习模型的速度和计算量。通过一个简单的三层卷积网络示例,展示了如何在CPU或GPU上进行性能剖析,并导出详细的性能报告。此外,还利用flops-counter计算了模型的参数数量和MACs,提供了每层的详细信息,帮助理解模型的资源需求。


 6290
6290

 被折叠的 条评论
为什么被折叠?


