


五一假期个人不完全翻译,主要针对Ubuntu及使用自己的数据集训练的需求。
原作
论文 Yolo v4: https://arxiv.org/abs/2004.10934
更多细节: http://pjreddie.com/darknet/yolo/

如何在COCO的评价服务器上评估YOLO-V4的AP
1.下载解压 test-dev2017 dataset 从 MS COCO server: http://images.cocodataset.org/zips/test2017.zip
2. 下载图片( for Detection taks) 列表并替换成自己的路径: https://raw.githubusercontent.com/AlexeyAB/darknet/master/scripts/testdev2017.txt
3.下载权重文件 yolov4.weights file: https://drive.google.com/open?id=1cewMfusmPjYWbrnuJRuKhPMwRe_b9PaT
4.该 cfg/coco.data 文件内容应该是
classes= 80
train  = <replace with your path>/trainvalno5k.txt
valid = <replace with your path>/testdev2017.txt
names = data/coco.names
backup = backup
eval=coco
5.创建同级文件夹 Create /results/ folder near with ./darknet executable file
6. 运行命令: ./darknet detector valid cfg/coco.data cfg/yolov4.cfg yolov4.weights
7.重命名文件 /results/coco_results.json to detections_test-dev2017_yolov4_results.json并压缩 detections_test-dev2017_yolov4_results.zip
8. 提价文件 detections_test-dev2017_yolov4_results.zip 到MS COCO evaluation server for the test-dev2019 (bbox)
如何评估使用了GPU的YOLOv4的FPS
- 编译 Darknet 用
GPU=1 CUDNN=1 CUDNN_HALF=1 OPENCV=1在Makefile(or use the same settings with Cmake)
2.下载权重文件yolov4.weightsfile 245 MB: yolov4.weights (Google-drive网盘 镜像 yolov4.weights ) - 获得得任何一个
.avi或.mp4视频文件 (大小<= 1920x1080 to 避免GPU性能瓶颈) - 运行下面两个命令的一个来观察 AVG FPS:
- 有 video_capturing + NMS + drawing_bboxes:
./darknet detector demo cfg/coco.data cfg/yolov4.cfg yolov4.weights test.mp4 -dont_show -ext_output - 没有 video_capturing + NMS + drawing_bboxes:
./darknet detector demo cfg/coco.data cfg/yolov4.cfg yolov4.weights test.mp4 -benchmark
Pre-trained 模型
对不同的cfg文件有一些权重文件 (trained for MS COCO dataset):
FPS on RTX 2070 ® and Tesla V100 (V):
-
yolov4.cfg - 245 MB: yolov4.weights (网盘镜像 yolov4.weights ) paper Yolo v4
仅需改变width=和height=参数在yolov4.cfg文件并且在以下情况下使用相同的yolov4.weights文件:width=608 height=608在 cfg: 65.7% mAP@0.5 (43.5% AP@0.5:0.95) - 34® FPS / 62(V) FPS - 128.5 BFlopswidth=512 height=512在cfg: 64.9% mAP@0.5 (43.0% AP@0.5:0.95) - 45® FPS / 83(V) FPS - 91.1 BFlopswidth=416 height=416in cfg: 62.8% mAP@0.5 (41.2% AP@0.5:0.95) - 55® FPS / 96(V) FPS - 60.1 BFlopswidth=320 height=320in cfg: 60% mAP@0.5 ( 38% AP@0.5:0.95) - 63® FPS / 123(V) FPS - 35.5 BFlops
-
yolov3-tiny-prn.cfg - 33.1% mAP@0.5 - 370® FPS - 3.5 BFlops - 18.8 MB: yolov3-tiny-prn.weights
-
enet-coco.cfg (EfficientNetB0-Yolov3) - 45.5% mAP@0.5 - 55® FPS - 3.7 BFlops - 18.3 MB: enetb0-coco_final.weights
-
yolov3-openimages.cfg - 247 MB - 18® FPS - OpenImages dataset: yolov3-openimages.weights
-
csresnext50-panet-spp-original-optimal.cfg - 65.4% mAP@0.5 (43.2% AP@0.5:0.95) - 32® FPS - 100.5 BFlops - 217 MB: csresnext50-panet-spp-original-optimal_final.weights
-
yolov3-spp.cfg - 60.6% mAP@0.5 - 38® FPS - 141.5 BFlops - 240 MB: yolov3-spp.weights
-
csresnext50-panet-spp.cfg - 60.0% mAP@0.5 - 44 FPS - 71.3 BFlops - 217 MB: csresnext50-panet-spp_final.weights
-
yolov3.cfg - 55.3% mAP@0.5 - 66® FPS - 65.9 BFlops - 236 MB: yolov3.weights
-
yolov3-tiny.cfg - 33.1% mAP@0.5 - 345® FPS - 5.6 BFlops - 33.7 MB: yolov3-tiny.weights
yolov2.cfg(194 MB COCO Yolo v2) - 需要 4 GB GPU-RAM: https://pjreddie.com/media/files/yolov2.weightsyolo-voc.cfg(194 MB VOC Yolo v2) -需要 4 GB GPU-RAM: http://pjreddie.com/media/files/yolo-voc.weightsyolov2-tiny.cfg(43 MB COCO Yolo v2) - 需要 1 GB GPU-RAM: https://pjreddie.com/media/files/yolov2-tiny.weightsyolov2-tiny-voc.cfg(60 MB VOC Yolo v2) - 需要 1 GB GPU-RAM: http://pjreddie.com/media/files/yolov2-tiny-voc.weightsyolo9000.cfg(186 MB Yolo9000-model) - 需 4 GB GPU-RAM: http://pjreddie.com/media/files/yolo9000.weights
Put it near compiled: darknet.exe
可以从 darknet/cfg/中的到cfg文件
需要条件
- Windows 或 Linux都要满足:
- CMake >= 3.8 for modern CUDA support: https://cmake.org/download/
- CUDA 10.0: https://developer.nvidia.com/cuda-toolkit-archive (on Linux do Post-installation Actions)
- OpenCV >= 2.4: use your preferred package manager (brew, apt), build from source using vcpkg or download from OpenCV official site (on Windows set system variable
OpenCV_DIR=C:\opencv\build- where are theincludeandx64folders image) - cuDNN >= 7.0 for CUDA 10.0 https://developer.nvidia.com/rdp/cudnn-archive (on Linux copy
cudnn.h,libcudnn.so… as desribed here https://docs.nvidia.com/deeplearning/sdk/cudnn-install/index.html#installlinux-tar , on Windows copycudnn.h,cudnn64_7.dll,cudnn64_7.libas desribed here https://docs.nvidia.com/deeplearning/sdk/cudnn-install/index.html#installwindows ) - GPU with CC >= 3.0: https://en.wikipedia.org/wiki/CUDA#GPUs_supported
- on Linux GCC or Clang, on Windows MSVC 2015/2017/2019 https://visualstudio.microsoft.com/thank-you-downloading-visual-studio/?sku=Community
Yolo v3 in other frameworks
- TensorFlow: convert
yolov3.weights/cfgfiles toyolov3.ckpt/pb/meta: by using mystic123 or jinyu121 projects, and TensorFlow-lite - Intel OpenVINO 2019 R1: (Myriad X / USB Neural Compute Stick / Arria FPGA): read this manual
- OpenCV-dnn the fastest implementation for CPU (x86/ARM-Android), OpenCV can be compiled with OpenVINO-backend for running on (Myriad X / USB Neural Compute Stick / Arria FPGA), use
yolov3.weights/cfgwith: C++ example or Python example - PyTorch > ONNX > CoreML > iOS how to convert cfg/weights-files to pt-file: ultralytics/yolov3 and iOS App
- TensorRT for YOLOv3 (-70% faster inference): Yolo is natively supported in DeepStream 4.0 read PDF
- TVM - compilation of deep learning models (Keras, MXNet, PyTorch, Tensorflow, CoreML, DarkNet) into minimum deployable modules on diverse hardware backends (CPUs, GPUs, FPGA, and specialized accelerators): https://tvm.ai/about
- OpenDataCam - It detects, tracks and counts moving objects by using Yolo: https://github.com/opendatacam/opendatacam#-hardware-pre-requisite
- Netron - Visualizer for neural networks: https://github.com/lutzroeder/netron
数据集
- MS COCO: 用
./scripts/get_coco_dataset.sh得到标记了的MS COCO 检测数据集 - OpenImages: 使用
python ./scripts/get_openimages_dataset.py得到标记了的检测数据集 - Pascal VOC: 用
python ./scripts/voc_label.py的到标记了的 训练/测试/验证 检测数据集 - ILSVRC2012 (ImageNet 分类): 使用
./scripts/get_imagenet_train.sh(同理imagenet_label.sh来得到标记了的 valid 数据集) - German/Belgium/Russian/LISA/MASTIF 交通标志检测数据集n - 使用这个解析器: https://github.com/angeligareta/Datasets2Darknet#detection-task
- 其他数据集的列表: https://github.com/AlexeyAB/darknet/tree/master/scripts#datasets
结果的例子
其他例子: https://www.youtube.com/user/pjreddie/videos
Improvements in this repository
- added support for Windows
- added State-of-Art models: CSP, PRN, EfficientNet
- added layers: [conv_lstm], [scale_channels] SE/ASFF/BiFPN, [local_avgpool], [sam], [Gaussian_yolo], [reorg3d] (fixed [reorg]), fixed [batchnorm]
- added the ability for training recurrent models (with layers conv-lstm
[conv_lstm]/conv-rnn[crnn]) for accurate detection on video - added data augmentation:
[net] mixup=1 cutmix=1 mosaic=1 blur=1. Added activations: SWISH, MISH, NORM_CHAN, NORM_CHAN_SOFTMAX - added the ability for training with GPU-processing using CPU-RAM to increase the mini_batch_size and increase accuracy (instead of batch-norm sync)
- improved binary neural network performance 2x-4x times for Detection on CPU and GPU if you trained your own weights by using this XNOR-net model (bit-1 inference) : https://github.com/AlexeyAB/darknet/blob/master/cfg/yolov3-tiny_xnor.cfg
- improved neural network performance ~7% by fusing 2 layers into 1: Convolutional + Batch-norm
- improved performance: Detection 2x times, on GPU Volta/Turing (Tesla V100, GeForce RTX, …) using Tensor Cores if
CUDNN_HALFdefined in theMakefileordarknet.sln - improved performance ~1.2x times on FullHD, ~2x times on 4K, for detection on the video (file/stream) using
darknet detector demo… - improved performance 3.5 X times of data augmentation for training (using OpenCV SSE/AVX functions instead of hand-written functions) - removes bottleneck for training on multi-GPU or GPU Volta
- improved performance of detection and training on Intel CPU with AVX (Yolo v3 ~85%)
- optimized memory allocation during network resizing when
random=1 - optimized GPU initialization for detection - we use batch=1 initially instead of re-init with batch=1
- added correct calculation of mAP, F1, IoU, Precision-Recall using command
darknet detector map… - added drawing of chart of average-Loss and accuracy-mAP (
-mapflag) during training - run
./darknet detector demo ... -json_port 8070 -mjpeg_port 8090as JSON and MJPEG server to get results online over the network by using your soft or Web-browser - added calculation of anchors for training
- added example of Detection and Tracking objects: https://github.com/AlexeyAB/darknet/blob/master/src/yolo_console_dll.cpp
- run-time tips and warnings if you use incorrect cfg-file or dataset
- many other fixes of code…
And added manual - How to train Yolo v4-v2 (to detect your custom objects)
Also, you might be interested in using a simplified repository where is implemented INT8-quantization (+30% speedup and -1% mAP reduced): https://github.com/AlexeyAB/yolo2_light
在命令行中的使用
Linux中用 ./darknet 而不能用 darknet.exe, 比如应该这样:./darknet detector test ./cfg/coco.data ./cfg/yolov4.cfg ./yolov4.weights
On Linux 在root目录找到可执行文件 ./darknet , 而windows中在 \build\darknet\x64 里寻找
- Yolo v4 COCO - 图片:
darknet.exe detector test cfg/coco.data cfg/yolov4.cfg yolov4.weights -thresh 0.25 - 物体的输出坐标 :
darknet.exe detector test cfg/coco.data yolov4.cfg yolov4.weights -ext_output dog.jpg - Yolo v4 COCO - 视频:
darknet.exe detector demo cfg/coco.data cfg/yolov4.cfg yolov4.weights -ext_output test.mp4 - Yolo v4 COCO - 摄像头0号:
darknet.exe detector demo cfg/coco.data cfg/yolov4.cfg yolov4.weights -c 0 - Yolo v4 COCO for net-videocam - Smart WebCam:
darknet.exe detector demo cfg/coco.data cfg/yolov4.cfg yolov4.weights http://192.168.0.80:8080/video?dummy=param.mjpg - Yolo v4 - 保存结果视频文件: res.avi:
darknet.exe detector demo cfg/coco.data cfg/yolov4.cfg yolov4.weights test.mp4 -out_filename res.avi - Yolo v3 Tiny COCO -视频:
darknet.exe detector demo cfg/coco.data cfg/yolov3-tiny.cfg yolov3-tiny.weights test.mp4 - JSON and MJPEG server that allows multiple connections from your soft or Web-browser
ip-address:8070and 8090:./darknet detector demo ./cfg/coco.data ./cfg/yolov3.cfg ./yolov3.weights test50.mp4 -json_port 8070 -mjpeg_port 8090 -ext_output - Yolo v3 Tiny 在 GPU #1上:
darknet.exe detector demo cfg/coco.data cfg/yolov3-tiny.cfg yolov3-tiny.weights -i 1 test.mp4 - Alternative method Yolo v3 COCO - image:
darknet.exe detect cfg/yolov4.cfg yolov4.weights -i 0 -thresh 0.25 - Train on Amazon EC2, to see mAP & Loss-chart using URL like:
http://ec2-35-160-228-91.us-west-2.compute.amazonaws.com:8090in the Chrome/Firefox (Darknet should be compiled with OpenCV):
./darknet detector train cfg/coco.data yolov4.cfg yolov4.conv.137 -dont_show -mjpeg_port 8090 -map - 186 MB Yolo9000 -图像:
darknet.exe detector test cfg/combine9k.data cfg/yolo9000.cfg yolo9000.weights - 如果你用cpp api构建一个应用程序(app)记得把 data/9k.tree 和 data/coco9k.map放在你的app的同一个文件夹下
- 处理图片的列表
data/train.txt并且把识别结果保存在result.json文件,应使用:
darknet.exe detector test cfg/coco.data cfg/yolov4.cfg yolov4.weights -ext_output -dont_show -out result.json < data/train.txt - (类似上面T)to process a list of images
data/train.txtand save results of detection toresult.txtuse:
darknet.exe detector test cfg/coco.data cfg/yolov4.cfg yolov4.weights -dont_show -ext_output < data/train.txt > result.txt - Pseudo-lableing - 处理图像的列表
data/new_train.txt并以Yolo training format 保存识别结果每个图片的标签格式为<image_name>.txt(这样可以增加训练数据的量),你应使用:
darknet.exe detector test cfg/coco.data cfg/yolov4.cfg yolov4.weights -thresh 0.25 -dont_show -save_labels < data/new_train.txt - 计算 anchors:
darknet.exe detector calc_anchors data/obj.data -num_of_clusters 9 -width 416 -height 416 - 检测准确性 mAP在IoU=50条件下:
darknet.exe detector map data/obj.data yolo-obj.cfg backup\yolo-obj_7000.weights - 检测准确性 mAP在IoU=75:
darknet.exe detector map data/obj.data yolo-obj.cfg backup\yolo-obj_7000.weights -iou_thresh 0.75
在任何一个安卓智能手机使用网络摄影头 mjpeg-stream
-
Download for Android phone mjpeg-stream soft: IP Webcam / Smart WebCam
- 智能摄像头-最好是: https://play.google.com/store/apps/details?id=com.acontech.android.SmartWebCam2
- IP 网络摄像头: https://play.google.com/store/apps/details?id=com.pas.webcam
-
手机和电脑统一wifi (through a WiFi-router) 或者用USB
-
Start Smart WebCam on your phone
-
替换掉下面的地址, on shown in the phone application (Smart WebCam) and launch:
- Yolo v4 COCO-model:
darknet.exe detector demo data/coco.data yolov4.cfg yolov4.weights http://192.168.0.80:8080/video?dummy=param.mjpg -i 0
在Linux上编译(使用 cmake)
CMakeLists.txt 将会尝试寻找已安装的符合要求的
CUDA, cudnn, ZED 然后构建. 将会创建一个共享对象。
库文件使用 darknet来进行代码开发.
在clone的库里执行:
mkdir build-release
cd build-release
cmake ..
make
make install
下面的编译不再翻译
How to compile on Linux (using make)
Just do make in the darknet directory.
Before make, you can set such options in the Makefile: link
GPU=1to build with CUDA to accelerate by using GPU (CUDA should be in/usr/local/cuda)CUDNN=1to build with cuDNN v5-v7 to accelerate training by using GPU (cuDNN should be in/usr/local/cudnn)CUDNN_HALF=1to build for Tensor Cores (on Titan V / Tesla V100 / DGX-2 and later) speedup Detection 3x, Training 2xOPENCV=1to build with OpenCV 4.x/3.x/2.4.x - allows to detect on video files and video streams from network cameras or web-camsDEBUG=1to bould debug version of YoloOPENMP=1to build with OpenMP support to accelerate Yolo by using multi-core CPULIBSO=1to build a librarydarknet.soand binary runable fileuselibthat uses this library. Or you can try to run soLD_LIBRARY_PATH=./:$LD_LIBRARY_PATH ./uselib test.mp4How to use this SO-library from your own code - you can look at C++ example: https://github.com/AlexeyAB/darknet/blob/master/src/yolo_console_dll.cpp
or use in such a way:LD_LIBRARY_PATH=./:$LD_LIBRARY_PATH ./uselib data/coco.names cfg/yolov4.cfg yolov4.weights test.mp4ZED_CAMERA=1to build a library with ZED-3D-camera support (should be ZED SDK installed), then run
LD_LIBRARY_PATH=./:$LD_LIBRARY_PATH ./uselib data/coco.names cfg/yolov4.cfg yolov4.weights zed_camera
To run Darknet on Linux use examples from this article, just use ./darknet instead of darknet.exe, i.e. use this command: ./darknet detector test ./cfg/coco.data ./cfg/yolov4.cfg ./yolov4.weights
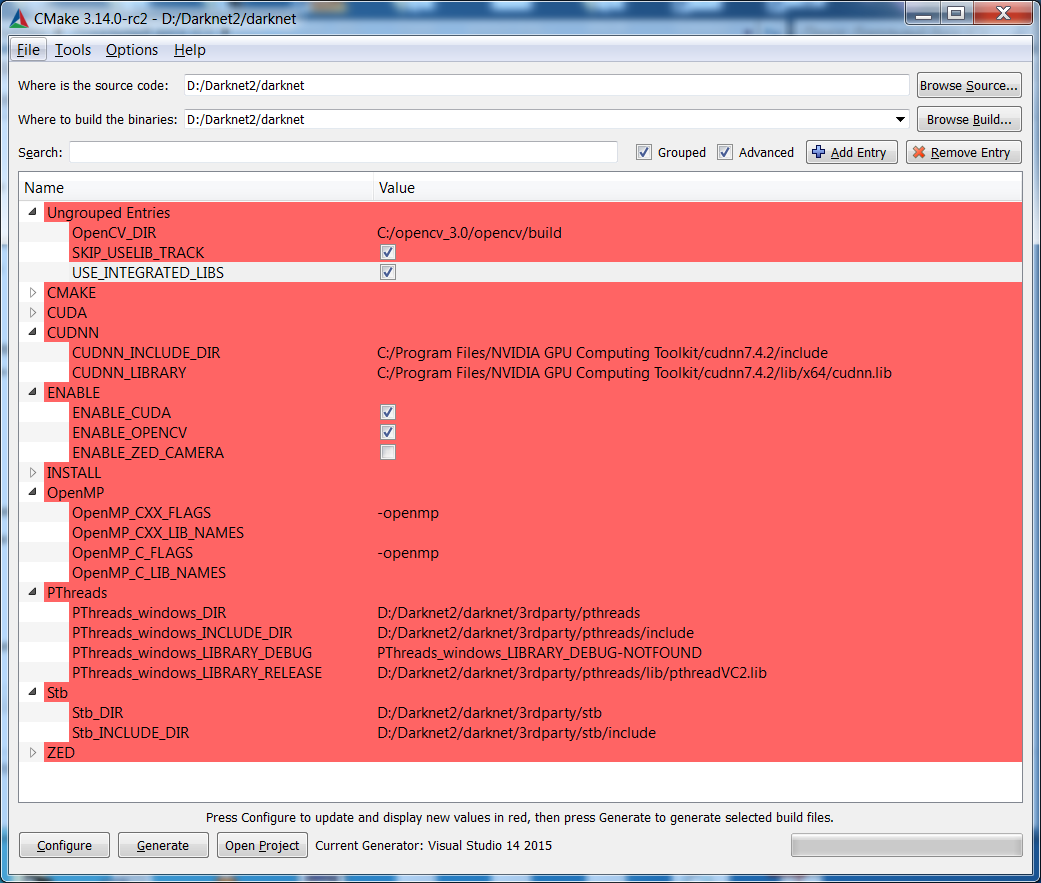
How to compile on Windows (using CMake-GUI)
This is the recommended approach to build Darknet on Windows if you have already
installed Visual Studio 2015/2017/2019, CUDA > 10.0, cuDNN > 7.0, and
OpenCV > 2.4.
Use CMake-GUI as shown here on this IMAGE:
- Configure
- Optional platform for generator (Set: x64)
- Finish
- Generate
- Open Project
- Set: x64 & Release
- Build
- Build solution
How to compile on Windows (using vcpkg)
If you have already installed Visual Studio 2015/2017/2019, CUDA > 10.0,
cuDNN > 7.0, OpenCV > 2.4, then to compile Darknet it is recommended to use
CMake-GUI.
Otherwise, follow these steps:
-
Install or update Visual Studio to at least version 2017, making sure to have it fully patched (run again the installer if not sure to automatically update to latest version). If you need to install from scratch, download VS from here: Visual Studio Community
-
Install CUDA and cuDNN
-
Install
gitandcmake. Make sure they are on the Path at least for the current account -
Install vcpkg and try to install a test library to make sure everything is working, for example
vcpkg install opengl -
Define an environment variables,
VCPKG_ROOT, pointing to the install path ofvcpkg -
Define another environment variable, with name
VCPKG_DEFAULT_TRIPLETand valuex64-windows -
Open Powershell and type these commands:
PS \>                  cd $env:VCPKG_ROOT
PS Code\vcpkg>         .\vcpkg install pthreads opencv[ffmpeg] #replace with opencv[cuda,ffmpeg] in case you want to use cuda-accelerated openCV
- Open Powershell, go to the
darknetfolder and build with the command.\build.ps1. If you want to use Visual Studio, you will find two custom solutions created for you by CMake after the build, one inbuild_win_debugand the other inbuild_win_release, containing all the appropriate config flags for your system.
How to compile on Windows (legacy way)
-
If you have CUDA 10.0, cuDNN 7.4 and OpenCV 3.x (with paths:
C:\opencv_3.0\opencv\build\include&C:\opencv_3.0\opencv\build\x64\vc14\lib), then openbuild\darknet\darknet.sln, set x64 and Release https://hsto.org/webt/uh/fk/-e/uhfk-eb0q-hwd9hsxhrikbokd6u.jpeg and do the: Build -> Build darknet. Also add Windows system variableCUDNNwith path to CUDNN: https://user-images.githubusercontent.com/4096485/53249764-019ef880-36ca-11e9-8ffe-d9cf47e7e462.jpg1.1. Find files
opencv_world320.dllandopencv_ffmpeg320_64.dll(oropencv_world340.dllandopencv_ffmpeg340_64.dll) inC:\opencv_3.0\opencv\build\x64\vc14\binand put it near withdarknet.exe1.2 Check that there are
binandincludefolders in theC:\Program Files\NVIDIA GPU Computing Toolkit\CUDA\v10.0if aren’t, then copy them to this folder from the path where is CUDA installed1.3. To install CUDNN (speedup neural network), do the following:
-
download and install cuDNN v7.4.1 for CUDA 10.0: https://developer.nvidia.com/rdp/cudnn-archive
-
add Windows system variable
CUDNNwith path to CUDNN: https://user-images.githubusercontent.com/4096485/53249764-019ef880-36ca-11e9-8ffe-d9cf47e7e462.jpg -
copy file
cudnn64_7.dllto the folder\build\darknet\x64near withdarknet.exe
1.4. If you want to build without CUDNN then: open
\darknet.sln-> (right click on project) -> properties -> C/C++ -> Preprocessor -> Preprocessor Definitions, and remove this:CUDNN; -
-
If you have other version of CUDA (not 10.0) then open
build\darknet\darknet.vcxprojby using Notepad, find 2 places with “CUDA 10.0” and change it to your CUDA-version. Then open\darknet.sln-> (right click on project) -> properties -> CUDA C/C++ -> Device and remove there;compute_75,sm_75. Then do step 1 -
If you don’t have GPU, but have OpenCV 3.0 (with paths:
C:\opencv_3.0\opencv\build\include&C:\opencv_3.0\opencv\build\x64\vc14\lib), then openbuild\darknet\darknet_no_gpu.sln, set x64 and Release, and do the: Build -> Build darknet_no_gpu -
If you have OpenCV 2.4.13 instead of 3.0 then you should change paths after
\darknet.slnis opened4.1 (right click on project) -> properties -> C/C++ -> General -> Additional Include Directories:
C:\opencv_2.4.13\opencv\build\include4.2 (right click on project) -> properties -> Linker -> General -> Additional Library Directories:
C:\opencv_2.4.13\opencv\build\x64\vc14\lib -
If you have GPU with Tensor Cores (nVidia Titan V / Tesla V100 / DGX-2 and later) speedup Detection 3x, Training 2x:
\darknet.sln-> (right click on project) -> properties -> C/C++ -> Preprocessor -> Preprocessor Definitions, and add here:CUDNN_HALF;Note: CUDA must be installed only after Visual Studio has been installed.
How to compile (custom):
Also, you can to create your own darknet.sln & darknet.vcxproj, this example for CUDA 9.1 and OpenCV 3.0
Then add to your created project:
- (right click on project) -> properties -> C/C++ -> General -> Additional Include Directories, put here:
C:\opencv_3.0\opencv\build\include;..\..\3rdparty\include;%(AdditionalIncludeDirectories);$(CudaToolkitIncludeDir);$(CUDNN)\include
- (right click on project) -> Build dependecies -> Build Customizations -> set check on CUDA 9.1 or what version you have - for example as here: http://devblogs.nvidia.com/parallelforall/wp-content/uploads/2015/01/VS2013-R-5.jpg
- add to project:
- all
.cfiles - all
.cufiles - file
http_stream.cppfrom\srcdirectory - file
darknet.hfrom\includedirectory
- all
- (right click on project) -> properties -> Linker -> General -> Additional Library Directories, put here:
C:\opencv_3.0\opencv\build\x64\vc14\lib;$(CUDA_PATH)\lib\$(PlatformName);$(CUDNN)\lib\x64;%(AdditionalLibraryDirectories)
- (right click on project) -> properties -> Linker -> Input -> Additional dependecies, put here:
..\..\3rdparty\lib\x64\pthreadVC2.lib;cublas.lib;curand.lib;cudart.lib;cudnn.lib;%(AdditionalDependencies)
- (right click on project) -> properties -> C/C++ -> Preprocessor -> Preprocessor Definitions
OPENCV;_TIMESPEC_DEFINED;_CRT_SECURE_NO_WARNINGS;_CRT_RAND_S;WIN32;NDEBUG;_CONSOLE;_LIB;%(PreprocessorDefinitions)
-
compile to .exe (X64 & Release) and put .dll-s near with .exe: https://hsto.org/webt/uh/fk/-e/uhfk-eb0q-hwd9hsxhrikbokd6u.jpeg
-
pthreadVC2.dll, pthreadGC2.dllfrom \3rdparty\dll\x64 -
cusolver64_91.dll, curand64_91.dll, cudart64_91.dll, cublas64_91.dll- 91 for CUDA 9.1 or your version, from C:\Program Files\NVIDIA GPU Computing Toolkit\CUDA\v9.1\bin -
For OpenCV 3.2:
opencv_world320.dllandopencv_ffmpeg320_64.dllfromC:\opencv_3.0\opencv\build\x64\vc14\bin -
For OpenCV 2.4.13:
opencv_core2413.dll,opencv_highgui2413.dllandopencv_ffmpeg2413_64.dllfromC:\opencv_2.4.13\opencv\build\x64\vc14\bin
-
多GPU训练:
1.首先在一个GPU上进行比如1000次迭代: darknet.exe detector train cfg/coco.data cfg/yolov4.cfg yolov4.conv.137
- 停止然后使用
/backup/yolov4_1000.weights进行多GPU训练(最多4个GPU),使用命令:darknet.exe detector train cfg/coco.data cfg/yolov4.cfg /backup/yolov4_1000.weights -gpus 0,1,2,3
如果你得到了Nan,那么对于一些数据集来说最好减少学习率( learning rate), 4块GPU可以设置 learning_rate = 0,00065 (即learning_rate = 0.00261 / GPU数目). 在这种情况下你的 cfg文件里也要增加4倍的burn_in = .即使用 burn_in = 4000 代替 burn_in =1000.
https://groups.google.com/d/msg/darknet/NbJqonJBTSY/Te5PfIpuCAAJ
用自己的数据集训练:
(训练老的Yolo v2 yolov2-voc.cfg, yolov2-tiny-voc.cfg, yolo-voc.cfg, yolo-voc.2.0.cfg, … 点击链接)
训练V4(V3一样):
-
要训练
cfg/yolov4-custom.cfg下载预训练权重文件 (pre-trained weights-file) (162 MB): yolov4.conv.137 (网盘镜像yolov4.conv.137 ) -
创建与
yolov4-custom.cfg内容相同的文件--yolo-obj.cfg(或者直接Copy并重命名为yolo-obj.cfg),然后:
- 改batch为
batch=64 - 改subdivisions 为
subdivisions=16 - 改 max_batches 为 (
类别数*2000但不小于于4000), 举例.:如果你训练的3类max_batches=6000 - 改steps 为max_batches的80%到90%之间, 比如
steps=4800,5400 - 将 network size设为
width=416 height=416或者32的任意倍数: https://github.com/AlexeyAB/darknet/blob/0039fd26786ab5f71d5af725fc18b3f521e7acfd/cfg/yolov3.cfg#L8-L9 - 把3个
[yolo]层中每个的classes=80改为你的类别数:- https://github.com/AlexeyAB/darknet/blob/0039fd26786ab5f71d5af725fc18b3f521e7acfd/cfg/yolov3.cfg#L610
- https://github.com/AlexeyAB/darknet/blob/0039fd26786ab5f71d5af725fc18b3f521e7acfd/cfg/yolov3.cfg#L696
- https://github.com/AlexeyAB/darknet/blob/0039fd26786ab5f71d5af725fc18b3f521e7acfd/cfg/yolov3.cfg#L783
- 在每个
[yolo]前面的[convolutional]层中(一共3个),将[filters=255]改为=(类别数 + 5)x3 , keep in mind that it only has to be the last[convolutional]before each of the[yolo]layers.- https://github.com/AlexeyAB/darknet/blob/0039fd26786ab5f71d5af725fc18b3f521e7acfd/cfg/yolov3.cfg#L603
- https://github.com/AlexeyAB/darknet/blob/0039fd26786ab5f71d5af725fc18b3f521e7acfd/cfg/yolov3.cfg#L689
- https://github.com/AlexeyAB/darknet/blob/0039fd26786ab5f71d5af725fc18b3f521e7acfd/cfg/yolov3.cfg#L776
- 当使用
[Gaussian_yolo]层时, 改变[Gaussian_yolo]层前每个[convolutional]层 中[filters=57]为filters=(类别 + 9)x3- https://github.com/AlexeyAB/darknet/blob/6e5bdf1282ad6b06ed0e962c3f5be67cf63d96dc/cfg/Gaussian_yolov3_BDD.cfg#L604
- https://github.com/AlexeyAB/darknet/blob/6e5bdf1282ad6b06ed0e962c3f5be67cf63d96dc/cfg/Gaussian_yolov3_BDD.cfg#L696
- https://github.com/AlexeyAB/darknet/blob/6e5bdf1282ad6b06ed0e962c3f5be67cf63d96dc/cfg/Gaussian_yolov3_BDD.cfg#L789
所以,如果 classes=1,那么filters=18。如果 classes=2 那么 filters=21.
(不要写: filters=(classes + 5)x3,等号后面直接写数字)
(一般 filters取决于 classes, coords 和 mask的数量, 比如 filters=(classes + coords + 1)*<number of mask>,这里 mask 指anchors的数目. 如果没有 mask , 那么filters=(classes + coords + 1)*num)
所以比如, 对2个物体,你的文件 yolo-obj.cfg的 3 [yolo]-layers位置的内容应不同于 yolov4-custom.cfg :
[convolutional]
filters=21

[region]
classes=2
-
创建文件
obj.names在目录build\darknet\x64\data\里,文件的每一行为物体的名称 -
创建文件
obj.data在目录build\darknet\x64\data\里,文件包含以下内容 (这里classes 改为自己的要识别的物体的种类数):
classes= 2
train  = data/train.txt
valid  = data/test.txt
names = data/obj.names
backup = backup/
4.把.jpg格式的图像文件 放在 build\darknet\x64\data\obj\
- 你应当为每个图片做标签.可以使用这个GUI可视化软件来画Bbox和生成适用于v3&v2格式的注释文件: https://github.com/AlexeyAB/Yolo_mark
它会在与图片文件同一目录里为每个.jpg创建同名.txt- , 文件中包含物体的类别与框的坐标, 每个物体是这样的一行:
<物体种类> <x轴中心坐标> <y轴中心坐标> <宽h> <高>
这里:
<object-class>- 从0开始的整数<x_center> <y_center> <width> <height>- 相对于 图片的宽度高度的浮点数,范围是(0.0 to 1.0]- 例子:
<x> = <绝对x坐标> / <图像宽度>或者理解为<height> = <绝对高度> / <图像高度> - 注意:
<x_center> <y_center>-是矩形框的中心而不是左上角
举例: img1.jpg你将会创建img1.txt 包含如下内容:
1 0.716797 0.395833 0.216406 0.147222
0 0.687109 0.379167 0.255469 0.158333
1 0.420312 0.395833 0.140625 0.166667
6.创建文件 train.txt 在目录build\darknet\x64\data\里, 文件包括你图片的文件名,每个文件名占一行,文件名是相对于 darknet.exe的相对路径,比如:
data/obj/img1.jpg
data/obj/img2.jpg
data/obj/img3.jpg
-
下载预训练权重 放在
build\darknet\x64里- 下载
yolov4.cfg,yolov4-custom.cfg(162 MB): yolov4.conv.137 (Google drive mirror yolov4.conv.137 ) - 下载
csresnext50-panet-spp.cfg(133 MB): csresnext50-panet-spp.conv.112 - for
yolov3.cfg, yolov3-spp.cfg(154 MB): darknet53.conv.74 - for
yolov3-tiny-prn.cfg , yolov3-tiny.cfg(6 MB): yolov3-tiny.conv.11 - 下载
enet-coco.cfg (EfficientNetB0-Yolov3)(14 MB): enetb0-coco.conv.132
- 下载
-
开始训练:
darknet.exe detector train data/obj.data yolo-obj.cfg yolov4.conv.137在Linux上:
./darknet detector train data/obj.data yolo-obj.cfg yolov4.conv.137(just use./darknetinstead ofdarknet.exe)- (每100次迭代
yolo-obj_last.weights文件将别保存在 willbuild\darknet\x64\backup\) - (每1000次迭代
yolo-obj_xxxx.weights将被保存至build\darknet\x64\backup\) - (禁用Loss窗口使用:
darknet.exe detector train data/obj.data yolo-obj.cfg yolov4.conv.137 -dont_show, 如果你在一个没有显示器的云平台上训练的话) - (在没有GUI的远程服务器中想在训练中看 mAP & Loss-chart 使用
darknet.exe detector train data/obj.data yolo-obj.cfg yolov4.conv.137 -dont_show -mjpeg_port 8090 -map然后在谷歌或者火狐浏览器打开链接http://ip-address:8090)
- (每100次迭代
8.1. For training with mAP (mean average precisions) calculation for each 4 Epochs (set valid=valid.txt or train.txt in obj.data file) and run: darknet.exe detector train data/obj.data yolo-obj.cfg yolov4.conv.137 -map
- 训练完成后你将 在文件夹
build\darknet\x64\backup\里得到yolo-obj_final.weights
-
每100次迭代后你可以停止训练然后再从这个点继续训练.比如, 训练2000次后你停止了训练, 之后通过:
darknet.exe detector train data/obj.data yolo-obj.cfg backup\yolo-obj_2000.weights继续训练(在原始的库中https://github.com/pjreddie/darknet the 权重文件每1000次保存一次
if(iterations > 1000)) -
你也可以比45000次更早的得到结果.
Note: 如果训练中你在 avg (loss) field 中发现了nan值- 训练可能出来问题,但如果 nan 在其他行中 那么训练还顺利.
Note: 如果你在cfg文件中改变了宽度和高度的值, 那么新的宽度和高度必须要满足是32的倍数这一条件.
Note: 训练结束后这样检测: darknet.exe detector test data/obj.data yolo-obj.cfg yolo-obj_8000.weights
Note: 如果发生错误 Out of memory(内存不足) 你应该在cfg文件中增加 subdivisions=16,、为 32 或者 64: link
怎样用自己的数据集训练yolo-yiny
与上大体相同,只是以下有所差异:
- Download default weights file for yolov3-tiny: https://pjreddie.com/media/files/yolov3-tiny.weights
- Get pre-trained weights
yolov3-tiny.conv.15using command:darknet.exe partial cfg/yolov3-tiny.cfg yolov3-tiny.weights yolov3-tiny.conv.15 15 - Make your custom model
yolov3-tiny-obj.cfgbased oncfg/yolov3-tiny_obj.cfginstead ofyolov3.cfg - Start training:
darknet.exe detector train data/obj.data yolov3-tiny-obj.cfg yolov3-tiny.conv.15
如果基于其他模型训练yolo(DenseNet201-Yolo or ResNet50-Yolo), 您可以下载并得到pre-trained权重,列在这个文件里面件:https://github.com/AlexeyAB/darknet/blob/master/build/darknet/x64/partial.cmd
如果你使用你自定义模型,并不是基于其他模型,你可以训练它没有pre-trained权重,然后将使用随机初始权重.
何时停止训练
通常一个类别训练2000次迭代但总体不应少于4000次.但想要一个更好的结果应当按照下面做:
1.训练中,你将看到不同错误(loss)指标变化的值,当不再减少0.XXXXXXX avg时,应当停止
Region Avg IOU: 0.798363, Class: 0.893232, Obj: 0.700808, No Obj: 0.004567, Avg Recall: 1.000000, count: 8
Region Avg IOU: 0.800677, Class: 0.892181, Obj: 0.701590, No Obj: 0.004574, Avg Recall: 1.000000, count: 89002: 0.211667, 0.60730 avg, 0.001000 rate, 3.868000 seconds, 576128 images
Loaded: 0.000000 seconds
- 9002 - 迭代次数 (batch的数目)
- 0.60730 avg - 平均损失 (error) - the lower, the better
当你看到平均损失 0.xxxxxx avg在许多迭代中不再减少,你应该停止训练.最后可能平均损失从 0.05 (一个小模型和简单的数据集)到 3.0 (一个大模型和困难的数据集)直接。
- 当训练结束后你应当从
darknet\build\darknet\x64\backup取一些以.weights结尾的文件然后选出它们中最好的:
例如,你训练的9000次迭代,但是最好的结果可能是先前的一个权重 (7000, 8000, 9000).它可能发生过拟合. Overfitting - 这种情况下你只能从训练集中识别出物体但不能从其他图片中识别出来. 你应当从早期停止点 Early Stopping Point中得到权重:
[外链图片转存失败,源站可能有防盗链机制,建议将图片保存下来直接上传(img-RihSXGsw-1588601941790)(https://hsto.org/files/5dc/7ae/7fa/5dc7ae7fad9d4e3eb3a484c58bfc1ff5.png)]
从早期停止点 Early Stopping Point中得到权重:
2.1. 首先在你的文件 obj.data里 指定验证集的路径valid = valid.txt ( valid.txt 中的格式与train.txt相同), 如果你没有验证集, 那么就复制一份data\train.txt 为data\valid.txt.
2.2 如果在9000次迭代后停止训练,要检验之前的权重,使用以下命令:
(如果你使用另一个Github库,那么使用 darknet.exe detector recall… 而不是 darknet.exe detector map…)
darknet.exe detector map data/obj.data yolo-obj.cfg backup\yolo-obj_7000.weightsdarknet.exe detector map data/obj.data yolo-obj.cfg backup\yolo-obj_8000.weightsdarknet.exe detector map data/obj.data yolo-obj.cfg backup\yolo-obj_9000.weights
然后比较每个权重文件 (7000, 8000, 9000)的最后输出的几行:
选择那个有最高mAP (mean average precision)** 或者IOU的(intersect over union)
例如,yolo-obj_8000.weights的mAP最高那么使用这个权重文件识别目标.
或者就与 -map标志一起训练(train with flag):
darknet.exe detector train data/obj.data yolo-obj.cfg yolov4.conv.137 -map
那么你将会看到mAP-chart (红线) 在Loss-chart 窗口. 将使用 obj.data 指定的 valid=valid.txt每4批(Epoch)(1 Epoch = images_in_train_txt / batch )计算一次mAP。
(要改变x轴最大值 - 改变 max_batches= 参数 为 2000*类别数,举例:训练3类时 max_batches=6000 )

自定义检测对象的例子: darknet.exe detector test data/obj.data yolo-obj.cfg yolo-obj_8000.weights
-
IoU (intersect over union) - average instersect over union of objects and detections for a certain threshold = 0.24
-
mAP (mean average precision) - mean value of
average precisionsfor each class, whereaverage precisionis average value of 11 points on PR-curve for each possible threshold (each probability of detection) for the same class (Precision-Recall in terms of PascalVOC, where Precision=TP/(TP+FP) and Recall=TP/(TP+FN) ), page-11: http://homepages.inf.ed.ac.uk/ckiw/postscript/ijcv_voc09.pdf
mAP is default metric of precision in the PascalVOC competition, this is the same as AP50 metric in the MS COCO competition.
In terms of Wiki, indicators Precision and Recall have a slightly different meaning than in the PascalVOC competition, but IoU always has the same meaning.

自定义目标检测
例子: darknet.exe detector test data/obj.data yolo-obj.cfg yolo-obj_8000.weights
 | [外链图片转存失败,源站可能有防盗链机制,建议将图片保存下来直接上传(img-HQA9TRGp-1588601941797)(https://hsto.org/files/727/c7e/5e9/727c7e5e99bf4d4aa34027bb6a5e4bab.jpg)] |
|---|
提高目标检测
1.训练前:
-
设置标志
random=1在.cfg文件中 - 训练时它将提高精度: link -
增加
.cfg文件中的网络数 (height=608,width=60832的任意备赛) - 它将提高精度 -
检测你的数据集里每个要识别的物体都要有标签 . 训练中最多的问题是你的数据集中有错误的标签(通过转化脚本获得标签,用第三方工具标记,等等).使用下面的来检测你的标签: https://github.com/AlexeyAB/Yolo_mark
-
我的loss总是很高而map很低,训练有错吗?训练时在命令最后加上
-show_imgs标志, 在显示的窗口里看见了正确的Bbox? 如果没有就错了 -
对每个你要识别的物体 -训练集中至少还有一个相似的物体:有相同的大小、形状、相对大小、旋转角度、倾斜、光照. 所以理想的数据集应当包含物体的以下的差异: scales, rotations, lightings, from different sides, on different backgrounds - 你应当为每个类准备最好至少2000张图片,训练至少
2000*classes次迭代或者更多 -
你的理想的数据集应当包括那些未标记的你不想识别的物体( images with non-labeled objects that you do not want to detect) -也就是没有BBox的负样本(empty
.txtfiles) - 负样本数目和有要识别的物体的数目一样多 -
怎样标记物体最好: label only the visible part of the object, or label the visible and overlapped part of the object, or label a little more than the entire object (with a little gap)? 你想让物体怎么样被识别出来就怎么标记
-
训练那些每个图片中有多个物体的数据, 增加参数
max=200或者更高的值在最后的[yolo]层或者[region]-层在你的 cfg-file (the global maximum number of objects that can be detected by YoloV3 is0,0615234375*(width*height)where are width and height are parameters from[net]section in cfg-file) -
要识别小物体 (小于 16x16 after the image is resized to 416x416) - 设置
layers = 23而不是https://github.com/AlexeyAB/darknet/blob/6f718c257815a984253346bba8fb7aa756c55090/cfg/yolov4.cfg#L895
设置tstride=4instead of https://github.com/AlexeyAB/darknet/blob/6f718c257815a984253346bba8fb7aa756c55090/cfg/yolov4.cfg#L892
and setstride=4instead of https://github.com/AlexeyAB/darknet/blob/6f718c257815a984253346bba8fb7aa756c55090/cfg/yolov4.cfg#L989 -
训练即识别大物体又识别小物体的 use modified models:
- Full-model: 5 yolo layers: https://raw.githubusercontent.com/AlexeyAB/darknet/master/cfg/yolov3_5l.cfg
- Tiny-model: 3 yolo layers: https://raw.githubusercontent.com/AlexeyAB/darknet/master/cfg/yolov3-tiny_3l.cfg
- YOLOv4: 3 yolo layers: https://raw.githubusercontent.com/AlexeyAB/darknet/master/cfg/yolov4-custom.cfg
-
如果你的模型要区别手性物体(left/right hand, left/right-turn on road signs, …)为两个不同类别 那么禁用数据增强- 然后添加
flip=0here: https://github.com/AlexeyAB/darknet/blob/3d2d0a7c98dbc8923d9ff705b81ff4f7940ea6ff/cfg/yolov3.cfg#L17 -
一般规则你训练集中物体的相对大小应满足这样一组规则:
train_network_width * train_obj_width / train_image_width ~= detection_network_width * detection_obj_width / detection_image_widthtrain_network_height * train_obj_height / train_image_height ~= detection_network_height * detection_obj_height / detection_image_height
也就是说在训练集中每个物体必须在测试集中有至少一个相同class_id和相对大小的物体:
object width in percent from Training dataset~=object width in percent from Test dataset这就是说如果训练集中这个物体占据的一张图片的80%-90%那么在测试集中如果只占据1~10%那么它不会被检测出来
-
加速训练(将减少准确性) 在cfg文件中设置 layer-136 的参数
stopbackward=1 -
each:
model of object, side, illimination, scale, each 30 gradof the turn and inclination angles - these are different objects from an internal perspective of the neural network. 所以越多不同的物体 你想检测, t越复杂的网络应当被使用. -
要使Bbox更精确,你应当在
[yolo]layer 中增加三个参数ignore_thresh = .9 iou_normalizer=0.5 iou_loss=giou然后训练, 它将增加 mAP@0.9, 但减少mAP@0.5. -
Only if you are an expert in neural detection networks - recalculate anchors for your dataset for
widthandheightfrom cfg-file:
darknet.exe detector calc_anchors data/obj.data -num_of_clusters 9 -width 416 -height 416
then set the same 9anchorsin each of 3[yolo]-layers in your cfg-file. But you should change indexes of anchorsmasks=for each [yolo]-layer, so that 1st-[yolo]-layer has anchors larger than 60x60, 2nd larger than 30x30, 3rd remaining. Also you should change thefilters=(classes + 5)*<number of mask>before each [yolo]-layer. If many of the calculated anchors do not fit under the appropriate layers - 否则你就应试着用这些默认的值
- 训练后,检测:
-
通过设置
.cfg文件中 (height=608andwidth=608)或者 (height=832andwidth=832)或者 (任意32的倍数)增加 network-resolution - 这将增加精度并且可以检测更小的物体: link- 没必要再次训练网络, 使用训练的416x416 resolution
.weights权重文件就好 - 但要获得更高的精度,就训练 608x608 或者832x832,记住: 如果
Out of memoryoccurs 那么在cfg文件中你应当增加subdivisions=16, 32 or 64: link
- 没必要再次训练网络, 使用训练的416x416 resolution
标记Bbox和做注释文件
工具在这里: https://github.com/AlexeyAB/Yolo_mark
例子有: train.txt, obj.names, obj.data, yolo-obj.cfg, air1-6.txt, bird1-4.txt 这些使识别两类物体的 (air, bird) 。train_obj.cmd 是个如何用 Yolo v2 - v4训练的例子
在图片中标记物体的不同工具:
- in C++: https://github.com/AlexeyAB/Yolo_mark
- in Python: https://github.com/tzutalin/labelImg
- in Python: https://github.com/Cartucho/OpenLabeling
- in C++: https://www.ccoderun.ca/darkmark/
- in JavaScript: https://github.com/opencv/cvat
用 Yolo9000
Simultaneous detection and classification of 9000 objects: darknet.exe detector test cfg/combine9k.data cfg/yolo9000.cfg yolo9000.weights data/dog.jpg
-
yolo9000.weights- (186 MB Yolo9000 Model) 需要 4 GB GPU-RAM: http://pjreddie.com/media/files/yolo9000.weights -
yolo9000.cfg- cfg-file of the Yolo9000, also there are paths to the9k.treeandcoco9k.maphttps://github.com/AlexeyAB/darknet/blob/617cf313ccb1fe005db3f7d88dec04a04bd97cc2/cfg/yolo9000.cfg#L217-L218-
9k.tree- WordTree of 9418 categories -<label> <parent_it>, ifparent_id == -1then this label hasn’t parent: https://raw.githubusercontent.com/AlexeyAB/darknet/master/build/darknet/x64/data/9k.tree -
coco9k.map- map 80 categories from MSCOCO to WordTree9k.tree: https://raw.githubusercontent.com/AlexeyAB/darknet/master/build/darknet/x64/data/coco9k.map
-
-
combine9k.data- data file, there are paths to:9k.labels,9k.names,inet9k.map, (change path to yourcombine9k.train.list): https://raw.githubusercontent.com/AlexeyAB/darknet/master/build/darknet/x64/data/combine9k.data-
9k.labels- 9418 labels of objects: https://raw.githubusercontent.com/AlexeyAB/darknet/master/build/darknet/x64/data/9k.labels -
9k.names-
9418 names of objects: https://raw.githubusercontent.com/AlexeyAB/darknet/master/build/darknet/x64/data/9k.names -
inet9k.map- map 200 categories from ImageNet to WordTree9k.tree: https://raw.githubusercontent.com/AlexeyAB/darknet/master/build/darknet/x64/data/inet9k.map
-
How to use Yolo as DLL and SO libraries
- on Linux
- using
build.shor - build
darknetusingcmakeor - set
LIBSO=1in theMakefileand domake
- using
- on Windows
- using
build.ps1or - build
darknetusingcmakeor - compile
build\darknet\yolo_cpp_dll.slnsolution orbuild\darknet\yolo_cpp_dll_no_gpu.slnsolution
- using
There are 2 APIs:
-
C API: https://github.com/AlexeyAB/darknet/blob/master/include/darknet.h
- Python examples using the C API::
- https://github.com/AlexeyAB/darknet/blob/master/darknet.py
- https://github.com/AlexeyAB/darknet/blob/master/darknet_video.py
- Python examples using the C API::
-
C++ API: https://github.com/AlexeyAB/darknet/blob/master/include/yolo_v2_class.hpp
- C++ example that uses C++ API: https://github.com/AlexeyAB/darknet/blob/master/src/yolo_console_dll.cpp
-
To compile Yolo as C++ DLL-file
yolo_cpp_dll.dll- open the solutionbuild\darknet\yolo_cpp_dll.sln, set x64 and Release, and do the: Build -> Build yolo_cpp_dll- You should have installed CUDA 10.0
- To use cuDNN do: (right click on project) -> properties -> C/C++ -> Preprocessor -> Preprocessor Definitions, and add at the beginning of line:
CUDNN;
-
To use Yolo as DLL-file in your C++ console application - open the solution
build\darknet\yolo_console_dll.sln, set x64 and Release, and do the: Build -> Build yolo_console_dll-
you can run your console application from Windows Explorer
build\darknet\x64\yolo_console_dll.exe
use this command:yolo_console_dll.exe data/coco.names yolov4.cfg yolov4.weights test.mp4 -
after launching your console application and entering the image file name - you will see info for each object:
<obj_id> <left_x> <top_y> <width> <height> <probability> -
to use simple OpenCV-GUI you should uncomment line
//#define OPENCVinyolo_console_dll.cpp-file: link -
you can see source code of simple example for detection on the video file: link
-
yolo_cpp_dll.dll-API: link
struct bbox_t {
    unsigned int x, y, w, h;    // (x,y) - top-left corner, (w, h) - width & height of bounded box
    float prob;                    // confidence - probability that the object was found correctly
    unsigned int obj_id;        // class of object - from range [0, classes-1]
    unsigned int track_id;        // tracking id for video (0 - untracked, 1 - inf - tracked object)
    unsigned int frames_counter;// counter of frames on which the object was detected
};

class Detector {
public:
        Detector(std::string cfg_filename, std::string weight_filename, int gpu_id = 0);
        ~Detector();

        std::vector<bbox_t> detect(std::string image_filename, float thresh = 0.2, bool use_mean = false);
        std::vector<bbox_t> detect(image_t img, float thresh = 0.2, bool use_mean = false);
        static image_t load_image(std::string image_filename);
        static void free_image(image_t m);

#ifdef OPENCV
        std::vector<bbox_t> detect(cv::Mat mat, float thresh = 0.2, bool use_mean = false);
	std::shared_ptr<image_t> mat_to_image_resize(cv::Mat mat) const;
#endif
};


 515
515

 被折叠的 条评论
为什么被折叠?
被折叠的 条评论
为什么被折叠?
 到【灌水乐园】发言


