


Windows10下的GTSAM因子图安装与使用
一、windows系统预安装
1. windows 10安装gcc
https://www.xjx100.cn/news/592566.html?action=onClick
《下载安装MinGW-w64详细步骤(c/c++的编译器gcc的windows版,win10真实可用)》
2.windows 10 安装 boost
https://www.xjx100.cn/news/140767.html?action=onClick
《ubuntu和Win10上安装boost-C++库》
https://blog.csdn.net/m0_67357141/article/details/125318505
《VS配置boost库》
3.CMake 安装与查看
https://blog.csdn.net/L888666Q/article/details/130686315
4.CMake 配置boost
https://blog.csdn.net/LostUnravel/article/details/127076377
《C++ Boost 库 Windows 环境 GCC 编译安装及 CMake 相关配置》
二、GTSAM安装与使用
https://blog.csdn.net/missiledefense/article/details/56319421
《GTSAM 的使用》
https://www.borg.cc.gatech.edu/download.html#download
《官网下载与安装说明》
On Windows:
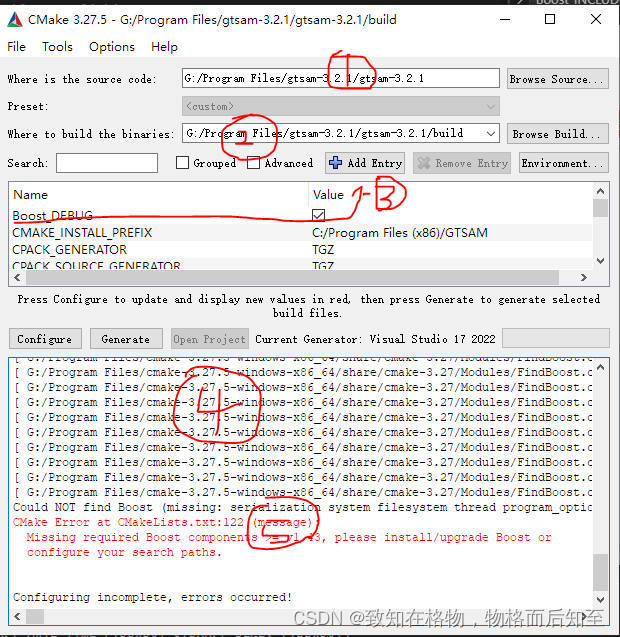
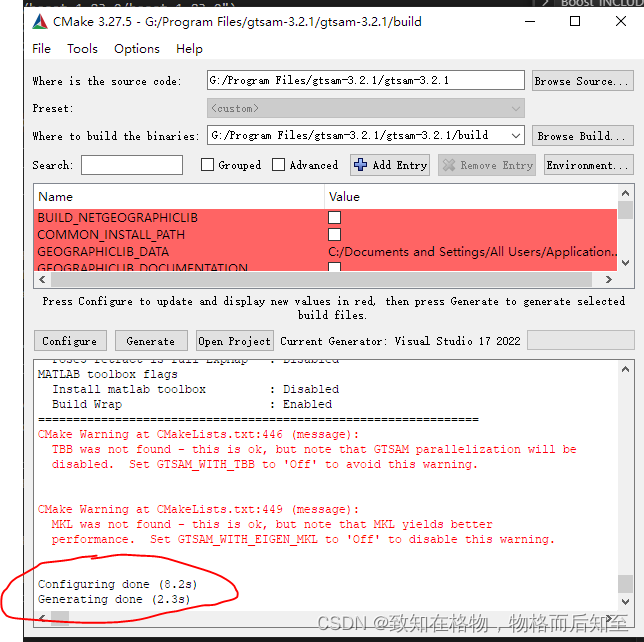
- 打开CMake GUI program,设置“”Where is the source code“” 为top-level GTSAM directory(解压后)(下图1), 然后设置build directory “Where to build the binaries”为一个子文件夹,例如 e.g. ‘…/build’(下图2).
You may want to change CMAKE_INSTALL_PREFIX to install GTSAM in your home directory instead of in Program Files. There is no need to set CMAKE_BUILD_TYPE. You may also set GTSAM_DISABLE_EXAMPLES_ON_INSTALL to speed up the compilation later on.
-
若没有自动找到 Boost(上图5), 通过设置如下CMake variables来提供提示给CMake:
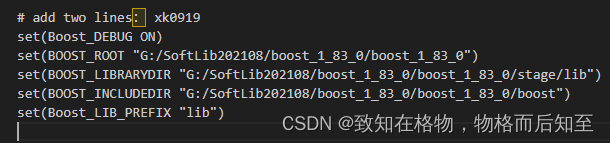
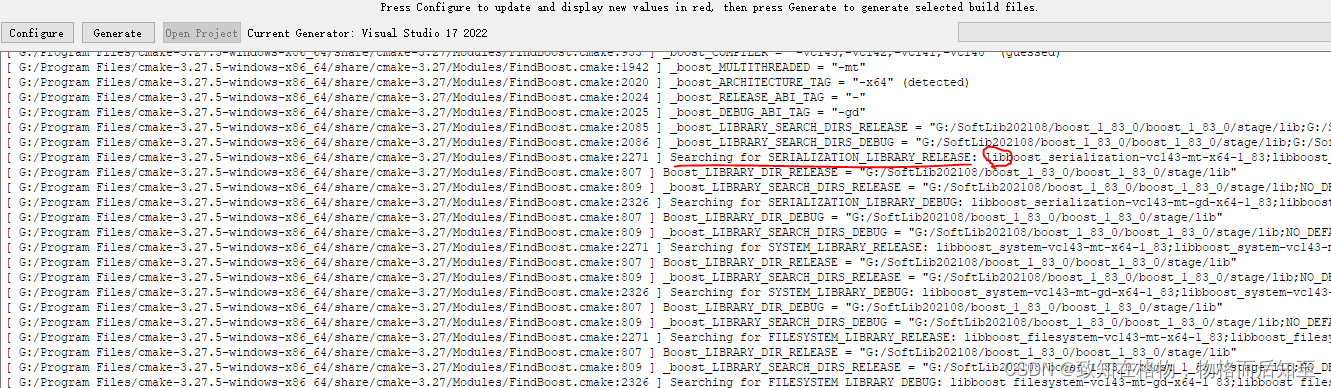
BOOST_ROOT and BOOST_INCLUDEDIR 为你安装的boost的相关文件夹. If problems persist, boolean variable Boost_DEBUG(上图3,或者增加语句 set(Boost_DEBUG ON) ) can be set to make the FindBoost script verbose (信息冗长的)(上图4).
尝试措施I:cmakelists.txt增加如下指定路径,仍然有错(上图5)。
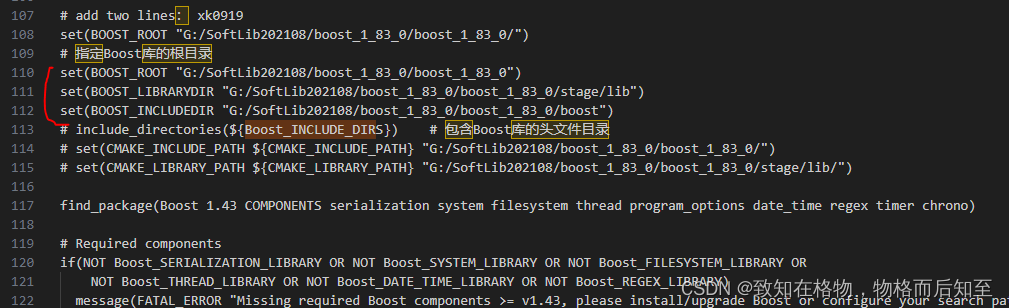
尝试措施II: 参考下列帖子,发现下列名称不同:
cmake中显示的信息: boost_serialization-vc143-mt-x64-1_83
gtsam-3.2.1中lib文件的名称信息:libboost_serialization-vc143-mt-x64-1_83
于是,我们添加set(Boost_LIB_PREFIX “lib”)来增加lib前缀
-
点击 ‘Configure’,然后点击 ‘Generate’. 第一次配置时,CMake会要求你选择编译器 compiler. 选择与所安装的Visual Studio版本相对应的Visual Studio选项。Do not choose NMake makefiles or Cygwin makefiles, our scripts are not compatible with these.
-
在设置的build文件夹路径下打开GTSAM.sln file. Subsequently, you can re-generate the solution files with MSVC still open and it will automatically reload them.
-
设置 build configuration (Debug, Release, etc) :Visual Studio toolbar下拉菜单中。注意,在CMake中设置 CMAKE_BUILD_TYPE 没有效果(除非 building the MATLAB wrapper, see below).

-
在solution browser(‘解决方案’), 在 'CMakePredefinedTargets’下的 ‘INSTALL’ project进行build(右键生成) . 确认Debug 和 Release 下都要build(生成) ‘INSTALL’ .
注意:If you prefer, it is not necessary to “install” GTSAM to build projects against it. Our CMake configuration will properly find and link to GTSAM. In your project CMake environment set GTSAM_DIR to the GTSAM build directory in which the solution files were generated.
如果您愿意,没有必要通过“安装”GTSAM进而针对它来build project。用户的CMake configuration将正确地找到并链接到GTSAM。在您的项目CMake环境中,将GTSAM_DIR设置为GTSAM build directory (生成解决方案文件的build 文件路径)。
三、CMAKE 创建立 使用GTSAM的Visual Studio项目
《5分钟学会使用cmake创建visual studio工程》
- cmake和visual studio假设你已经安装好了
- 在你下载cmake的文件夹中,找到cmake-gui.exe,它在cmake\cmake-3.20.0-rc1-windows-x86_64\bin中。点击打开,并填上你要打开项目的路径,在where to build……后加上**/build**即可:
- 点击configure,选择yes,选择你要运行.cpp文件的编辑器,一般是你本机安装的VS,然后finish
在您的项目CMake环境中,将GTSAM_DIR设置为GTSAM build directory (生成解决方案文件的build 文件路径) 例如:其中路径为本机根据上述二安装好的GTSAM的build路径
# add GTSAM path
set(GTSAM_DIR "G:/Program Files/gtsam-3.2.1/gtsam-3.2.1/build")
- 再点击Generate即可。此时会发现多了一个build文件
- 打开刚才新建的build文件中的.sln后缀名的项目文件
- 点击改解决方案并设置启动项为项目名
- 然后运行即可
参考文献
1.https://www.borg.cc.gatech.edu/download.html#documentation


 1912
1912

 被折叠的 条评论
为什么被折叠?
被折叠的 条评论
为什么被折叠?
 到【灌水乐园】发言


