


本文翻译整理自:https://docs.unsloth.ai/
文章目录
一、基本说明
Unsloth 基本介绍:https://blog.csdn.net/lovechris00/article/details/140404957
Unsloth 使微调大型语言模型,如Llama-3、Mistral、Phi-3和Gemma的速度提高了2倍,使用的内存减少了70%,并且精度没有下降! 我们的文档将帮助您完成自定义模型的训练。
它涵盖了创建数据集、运行和部署模型的基本要素。
本文档您还将学习如何集成第三方工具,使用Google Colab 等工具!
什么是微调,为什么?
如果我们想让语言模型学习一项新技能、一门新语言、一些新的编程语言,或者只是想让语言模型学习如何遵循和回答ChatGPT函数等指令,我们会进行微调!
微调是通过某种称为反向传播的过程来更新语言模型的实际“大脑”的过程。
但是,微调可能会变得非常缓慢并且非常耗费资源。
如何使用Unsloth?
我们的Unsloth开源版本可以安装在本地或其他GPU服务,如谷歌Colab。
大多数人通过谷歌Colab接口使用Unsloth,谷歌Colab提供了一个免费的GPU来训练。
您可以在这里访问我们所有的笔记本。
📒Unsloth Notebooks
Google Colab
Main notebooks:
- Llama 3.1 (8B)
- Mistral NeMo (12B)
- Gemma 2 (9B)
- Inference chat UI
- Phi-3.5 (mini)
- Llama 3 (8B)
- Mistral v0.3 (7B)
- Phi-3 (medium)
- Qwen2 (7B)
- Gemma (2B)
- TinyLlama
Other notebooks:
- ORPO
- Ollama
- Text Classification by Timotheeee
- Multiple Datasets by Flail
- DPO Zephyr
- Conversational
- ChatML
- Text Completion
- Continued Pretraining
- Mistral v0.3 Instruct (7B)
- CodeGemma (7B)
- Inference only
Kaggle
支持的所有模型 📚
See the list below for all our 4bit bnb uploaded models
You can also view all our uploaded models on Hugging Face directly.
https://docs.unsloth.ai/get-started/all-our-models
| Model | Base | Instruct |
|---|---|---|
| Llama 3.1 | 8B70B405B | 8B70B405B |
| Phi-3.5 | mini | |
| Mistral NeMo | 12B | 12B |
| Gemma 2 | 2B9B27B | 2B9B27B |
| Llama 3 | 8B70B | 8B70B |
| Phi-3 | minimedium | |
| Mistral | 7B (v0.3)7B (v0.2) | Large7B (v0.3)7B (v0.2) |
| Qwen2 | 1.5B7B72B | 1.5B7B72B |
| Llama 2 | 7B13B | 7B |
| TinyLlama | Base | Instruct |
| Zephyr SFT | Instruct | |
| CodeLlama | 7B13B34B | |
| Yi | 6B (v 1.5)6B34B | 34B |
二、安装📥
Learn to install Unsloth locally or on Google Colab.
1、更新
要更新Unsloth,请按照以下步骤操作:
无需依赖项 更新
pip uninstall unsloth -y
pip install --upgrade --no-cache-dir "unsloth[colab-new] @ git+https://github.com/unslothai/unsloth.git"
2、Conda 安装
要在Conda上本地安装Unsloth,请执行以下步骤:
选择pytorch-cuda=11.8用于CUDA 11.8 或 pytorch-cuda=12.1用于CUDA 12.1。
如果您有mamba,请使用mamba而不是conda以更快地解决。
有关调试Conda安装的帮助,请参阅此Github问题。
conda create --name unsloth_env \
    python=3.10 \
    pytorch-cuda=<11.8/12.1> \
    pytorch cudatoolkit xformers -c pytorch -c nvidia -c xformers \
    -y
conda activate unsloth_env

pip install "unsloth[colab-new] @ git+https://github.com/unslothai/unsloth.git"

pip install --no-deps "trl<0.9.0" peft accelerate bitsandbytes
3、Pip安装
要通过Pip在本地安装Unsloth,请执行以下步骤:
如果你有蟒蛇,不要使用这个。
你必须使用Conda安装方法,否则东西会坏掉。
1、通过以下方式查找您的CUDA版本
import torch; torch.version.cuda
2、对于Pytorch2.1.0:您可以通过Pip更新Pytorch(交换cu121/cu118)。
转到https://pytorch.org/了解更多信息。
为CUDA 11.8选择cu118或为CUDA 12.1选择cu121。
如果您有RTX 3060或更高版本(A100、H100等),请使用"ampere"路径。
对于Pytorch 2.1.1:转到步骤3。
对于Pytorch 2.2.0:转到步骤4。
pip install --upgrade --force-reinstall --no-cache-dir torch==2.1.0 triton \
  --index-url https://download.pytorch.org/whl/cu121
pip install "unsloth[cu118] @ git+https://github.com/unslothai/unsloth.git"
pip install "unsloth[cu121] @ git+https://github.com/unslothai/unsloth.git"
pip install "unsloth[cu118-ampere] @ git+https://github.com/unslothai/unsloth.git"
pip install "unsloth[cu121-ampere] @ git+https://github.com/unslothai/unsloth.git"
3、对于Pytorch 2.1.1:将"ampere"路径用于较新的RTX 30xx GPU或更高版本。
pip install --upgrade --force-reinstall --no-cache-dir torch==2.1.1 triton \
  --index-url https://download.pytorch.org/whl/cu121
pip install "unsloth[cu118-torch211] @ git+https://github.com/unslothai/unsloth.git"
pip install "unsloth[cu121-torch211] @ git+https://github.com/unslothai/unsloth.git"
pip install "unsloth[cu118-ampere-torch211] @ git+https://github.com/unslothai/unsloth.git"
pip install "unsloth[cu121-ampere-torch211] @ git+https://github.com/unslothai/unsloth.git"
4、对于Pytorch2.2.0:将"ampere"路径用于较新的RTX 30xx GPU或更高版本。
pip install --upgrade --force-reinstall --no-cache-dir torch==2.2.0 triton \
  --index-url https://download.pytorch.org/whl/cu121
pip install "unsloth[cu118-torch220] @ git+https://github.com/unslothai/unsloth.git"
pip install "unsloth[cu121-torch220] @ git+https://github.com/unslothai/unsloth.git"
pip install "unsloth[cu118-ampere-torch220] @ git+https://github.com/unslothai/unsloth.git"
pip install "unsloth[cu121-ampere-torch220] @ git+https://github.com/unslothai/unsloth.git"
5、如果出现错误,请先尝试以下操作,然后返回步骤1:
pip install --upgrade pip
6、对于Pytorch2.2.1:
# RTX 3090, 4090 Ampere GPUs:
pip install "unsloth[colab-new] @ git+https://github.com/unslothai/unsloth.git"
pip install --no-deps packaging ninja einops flash-attn xformers trl peft accelerate bitsandbytes

# Pre Ampere RTX 2080, T4, GTX 1080 GPUs:
pip install "unsloth[colab-new] @ git+https://github.com/unslothai/unsloth.git"
pip install --no-deps xformers "trl<0.9.0" peft accelerate bitsandbytes
7、对于Pytorch2.3.0:将"ampere"路径用于较新的RTX 30xx GPU或更高版本。
pip install "unsloth[cu118-torch230] @ git+https://github.com/unslothai/unsloth.git"
pip install "unsloth[cu121-torch230] @ git+https://github.com/unslothai/unsloth.git"
pip install "unsloth[cu118-ampere-torch230] @ git+https://github.com/unslothai/unsloth.git"
pip install "unsloth[cu121-ampere-torch230] @ git+https://github.com/unslothai/unsloth.git"
8、要对安装进行故障排除,请尝试以下操作(所有操作都必须成功)。
nvcc
python -m xformers.info
python -m bitsandbytes
4、Google Colab
要在Google Colab上安装和运行Unsloth,请执行以下步骤:
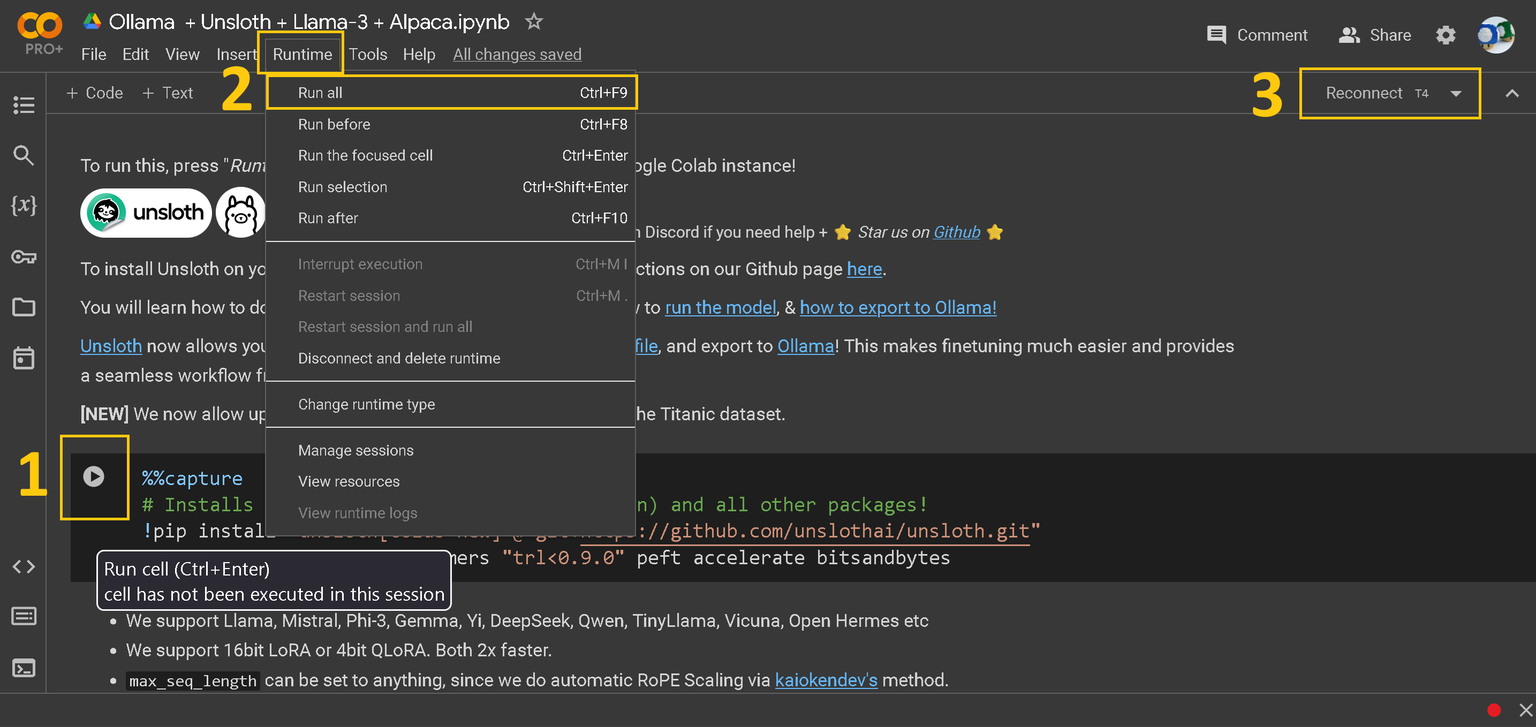
如果您从未使用过Colab笔记本,请快速了解笔记本本身:
1、在每个“单元格”播放按钮。
2、顶部工具栏中的运行时按钮。
3、连接/重新连接T4按钮。
第一个安装单元格如下所示:记得点击括号[]中的PLAY按钮。
我们获取我们的开源Github包,并安装其他一些包。

三、保存模型📂
了解如何保存您的微调模型,以便您可以在您最喜欢的推理引擎中运行它。
保存到GGUF
为GGUF将模型保存为16位,以便您可以将其用于Ollama、Jan AI、Open WebUI等!
本地地手动保存
要保存到GGUF,请使用以下命令在本地保存:
model.save_pretrained_gguf("dir", tokenizer, quantization_method = "q4_k_m")
model.save_pretrained_gguf("dir", tokenizer, quantization_method = "q8_0")
model.save_pretrained_gguf("dir", tokenizer, quantization_method = "f16")
要推送到集线器:
model.push_to_hub_gguf("hf_username/dir", tokenizer, quantization_method = "q4_k_m")
model.push_to_hub_gguf("hf_username/dir", tokenizer, quantization_method = "q8_0")
quantization_method
# https://github.com/ggerganov/llama.cpp/blob/master/examples/quantize/quantize.cpp#L19
# From https://mlabonne.github.io/blog/posts/Quantize_Llama_2_models_using_ggml.html
ALLOWED_QUANTS = \
{
    "not_quantized"  : "Recommended. Fast conversion. Slow inference, big files.",
    "fast_quantized" : "Recommended. Fast conversion. OK inference, OK file size.",
    "quantized"      : "Recommended. Slow conversion. Fast inference, small files.",
    "f32"     : "Not recommended. Retains 100% accuracy, but super slow and memory hungry.",
    "f16"     : "Fastest conversion + retains 100% accuracy. Slow and memory hungry.",
    "q8_0"    : "Fast conversion. High resource use, but generally acceptable.",
    "q4_k_m"  : "Recommended. Uses Q6_K for half of the attention.wv and feed_forward.w2 tensors, else Q4_K",
    "q5_k_m"  : "Recommended. Uses Q6_K for half of the attention.wv and feed_forward.w2 tensors, else Q5_K",
    "q2_k"    : "Uses Q4_K for the attention.vw and feed_forward.w2 tensors, Q2_K for the other tensors.",
    "q3_k_l"  : "Uses Q5_K for the attention.wv, attention.wo, and feed_forward.w2 tensors, else Q3_K",
    "q3_k_m"  : "Uses Q4_K for the attention.wv, attention.wo, and feed_forward.w2 tensors, else Q3_K",
    "q3_k_s"  : "Uses Q3_K for all tensors",
    "q4_0"    : "Original quant method, 4-bit.",
    "q4_1"    : "Higher accuracy than q4_0 but not as high as q5_0. However has quicker inference than q5 models.",
    "q4_k_s"  : "Uses Q4_K for all tensors",
    "q4_k"    : "alias for q4_k_m",
    "q5_k"    : "alias for q5_k_m",
    "q5_0"    : "Higher accuracy, higher resource usage and slower inference.",
    "q5_1"    : "Even higher accuracy, resource usage and slower inference.",
    "q5_k_s"  : "Uses Q5_K for all tensors",
    "q6_k"    : "Uses Q8_K for all tensors",
    "iq2_xxs" : "2.06 bpw quantization",
    "iq2_xs"  : "2.31 bpw quantization",
    "iq3_xxs" : "3.06 bpw quantization",
    "q3_k_xs" : "3-bit extra small quantization",
}
保存到Ollama
有关如何保存到Ollama的完整过程,请参阅下面的指南:
🦙如何微调Llama-3并导出到Ollama:https://docs.unsloth.ai/tutorials/how-to-finetune-llama-3-and-export-to-ollama
在Google Colab上保存
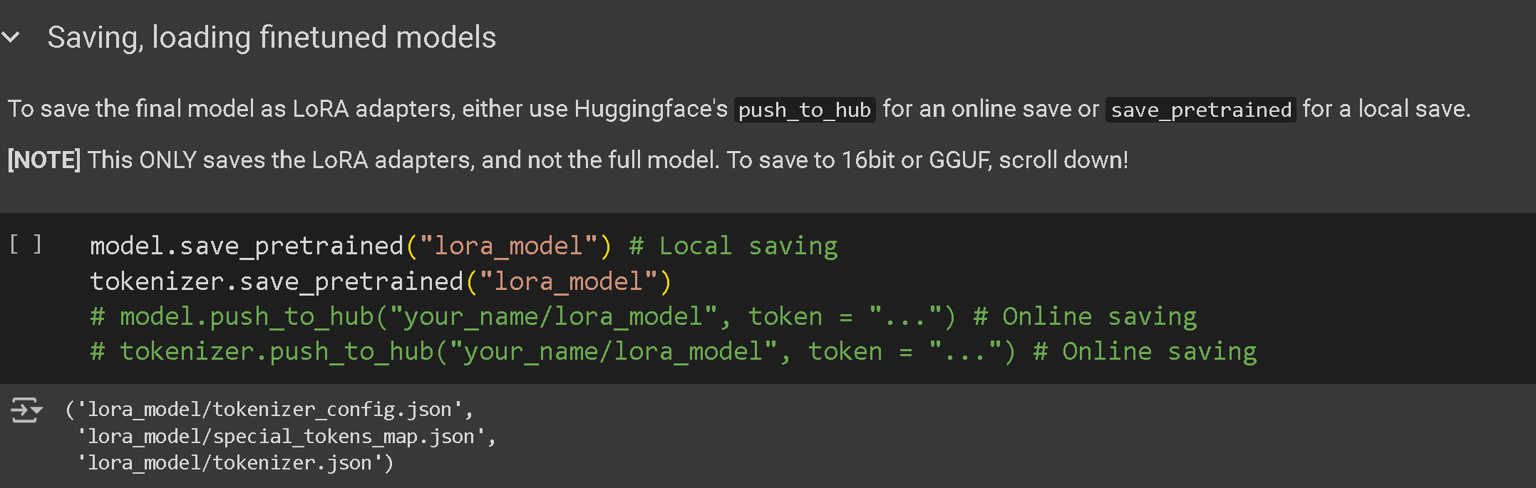
您可以将微调模型保存为一个100MB的小文件,称为LoRA适配器,如下所示。
如果您想上传模型,您也可以推送到 Hugging Face 中心!请记住通过以下方式获取 Hugging Face token:https://huggingface.co/settings/tokens 并添加令牌!
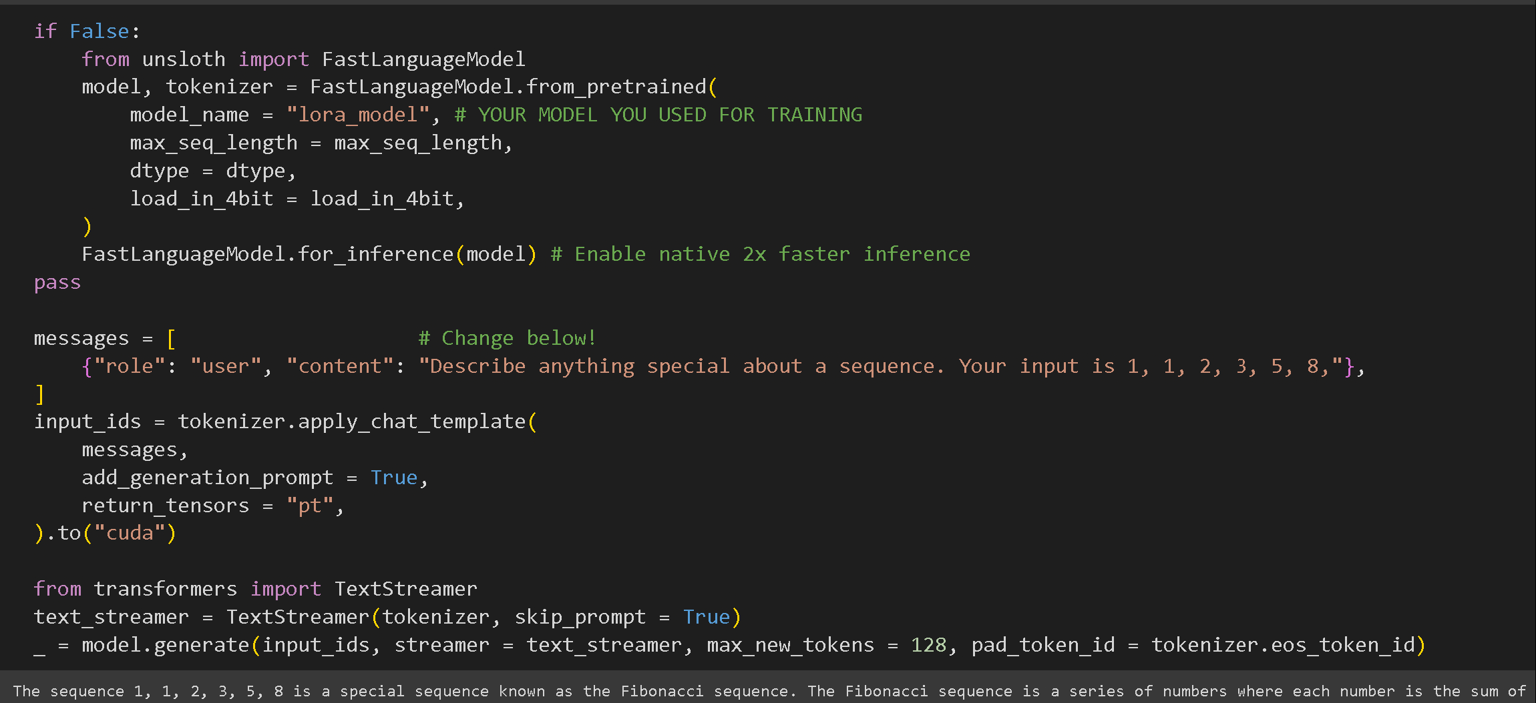
保存模型后,我们可以再次使用Unsloth运行模型本身!再次使用FastLanguageModel调用它进行推理!
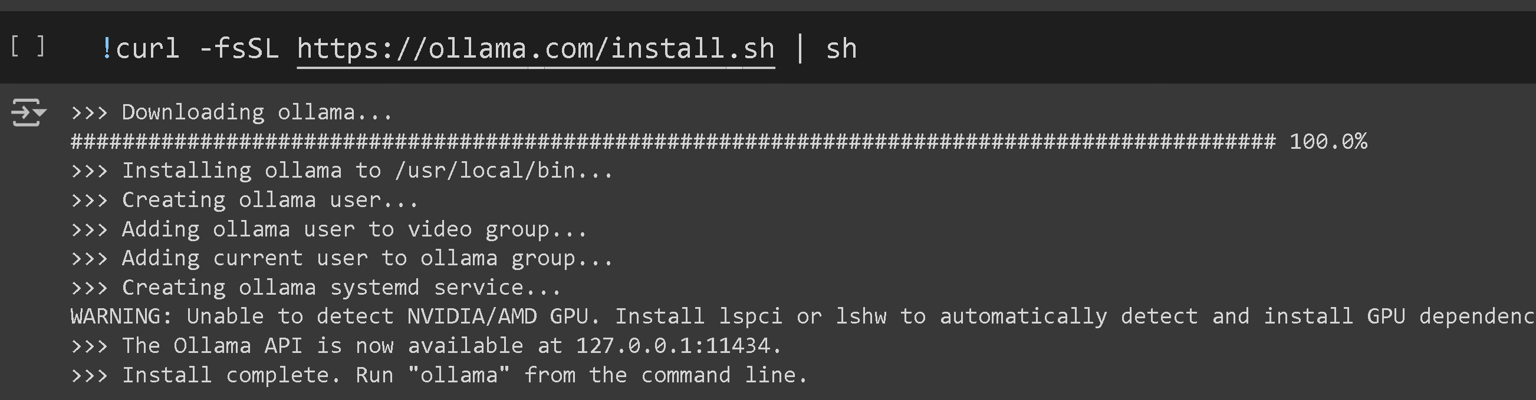
出口到Ollama
最后,我们可以将微调模型导出到Ollama本身!首先,我们必须在Colab笔记本中安装Ollama:
然后我们将我们必须的finetuned模型导出为llama. cpp的GGUF格式,如下所示:
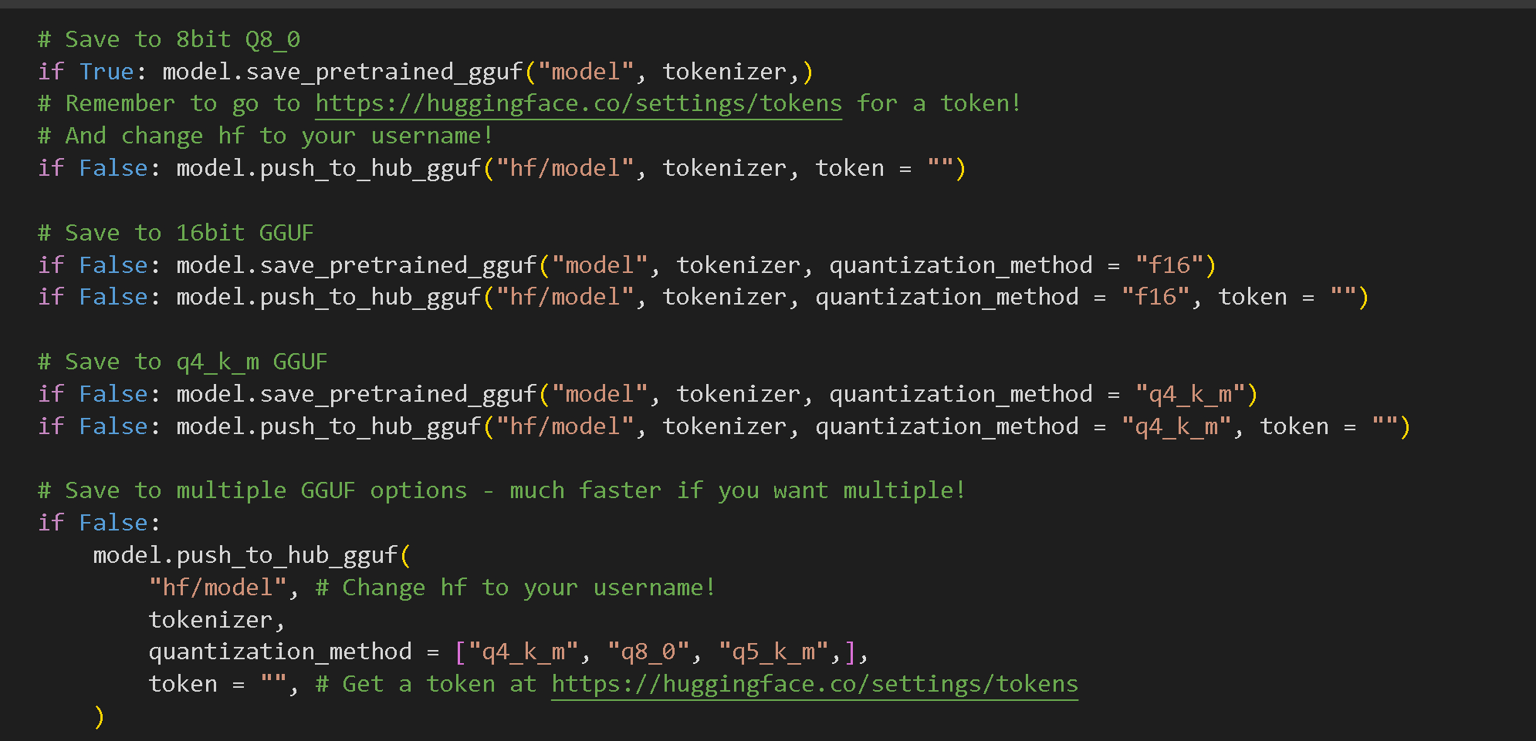
提醒1行要将False转换为True,不要将每一行都更改为True,否则您将等待很长时间!我们通常建议将第一行设置为True,因此我们可以将finetuned模型快速导出为Q8_0格式(8位量化)。
我们还允许您导出到整个量化方法列表,其中一个流行的是q4_k_m。
前往https://github.com/ggerganov/llama.cpp了解更多关于GGUF的信息。
如果您愿意,我们还有一些关于如何导出到GGUF的手动说明:https://github.com/unslothai/unsloth/wiki#manually-saving-to-gguf
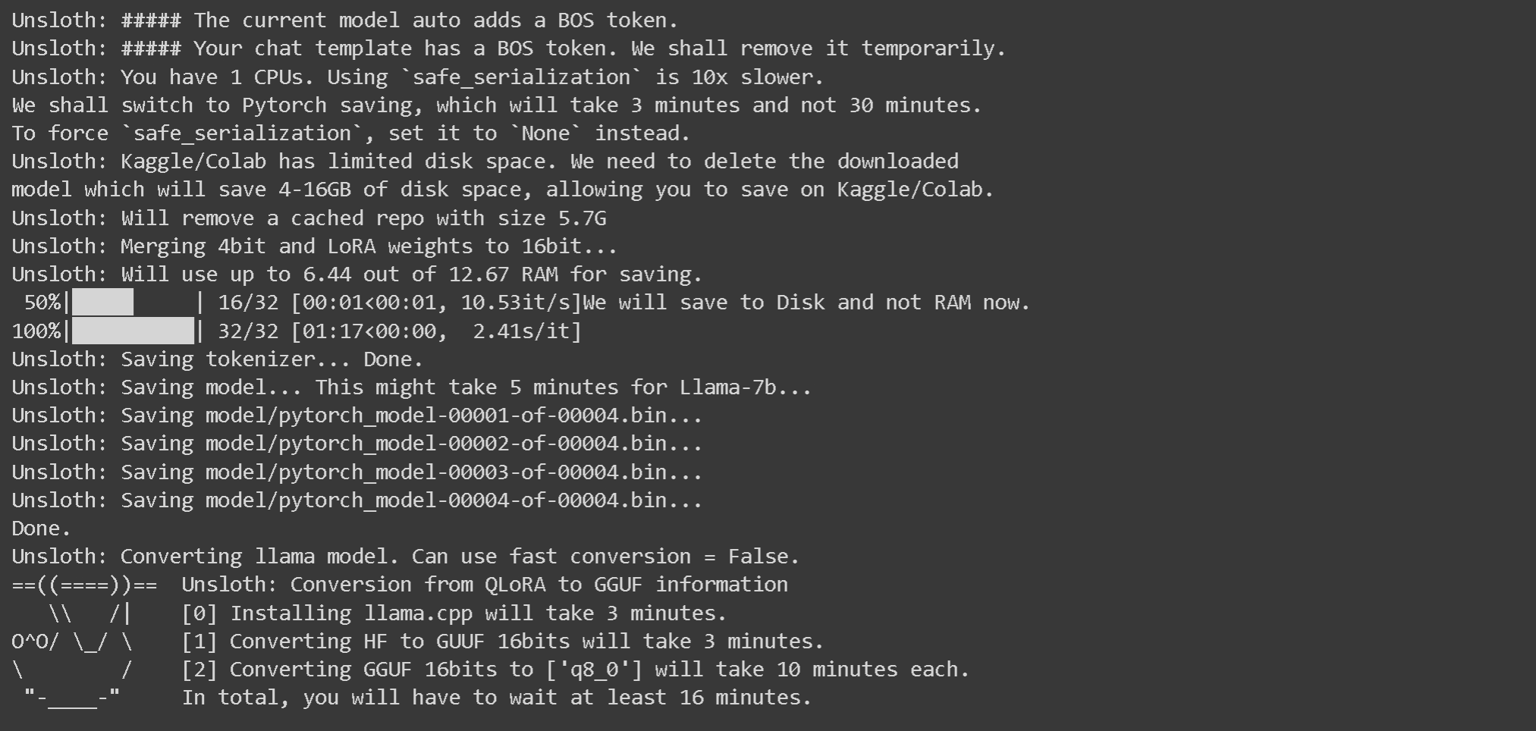
您将看到一长串如下所示的文本-请等待5到10分钟!!
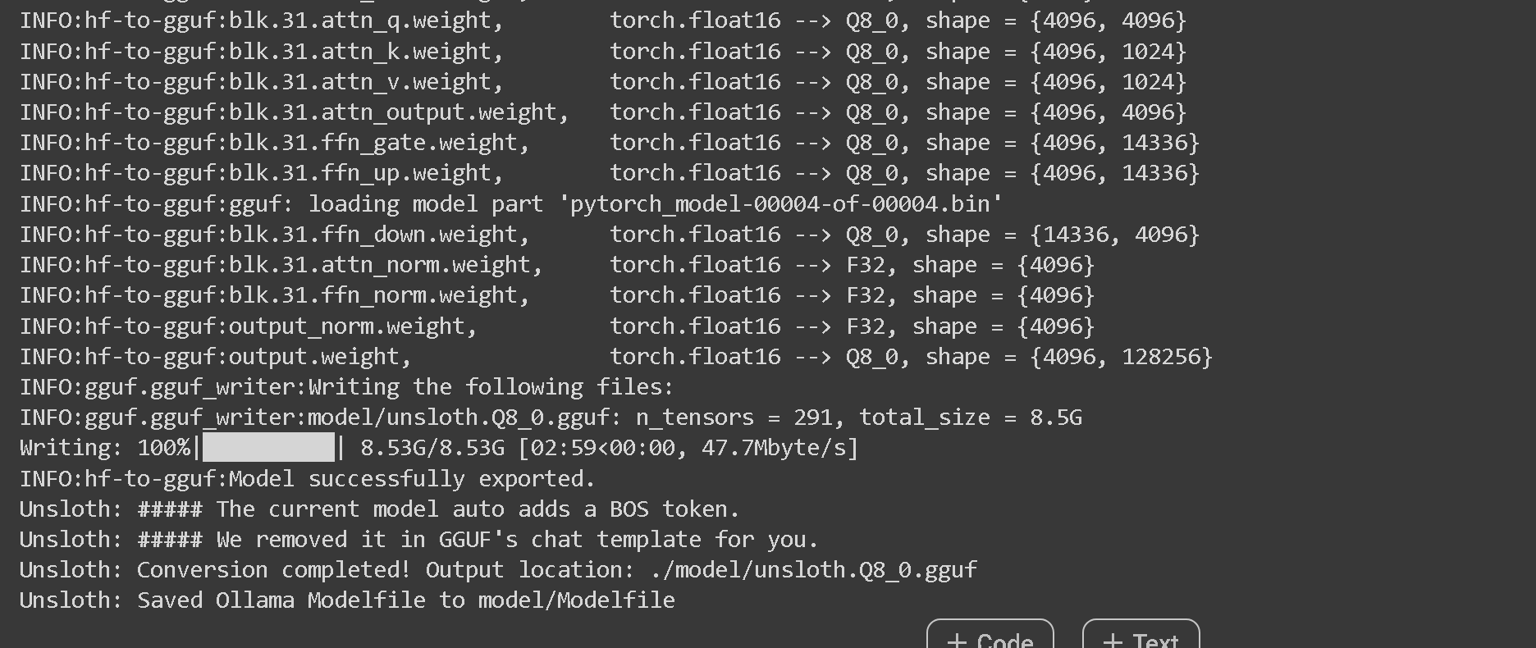
最后在最后,它看起来像下面:
然后,我们必须在后台运行Ollama本身。
我们使用subprocess,因为Colab不喜欢异步调用,但通常只需在终端/命令提示符下运行ollama serve。

自动创建Modelfile
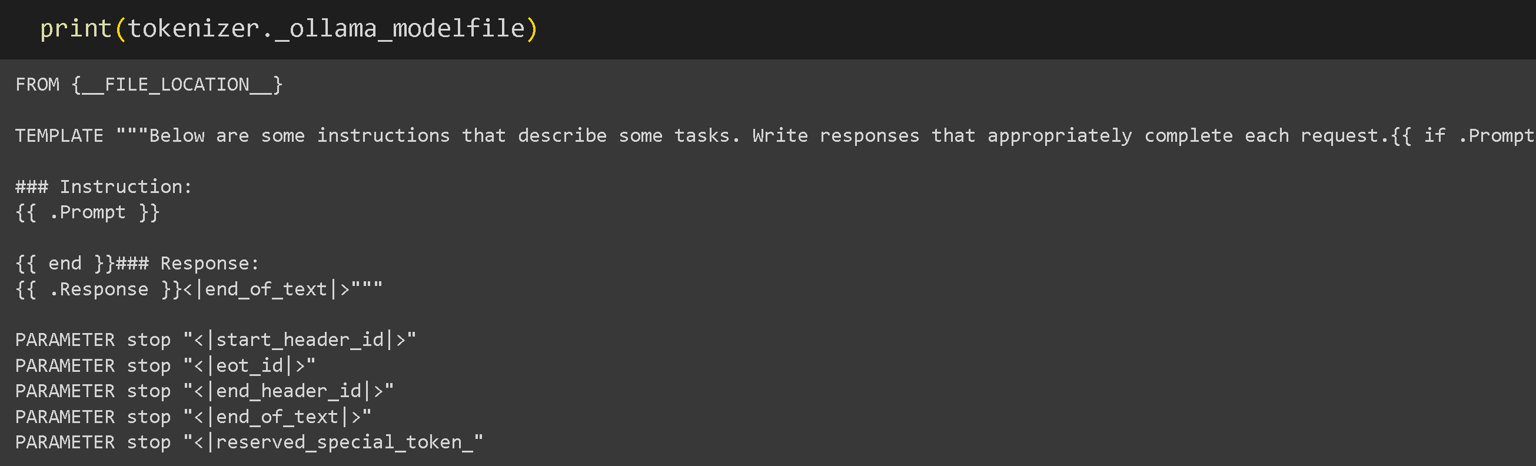
Unsloth提供的技巧是我们自动创建Ollama需要的Modelfile!这只是一个设置列表,包括我们用于finetune过程的聊天模板!您还可以打印生成的Modelfile,如下所示:
然后我们要求Ollama创建一个与Ollama兼容的模型,通过使用Modelfile

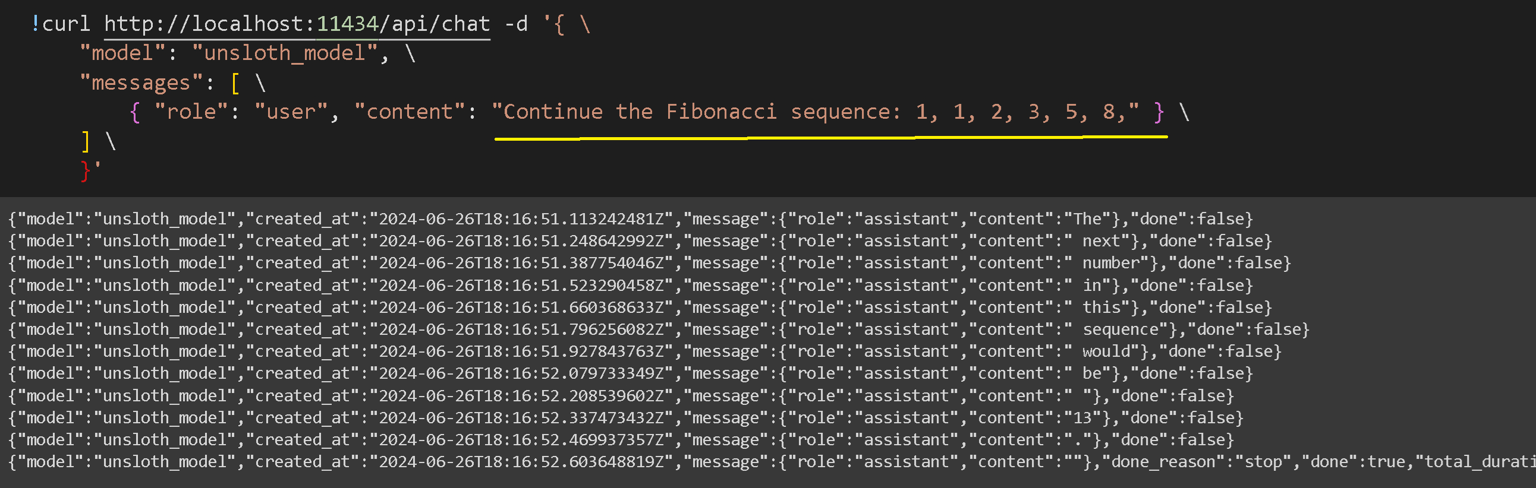
Ollama 推理
如果您想调用在您自己的本地机器上运行的Ollama服务器本身/在后台的免费Colab笔记本中,我们现在可以调用模型进行推理。
请记住,您可以编辑黄色下划线部分。
保存到VLLM
为VLLM将模型保存到16bit
要为VLLM保存到16位,请使用:
model.save_pretrained_merged("model", tokenizer, save_method = "merged_16bit",)
model.push_to_hub_merged("hf/model", tokenizer, save_method = "merged_16bit", token = "")
要合并到4bit以加载HuggingFace,请先调用merged_4bit。
如果您确定要合并到4bit,请使用merged_4bit_forced。
我强烈劝阻您,除非您知道要使用4bit模型做什么(例如用于DPO训练或HuggingFace的在线推理引擎)
model.save_pretrained_merged("model", tokenizer, save_method = "merged_4bit",)
model.push_to_hub_merged("hf/model", tokenizer, save_method = "merged_4bit", token = "")
要仅保存LoRA适配器,请使用:
model.save_pretrained(...) AND tokenizer.save_pretrained(...)
或者只是使用我们的内置函数来做到这一点:
model.save_pretrained_merged("model", tokenizer, save_method = "lora",)
model.push_to_hub_merged("hf/model", tokenizer, save_method = "lora", token = "")
故障排除
保存到safetensors,而不是Colab中的bin格式
我们保存到Colab中的.bin,所以速度快了4倍,但是设置safe_serialization = None以强制保存到.safetensors。
所以model.save_pretrained(..., safe_serialization = None)或model.push_to_hub(..., safe_serialization = None)
如果保存到GGUF或vLLM 16bit崩溃
您可以尝试通过更改maximum_memory_usage来减少保存期间的最大GPU使用量。
默认是model.save_pretrained(..., maximum_memory_usage = 0.75)。
将其减少到0.5以使用50%的GPU峰值内存或更低。
这可以减少保存过程中的OOM崩溃。
四、继续预训练♻️
又名继续微调。Unsloth允许您不断进行预训练,以便模型可以学习一门新语言。
text completion notebook 用于继续预训练/原始文本。
continued pretraining notebook 用于学习另一种语言。
你可以在我们的博客文章中阅读更多关于持续预训练和我们发布的信息。
1、什么是持续预训练?
持续或持续预训练(CPT)对于“引导”语言模型理解新的知识领域或分布领域是必要的。
像Llama-38b或米斯特拉尔7b这样的基础模型首先在数万亿个令牌的巨大数据集上进行预训练(例如Llama-3是15万亿)。
但有时这些模型在其他语言或文本特定领域(如法律、医学或其他领域)上没有得到很好的训练。
因此,继续预训练(CPT)对于使语言模型学习新的标记或数据集是必要的。
2、高级功能:
2.1 加载LoRA适配器以继续微调
如果您通过Unsloth保存了LoRA适配器,您还可以使用LoRA权重继续训练。优化器状态也将重置。
要加载偶数优化器状态以继续微调,请参阅下一节。
from unsloth import FastLanguageModel
model, tokenizer = FastLanguageModel.from_pretrained(
    model_name = "LORA_MODEL_NAME",
    max_seq_length = max_seq_length,
    dtype = dtype,
    load_in_4bit = load_in_4bit,
)
trainer = Trainer(...)
trainer.train()
2.2 继续预训练和微调lm_head和embed_tokens矩阵
添加lm_head和embed_tokens。
对于Colab,有时Llama-38b内存溢出。
如果是这样,只需添加lm_head。
model = FastLanguageModel.get_peft_model(
    model,
    r = 16,
    target_modules = ["q_proj", "k_proj", "v_proj", "o_proj",
                      "gate_proj", "up_proj", "down_proj",
                      "lm_head", "embed_tokens",],
    lora_alpha = 16,
)
然后使用2种不同的学习率——lm_head或embed_tokens使用2-10倍的小学习率:
from unsloth import UnslothTrainer, UnslothTrainingArguments

trainer = UnslothTrainer(
    ....
    args = UnslothTrainingArguments(
        ....
        learning_rate = 5e-5,
        embedding_learning_rate = 5e-6, # 2-10x smaller than learning_rate
    ),
)
五、聊天模板💬
Colab聊天模板笔记本列表:
- Conversational
- ChatML
- Ollama
- Text Classification by Timotheeee
- Multiple Datasets by Flail
更多信息
假设您的数据集是如下所示的字典列表:
[
    [{'from': 'human', 'value': 'Hi there!'},
     {'from': 'gpt', 'value': 'Hi how can I help?'},
     {'from': 'human', 'value': 'What is 2+2?'}],
    [{'from': 'human', 'value': 'What's your name?'},
     {'from': 'gpt', 'value': 'I'm Daniel!'},
     {'from': 'human', 'value': 'Ok! Nice!'},
     {'from': 'gpt', 'value': 'What can I do for you?'},
     {'from': 'human', 'value': 'Oh nothing :)'},],
]
您可以使用我们的get_chat_template来格式化它。
选择chat_template 为任意 zephyr, chatml, mistral, llama, alpaca, vicuna, vicuna_old, unsloth,并使用mapping映射字典值from,value等。
map_eos_token允许您映射<|im_end|>到EOS无需任何训练。
from unsloth.chat_templates import get_chat_template

tokenizer = get_chat_template(
    tokenizer,
    chat_template = "chatml", # Supports zephyr, chatml, mistral, llama, alpaca, vicuna, vicuna_old, unsloth
    mapping = {"role" : "from", "content" : "value", "user" : "human", "assistant" : "gpt"}, # ShareGPT style
    map_eos_token = True, # Maps <|im_end|> to </s> instead
)

def formatting_prompts_func(examples):
    convos = examples["conversations"]
    texts = [tokenizer.apply_chat_template(convo, tokenize = False, add_generation_prompt = False) for convo in convos]
    return { "text" : texts, }
pass

from datasets import load_dataset
dataset = load_dataset("philschmid/guanaco-sharegpt-style", split = "train")
dataset = dataset.map(formatting_prompts_func, batched = True,)
您还可以制作自己的自定义聊天模板!例如,我们使用的内部聊天模板如下。
您必须传入(custom_template, eos_token)的tuple,其中eos_token必须在模板中使用。
unsloth_template = \
    "{{ bos_token }}"\
    "{{ 'You are a helpful assistant to the user\n' }}"\
    "</div>"\
    "<div data-gb-custom-block data-tag="for">"\
        "<div data-gb-custom-block data-tag="if" data-0='role' data-1='role' data-2='] == ' data-3='user'>"\
            "{{ '>>> User: ' + message['content'] + '\n' }}"\
        "<div data-gb-custom-block data-tag="elif" data-0='role' data-1='role' data-2='] == ' data-3='assistant'></div>"\
            "{{ '>>> Assistant: ' + message['content'] + eos_token + '\n' }}"\
        "</div>"\
    "</div>"\
    "<div data-gb-custom-block data-tag="if">"\
        "{{ '>>> Assistant: ' }}"\
    "</div>"
unsloth_eos_token = "eos_token"

tokenizer = get_chat_template(
    tokenizer,
    chat_template = (unsloth_template, unsloth_eos_token,), # You must provide a template and EOS token
    mapping = {"role" : "from", "content" : "value", "user" : "human", "assistant" : "gpt"}, # ShareGPT style
    map_eos_token = True, # Maps <|im_end|> to </s> instead
)
六、LoRA参数百科全书💡
了解参数如何影响微调过程。由 Sebastien 撰写。
1、LoraConfig参数
调整LoraConfig参数可以让您在低秩自适应(LoRA)中平衡模型性能和计算效率。
以下是关键参数的简明细分:
r
- 描述:分解权重矩阵 的低秩分解秩。
- 影响:
- 更高:保留更多信息,增加计算负载。
- 更低:更少的参数,更有效的训练,如果太小,潜在的性能下降。
lora_alpha
- 描述:低秩矩阵贡献的缩放因子。
- 影响:
- 更高:增加影响力,加速收敛,有不稳定或过度拟合的风险。
- 较低:效果更微妙,可能需要更多的训练步骤。
lora_dropout
- 描述:将低秩矩阵中的元素归零以进行正则化的概率。
- 影响:
- 更高:更多的正则化,防止过度拟合,可能会减慢训练并降低性能。
- 更低:更少的正则化,可能会加快训练,有过度拟合的风险。
loftq_config
- 描述:LoftQ的配置,一种用于 骨干权重 和 LoRA层初始化的量化方法。
- 影响:
- 非无:如果指定,LoftQ将量化主干权重并初始化LoRA层。
它需要设置init_lora_weights='loftq'。 - 无:未应用LoftQ量化。
- 注意:使用LoftQ时不要传递已经量化的模型,因为LoftQ本身会处理量化过程。
- 非无:如果指定,LoftQ将量化主干权重并初始化LoRA层。
use_rslora
- 说明:启用 Rank-Stabilized LoRA(RSLora)。
- 影响:
- True:使用Rank-Stabilize LoRA,将适配器缩放因子设置为
lora_alpha/math.sqrt(r),这已被证明可以更好地工作,根据Rank-Stabilize LoRA论文。 - False:使用原始默认缩放因子
lora_alpha/r。
- True:使用Rank-Stabilize LoRA,将适配器缩放因子设置为
gradient_accumulation_steps
- 默认值:1
- 说明:在执行反向传播更新之前累积梯度的步骤数。
- 影响:
- 更高:在多个步骤上积累梯度,在不需要额外内存的情况下有效增加批量大小。
这可以提高训练稳定性和收敛性,尤其是在大型模型和有限硬件的情况下。 - 更低:更新更快,但每步可能需要更多内存并且可能不太稳定。
- 更高:在多个步骤上积累梯度,在不需要额外内存的情况下有效增加批量大小。
weight_decay
- 默认值:0.01
- 描述:正则化技术,在训练期间对重量施加少量惩罚。
- 影响:
- 非零值(例如 0.01):将与权重大小成比例的惩罚添加到损失函数中,通过阻止大权重来帮助防止过拟合。
- 零:不应用权重衰减,这可能导致过拟合,尤其是在大型模型或小型数据集中。
learning_rate
- 默认值:2e-4
- 描述:模型在训练期间更新其参数的速率。
- 影响:
- 更高:更快的收敛,但有超过最佳参数并导致训练不稳定的风险。
- 更低:更稳定和更精确的更新,但可能会减慢收敛速度,需要更多的训练步骤才能获得良好的性能。
2、目标模块
q_proj(query投影)
- 描述:转换器模型中注意力机制的一部分,负责将输入投影到查询空间中。
- 影响:将输入转换为用于计算注意力分数的查询向量。
k_proj(key 投影)
- 描述:将输入投影到注意力机制中的键空间。
- 影响:生成与查询向量进行比较的关键向量以确定注意力权重。
v_proj(value 预测)
- 描述:将输入投射到注意力机制中的值空间中。
- 影响:产生由注意力分数加权并组合形成输出的值向量。
o_proj(输出投影)
- 描述:将注意力机制的输出投影回原始空间。
- 影响:将组合的加权值向量转换回输入维度,将注意力结果集成到模型中。
gate_proj(门投影)
- 描述:通常用于神经网络中的门控机制,例如门控循环单元(GRU)中的门控单元或其他门控机制。
- 影响:控制通过门的信息流,允许基于学习权重的选择性信息传递。
up_proj(up 投影)
- 描述:用于上投影,通常增加输入的维数。
- 影响:将输入扩展到更高维度的空间,通常用于前馈层或在具有不同维度的不同层之间转换时使用。
down_proj(down 投影)
- 描述:用于下投影,通常降低输入的维数。
- 影响:将输入压缩到低维空间,有助于降低计算复杂性和控制模型大小。
七、奖励建模-DPO&ORPO🏆
要将DPO或ORPO与Unsloth一起使用,请按照以下步骤操作:
DPO(直接偏好优化)、ORPO(赔率偏好优化)、PPO、奖励建模 都适用于Unsloth。
我们有用于再现ORPO和DPO Zephy r的Google Colab笔记本:
我们也在 🤗 Hugging Face 的官方文档中!我们在SFT文档和DPO文档上。
DPO代码
from unsloth import FastLanguageModel, PatchDPOTrainer
from unsloth import is_bfloat16_supported
PatchDPOTrainer()
import torch
from transformers import TrainingArguments
from trl import DPOTrainer

model, tokenizer = FastLanguageModel.from_pretrained(
    model_name = "unsloth/zephyr-sft-bnb-4bit",
    max_seq_length = max_seq_length,
    dtype = None,
    load_in_4bit = True,
)

# Do model patching and add fast LoRA weights
model = FastLanguageModel.get_peft_model(
    model,
    r = 64,
    target_modules = ["q_proj", "k_proj", "v_proj", "o_proj",
                      "gate_proj", "up_proj", "down_proj",],
    lora_alpha = 64,
    lora_dropout = 0, # Supports any, but = 0 is optimized
    bias = "none",    # Supports any, but = "none" is optimized
    # [NEW] "unsloth" uses 30% less VRAM, fits 2x larger batch sizes!
    use_gradient_checkpointing = "unsloth", # True or "unsloth" for very long context
    random_state = 3407,
    max_seq_length = max_seq_length,
)

dpo_trainer = DPOTrainer(
    model = model,
    ref_model = None,
    args = TrainingArguments(
        per_device_train_batch_size = 4,
        gradient_accumulation_steps = 8,
        warmup_ratio = 0.1,
        num_train_epochs = 3,
        fp16 = not is_bfloat16_supported(),
        bf16 = is_bfloat16_supported(),
        logging_steps = 1,
        optim = "adamw_8bit",
        seed = 42,
        output_dir = "outputs",
    ),
    beta = 0.1,
    train_dataset = YOUR_DATASET_HERE,
    # eval_dataset = YOUR_DATASET_HERE,
    tokenizer = tokenizer,
    max_length = 1024,
    max_prompt_length = 512,
)
dpo_trainer.train()
八、推理 🖥️
了解如何运行您的微调模型。
Unsloth原生支持2倍速度的推理。对于我们的仅推理笔记本,请单击此处。
所有QLoRA、LoRA和非LoRA推理路径都快2倍。这不需要更改代码或任何新的依赖项。
from unsloth import FastLanguageModel
model, tokenizer = FastLanguageModel.from_pretrained(
    model_name = "lora_model", # YOUR MODEL YOU USED FOR TRAINING
    max_seq_length = max_seq_length,
    dtype = dtype,
    load_in_4bit = load_in_4bit,
)
FastLanguageModel.for_inference(model) # Enable native 2x faster inference
text_streamer = TextStreamer(tokenizer)
_ = model.generate(**inputs, streamer = text_streamer, max_new_tokens = 64)
没有实现错误:需要UTF-8语言环境。得到 ANSI。
有时执行 cell 时会出现此错误。
要解决此问题,请在新cell 中运行以下命令:
import locale
locale.getpreferredencoding = lambda: "UTF-8"
九、从上次 Checkpoint 进行微调🏁
Checkpoint 允许您保存微调进度,以便您可以暂停它,然后继续。
您必须先编辑Trainer以添加save_strategy和save_steps。
下面每50步将检查点保存到文件夹outputs中。
trainer = SFTTrainer(
    ....
    args = TrainingArguments(
        ....
        output_dir = "outputs",
        save_strategy = "steps",
        save_steps = 50,
    ),
)
然后在 trainer 执行:
trainer_stats = trainer.train(resume_from_checkpoint = True)
他们将从最近的检查站开始,继续训练。
Wandb集成
# Install library
!pip install wandb --upgrade

# Setting up Wandb
!wandb login <token>

import os

os.environ["WANDB_PROJECT"] = "<name>"
os.environ["WANDB_LOG_MODEL"] = "checkpoint"
然后在TrainingArguments() 设置
report_to = "wandb",
logging_steps = 1, # Change if needed
save_steps = 100 # Change if needed
run_name = "<name>" # (Optional)
要训练模型,请执行trainer.train();要恢复训练,请执行
import wandb
run = wandb.init()
artifact = run.use_artifact('<username>/<Wandb-project-name>/<run-id>', type='model')
artifact_dir = artifact.download()
trainer.train(resume_from_checkpoint=artifact_dir)
十、错误处理⚠️
要修复设置中的任何错误,请参阅以下内容:
1、保存到GGUF/vLLM 16位崩溃
您可以尝试通过更改maximum_memory_usage来减少保存期间的最大GPU使用量。
默认是model.save_pretrained(..., maximum_memory_usage = 0.75)。
将其减少到0.5以使用50%的GPU峰值内存或更低。
这可以减少保存过程中的OOM崩溃。
2、评估循环-也是OOM或崩溃。
将评估的训练师设置设置为:
SFTTrainer(
    args = TrainingArguments(
        fp16_full_eval = True,
        per_device_eval_batch_size = 2,
        eval_accumulation_steps = 4,
        evaluation_strategy = "steps",
        eval_steps = 1,
    ),
    train_dataset = train_dataset,
    eval_dataset = eval_dataset,
这将导致没有OOM,并使其在没有向上转换到float32的情况下稍微快一些。
3、没有实现错误:需要UTF-8语言环境,得到ANSI
详见: https://github.com/googlecolab/colabtools/issues/3409
在新单元格中,运行以下命令:
import locale
locale.getpreferredencoding = lambda: "UTF-8"
2024-08-24(六)


 32
32

 被折叠的 条评论
为什么被折叠?
被折叠的 条评论
为什么被折叠?
 到【灌水乐园】发言


