


Llama 2 是来自 Meta 的第二代开源LLM的集合,旨在处理各种自然语言处理任务,模型的规模从 7B(70亿)到 70B(700亿)个参数不等,可以商用。
前排提示,文末有大模型AGI-CSDN独家资料包哦!
Llama-2-Chat 针对对话进行了优化,显示出与 ChatGPT 和 PaLM 等流行的闭源模型相似的性能。我们可以通过在高质量的对话数据集上微调模型来获得更高的模型性能。
Llama 系列不仅性能非常优秀,而且社区最为完善,特别是架构和代码是行业标杆,很多大模型公司都是基于 Llama 2 在构建自己的大模型,而且今年 Llama 3 也会开源,因此 Llama 系列是所有 LLMer 们必看、必学、 必会的一个开源大语言模型了。
机器学习中的微调(Fine-Tuning)是在新数据上调整预训练模型的权重和参数以提高其在特定任务上的性能的过程。它涉及在一个针对手头任务的新数据集上训练模型,同时更新模型的权重以适应新数据。
本篇文章就来一步一步的教大家怎样基于 Llama-2-7B-Chat 微调一个自己的大语言模型,文章略长和详细,大家可以先一键三连(点赞、收藏、分享)再阅读。
硬件配置
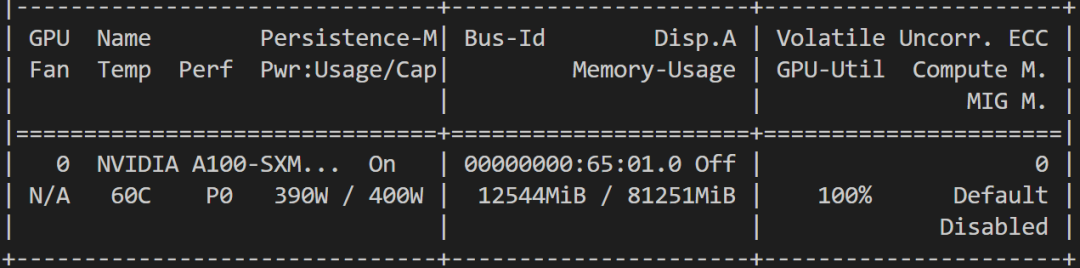
为了能让更多人能运行本教程,代码使用了参数高效微调技术(Parameter-Efficient Fine-Tuning,PEFT)进行训练,比如 LoRA 或者 QLoRA,因此一块 16G 左右显存的 GPU 即可完成该任务,比如 T4、RTX 3090 等,当然更高端的显卡同样支持了,比如 V100、A100、甚至 H100(如果你有😜)。
训练过程显存占用如下图所示:
代码环境配置
编程工具:VSCode
插件:Jupyter
使用 VSCode IDE 和 Notebook 进行交互演示,为了能在 VSCode 中使用 Notebook,需要先安装 Jupyter 插件。
安装依赖库
我们将使用 QLoRA 技术以 4bit 精度微调模型并优化显存使用。因此我们需要安装 Hugging Face 生态的 LLM 库:transformers、accelerate、peft、trl、bitsandbytes。
另外模型训练基础库 torch 和数据加载库 datasets 是不必多说的了。
安装命令如下:
pip install torch datasets accelerate peft bitsandbytes transformers trl
导入依赖库
导入依赖库中需要的模块:
import os
import torch
from datasets import load_dataset
from transformers import (
    AutoModelForCausalLM,
    AutoTokenizer,
    BitsAndBytesConfig,
    TrainingArguments,
    pipeline,
    logging,
)
from peft import LoraConfig
from trl import SFTTrainer
如遇到 peft ImportError,可尝试从github pip 安装。
ImportError: cannot import name ‘prepare_model_for_kbit_training’ from ‘peft’.
pip install git+https://github.com/huggingface/peft
模型和数据配置
你可以通过 Meta 的官方渠道申请在 Hugging Face 上的官方 Llama-2-7b-chat-hf 模型,如果遇到网址无法访问或者等待不到申请回复,你可以使用 https://huggingface.co/NousResearch/Llama-2-7b-chat-hf 这个模型。
我们使用 guanaco-llama2-1k 这个很小的数据集进行微调模型,数据集地址为 https://huggingface.co/datasets/mlabonne/guanaco-llama2-1k。
# Model from Hugging Face hub
# 如果你的运行环境可以访问 Hugging Face
# base_model = "NousResearch/Llama-2-7b-chat-hf"
# 如果你的运行环境不能访问 Hugging Face,可以将全部模型文件下载到本地
base_model = "/root/aidaily/model/meta-llama/Llama-2-7b-chat-hf"

# New instruction dataset
# 如果你的运行环境可以访问 Hugging Face
# guanaco_dataset = "mlabonne/guanaco-llama2-1k"
# 如果你的运行环境不能访问 Hugging Face,可以将数据集下载到本地
guanaco_dataset = "/root/aidaily/mlabonne/guanaco-llama2-1k"

# Fine-tuned model name
new_model = "llama-2-7b-chat-guanaco"
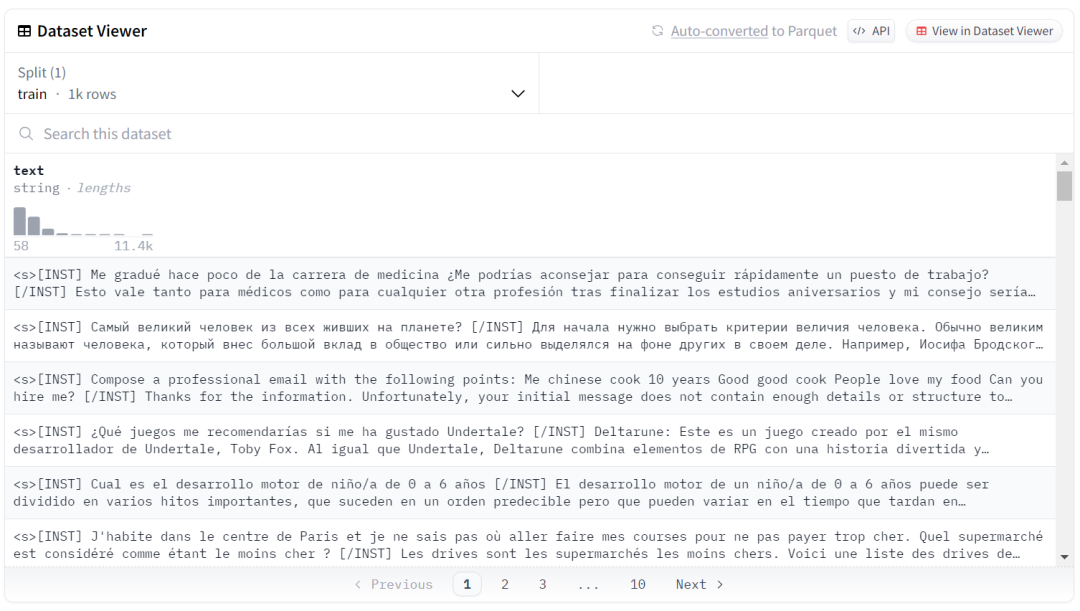
数据样子如下图所示(大家可以好好学习一下数据格式,这样就可以训练自己的任何行业大语言模型了🤪):
加载数据
Guanaco-llama2-1k 是来自 https://huggingface.co/datasets/timdettmers/openassistant-guanaco 的子集,其数据集包含 1000 个样本,已经处理成了与 Llama 2 prompt 匹配的格式。
数据加载命令如下所示:
dataset = load_dataset(guanaco_dataset, split="train")
4-bit 量化配置
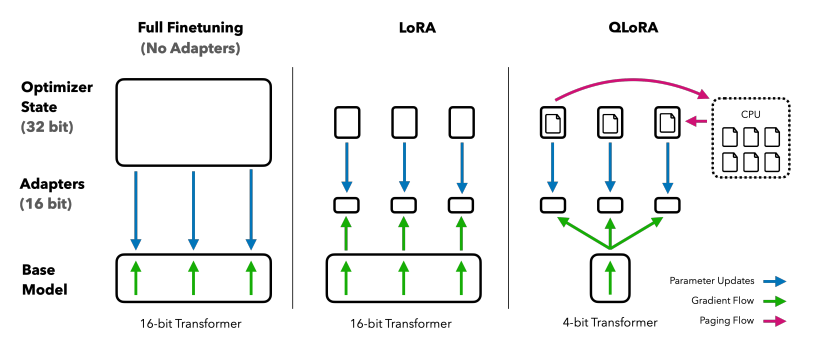
通过 QLoRA 的 4bit 量化技术,可以允许我们在消费级硬件上高效微调巨大的 LLM,同时还能保持高性能,这大大提高了现实应用程序的可访问性和可用性。
QLoRA 将预训练的语言模型量化为 4bit,并冻结参数,然后将少量可训练的 Low-Rank Adapter 层添加到模型中(本篇教程中使用的 LoRA 和 Adapter 的描述指的是同一个东西)。
在微调过程中,梯度只在 Low-Rank Adapter 层反传,整个预训练的模型保持 4bit 权重固定,只更新 adapters,因此 4bit 量化不会损坏模型性能。
QLoRA 原理如下图所示:
我们用 BitsAndBytes 库的“nf4”类型创建 4bit 量化,代码如下所示:
compute_dtype = getattr(torch, "float16")

quant_config = BitsAndBytesConfig(
    load_in_4bit=True,
    bnb_4bit_quant_type="nf4",
    bnb_4bit_compute_dtype=compute_dtype,
    bnb_4bit_use_double_quant=False,
)
加载 Llama 2 模型
现在,我们将使用 Hugging Face 库中的计算数据类型“float16”加载使用 4bit 精度的模型,以加快训练速度。
model = AutoModelForCausalLM.from_pretrained(
    base_model,
    quantization_config=quant_config,
    device_map={"": 0}
)
model.config.use_cache = False
model.config.pretraining_tp = 1
加载 Tokenizer
接下来,我们将从 Hugging Face 库加载 Tokenizer,并将 padding_side 设置为“right”以修复 fp16 的问题。
tokenizer = AutoTokenizer.from_pretrained(base_model, trust_remote_code=True)
tokenizer.pad_token = tokenizer.eos_token
tokenizer.padding_side = "right"
PEFT 配置
预训练语言模型 (PLM) 的传统微调需要更新模型的所有参数,这不仅计算成本高,而且需要大量数据。
参数高效微调 (PEFT) 的工作原理是仅更新模型最有影响力的参数的一小部分,从而使其更加高效(LoRA的本质:微调更新的参数是低质的,所以可以用更少的参数更新来代替全部参数的更新)。
peft_params = LoraConfig(
    lora_alpha=16,
    lora_dropout=0.1,
    r=64,
    bias="none",
    task_type="CAUSAL_LM",
)
训练参数配置
下面是优化训练过程的超参数配置:
training_params = TrainingArguments(
    output_dir="./results",
    num_train_epochs=1,
    per_device_train_batch_size=4,
    gradient_accumulation_steps=1,
    gradient_checkpointing=True,
    optim="paged_adamw_32bit",
    save_steps=25,
    logging_steps=25,
    learning_rate=2e-4,
    weight_decay=0.001,
    fp16=False,
    bf16=False,
    max_grad_norm=0.3,
    max_steps=-1,
    warmup_ratio=0.03,
    group_by_length=True,
    lr_scheduler_type="constant",
    report_to="tensorboard"
)
训练超参数含义分别如下:
- output_dir: 模型训练 log 和 checkpoints 的存储路径
- num_train_epochs: 训练轮数
- per_device_train_batch_size: 训练时每个 GPU 的 Batch Size
- gradient_accumulation_steps: 梯度累积步数(训练多少步才进行一次累积的梯度更新)
- gradient_checkpointing: 是否开启梯度检查点(PyTorch 自带的一种显存优化技术)
- optim: 模型优化器(使用当前主流的 AdamW 优化器)
- save_steps: 每隔多少步存储一次 checkpoint
- logging_steps: 每隔多少步记录一次 log
- learning_rate: 初始学习率
- weight_decay: 权重衰减值(除 bias/LayerNorm 权重以外,会作用到其他全部层)
- fp16/bf16: 是否进行 fp16/bf16 训练
- max_grad_norm: 梯度裁剪的最大值(可以通过梯度裁剪来防止梯度爆炸)
- max_steps: 最大训练步数(设置为-1,则会使用 num_train_epochs 参数)
- warmup_ratio: 线性学习率 warmup 的步数比例
- group_by_length: 该设置可以显著提高性能并加速训练过程
- lr_scheduler_type: 学习率下降策略(本教程使用"constant",即保持常数不下降)
- report_to: log 记录形式
Fine-tuning 配置
监督微调(SFT)是人类反馈强化学习(RLHF)的关键步骤。HuggingFace 的 TRL 库提供了一种易于使用的 API,可以创建 SFT 模型并使用几行代码在数据集上训练它们。它具有使用强化学习训练语言模型的工具,从监督微调开始,然后奖励建模,最后近端策略优化(PPO)。
下面的代码为 SFT Trainer 提供模型、数据集、LoRA 配置、Tokenizer 和训练参数。
trainer = SFTTrainer(
    model=model,
    train_dataset=dataset,
    peft_config=peft_params,
    dataset_text_field="text",
    max_seq_length=None,
    tokenizer=tokenizer,
    args=training_params,
    packing=False,
)
开始训练
我们将使用 .train() 在新数据集中微调 Llama 2 模型。以下为模型在 A100 GPU 上的训练过程和结果,完成一轮训练大约花了13分钟(当然你可以设置更多轮数来观察和验证模型训练效果)。
trainer.train()
训练进度如下所示:
 10%|████                                    | 25/250
 {'loss': 1.3481, 'learning_rate': 0.0002, 'epoch': 0.1}
 20%|████████                                | 50/250
 {'loss': 1.6151, 'learning_rate': 0.0002, 'epoch': 0.2}
 30%|████████████                            | 75/250
 {'loss': 1.2203, 'learning_rate': 0.0002, 'epoch': 0.3}
 50%|███████████████████▌                   | 125/250
 {'loss': 1.1887, 'learning_rate': 0.0002, 'epoch': 0.5}
 60%|███████████████████████▍               | 150/250
 {'loss': 1.3739, 'learning_rate': 0.0002, 'epoch': 0.6}
 70%|███████████████████████████▎           | 175/250
 {'loss': 1.1831, 'learning_rate': 0.0002, 'epoch': 0.7}
 80%|███████████████████████████████▏       | 200/250
 {'loss': 1.4705, 'learning_rate': 0.0002, 'epoch': 0.8}
 90%|███████████████████████████████████    | 225/250
 {'loss': 1.1644, 'learning_rate': 0.0002, 'epoch': 0.9}
100%|███████████████████████████████████████| 250/250
 {'loss': 1.532, 'learning_rate': 0.0002, 'epoch': 1.0}

{
  'train_runtime': 741.0772,
  'train_samples_per_second': 1.349,
  'train_steps_per_second': 0.337,
  'train_loss': 1.3548058242797851,
  'epoch': 1.0
}
存储模型
使用如下两行代码进行 adapter 和 tokenizers 的本地存储。
trainer.model.save_pretrained(new_model)
trainer.tokenizer.save_pretrained(new_model)
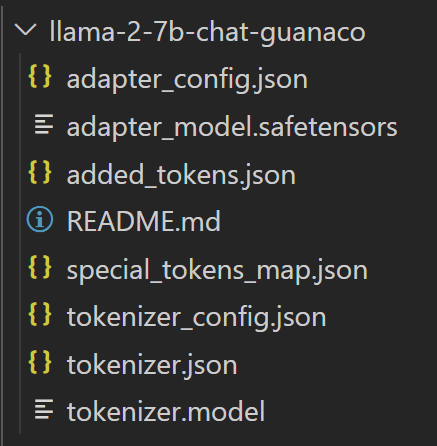
保存完毕后,保存的内容如下图所示(此时只保存了和 adapter 相关的模型参数和文件):
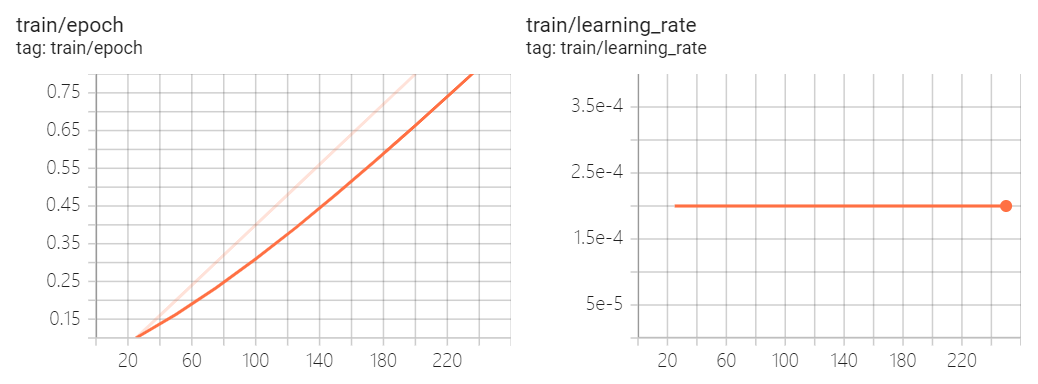
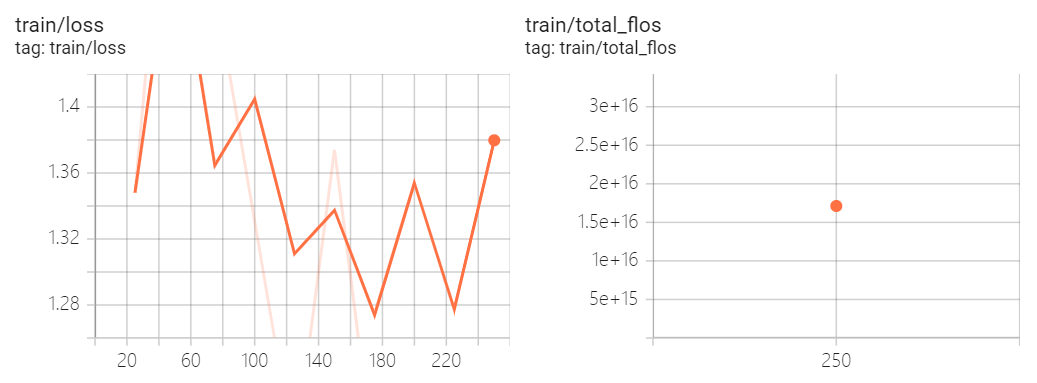
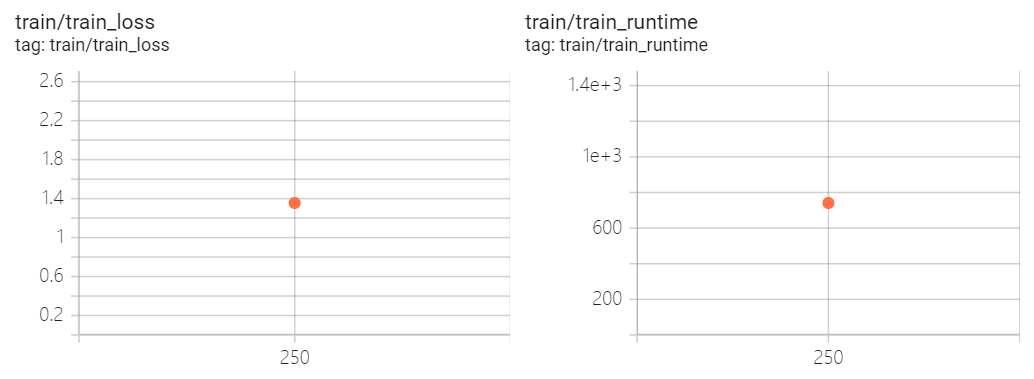
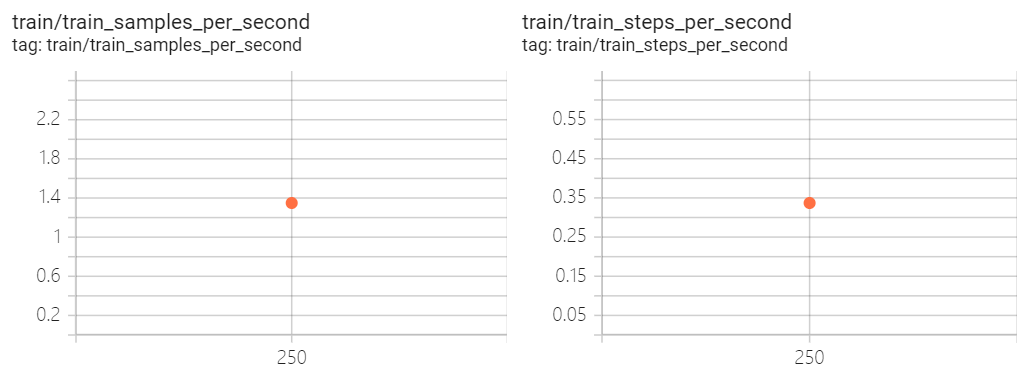
训练日志
现在,我们可以在 Tensorboard 的交互式会话中查看训练结果(只训练了 1 个epoch,250 个 steps 的 log)。
from tensorboard import notebook
log_dir = "results/runs"
notebook.start("--logdir {} --port 4000".format(log_dir))
模型测试
我们将使用 transformers 库的文本生成 pipeline,并提问一个简单的问题:“Who is Leonardo Da Vinci?”
# Ignore warnings
logging.set_verbosity(logging.CRITICAL)

# Run text generation pipeline with our next model
prompt = "Who is Leonardo Da Vinci?"
pipe = pipeline(task="text-generation", model=new_model, tokenizer=new_model, device=0, max_length=200)
result = pipe(f"<s>[INST] {prompt} [/INST]")
print(result[0]['generated_text'])
如你所见,我们训练得到的自己的大语言模型,取得了非常不错的结果(max_length参数可以控制生成的长度)。
<s>[INST] Who is Leonardo Da Vinci? [/INST]  Leonardo da Vinci (1452-1519) was a true Renaissance man - an Italian polymath, artist, inventor, engineer, and scientist. He is widely considered one of the most diversely talented individuals to have ever lived.

Da Vinci was born in Vinci, Italy, and was the illegitimate son of a notary named Ser Piero and a peasant woman named Caterina Buti. Despite his humble beginnings, he was recognized for his artistic talent at a young age and was apprenticed to the artist Andrea del Verrocchio in Florence. It was during this apprenticeship that he honed his skills as a painter, sculptor, and engineer.

Da Vinci's most famous works include the Mona Lisa (Lisa del Giocondo), The
下面再问一个问题:“What is Datacamp Career track?”
prompt = "What is Datacamp Career track?"
result = pipe(f"<s>[INST] {prompt} [/INST]")
print(result[0]['generated_text'])
我们可以看到同样得到了非常好的回答。这是因为 Guanaco 是一个高质量的数据集,过去就曾用来微调最先进的LLMs。如果使用 Guanaco 在 Hugging Face 上的整个数据集,有可能在各种自然语言任务上实现更高的性能。
<s>[INST] What is Datacamp Career track? [/INST]  DataCamp is an online learning platform that offers a range of courses and tutorials on data science and machine learning. Here's an overview of their Career Track program:

DataCamp Career Track is a professional development program designed to help data science and machine learning professionals advance their careers. The program is tailored to individuals who have some experience in the field and want to enhance their skills and knowledge to take on more complex projects and roles.

The program consists of a series of courses and projects that cover a range of topics, including:

1. Data Engineering: Learn how to design, implement, and manage data pipelines, including data ingestion, storage, and processing.
2. Data Analysis: Develop your skills in data analysis, including data visualization, statistical modeling, and data storytelling.
3. Machine Learning: Learn how to
模型合并
下面我们将 Llama 2 之前训练好的模型 weights 和刚刚微调得到的 LoRA weights 合并。
# Reload model in FP16 and merge it with LoRA weights
load_model = AutoModelForCausalLM.from_pretrained(
    base_model,
    low_cpu_mem_usage=True,
    return_dict=True,
    torch_dtype=torch.float16,
    device_map={"": 0},
)

model = PeftModel.from_pretrained(load_model, new_model)
model = model.merge_and_unload()

# Reload tokenizer to save it
tokenizer = AutoTokenizer.from_pretrained(base_model, trust_remote_code=True)
tokenizer.add_special_tokens({'pad_token': '[PAD]'})
tokenizer.pad_token = tokenizer.eos_token
tokenizer.padding_side = "right"
存储合并模型到本地
这次使用下面两行代码将完整的模型 weights 和 tokenizers 存储到本地。
model.save_pretrained(new_model)
tokenizer.save_pretrained(new_model)
此时的模型存储结果如下图所示(可以和前面一次的存储对比一下差异):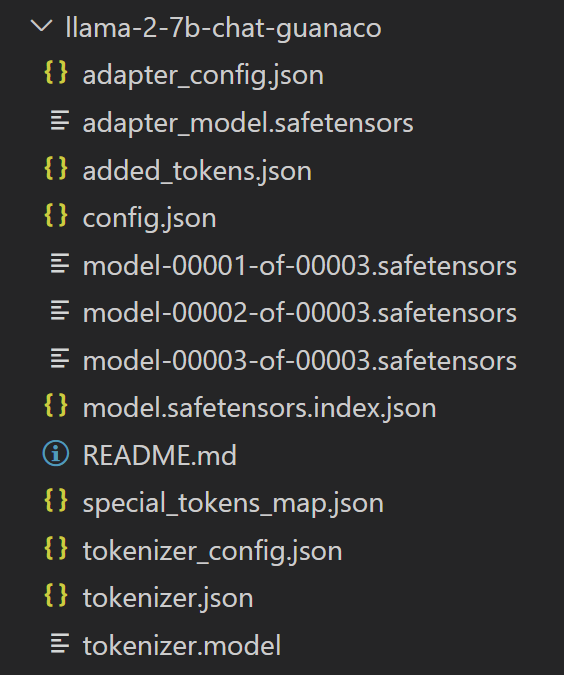
上传合并模型到HF
在网络畅通的前提下,也可以通过 huggingface-cli login 将模型上传到 HF。
model.push_to_hub(new_model, use_temp_dir=False)
tokenizer.push_to_hub(new_model, use_temp_dir=False)
模型使用
如何重新使用自己的大语言模型?一条 pipeline 核心代码搞定。
from transformers import pipeline


# Fine-tuned and merged model path in local or HF
new_model = "/root/aidaily/myllama/llama-2-7b-chat-guanaco"

# Run text generation pipeline with our next model
prompt = "Who is Leonardo Da Vinci?"
pipe = pipeline(task="text-generation", model=new_model, tokenizer=new_model, device=0, max_length=200)
result = pipe(f"<s>[INST] {prompt} [/INST]")
print(result[0]['generated_text'])
我们来看下输出结果,可以和之前生成的输出对比一下,不能说有所不同,只能说一模一样。
<s>[INST] Who is Leonardo Da Vinci? [/INST]  Leonardo da Vinci (1452-1519) was a true Renaissance man - an Italian polymath, artist, inventor, engineer, and scientist. He is widely considered one of the most diversely talented individuals to have ever lived.

Da Vinci was born in Vinci, Italy, and was the illegitimate son of a notary named Ser Piero and a peasant woman named Caterina Buti. Despite his humble beginnings, he was recognized for his artistic talent at a young age and was apprenticed to the artist Andrea del Verrocchio in Florence. It was during this apprenticeship that he honed his skills as a painter, sculptor, and engineer.

Da Vinci's most famous works include the Mona Lisa (Lisa del Giocondo), The
完整代码
如何重新使用自己的大语言模型?一条 pipeline 核心代码搞定。
import torch
from datasets import load_dataset
from transformers import (
    AutoModelForCausalLM,
    AutoTokenizer,
    BitsAndBytesConfig,
    HfArgumentParser,
    TrainingArguments,
    pipeline,
    logging,
)
from peft import LoraConfig, PeftModel
from trl import SFTTrainer


# Model from Hugging Face hub
# 如果你的运行环境可以访问 Hugging Face
# base_model = "NousResearch/Llama-2-7b-chat-hf"
# 如果你的运行环境不能访问 Hugging Face,可以将全部模型文件下载到本地
base_model = "/root/aidaily/model/meta-llama/Llama-2-7b-chat-hf"

# New instruction dataset
# 如果你的运行环境可以访问 Hugging Face
# guanaco_dataset = "mlabonne/guanaco-llama2-1k"
# 如果你的运行环境不能访问 Hugging Face,可以将数据集下载到本地
guanaco_dataset = "/root/aidaily/mlabonne/guanaco-llama2-1k"

# Fine-tuned model name
new_model = "llama-2-7b-chat-guanaco"dataset = load_dataset(guanaco_dataset, split="train")

compute_dtype = getattr(torch, "float16")

quant_config = BitsAndBytesConfig(
    load_in_4bit=True,
    bnb_4bit_quant_type="nf4",
    bnb_4bit_compute_dtype=compute_dtype,
    bnb_4bit_use_double_quant=False,
)

model = AutoModelForCausalLM.from_pretrained(
    base_model,
    quantization_config=quant_config,
    device_map={"": 0}
)
model.config.use_cache = False
model.config.pretraining_tp = 1

tokenizer = AutoTokenizer.from_pretrained(base_model, trust_remote_code=True)
tokenizer.pad_token = tokenizer.eos_token
tokenizer.padding_side = "right"

peft_params = LoraConfig(
    lora_alpha=16,
    lora_dropout=0.1,
    r=64,
    bias="none",
    task_type="CAUSAL_LM",
)

training_params = TrainingArguments(
    output_dir="./results",
    num_train_epochs=1,
    per_device_train_batch_size=4,
    gradient_accumulation_steps=1,
    gradient_checkpointing=True,
    optim="paged_adamw_32bit",
    save_steps=25,
    logging_steps=25,
    learning_rate=2e-4,
    weight_decay=0.001,
    fp16=False,
    bf16=False,
    max_grad_norm=0.3,
    max_steps=-1,
    warmup_ratio=0.03,
    group_by_length=True,
    lr_scheduler_type="constant",
    report_to="tensorboard"
)

trainer = SFTTrainer(
    model=model,
    train_dataset=dataset,
    peft_config=peft_params,
    dataset_text_field="text",
    max_seq_length=None,
    tokenizer=tokenizer,
    args=training_params,
    packing=False,
)

# Train model
trainer.train()

trainer.model.save_pretrained(new_model)
trainer.tokenizer.save_pretrained(new_model)

# View log
'''
from tensorboard import notebook
log_dir = "results/runs"
notebook.start("--logdir {} --port 4000".format(log_dir))
'''

# Ignore warnings
logging.set_verbosity(logging.CRITICAL)

# Run text generation pipeline with our next model
prompt = "Who is Leonardo Da Vinci?"
pipe = pipeline(task="text-generation", model=new_model, tokenizer=new_model, max_length=200)
result = pipe(f"<s>[INST] {prompt} [/INST]")
print(result[0]['generated_text'])

prompt = "What is Datacamp Career track?"
result = pipe(f"<s>[INST] {prompt} [/INST]")
print(result[0]['generated_text'])

# Reload model in FP16 and merge it with LoRA weights
load_model = AutoModelForCausalLM.from_pretrained(
    base_model,
    low_cpu_mem_usage=True,
    return_dict=True,
    torch_dtype=torch.float16,
    device_map={"": 0},
)

model = PeftModel.from_pretrained(load_model, new_model)
model = model.merge_and_unload()

# Reload tokenizer to save it
tokenizer = AutoTokenizer.from_pretrained(base_model, trust_remote_code=True)
tokenizer.add_special_tokens({'pad_token': '[PAD]'})
tokenizer.pad_token = tokenizer.eos_token
tokenizer.padding_side = "right"

# Save model to the local
model.save_pretrained(new_model)
tokenizer.save_pretrained(new_model)

# Push model to the hf hub
'''
model.push_to_hub(new_model, use_temp_dir=False)
tokenizer.push_to_hub(new_model, use_temp_dir=False)
'''
读者福利:如果大家对大模型感兴趣,这套大模型学习资料一定对你有用
对于0基础小白入门:
如果你是零基础小白,想快速入门大模型是可以考虑的。
一方面是学习时间相对较短,学习内容更全面更集中。
二方面是可以根据这些资料规划好学习计划和方向。
包括:大模型学习线路汇总、学习阶段,大模型实战案例,大模型学习视频,人工智能、机器学习、大模型书籍PDF。带你从零基础系统性的学好大模型!
😝有需要的小伙伴,可以保存图片到wx扫描二v码免费领取【保证100%免费】🆓

👉AI大模型学习路线汇总👈
大模型学习路线图,整体分为7个大的阶段:(全套教程文末领取哈)

第一阶段: 从大模型系统设计入手,讲解大模型的主要方法;
第二阶段: 在通过大模型提示词工程从Prompts角度入手更好发挥模型的作用;
第三阶段: 大模型平台应用开发借助阿里云PAI平台构建电商领域虚拟试衣系统;
第四阶段: 大模型知识库应用开发以LangChain框架为例,构建物流行业咨询智能问答系统;
第五阶段: 大模型微调开发借助以大健康、新零售、新媒体领域构建适合当前领域大模型;
第六阶段: 以SD多模态大模型为主,搭建了文生图小程序案例;
第七阶段: 以大模型平台应用与开发为主,通过星火大模型,文心大模型等成熟大模型构建大模型行业应用。
👉大模型实战案例👈
光学理论是没用的,要学会跟着一起做,要动手实操,才能将自己的所学运用到实际当中去,这时候可以搞点实战案例来学习。

👉大模型视频和PDF合集👈
观看零基础学习书籍和视频,看书籍和视频学习是最快捷也是最有效果的方式,跟着视频中老师的思路,从基础到深入,还是很容易入门的。


👉学会后的收获:👈
• 基于大模型全栈工程实现(前端、后端、产品经理、设计、数据分析等),通过这门课可获得不同能力;
• 能够利用大模型解决相关实际项目需求: 大数据时代,越来越多的企业和机构需要处理海量数据,利用大模型技术可以更好地处理这些数据,提高数据分析和决策的准确性。因此,掌握大模型应用开发技能,可以让程序员更好地应对实际项目需求;
• 基于大模型和企业数据AI应用开发,实现大模型理论、掌握GPU算力、硬件、LangChain开发框架和项目实战技能, 学会Fine-tuning垂直训练大模型(数据准备、数据蒸馏、大模型部署)一站式掌握;
• 能够完成时下热门大模型垂直领域模型训练能力,提高程序员的编码能力: 大模型应用开发需要掌握机器学习算法、深度学习框架等技术,这些技术的掌握可以提高程序员的编码能力和分析能力,让程序员更加熟练地编写高质量的代码。
👉获取方式:
😝有需要的小伙伴,可以保存图片到wx扫描二v码免费领取【保证100%免费】🆓


 1012
1012

 被折叠的 条评论
为什么被折叠?
被折叠的 条评论
为什么被折叠?
 到【灌水乐园】发言


