


目录
一、 任务目标
- 分别完成话题、服务模式的ROS示例程序,并实践练习
- 练习ROS动作编程:客户端发送一个运动坐标,模拟机器人运动到目标位置的过程。包括服务端和客户端的代码实现,要求带有实时位置反馈。同时注意学习cmakelists 的使用方法。
- 完成学习opencv图像库编程,了解如何借助第三方库函数完成一个综合程序设计。
3.1 编写一个打开图片进行特效显示的代码 test1.cpp
3.2 练习使用opencv库编写打开摄像头压缩视频的程序。参考示例代码1和示例代码2。并回答:
1)如果要求打开你硬盘上一个视频文件来播放,请问示例代码1第7行代码如何修改?
2)在示例代码1第9行的while循环中,Mat是一个什么数据结构? 为什么一定要加一句waitKey延时代码,删除它行不行?
3)示例代码1代码会在while循环中一直运行,你如果试图用鼠标关闭图像显示窗口,会发现始终关不掉。需要用键盘Ctrl+C 强制中断程序,非常不友好。如何改进?
二、 任务实操
准备工作
- 创建工作区
mkdir -p ~/catkin_ws/src
cd ~/catkin_ws/src
catkin_init_workspace
1. 分别完成话题、服务模式的ROS示例程序,并实践练习
Ⅰ 话题模式
- 创建ros包
cd ~/catkin_ws/src
catkin_create_pkg topic_demo rospy std_msgs
回到catkin_ws目录,编译一下环境
catkin_make
- 进入src,创建scripts文件夹
mkdir scripts
- 创建talker.py
#!/usr/bin/env python3
# license removed for brevity
import rospy
from std_msgs.msg import String

def talker():
    pub = rospy.Publisher('chatter', String, queue_size=10)
    rospy.init_node('talker', anonymous=True)
    rate = rospy.Rate(10) # 10hz
    while not rospy.is_shutdown():
        hello_str = "hello world %s" % rospy.get_time()
        rospy.loginfo(hello_str)
        pub.publish(hello_str)
        rate.sleep()

if __name__ == '__main__':
    try:
        talker()
    except rospy.ROSInterruptException:
        pass
创建listener.py
#!/usr/bin/env python3
import rospy
from std_msgs.msg import String

def callback(data):
    rospy.loginfo(rospy.get_caller_id() + "I heard %s", data.data)

def listener():

    # In ROS, nodes are uniquely named. If two nodes with the same
    # name are launched, the previous one is kicked off. The
    # anonymous=True flag means that rospy will choose a unique
    # name for our 'listener' node so that multiple listeners can
    # run simultaneously.
    rospy.init_node('listener', anonymous=True)

    rospy.Subscriber("chatter", String, callback)

    # spin() simply keeps python from exiting until this node is stopped
    rospy.spin()

if __name__ == '__main__':
    listener()
保存文件后,授权给两个文件
chmod 777 *.py
- 运行
首先开启ros master
roscore
然后在两个终端运行
rosrun topic_demo talker.py
rosrun topic_demo listener.py


Ⅱ 服务模式
- 创建功能包
cd ~/catkin_ws/src
catkin_create_pkg service_example rospy std_msgs
- 创建srv文件
cd ~/catkin_ws/src/service_example
mkdir srv
创建srv文件
AddTwoInts.srv
int64 a
int64 b
---
int64 sum
- 在package.xml中添加依赖
找到service_example下的package.xml
添加:
 <build_depend>message_generation</build_depend>
 <exec_depend>message_runtime</exec_depend>
- 进入CMakeLists.txt
① 找到
find_package(catkin REQUIRED COMPONENTS
在下面添加:
message_generation
② 找到
# add_service_files(
 #   FILES
 #   Service1.srv
 #   Service2.srv
 # )
替换为
 add_service_files(
   FILES
   AddTwoInts.srv
 )
③ 找到
 # generate_messages(
 #   DEPENDENCIES
 # #  std_msgs  # Or other packages containing msgs
 # )
替换为
 generate_messages(
   DEPENDENCIES
   std_msgs
 )
- 重新编译
cd ~/catkin_ws
catkin_make -DCATKIN_WHITELIST_PACKAGES="service_example"
- 编写代码
进入service_example,新建scripts
cd ~/catkin_ws/src/service_example
mkdir scripts
创建server.py
#!/usr/bin/env python3

from service_example.srv import AddTwoInts, AddTwoIntsResponse
import rospy

def handle_add_two_ints(req):
    """
    处理服务请求的函数。
    当接收到请求时,将会调用该函数,并返回两个整数的和。
    """
    rospy.loginfo("Request to add %d and %d" % (req.a, req.b))
    result = req.a + req.b
    rospy.loginfo("Returning %d" % result)
    return AddTwoIntsResponse(result)

def add_two_ints_server():
    """
    启动服务服务器的函数。
    """
    rospy.init_node('add_two_ints_server')  # 初始化 ROS 节点

    # 定义服务服务器,监听名为 'add_two_ints' 的服务请求,并在收到请求时调用 handle_add_two_ints 函数
    service = rospy.Service('add_two_ints', AddTwoInts, handle_add_two_ints)
    rospy.loginfo("Ready to add two ints.")

    # 使节点保持活动状态,直到收到退出信号
    rospy.spin()

if __name__ == "__main__":
    add_two_ints_server()
创建client.py
#!/usr/bin/env python3

"""
这是一个客户端程序,用于调用名为 'add_two_ints' 的服务。
"""

import sys
import rospy
from service_example.srv import *

def add_two_ints_client(x, y):
    """
    客户端函数,用于向 'add_two_ints' 服务发送请求,并返回结果。
    """
    # 等待 'add_two_ints' 服务可用
    rospy.wait_for_service('add_two_ints')
    try:
        # 创建 'add_two_ints' 服务的处理句柄
        add_two_ints = rospy.ServiceProxy('add_two_ints', AddTwoInts)
        # 向服务发送请求,并接收响应
        resp1 = add_two_ints(x, y)
        return resp1.sum
    except rospy.ServiceException as e:
        # 如果调用失败,打印错误信息
        print("Service call failed: %s" % e)

def usage():
    """
    显示程序的使用方法
    """
    return "%s [x y]" % sys.argv[0]

if __name__ == "__main__":
    # 如果输入参数个数不等于3,则打印使用方法并退出程序
    if len(sys.argv) == 3:
        x = int(sys.argv[1])
        y = int(sys.argv[2])
    else:
        print(usage())
        sys.exit(1)

    # 打印请求信息
    print("Requesting %s + %s" % (x, y))
    # 打印请求结果
    print("%s + %s = %s" % (x, y, add_two_ints_client(x, y)))
- 授权
chmod ~/catkin_ws/src/service_example/scripts/*.py
- 编译功能包
cd ~/catkin_ws
catkin_make -DCATKIN_WHITELIST_PACKAGES="service_example"
- 运行
roscore
① 运行service
source ~/catkin_ws/devel/setup.bash
rosrun service_example server.py

② 运行client
source ~/catkin_ws/devel/setup.bash
rosrun service_example client.py 1 3

服务与客户端模式完成
2. 练习ROS动作编程
① 创建包
cd ~/catkin_ws/src
catkin_create_pkg robot_motion rospy turtlesim std_msgs
cd robot_motion/
② 创建srv文件
cd ~/catkin_ws/src/roboto_motion
mkdir srv
创建srv文件
MoveToPosition.srv
float64 x
float64 y
---
bool success
- 在package.xml中添加依赖
找到service_example下的package.xml
添加:
 <build_depend>message_generation</build_depend>
 <exec_depend>message_runtime</exec_depend>
- 进入CMakeLists.txt
① 找到
find_package(catkin REQUIRED COMPONENTS
在下面添加:
message_generation
② 找到
# add_service_files(
 #   FILES
 #   Service1.srv
 #   Service2.srv
 # )
替换为
 add_service_files(
   FILES
   MoveToPosition.srv
 )
③ 找到
 # generate_messages(
 #   DEPENDENCIES
 # #  std_msgs  # Or other packages containing msgs
 # )
替换为
 generate_messages(
   DEPENDENCIES
   std_msgs
 )
④ 重新编译
cd ~/catkin_ws
catkin_make -DCATKIN_WHITELIST_PACKAGES="robot_motion"
⑤ 编写代码
进入robot_motion,新建scripts
cd ~/catkin_ws/src/robot_motion
mkdir scripts
创建motion_server.py
#!/usr/bin/env python3

import rospy
from geometry_msgs.msg import Twist
from robot_motion.srv import MoveToPosition, MoveToPositionResponse
from turtlesim.msg import Pose

class MotionServer:
    def __init__(self):
        rospy.init_node('motion_server')
        self.current_position = (0, 0)
        self.turtle_pub = rospy.Publisher('/turtle1/cmd_vel', Twist, queue_size=10)
        self.pose_sub = rospy.Subscriber('/turtle1/pose', Pose, self.pose_callback)
        self.server = rospy.Service('move_to_position', MoveToPosition, self.handle_move_to_position)
        rospy.spin()

    def handle_move_to_position(self, req):
        target_position = (req.x, req.y)
        rate = rospy.Rate(1)  # 1 Hz
        while self.current_position != target_position:
            # Simulate motion to the target position
            self.move_to_target(target_position)
            # Publish current position feedback
            self.publish_feedback()
            rate.sleep()
        return MoveToPositionResponse(True)

    def pose_callback(self, pose):
        self.current_position = (pose.x, pose.y)

    def move_to_target(self, target_position):
        twist = Twist()
        twist.linear.x = target_position[0] - self.current_position[0]
        twist.linear.y = target_position[1] - self.current_position[1]
        self.turtle_pub.publish(twist)

    def publish_feedback(self):
        rospy.loginfo("Current position: x={}, y={}".format(*self.current_position))

if __name__ == '__main__':
    MotionServer()
创建/motion_client.py
#!/usr/bin/env python

import rospy
from robot_motion.srv import MoveToPosition, MoveToPositionRequest

def move_to_position_client(positions):
    rospy.wait_for_service('move_to_position')
    try:
        move_to_position = rospy.ServiceProxy('move_to_position', MoveToPosition)
        for pos in positions:
            req = MoveToPositionRequest()
            req.x = pos[0]
            req.y = pos[1]
            success = move_to_position(req).success
            if not success:
                rospy.logerr("Failed to move to position ({}, {})".format(*pos))
                return False
        return True
    except rospy.ServiceException as e:
        rospy.logerr("Service call failed: %s" % e)
        return False

if __name__ == '__main__':
    rospy.init_node('motion_client')
    num_positions = int(input("Enter the number of positions to move to: "))
    positions = []
    for i in range(num_positions):
        x = float(input("Enter target x position {}: ".format(i+1)))
        y = float(input("Enter target y position {}: ".format(i+1)))
        positions.append((x, y))
    success = move_to_position_client(positions)
    if success:
        rospy.loginfo("Robot successfully moved to all target positions.")
    else:
        rospy.logerr("Failed to move robot to all target positions.")
⑥ 运行service
创建终端
roscore
创建终端2,启动小海龟仿真
rosrun turtlesim turtlesim_node
创建终端3,启动服务端代码
rosrun robot_motion motion_server.py
创建终端4,启动客户端代码
rosrun robot_motion motion_client.py
⑦ 进行操作
首先输入移动次数,然后输入每次的移动坐标

3. opencv练习
准备工作
- 安装opencv
- 一张图片
3.0 安装opencv
① 安装opencv依赖库
sudo apt-get install build-essential libgtk2.0-dev libgtk-3-dev libavcodec-dev libavformat-dev libjpeg-dev libswscale-dev libtiff5-dev
② 安装一些可选的库
# python3支持(首次安装了python的库,但make报错了,之后删了这两个库,若不使用python,建议不安装)
sudo apt install python3-dev python3-numpy
# streamer支持
sudo apt install libgstreamer-plugins-base1.0-dev libgstreamer1.0-dev
# 可选的依赖
sudo apt install libpng-dev libopenexr-dev libtiff-dev libwebp-dev
③ 下载openCV 4.5源文件
# 安装4.5.0版本
wget -O opencv.zip https://github.com/opencv/opencv/archive/4.5.0.zip
④ 把里面的opencv4.5解压到主目录,并改名为opencv
⑤ Cmake配置和编译openCV
进入目录,新建目录build
cd opencv
mkdir build
cd build
用cmake配置opencv
cmake -D CMAKE_BUILD_TYPE=Release -D OPENCV_GENERATE_PKGCONFIG=YES ..
用make进行编译
make -j4
用make进行安装
sudo make install
⑥ 配置环境
首先找到opencv4.pc的路径
sudo find / -iname opencv4.pc
打开PKG_CONFIG_PATH:
sudo vim /etc/profile.d/pkgconfig.sh
将找到的opencv4.pc的路径赋值进去
然后在末端加入:
export PKG_CONFIG_PATH=/usr/local/lib/pkgconfig:$PKG_CONFIG_PATH
保存后激活
# 激活
source /etc/profile
激活后可以用以下指令验证
pkg-config --libs opencv4

⑦ 配置动态库环境
打开文件
sudo vim /etc/ld.so.conf.d/opencv4.conf
在文件末尾加入
/usr/local/lib
这是opencv的lib路径
加入后保存退出,激活路径
sudo ldconfig
然后测试一下是否安装成功
cd ~/opencv/samples/cpp/example_cmake
cmake .
make
./opencv_example

3.1
① 新建 test1.cpp
mkdir test1.cpp
按“i”进入输入模式
输入代码
#include <opencv2/opencv.hpp>
#include <iostream>

using namespace cv;
using namespace std;

int main() {
    // 读取图像
    Mat image = imread("image.jpg");

    // 检查图像是否成功加载
    if (image.empty()) {
        cout << "无法读取图像文件,请确保路径正确" << endl;
        return -1;
    }

    // 显示原始图像
    imshow("Original Image", image);

    // 灰度化
    Mat gray_image;
    cvtColor(image, gray_image, COLOR_BGR2GRAY);

    // 显示灰度图像
    imshow("Grayscale Image", gray_image);

    // 边缘检测
    Mat edges;
    Canny(gray_image, edges, 50, 150);

    // 显示边缘图像
    imshow("Edge Detected Image", edges);

    // 图像模糊
    Mat blurred_image;
    GaussianBlur(image, blurred_image, Size(5, 5), 0);

    // 显示模糊图像
    imshow("Blurred Image", blurred_image);

    // 等待按键
    waitKey(0);

    return 0;
}
② 编译运行
g++ test1.cpp -o test1 `pkg-config --cflags --libs opencv4`
./text1
Q:请解释这条编译命令,它是如何获得opencv头文件、链接lib库文件的路径的?
g++ test1.cpp -o test1pkg-config --cflags --libs opencv4

gcc test1.cpp -o test1: 这部分命令使用 gcc 编译器编译源文件 test1.cpp,并将生成的可执行文件命名为 test1。这部分命令告诉编译器要编译源文件并生成可执行文件。
pkg-config --cflags --libs opencv: 这部分命令使用 pkg-config 工具来获取 OpenCV 库的编译选项。–cflags 选项用于获取包含 OpenCV 头文件的目录路径,–libs 选项用于获取链接 OpenCV 库文件的路径。这些选项告诉编译器在编译和链接过程中需要包含哪些头文件和链接哪些库文件。
通过将这些选项传递给 gcc 编译器,它就能够知道在编译和链接过程中需要包含哪些头文件和链接哪些库文件,从而正确地编译和链接你的程序。
简而言之,这条编译命令通过 pkg-config 工具获取了 OpenCV 库的编译选项,然后将这些选项传递给 gcc 编译器,以确保编译和链接过程中正确地包含了 OpenCV 的头文件和链接了 OpenCV 的库文件。
3.2 练习使用opencv库编写打开摄像头压缩视频的程序
准备工作
检查虚拟机摄像头是否可用
准备一个视频

① 练习示例代码一
编译运行此代码
#include <iostream>
#include <opencv2/opencv.hpp>

using namespace cv;
using namespace std;

int main()
{
    VideoCapture capture("sion.mp4");//记得替换为视频名称
    if (!capture.isOpened()) {
        cerr << "Error: Failed to open camera." << endl;
        return -1;
    }

    while (true)
    {
        Mat frame;
        capture >> frame;
        if (frame.empty()) {
            cerr << "Error: Failed to capture frame." << endl;
            break;
        }
        imshow("Read Video", frame);
        if (waitKey(30) >= 0) break;
    }

    return 0;
}


{
// 打开电脑摄像头
VideoCapture cap(0);//同样记得选择视频文件
if (!cap.isOpened())
{
cout << "Error: Failed to open camera." << endl;
waitKey(0);
return -1;
}
// 获取摄像头分辨率
int w = static_cast<int>(cap.get(CAP_PROP_FRAME_WIDTH));
int h = static_cast<int>(cap.get(CAP_PROP_FRAME_HEIGHT));
Size videoSize(w, h);
VideoWriter writer("RecordVideo.avi", VideoWriter::fourcc('M', 'J', 'P', 'G'), 25, videoSize);
Mat frame;
int key; // 记录键盘按键
bool recording = false; // 是否正在录制视频
while (true)
{
cap >> frame;
imshow("picture", frame);
key = waitKey(100);
if (key == ' ') // 空格键控制视频录制的开始和暂停
{
recording = !recording;
if (recording)
{
cout << "Recording started." << endl;
}
else
{
cout << "Recording stopped." << endl;
}
}
else if (key == 27) // 按下 ESC 键退出程序并保存视频
{
break;
}
if (recording)
{
writer << frame;
cout << "Recording..." << endl;
}
}
// 释放资源
cap.release();
writer.release();
destroyAllWindows();
return 0;
}
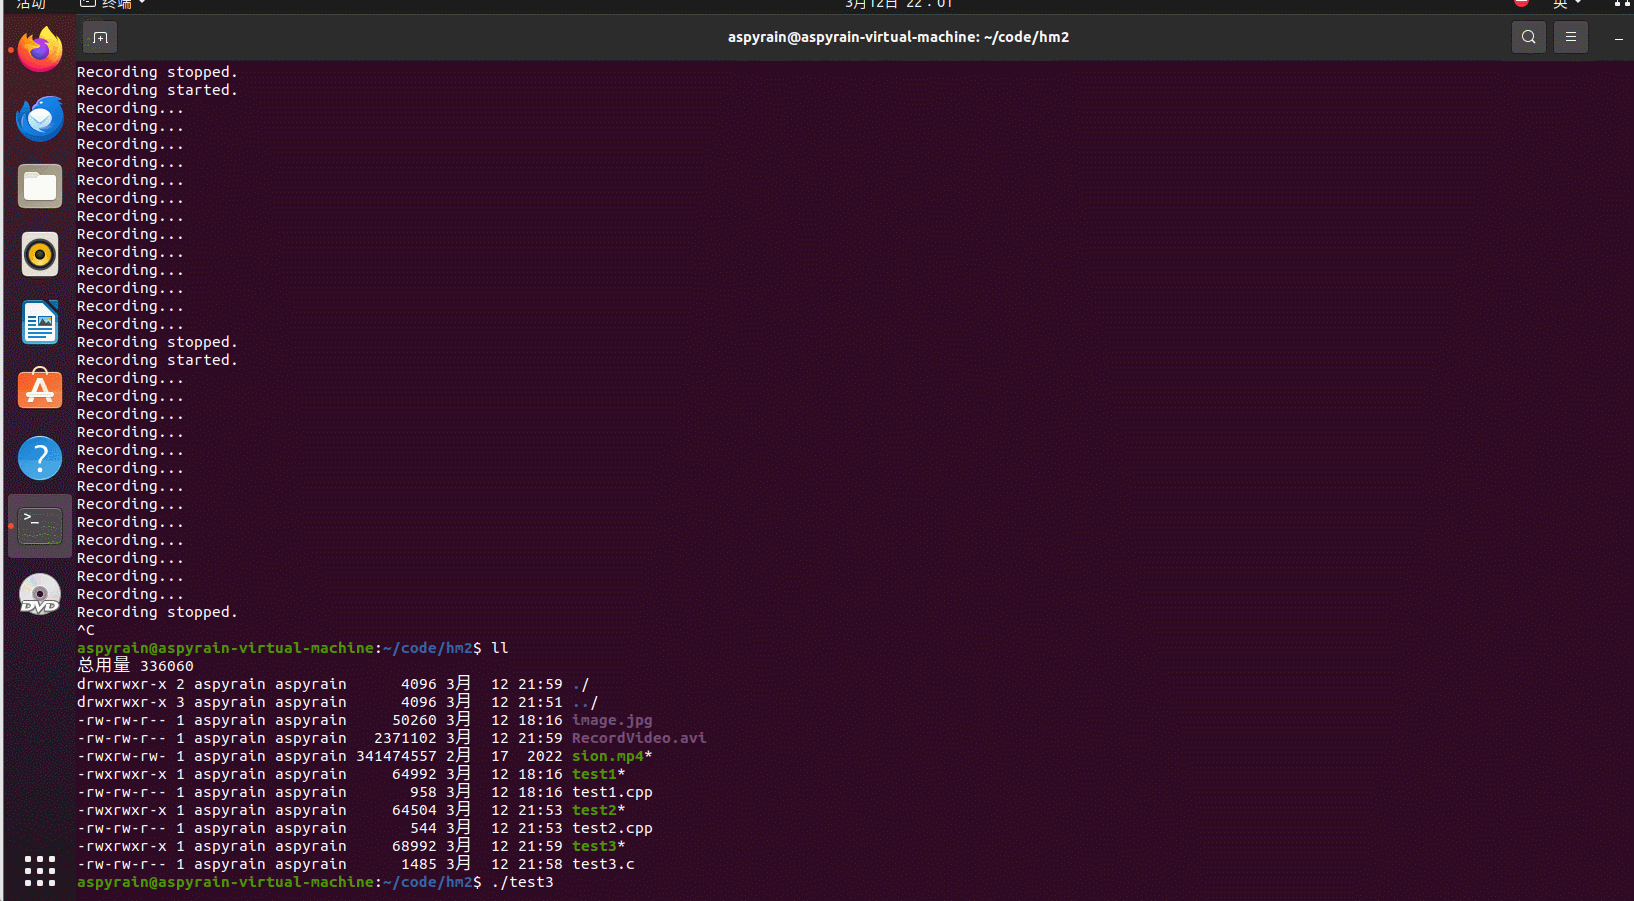
可以看到成功录制了视频
Q:如果要求打开你硬盘上一个视频文件来播放,请问示例代码1第7行代码如何修改?
A:VideoCapture capture("your_video_file.mp4");Q:在示例代码1第9行的while循环中,Mat是一个什么数据结构? 为什么一定要加一句waitKey延时代码,删除它行不行?
A:在示例代码1第9行的 while 循环中,Mat 是 OpenCV 中表示图像的数据结构,它是一个矩阵类,用于存储图像的像素信息。waitKey 函数的作用是等待用户按下键盘按键,其参数指定了等待的时间,单位为毫秒。加上 waitKey 函数是为了保持图像窗口的显示。如果不加 waitKey 函数,图像窗口可能会一闪而过或者不会显示,因为程序会在显示图像后立即退出。删除 waitKey 行会导致图像窗口无法正常显示,程序可能会异常退出。
Q:示例代码1代码会在while循环中一直运行,你如果试图用鼠标关闭图像显示窗口,会发现始终关不掉。需要用键盘Ctrl+C 强制中断程序,非常不友好。如何改进?
A:示例代码1的问题在于没有处理窗口关闭的事件,导致窗口无法正常关闭。为了改进这个问题,可以使用 waitKey 函数来检测用户按下键盘的事件,并在用户按下指定按键时退出循环。例如,可以修改代码如下:while (true) { Mat frame; capture >> frame; if (frame.empty()) { cerr << "Error: Failed to capture frame." << endl; break; } imshow("Read Video", frame); char key = waitKey(30); if (key == 'q' || key == 'Q' || key == 27) // 如果用户按下 q 键或 ESC 键 break; }
三、 实验心得
在完成上述任务时,我深入学习了ROS(Robot Operating System)和OpenCV图像处理库。首先,我学习了ROS的基本概念,包括话题(Topic)和服务(Service)模式。通过编写示例程序,我了解了如何创建和发布话题,以及如何编写话题订阅者和服务端程序。这些概念和实践使我更加熟悉ROS的工作原理和编程模式。
其次,我学习了ROS动作编程的基本概念和实践。动作(Action)是ROS中一种用于实现长时间运行任务的机制,我学习了如何创建和使用动作服务器和客户端程序,并实现了一个模拟机器人运动到目标位置的过程。在这个过程中,我注意到实时位置反馈对于控制过程的可视化和调试非常重要。
最后,我深入学习了OpenCV图像库的使用。通过编写代码实现打开图片并应用特效显示,以及打开摄像头并压缩视频的程序,我了解了如何借助OpenCV库函数完成图像处理任务。在这个过程中,我也遇到了一些问题,比如如何处理窗口关闭事件以及为什么需要在循环中加入 waitKey 函数等。
通过这些实验,我对ROS和OpenCV的使用有了更深入的理解,并且掌握了一些常用的编程技巧和调试方法。这些经验将对我未来在机器人技术和计算机视觉领域的研究和工作起到积极的促进作用。


 458
458

 被折叠的 条评论
为什么被折叠?
被折叠的 条评论
为什么被折叠?
 到【灌水乐园】发言


