


 该专栏为热销专栏榜 第42名
 本文详细介绍了如何使用YoloV9进行COCO数据集的训练,包括数据集的下载、COCO格式到Yolo格式的转换。同时,文章还展示了如何训练自定义数据集,提供了数据格式转换的代码,并给出了数据集配置文件的内容和训练脚本的修改说明。
模型实战
训练COCO数据集
本次使用2017版本的COCO数据集作为例子,演示如何使用YoloV8训练和预测。
下载数据集
Images:
- 2017 Train images [118K/18GB] :http://images.cocodataset.org/zips/train2017.zip
- 2017 Val images [5K/1GB]:http://images.cocodataset.org/zips/val2017.zip
- 2017 Test images [41K/6GB]:http://images.cocodataset.org/zips/unlabeled2017.zip
Annotations:
- 2017 annotations_trainval2017 [241MB]:http://images.cocodataset.org/annotations/annotations_trainval2017.zip
COCO转yolo格式数据集(适用V4,V5,V6,V7,V8)
最初的研究论文中,COCO中有91个对象类别。然而,在2014年的第一次发布中,仅发布了80个标记和分割图像的对象类别。2014年发布之后,2017年发布了后续版本。详细的类别如下:
| ID | OBJECT (PAPER) | OBJECT (2014 REL.) | OBJECT (2017 REL.) | SUPER CATEGORY |
|---|---|---|---|---|
| 1 | person | person | person | person |
| 2 | bicycle | bicycle | bicycle | vehicle |
| 3 | car | car | car | vehicle |
| 4 | motorcycle | motorcycle | motorcycle | vehicle |
| 5 | airplane | airplane | airplane | vehicle |
| 6 | bus | bus | bus | vehicle |
| 7 | train | train | train | vehicle |
| 8 | truck | truck | truck | vehicle |
| 9 | boat | boat | boat | vehicle |
| 10 | trafficlight | traffic light | traffic light | outdoor |
| 11 | fire hydrant | fire hydrant | fire hydrant | outdoor |
| 12 | street | sign | - | - |
| 13 | stop sign | stop sign | stop sign | outdoor |
| 14 | parking meter | parking meter | parking meter | outdoor |
| 15 | bench | bench | bench | outdoor |
| 16 | bird | bird | bird | animal |
| 17 | cat | cat | cat | animal |
| 18 | dog | dog | dog | animal |
| 19 | horse | horse | horse | animal |
| 20 | sheep | sheep | sheep | animal |
| 21 | cow | cow | cow | animal |
| 22 | elephant | elephant | elephant | animal |
| 23 | bear | bear | bear | animal |
| 24 | zebra | zebra | zebra | animal |
| 25 | giraffe | giraffe | giraffe | animal |
| 26 | hat | - | - | accessory |
| 27 | backpack | backpack | backpack | accessory |
| 28 | umbrella | umbrella | umbrella | accessory |
| 29 | shoe | - | - | accessory |
| 30 | eye glasses | - | - | accessory |
| 31 | handbag | handbag | handbag | accessory |
| 32 | tie | tie | tie | accessory |
| 33 | suitcase | suitcase | suitcase | accessory |
| 34 | frisbee | frisbee | frisbee | sports |
| 35 | skis | skis | skis | sports |
| 36 | snowboard | snowboard | snowboard | sports |
| 37 | sports ball | sports ball | sports ball | sports |
| 38 | kite | kite | kite | sports |
| 39 | baseball bat | baseball bat | baseball bat | sports |
| 40 | baseball glove | baseball glove | baseball glove | sports |
| 41 | skateboard | skateboard | skateboard | sports |
| 42 | surfboard | surfboard | surfboard | sports |
| 43 | tennis racket | tennis racket | tennis racket | sports |
| 44 | bottle | bottle | bottle | kitchen |
| 45 | plate | - | - | kitchen |
| 46 | wine glass | wine glass | wine glass | kitchen |
| 47 | cup | cup | cup | kitchen |
| 48 | fork | fork | fork | kitchen |
| 49 | knife | knife | knife | kitchen |
| 50 | spoon | spoon | spoon | kitchen |
| 51 | bowl | bowl | bowl | kitchen |
| 52 | banana | banana | banana | food |
| 53 | apple | apple | apple | food |
| 54 | sandwich | sandwich | sandwich | food |
| 55 | orange | orange | orange | food |
| 56 | broccoli | broccoli | broccoli | food |
| 57 | carrot | carrot | carrot | food |
| 58 | hot dog | hot dog | hot dog | food |
| 59 | pizza | pizza | pizza | food |
| 60 | donut | donut | donut | food |
| 61 | cake | cake | cake | food |
| 62 | chair | chair | chair | furniture |
| 63 | couch | couch | couch | furniture |
| 64 | potted plant | potted plant | potted plant | furniture |
| 65 | bed | bed | bed | furniture |
| 66 | mirror | - | - | furniture |
| 67 | dining table | dining table | dining table | furniture |
| 68 | window | - | - | furniture |
| 69 | desk | - | - | furniture |
| 70 | toilet | toilet | toilet | furniture |
| 71 | door | - | - | furniture |
| 72 | tv | tv | tv | electronic |
| 73 | laptop | laptop | laptop | electronic |
| 74 | mouse | mouse | mouse | electronic |
| 75 | remote | remote | remote | electronic |
| 76 | keyboard | keyboard | keyboard | electronic |
| 77 | cell phone | cell phone | cell phone | electronic |
| 78 | microwave | microwave | microwave | appliance |
| 79 | oven | oven | oven | appliance |
| 80 | toaster | toaster | toaster | appliance |
| 81 | sink | sink | sink | appliance |
| 82 | refrigerator | refrigerator | refrigerator | appliance |
| 83 | blender | - | - | appliance |
| 84 | book | book | book | indoor |
| 85 | clock | clock | clock | indoor |
| 86 | vase | vase | vase | indoor |
| 87 | scissors | scissors | scissors | indoor |
| 88 | teddy bear | teddy bear | teddy bear | indoor |
| 89 | hair drier | hair drier | hair drier | indoor |
| 90 | toothbrush | toothbrush | toothbrush | indoor |
| 91 | hair brush | - | - | indoor |
可以看到,2014年和2017年发布的对象列表是相同的,它们是论文中最初91个对象类别中的80个对象。所以在转换的时候,要重新对类别做映射,映射函数如下:
def coco91_to_coco80_class():  # converts 80-index (val2014) to 91-index (paper)
    # https://tech.amikelive.com/node-718/what-object-categories-labels-are-in-coco-dataset/
    # a = np.loadtxt('data/coco.names', dtype='str', delimiter='\n')
    # b = np.loadtxt('data/coco_paper.names', dtype='str', delimiter='\n')
    # x1 = [list(a[i] == b).index(True) + 1 for i in range(80)]  # darknet to coco
    # x2 = [list(b[i] == a).index(True) if any(b[i] == a) else None for i in range(91)]  # coco to darknet
    x = [0, 1, 2, 3, 4, 5, 6, 7, 8, 9, 10, None, 11, 12, 13, 14, 15, 16, 17, 18, 19, 20, 21, 22, 23, None, 24, 25, None,
         None, 26, 27, 28, 29, 30, 31, 32, 33, 34, 35, 36, 37, 38, 39, None, 40, 41, 42, 43, 44, 45, 46, 47, 48, 49, 50,
         51, 52, 53, 54, 55, 56, 57, 58, 59, None, 60, None, None, 61, None, 62, 63, 64, 65, 66, 67, 68, 69, 70, 71, 72,
         None, 73, 74, 75, 76, 77, 78, 79, None]
    return x
接下来,开始格式转换,工程的目录如下:

- coco:存放解压后的数据集。
-out:保存输出结果。
-coco2yolo.py:转换脚本。
转换代码如下:
import json
import glob
import os
import shutil
from pathlib import Path
import numpy as np
from tqdm import tqdm


def make_folders(path='../out/'):
    # Create folders

    if os.path.exists(path):
        shutil.rmtree(path)  # delete output folder
    os.makedirs(path)  # make new output folder
    os.makedirs(path + os.sep + 'labels')  # make new labels folder
    os.makedirs(path + os.sep + 'images')  # make new labels folder
    return path


def convert_coco_json(json_dir='./coco/annotations_trainval2017/annotations/'):
    jsons = glob.glob(json_dir + '*.json')
    coco80 = coco91_to_coco80_class()

    # Import json
    for json_file in sorted(jsons):
        fn = 'out/labels/%s/' % Path(json_file).stem.replace('instances_', '')  # folder name
        fn_images = 'out/images/%s/' % Path(json_file).stem.replace('instances_', '')  # folder name
        os.makedirs(fn,exist_ok=True)
        os.makedirs(fn_images,exist_ok=True)
        with open(json_file) as f:
            data = json.load(f)
        print(fn)
        # Create image dict
        images = {'%g' % x['id']: x for x in data['images']}

        # Write labels file
        for x in tqdm(data['annotations'], desc='Annotations %s' % json_file):
            if x['iscrowd']:
                continue

            img = images['%g' % x['image_id']]
            h, w, f = img['height'], img['width'], img['file_name']
            file_path='coco/'+fn.split('/')[-2]+"/"+f
            # The Labelbox bounding box format is [top left x, top left y, width, height]
            box = np.array(x['bbox'], dtype=np.float64)
            box[:2] += box[2:] / 2  # xy top-left corner to center
            box[[0, 2]] /= w  # normalize x
            box[[1, 3]] /= h  # normalize y

            if (box[2] > 0.) and (box[3] > 0.):  # if w > 0 and h > 0
                with open(fn + Path(f).stem + '.txt', 'a') as file:
                    file.write('%g %.6f %.6f %.6f %.6f\n' % (coco80[x['category_id'] - 1], *box))
            file_path_t=fn_images+f
            print(file_path,file_path_t)
            shutil.copy(file_path,file_path_t)


def coco91_to_coco80_class():  # converts 80-index (val2014) to 91-index (paper)
    # https://tech.amikelive.com/node-718/what-object-categories-labels-are-in-coco-dataset/
    # a = np.loadtxt('data/coco.names', dtype='str', delimiter='\n')
    # b = np.loadtxt('data/coco_paper.names', dtype='str', delimiter='\n')
    # x1 = [list(a[i] == b).index(True) + 1 for i in range(80)]  # darknet to coco
    # x2 = [list(b[i] == a).index(True) if any(b[i] == a) else None for i in range(91)]  # coco to darknet
    x = [0, 1, 2, 3, 4, 5, 6, 7, 8, 9, 10, None, 11, 12, 13, 14, 15, 16, 17, 18, 19, 20, 21, 22, 23, None, 24, 25, None,
         None, 26, 27, 28, 29, 30, 31, 32, 33, 34, 35, 36, 37, 38, 39, None, 40, 41, 42, 43, 44, 45, 46, 47, 48, 49, 50,
         51, 52, 53, 54, 55, 56, 57, 58, 59, None, 60, None, None, 61, None, 62, 63, 64, 65, 66, 67, 68, 69, 70, 71, 72,
         None, 73, 74, 75, 76, 77, 78, 79, None]
    return x

convert_coco_json()
开始运行:

转换完成后,验证转换的结果:
import cv2
import os

def draw_box_in_single_image(image_path, txt_path):
    # 读取图像
    image = cv2.imread(image_path)

    # 读取txt文件信息
    def read_list(txt_path):
        pos = []
        with open(txt_path, 'r') as file_to_read:
            while True:
                lines = file_to_read.readline()  # 整行读取数据
                if not lines:
                    break
                # 将整行数据分割处理,如果分割符是空格,括号里就不用传入参数,如果是逗号, 则传入‘,'字符。
                p_tmp = [float(i) for i in lines.split(' ')]
                pos.append(p_tmp)  # 添加新读取的数据
                # Efield.append(E_tmp)
                pass
        return pos


    # txt转换为box
    def convert(size, box):
        xmin = (box[1]-box[3]/2.)*size[1]
        xmax = (box[1]+box[3]/2.)*size[1]
        ymin = (box[2]-box[4]/2.)*size[0]
        ymax = (box[2]+box[4]/2.)*size[0]
        box = (int(xmin), int(ymin), int(xmax), int(ymax))
        return box

    pos = read_list(txt_path)
    print(pos)
    tl = int((image.shape[0]+image.shape[1])/2)
    lf = max(tl-1,1)
    for i in range(len(pos)):
        label = str(int(pos[i][0]))
        print('label is '+label)
        box = convert(image.shape, pos[i])
        image = cv2.rectangle(image,(box[0], box[1]),(box[2],box[3]),(0,0,255),2)
        cv2.putText(image,label,(box[0],box[1]-2), 0, 1, [0,0,255], thickness=2, lineType=cv2.LINE_AA)
        pass

    if pos:
        cv2.imwrite('./Data/see_images/{}.png'.format(image_path.split('\\')[-1][:-4]), image)
    else:
        print('None')


img_folder = "./out/images/val2017"
img_list = os.listdir(img_folder)
img_list.sort()

label_folder = "./out/labels/val2017"
label_list = os.listdir(label_folder)
label_list.sort()
if not os.path.exists('./Data/see_images'):
    os.makedirs('./Data/see_images')
for i in range(len(img_list)):
    image_path = img_folder + "\\" + img_list[i]
    txt_path = label_folder + "\\" + label_list[i]
    draw_box_in_single_image(image_path, txt_path)
结果展示:

训练自定义数据集
自定义数据,我们采用Labelme标注数据,将标注后的数据统一放大一个文件夹里面。
数据集下载链接:
https://download.csdn.net/download/hhhhhhhhhhwwwwwwwwww/63242994。
类别如下: [‘c17’, ‘c5’, ‘helicopter’, ‘c130’, ‘f16’, ‘b2’,
‘other’, ‘b52’, ‘kc10’, ‘command’, ‘f15’, ‘kc135’, ‘a10’,
‘b1’, ‘aew’, ‘f22’, ‘p3’, ‘p8’, ‘f35’, ‘f18’, ‘v22’, ‘f4’,
‘globalhawk’, ‘u2’, ‘su-27’, ‘il-38’, ‘tu-134’, ‘su-33’,
‘an-70’, ‘su-24’, ‘tu-22’, ‘il-76’]
格式转换
将Lableme数据集转为yolov8格式的数据集,转换代码如下:
import os
import shutil

import numpy as np
import json
from glob import glob
import cv2
from sklearn.model_selection import train_test_split
from os import getcwd


def convert(size, box):
    dw = 1. / (size[0])
    dh = 1. / (size[1])
    x = (box[0] + box[1]) / 2.0 - 1
    y = (box[2] + box[3]) / 2.0 - 1
    w = box[1] - box[0]
    h = box[3] - box[2]
    x = x * dw
    w = w * dw
    y = y * dh
    h = h * dh
    return (x, y, w, h)


def change_2_yolo5(files, txt_Name):
    imag_name=[]
    for json_file_ in files:
        json_filename = labelme_path + json_file_ + ".json"
        out_file = open('%s/%s.txt' % (labelme_path, json_file_), 'w')
        json_file = json.load(open(json_filename, "r", encoding="utf-8"))
        # image_path = labelme_path + json_file['imagePath']
        imag_name.append(json_file_+'.jpg')
        height, width, channels = cv2.imread(labelme_path + json_file_ + ".jpg").shape
        for multi in json_file["shapes"]:
            points = np.array(multi["points"])
            xmin = min(points[:, 0]) if min(points[:, 0]) > 0 else 0
            xmax = max(points[:, 0]) if max(points[:, 0]) > 0 else 0
            ymin = min(points[:, 1]) if min(points[:, 1]) > 0 else 0
            ymax = max(points[:, 1]) if max(points[:, 1]) > 0 else 0
            label = multi["label"].lower()
            if xmax <= xmin:
                pass
            elif ymax <= ymin:
                pass
            else:
                cls_id = classes.index(label)
                b = (float(xmin), float(xmax), float(ymin), float(ymax))
                bb = convert((width, height), b)
                out_file.write(str(cls_id) + " " + " ".join([str(a) for a in bb]) + '\n')
                # print(json_filename, xmin, ymin, xmax, ymax, cls_id)
    return imag_name

def image_txt_copy(files,scr_path,dst_img_path,dst_txt_path):
    """
    :param files: 图片名字组成的list
    :param scr_path: 图片的路径
    :param dst_img_path: 图片复制到的路径
    :param dst_txt_path: 图片对应的txt复制到的路径
    :return:
    """
    for file in files:
        img_path=scr_path+file
        print(file)
        shutil.copy(img_path, dst_img_path+file)
        scr_txt_path=scr_path+file.split('.')[0]+'.txt'
        shutil.copy(scr_txt_path, dst_txt_path + file.split('.')[0]+'.txt')


if __name__ == '__main__':
    classes = ['c17', 'c5', 'helicopter', 'c130', 'f16', 'b2',
               'other', 'b52', 'kc10', 'command', 'f15', 'kc135', 'a10',
               'b1', 'aew', 'f22', 'p3', 'p8', 'f35', 'f18', 'v22', 'f4',
               'globalhawk', 'u2', 'su-27', 'il-38', 'tu-134', 'su-33',
               'an-70', 'su-24', 'tu-22', 'il-76']

    # 1.标签路径
    labelme_path = "USA-Labelme/"
    isUseTest = True  # 是否创建test集
    # 3.获取待处理文件
    files = glob(labelme_path + "*.json")

    files = [i.replace("\\", "/").split("/")[-1].split(".json")[0] for i in files]
    for i in files:
        print(i)
    trainval_files, test_files = train_test_split(files, test_size=0.1, random_state=55)
    # split
    train_files, val_files = train_test_split(trainval_files, test_size=0.1, random_state=55)
    train_name_list=change_2_yolo5(train_files, "train")
    print(train_name_list)
    val_name_list=change_2_yolo5(val_files, "val")
    test_name_list=change_2_yolo5(test_files, "test")
    #创建数据集文件夹。
    file_List = ["train", "val", "test"]
    for file in file_List:
        if not os.path.exists('./VOC/images/%s' % file):
            os.makedirs('./VOC/images/%s' % file)
        if not os.path.exists('./VOC/labels/%s' % file):
            os.makedirs('./VOC/labels/%s' % file)
    image_txt_copy(train_name_list,labelme_path,'./VOC/images/train/','./VOC/labels/train/')
    image_txt_copy(val_name_list, labelme_path, './VOC/images/val/', './VOC/labels/val/')
    image_txt_copy(test_name_list, labelme_path, './VOC/images/test/', './VOC/labels/test/')
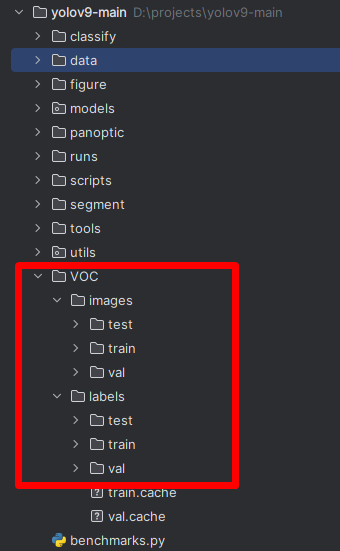
运行完成后就得到了yolov9格式的数据集。

设置数据集的yaml文件,将其命名为VOC.yaml,放到data文件夹下面,内容如下:
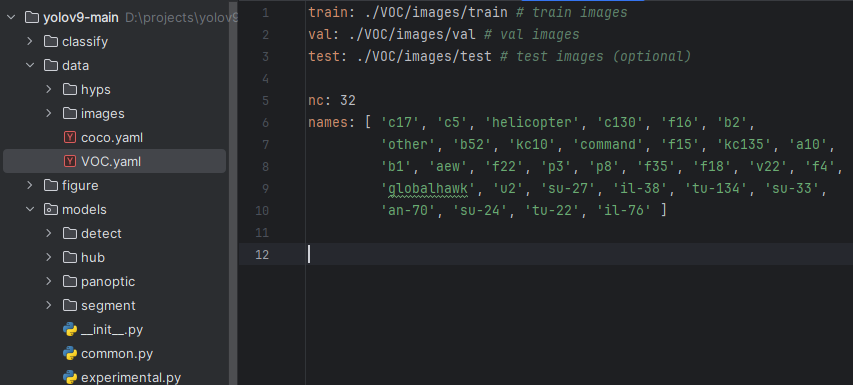
代码:
train: ./VOC/images/train # train images
val: ./VOC/images/val # val images
test: ./VOC/images/test # test images (optional)

nc: 32
names: [ 'c17', 'c5', 'helicopter', 'c130', 'f16', 'b2',
         'other', 'b52', 'kc10', 'command', 'f15', 'kc135', 'a10',
         'b1', 'aew', 'f22', 'p3', 'p8', 'f35', 'f18', 'v22', 'f4',
         'globalhawk', 'u2', 'su-27', 'il-38', 'tu-134', 'su-33',
         'an-70', 'su-24', 'tu-22', 'il-76' ]
将转化后的数据放到根目录下面,如下图:
修改train_dual.py脚本,代码如下:
    parser.add_argument('--weights', type=str, default='', help='initial weights path')
    parser.add_argument('--cfg', type=str, default='models/detect/yolov9-c.yaml', help='model.yaml path')
    parser.add_argument('--data', type=str, default=ROOT / 'data/VOC.yaml', help='dataset.yaml path')
    parser.add_argument('--epochs', type=int, default=100, help='total training epochs')
    parser.add_argument('--hyp', type=str, default=ROOT / 'data/hyps/hyp.scratch-high.yaml', help='hyperparameters path')
    parser.add_argument('--batch-size', type=int, default=4, help='total batch size for all GPUs, -1 for autobatch')
    parser.add_argument('--workers', type=int, default=8, help='max dataloader workers (per RANK in DDP mode)')
weights:设置预训练权重。
cfg:选择配置文件
data:数据集配置文件的路径。
epochs:轮数。
hyp:数据增强文件。
batch-size:BatchSize的大小。
workers:使用CPU的核数。
测试结果
yolov9 summary: 580 layers, 60567520 parameters, 0 gradients, 264.3 GFLOPs
                 Class     Images  Instances          P          R      mAP50   mAP50-95: 100%|██████████| 15/15 00:02
                   all        230       1412      0.878      0.991      0.989      0.732
                   c17        230        131       0.92      0.992      0.994      0.797
                    c5        230         68      0.828          1      0.992      0.807
            helicopter        230         43      0.895      0.977      0.969      0.634
                  c130        230         85      0.955      0.999      0.994      0.684
                   f16        230         57      0.839      0.965      0.966      0.689
                    b2        230          2          1      0.978      0.995      0.647
                 other        230         86       0.91      0.942      0.957      0.525
                   b52        230         70      0.917      0.971      0.979      0.806
                  kc10        230         62      0.958      0.984      0.987      0.826
               command        230         40      0.964          1      0.995      0.815
                   f15        230        123      0.939      0.995      0.995      0.702
                 kc135        230         91      0.949      0.989      0.978      0.691
                   a10        230         27      0.863      0.963      0.982      0.458
                    b1        230         20      0.926          1      0.995      0.712
                   aew        230         25      0.929          1      0.993      0.812
                   f22        230         17      0.835          1      0.995      0.706
                    p3        230        105       0.97          1      0.995      0.804
                    p8        230          1      0.566          1      0.995      0.697
                   f35        230         32      0.908          1      0.995      0.547
                   f18        230        125      0.956      0.992      0.993      0.828
                   v22        230         41      0.921          1      0.995      0.682
                 su-27        230         31      0.925          1      0.994      0.832
                 il-38        230         27      0.899          1      0.995      0.816
                tu-134        230          1      0.346          1      0.995      0.895
                 su-33        230          2       0.96          1      0.995      0.747
                 an-70        230          2      0.718          1      0.995      0.796
                 tu-22        230         98      0.912          1      0.995      0.804


 855
855

 被折叠的 条评论
为什么被折叠?
被折叠的 条评论
为什么被折叠?
 到【灌水乐园】发言


