


电机模块开发
L9110s概述 接通VCC,GND 模块电源指示灯亮, 以下资料来源官方,但是不对,根据下节课实际调试 IA1输入高电平,IA1输入低电平,【OA1 OB1】电机正转; IA1输入低电平,IA1输入高电平,【OA1 OB1】电机反转; IA2输入高电平,IA2输入低电平,【OA2 OB2】电机正转; IA2输入低电平,IA2输入高电平,【OA2 OB2】电机反转;
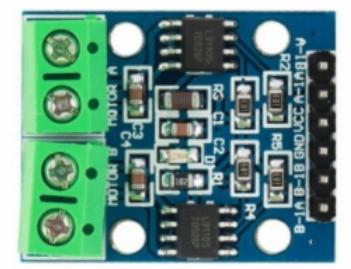
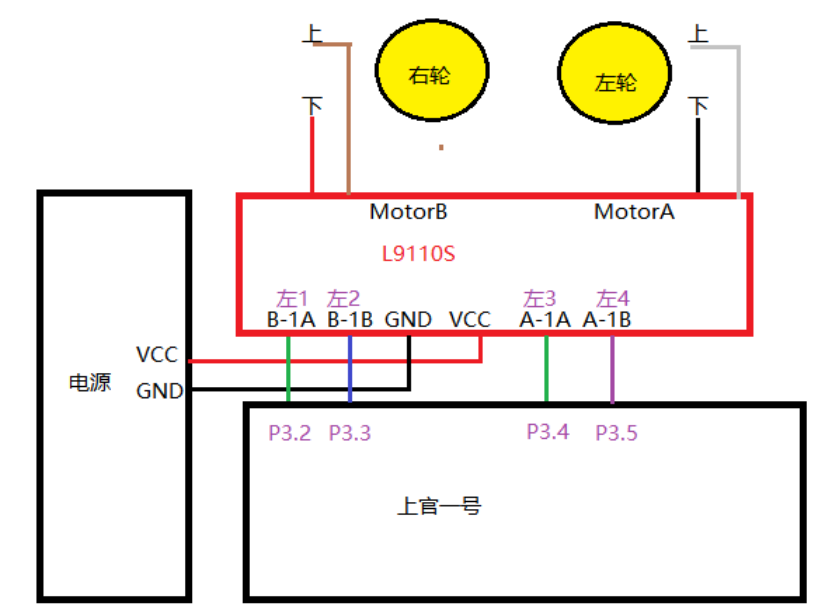
接线
有个很重的事
有时候会发现小车动不起来,代码都正确,这时候很可能是L9110s和单片机没有共地!!!
2.代码-让小车动起来
//调试出小车前后左右控制
#include "reg52.h"
#include "intrins.h"
sbit RightCon1A = P3^2;
sbit RightCon1B = P3^3;
sbit LeftCon1A = P3^4;
sbit LeftCon1B = P3^5;
void Delay1000ms() //@11.0592MHz
{
    unsigned char i, j, k;
    _nop_();
    i = 8;
    j = 1;
    k = 243;
    do
    {
        do
        {
            while (--k);
        } while (--j);
    } while (--i);
}
void goForward()
{
    LeftCon1A = 0;
    LeftCon1B = 1;
    RightCon1A = 0;
    RightCon1B = 1;
}
void goRight()
{
    LeftCon1A = 0;
    LeftCon1B = 1;
    RightCon1A = 0;
    RightCon1B = 0;
}
void goLeft()
{
    LeftCon1A = 0;
    LeftCon1B = 0;
    RightCon1A = 0;
    RightCon1B = 1;
}
void goBack()
{
    LeftCon1A = 1;
    LeftCon1B = 0;
    RightCon1A = 1;
    RightCon1B = 0;
}
void main()
{
w    hile(1){
    goForward();
    Delay1000ms();
    Delay1000ms();
    goBack();
    Delay1000ms();
    Delay1000ms();
    goLeft();
    Delay1000ms();
    Delay1000ms();
    goRight();
    Delay1000ms();
    Delay1000ms();
    }
}
3.代码-串口(蓝牙)控制小车方向
uart.c

char buffer[SIZE];

void UartInit()
{
    SCON = 0x50;
    AUXR = 0x01;
    TMOD &= 0xF0;
    TMOD |= 0x20;
    TH1 = 0xFD;
    TL1 = 0xFD;
    TR1 = 1;
    EA = 1;
    ES = 1;
}

void Uart_Handler() interrupt 4
{
    static int i =0;//静态变量被初始化一次
    char tmp;

    if(RI == 1){  //中断处理函数中,对于接收中断的响应

        RI = 0;//软件置1
        tmp = SBUF;
        if(tmp == 'M'){
            i = 0;
        }
        buffer[i] = tmp;
        i++;
        if(buffer[0] == 'M'){
            switch(buffer[1]){
                case'1':
                    goForward();
                    break;
                case'2':
                    goBack();
                    break;
                case'3':
                    goLeft();
                    break;
                case'4':
                    goRight();
                    break;
                default:
                    stop();
                    break;
            }
        }
        if(i == 12){
            i = 0;
            memset(buffer,'\0',SIZE);
        }
    }

}
main.c
void main()
{
UartInit();
while(1){
}
}3.1加入点动模式
uart.c

void main()
{
    UartInit();
    while(1){
        stop();
    }

}
uart.c
void Uart_Handler() interrupt 4
{
static int i =0;//静态变量被初始化一次
char tmp;
if(RI == 1){ //中断处理函数中,对于接收中断的响应
RI = 0;//软件置1
tmp = SBUF;
if(tmp == 'M'){
i = 0;
}
buffer[i] = tmp;
i++;
if(buffer[0] == 'M'){
switch(buffer[1]){
case'1':
goForward();
Delay10ms();
break;
case'2':
goBack();
Delay10ms();
break;
case'3':
goLeft();
Delay10ms();
break;
case'4':
goRight();
Delay10ms();
break;
default:
stop();
break;
}
}
if(i == 12){
i = 0;
memset(buffer,'\0',SIZE);
}
}
}4.PWM方式实现小车转向
原理: 左轮定时器0调速,右轮定时器1调速,那么左转就是右轮速度大于左轮! 开发:有手就行
//main.c
void main()
{
    Time0Init();
    Time1Init();
    //UartInit();
    while(1){
        speedLeft = 10;//10份单位时间全速运行,30份停止,所以慢,20ms是40份的500us
        speedRight = 40;
        Delay1000ms();
        Delay1000ms();
        speedLeft = 40;
        speedRight = 10;
        Delay1000ms();
        Delay1000ms();
    }
}
//time.c
#include "motor.h"
#include "reg52.h"
char speedLeft;
char cntLeft = 0;
char speedRight;
char cntRight = 0;
void Time1Init()
{
    //1. 配置定时器1工作模式位16位计时
    TMOD &= 0x0F;
    TMOD |= 0x1 << 4;
    //2. 给初值,定一个0.5出来
    TL1=0x33;
    TH1=0xFE;
    //3. 开始计时
    TR1 = 1;
    TF1 = 0;
    //4. 打开定时器1中断
    ET1 = 1;
    //5. 打开总中断EA
    EA = 1;
}
void Time0Init()
{
    //1. 配置定时器0工作模式位16位计时
    TMOD = 0x01;
    //2. 给初值,定一个0.5出来
    TL0=0x33;
    TH0=0xFE;
    //3. 开始计时
    TR0 = 1;
    TF0 = 0;
    //4. 打开定时器0中断
    ET0 = 1;
    EA = 1;
}
void Time1Handler() interrupt 3
{
    cntRight++; //统计爆表的次数. cnt=1的时候,报表了1
    //重新给初值
    TL1=0x33;
    TH1=0xFE;
    //控制PWM波
    if(cntRight < speedRight){
        //右前进
        goForwardRight();
    }else{
        //停止
        stopRight();
    }
    if(cntRight == 40){//爆表40次,经过了20ms
        cntRight = 0; //当100次表示1s,重新让cnt从0开始,计算下一次的1s
    }
}
void Time0Handler() interrupt 1
{
    cntLeft++; //统计爆表的次数. cnt=1的时候,报表了1
    //重新给初值
    TL0=0x33;
    TH0=0xFE;
    //控制PWM波
    if(cntLeft < speedLeft){
        //左前进
        goForwardLeft();
    }else{
        //停止
        stopLeft();
    }
    if(cntLeft == 40){//爆表40次,经过了20ms
        cntLeft = 0; //当100次表示1s,重新让cnt从0开始,计算下一次的1s
    }
}


 4429
4429


 被折叠的 条评论
为什么被折叠?
被折叠的 条评论
为什么被折叠?
 到【灌水乐园】发言


