


秋招面试专栏推荐 :深度学习算法工程师面试问题总结【百面算法工程师】——点击即可跳转
💡💡💡本专栏所有程序均经过测试,可成功执行💡💡💡
专栏目录: 《YOLOv5入门 + 改进涨点》专栏介绍 & 专栏目录 |目前已有50+篇内容,内含各种Head检测头、损失函数Loss、Backbone、Neck、NMS等创新点改进
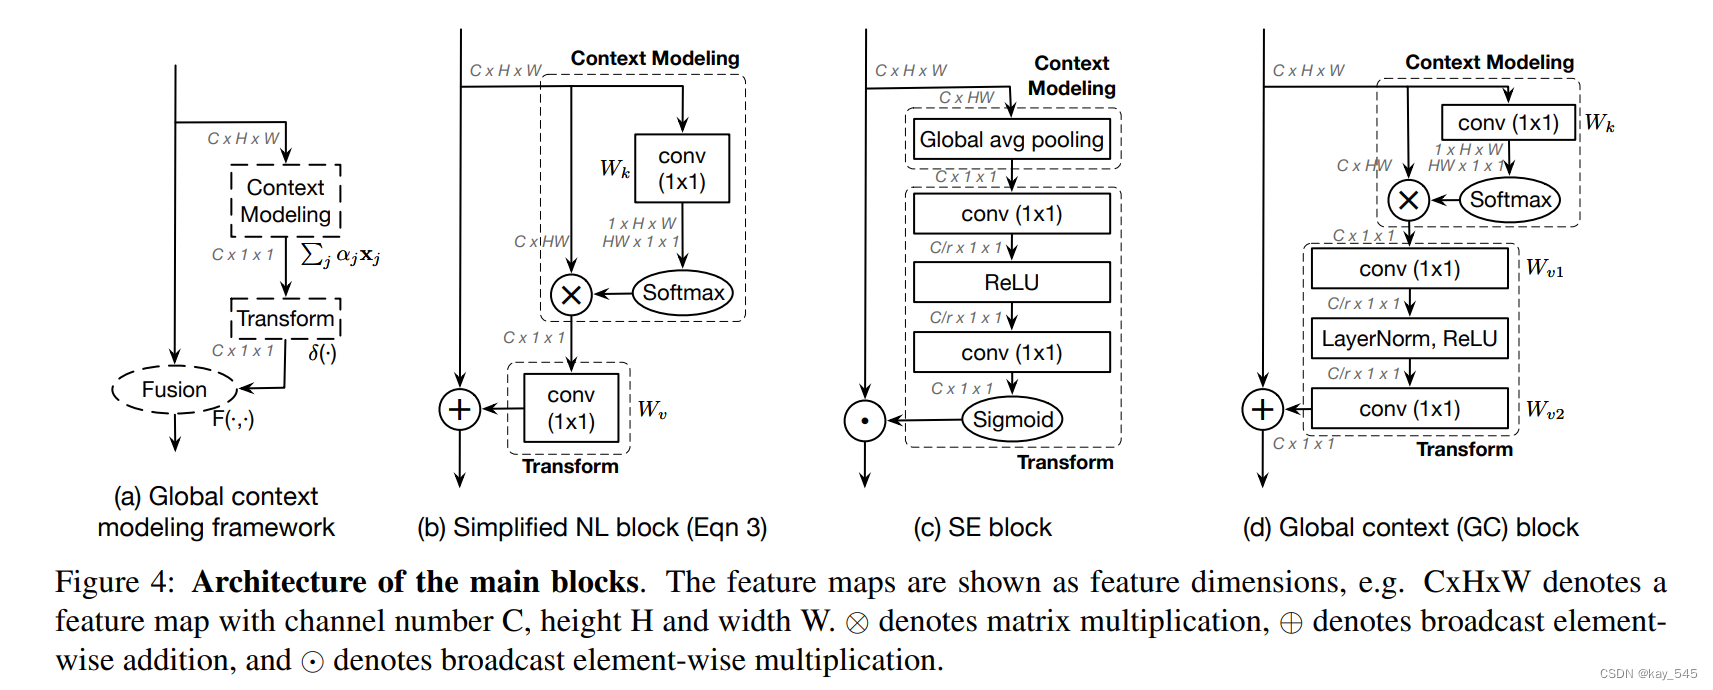
非局部网络通过将特定于查询的全局上下文聚合到每个查询位置,为捕获长距离依赖关系提供了一种开创性的方法。然而,通过实验证明,非局部网络建模的全局上下文在图像内不同的查询位置几乎是相同的。因此,利用这一发现创建了一个简化的网络。在本文中,给大家带来的教程是将原来的的网络替换添加GcNet。文章在介绍主要的原理后,将手把手教学如何进行模块的代码添加和修改,并将修改后的完整代码放在文章的最后,方便大家一键运行,小白也可轻松上手实践。以帮助您更好地学习深度学习目标检测YOLO系列的挑战。
目录
1.原理

论文地址:GCNet: Non-local Networks Meet Squeeze-Excitation Networks and Beyond点击即可跳转
官方代码:官方代码仓库——点击即可跳转
GCNet(Global Context Network)是一种用于计算机视觉任务的注意力机制模型。该模型旨在提高深度神经网络对全局上下文信息的理解和利用,以改善其在各种视觉任务中的性能。
GCNet 主要解决的问题是,传统的卷积神经网络(CNN)在处理图像时,往往只关注局部信息,而忽略了图像的全局上下文信息。GCNet 引入了全局上下文注意力机制,允许网络在处理图像时动态地调整不同位置的权重,以更好地捕捉全局信息。
GCNet 的主要组成部分:
-
全局上下文模块:GCNet 包括一个全局上下文模块,用于从整个图像中提取全局信息。这个模块通常由全局平均池化层(Global Average Pooling)组成,用于将整个特征图压缩成一个全局特征向量。
-
通道注意力机制:GCNet 使用通道注意力机制来动态地调整特征图中每个通道的权重,以更好地捕获图像中不同通道的重要性。这有助于网络更加聚焦于对解决当前任务最重要的特征。
-
空间注意力机制:除了通道注意力,GCNet 还引入了空间注意力机制,以考虑不同位置之间的关系。这个机制通常通过使用卷积操作来实现,以便网络可以学习到图像中不同位置之间的依赖关系。
-
反馈机制:GCNet 通常具有反馈机制,允许网络根据任务的需求动态地调整注意力权重。这种反馈机制通常通过在训练过程中引入反向传播来实现,网络可以根据任务的损失来调整注意力权重。
总的来说,GCNet 通过引入全局上下文注意力机制,允许网络更好地理解和利用图像的全局信息,从而提高了在各种计算机视觉任务中的性能。它的核心思想是通过动态地调整注意力权重来关注图像中最相关的信息,从而提高了网络的表现。
2. GcNet代码实现
2.1 将GcNet添加到YOLOv5中
关键步骤一: 将下面代码粘贴到/projects/yolov5-6.1/models/common.py文件中
class ContextBlock2d(nn.Module):
    """ContextBlock2d
    Parameters
    ----------
    inplanes : int
        Number of in_channels.
    pool : string
        spatial att or global pooling (default:'att').
    fusions : list
    Reference:
        Yue Cao, et al. "GCNet: Non-local Networks Meet Squeeze-Excitation Networks and Beyond."
    """

    def __init__(self, inplanes, pool='att', fusions=None):
        super(ContextBlock2d, self).__init__()
        if fusions is None:
            fusions = ['channel_add', 'channel_mul']
        assert pool in ['avg', 'att']
        assert all([f in ['channel_add', 'channel_mul'] for f in fusions])
        assert len(fusions) > 0, 'at least one fusion should be used'
        self.inplanes = inplanes
        self.planes = inplanes // 4
        self.pool = pool
        self.fusions = fusions
        if 'att' in pool:
            self.conv_mask = nn.Conv2d(inplanes, 1, kernel_size=1)
            self.softmax = nn.Softmax(dim=2)
        else:
            self.avg_pool = nn.AdaptiveAvgPool2d(1)
        if 'channel_add' in fusions:
            self.channel_add_conv = nn.Sequential(nn.Conv2d(self.inplanes, self.planes, kernel_size=1),
                                                  nn.LayerNorm([self.planes, 1, 1]), nn.SiLU(inplace=True),
                                                  nn.Conv2d(self.planes, self.inplanes, kernel_size=1))
        else:
            self.channel_add_conv = None
        if 'channel_mul' in fusions:
            self.channel_mul_conv = nn.Sequential(nn.Conv2d(self.inplanes, self.planes, kernel_size=1),
                                                  nn.LayerNorm([self.planes, 1, 1]), nn.SiLU(inplace=True),
                                                  nn.Conv2d(self.planes, self.inplanes, kernel_size=1))
        else:
            self.channel_mul_conv = None
        self.reset_parameters()

    def reset_parameters(self):
        if self.pool == 'att':
            kaiming_init(self.conv_mask, mode='fan_in')
            self.conv_mask.inited = True

        if self.channel_add_conv is not None:
            last_zero_init(self.channel_add_conv)
        if self.channel_mul_conv is not None:
            last_zero_init(self.channel_mul_conv)

    def spatial_pool(self, x):
        batch, channel, height, width = x.size()
        if self.pool == 'att':
            input_x = x
            # [N, C, H * W]
            input_x = input_x.view(batch, channel, height * width)
            # [N, 1, C, H * W]
            input_x = input_x.unsqueeze(1)
            # [N, 1, H, W]
            context_mask = self.conv_mask(x)
            # [N, 1, H * W]
            context_mask = context_mask.view(batch, 1, height * width)
            # [N, 1, H * W]
            context_mask = self.softmax(context_mask)
            # [N, 1, H * W, 1]
            context_mask = context_mask.unsqueeze(3)
            # [N, 1, C, 1]
            context = torch.matmul(input_x, context_mask)
            # [N, C, 1, 1]
            context = context.view(batch, channel, 1, 1)
        else:
            # [N, C, 1, 1]
            context = self.avg_pool(x)

        return context

    def forward(self, x):
        # [N, C, 1, 1]
        context = self.spatial_pool(x)

        if self.channel_mul_conv is not None:
            # [N, C, 1, 1]
            channel_mul_term = torch.sigmoid(self.channel_mul_conv(context))
            out = x * channel_mul_term
        else:
            out = x
        if self.channel_add_conv is not None:
            # [N, C, 1, 1]
            channel_add_term = self.channel_add_conv(context)
            out = out + channel_add_term
        return out

def constant_init(module, val, bias=0):
    if hasattr(module, 'weight') and module.weight is not None:
        nn.init.constant_(module.weight, val)
    if hasattr(module, 'bias') and module.bias is not None:
        nn.init.constant_(module.bias, bias)

def kaiming_init(module, a=0, mode='fan_out', nonlinearity='relu', bias=0, distribution='normal'):
    assert distribution in ['uniform', 'normal']
    if hasattr(module, 'weight') and module.weight is not None:
        if distribution == 'uniform':
            nn.init.kaiming_uniform_(module.weight, a=a, mode=mode, nonlinearity=nonlinearity)
        else:
            nn.init.kaiming_normal_(module.weight, a=a, mode=mode, nonlinearity=nonlinearity)
    if hasattr(module, 'bias') and module.bias is not None:
        nn.init.constant_(module.bias, bias)

def last_zero_init(m):
    if isinstance(m, nn.Sequential):
        constant_init(m[-1], val=0)
        m[-1].inited = True
    else:
        constant_init(m, val=0)
        m.inited = True

class C3GC(nn.Module):
    # C3 Bottleneck with 3 convolutions
    def __init__(self, c1, c2, n=1, shortcut=True, g=1, e=0.5):  # ch_in, ch_out, number, shortcut, groups, expansion
        super(C3GC, self).__init__()
        c_ = int(c2 * e)  # hidden channels
        self.gc = ContextBlock2d(c1)
        self.cv1 = Conv(c1, c_)
        self.cv2 = Conv(c1, c_)
        self.cv3 = Conv(2 * c_, c2)  # act=FReLU(c2)
        self.m = nn.Sequential(*[Bottleneck(c_, c_, shortcut, g, e=1.0) for _ in range(n)])

    def forward(self, x):
        out = torch.cat((self.m(self.cv1(x)), self.cv2(self.gc(x))), dim=1)
        out = self.cv3(out)
        return out
GCNet的主要流程可以概括为以下几个步骤:
-
输入图像的特征提取:
-
首先,将输入图像通过一个预训练的卷积神经网络(如ResNet、VGG等)进行特征提取,得到一个特征图。
-
-
全局上下文模块:
-
将特征图输入到全局上下文模块中。
-
在全局上下文模块中,使用全局平均池化(Global Average Pooling)对整个特征图进行操作,得到一个全局上下文特征向量。
-
-
通道注意力机制:
-
将全局上下文特征向量与原始特征图结合起来。
-
对结合后的特征进行通道注意力机制的处理,动态地调整特征图中每个通道的权重,以便网络能够自适应地关注对解决当前任务最重要的特征通道。
-
-
空间注意力机制:
-
在通道注意力机制之后,还可以引入空间注意力机制。
-
通过卷积操作,在特征图的空间维度上学习到不同位置之间的依赖关系,从而更好地捕捉图像中的结构信息。
-
-
特征融合和输出:
-
将经过通道注意力和空间注意力机制处理后的特征图输入到后续的网络层中,可能是全连接层或者其他类型的层。
-
最终,通过输出层生成网络的最终预测结果,如分类标签、图像分割等。
-
在整个流程中,GCNet通过全局上下文模块和注意力机制,使网络能够更好地理解和利用图像中的全局信息,并自适应地关注对解决当前任务最重要的特征通道和位置信息,从而提高了网络在各种图像处理任务中的性能和效果。
2.2 新增yaml文件
关键步骤二:在下/projects/yolov5-6.1/models下新建文件 yolov5_C3GC.yaml并将下面代码复制进去
- OD【目标检测 】
# YOLOv5 🚀 by Ultralytics, GPL-3.0 license

# Parameters
nc: 80  # number of classes
depth_multiple: 0.33  # model depth multiple
width_multiple: 0.25  # layer channel multiple
anchors:
  - [ 10,13, 16,30, 33,23 ]  # P3/8
  - [ 30,61, 62,45, 59,119 ]  # P4/16
  - [ 116,90, 156,198, 373,326 ]  # P5/32

# YOLOv5 v6.0 backbone
backbone:
  # [from, number, module, args]
  [ [ -1, 1, Conv, [ 64, 6, 2, 2 ] ],  # 0-P1/2
    [ -1, 1, Conv, [ 128, 3, 2 ] ],  # 1-P2/4
    [ -1, 3, C3GC, [ 128 ] ],
    [ -1, 1, Conv, [ 256, 3, 2 ] ],  # 3-P3/8
    [ -1, 6, C3GC, [ 256 ] ],
    [ -1, 1, Conv, [ 512, 3, 2 ] ],  # 5-P4/16
    [ -1, 9, C3GC, [ 512 ] ],
    [ -1, 1, Conv, [ 1024, 3, 2 ] ],  # 7-P5/32
    [ -1, 3, C3GC, [ 1024 ] ],
    [ -1, 1, SPPF, [ 1024, 5 ] ],  # 9
  ]

# YOLOv5 v6.0 head
head:
  [ [ -1, 1, Conv, [ 512, 1, 1 ] ],
    [ -1, 1, nn.Upsample, [ None, 2, 'nearest' ] ],
    [ [ -1, 6 ], 1, Concat, [ 1 ] ],  # cat backbone P4
    [ -1, 3, C3GC, [ 512, False ] ],  # 13

    [ -1, 1, Conv, [ 256, 1, 1 ] ],
    [ -1, 1, nn.Upsample, [ None, 2, 'nearest' ] ],
    [ [ -1, 4 ], 1, Concat, [ 1 ] ],  # cat backbone P3
    [ -1, 3, C3GC, [ 256, False ] ],  # 17 (P3/8-small)

    [ -1, 1, Conv, [ 256, 3, 2 ] ],
    [ [ -1, 14 ], 1, Concat, [ 1 ] ],  # cat head P4
    [ -1, 3, C3GC, [ 512, False ] ],  # 20 (P4/16-medium)

    [ -1, 1, Conv, [ 512, 3, 2 ] ],
    [ [ -1, 10 ], 1, Concat, [ 1 ] ],  # cat head P5
    [ -1, 3, C3GC, [ 1024, False ] ],  # 23 (P5/32-large)

    [ [ 17, 20, 23 ], 1, Detect, [ nc, anchors ] ],  # Detect(P3, P4, P5)
  ]
- Seg【语义分割】
# YOLOv5 🚀 by Ultralytics, GPL-3.0 license

# Parameters
nc: 80  # number of classes
depth_multiple: 0.33  # model depth multiple
width_multiple: 0.25  # layer channel multiple
anchors:
  - [ 10,13, 16,30, 33,23 ]  # P3/8
  - [ 30,61, 62,45, 59,119 ]  # P4/16
  - [ 116,90, 156,198, 373,326 ]  # P5/32

# YOLOv5 v6.0 backbone
backbone:
  # [from, number, module, args]
  [ [ -1, 1, Conv, [ 64, 6, 2, 2 ] ],  # 0-P1/2
    [ -1, 1, Conv, [ 128, 3, 2 ] ],  # 1-P2/4
    [ -1, 3, C3GC, [ 128 ] ],
    [ -1, 1, Conv, [ 256, 3, 2 ] ],  # 3-P3/8
    [ -1, 6, C3GC, [ 256 ] ],
    [ -1, 1, Conv, [ 512, 3, 2 ] ],  # 5-P4/16
    [ -1, 9, C3GC, [ 512 ] ],
    [ -1, 1, Conv, [ 1024, 3, 2 ] ],  # 7-P5/32
    [ -1, 3, C3GC, [ 1024 ] ],
    [ -1, 1, SPPF, [ 1024, 5 ] ],  # 9
  ]

# YOLOv5 v6.0 head
head:
  [ [ -1, 1, Conv, [ 512, 1, 1 ] ],
    [ -1, 1, nn.Upsample, [ None, 2, 'nearest' ] ],
    [ [ -1, 6 ], 1, Concat, [ 1 ] ],  # cat backbone P4
    [ -1, 3, C3GC, [ 512, False ] ],  # 13

    [ -1, 1, Conv, [ 256, 1, 1 ] ],
    [ -1, 1, nn.Upsample, [ None, 2, 'nearest' ] ],
    [ [ -1, 4 ], 1, Concat, [ 1 ] ],  # cat backbone P3
    [ -1, 3, C3GC, [ 256, False ] ],  # 17 (P3/8-small)

    [ -1, 1, Conv, [ 256, 3, 2 ] ],
    [ [ -1, 14 ], 1, Concat, [ 1 ] ],  # cat head P4
    [ -1, 3, C3GC, [ 512, False ] ],  # 20 (P4/16-medium)

    [ -1, 1, Conv, [ 512, 3, 2 ] ],
    [ [ -1, 10 ], 1, Concat, [ 1 ] ],  # cat head P5
    [ -1, 3, C3GC, [ 1024, False ] ],  # 23 (P5/32-large)

    [ [ 17, 20, 23 ], 1, Segment, [nc, anchors, 32, 256]], # Detect(P3, P4, P5)
  ]
温馨提示:本文只是对yolov5l基础上添加swin模块,如果要对yolov8n/l/m/x进行添加则只需要指定对应的depth_multiple 和 width_multiple。
# YOLOv5n
depth_multiple: 0.33  # model depth multiple
width_multiple: 0.25  # layer channel multiple

# YOLOv5s
depth_multiple: 0.33  # model depth multiple
width_multiple: 0.50  # layer channel multiple

# YOLOv5l
depth_multiple: 1.0  # model depth multiple
width_multiple: 1.0  # layer channel multiple

# YOLOv5m
depth_multiple: 0.67  # model depth multiple
width_multiple: 0.75  # layer channel multiple

# YOLOv5x
depth_multiple: 1.33  # model depth multiple
width_multiple: 1.25  # layer channel multiple
2.3 注册模块
关键步骤:在yolo.py中的parse_model注册添加 ‘C3GC’


2.4 执行程序
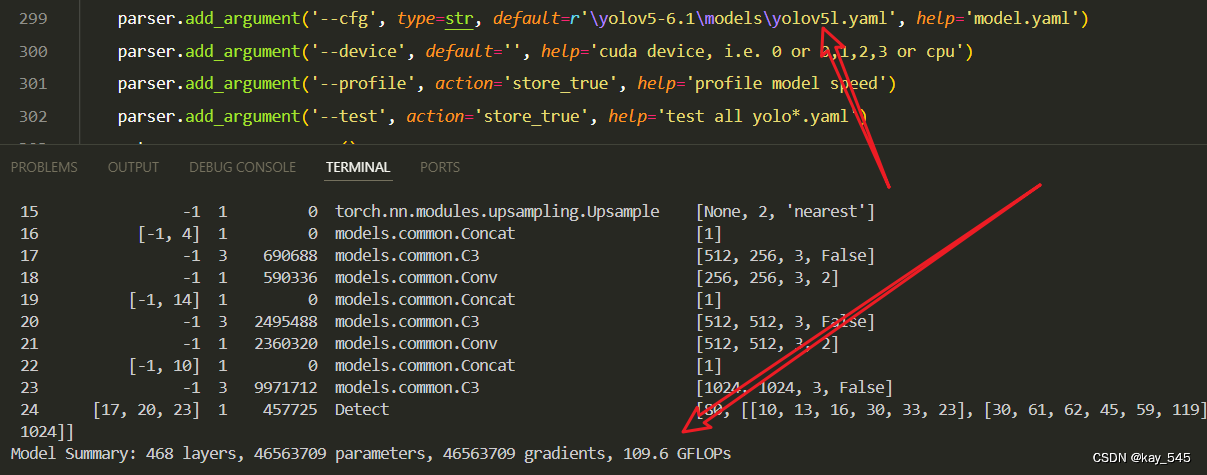
在train.py中,将cfg的参数路径设置为yolov5_C3GC.yaml的路径
建议大家写绝对路径,确保一定能找到

🚀运行程序,如果出现下面的内容则说明添加成功🚀
  from  n    params  module                                  arguments
  0                -1  1      1760  models.common.Conv                      [3, 16, 6, 2, 2]
  1                -1  1      4672  models.common.Conv                      [16, 32, 3, 2]
  2                -1  1      5969  models.common.C3GC                      [32, 32, 1]
  3                -1  1     18560  models.common.Conv                      [32, 64, 3, 2]
  4                -1  2     33569  models.common.C3GC                      [64, 64, 2]
  5                -1  1     73984  models.common.Conv                      [64, 128, 3, 2]
  6                -1  3    173889  models.common.C3GC                      [128, 128, 3]
  7                -1  1    295424  models.common.Conv                      [128, 256, 3, 2]
  8                -1  1    363137  models.common.C3GC                      [256, 256, 1]
  9                -1  1    164608  models.common.SPPF                      [256, 256, 5]
 10                -1  1     33024  models.common.Conv                      [256, 128, 1, 1]
 11                -1  1         0  torch.nn.modules.upsampling.Upsample    [None, 2, 'nearest']
 12           [-1, 6]  1         0  models.common.Concat                    [1]
 13                -1  1    157569  models.common.C3GC                      [256, 128, 1, False]
 14                -1  1      8320  models.common.Conv                      [128, 64, 1, 1]
 15                -1  1         0  torch.nn.modules.upsampling.Upsample    [None, 2, 'nearest']
 16           [-1, 4]  1         0  models.common.Concat                    [1]
 17                -1  1     39873  models.common.C3GC                      [128, 64, 1, False]
 18                -1  1     36992  models.common.Conv                      [64, 64, 3, 2]
 19          [-1, 14]  1         0  models.common.Concat                    [1]
 20                -1  1     91457  models.common.C3GC                      [128, 128, 1, False]
 21                -1  1    147712  models.common.Conv                      [128, 128, 3, 2]
 22          [-1, 10]  1         0  models.common.Concat                    [1]
 23                -1  1    363137  models.common.C3GC                      [256, 256, 1, False]
 24      [17, 20, 23]  1    115005  Detect                                  [80, [[10, 13, 16, 30, 33, 23], [30, 61, 62, 45, 59, 119], [116, 90, 156, 198, 373, 326]], [64, 128, 256]]
YOLOv5_C3GC summary: 318 layers, 2128661 parameters, 2128661 gradients, 4.8 GFLOPs
3. 完整代码分享
https://pan.baidu.com/s/15a2JywncqIacuKaLAxyG7A?pwd=ccbt提取码: ccbt
4.GFLOPs
关于GFLOPs的计算方式可以查看:百面算法工程师 | 卷积基础知识——Convolution
未改进的GFLOPs
改进后的GFLOPs

5. 进阶
你能在不同的位置添加全局注意力机制吗?
6. 总结
GCNet(Global Context Network)是一种引入全局上下文信息和注意力机制的图像处理模型。其流程首先通过全局上下文模块提取整个图像的全局信息,然后通过通道注意力机制动态调整特征图中每个通道的权重,使网络能够自适应地关注对解决当前任务最重要的特征通道。接着,GCNet引入空间注意力机制,学习不同位置之间的依赖关系,以更好地捕捉图像中的结构信息。通过全局上下文模块和注意力机制的综合利用,GCNet使网络能够更充分地理解和利用图像中的全局信息,从而提高了在各种图像处理任务中的性能和效果。


 1357
1357

 被折叠的 条评论
为什么被折叠?
被折叠的 条评论
为什么被折叠?
 到【灌水乐园】发言


