


一、Gradle 常用命令与参数
本课程全程基于 Gradle8.0 环境
1、Gradle 命令
介绍 gradle 命令之前我们先来了解下 gradle 命令怎么在项目中执行。
1.1、gradlew
gradlew 即 Gradle Wrapper,在学习小组的第一课时已经介绍过了这里就不多赘述。提一下执行命令,一般网上都是 windows 下用 gradlew; Mac 或者 Linux 下用 ./gradlew 。实际上 AS Dolphin 2021.3.1 后的版本因为默认终端切换成 powershell 所以命令变成了 .\gradlew 或者 ./gradlew 都可以。我们接下来看看 gradlew 脚本的内容(Android Studio 项目根目录 gradlew 文件):
#!/usr/bin/env sh

#
# Copyright 2015 the original author or authors.
#
# Licensed under the Apache License, Version 2.0 (the "License");
# you may not use this file except in compliance with the License.
# You may obtain a copy of the License at
#
#      https://www.apache.org/licenses/LICENSE-2.0
#
# Unless required by applicable law or agreed to in writing, software
# distributed under the License is distributed on an "AS IS" BASIS,
# WITHOUT WARRANTIES OR CONDITIONS OF ANY KIND, either express or implied.
# See the License for the specific language governing permissions and
# limitations under the License.
#

##############################################################################
##
##  Gradle start up script for UN*X
##
##############################################################################

# Attempt to set APP_HOME
# Resolve links: $0 may be a link
PRG="$0"
# Need this for relative symlinks.
while [ -h "$PRG" ] ; do
    ls=`ls -ld "$PRG"`
    link=`expr "$ls" : '.*-> \(.*\)$'`
    if expr "$link" : '/.*' > /dev/null; then
        PRG="$link"
    else
        PRG=`dirname "$PRG"`"/$link"
    fi
done
SAVED="`pwd`"
cd "`dirname \"$PRG\"`/" >/dev/null
APP_HOME="`pwd -P`"
cd "$SAVED" >/dev/null

APP_NAME="Gradle"
APP_BASE_NAME=`basename "$0"`

# Add default JVM options here. You can also use JAVA_OPTS and GRADLE_OPTS to pass JVM options to this script.
DEFAULT_JVM_OPTS='"-Xmx64m" "-Xms64m"'

# Use the maximum available, or set MAX_FD != -1 to use that value.
MAX_FD="maximum"

warn () {
    echo "$*"
}

die () {
    echo
    echo "$*"
    echo
    exit 1
}

# OS specific support (must be 'true' or 'false').
cygwin=false
msys=false
darwin=false
nonstop=false
case "`uname`" in
  CYGWIN* )
    cygwin=true
    ;;
  Darwin* )
    darwin=true
    ;;
  MINGW* )
    msys=true
    ;;
  NONSTOP* )
    nonstop=true
    ;;
esac

CLASSPATH=$APP_HOME/gradle/wrapper/gradle-wrapper.jar


# Determine the Java command to use to start the JVM.
if [ -n "$JAVA_HOME" ] ; then
    if [ -x "$JAVA_HOME/jre/sh/java" ] ; then
        # IBM's JDK on AIX uses strange locations for the executables
        JAVACMD="$JAVA_HOME/jre/sh/java"
    else
        JAVACMD="$JAVA_HOME/bin/java"
    fi
    if [ ! -x "$JAVACMD" ] ; then
        die "ERROR: JAVA_HOME is set to an invalid directory: $JAVA_HOME

Please set the JAVA_HOME variable in your environment to match the
location of your Java installation."
    fi
else
    JAVACMD="java"
    which java >/dev/null 2>&1 || die "ERROR: JAVA_HOME is not set and no 'java' command could be found in your PATH.

Please set the JAVA_HOME variable in your environment to match the
location of your Java installation."
fi

# Increase the maximum file descriptors if we can.
if [ "$cygwin" = "false" -a "$darwin" = "false" -a "$nonstop" = "false" ] ; then
    MAX_FD_LIMIT=`ulimit -H -n`
    if [ $? -eq 0 ] ; then
        if [ "$MAX_FD" = "maximum" -o "$MAX_FD" = "max" ] ; then
            MAX_FD="$MAX_FD_LIMIT"
        fi
        ulimit -n $MAX_FD
        if [ $? -ne 0 ] ; then
            warn "Could not set maximum file descriptor limit: $MAX_FD"
        fi
    else
        warn "Could not query maximum file descriptor limit: $MAX_FD_LIMIT"
    fi
fi

# For Darwin, add options to specify how the application appears in the dock
if $darwin; then
    GRADLE_OPTS="$GRADLE_OPTS \"-Xdock:name=$APP_NAME\" \"-Xdock:icon=$APP_HOME/media/gradle.icns\""
fi

# For Cygwin or MSYS, switch paths to Windows format before running java
if [ "$cygwin" = "true" -o "$msys" = "true" ] ; then
    APP_HOME=`cygpath --path --mixed "$APP_HOME"`
    CLASSPATH=`cygpath --path --mixed "$CLASSPATH"`

    JAVACMD=`cygpath --unix "$JAVACMD"`

    # We build the pattern for arguments to be converted via cygpath
    ROOTDIRSRAW=`find -L / -maxdepth 1 -mindepth 1 -type d 2>/dev/null`
    SEP=""
    for dir in $ROOTDIRSRAW ; do
        ROOTDIRS="$ROOTDIRS$SEP$dir"
        SEP="|"
    done
    OURCYGPATTERN="(^($ROOTDIRS))"
    # Add a user-defined pattern to the cygpath arguments
    if [ "$GRADLE_CYGPATTERN" != "" ] ; then
        OURCYGPATTERN="$OURCYGPATTERN|($GRADLE_CYGPATTERN)"
    fi
    # Now convert the arguments - kludge to limit ourselves to /bin/sh
    i=0
    for arg in "$@" ; do
        CHECK=`echo "$arg"|egrep -c "$OURCYGPATTERN" -`
        CHECK2=`echo "$arg"|egrep -c "^-"`                                 ### Determine if an option

        if [ $CHECK -ne 0 ] && [ $CHECK2 -eq 0 ] ; then                    ### Added a condition
            eval `echo args$i`=`cygpath --path --ignore --mixed "$arg"`
        else
            eval `echo args$i`="\"$arg\""
        fi
        i=`expr $i + 1`
    done
    case $i in
        0) set -- ;;
        1) set -- "$args0" ;;
        2) set -- "$args0" "$args1" ;;
        3) set -- "$args0" "$args1" "$args2" ;;
        4) set -- "$args0" "$args1" "$args2" "$args3" ;;
        5) set -- "$args0" "$args1" "$args2" "$args3" "$args4" ;;
        6) set -- "$args0" "$args1" "$args2" "$args3" "$args4" "$args5" ;;
        7) set -- "$args0" "$args1" "$args2" "$args3" "$args4" "$args5" "$args6" ;;
        8) set -- "$args0" "$args1" "$args2" "$args3" "$args4" "$args5" "$args6" "$args7" ;;
        9) set -- "$args0" "$args1" "$args2" "$args3" "$args4" "$args5" "$args6" "$args7" "$args8" ;;
    esac
fi

# Escape application args
save () {
    for i do printf %s\\n "$i" | sed "s/'/'\\\\''/g;1s/^/'/;\$s/\$/' \\\\/" ; done
    echo " "
}
APP_ARGS=`save "$@"`

# Collect all arguments for the java command, following the shell quoting and substitution rules
eval set -- $DEFAULT_JVM_OPTS $JAVA_OPTS $GRADLE_OPTS "\"-Dorg.gradle.appname=$APP_BASE_NAME\"" -classpath "\"$CLASSPATH\"" org.gradle.wrapper.GradleWrapperMain "$APP_ARGS"

exec "$JAVACMD" "$@"
主要干了这几件事
- 设置 APP_HOME
- 配置默认的 JVM 选项
- 设置 CLASSPATH 路径,即指定 gradlew-wrapper.jar 路径
- 检查 JAVA 环境配置等
1.2、命令大全
执行 ./gradlew --help gradle 会为我们输出帮助信息:(这里只列出了部分,更多可以自己敲命令去看看)
PS D:\workspace\GradleDemo> ./gradlew --help

To see help contextual to the project, use gradlew help

USAGE: gradlew [option...] [task...]

-?, -h, --help                     Shows this help message.
-b, --build-file                   Specify the build file. [deprecated]
--build-cache                      Enables the Gradle build cache. Gradle will try to reuse outputs from previous builds.
-c, --settings-file                Specify the settings file. [deprecated]
--configuration-cache              Enables the configuration cache. Gradle will try to reuse the build configuration from previous builds. [incubating]
--configuration-cache-problems     Configures how the configuration cache handles problems (fail or warn). Defaults to fail. [incubating]
--configure-on-demand              Configure necessary projects only. Gradle will attempt to reduce configuration time for large multi-project builds. [incubating]
--console                          Specifies which type of console output to generate. Values are 'plain', 'auto' (default), 'rich' or 'verbose'.
--continue                         Continue task execution after a task failure.
-D, --system-prop                  Set system property of the JVM (e.g. -Dmyprop=myvalue).
-d, --debug                        Log in debug mode (includes normal stacktrace).
--daemon                           Uses the Gradle daemon to run the build. Starts the daemon if not running.
--export-keys                      Exports the public keys used for dependency verification.
-F, --dependency-verification      Configures the dependency verification mode. Values are 'strict', 'lenient' or 'off'.
--foreground                       Starts the Gradle daemon in the foreground.
-g, --gradle-user-home             Specifies the Gradle user home directory. Defaults to ~/.gradle
-I, --init-script                  Specify an initialization script.
-i, --info                         Set log level to info.
-p, --project-dir
这些命令也是可以简写的,例如 --help 可以简写为 -?、-h
1.3、命令格式
gradle 命令的整体格式如下:
gradle [taskName...] [--option-name...]
2 gradle 常见命令
根据命令的功能目的,Gradle 命令大致可以分为下图的这些类型。

2.1 gradle 自身相关
2.1.1 查看 gradle 版本
查看 gradle 版本一般我们都是直接看项目中的 gradle.property 文件,里面的 distributionUrl 参数。除了这种方式,我们还可以通过gradle 命令查看: 输入:
./gradlew -version
//or
./gradlew -v
输出:
------------------------------------------------------------
Gradle 8.0
------------------------------------------------------------

Build time:   2023-02-13 13:15:21 UTC
Revision:     62ab9b7c7f884426cf79fbedcf07658b2dbe9e97

Kotlin:       1.8.10
Groovy:       3.0.13
Ant:          Apache Ant(TM) version 1.10.11 compiled on July 10 2021
JVM:          17.0.8 (Amazon.com Inc. 17.0.8+7-LTS)
OS:           Mac OS X 13.0.1 x86_64
2.1.2 gradle 版本升级
1、直接修改工程 gradle/wrapper/gradle-wrapper.properties 文件的 distributionUrl修改 gradle 版本 2、File>Project Structure 修改 AndroidGradle Plugin Version 和 Gradle 的版本然后 apply 3、使用命令行输入命令升级
./gradlew wrapper --gradle-version xxx
2.1.3 列出某个命令将要执行的所有任务(并不是真的执行它)
./gradlew xxx --dry-run
其中xxx就是要执行的命令,我们在学习的时候可以通过这个命令来快速的查看某个命令将要执行哪些任务。也方便快速对比相似功能的命令在执行过程中有哪些差异。

2.2 编译命令
2.2.1 编译打包
./gradlew build
//or
./gradlew assemble
这两个命令都是编译并输出全部类型的包。他们之间差别在于,build 命令是包含了 assemble 命令的全生命周期的,从上面的 task --all 命令说明也可以看出。下面的这个图可以更直观的反映:

分别执行 ./gradlew assemble --dry-run 和 ./gradlew assemble --dry-run命令,把输出结果进行对比。差别就是 build 命令会在 assemble 之后执行额外的 check 任务
2.2.2 编译 debug 包
./gradlew assembleDebug
//or
//反映
./gradlew installDebug
两个任务前面步骤一致,最后一步不一样,分别是执行 :app:assebmleDebug 和 :app:installDebug
2.2.3 编译 release 包
./gradlew assembleRelease
//or
./gradlew installRelease
两个任务前面步骤一致,最后一步不一样,分别是执行 :app:assebmleRelease 和 :app:installRelease
2.2.4 编译并打印日志
./gradlew assembleDebug --info
//or
./gradlew assembleRelease --info
加上 --info,编译日志会更完整,方便定位问题。
2.3 清除命令
./gradlew clean
等同于 Build > Clean Project,会清除构建目录下的产物
2.4 卸载命令
./gradlew uninstallDebug
//or
./gradlew uninstallRelease
这个命令是直接卸载连接设备上的当前项目安装包,跟 adb 指定包名进行卸载一样
2.5 调试命令
当我们使用 gradle 进行打包报错时,调试命令就可以帮我们更方便的定位出问题原因
2.5.1 编译并输出堆栈日志
./gradlew assembleDebug --stacktrace
//or
./gradlew assembleDebug -s
或者可以在参数前加上 --full 输出更详细的日志信息
./gradlew assembleDebug --full-stacktrace
//or
./gradlew assembleDebug --full-s
2.5.2 设置日志级别
Gradle 的日志分级
| Level | 作用 |
|---|---|
| ERROR | 错误 |
| WARNING | 警告 |
| LIFECYCLE | 生命周期 |
| INFO | 信息 |
| DEBUG | 调试 |
| TRACE | 跟踪 |
日志过滤
| 过滤命令 | 作用 |
|---|---|
| -q 或 -quiet | 只显示 ERROR 和 WARNING 日志 |
| –i 或 --info | 显示 INFO 及以上日志 |
| -d 或 --debug | 显示 DEBUG 及以上日志 |
示例:
./gradlew assembleDebug -e
2.6 任务相关命令
2.6.1 查看项目 gradle task
./gradlew tasks //只列出关键的 task
//or
./gradlew tasks --all //所有的 task 都将列出
这个命令将列出项目所有要执行的 task,并且会有这个 task 的相应说明信息(这里只截取了一部分)

2.6.2 执行 Task
./gradlew <taskName>
//or
./gradlew :<moduleName>:<taskName>
可以在 AndroidStudio 右边栏的 Gradle 菜单下选择 Tasks 执行也是一样的效果
2.7 依赖查看命令
依赖查看命令可以让我们更清晰的了解引入的依赖库,解决因为依赖导致的错误或者剔除一些不需要的依赖
./gradlew app:dependencies //输出 app 模块依赖树
//or
./gradlew dependencies > xxx.txt //输出依赖树到 xxx.txt 文件

依赖关系树后面有的会跟(*)``(c)有的又没有,代表如下意义:
*:表示该依赖项已被标记为被选中的版本。这意味着它是根据解析规则中的约束条件被选择的版本,而不是默认的最新版本。这通常是由于在项目的构建配置中明确指定了依赖项的版本或者存在其他依赖项对其版本有限制的情况。c:表示该依赖项是由于冲突解决而被强制选择的版本。当项目中存在多个依赖项,它们对同一依赖的版本有不同的要求时,Gradle 将尝试解决这些冲突。如果无法找到满足所有依赖项的版本,Gradle 将选择一个版本并标记为冲突(conflict)。(c)标记表示该依赖项是由于冲突解决而被强制选择的版本。
举个例子:
假设项目 A 依赖于库 X 的版本 1.0,而项目 B 依赖于库 X 的版本 2.0。这两个项目都作为依赖项添加到同一个项目 C 中。现在,项目 C 需要同时满足项目 A 和项目 B 的依赖。
Gradle 将尝试解决这个冲突,它会检查是否有一个版本可以同时满足项目 A 和项目 B 的依赖。如果存在满足所有依赖项的版本,Gradle 将选择该版本,并将其标记为被选中的版本 (*)。
然而,如果无法找到满足所有依赖项的版本,Gradle 将不得不做出一个决策。在这种情况下,Gradle 会选择一个版本,并将其标记为冲突 (c)。这表示所选的版本是为了解决冲突而被强制选择的,可能无法完全满足所有依赖项的要求。
2.8 性能相关命令
2.8.1 使用本地缓存版本离线编译
./gradlew assembleDebug --offline
也可以在AndroidStudio 侧边栏可视化开启关闭。差别在于,如果没开启离线编译,每次编译的时候都会去检查版本,对于没指定版本号或者动态版本号的依赖每次都会以最新的版本进行编译。
2.8.2 构建缓存
./gradlew assembleDebug --build-cache //开启
./gradlew assembleDebug --no-build-cache //不开启
2.8.3 配置缓存
./gradlew assembleDebug --configuration-cache //开启
./gradlew assembleDebug --no-configuration-cache //不开启
2.8.4 并行构建
./gradlew assembleDebug --parallel //开启
./gradlew assembleDebug --no-parallel //不开启
性能相关的这几个命令执行效果,和直接在 gradle.properties 中配置效果是一样的。
2.8.5 编译性能报告
./gradlew assembleDebug --profile
会在项目目录的 build > reports > profile 路径下生成报告文件
./gradlew assembleDebug --scan
会生成更详细的在线报告,首次执行会邮箱验证授权,完成后会输出一个链接。
2.9 动态传参命令
./gradlew assembleDebug -PisTest=true
build.gradle 中通过如下方式获取参数值
if(project.hasProperty("isTest")){
// do something
}else{
// do something else
}
通过 hasProperty 来获取命令行的参数
project.getProperty("isTest")
上面的方式都是判断参数是否存在,那么怎么获取参数的值呢?
if(project.hasProperty("isTest")){
    println("******hasProperty isTest yes******")
    if(Boolean.valueOf(project.getProperty('isTest')){
        println("******property isTest true******")
    }else{
        println("******property isTest false******")
    }
}else{
    println("******hasProperty isTest no******")
}
获取参数的数据类型需要基本数据类型转换成对应的类型,即 XXX.valueOf(getProperty('key'))。通过动态参数,我们可以在打包过程中做一些差异化的构建。

二、依赖管理和版本决议
在我们的开发中,经常会遇到各个模块中引入了相同的三方库,但是三方库版本又各不相同。有时候只是升级了一下某个依赖库存,结果运行就各种报错了。这部分课程将介绍一下 Gradle 的依赖管理方式和版本决议机制,弄明白 Gradle 是怎么把三方库引入到项目中的。在遇到同库不同版本的时候又是怎样决定使用哪个版本的。

1、依赖管理
不使用 maven 方式接入三方库,我们一般都是直接导入 jar 包或者 aar 包。替换版本的时候又重新去导入新的版本的 jar 或者 aar。遇到导入了相同 jar 或者 aar 的时候还出现冲突编不过。如果我们基于 Gradle 来开发项目,则可以依靠 Gradle 比较灵活方便的对依赖库版本进行管理。下图是 Gradle 工作的大致示意图:

构建过程中,Gradle 会先从本地检索,找不到就挨个从远端找依赖库,然后缓存到本地。 我们也可以通过以下方式,开启离线编译,对于未指定版本号或者使用动态版本号的依赖使用本地的版本进行编译

1.1 声明依赖
1.1.1 配置 maven 和依赖信息
声明 maven 依赖包含两部分:
- 仓库配置 我这里是在 gradle 8.0 的环境下演示的。配置信息在 projetc > settings.gradle 下,低版本配置信息一般在 project > build.gradle 下
pluginManagement {
    repositories {
        //指定 maven 仓库的地址
        maven { url "https://www.jitpack.io" }
        google()
        //maven 官方仓库地址
        mavenCentral()
        //自定义 gitlab 仓库作为 maven 地址
        maven {
            url "https://gitee.com/monkeies/maven/raw/master"
        }
        //本地 maven 仓库地址
        maven {
            url uri("/Users/pandaq/WorkSpace/AndroidProjects/Aizhong/Maven/")
        }
        //http 地址需要配置 allowInsecureProtocol = true
        maven {
            url 'http://xxx.xxx.xxx/xxx/'
            allowInsecureProtocol = true
        }
    }
}
- 依赖库配置 依赖库的配置信息在各个 module 的 build.gradle 下
implementation 'com.airbnb.android:lottie:6.1.0'
1.1.2 依赖类型
- 本地模块依赖
- 本地二进制文件依赖
- 远端二进制文件依赖
dependencies {
// Dependency on a local library module
implementation project(':mylibrary')
// Dependency on local binaries
implementation fileTree(dir: 'libs', include: ['*.jar'])
// Dependency on a remote binary
implementation 'com.example.android:app-magic:12.3' }
1.2 远端仓库
1.1.1 中我们配置的 repositories ,里面的 url 就是依赖项上川岛远端仓库的 url,远端仓库起一个桥梁的作用,把开发者和依赖库作者连接起来。开发者、远端仓库、依赖库开发者三者关系大概如下图所示:

- 左侧是我们项目的开发过程,通过声明依赖库信息和配置远端仓库地址,从而找到我们想要的 Lib;
- 中间为远端仓库,包含了丰富的 library/组件/插件;
- 右侧是 Lib 组件的开发者,把代码通过 aar/jar的形式打包到远端仓库提供给使用方;
1.3 GAV
GAV 即 groupId、artifactId、version , maven 根据这三个维度的规则确定 Library 的唯一性。我们日常的依赖引入是这样的:
implementation 'com.airbnb.android:lottie:6.1.0'
完整的内容其实是这样的:
implementation group: 'com.airbnb.android', name: 'lottie', version: '6.1.0'
打开 maven 搜索对应的 Library,我们可以看到更多依赖库的相关信息:


在 Maven 依赖方式下可以更清晰的看出一个依赖库引用方式的结构:
- groupId:依赖库发布组织的名称,一般是公司域名倒写.包名;
- artifactId:项目名称,如果 groupId 包含了项目名称,这里就是子项目名称;
- version:版本号,这个库的具体版本号;
这里我们已系统设置的 DataReporter 这个 Lib 为例,发布端配置信息如下

1.4 依赖传递
Gradle 除了帮我们下载依赖,还提供了依赖传递的能力。根据我们的依赖引入方法不同,有着不同的依赖传递效果。
| 依赖方法 | 说明 | 示例 |
|---|---|---|
| implementation | 编译时对模块可用,运行时对模块的消费者可用 | A 依赖 B,B 依赖 C;在编译和运行时 B均可用 C的代码;A 不能编译时用 C 代码,但运行时可访问 C 代码。 |
| api | 编译和运行时对模块和模块的消费者都可用 | A 依赖 B,B 依赖 C;编译和运行时 A、B 都可以用 C 的代码 |
| compileOnly | 仅编译时对模块可用,编译和运行时对模块消费者不可用,运行时对所有都不可用 | A 依赖 B,B 依赖 C;仅编译时 B 可以访问 C,运行时是没有 C 的任何代码的 |
| runtimeOnly | 仅在运行时对模块和其消费者可用 | A 依赖 B,B 依赖 C;A、B都无法调用 C 的代码,但是 C 的代码会被打包到 apk 中,一般用于组件化隔离代码。 |
2、版本决议
既然各个模块都能引入依赖,并且依赖还具有传递性,那么必然存在某两个或几个模块都引入了某个依赖库。当他们引入版本不一样的时候问题就来了,最终构建项目时以哪个版本的依赖库为准呢?
2.1 依赖信息
前面课程已经讲过通过./gradlew app:dependencies这个命令,我们可以输出项目的依赖树。通过 build --scan,或者AndroidStudio 的 Gradle 侧边栏 Gradle > app > help > dependencies 也是一样的效果。

输出的依赖树包含了模块所有的直接依赖和间接依赖信息,从图中我们可以看到,okhttp 是有4.9.3 和 4.10.0两个版本的。图的 4.9.3 -> 4.10.0 表示 lib 模块中的版本被拔高到了 4.10.0,因为 app 中引入了更高的 4.10.0 版本。接下来我们一起来了解一下,gradle 是以怎样的规则来决定用哪个版本的。
2.2 决议规则
我们直接通过不同的示例来了解 gradle 的版本决议规则:
示例1:同模块不同版本
implementation 'com.squareup.okhttp3:okhttp:4.10.0'
implementation 'com.squareup.okhttp3:okhttp:4.9.3'

结论:同模块引入不同版本,以更高版本为准
示例2:同模块使用强制关键字
//app
implementation 'com.squareup.okhttp3:okhttp:4.10.0'
implementation ('com.squareup.okhttp3:okhttp:4.9.3'){
    version{
        structly("4.9.3")
        //strictly("4.10.0")
    }
}


结论:低版本中如果用 strictly 强制低版本会报错,强制高版本会给高版本标识 strictly
示例3:不同同模块不同版本
1、app 中引入 4.10.0,lib 中引入 4.9.3
//app
implementation 'com.squareup.okhttp3:okhttp:4.10.0'
//lib
implementation 'com.squareup.okhttp3:okhttp:4.9.3'

2、app 中引入 4.9.3,lib 中引入 4.10.0
//app
implementation 'com.squareup.okhttp3:okhttp:4.9.3'
//lib
implementation 'com.squareup.okhttp3:okhttp:4.10.0'

结论:不同模块引入不同版本,以版本高的为准
示例4:子模块使用强制关键字
1、app 引入4.10.0,lib 中强制 4.9.3
//app
implementation 'com.squareup.okhttp3:okhttp:4.10.0'
//lib
implementation ('com.squareup.okhttp3:okhttp:4.9.3'){
    version{
        strictly("4.9.3")
    }
}

2、app 强制4.9.3,lib 中引入4.10.0
//app
implementation ('com.squareup.okhttp3:okhttp:4.9.3'){
    version{
        strictly("4.9.3")
    }
}
//lib
implementation 'com.squareup.okhttp3:okhttp:4.10.0'

结论:子模块使用 strictly 强制低版本会报错,主模块使用 strictly 可以实现子模块降版本,可能导致子模块兼容问题。
总结
- 默认规则总是取高版本覆盖低版本
- strictly 关键字主工程可以实现降低编译版本
- 同模块或者子模块使用 strictly 降版本会直接报错
2.3 版本号规则
gradle 版本决议时的版本号规则如下表所示:
| 分类 | 示例 | 决议结果 | 说明 |
|---|---|---|---|
| 全数字,段数不同 | 1.2.3 vs 1.3 | 1.3 | 段数从左到右比较,高的胜 |
| 全数字,段数相同 | 1.2.3 vs 1.2.4 | 1.2.4 | 段数从左到右比较,高的胜 |
| 全数字,段数相同,位数不同 | 1.2.10 vs 1.2.3 | 1.2.10 | 段数从左到右比较,高的胜 |
| 全数字,段数不同 | 1.2.3 vs 1.2.3.0 | 1.2.3.0 | 段数多的胜 |
| 段数相同,字母比较 | 1.2.a vs 1.2.b | 1.2.b | 字母大胜 |
| 段数相同,数字与非数字 | 1.2.3 vs 1.2.abc | 1.2.3 | 数字优先于字母 |
另外 gradle 也支持版本号范围选项,如[1.0,)、[1.1,2.0)、latest.release等
2.4 冲突解决
当项目比较复杂,依赖层级和module较多的时候,很多依赖传递就变得不可控了,时常会遇到各种版本依赖冲突。不管采用哪种方式,我们都需要有一个决议机制,保证依赖版本全局的唯一性,大家遵循这个机制进行依赖管理才能尽可能的避免这个问题。
2.4.1 版本管理(提前预防)
在项目实施过程中我们一般有以下方式对依赖版本进行约束:
- 配置统一的 gradle.config 放在云端统一进行维护,所有工程要增加三方依赖都通过这个文件进行配置,这样可以做到编译过程各个module三方依赖的版本统一。像我们现在项目中统一配置的 config.gradle。目前看应该是项目级别进行了配置,其实也可以迁移到云端统一管理,多项目共用
- 模块配置一个公共的 module_build.gradle,里面可以把必须项比如 kotlin 、androidx 这些依赖放在里面,使用模块再 apply from 的形式引入进去。
2.4.2 强制版本(临时补救)
项目实施中途遇到冲突了,再去统一版本显然不现实,那么我们有什么小范围的临时补救措施呢:
1、exclude 单独去掉某个依赖的冲突
//去除com.github.niorgai:StatusBarCompat:2.1.3引用的com.android.support包下内容

implementation('com.github.niorgai:StatusBarCompat:2.1.3') {
    exclude group: 'com.android.support'
})
//去除module引用的'com.google.code.findbugs:jar305'的相关内容
implementation(project(':downlibrary')) {
    exclude group: 'com.google.code.findbugs', module: 'jsr305'
}
2、去掉所有 module 中的指定依赖
configurations {
    implementation.exclude group: 'com.example', module: 'lib'
}

lib 中的依赖变成了 app 中的 4.10.0 版本,并且没有以来冲突标识
3、强制所有module使用指定版本
//app build.gradle 中配置
configurations.configureEach {
    resolutionStrategy {
        force 'com.squareup.okhttp3:okhttp:4.11.0'
    }
}


app 中版本由 4.10.0 升到了 4.11.0;lib1 版本由 4.9.0 升级到了 4.11.0;lib 版本由 4.10.0 升级到了4.11.0
2.4.3 面向 Bug 编程
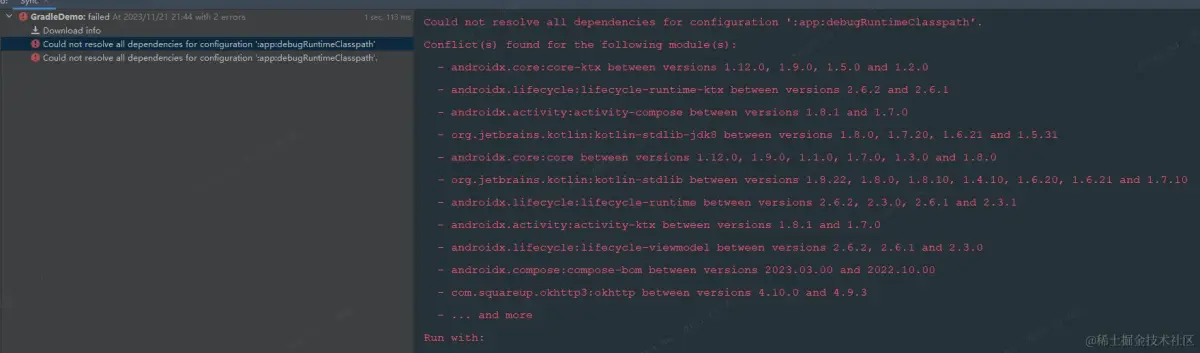
开启版本冲突强检测模式,此模式下编译只要有版本冲突就会报错,再反过去顺藤摸瓜解决版本冲突。
configurations.configureEach {
    resolutionStrategy { failOnVersionConflict() }
}
Android 学习笔录
Gradle 篇:https://qr18.cn/DzrmMB
Android 性能优化篇:https://qr18.cn/FVlo89
Android Framework底层原理篇:https://qr18.cn/AQpN4J
Android 车载篇:https://qr18.cn/F05ZCM
Android 逆向安全学习笔记:https://qr18.cn/CQ5TcL
Android 音视频篇:https://qr18.cn/Ei3VPD
Jetpack全家桶篇(内含Compose):https://qr18.cn/A0gajp
OkHttp 源码解析笔记:https://qr18.cn/Cw0pBD
Kotlin 篇:https://qr18.cn/CdjtAF
Flutter 篇:https://qr18.cn/DIvKma
Android 八大知识体:https://qr18.cn/CyxarU
Android 核心笔记:https://qr21.cn/CaZQLo
Android 往年面试题锦:https://qr18.cn/CKV8OZ
2023年最新Android 面试题集:https://qr18.cn/CgxrRy
Android 车载开发岗位面试习题:https://qr18.cn/FTlyCJ
音视频面试题锦:https://qr18.cn/AcV6Ap


 3087
3087


 被折叠的 条评论
为什么被折叠?
被折叠的 条评论
为什么被折叠?
 到【灌水乐园】发言


