


介绍
在 AI 领域,检索增强生成 (RAG) 系统已成为处理简单查询和生成上下文相关响应的常用工具。然而,随着对更复杂的 AI 应用程序的需求不断增长,我们需要超越这些检索功能的系统。AI 代理 — 能够执行复杂、多步骤任务、在交互过程中保持状态并动态适应新信息的自主实体。LangGraph 是LangChain库的强大扩展,旨在通过启用具有循环计算功能的有状态、多参与者应用程序来帮助开发人员构建这些高级 AI 代理。
在本文中,我们将探讨 LangGraph 如何改变 AI 开发,并通过计算太阳能电池板的节能效果的示例,提供构建自己的 AI 代理的分步指南。此示例将展示 LangGraph 的独特功能如何创建智能、适应性强且适用于现实世界的 AI 系统。
什么是 LangGraph?
LangGraph 是一个基于 LangChain 构建的高级库,旨在通过引入循环计算功能来增强大型语言模型 (LLM) 应用程序。虽然 LangChain 允许为线性工作流创建有向无环图 (DAG),但 LangGraph 更进一步,允许添加循环,这对于开发复杂的类似代理的行为至关重要。这些行为允许 LLM 连续循环执行某个过程,根据不断变化的条件动态决定下一步要采取什么行动。
Langraph:节点、状态和边。
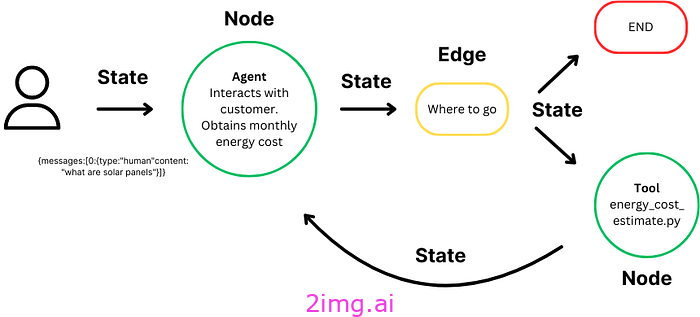
LangGraph 的核心是状态图的概念:
- 状态:表示在计算过程中维护和更新的上下文或记忆。它确保图中的每个步骤都可以访问来自先前步骤的相关信息,从而允许根据整个过程中累积的数据进行动态决策。
- 节点:充当图的构建块,代表单个计算步骤或功能。每个节点执行特定任务,例如处理输入、做出决策或与外部系统交互。可以自定义节点以执行工作流中的各种操作。
- 边:连接图中的节点,定义从一个步骤到下一个步骤的计算流程。它们支持条件逻辑,允许执行路径根据当前状态改变,并促进节点之间的数据和控制移动,从而实现复杂的多步骤工作流程。
LangGraph 通过无缝管理图形结构、状态和协调重新定义了 AI 开发,支持创建复杂的多参与者应用程序。通过自动状态管理,LangGraph 可确保在交互过程中保留上下文,使您的 AI 能够智能地响应不断变化的输入。其简化的代理协调可确保精确执行和高效的信息交换,让您专注于制定创新的工作流程,而不是技术复杂性。LangGraph 的灵活性允许开发定制的高性能应用程序,而其可扩展性和容错性可确保您的系统即使在企业级也能保持稳健可靠。
循序渐进指南
现在我们已经充分了解了 LangGraph 是什么以及它如何增强 AI 开发,让我们深入研究一个实际示例。在这个场景中,我们将构建一个 AI 代理,旨在根据用户输入计算太阳能电池板的潜在节能效果。该代理可以作为太阳能电池板销售商网站上的潜在客户生成工具,在那里它与潜在客户进行互动,提供个性化的节能估算。通过收集每月电费等关键数据,该 AI 代理可帮助教育客户了解太阳能的经济效益,同时为销售团队提供合格的潜在客户以供跟进。这个示例展示了 LangGraph 在创建智能动态系统方面的强大功能,该系统可以自动执行复杂任务并推动业务价值。
步骤 1:导入必要的库
我们首先导入项目所需的所有基本 Python 库和模块。
from langchain_core.tools import tool
from langchain_community.tools.tavily_search import TavilySearchResults
from langchain_core.prompts import ChatPromptTemplate
from langchain_core.runnables import Runnable
from langchain_aws import ChatBedrock
import boto3
from typing import Annotated
from typing_extensions import TypedDict
from langgraph.graph.message import AnyMessage, add_messages
from langchain_core.messages import ToolMessage
from langchain_core.runnables import RunnableLambda
from langgraph.prebuilt import ToolNode
这些导入为利用 LangChain、LangGraph 和 AWS 服务构建我们的 AI 助手奠定了基础。
第 2 步:定义计算太阳能节省量的工具
接下来,我们定义一个工具,根据用户提供的每月电费来计算能源节省量。
@tool
def compute_savings(monthly_cost: float) -> float:
    """
    Tool to compute the potential savings when switching to solar energy based on the user's monthly electricity cost.

    Args:
        monthly_cost (float): The user's current monthly electricity cost.

    Returns:
        dict: A dictionary containing:
            - 'number_of_panels': The estimated number of solar panels required.
            - 'installation_cost': The estimated installation cost.
            - 'net_savings_10_years': The net savings over 10 years after installation costs.
    """
    def calculate_solar_savings(monthly_cost):
        # Assumptions for the calculation
        cost_per_kWh = 0.28
        cost_per_watt = 1.50
        sunlight_hours_per_day = 3.5
        panel_wattage = 350
        system_lifetime_years = 10

        # Monthly electricity consumption in kWh
        monthly_consumption_kWh = monthly_cost / cost_per_kWh

        # Required system size in kW
        daily_energy_production = monthly_consumption_kWh / 30
        system_size_kW = daily_energy_production / sunlight_hours_per_day

        # Number of panels and installation cost
        number_of_panels = system_size_kW * 1000 / panel_wattage
        installation_cost = system_size_kW * 1000 * cost_per_watt

        # Annual and net savings
        annual_savings = monthly_cost * 12
        total_savings_10_years = annual_savings * system_lifetime_years
        net_savings = total_savings_10_years - installation_cost

        return {
            "number_of_panels": round(number_of_panels),
            "installation_cost": round(installation_cost, 2),
            "net_savings_10_years": round(net_savings, 2)
        }

    # Return calculated solar savings
    return calculate_solar_savings(monthly_cost)
此函数处理用户的每月电费,并返回太阳能电池板系统效益的详细估算,包括所需的电池板数量、安装成本以及十年内的净节省。为简单起见,我们在计算中做了一些假设,例如每千瓦时的平均成本和平均日照时数。但是,在这个 AI 代理的更高级版本中,我们可以直接从用户那里收集这些信息,根据他们的独特情况更精确地调整估算。
步骤 3:设置状态管理和错误处理
有效的状态管理和错误处理对于构建强大的 AI 系统至关重要。在这里,我们定义了一些实用程序来管理错误并维护对话的状态。
def handle_tool_error(state) -> dict:
    """
    Function to handle errors that occur during tool execution.

    Args:
        state (dict): The current state of the AI agent, which includes messages and tool call details.

    Returns:
        dict: A dictionary containing error messages for each tool that encountered an issue.
    """
    # Retrieve the error from the current state
    error = state.get("error")

    # Access the tool calls from the last message in the state's message history
    tool_calls = state["messages"][-1].tool_calls

    # Return a list of ToolMessages with error details, linked to each tool call ID
    return {
        "messages": [
            ToolMessage(
                content=f"Error: {repr(error)}\n please fix your mistakes.",  # Format the error message for the user
                tool_call_id=tc["id"],  # Associate the error message with the corresponding tool call ID
            )
            for tc in tool_calls  # Iterate over each tool call to produce individual error messages
        ]
    }

def create_tool_node_with_fallback(tools: list) -> dict:
    """
    Function to create a tool node with fallback error handling.

    Args:
        tools (list): A list of tools to be included in the node.

    Returns:
        dict: A tool node that uses fallback behavior in case of errors.
    """
    # Create a ToolNode with the provided tools and attach a fallback mechanism
    # If an error occurs, it will invoke the handle_tool_error function to manage the error
    return ToolNode(tools).with_fallbacks(
        [RunnableLambda(handle_tool_error)],  # Use a lambda function to wrap the error handler
        exception_key="error"  # Specify that this fallback is for handling errors
    )
这些功能可确保工具执行期间遇到的任何错误都得到妥善处理,并向用户提供有用的反馈。
步骤 4:定义状态和助手类
在此步骤中,我们将定义 AI 代理如何管理其状态(对话的持续内容)并确保它对用户的输入和工具输出做出适当的响应。
为此,我们State使用 Python 创建一个类TypedDict来定义将要传递的消息的结构。状态将保存消息,包括来自用户的输入以及来自代理或工具的输出。
class State(TypedDict): messages: Annotated[list[AnyMessage], add_messages]接下来,我们创建 Assistant 类,该类负责运行 AI 代理、与工具交互以及管理对话流程。Assistant 调用工具,确保它们返回适当的结果,并处理执行期间可能发生的任何重新提示或错误。其核心功能包括调用 Runnable,它定义了调用 LLM 和工具(如)的过程compute_savings,然后监控结果。如果代理未能返回有效响应或工具未提供有意义的数据,Assistant 会重新提示用户或请求澄清。它继续循环遍历 Runnable,直到获得有效输出,确保顺利执行和有效响应。
class Assistant:
    def __init__(self, runnable: Runnable):
        # Initialize with the runnable that defines the process for interacting with the tools
        self.runnable = runnable

    def __call__(self, state: State):
        while True:
            # Invoke the runnable with the current state (messages and context)
            result = self.runnable.invoke(state)

            # If the tool fails to return valid output, re-prompt the user to clarify or retry
            if not result.tool_calls and (
                not result.content
                or isinstance(result.content, list)
                and not result.content[0].get("text")
            ):
                # Add a message to request a valid response
                messages = state["messages"] + [("user", "Respond with a real output.")]
                state = {**state, "messages": messages}
            else:
                # Break the loop when valid output is obtained
                break

        # Return the final state after processing the runnable
        return {"messages": result}
此设置对于维持对话流畅性和确保助手根据上下文做出适当响应至关重要。
步骤 5:使用 AWS Bedrock 设置 LLM
在此步骤中,我们使用 AWS Bedrock 配置大型语言模型 (LLM),这将为 AI 助手的语言功能提供支持。AWS Bedrock 允许我们访问高级 LLM,例如 Anthropic 的 Claude。要与 AWS 服务交互,您需要配置您的AWS 凭证。这意味着您必须在您的环境中设置您的 AWS 凭证(通过 AWS CLI 或环境变量)或使用 AWS SDK 可以访问的凭证文件。如果没有正确的 AWS 配置,助手将无法连接到 Bedrock 等 AWS 服务来运行 LLM。
def get_bedrock_client(region):
    return boto3.client("bedrock-runtime", region_name=region)

def create_bedrock_llm(client):
    return ChatBedrock(model_id='anthropic.claude-3-sonnet-20240229-v1:0', client=client, model_kwargs={'temperature': 0}, region_name='us-east-1')

llm = create_bedrock_llm(get_bedrock_client(region='us-east-1'))
这种集成确保助手能够有效地解释和响应用户输入。
第 6 步:定义助理的工作流程
现在我们已经设置了 LLM 和工具,下一步是定义 AI 助手的工作流程。这涉及创建对话模板、指定助手将使用的工具,以及配置 AI 代理如何响应用户输入并触发不同的功能(例如计算太阳能节省量)。工作流程本质上是控制助手如何与用户交互、收集信息以及调用工具来提供结果的逻辑。
工作流程的第一部分涉及创建提示模板,该模板定义助手如何与用户沟通。提示有助于指导 AI 助手确定要询问用户什么、如何根据输入做出响应以及何时触发工具等compute_savings。
在这种情况下,助手需要询问用户每月的电费,以计算太阳能电池板节省的费用。我们是这样定义对话的:
primary_assistant_prompt = ChatPromptTemplate.from_messages(
    [
        (
            "system",
            '''You are a helpful customer support assistant for Solar Panels Belgium.
            You should get the following information from them:
            - monthly electricity cost
            If you are not able to discern this info, ask them to clarify! Do not attempt to wildly guess.

            After you are able to discern all the information, call the relevant tool.
            ''',
        ),
        ("placeholder", "{messages}"),
    ]
)system消息:此消息充当 AI 代理的指南,指示它向用户询问每月的电费,如果信息不清楚,则不要进行猜测。助手将不断提示用户,直到收集到所需的数据。placeholder:此占位符允许助手动态地注入来自对话的消息,从而创建一个持续的对话,其中用户的输入会影响后续步骤。
接下来,我们定义助手在交互过程中将使用的工具,主要工具是compute_savings,它根据用户的每月电费计算潜在节省金额。在列表中指定工具后,我们使用方法将它们绑定到助手的工作流程llm.bind_tools()。此步骤可确保 AI 助手可以在对话过程中根据需要访问和触发工具,从而实现用户与助手之间的无缝交互。
# Define the tools the assistant will use
part_1_tools = [
    compute_savings
]

# Bind the tools to the assistant's workflow
part_1_assistant_runnable = primary_assistant_prompt | llm.bind_tools(part_1_tools)
步骤 7:构建图形结构
在此步骤中,我们使用 LangGraph 为 AI 助手构建图形结构,该结构控制助手如何处理用户输入、触发工具以及在各个阶段之间移动。该图定义了核心操作(如调用助手和工具)的节点以及指示这些节点之间流程的边。
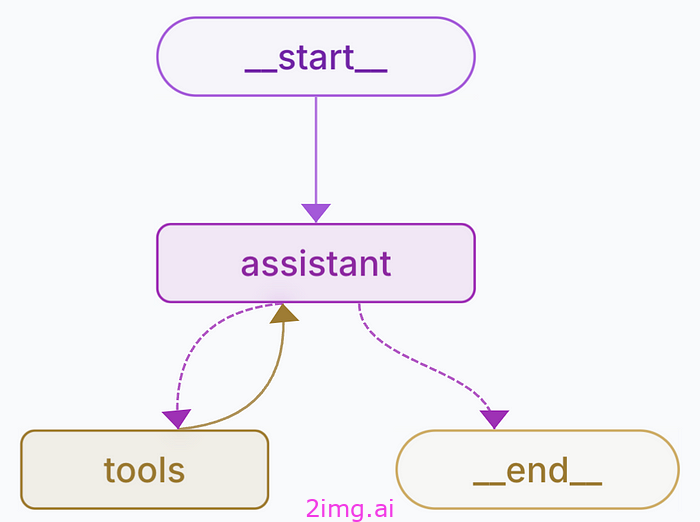
设计用于计算太阳能电池板潜在节能效果的人工智能代理。
LangGraph 中的每个节点代表一个操作步骤,例如与用户交互或执行某个工具。我们为这个 AI 助手定义了两个关键节点:
- 助理节点:管理对话流程,询问用户电费并处理响应。
- 工具节点:执行工具(例如
compute_savings)来计算用户的太阳能电池板节省的金额。
builder = StateGraph(State)
builder.add_node("assistant", Assistant(part_1_assistant_runnable))
builder.add_node("tools", create_tool_node_with_fallback(part_1_tools))边缘定义了流程在节点之间的移动方式。在这里,助手开始对话,然后在收集到所需输入后转换到工具,并在工具执行后返回助手。
builder.add_edge(START, "assistant")  # Start with the assistant
builder.add_conditional_edges("assistant", tools_condition)  # Move to tools after input
builder.add_edge("tools", "assistant") # Return to assistant after tool execution我们使用MemorySaver来确保图表保留不同步骤之间的对话状态。这让助手能够记住用户的输入,确保多步骤交互的连续性。
memory = MemorySaver()
graph = builder.compile(checkpointer=memory)
步骤 8:运行助手
最后,您可以通过启动图表并开始对话来运行助手。
# import shutil
import uuid

# Let's create an example conversation a user might have with the assistant
tutorial_questions = [
    'hey',
    'can you calculate my energy saving',
    "my montly cost is $100, what will i save"
]

# Update with the backup file so we can restart from the original place in each section
# shutil.copy(backup_file, db)
thread_id = str(uuid.uuid4())

config = {
    "configurable": {
        # The passenger_id is used in our flight tools to
        # fetch the user's flight information
        # "passenger_id": "3442 587242",
        # Checkpoints are accessed by thread_id
        "thread_id": thread_id,
    }
}

_printed = set()
for question in tutorial_questions:
    events = graph.stream(
        {"messages": ("user", question)}, config, stream_mode="values"
    )
    for event in events:
        _print_event(event, _printed)
结论
通过遵循这些步骤,您已成功使用 LangGraph 创建了一个 AI 助手,它可以根据用户输入计算太阳能电池板的节能效果。本教程展示了 LangGraph 在管理复杂、多步骤流程方面的强大功能,并重点介绍了如何利用高级 AI 工具有效解决实际挑战。无论您是为客户支持、能源管理还是其他应用程序开发 AI 代理,LangGraph 都能提供实现您的想法所需的灵活性、可扩展性和稳健性。


 236
236

 被折叠的 条评论
为什么被折叠?
被折叠的 条评论
为什么被折叠?
 到【灌水乐园】发言


