


编辑:OAK中国
首发:oakchina.cn
喜欢的话,请多多👍⭐️✍
▌前言
Hello,大家好,这里是OAK中国,我是助手君。
之前有用户在我们群里讨论怎么用OAK去测量物体的尺寸,正好近期看到一个项目与之类似,整理了一下分享给大家。
此项目的地址:查看
往期开源项目:查看
⚠注意此项目源代码中用的depthai比较老了,也没有做对齐优化,直接使用可能会出校偏差大、有负数等问题。
请先升级depthai:pip install -U depthai,再替换main.py(下载地址),我们已经把代码修改了。
▌项目背景
对于仓储业来说,空间=金钱,劳动成本高=较少的利润。仓库问题可以影响一个特定仓库操作或与之相关的整个流程链的速度、效率和生产力。在仓库中,包装操作一直很费时间,且大部分情况下都是手工打包。这对整个仓库的流程来说,是一个真正的瓶颈。在卡车离开仓库的半小时前,包装区通常会出现混乱,工作人员相互碰撞、忙于寻找合适的盒子和包装材料等等,导致不同订单的货物时常混杂在一起。此外,选择正确的包装尺寸可以帮助你避免不必要的填充材料成本。

高效的打包流程由以下因素决定:
- 正确的产品包装尺寸
- 正确的包装材料
- 正确的操作顺序
如果严格控制这些因素,标准化操作,可以有效减少损坏,合理管理库存和运输,提供客户满意度。

▌项目目标
- 使用OAK-D相机来捕捉包裹或箱子的测量结果
- 测量物体需要多少存储空间,确定使用什么尺寸的纸箱进行运输,估计运输成本。
- 附加AI功能,如箱子破损检测、检测箱子是否被打开、包装优化等,以提高劳动力效率和安全。

▌技术说明
- 用于OAK-D深度相机推理和空间数据的DepthAI SDK。
- Streamlit用于基于网络的仪表板,一键式尺寸测量和所有指标的计算。
- OpenCV用于所有图像处理和特征提取。
- Pycharm IDE版本: 2021.1.1。

DepthAI是一个围绕Myriad X建立的平台,将深度感知、物体检测(神经推理)和物体跟踪结合起来,在一个简单、易于使用的Python API和一个带有开源硬件的即插即用系统模块(SoM)中为你提供这种能力。
▌项目实践
1. 配置用于深度和RGB图像数据的DepthAI管道
# create depthai pipeline
def createPipeline():
    print('Creating Pipeline')

    # Start defining a pipeline
    pipeline = dai.Pipeline()

    # Define color camera
    camRgb = pipeline.createColorCamera()
    camRgb.setPreviewSize(640, 480)
    camRgb.setBoardSocket(dai.CameraBoardSocket.RGB)
    camRgb.setColorOrder(dai.ColorCameraProperties.ColorOrder.BGR)

    # Define a source - two mono (grayscale) cameras
    monoLeft = pipeline.createMonoCamera()
    monoRight = pipeline.createMonoCamera()
    stereo = pipeline.createStereoDepth()
    spatialLocationCalculator = pipeline.createSpatialLocationCalculator()

    # MonoCamera
    monoLeft.setResolution(dai.MonoCameraProperties.SensorResolution.THE_400_P)
    monoLeft.setBoardSocket(dai.CameraBoardSocket.LEFT)
    monoRight.setResolution(dai.MonoCameraProperties.SensorResolution.THE_400_P)
    monoRight.setBoardSocket(dai.CameraBoardSocket.RIGHT)

    outputDepth = True
    outputRectified = False
    lrcheck = False
    subpixel = False

    # Create outputs
    xoutPreview = pipeline.createXLinkOut()
    xoutDepth = pipeline.createXLinkOut()
    xoutSpatialData = pipeline.createXLinkOut()
    xinSpatialCalcConfig = pipeline.createXLinkIn()

    xoutPreview.setStreamName("preview")
    xoutDepth.setStreamName("depth")
    xoutSpatialData.setStreamName("spatialData")
    xinSpatialCalcConfig.setStreamName("spatialCalcConfig")

    # StereoDepth
    stereo.setOutputDepth(outputDepth)
    stereo.setOutputRectified(outputRectified)
    stereo.setConfidenceThreshold(255)

    stereo.setLeftRightCheck(lrcheck)
    stereo.setSubpixel(subpixel)

    monoLeft.out.link(stereo.left)
    monoRight.out.link(stereo.right)

    spatialLocationCalculator.passthroughDepth.link(xoutDepth.input)
    stereo.depth.link(spatialLocationCalculator.inputDepth)

    topLeft = dai.Point2f(0.4, 0.4)
    bottomRight = dai.Point2f(0.8, 0.8)

    spatialLocationCalculator.setWaitForConfigInput(False)
    config = dai.SpatialLocationCalculatorConfigData()
    config.depthThresholds.lowerThreshold = 100
    config.depthThresholds.upperThreshold = 10000
    config.roi = dai.Rect(topLeft, bottomRight)
    spatialLocationCalculator.initialConfig.addROI(config)
    spatialLocationCalculator.out.link(xoutSpatialData.input)
    xinSpatialCalcConfig.out.link(spatialLocationCalculator.inputConfig)
    camRgb.preview.link(xoutPreview.input)

    return pipeline, topLeft, bottomRight, config
2.底部深度估计
在应用程序开始时,从摄像机计算出底座的深度,以便进一步计算包装高度。
![[外链图片转存失败,源站可能有防盗链机制,建议将图片保存下来直接上传(img-uB5cNueW-1652166329883)(https://github.com/vilaksh01/DepthAI-LazyProjects/raw/main/Projects/PackagingBox%20Measurement/Images/calibBig.gif#pic_center)]](https://i-blog.csdnimg.cn/blog_migrate/5294de090ded33ed3a1bcda4ec184bf3.png)
# call base depth estimation to set base depth for height calculations
def baseDepthEstimation(pipeline, topLeft, bottomRight, config):
    st.warning('Please make sure the bounding box area is clear of objects.')
    col1, col2 = st.beta_columns(2)
    with col1:
        st.text('Preview window.')
    with col2:
        st.text('Click start to calibrate depth for avg. 25 frames')
        start = st.button('Start Calibration')

    # Pipeline is defined, now we can connect to the device
    with dai.Device(pipeline) as device:
        device.startPipeline()

        # Output queue will be used to get the depth frames from the outputs defined above
        depthQueue = device.getOutputQueue(name="depth", maxSize=4, blocking=False)
        spatialCalcQueue = device.getOutputQueue(name="spatialData", maxSize=4, blocking=False)
        spatialCalcConfigInQueue = device.getInputQueue("spatialCalcConfig")

        color = (255, 255, 255)
        noFrames = 0
        frameST = col1.empty()
        frameST2 = col2.empty()
        baseDepth = 0.0
        DepthValue = 0.0
        count = False
        fontType = cv2.FONT_HERSHEY_TRIPLEX

        while True:
            inDepth = depthQueue.get()  # Blocking call, will wait until a new data has arrived
            inDepthAvg = spatialCalcQueue.get()  # Blocking call, will wait until a new data has arrived
            preview = device.getOutputQueue('preview').get()

            img = preview.getFrame()

            depthFrame = inDepth.getFrame()
            depthFrameColor = cv2.normalize(depthFrame, None, 255, 0, cv2.NORM_INF, cv2.CV_8UC1)
            depthFrameColor = cv2.equalizeHist(depthFrameColor)
            depthFrameColor = cv2.applyColorMap(depthFrameColor, cv2.COLORMAP_JET)

            spatialData = inDepthAvg.getSpatialLocations()
            for depthData in spatialData:
                roi = depthData.config.roi
                roi = roi.denormalize(width=depthFrameColor.shape[ 1 ], height=depthFrameColor.shape[ 0 ])
                xmin = int(roi.topLeft().x)
                ymin = int(roi.topLeft().y)
                xmax = int(roi.bottomRight().x)
                ymax = int(roi.bottomRight().y)

                # preview window info
                cv2.rectangle(img, (xmin, ymin), (xmax, ymax), color, cv2.FONT_HERSHEY_SCRIPT_SIMPLEX)
                cv2.putText(img, f"X: {int(depthData.spatialCoordinates.x)} mm", (xmin + 10, ymin + 20),
                            fontType, 0.5, color)
                cv2.putText(img, f"Y: {int(depthData.spatialCoordinates.y)} mm", (xmin + 10, ymin + 35),
                            fontType, 0.5, color)
                cv2.putText(img, f"Z: {int(depthData.spatialCoordinates.z)} mm", (xmin + 10, ymin + 50),
                            fontType, 0.5, color)

                # depth window info
                cv2.rectangle(depthFrameColor, (xmin, ymin), (xmax, ymax), color, cv2.FONT_HERSHEY_SCRIPT_SIMPLEX)
                cv2.putText(depthFrameColor, f"X: {int(depthData.spatialCoordinates.x)} mm", (xmin + 10, ymin + 20),
                            fontType, 0.5, color)
                cv2.putText(depthFrameColor, f"Y: {int(depthData.spatialCoordinates.y)} mm", (xmin + 10, ymin + 35),
                            fontType, 0.5, color)
                cv2.putText(depthFrameColor, f"Z: {int(depthData.spatialCoordinates.z)} mm", (xmin + 10, ymin + 50),
                            fontType, 0.5, color)

                if start:
                    start = False
                    count = True
                    noFrames = 1

                if count:
                    DepthValue = (depthData.spatialCoordinates.z) / 10
                    baseDepth += DepthValue
                    print(baseDepth)
                    DepthValue = 0.0

                if noFrames == 25 and count == True:
                    # Base depth value calculation, dividing by no. of frames for the average
                    count = False
                    print('Frames count {:d}'.format(noFrames))
                    baseDepth = baseDepth / 25
                    print('base depth {:>2f}'.format(baseDepth))
                    st.text("Base Depth = {:>2f}".format(baseDepth))
                    cv2.destroyAllWindows()
                    return baseDepth

                with col1:
                    frameST.image(img, channels='BGR')
                with col2:
                    frameST2.image(depthFrameColor)

                noFrames += 1

                if cv2.waitKey(1) & 0xFF == ord('q'):
                    break
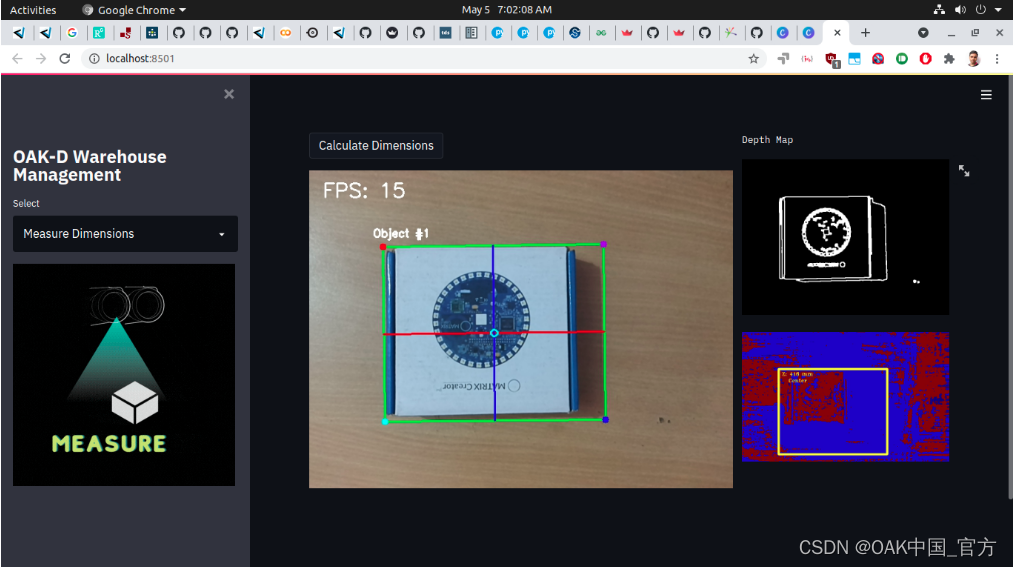
3.包装轮廓检测
为了检测轮廓,我们首先应用过滤器和canny检测法。
# perform blurring, edge detection, dilation and erode to find contours
            imgBlur = cv2.GaussianBlur(img, (7, 7), 0)
            imgGray = cv2.cvtColor(imgBlur, cv2.COLOR_BGR2GRAY)
            imgCanny = cv2.Canny(imgGray, 50, 100)
            kernel = np.ones((5, 5))
            edged = cv2.dilate(imgCanny, kernel, iterations=1)
            edged = cv2.erode(edged, None, iterations=1)

            # call find contours to get all contours in image
            cnts = cv2.findContours(edged.copy(), cv2.RETR_EXTERNAL, cv2.CHAIN_APPROX_NONE)
            cnts = imutils.grab_contours(cnts)
            if len(cnts) > 0:
                cnts = contours.sort_contours(cnts)[ 0 ]
            # color for each edge in case of rectangular bounding box
            colors = ((0, 0, 255), (240, 0, 159), (255, 0, 0), (255, 255, 0))

            # loop over the contours individually
            for (i, c) in enumerate(cnts):

                # if the contour is not sufficiently large, ignore it
                if cv2.contourArea(c) < 1000:
                    continue
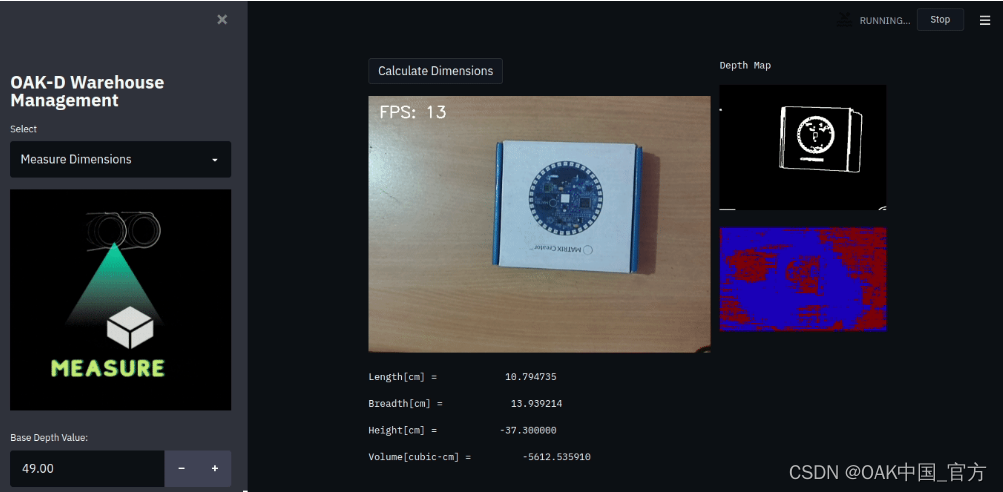
4.包装尺寸和体积估算
下面你可以看到我们提供了之前的基础深度值来计算高度,然而我们得到的高度是负数,因为设备应该被安装和稳定,我目前没有相机的三脚架,所以用我的手来测试它(所以误差是由于错误的对齐和相机的移动造成的,其他长度和宽度是准确的,只是~2厘米的折中。盒子的实际尺寸是12cm x 15cm x 3.5cm。
# order the points in the contour such that they appear
# in top-left, top-right, bottom-right, and bottom-left
# order, then draw the outline of the rotated bounding
rect = perspective.order_points(box)
# compute the center of the bounding box
cX = int(np.average(box[ :, 0 ]))
cY = int(np.average(box[ :, 1 ]))

print(rect.astype("int"))
print("")

# extract all the edges as tuple
(tl, tr, br, bl) = rect

# compute width
(tlblX, tlblY) = midpoint(tl, bl)
(trbrX, trbrY) = midpoint(tr, br)
# multiply by a constant we used while converting from pixel to actual breadth
breadth = (dist.euclidean((tlblX, tlblY), (trbrX, trbrY))) * 0.046
print(breadth)

# compute length
(tltrX, tltrY) = midpoint(tl, tr)
(blbrX, blbrY) = midpoint(bl, br)
# multiply by a constant we used while converting from pixel to actual length
length = (dist.euclidean((tltrX, tltrY), (blbrX, blbrY))) * 0.042
print(length)

cv2.line(org, (int(tlblX), int(tlblY)), (int(trbrX), int(trbrY)), (0, 0, 255), 2)
cv2.line(org, (int(tltrX), int(tltrY)), (int(blbrX), int(blbrY)), (255, 0, 0), 2)
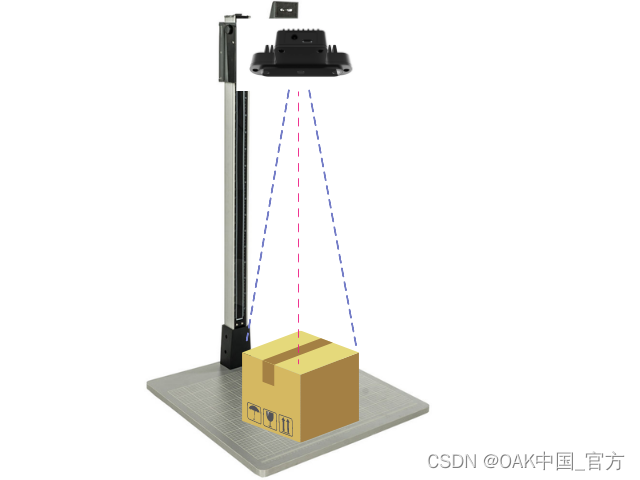
5.相机安装
6.运行项目
- 克隆这个资源库。
- 安装所有的需求
- 运行main.py
场景必须只有盒子,且没有其他边缘。
7.项目灵感
这个项目是从Intel® RealSense™ Dimensional Weight Software 受到启发,移植到OAK-D上了。你可以自己建立这种设备,用于仓库包装管理。
未来这个项目可能往两个方向做提升:
- 破损包装检测
识别给定的箱子是否破损,是否被拆封;启用AI的优化包装箱尺寸和包装方法。 - 条形码检测和解码
识别条形码的位置并进行解码;云端连接,用于库存更新。
▌参考资料
https://docs.oakchina.cn/en/latest/
https://www.oakchina.cn/selection-guide/
OAK中国
| OpenCV AI Kit在中国区的官方代理商和技术服务商
| 追踪AI技术和产品新动态
戳「+关注」获取最新资讯↗↗


 5360
5360

 被折叠的 条评论
为什么被折叠?
被折叠的 条评论
为什么被折叠?
 到【灌水乐园】发言


