


In this tutorial my objective is to walk you through the steps required to create a descentralized application from start to finish and deploy it in ethereum.
Here is how it will look:
I’m making it because I see a lot of tutorials that don’t really show you the whole picture of how to connect everything and have a final descentralized application including hosting.
And because I found myself lost in a situation where I didn’t know exactly how to develop the truly unstoppable application that the ethereum website talks about.
You’ll learn some basic concepts like how to create a contract and the frontend for the Dapp along with some more complex details like how to connect the deployed contract with your application and how to use your custom domain.
At the end of this tutorial you’ll have a fully descentralized website working with the contracts that you’ll create so you can access it from the browser and interact with the blockchain using Metamask or Mist.
You must know a little bit about the blockchain, the software that has been created, a basic knowledge of how contracts work and experience programming websites.
This tutorial is ideal for you if you’re a web developer at the point of “I know how this works and I just want to start creating something in Ethereum to learn and hopefully become a Dapp developer”.
Here is the technology that we are going to use:
- Database: Ethereum’s Testnet Ropsten blockchain.
- Hosting: IPFS to get free hosting forever in a descentralized platform.
- Frontend: react.js with webpack, don’t worry I’ll explain the most important steps. You can use whatever framework you like.
- Domain name: godaddy. Here I could use some descentralized domain service like peername but it’s just faster and easier with godaddy or any other domain registrar.
- Contract’s programing language: Solidity 0.4.11, right now the most famous language.
- Frontend contracts: web3.js to use those contracts in your user interface.
- Frameworks: truffle to deploy, test and compile our contracts.
- Development server: node.js to use the app while developing it along with testrpc to use our contracts while developing.
- Metamask: To use the final application like the end user would.
And these are the steps that we’re going to follow:
- Setup the project
- Program the Solidity contracts
- Create the frontend application
- Deploy the application online with IPFS
- Use a custom domain for the application
- Play with the final Dapp!
1. Setup the project
I’ll explain you what are we going to create so you have a clear image of the end result.
We are going to create a casino like application where users are able to bet money for a number between 1 and 10 and if they’re correct, they win a portion of all the ether money staked after 100 total bets.
It’s quite a complex app to start but you’ll love it because it’s original and funny to use.
Now I must warn you that this is not a secure application because you can’t simply generate randomness with Solidity. So you’ve to take different approaches and see what works.
Take this tutorial as an introduction to see the whole process of creating a Dapp from start to finish.
First, download the current version of node.js from their website nodejs.org if you haven’t done so. Then create a folder called casino-ethereum and inside, open the terminal or command line and execute the command: npm init -y
After that do: npm i -D truffle to install the contract’s framework truffle in this project as a developing dependency.
Then execute truffle init. This will start the project.
Then do:
npm i -D webpack react react-dom babel-core babel-loader babel-preset-react babel-preset-es2015 babel-preset-stage-2 css-loader style-loader json-loader web3@^0.20.0Note that we are installing web3@^0.20.0 because the other versions have some kind of bug in windows when installing.
Then install npm i -g http-server . This a lightweight server that you’ll use to use your website on localhost:8080 when developing.
That will get all that we need to create this project with react and webpack.
After that go to your project folder and create a webpack.config.js file. This is the file that will combine all of our javascripts and css to create a single file build.js that will hold all the js code in one place.
Now paste this code inside the file:
const path = require('path')
module.exports = {
   entry: path.join(__dirname, 'src/js', 'index.js'), // Our frontend will be inside the src folder
   output: {
      path: path.join(__dirname, 'dist'),
      filename: 'build.js' // The final file will be created in dist/build.js
   },
   module: {
      loaders: [{
         test: /\.css$/, // To load the css in react
         use: ['style-loader', 'css-loader'],
         include: /src/
      }, {
         test: /\.jsx?$/, // To load the js and jsx files
         loader: 'babel-loader',
         exclude: /node_modules/,
         query: {
            presets: ['es2015', 'react', 'stage-2']
         }
      }, {
         test: /\.json$/, // To load the json files
         loader: 'json-loader'
      }]
   }
}
After that, create the folder src/ in the project and inside that folder, create the folders js/ and css/ just to organize the source code.
Inside each folder create index.js and index.css .
Finally create the folder dist/ at the outer level and inside index.html .
The structure will be the following:
contracts/
-- Migrations.sol
migrations/
node_modules/
test/
src/
-- css/index.css
-- js/index.js
dist/
-- index.html
package.json
truffle.js
webpack.config.js
Now go to your index.html and generate this code:
<!DOCTYPE html>
<html lang="en">
<head>
   <meta charset="UTF-8">
   <meta name="viewport" content="width=device-width, initial-scale=1.0">
   <link href='https://fonts.googleapis.com/css?family=Open+Sans:400,700' rel='stylesheet' type='text/css'>
   <title>Casino Ethereum Dapp</title>
</head>
<body>
   <div id="root"></div>
   <script src="build.js"></script>
</body>
</html>
The important things about this html is that I’ve added the Open sans fonts to have better looking text, the <div id="root"></div> this is where the react code will be inserted and the <script src="build.js"></script> to include the build file generated by webpack.
Finally remove the files contracts/ConvertLib.sol, contracts/MetaCoin.sol, test/metacoin.js and test/TestMetacoin.sol. These are just example files of a project made with truffle. We won’t need them.
Then create the file contracts/Casino.sol , this is the main Solidity contract that we’ll be coding in the next section.
After preparing all this we can start to create the app at last!
2. Program the Solidity contracts
You’ll write the main contract of the project and then you’ll test it to see if it works correctly and to make changes.
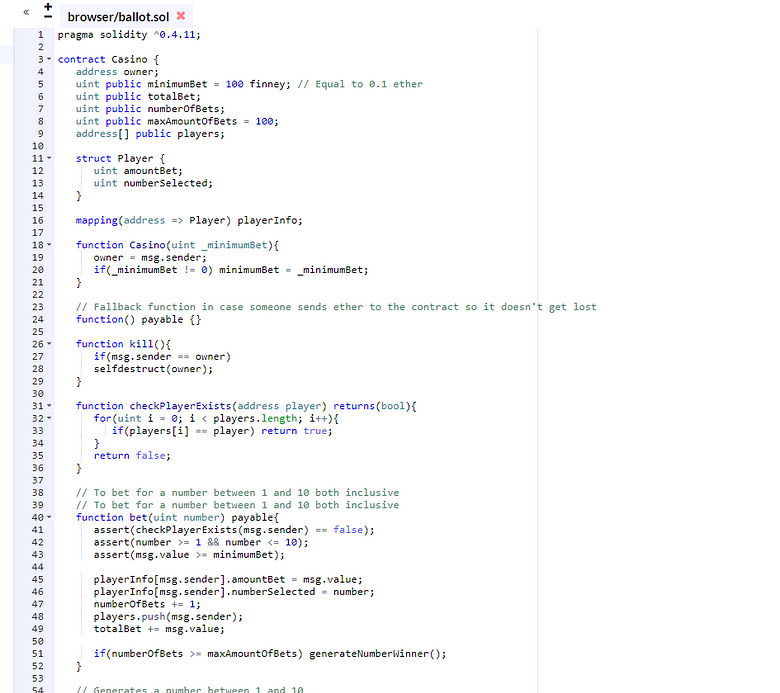
First, every Solidity contract must start with the compiler version, so write this at the top of the Casino.sol file that you created:
pragma solidity ^0.4.11;
Now create the contract:
pragma solidity ^0.4.11;
contract Casino {
   address owner;
   function Casino(){
      owner = msg.sender;
   }
   function kill(){
      if(msg.sender == owner)
         selfdestruct(owner);
   }
}
- The address owner is that long string from your Metamask account, in my case is 0x08f96d0f5C9086d7f6b59F9310532BdDCcF536e2.
- That
function Casino()is the constructor because it has the same name as the contract and we use it to set up the owner of that contract. - The
function kill()is used to destroy the contract whenever you want. Of course only the owner can kill it. The remaining ether that the contract has stored will be sent to the owner’s address.
If you remember, the goal is to:
Create a casino like application where users are able to bet money for a number between 1 and 10 and if they’re correct, they win a portion of all the ether money staked after 100 bets.
So we have to do the following tasks:
- Keep a record of how much a user has bet for what number.
- The minimum price of a bet.
- The total amount of ether accomulated.
- A variable to store how many bets there are.
- When to stop the bets and reveal the winning number.
- A function to send the winning amount of ether for each winner.
These are the functions:
- Bet for a number.
- Generate random number as winner.
- Send ether to winners.
Keep a record of how much a user has bet for what number.
We can use a struct with a mapping to store in a javascript like object the address of the user, the amount bet and the number.
A struct is like an object in javascript and amapping is like an array.
Let’s go with the code:
uint minimumBet;
uint totalBet;
uint numberOfBets;
uint maxAmountOfBets = 100;
address[] players;
struct Player {
   uint amountBet;
   uint numberSelected;
}
mapping(address => Player) playerInfo;
The Player struct has an address, the amountBet and the number selected. Then we create a mapping called playerInfo to do something like this playerInfo[here_goes_his_address].amountBet where we can use the address as the “key” in a javascript object to access it’s properties.
We want to have an array of players to know who is playing the game.
Modify the constructor to define the minimum bet for the game:
function Casino(uint _minimumBet){
   owner = msg.sender;
   if(_minimumBet != 0 ) minimumBet = _minimumBet;
}
Now create a function to bet for the numbers between 1 and 10 both inclusive:
// To bet for a number between 1 and 10 both inclusive
function bet(uint number) payable{
   assert(checkPlayerExists(msg.sender) == false);
   assert(number >= 1 && number <= 10);
   assert(msg.value >= minimumBet);
   playerInfo[msg.sender].amountBet = msg.value;
   playerInfo[msg.sender].numberSelected = number;
   numberOfBets += 1;
   players.push(msg.sender);
   totalBet += msg.value;
}
- The word
payableis amodifierthat it’s used to say that, in order to execute this function you must pay ether. - The
assert()function is like anifthat must return true. If the condition inside the assert results in false, the function stops there. We use it to make sure that the player hasn’t played already, that the number is in range and that he bet more or equal the minimum. msg.senderandmsg.valueare values defined by the user when he executes the contract. The sender is his address and the value is the amount of ether he paid.- Then we define the amount bet for that user.
msg.senderis the address of the user that executed that function. - Then we increase the
numberOfBets, this is how many bets there are for this game to stop it when there are 100. - Finally we increase the totalAmount bet for this game that will be spread across the winners.
We also have to check that the user has not played already because we only want that each person only plays once per game. So let’s create a function to check for that:
function checkPlayerExists(address player) returns(bool){
   for(uint i = 0; i < players.length; i++){
      if(players[i] == player) return true;
   }
   return false;
}
After that we have to check if the number of bets is bigger or equal the maximum so we can generate the winner number. Add this at the end of the bet function:
...
if(numberOfBets >= maxAmountOfBets) generateNumberWinner();
Now we have to create the function generateNumberWinner() that will randomly generate a number between 1 and 10 to decide the winner:
// Generates a number between 1 and 10
function generateNumberWinner(){
   uint numberGenerated = block.number % 10 + 1; // This isn't secure
   distributePrizes(numberGenerated);
}
That will work as an example. It takes the actual block number and gets the last number + 1 so if the block number is 128142 the number generated will be 3.
This isn’t secure because it’s easy to know what number will be the winner depending on the conditions.
Then, we distribute the prizes for the winners with the function distributePrices(numberGenerated) :
// Sends the corresponding ether to each winner depending on the total bets
function distributePrizes(uint numberWinner){
   address[100] memory winners; // We have to create a temporary in memory array with fixed size
   uint count = 0; // This is the count for the array of winners
   for(uint i = 0; i < players.length; i++){
      address playerAddress = players[i];
      if(playerInfo[playerAddress].numberSelected == numberWinner){
         winners[count] = playerAddress;
         count++;
      }
      delete playerInfo[playerAddress]; // Delete all the players
   }
players.length = 0; // Delete all the players array
uint winnerEtherAmount = totalBet / winners.length; // How much each winner gets
   for(uint j = 0; j < count; j++){
      if(winners[j] != address(0)) // Check that the address in this fixed array is not empty
         winners[j].transfer(winnerEtherAmount);
   }
}
This function does the following:
- First generates an array of winners called
winnersby checking if the player’snumberSelectedis thenumberWinner. Thewinnersarray is amemoryarray that get’s deleted after the function executes. It must have a fixed size. - Then it calculates the amount of ether each winner gets depending on the total bet amount and the amount of winners. The less winners, the bigger the prize.
- Then it sends the corresponding amount of ether for each winner with
winners[j].transfer.
This should be it. Now we have a working contract that allows people to play as a simple casino.
One last thing that I like to do is to create an anonymous fallback function, a function without name that has the modifier payable that it’s executed when you send ether to the contract without executing any function:
// Fallback function in case someone sends ether to the contract so it doesn't get lost
   function() payable {}
This will allow you to save the ether you send to the contract. Otherwise it would get lost.
You can see the complete and updated contract in my github https://github.com/merlox/casino-ethereum inside the contracts folder.
Now that the contract is done we have 2 options:
- Write tests using truffle and deploying the contract in
testrpcduring those tests. - Test the contract manually using the Solidity’s IDE https://remix.ethereum.org. This is the official tool to write, test and deploy contracts.
Because I don’t want to make this article too long, we’ll use the remix IDE to test the contract quickly altough you must make the tests with truffle to make sure your apps work as expected and are secure.
So go to the Remix IDE and paste the contract:
This is what we’re going to do in the remix IDE:
- Deploy the contract to the Testnet Ropsten Blockchain, the blockchain where ether has no real value.
- Use metamask to pay for the gas of each function.
- Make sure that all functions work as expected.
You have 2 panels, the left with your code and the right one where you can do interesting stuff with that contract.
On the right panel you can see a red button that says Create with an input field that has a placeholder saying uint256 _minimumBet . That’s the minimum bet of the constructor. You can leave it empty or write a number.
Before clicking on the button to compile the contract and play with it, you have to install the Chrome extension Metamask https://metamask.io/.
Install it and create an account. Make sure to save the 12 word passphrase because it’s the only way to recover your account if you forget your password.
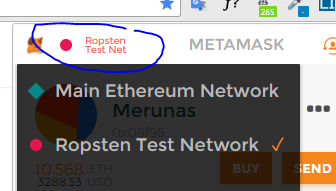
Now open the extension and change your network to the Ropsten Testnet Network like in the image.
Next go to https://faucet.metamask.io/ and request 1 free ether. The faucet is a place where you can get ether for your Ropsten account.
After a while you’ll see that your account has some nice amount of ether in it.
Go to the Remix IDE and make sure that you are in the Environment: Injected web3:

This means that you are using the blockchain injected from Metamask. Now click on Create to deploy your contract, you’ll see a notification window from metamask:
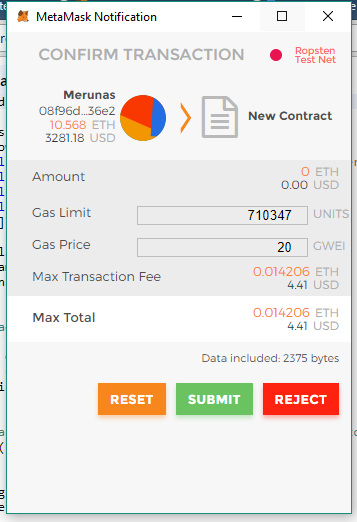
Just click on Submit to pay for the deployment and you are done, your contract is live on the Ropsten network.
If for some reason, you can’t change the enviroment or you don’t see the notification window, press the F12 key to open the Chrome dev tools. Click and hold the reload button in chrome and select the last option:
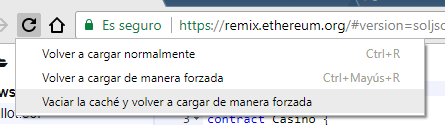
That should fix those bugs.
After deploying the contract you’ll see the address of the contract, the functions and more interesting data on the right panel.
Something like this:
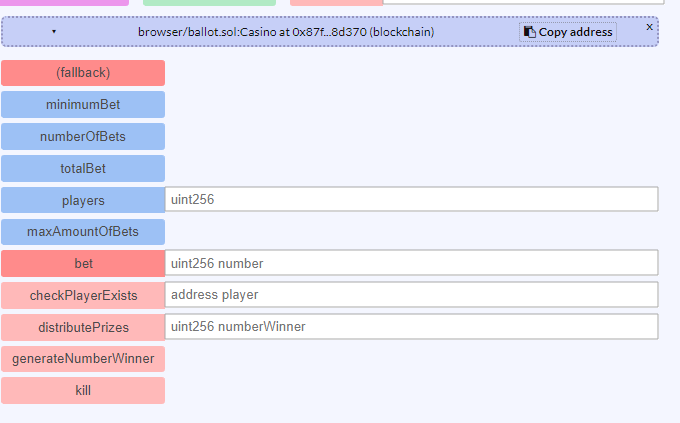
At the top you have a button that says Copy address that you can use to save that contract’s address for later use. Just click it and save the address somewhere.
Then, the blue buttons are constant orpublic functions and variables. This means that when you declare a public variable like uint public totalBet;you can access it’s value anytime because it’s public.
You can say that it has a getter method automatically generated.
Then the constant functions are those that return a value and don’t modify the state of the contract. This means that they don’t modify the contract’s variables, they just execute and give you a result.
Also, those blue buttons don’t cost ether to execute unless you’re executing a huge function.
Let’s start by executing the functions one by one.
If you click on minimumBet you’ll instantly get the value of that variable because it’s public:

It returns uint256: 1000000000000000 in Wei, which is 0.1 ether. Remember that you interact using Wei, not ether.
Next, the red buttons are those that consume gas to execute functions that save values to the blockchain.
Now I see that the function checkPlayerExists() must be constant because it returns a value and doen’t modify the main variables.
So before changing the contract, we have to destroy the current contract. Execute the kill function and modify the contract:
function checkPlayerExists(address player) constant returns(bool){
Deploy it again and you’ll see that the checkPlayerExists button is now blue. That means that it won’t consume gas to operate.

Note that bytes32 and string must be in double quotes " to work. It’s a common problem that happens when you paste an address.
The bet function requires that you send an amount of ether bigger than the minimum bet and that you select a number between 1 and 10.
To test it go to the top section of the right column and send a monetary value like in the image:
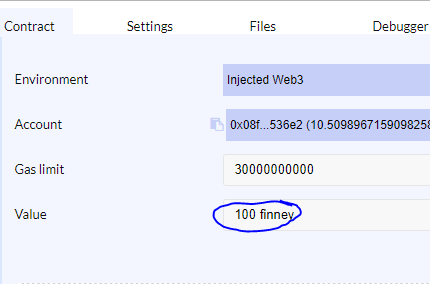
That’s the value that will be available as msg.value in the contract. Send something bigger than the minimumBet that you set for your contract and execute the function by sending the number to bet for.
If it says that the gas exceeds the gas limit, refresh the page removing the cookies as I taught you before.
After playing with the functions I realized that the distributePrizes()function doesn’t reset all the variables of the contract so the totalBet and the numberOfBets stayed the same after the first game.
So I created a new function like this:
function resetData(){
   players.length = 0; // Delete all the players array
   totalBet = 0;
   numberOfBets = 0;
}
And I called it from the distributePrizes() function. I found a potential problem that I didn’t know before, that’s the power of testing!
Now before going to the next part, let’s compile the contract to use it later with the frontend application.
Go to the file: migrations/2_deploy_contracts.js . In this file is where you set up the values that the constructor of your contract will receive, in my case it’s:
var Casino = artifacts.require("./Casino.sol");
module.exports = function(deployer) {
  deployer.deploy(web3.toWei(0.1, 'ether'), 100, {gas: 3000000});
};
Explanation:
- First we require the
Casino.solcontract. - Then, in the .
deploy()method we specify the minimum bet, in this case it’s0.1 etherconverted toweiwith that function. - 100 is the max amount of players.
- Finally the gas limit that we are willing to use to deploy the contract.
After that, go to your project folder and execute the command truffle compile . This will generate a json file that will have all the needed data about the contract.
We won’t use this data but just so you know when you use the truffle framework. It helps you deploy and test everything from the command line instead of using the Remix IDE.
When you’re done testing, continue with the next part of the tutorial.
3. Create the frontend application
Start by opening the index.js file to create the application with react:
import React from 'react'
import ReactDOM from 'react-dom'
import Web3 from 'web3'
import './../css/index.css'
class App extends React.Component {
   constructor(props){
      super(props)
      this.state = {
         lastWinner: 0,
         timer: 0
      }
   }
voteNumber(number){
      console.log(number)
   }
render(){
      return (
         <div className="main-container">
            <h1>Bet for your best number and win huge amounts of Ether</h1>
<div className="block">
<h4>Timer:</h4>
<span ref="timer"> {this.state.timer}</span>
</div>
<div className="block">
<h4>Last winner:</h4>
<span ref="last-winner">{this.state.lastWinner}</span>
</div>
<hr/>
<h2>Vote for the next number</h2>
            <ul>
               <li onClick={() => {this.voteNumber(1)}}>1</li>
               <li onClick={() => {this.voteNumber(2)}}>2</li>
               <li onClick={() => {this.voteNumber(3)}}>3</li>
               <li onClick={() => {this.voteNumber(4)}}>4</li>
               <li onClick={() => {this.voteNumber(5)}}>5</li>
               <li onClick={() => {this.voteNumber(6)}}>6</li>
               <li onClick={() => {this.voteNumber(7)}}>7</li>
               <li onClick={() => {this.voteNumber(8)}}>8</li>
               <li onClick={() => {this.voteNumber(9)}}>9</li>
               <li onClick={() => {this.voteNumber(10)}}>10</li>
            </ul>
         </div>
      )
   }
}
ReactDOM.render(
   <App />,
   document.querySelector('#root')
)
That’s the main structure only with react, here is what I did:
- First I imported react, reactdom, the css and web3 because that’s what we are going to use.
- Then I created an
<App />component that we’re going to use to generate the main view of the document. - Finally I generated the constructor, the method
voteNumber(number)that we’ll use to send a vote to the contract and, in therender()method I added the basic html with theonClickevents.
If you are new with react, I recommend you to just copy the code by hand or to create a simple html website with those events in javascript.
Here is the css:
body{
    font-family: 'open sans';
    margin: 0;
}
ul{
    list-style-type: none;
    padding-left: 0;
    display: flex;
}
li{
    padding: 40px;
    border: 2px solid rgb(30,134,255);
    margin-right: 5px;
    border-radius: 10px;
    cursor: pointer;
}
li:hover{
    background-color: rgb(30,134,255);
    color: white;
}
li:active{
    opacity: 0.7;
}
*{
   color: #444444;
}
.main-container{
   padding: 20px;
}
.block{
   display: flex;
   align-items: center;
}
.number-selected{
   background-color: rgb(30,134,255);
   color: white;
}
.bet-input{
   padding: 15px;
   border-radius: 10px;
   border: 1px solid lightgrey;
   font-size: 15pt;
   margin: 0 10px;
}
When combined, the app looks like this:
Now let’s connect to the contract. We could use truffle to deploy the contract and get the data but in order to do that, you would have to download the entire blockchain which is several dozens of GB.
Because I want it to be accessible for everybody, let’s just deploy the contract to the Remix IDE and get the ABI with the Address.
Go to remix.ethereum.org and deploy the contract clicking on Create .
Open the contract details right at the end:

Next copy the ABI interface:
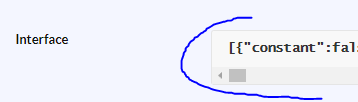
Then go to you index.js and paste the following right in the constructor:
constructor(props){
   super(props)
   this.state = {
      lastWinner: 0,
      numberOfBets: 0,
      minimumBet: 0,
      totalBet: 0,
      maxAmountOfBets: 0,
   }
   if(typeof web3 != 'undefined'){
      console.log("Using web3 detected from external source like Metamask")
      this.web3 = new Web3(web3.currentProvider)
   }else{
      this.web3 = new Web3(new Web3.providers.HttpProvider("http://localhost:8545"))
   }
const MyContract = web3.eth.contract([here goes the ABI interface])
   this.state.ContractInstance = MyContract.at("0x925d81c01d878899adbb7d38f84ce9d5284fa2e7")
}
Here is what I did:
- First I create the constructor and set the initial
stateof the application. - Then I check if the
Web3variable that we imported is defined or not. Web3 is defined when utilities like Metamask inject their web3. In fact, if you use metamask you’ll see in the chrome dev tools that message. - I set up the contract ABI so the app knows what functions are available for this contract.
- Finally I set up the address of the contract with
MyContract.at(). I saved the instance in thestateas a property calledContractInstancebut the important thing to know is that MyContract.at() returns the instance.
Get the address of the contract clicking on the following in the Remix IDE:

With the contract’s ABI and with it’s address you can use the functions of the contract in your front end application.
Let’s say you want to execute the function bet() , in that case you’ll do:
yourContractInstance.bet(7, {
   gas: 300000,
   from: web3.eth.accounts[0],
   value: web3.toWei(0.1, 'ether')
}, (err, result) => {
   // Result is the transaction address of that function
})
- Basically take your instance and execute the function.
- Send the parameters of the function, in my case
7is the number to bet for. - Send an object with
gas:andfrom:. Thevalue:is just the amount of ether the user will bet so that you can access it withmsg.valuein the contract. - Finally the callback with
errandresult. Error is null if there was no error and result it’s just the transaction address so you can see in etherscan.io how it went the call. Use them to display messages that expain what happened after the execution.
You will do something quite similar with constant functions and public variables. Because they don’t cost gas to run (except for big constant functions) you can execute them like this:
yourContractInstance.maxAmountOfBets((err, result) => {
   if(result != null) // Do something
})
That’s how you would get the public variable maxAmountOfBets .
Now I developed the code of the frontend with my style. This is the complete code:
import React from 'react'
import ReactDOM from 'react-dom'
import Web3 from 'web3'
import './../css/index.css'
class App extends React.Component {
   constructor(props){
      super(props)
      this.state = {
         lastWinner: 0,
         numberOfBets: 0,
         minimumBet: 0,
         totalBet: 0,
         maxAmountOfBets: 0,
      }
if(typeof web3 != 'undefined'){
         console.log("Using web3 detected from external source like Metamask")
         this.web3 = new Web3(web3.currentProvider)
      }else{
         console.log("No web3 detected. Falling back to http://localhost:8545. You should remove this fallback when you deploy live, as it's inherently insecure. Consider switching to Metamask for development. More info here: http://truffleframework.com/tutorials/truffle-and-metamask");
         this.web3 = new Web3(new Web3.providers.HttpProvider("http://localhost:8545"))
      }
const MyContract = web3.eth.contract([{"constant":false,"inputs":[],"name":"generateNumberWinner","outputs":[],"payable":false,"type":"function"},{"constant":true,"inputs":[],"name":"numberOfBets","outputs":[{"name":"","type":"uint256"}],"payable":false,"type":"function"},{"constant":false,"inputs":[{"name":"player","type":"address"}],"name":"checkPlayerExists","outputs":[{"name":"","type":"bool"}],"payable":false,"type":"function"},{"constant":false,"inputs":[],"name":"kill","outputs":[],"payable":false,"type":"function"},{"constant":false,"inputs":[],"name":"resetData","outputs":[],"payable":false,"type":"function"},{"constant":false,"inputs":[{"name":"maxBets","type":"uint256"}],"name":"setMaxAmountOfBets","outputs":[],"payable":false,"type":"function"},{"constant":false,"inputs":[{"name":"number","type":"uint256"}],"name":"bet","outputs":[],"payable":true,"type":"function"},{"constant":false,"inputs":[],"name":"distributePrizes","outputs":[],"payable":false,"type":"function"},{"constant":true,"inputs":[],"name":"numberWinner","outputs":[{"name":"","type":"uint256"}],"payable":false,"type":"function"},{"constant":true,"inputs":[],"name":"minimumBet","outputs":[{"name":"","type":"uint256"}],"payable":false,"type":"function"},{"constant":true,"inputs":[],"name":"maxAmountOfBets","outputs":[{"name":"","type":"uint256"}],"payable":false,"type":"function"},{"constant":true,"inputs":[{"name":"","type":"uint256"}],"name":"players","outputs":[{"name":"","type":"address"}],"payable":false,"type":"function"},{"constant":true,"inputs":[],"name":"totalBet","outputs":[{"name":"","type":"uint256"}],"payable":false,"type":"function"},{"inputs":[{"name":"_minimumBet","type":"uint256"},{"name":"_maxAmountOfBets","type":"uint256"}],"payable":false,"type":"constructor"},{"payable":true,"type":"fallback"}])
      this.state.ContractInstance = MyContract.at("0x7a684de06f473636e03e2d951c78d190eeecb411")
   }
componentDidMount(){
      this.updateState()
      this.setupListeners()
setInterval(this.updateState.bind(this), 10e3)
   }
updateState(){
      this.state.ContractInstance.minimumBet((err, result) => {
         if(result != null){
            this.setState({
               minimumBet: parseFloat(web3.fromWei(result, 'ether'))
            })
         }
      })
      this.state.ContractInstance.totalBet((err, result) => {
         if(result != null){
            this.setState({
               totalBet: parseFloat(web3.fromWei(result, 'ether'))
            })
         }
      })
      this.state.ContractInstance.numberOfBets((err, result) => {
         if(result != null){
            this.setState({
               numberOfBets: parseInt(result)
            })
         }
      })
      this.state.ContractInstance.maxAmountOfBets((err, result) => {
         if(result != null){
            this.setState({
               maxAmountOfBets: parseInt(result)
            })
         }
      })
   }
// Listen for events and executes the voteNumber method
   setupListeners(){
      let liNodes = this.refs.numbers.querySelectorAll('li')
      liNodes.forEach(number => {
         number.addEventListener('click', event => {
            event.target.className = 'number-selected'
            this.voteNumber(parseInt(event.target.innerHTML), done => {
// Remove the other number selected
               for(let i = 0; i < liNodes.length; i++){
                  liNodes[i].className = ''
               }
            })
         })
      })
   }
voteNumber(number, cb){
      let bet = this.refs['ether-bet'].value
if(!bet) bet = 0.1
if(parseFloat(bet) < this.state.minimumBet){
         alert('You must bet more than the minimum')
         cb()
      } else {
         this.state.ContractInstance.bet(number, {
            gas: 300000,
            from: web3.eth.accounts[0],
            value: web3.toWei(bet, 'ether')
         }, (err, result) => {
            cb()
         })
      }
   }
render(){
      return (
         <div className="main-container">
            <h1>Bet for your best number and win huge amounts of Ether</h1>
<div className="block">
<b>Number of bets:</b>
<span>{this.state.numberOfBets}</span>
</div>
<div className="block">
<b>Last number winner:</b>
<span>{this.state.lastWinner}</span>
</div>
<div className="block">
<b>Total ether bet:</b>
<span>{this.state.totalBet} ether</span>
</div>
<div className="block">
<b>Minimum bet:</b>
<span>{this.state.minimumBet} ether</span>
</div>
<div className="block">
<b>Max amount of bets:</b>
<span>{this.state.maxAmountOfBets} ether</span>
</div>
<hr/>
<h2>Vote for the next number</h2>
<label>
               <b>How much Ether do you want to bet? <input className="bet-input" ref="ether-bet" type="number" placeholder={this.state.minimumBet}/></b> ether
               <br/>
            </label>
   <ul ref="numbers">
               <li>1</li>
               <li>2</li>
               <li>3</li>
               <li>4</li>
               <li>5</li>
               <li>6</li>
               <li>7</li>
               <li>8</li>
               <li>9</li>
               <li>10</li>
            </ul>
         </div>
      )
   }
}
ReactDOM.render(
   <App />,
   document.querySelector('#root')
)
I update the state of the app at the begining, when the component is mount to set up the important variables like the total ether bet.
Then I set up click event listeners for each <li> number so when you click it, it executes the bet() function of the contract with the correct number and the amount of ether you want to bet.
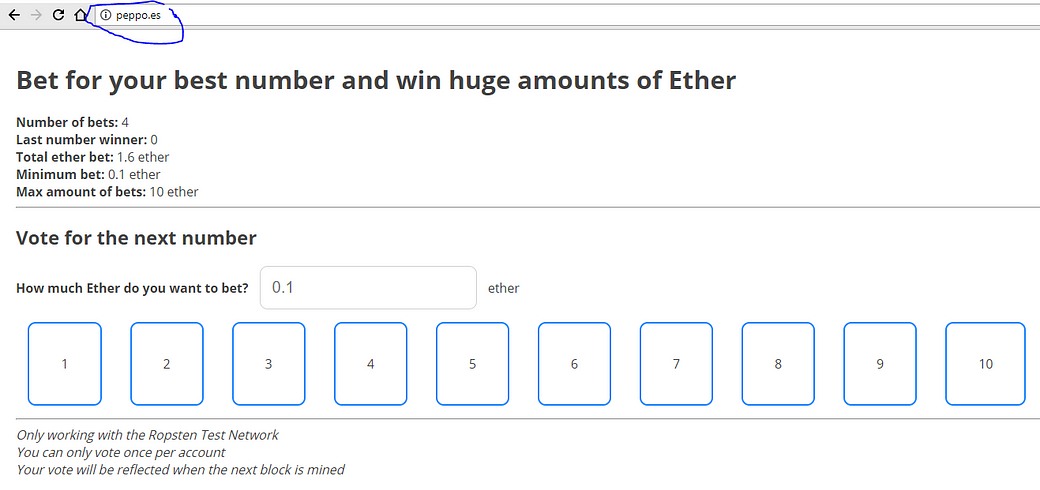
Now it looks and works like this:
The complete code is available in my github: https://github.com/merlox/casino-ethereum
Congratulations if you made this far! Few people actually read the complete content, will you be one of them?
4. Deploy the application online with IPFS
Now that the application is complete, it’s time to move it to the online world with free hosting forever and descentralized, how cool is that?
That’s the power of IPFS.
Well, in reallity it isn’t so good because your app will be online as long as a node keeps it online. It’s like the torrent p2p movies, you can download it as long as somebody is seeding it.
But it will be totally descentralized so it’s worth doing it.
Let’s start by installing IPFS, go to their website and install the app: https://ipfs.io/docs/install/
In windows I had to add the folder to the path variable to be able to execute the command ipfs from anywhere. If you’re reading this, you must know already how to modify the path variable.
After installing it go to your desktop and execute the following commands:
ipfs daemon
This will create a node. In another command line or terminal do:
ipfs swarm peers
This will get you peers that will share your content.
ipfs add -r dist/
This will add your dist folder to the network. You’ll see a long hash that’s been generated for you. The last hash is a unique identifier for that folder:
added Qmc9HzLPur2ncuUArLjAaa4t2HrXFycgjUPb6122N6tzi2 dist/build.js
added QmZBaGYWsACJ5aCFhW459xHZ8hk4YazX1EQFiSenu3ANfR dist/index.html
added QmfZoCnPcgmHYmFJqHBcyuFh3FEYrTZqGdGyioSMrAZzw2 dist
Copy that last hash and execute:
ipfs name publish QmfZoCnPcgmHYmFJqHBcyuFh3FEYrTZqGdGyioSMrAZzw2
You’ll get something like this:
Published to QmRDVed784YwKrYAgiiBbh2rFGfCUemXWk3NkD7nWdstER: /ipfs/QmfZoCnPcgmHYmFJqHBcyuFh3FEYrTZqGdGyioSMrAZzw2
That means that your content is available in that url, the first one. You can check it by going to gateway.ipfs.io/ipns/<your-hash-here>
In my case is:
gateway.ipfs.io/ipns/QmRDVed784YwKrYAgiiBbh2rFGfCUemXWk3NkD7nWdstER
It’ll take some time to load because the network isn’t so big at this moment. Then you’ll see that amazing Dapp! Remember to set Metamask on the Ropsten Test Network .
If you make changes to your files remember to execute webpack then ipfs add -r dist/ and ipfs name publish <the-hash> . You’ll realize that the publish name hash is always the same.
Your Dapp is online.
5. Use a custom domain for the application
Now you may want to use your own domain because it’s a little bit unproffessional to use such a url for your projects.
This excellent tutorial example by IPFS will explain it to you clearly if you want full details.
I’ll explain you how to do it with godaddy. It’s almost the same with other providers.
- First go to the DNS manager of your domain in godaddy.
- Add a new TXT record with Host: @ and Value:
dnslink=/ipns/<your-hash> - Save it and change or add an A record with Host: @ Pointing to:
217.182.195.23. That’s the gateway.ipfs.io’s original IP. - Remove any other A records because they may interfiere with this new A record.
- Save it, after some minutes go to that domain and check if it’s working.
- Also you can access it by going to: gateway.ipfs.io/ipns/<yourdomain>
- In this case the urls are
gateway.ipfs.io/peppo.esandpeppo.es
6. Play with the final Dapp
That’s the entire tutorial. If you read it till’ the end, congratulations! You are awsome and now capable of creating unstoppable applications as the ethereum.org page claims.
Enjoy your efford and make sure to test the app as much as you can to find any bugs. If you’re brave enough, you can deploy it to the main Homestead network.
The only difference is that you have to change your Metamask network when deploying.
Also I recommend you to check the Solidity Docs, the Web3.js Docs, the Truffle Docs and the IPFS Docs. They have all you need to learn more and create huge applications.
You could learn to use truffle and develop apps faster because you just could deploy them from the command line, altough you need to download the entire blockchain for that.
Also you can generate truly random numbers with the Oraclize contracts. Search for them if you’re interested in extending your Dapp to a professional one.
Finally let me know if something is unclear, possible errors and questions about the project.
Did you make it?
原文地址:https://medium.com/@merunasgrincalaitis/the-ultimate-end-to-end-tutorial-to-create-and-deploy-a-fully-descentralized-dapp-in-ethereum-18f0cf6d7e0e


 1577
1577


 被折叠的 条评论
为什么被折叠?
被折叠的 条评论
为什么被折叠?
 到【灌水乐园】发言


