


YOLOv8实例分割算法移植
YOLOv8实例分割
YOLOv8中的实例分割(Segment)同时完成两个任务:1. 检测目标框及目标分类 2. 对每个像素点进行二分类:前景或背景。Segment输出以下四类信息:
- 每个尺度一个bounding box特征图,(bs, 64, h, w)
- 每尺度一个类型置信度特征图,(bs, nc, h, w)
- mask特征图,每尺度一个,(bs, 32, h, w)
- mask proto,所有尺度共享一个,输出尺寸为输入尺寸的1/4, (bs, 32, input height / 8, input widht / 8)
mask特征图和mask proto做矩阵乘法得到输入尺寸1/8的mask。由于mask尺寸是输入尺寸的1/8,输出mask信息(例如在原始图像上叠加)时要同时考虑resize和padding的影响。
可以看出实例分割的输出与关键点检测的输出在某种程度上是对应的,相应地,裁剪/导出、后处理也有相通的地方。
Segment的模型定义文件位于ultralytics/cfg/models/v8/yolov8-seg.yaml
nc: 80  # number of classes
scales: # 省略
scales: # 省略
backbone: # 省略
head:
  # 中间省略
  - [[15, 18, 21], 1, Segment, [nc, 32, 256]]  # Segment(P3, P4, P5)
以上配置表示:
- 使用Segment Head网络
- 类型数量nc为80
- mask特征图长度为32
Segment检测头的源代码位于文件ultralytics/nn/modules/head.py中的Segment类
类型定义class Segment(Detect)表示Segment检测头从Detect检测头继承得到,因此也有cv2和cv3分支:
        self.cv2 = nn.ModuleList(
            nn.Sequential(Conv(x, c2, 3), Conv(c2, c2, 3), nn.Conv2d(c2, 4 * self.reg_max, 1)) for x in ch
        )
        self.cv3 = nn.ModuleList(nn.Sequential(Conv(x, c3, 3), Conv(c3, c3, 3), nn.Conv2d(c3, self.nc, 1)) for x in ch)
其中cv2分支用于预测bounding box,cv3用于预测类型置信度
Segment检测头在Detect检测头的基础上增加cv4分支用于预测关键点
self.cv4 = nn.ModuleList(nn.Sequential(Conv(x, c4, 3), Conv(c4, c4, 3), nn.Conv2d(c4, self.nm, 1)) for x in ch)
Segment检测头的Proto分支用于计算mask proto
self.proto = Proto(ch[0], self.npr, self.nm) # protos
Proto的源代码位于文件ultralytics/nn/modules/block.py中的Proto类,定义如下:
class Proto(nn.Module):
    """YOLOv8 mask Proto module for segmentation models."""

    def __init__(self, c1, c_=256, c2=32):
        """
        Initializes the YOLOv8 mask Proto module with specified number of protos and masks.

        Input arguments are ch_in, number of protos, number of masks.
        """
        super().__init__()
        self.cv1 = Conv(c1, c_, k=3)
        self.upsample = nn.ConvTranspose2d(c_, c_, 2, 2, 0, bias=True)  # nn.Upsample(scale_factor=2, mode='nearest')
        self.cv2 = Conv(c_, c_, k=3)
        self.cv3 = Conv(c_, c2)

    def forward(self, x):
        """Performs a forward pass through layers using an upsampled input image."""
        return self.cv3(self.cv2(self.upsample(self.cv1(x))))
尺度1的三个分支的网络结构如下所示(尺度2和尺度3相应也有三个输出)
| 目标框分支 | 分类分支 | 关键点分支 |
|---|---|---|
| 每个GRID输出4x16个目标框数据 | 每个GRID输出80个分类置信度数据 | 每个GRID输出32个关键点数据 |
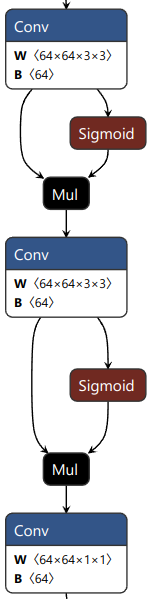 | 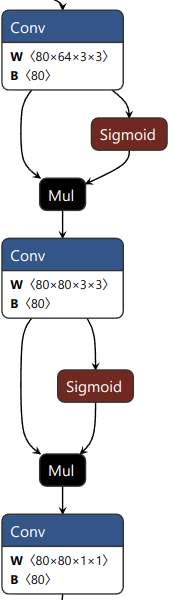 | 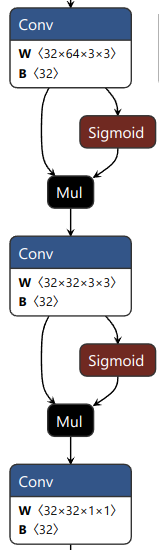 |
此外Segment模型还输出mask proto数据,维度为(bs, 32, input height / 8, input weght / 8)

导出和裁剪
Segment.forward调用Detect.forward,因此先按照YOLOv8目标检测算法移植修改Detect.forward,然后修改Segment.forward
    def forward(self, x):
        """Return model outputs and mask coefficients if training, otherwise return outputs and mask coefficients."""
        p = self.proto(x[0])  # mask protos
        bs = p.shape[0]  # batch size

		#### 删除开始 ####
        #mc = torch.cat([self.cv4[i](x[i]).view(bs, self.nm, -1) for i in range(self.nl)], 2)  # mask coefficients
        #### 删除结束 ####
        #### 增加开始 ####
        # 原始代码计算cv4之后用view/reshape改变张量的维度信息,丢失原始的输出宽度和高度,对后处理造成不便
        # 改为先计算cv4,reshape之后的张量给train/predict用,reshape之前的张量给export用
        mco = [self.cv4[i](x[i]) for i in range(self.nl)]
        mc = torch.cat([mco[i].view(bs, self.nm, -1) for i in range(self.nl)], 2)  # mask coefficients
        #### 增加结束 ####
        x = self.detect(self, x)
        #### 增加开始 ####
        if self.export:
        	export_cut = []
        	if len(x) == 0: return export_cut
        	for in in range(self.nl):
        		export_cut += x[2*i:2*i+2] # 保存cv2(bounding box)和cv3(分类置信度)特征图
        		# 保存cv4(mask)特征图
        		# 改变维度顺序,方便C/C++计算缓存偏移
        		export_cut.append(mco[i].permute(0, 2, 3, 1))
        	# 保存mask proto特征图
        	# 改变维度顺序,方便C/C++计算缓存偏移
        	export_cut.append(p.permute(0, 2, 3, 1))
        	return export_cut
        #### 增加结束 ####
        #### 以下不变 ####
        if self.training:
            return x, mc, p
测试
目标框和分类置信度相关的部分与目标检测算法相同,只需要通过矩阵乘法计算mask。
    # 导出时将mask proto的维度交换为bs, input height / 8, input width /8, 32
    h, w = proto.shape[1:3]
    for b in range(bs):
	    p = proto[b].reshape((-1, proto.shape[-1])).transpose(-1, 0)

		for bbox, conf, mask in preds:
			# 省略bounding box和分类置信度的计算过程
    		mask = mask @ p
	    	mask = mask.reshape(h, w)
绘图
绘图有几个关键点:
- 将mask从模型输入尺寸的1/8放大到原始图像的尺寸,同时应该考虑原始图像输入模型前可能经过padding
- 前景和背景的阈值为0.5
- 将bounding box以外的mask设置为背景
    # im0:原始图像(3, h, w)
    # im:模型输入图像:由原始图像经过缩小和padding,使得宽和高都是32的整数倍,并且不超过模型输入的最大尺寸
	# bbox: bouding box xyxy,在原始图像im0尺度下的像素坐标
	# masks: 分割掩码,模型输入尺寸的1/8
	# alpha:透明度
	# color: mask的RGB色彩
	masks = torch.tensor(masks[None, None])
	# 这里缩放没有考虑padding引起的坐标原点偏移
	# 用pytorch的双线性插值将mask放大到原始图像尺寸
	masks = torch.nn.functional.interpolate(masks, im0.shape[:2], mode='bilinear', align_corners=False)
	masks = masks[0][0] > 0.5 # 0.5是前景和背景的阈值

    # 剪切mask:只有位于bounding box内的mask是有效的
    bb = np.array(box, dtype=int)
    masks[:, 0:bb[0]] = False
    masks[:, bb[2]:im.shape[1]] = False
    masks[0:bb[1], :] = False
    masks[bb[3]:im.shape[0], :] = False
    # write to image
    im0[masks] = im0[masks] * alpha + np.array(color) * (1 - alpha)


 4万+
4万+


 被折叠的 条评论
为什么被折叠?
被折叠的 条评论
为什么被折叠?
 到【灌水乐园】发言


