


第一部分
Tensorflow重要学习资料
英文官网
中文社区
极客学院
Tensorflow Github
0 资料介绍
Tensorflow Mobile
官网:https://www.tensorflow.org/mobile.htmlGithub–Android Camera Demo
Github:https://github.com/tensorflow/tensorflow/tree/master/tensorflow/examples/android/ (重点参考资料)Android Studio
官网:https://developer.android.com/studio/index.html
教程:http://blog.csdn.net/qingqingdeaini/article/details/51995981(Blog第5节)SDK
Baidu云下载链接:http://pan.baidu.com/s/1c1Y7rXY 密码:uue8
官网:https://developer.android.com/studio/releases/build-tools.html
SDK结构:
|—Sdk
|——add-ons(Google API)
|——build-tools(android 开发所需)
|——————24.0.1
|——extras
|——platforms (android Level API)
|——————android-24
|——platform-tools(各版本SDK。根据API Level划分的SDK版本)
|——tools( 各版本SDK通用工具。比如adb、和aapt、aidl、dx等文件)NDK
官网:https://developer.android.com/ndk/index.html
中文网:http://www.androiddevtools.cn/
NDK百度云下载链接:http://pan.baidu.com/s/1eSE0GWq 密码:6226
说明
# 24 July, 2016; Ling Bao
#
# Ubuntu Trusty 14.04 LTS (虚拟机) Ubuntu Kylin 16.04.1 LTS也适用
# 内存 2G; 处理器 2
#
# python2.7
# JDK8
# SDK & NDK (具体版本详见本Blog 2.2.2. 配置WORKSPACE)
1 环境搭建
1.1 配置jdk环境(不是必须的步骤)
参考资料
教程:http://blog.csdn.net/qingqingdeaini/article/details/51921543(Blog第一节)配置环境变量
# 打开配置文件
sudo gedit /etc/profile #Global Env
    或者
sudo gedit ~/.bashrc    #Local Env

#配置内容
eg.
JAVA_HOME=/usr/sparkdir/java/jdk1.8.0_91
PATH=$JAVA_HOME/bin:$PATH   CLASSPATH=.:$JAVA_HOME/jre/lib/rt.jar:$JAVA_HOME/jre/lib/dt.jar:$JAVA_HOME/jre/lib/tools.jar
export JAVA_HOME PATH CLASSPATH

# 使配置生效
source /etc/profile
    或者
source ~/.bashrc
1.2 SDK与NDK下载
略,详见0节 资源介绍
1.3 安装Bazel
1.3.1 Using our custom APT repostiory
## Install JDK 8
    # As For Ubuntu Trusty (14.04 LTS)
    sudo add-apt-repository ppa:webupd8team/java
    sudo apt-get update
    sudo apt-get install oracle-java8-installer

    # As For Ubuntu Wily (15.10)
    sudo apt-get install openjdk-8-jdk

## Add Bazel distribution URI as a package source (one time setup)
    echo "deb [arch=amd64] http://storage.googleapis.com/bazel-apt stable jdk1.8" | sudo tee /etc/apt/sources.list.d/bazel.list
    curl https://storage.googleapis.com/bazel-apt/doc/apt-key.pub.gpg | sudo apt-key add -

## Update and install Bazel
    sudo apt-get update && sudo apt-get install bazel
    sudo apt-get upgrade bazel
1.3.2 Using binary installer
## Install JDK 8(同上)

## Install required packages
    sudo apt-get install pkg-config zip g++ zlib1g-dev unzip
1.3.3 Compiling Bazel from source
## Compiling
    git clone https://github.com/bazelbuild/bazel.git
    cd bazel
    ./compile.sh

## Configurate Env
    参考教程:http://blog.csdn.net/qingqingdeaini/article/details/51995981(Blog第5节第3小点)
    sudo gedit /etc/environment
第二部分
2 Tensorflow Android Camera Demo
2.1 下载Tensorflow源码
/tensorflow/examples/android是Camera Demo
## 命令来源于http://blog.csdn.net/wei220000/article/details/50985609(Blog第二:Build APK第2小点的说明)
git clone --recurse-submodules https://github.com/tensorflow/tensorflow

备注:--recurse-submodules 参数是必须得, 用于获取 TesorFlow 依赖的 protobuf 库.
2.2 下载训练库、配置WORKSPACE、编译
2.2.1 下载训练库
训练库官方下载点这里,并全部解压到assets文件夹内(需要在android项目中新建/assets文件夹)
百度云下载链接:http://pan.baidu.com/s/1ceGZaI 密码:jv47
# 解压到/android/assests
    unzip inception5h.zip -d ~/tensorflow/tensorflow/examples/android/assets/
2.2.2. 配置WORKSPACE
## 配置/tensorflow/WORKSPACE文件,打开并去掉android_sdk_repository和android_ndk_repository的#注释,替换SDK和NDK的路径,配置后内容(部分)如下

## 打开配置文件
    gedit ./tensorflow/WORKSPACE

## android_sdk_repository和android_ndk_repository配置内容
# Uncomment and update the paths in these entries to build the Android demo.
android_sdk_repository(
    name = "androidsdk",
    api_level = 24,
    build_tools_version = "24.0.1",
    # Replace with path to Android SDK on your system
    path = "/home/ubuntu1/Android/Sdk",
)
#
android_ndk_repository(
    name="androidndk",
    path="/home/ubuntu1/Android/android-ndk-r11c",
    api_level=21)
2.2.3 编译
编译
## 进入tensorflow根目录进行编译,编译成功后会输出apk到tensorflow/bazel-bin/tensorflow/eexamples/android/
bazel build //tensorflow/examples/android:tensorflow_demo

## 如果想输出详尽的编译错误信息需要增加 --verbose_failures
bazel build //tensorflow/examples/android:tensorflow_demo --verbose_failures

## If you get build errors about protocol buffers, run git submodule update --init and build again
git submodule update --init
错误分析
## 编译过程中出现如下错误
ERROR: /home/ubuntu1/.cache/bazel/_bazel_ubuntu1/036d6be7ed7ea8f6432b9254606342c5/external/gif_archive/BUILD:14:1: C++ compilation of rule '@gif_archive//:gif' failed: namespace-sandbox failed: error executing command
  (cd /home/ubuntu1/.cache/bazel/_bazel_ubuntu1/036d6be7ed7ea8f6432b9254606342c5/execroot/tensorflow && \
  exec env - \
    PATH=/usr/local/sbin:/usr/local/bin:/usr/sbin:/usr/bin:/sbin:/bin:/usr/games:/usr/local/games \
  /home/ubuntu1/.cache/bazel/_bazel_ubuntu1/036d6be7ed7ea8f6432b9254606342c5/execroot/tensorflow/_bin/namespace-sandbox @/home/ubuntu1/.cache/bazel/_bazel_ubuntu1/036d6be7ed7ea8f6432b9254606342c5/execroot/tensorflow/bazel-sandbox/19c766ad-27d9-4939-9e4c-b8d2024aac49-94.params -- /usr/bin/gcc -U_FORTIFY_SOURCE '-D_FORTIFY_SOURCE=1' -fstack-protector -Wall -Wl,-z,-relro,-z,now -B/usr/bin -B/usr/bin -Wunused-but-set-parameter -Wno-free-nonheap-object -fno-omit-frame-pointer -g0 -O2 -DNDEBUG -ffunction-sections -fdata-sections -g0 -DHAVE_CONFIG_H -iquote external/gif_archive -iquote bazel-out/host/genfiles/external/gif_archive -iquote external/bazel_tools -iquote bazel-out/host/genfiles/external/bazel_tools -isystem external/gif_archive/giflib-5.1.4/lib -isystem bazel-out/host/genfiles/external/gif_archive/giflib-5.1.4/lib -isystem external/bazel_tools/tools/cpp/gcc3 -fno-canonical-system-headers -Wno-builtin-macro-redefined '-D__DATE__="redacted"' '-D__TIMESTAMP__="redacted"' '-D__TIME__="redacted"' -MD -MF bazel-out/host/bin/external/gif_archive/_objs/gif/external/gif_archive/giflib-5.1.4/lib/dgif_lib.d -c external/gif_archive/giflib-5.1.4/lib/dgif_lib.c -o bazel-out/host/bin/external/gif_archive/_objs/gif/external/gif_archive/giflib-5.1.4/lib/dgif_lib.o).
external/gif_archive/giflib-5.1.4/lib/dgif_lib.c:24:29: fatal error: gif_lib_private.h: No such file or directory
#include "gif_lib_private.h"

## 分析原因
    从出错信息可以发现是.../bazel/.../tensorflow/_bin/namespace-sandbox出现了错误,因此怀疑是没有安装tensorflow。
    出错信息:/home/ubuntu1/.cache/bazel/_bazel_ubuntu1/036d6be7ed7ea8f6432b9254606342c5/execroot/tensorflow/_bin/namespace-sandbox

## 在tensorflow根目录执行./configure
    得到错误信息:Can't find swig.  Ensure swig is in $PATH or set $SWIG_PATH.
    解决方法:sudo apt-get -install swig
第三部分
3 安装tensorflow
3.1 安装 Bazel
略,见本Blog 1.3节
3.2 安装其他依赖
3.2.1 补充知识
参考资料
http://blog.csdn.net/u011534057/article/details/51615193
修改python版本
方法1:基于用户修改 Python 版本
    ls /usr/bin/python* # 查看已安装的python
    python --version    # 查看python版本信息

    # 设置别名操作
    gedit ~/.bashrc
    alias python='/usr/bin/python3.4' # 添加到./bashrc
    source ~/.bashrc # 使配置生效

方法2:在系统级修改 Python 版本
使用 update-alternatives 来为整个系统更改 Python 版本
    sudo update-alternatives --list python # 罗列出所有可用的 python 替代版本信息
    sudo update-alternatives --install /usr/bin/python python /usr/bin/python2.7 1 # 将python2.7更新至替代列表 选项为1
    sudo update-alternatives --install /usr/bin/python python /usr/bin/python3.4 2 # 将python3.4更新至替代列表 选项为2
    update-alternatives --config python # 在列出的 Python 替代版本中任意切换

## 移除替代版本
eg.
    update-alternatives --remove python /usr/bin/python2.7 # 将其从 update-alternatives 列表中删除掉

## 移除软连接
eg.
    rm -rf /data/logs # 移除软连接
    ln -s /temp/logs /data/logs # 创建软连接
3.2.2 安装pip(或Python3 的 pip3)
以python 2.7为例
sudo apt-get install python-pip python-dev
3.2.3 安装numpy
# For Python 2.7:
$ sudo apt-get install python-numpy swig python-dev python-wheel
# For Python 3.x:
$ sudo apt-get install python3-numpy swig python3-dev python3-wheel
3.3 可选: 安装 CUDA (在 Linux 上开启 GPU 支持)
为了编译并运行能够使用 GPU 的 TensorFlow, 需要先安装 NVIDIA 提供的 Cuda Toolkit 7.0 和 CUDNN 6.5 V2.
TensorFlow 的 GPU 特性只支持 NVidia Compute Capability >= 3.5 的显卡. 被支持的显卡 包括但不限于:
NVidia Titan
NVidia Titan X
NVidia K20
NVidia K40
安装的流程
1. 下载并安装 Cuda Toolkit 7.0
2. 下载并安装 CUDNN Toolkit 6.5
3. 配置 TensorFlow 的 Cuda 选项
4. 编译目标程序, 开启 GPU 支持
中文参考:‘Linux 安装’节的‘可选: 安装 CUDA (在 Linux 上开启 GPU 支持)’小点
官网参考:‘Installation for Linux’节的‘Optional: Install CUDA (GPUs on Linux)’小点
3.4 安装tensorflow
官方提供了 Pip, Docker, Virtualenv, Anaconda 或 源码编译的方法安装 TensorFlow,这里选择pip方式安装。
3.4.1 安装 pip
## 同1.6.2.2节

# Ubuntu/Linux 64-bit
$ sudo apt-get install python-pip python-dev

# Mac OS X
$ sudo easy_install pip
3.4.2 安装 TensorFlow
## python 2.7

# Ubuntu/Linux 64-bit, CPU only, Python 2.7:
$ sudo pip install --upgrade https://storage.googleapis.com/tensorflow/linux/cpu/tensorflow-0.8.0-cp27-none-linux_x86_64.whl

# Ubuntu/Linux 64-bit, GPU enabled, Python 2.7. Requires CUDA toolkit 7.5 and CuDNN v4.
# For other versions, see "Install from sources" below.
$ sudo pip install --upgrade https://storage.googleapis.com/tensorflow/linux/gpu/tensorflow-0.8.0-cp27-none-linux_x86_64.whl

# Mac OS X, CPU only:
$ sudo easy_install --upgrade six
$ sudo pip install --upgrade https://storage.googleapis.com/tensorflow/mac/tensorflow-0.8.0-py2-none-any.whl

## python 3x

# Ubuntu/Linux 64-bit, CPU only, Python 3.4:
$ sudo pip3 install --upgrade https://storage.googleapis.com/tensorflow/linux/cpu/tensorflow-0.8.0-cp34-cp34m-linux_x86_64.whl

# Ubuntu/Linux 64-bit, GPU enabled, Python 3.4. Requires CUDA toolkit 7.5 and CuDNN v4.
# For other versions, see "Install from sources" below.
$ sudo pip3 install --upgrade https://storage.googleapis.com/tensorflow/linux/gpu/tensorflow-0.8.0-cp34-cp34m-linux_x86_64.whl

# Mac OS X, CPU only:
$ sudo easy_install --upgrade six
$ sudo pip3 install --upgrade https://storage.googleapis.com/tensorflow/mac/tensorflow-0.8.0-py3-none-any.whl
3.4.3 测试
第四部分
4 结语
## 完成以上步骤后环境就搭建完毕了,再一次进行编译
    bazel build //tensorflow/examples/android:tensorflow_demo --verbose_failures

## 执行结果
Target //tensorflow/examples/android:tensorflow_demo up-to-date:
  bazel-bin/tensorflow/examples/android/tensorflow_demo_deploy.jar
  bazel-bin/tensorflow/examples/android/tensorflow_demo_unsigned.apk
  bazel-bin/tensorflow/examples/android/tensorflow_demo.apk
INFO: Elapsed time: 3730.512s, Critical Path: 3464.62s

## 结果截图如下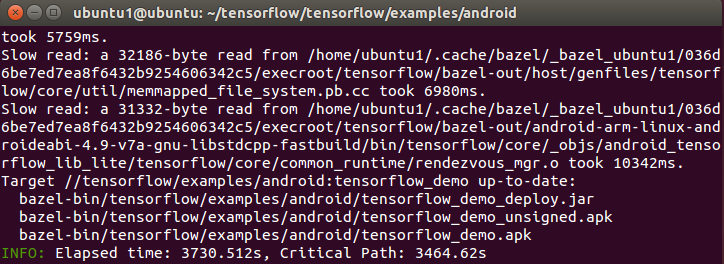
## 从结果可以看出深度神经网络模型在编译过程中花费总时间为3730.512s,数据流图的关键路径花费时间为3464.62s,因此这一过程用时很多,造成的原因留作后续深入分析。

## 可以将~/.cache/bazel/_bazel_ubuntu1/036d6be7ed7ea8f6432b9254606342c5/execroot/tensorflow/bazel-out/local-fastbuild/bin/tensorflow/examples/android/_dx/tensorflow_demo/native_symlinks/armeabi-v7a/中把libtensorflow_demo.so抠出来,放到Android studio中用于其他开发。
5 Android Camera Demo 源码及其Apk
获取下载资源点这里
|——TensorflowCameraDemo
|—————————————android
|—————————————libtensorflow_demo.so
|—————————————tensorflow_demo.apk


 557
557

 被折叠的 条评论
为什么被折叠?
被折叠的 条评论
为什么被折叠?
 到【灌水乐园】发言


