


一、前言
学习Qwen2-VL ,为我们打开了一扇通往先进人工智能技术的大门。让我们能够深入了解当今最前沿的视觉语言模型的工作原理和强大能力。这不仅拓宽了我们的知识视野,更让我们站在科技发展的潮头,紧跟时代的步伐。
Qwen2-VL 具有卓越的图像和视频理解能力,以及多语言支持等特性。学习它可以提升我们处理复杂视觉信息的能力,无论是在学术研究中分析图像数据、解读视频内容,还是在实际工作中进行文档处理、解决现实问题,都能为我们提供有力的工具和方法。
随着人工智能技术的不断发展,掌握 Qwen2-VL 这样的先进模型将为我们的职业发展增添强大的竞争力。在各个领域,对具备人工智能知识和技能的人才需求日益增长,学习 Qwen2-VL可以让我们在这个快速发展的领域中脱颖而出,为未来的职业道路奠定坚实的基础。
本篇将介绍如何使用OpenAI API接入方式调用Qwen2-VL-7B-Instruct模型进行推理。通过学习OpenAI API接入方式,可以高效与现有系统或服务集成,减少开发和维护的复杂性。
二、术语
2.1. Qwen2-VL
是基于 Qwen2 打造的新一代视觉语言模型,具有读懂不同分辨率和长宽比图片、理解长视频、可作为手机和机器人的视觉智能体、多语言支持等特点。目前开源了 Qwen2-VL-2B 和 Qwen2-VL-7B,并发布了Qwen2-VL-72B的API。该模型在视觉能力评估的多个方面表现优异,能进行更细节的识别理解、视觉推理、视频理解与实时聊天等。其架构延续了 ViT 加 Qwen2 的串联结构,并进行了对原生动态分辨率和多模态旋转位置嵌入的升级。
应用场景:
- 图像理解与识别:识别植物、地标等,理解场景中多个对象间的关系,识别手写文字及图像中的多种语言。
- 文档解析:能够解析包含密集公式的文档,理解文档中的内容。
- 多语言文本识别:转录图中多种语言的内容,并识别其语言类型。
- 解决现实世界问题:通过分析图片解决问题,解读复杂数学问题,从真实世界图像和图表中提取信息,执行指令。
- 视频内容分析:总结视频要点、即时回答相关问题,并维持连贯对话,帮助用户从视频中获取有价值的信息。
- 视觉代理:利用视觉能力完成自动化的工具调用和交互,例如实时数据检索。
- 与环境交互:像人一样与环境进行视觉交互,不仅作为观察者,还能作为执行者。
模型结构:
- Qwen2-VL 的一项关键架构改进是实现了动态分辨率支持(Naive Dynamic Resolution support)。与上一代模型Qwen-VL不同,Qwen2-VL 可以处理任意分辨率的图像,而无需将其分割成块,从而确保模型输入与图像固有信息之间的一致性。这种方法更接近地模仿人类的视觉感知,使模型能够处理任何清晰度或大小的图像。
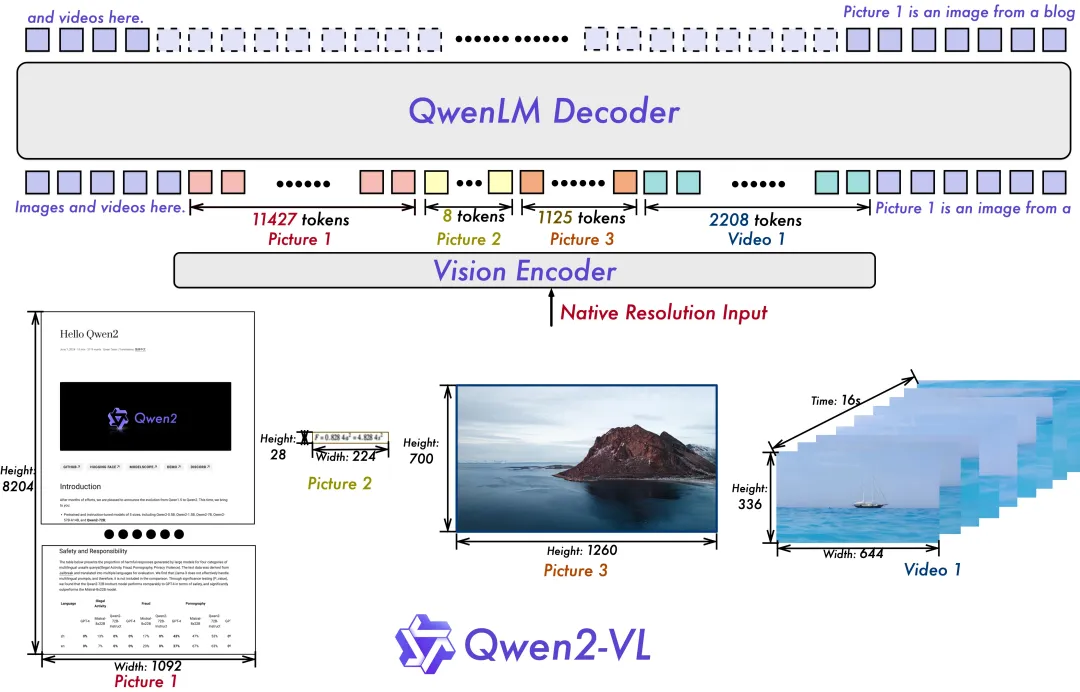
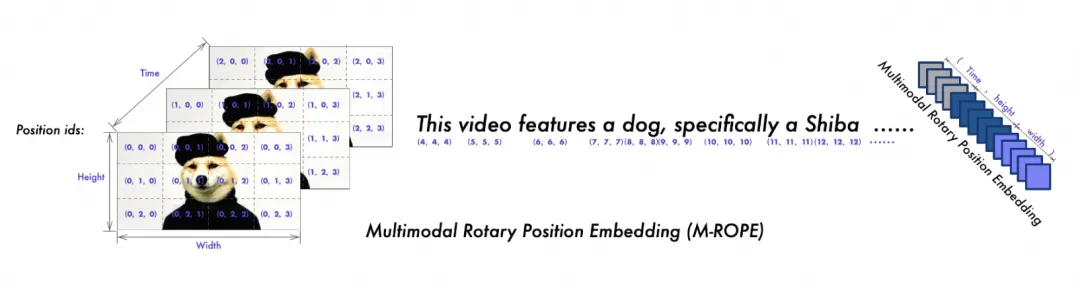
- 另一个关键的架构增强是Multimodal Rotary Position Embedding (M-ROPE) 的创新。通过将original rotary embedding分解为代表时间和空间(高度和宽度)信息的三个部分,M-ROPE 使 LLM 能够同时捕获和集成 1D 文本、2D视觉和 3D 视频位置信息。这使 LLM 能够充当强大的多模态处理器和推理器。
2.2. OpenAI API Client
遵循 OpenAI API 的接口规范,让开发者可以使用OpenAI API相同的方式和方法来调用这些服务,从而利用它们的模型功能。
三、前置条件
3.1. 模型部署
选择以下任意一种方式部署Qwen2-VL-7B-Instruct模型
(一) 代码:
开源模型应用落地-qwen模型小试-调用Qwen2-VL-7B-Instruct-更清晰地看世界-集成vLLM(二)
(二) 命令:
开源模型应用落地-qwen模型小试-调用Qwen2-VL-7B-Instruct-更清晰地看世界-集成vLLM(三)
(三) Docker:
开源模型应用落地-qwen模型小试-调用Qwen2-VL-7B-Instruct-更清晰地看世界-vLLM+Docker(七)
启动成功:

INFO 10-23 11:08:50 model_runner.py:1060] Starting to load model /data/model/qwen2-vl-7b-instruct...
INFO 10-23 11:08:51 selector.py:224] Cannot use FlashAttention-2 backend for Volta and Turing GPUs.
INFO 10-23 11:08:51 selector.py:115] Using XFormers backend.
Loading safetensors checkpoint shards:   0% Completed | 0/5 [00:00<?, ?it/s]
Loading safetensors checkpoint shards:  20% Completed | 1/5 [00:26<01:46, 26.51s/it]
Loading safetensors checkpoint shards:  40% Completed | 2/5 [00:52<01:19, 26.40s/it]
Loading safetensors checkpoint shards:  60% Completed | 3/5 [01:19<00:52, 26.37s/it]
Loading safetensors checkpoint shards:  80% Completed | 4/5 [01:45<00:26, 26.35s/it]
Loading safetensors checkpoint shards: 100% Completed | 5/5 [01:53<00:00, 19.59s/it]
Loading safetensors checkpoint shards: 100% Completed | 5/5 [01:53<00:00, 22.62s/it]

INFO 10-23 11:10:44 model_runner.py:1071] Loading model weights took 15.5083 GB
INFO 10-23 11:10:49 gpu_executor.py:122] # GPU blocks: 12154, # CPU blocks: 18724
INFO 10-23 11:10:49 gpu_executor.py:126] Maximum concurrency for 8192 tokens per request: 23.74x
INFO 10-23 11:11:05 api_server.py:232] vLLM to use /tmp/tmpdrdffmm5 as PROMETHEUS_MULTIPROC_DIR
WARNING 10-23 11:11:05 serving_embedding.py:199] embedding_mode is False. Embedding API will not work.
INFO 10-23 11:11:05 launcher.py:19] Available routes are:
INFO 10-23 11:11:05 launcher.py:27] Route: /openapi.json, Methods: GET, HEAD
INFO 10-23 11:11:05 launcher.py:27] Route: /docs, Methods: GET, HEAD
INFO 10-23 11:11:05 launcher.py:27] Route: /docs/oauth2-redirect, Methods: GET, HEAD
INFO 10-23 11:11:05 launcher.py:27] Route: /redoc, Methods: GET, HEAD
INFO 10-23 11:11:05 launcher.py:27] Route: /health, Methods: GET
INFO 10-23 11:11:05 launcher.py:27] Route: /tokenize, Methods: POST
INFO 10-23 11:11:05 launcher.py:27] Route: /detokenize, Methods: POST
INFO 10-23 11:11:05 launcher.py:27] Route: /v1/models, Methods: GET
INFO 10-23 11:11:05 launcher.py:27] Route: /version, Methods: GET
INFO 10-23 11:11:05 launcher.py:27] Route: /v1/chat/completions, Methods: POST
INFO 10-23 11:11:05 launcher.py:27] Route: /v1/completions, Methods: POST
INFO 10-23 11:11:05 launcher.py:27] Route: /v1/embeddings, Methods: POST
INFO:     Started server process [3232280]
INFO:     Waiting for application startup.
INFO:     Application startup complete.
INFO:     Uvicorn running on socket ('0.0.0.0', 9000) (Press CTRL+C to quit)
INFO 10-23 11:11:15 metrics.py:345] Avg prompt throughput: 0.0 tokens/s, Avg generation throughput: 0.0 tokens/s, Running: 0 reqs, Swapped: 0 reqs, Pending: 0 reqs, GPU KV cache usage: 0.0%, CPU KV cache usage: 0.0%.
四、技术实现
4.1. 单张图片推理
# -*- coding: utf-8 -*-
import base64
import requests
from openai import OpenAI

openai_api_key = "EMPTY"
openai_api_base = "http://localhost:9000/v1"

client = OpenAI(
    api_key=openai_api_key,
    base_url=openai_api_base,
)

models = client.models.list()
model = models.data[0].id


def encode_base64_content_from_url(content_url: str) -> str:
    with requests.get(content_url) as response:
        response.raise_for_status()
        result = base64.b64encode(response.content).decode('utf-8')

    return result

def encode_base64_content_from_local(content_path: str) -> str:
    with open(content_path, "rb") as image_file:
        # 将图像文件读取为二进制
        encoded_string = base64.b64encode(image_file.read())
        # 将字节数据解码为字符串形式
        return encoded_string.decode('utf-8')


def single_image_test(messages) -> None:
    chat_completion_from_url = client.chat.completions.create(
        messages=messages,
        model=model,
        temperature=0.1,
        max_tokens=1024,
        stream=False
    )

    result = chat_completion_from_url.choices[0].message.content
    return result


if __name__ == "__main__":
    image_url = '/data/test/duck.jpg'
    image_base64 = encode_base64_content_from_local(image_url)

    messages=[{
            "role": "user",
            "content": [
                {
                    "type": "text",
                    "text": "What's in this image?"
                },
                {
                    "type": "image_url",
                    "image_url": {
                        "url": f"data:image/jpeg;base64,{image_base64}"
                    },
                },
            ],
        }]


    result = single_image_test(messages)
    print("output:", result)
4.2. 多张图片推理
# -*- coding: utf-8 -*-
import base64
import requests
from openai import OpenAI

openai_api_key = "EMPTY"
openai_api_base = "http://localhost:9000/v1"

client = OpenAI(
    api_key=openai_api_key,
    base_url=openai_api_base,
)

models = client.models.list()
model = models.data[0].id


def encode_base64_content_from_url(content_url: str) -> str:
    with requests.get(content_url) as response:
        response.raise_for_status()
        result = base64.b64encode(response.content).decode('utf-8')

    return result

def encode_base64_content_from_local(content_path: str) -> str:
    with open(content_path, "rb") as image_file:
        # 将图像文件读取为二进制
        encoded_string = base64.b64encode(image_file.read())
        # 将字节数据解码为字符串形式
        return encoded_string.decode('utf-8')


def multi_image_test(messages) -> None:

    output = client.chat.completions.create(
        messages=messages,
        model=model,
        temperature=0,
        max_tokens=1024,
    )

    result = output.choices[0].message.content
    return result


if __name__ == "__main__":

    image_paths = [
        "https://upload.wikimedia.org/wikipedia/commons/d/da/2015_Kaczka_krzy%C5%BCowka_w_wodzie_%28samiec%29.jpg",
        "https://upload.wikimedia.org/wikipedia/commons/7/77/002_The_lion_king_Snyggve_in_the_Serengeti_National_Park_Photo_by_Giles_Laurent.jpg"
    ]

    messages = [{
        "type": "text",
        "text": "这些图像中的动物是什么?"
    }]
    for image_path in image_paths:
        obj = {
            "type": "image_url",
            "image_url": {
                "url": image_path
            },
        }
        messages.append(obj)


    result = multi_image_test(messages)
    print("output:", result)


 2555
2555

 被折叠的 条评论
为什么被折叠?
被折叠的 条评论
为什么被折叠?
 到【灌水乐园】发言


