


序列帧动画
Shader "Chan/SqueueAction"{
	Properties
	{
		_Color("Main Color",Color) = (1,1,1,1)
		_MainTex("Main Tex",2D) = "white"{}
		_HorizontalAmount("Horizontal Amount",Float) = 8
		_VerticalAmount("Vertical Amount",Float) = 8
		_Speed("Action Speed",Range(0,40)) = 20
	}

 SubShader
 {
     //动画帧一般包含透明通道,因此设置为渲染队列设置为 透明 = Transparent
    //透明度操作必有的三个标签
	Tags{"Queue" = "Transparent" "IgnoreProjector" = "True" "RenderType" = "Transparent"}

	  Pass
	  {
			Tags{"LightMode" = "Forwardbase"}

			ZWrite Off
			Blend SrcAlpha OneMinusSrcAlpha

			CGPROGRAM
			#pragma vertex vert
			#pragma fragment frag
			#include "UnityCG.cginc"

			float4 _Color;
			sampler2D _MainTex;
			float4 _MainTex_ST;
			float _HorizontalAmount;
			float _VerticalAmount;
			float _Speed;

			struct a2v
			{
				 float4 vertex:POSITION;
				 float2 texcoord:TEXCOORD0;
			};

			struct v2f
			{
				 float4 pos:SV_POSITION;
				 float2 uv:TEXCOORD0;
			};

			v2f vert(a2v v)
			{
				 v2f o;
				 o.pos = UnityObjectToClipPos(v.vertex);
				 o.uv = TRANSFORM_TEX(v.texcoord,_MainTex);
				 return o;
			}

			fixed4 frag(v2f i):SV_Target
			{
     			 float2 cellUV = float2(i.uv.x /_HorizontalAmount,i.uv.y/_VerticalAmount);
				 //位移
     			 float deltaX = 1 / _HorizontalAmount;
     			 float deltaY = 1 / _VerticalAmount;

     			 int index = _Time * _Speed;
     			 int col = fmod(index, _HorizontalAmount);
     			 int row = index / _HorizontalAmount;

     			 // 顶点(0,0)到(1,1)区域内经过映射过的UV坐标 + 位移坐标
     			 cellUV.x += col * deltaX;
     			 cellUV.y += row * deltaY;

				 fixed4 c = tex2D(_MainTex,cellUV);
				 c.rgb *= _Color;
				 return c;
			}
			ENDCG
			}
	  }
}
原理:随着时间增加,每隔一段时间间隔,改变UV的坐标,进而改变纹理的采样,达成帧动画效果。
具体操作是将获取到的顶点UV(0,0)到(1,1)的区间的UV坐标区域,根据时间变化映射到相应的纹理相应的UV区域,然后根据映射后的UV区域,采样得到纹素,进而显示屏幕像素。
half2 uv = float2(i.uv.x /_HorizontalAmount, i.uv.y / _VerticalAmount);
将原本(0,0)到(1,1)UV区域,根据帧动画纹理的行列数划分成 _HorizontalAmount * _VerticalAmount个(1/_HorizontalAmount,1/_VerticalAmount)大小的区域。第一个区域如下:

// 顶点(0,0)到(1,1)区域内经过映射过的UV坐标 + 位移坐标。这种写法,纹理Wrap Mode != Repeat也没问题。因为UV的xy分量不会超过1.0;
cellUV.x += col * deltaX;
cellUV.y += row * deltaY;

效果:

参考:http://www.cnblogs.com/Esfog/p/4088597.html
UV动画
// Upgrade NOTE: replaced 'mul(UNITY_MATRIX_MVP,*)' with 'UnityObjectToClipPos(*)'

Shader  "Chan/Chapter11_ScrollBackGround"
{
	Properties
	{
		_MainTex("Main Tex",2D) = "white"{}
		_DetailTex("Detail Tex",2D) = "white"{}
		_ScrollX("Main Tex Scroll Speed",float) = 1.0
		_Scroll2X("Detail Tex Scroll",float) = 1.0
		_Multiplier("Layer Multiplier",float) = 1
	}
	SubShader
		{
			Tags { "RenderType" = "Opaque" "Queue" = "Geometry"}

			Pass
			{
				Tags{"LightMode" = "ForwardBase"}

				CGPROGRAM

				#pragma vertex vert
				#pragma fragment frag
				#include "UnityCG.cginc"

				sampler2D _MainTex;
				sampler2D _DetailTex;
				float4 _MainTex_ST;
				float4 _DetailTex_ST;
				float _ScrollX;
				float _Scroll2X;
				float _Multiplier;

				struct a2v
				{
					float4 vertex:POSITION;
					float4 texcoord:TEXCOORD0;
				};

				struct v2f
				{
					float4 pos:SV_POSITION;
					float4 uv:TEXCOORD0;
				};

				v2f vert(a2v v)
				{
					v2f o;
					o.pos = UnityObjectToClipPos(v.vertex);
					o.uv = v.texcoord;
					o.uv.xy = TRANSFORM_TEX(v.texcoord, _MainTex) + frac(float2(_ScrollX, 0.0) * _Time.y);
					o.uv.zw = TRANSFORM_TEX(v.texcoord, _DetailTex) + frac(float2(_Scroll2X, 0.0) * _Time.y);
					return o;
				}

				fixed4 frag(v2f i) :SV_Target
				{
					fixed4 backGroundLayer = tex2D(_MainTex,i.uv.xy);
					fixed4 frontGroundLayer = tex2D(_DetailTex,i.uv.zw);

					fixed4 color = lerp(backGroundLayer,frontGroundLayer, frontGroundLayer.a);
					color.rgb *= _Multiplier;
					return color;
				}
				ENDCG
		     }
		}
	FallBack "VertexLit"
}
一前一后两张纹理,在顶点着色器函数vert中,修改两张纹理的UV。不在片元着色器frag,主要基于性能考虑。vert中足够满足需求。
frac函数 输出其输入的小数部分。它实质上移除整数部分,仅保留小数部分。如果输入为 4.32,则会输出 0.32。此节点在与 Time(时间)节点一起使用时非常有用,会随时间变化带来锯齿波。
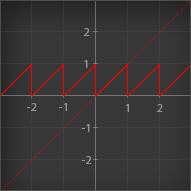
效果如下:
https://blog.csdn.net/NF_XY/article/details/77000858
顶点动画-简单位移
Shader  "Chan/Chapter11_Water"
{
	Properties
	{
		_MainTex("Main Tex",2D) = "white"{}
		_Color("Color Tint",Color) = (1,1,1,1)
		//波动幅度
		_Magnitude("Distortion Magnitude",Float) = 1
		//波动评率
		_Frequency("Distortion Frequency",Float) = 1
		//波长的倒数(控制波长大小,此值越大,波长越小)
		_InvWaveLength("Distortion Inverse Wave Length",Float) = 10
		//UV滚动速度
		_Speed("Speed",Float) = 0.5
	}
	SubShader
		{
			//透明效果Tags 三剑客 + 不批处理合并模型网格
			Tags {"Queue" = "Transparent" "IgnoreProjector" = "True" "RenderType" = "Transparent"
			"DisableBatching" = "True"}

			Pass
			{
				Tags{"LightMode" = "ForwardBase"}

				//关闭深度写入,设置混合因子 为了透明效果
				ZWrite  Off
				Blend SrcAlpha OneMinusSrcAlpha
				//关闭剔除功能,
				Cull Off

				CGPROGRAM

				#pragma vertex vert
				#pragma fragment frag
				#include "UnityCG.cginc"

				sampler2D _MainTex;
				float4 _MainTex_ST;
				fixed4 _Color;
				float _Magnitude;
				float _Frequency;
				float _InvWaveLength;
				float _Speed;

				struct a2v
				{
					float4 vertex:POSITION;
					float2 texcoord:TEXCOORD0;
				};

				struct v2f
				{
					float4 pos:SV_POSITION;
					float2 uv:TEXCOORD0;
				};

				v2f vert(a2v v)
				{
					v2f o;

					//顶点偏移量
					float4 offset = float4(0,0,0,0);
					offset.x = sin(_Frequency * _Time.y +
						v.vertex.x * _InvWaveLength +
						v.vertex.y * _InvWaveLength +
						v.vertex.z * _InvWaveLength) * _Magnitude;
					offset += v.vertex;
					o.pos = UnityObjectToClipPos(offset);

					o.uv = TRANSFORM_TEX(v.texcoord, _MainTex);
					o.uv += float2(0.0,_Time.y * _Speed);
					return o;
				}

				fixed4 frag(v2f i) :SV_Target
				{
					fixed4 color = tex2D(_MainTex,i.uv);
					color *= _Color;
					return color;
				}
				ENDCG
		     }
		}
	FallBack "Transparent/VertexLit"
}
原理:使用一个正弦函数,随着时间增减,对网格顶点进行进行偏移,再加UV滚动。即可实现。
Tags{"DisableBatching" = "True"} 使用此Shader的模型不进行批处理,批处理会合并使用相同材质的网格。多个小溪模型被合并网格,就没法对每个网格进行顶点偏移了。效果如下:
顶点动画-广告牌(Billboarding)
Shader "Chan/Chapter 11/Billboard"
{
	Properties
	{
		_MainTex ("Main Tex", 2D) = "white" {}
	    _Color ("Color Tint", Color) = (1,1,1,1)
		_VerticalBillboarding ("Vertical Restraints", Range(0,1)) = 1
	}
	SubShader
	{
		Tags{ "Queue" = "Transparent" "IgnoreProject" = "True" "RenderType" = "Transparent"
		"DisableBatching" = "True"
	 }

		Pass
		{
			Tags{ "LightMode" = "ForwardBase" }
			//为了让广告牌的每个面都能显示
			//关闭深度写入
			ZWrite off
			//开启并设置混合模式
			Blend SrcAlpha OneMinusSrcAlpha
			//关闭剔除功能
			Cull Off

			CGPROGRAM
			#pragma vertex vert
            #pragma fragment frag

			#include "UnityCG.cginc"

			sampler2D _MainTex;
	    	float4 _MainTex_ST;
			fixed4 _Color;
			float _VerticalBillboarding;

			struct a2v
			{
				float4 vertex : POSITION;
				float4 texcoord : TEXCOORD0;
			};

			struct v2f
			{
				float4 pos : SV_POSITION;
				float2 uv : TEXCOORD0;
			};

			v2f vert (a2v v)
			{
				v2f o;
				//选择模型空间的原点作为广告牌的锚点
				float3 center = float3(0, 0, 0);

				//获取模型空间下的视角位置
				float3 viewer = mul(unity_WorldToObject, float4(_WorldSpaceCameraPos, 1));

				//开始计算3个正交矢量
				//根据观察方向和锚点计算目标法线方向
				float3 normalDir = viewer - center;
				//根据_VerticalBillboarding属性控制垂直方向上的约束
				//当_VerticalBillboarding为1时,法线方向固定,为视角方向;
				//当_VerticalBillboarding为0时,向上方向固定,为(0,1,0)
				//获得的法线方向需要进行归一化操作得到单位矢量
				normalDir.y = normalDir.y * _VerticalBillboarding;
				normalDir = normalize(normalDir);

				//获得粗略的向上方向,为了方式法线方向和向上方向平行(如果平行,叉积会得到错误的结果),对法线方向的y分量进行判断
				float3 upDir = abs(normalDir.y) > 0.999 ? float3(0, 0, 1) : float3(0, 1, 0);
				//根据法线方向和粗略的向上方向得到向右方向,并归一化
				float3 rightDir = normalize(cross(upDir, normalDir));
				//根据法线方向和向右方向获得准确的向上方向
				upDir = normalize(cross(normalDir, rightDir));

				//根据原始的位置相对于锚点的偏移量以及3个正交基矢量,以计算得到新的顶点位置
				float3 centerOffs = v.vertex.xyz - center;
				float3 localPos = center + rightDir * centerOffs.x + upDir * centerOffs.y + normalDir * centerOffs.z;

				//把模型空间的顶点位置变换到裁剪空间
				o.pos = UnityObjectToClipPos(float4(localPos, 1));
				o.uv = TRANSFORM_TEX(v.texcoord, _MainTex);

				return o;
			}

			fixed4 frag (v2f i) : SV_Target
			{
				fixed4 c = tex2D(_MainTex,i.uv);
			    c.rgb *= _Color.rgb;
				return c;
			}
			ENDCG
		}
	}
	Fallback"Transparent/VertexLit"
}
原理:
广告牌技术的本质就是构建旋转矩阵,而我们知道一个变换矩阵需要3个基向量。广告牌技术使用的基向量通常就是表面法线(normal)、指向上的方向(up)以及指向右的方向(right)。除此之外,我们还需要指定一个锚点。这个锚点在旋转的过程中是固定不变的,以此来确定多边形在空间中的位置。
类似跷跷板两头,一边是面片,一边是摄像机,跷跷板不论怎么旋转,上下移动,摄像机看面片总是正对它。

https://www.twblogs.net/a/5b8b212c2b717718832d828d/zh-cn 推导慢慢看吧。。。
http://wiki.jikexueyuan.com/project/modern-opengl-tutorial/tutorial27.html
https://chengkehan.github.io/BillboardWithShader.html
PS:
1.Unity自带的Quad来作为广告牌,不能使用自带的Plane。这是因为,我们的代码是建立在一个竖直摆放的多边形的基础上的,也就是说,这个多边形的顶点结构需要满足在模型空间下是竖直排列的。只有这样,我们才能使用v.vertex来计算到正确的相对于中心的位置偏移量。
2.为了避免显示使用模型空间的中心来作为锚点,我们可以利用顶点颜色来存储每个顶点到锚点的距离值,这种做法在商业游戏中很常见。
3.其次,如果我们想要对包含了顶点动画的物体添加阴影,那么如果像之前那样使用内置的Diffuse等包含的阴影Pass来渲染,就得不到正确的阴影效果(这里指的是无法向其他物体正确地投射阴影)。这是因为,我们讲过Unity 的阴影绘制需要调用一个ShadowCaster Pass,而如果直接使用Diffuse等内置的ShadowCasterPass,这个Pass中并没有进行相关的顶点动画。因此Unity仍然会按原来的顶点位置计算渲染阴影,
而如果涉及半透明物体我们都把Fallback设置成了Transparent/VertexLit ,而Transparent/VertexLit没有定义ShadowCaster Pass,因此也就不会产生阴影。
因此需要自定义一个ShadowCaster Pass。
Shader "Chan/Chapter 11/Vertex Animation With Shadow"
{
	Properties
		{
			_MainTex("Main Tex",2D) = "white"{}
			_Color("Color Tint",Color) = (1,1,1,1)
			//波动幅度
			_Magnitude("Distortion Magnitude",Float) = 1
			//波动评率
			_Frequency("Distortion Frequency",Float) = 1
			//波长的倒数(控制波长大小,此值越大,波长越小)
			_InvWaveLength("Distortion Inverse Wave Length",Float) = 10
			//UV滚动速度
			_Speed("Speed",Float) = 0.5
		}
	SubShader
		{
			//透明效果Tags 三剑客 + 不批处理合并模型网格
			Tags {"Queue" = "Transparent" "IgnoreProjector" = "True" "RenderType" = "Transparent"
			"DisableBatching" = "True"}

			Pass
			{
				Tags{"LightMode" = "ForwardBase"}

				//关闭深度写入,设置混合因子 为了透明效果
				ZWrite  Off
				Blend SrcAlpha OneMinusSrcAlpha
				//关闭剔除功能,
				Cull Off

				CGPROGRAM

				#pragma vertex vert
				#pragma fragment frag
				#include "UnityCG.cginc"

				sampler2D _MainTex;
				float4 _MainTex_ST;
				fixed4 _Color;
				float _Magnitude;
				float _Frequency;
				float _InvWaveLength;
				float _Speed;

				struct a2v
				{
					float4 vertex:POSITION;
					float2 texcoord:TEXCOORD0;
				};

				struct v2f
				{
					float4 pos:SV_POSITION;
					float2 uv:TEXCOORD0;
				};

				v2f vert(a2v v)
				{
					v2f o;

					//定义一个正弦函数,做顶点偏移量
					float4 offset = float4(0,0,0,0);
					offset.x = sin(_Frequency * _Time.y +
						v.vertex.x * _InvWaveLength +
						v.vertex.y * _InvWaveLength +
						v.vertex.z * _InvWaveLength) * _Magnitude;
					offset += v.vertex;
					o.pos = UnityObjectToClipPos(offset);

					o.uv = TRANSFORM_TEX(v.texcoord, _MainTex);
					o.uv += float2(0.0,_Time.y * _Speed);
					return o;
				}

				fixed4 frag(v2f i) :SV_Target
				{
					fixed4 color = tex2D(_MainTex,i.uv);
					color *= _Color;
					return color;
				}
				ENDCG
		    }

		    //没有ShadowCaster Pass,自定义一个
			Pass
			{
				Tags { "LightMode" = "ShadowCaster" }

				CGPROGRAM

				#pragma vertex vert
				#pragma fragment frag
				#pragma multi_compile_shadowcaster

				#include "UnityCG.cginc"

				float _Magnitude;
				float _Frequency;
				float _InvWaveLength;
				float _Speed;

				struct v2f {
				    V2F_SHADOW_CASTER;
				};

				v2f vert(appdata_base v) {
					v2f o;

					float4 offset;
					offset.yzw = float3(0.0, 0.0, 0.0);
					offset.x = sin(_Frequency * _Time.y + v.vertex.x * _InvWaveLength + v.vertex.y * _InvWaveLength + v.vertex.z * _InvWaveLength) * _Magnitude;
					v.vertex = v.vertex + offset;

					//使用SHADOW_CASTER_FRAGMENT来让Unity自动完成阴影投射的部分,把结果输出到深度图和阴影映射纹理中
					TRANSFER_SHADOW_CASTER_NORMALOFFSET(o)

					return o;
				}

				fixed4 frag(v2f i) : SV_Target {
				    SHADOW_CASTER_FRAGMENT(i)
				}
				ENDCG
			}
		}

	FallBack "VertexLit"
}


 466
466


 被折叠的 条评论
为什么被折叠?
被折叠的 条评论
为什么被折叠?
 到【灌水乐园】发言


